lock MERCEDES-BENZ C-CLASS SALOON 2007 Owners Manual
[x] Cancel search | Manufacturer: MERCEDES-BENZ, Model Year: 2007, Model line: C-CLASS SALOON, Model: MERCEDES-BENZ C-CLASS SALOON 2007Pages: 377, PDF Size: 6.19 MB
Page 303 of 377

Locking/unlocking in an emergency
300 Locking/unlocking in an emergency
Emergency key
If the vehicle can no longer be unlocked or
locked with the key or the KEYLESS GO
key*, use the emergency key element.
If you use the emergency key element to
unlock and open the driver's door or the boot
lid, the anti-theft alarm system* will be trig-
gered (Y page 71).
There are several ways to turn off the alarm:
X Press the korj button on the key.
or
X Insert the key into the ignition lock.
or
X Press the KEYLESS GO but-
ton* (Y page 85).
or
X Lock or unlock the vehicle using KEYLESS
GO*.
If you unlock the vehicle using the emergency
key element, the fuel filler flap will not be
unlocked automatically.
X To unlock the fuel filler flap: insert the
key in the ignition lock. Releasing and removing the emergenc
y
key element 1
Release catch
2 Emergency key element
X Push release catch 1in the direction of
the arrow and at the same time remove
emergency key element 2from the key. Unlocking the vehicle
If the vehicle can no longer be unlocked cen-
trally with the key or the KEYLESS GO key*:
X Remove the emergency key element from
the key (Y page 300). $
To unlock
X Insert the emergency key element fully into
the lock of the driver's door.
X Turn the emergency key element anti-
clockwise to position $.
The door is unlocked.
i On right-hand-drive vehicles, turn the
emergency key element clockwise.
X Turn the emergency key element back and
remove it. Practical advice
* optional
204_AKB; 2; 3, en-GB
mkalafa,
2007-06-26T23:11:51+02:00 - Seite 300
Page 304 of 377

Locking/unlocking in an emergency
301Locking the vehicle
If the vehicle can no longer be locked cen -
trally with the key or the KEYLESS GO key*:
X Open the driver's door.
X Close the front-passenger door, the rear
doors and the boot lid/tailgate.
X Press the central locking button
(Y page 80).
X Check whether the locking knobs on th e
doors are still visible. Press the locking
knobs down by hand if necessary.
X Remove the emergency key element from
the key (Y page 300). $
To lock X
Insert the emergency key element fully into
the lock of the driver's door.
X Turn the emergency key element clockwise
as far as it will go to position $.
i On right-hand-drive vehicles, turn the
emergency key element anti-clockwise.
X Turn the emergency key element back and
remove it.
X Check whether the doors and the boot lid/
tailgate are locked. Opening the boot
! The boot lid swings upwards when
opened. Therefore, make sure that there is
enough space above the boot lid.
If the boot can no longer be unlocked with th e
key or the KEYLESS GO key *:
X Remove the emergency key element from
the key (Y page 300). Boot lock
$ Basic position
% Unlocking the boot
X Insert the emergency key element fully into
the boot lock.
X Turn the emergency key element anti-
clockwise as far as it will go to position
% .
The boot is unlocked.
X Turn the emergency key element back to
basic position $and remove it. Practical advice
* optional
204_AKB; 2; 3, en-GB
mkalafa
, 2007-06-26T23:11:51+02:00 - Seite 301
Page 305 of 377

Locking/unlocking in an emergency
302 Opening the tailgate
If the tailgate cannot be opened, use th e
emergency release on the inside of the tail-
gate.
X Take the emergency key element out of the
key (Y page 300). 1
Opening in trim
2 Emergency key element
! The tailgate swings upwards and to the
rear when opened. Therefore, make sure
that there is sufficient clearance above and
behind the tailgate .
X Insert emergency key element 2into
opening in trim 1. X
Turn emergency key element 290° clock-
wise.
X Push emergency key element 2in the
direction of arrow and open the tailgate. Emergency fuel filler flap release
G
Risk of injury
The corners of the vehicle walls may be
sharp-edged. You could injure yoursel f
while carrying out an emergency release of
the fuel filler flap. Avoid contact with th e
edges of the vehicle walls.
The emergency release is located in the
boot/luggage compartment, behind the fuse
box on the right-hand side when viewed in the
direction of travel.
X Open the tailgate/boot lid.
X Open the fuse box in the boot/luggage
compartment (Y page 334). 1
Release cord (example illustration from a
Saloon)
X Pull release cord 1.
The fuel filler flap is unlocked.
X Open the fuel filler flap. Practical advice
204_AKB; 2; 3, en-GB
mkalafa,
2007-06-26T23:11:51+02:00 - Seite 302
Page 306 of 377

Resetting triggered NECK-PRO head restraints
30
3 Releasing the parking lock manually
(vehicles with automatic transmis-
sion*)
In the event of an electrical fault, it is possible
to release the selector lever lock manually to
move it out of position P, e.g. if you wish to
tow the vehicle away. 1
Selector lever cove r
2 Release butto n
X Depress the parking brake firmly.
X Press selector lever cover 1to the left and
remove it upwards . X
Press release button 2down and simul-
taneously move the selector lever out of
position P.
The selector lever can now be moved freely
until it is returned to position P. Resetting triggered NECK-PRO head
restraints
If the NECK-PRO head restraints are triggered
in an accident, you must reset the hea d
restraints on the driver's and front-passenge r
seats. Otherwise, the additional protection
will not be available in the event of another
rear-end collision. You can recognise when
head restraints have been triggered by the
fact that they have been moved forwards and
can no longer be adjusted.
Mercedes-Benz recommends that you have
NECK-PRO head restraints checked at a quali-
fied specialist workshop, e.g. a Mercedes-
Benz Service Centre, following a rear-end
collision.
i This work requires a lot of strength; if you
have difficulty resetting the head
restraints, have this work carried out at a
qualified specialist workshop, e.g. a
Mercedes-Benz Service Centre. Practical advice
* optional
204_AKB; 2; 3, en-GB
mkalafa,
2007-06-26T23:11:51+02:00 - Seite 303
Page 311 of 377

Changing the bulbs
308Bi-xenon headlamp* (left-hand side, right mirror
image)
1
Bulb holder for turn signal
2 Housing cover for parking lamp
3 Housing cover for parking lamp
4 Housing cover for main-beam headlamp
5 Housing cover for dipped-beam headlamp
(bi-xenon headlamps) Halogen headlamps (left-hand side, right mirro
r
image)
6 Bulb holder for parking lamp
7 Bulb holder for parking lamp
8 Bulb holder for main-beam headlamp
9 Bulb holder for dipped-beam headlamp Bi-xenon headlamp* (left-hand side, right mirror
image)
6 Bulb holder for parking lamp
7 Bulb holder for parking lamp
8 Bulb holder for main-beam headlamp
Replacing dipped-beam headlamps
(vehicles with halogen headlamps) X
Switch off the lights .
X Open the bonnet.
X Turn housing cover 5anti-clockwise and
remove it.
X Disconnect the connector from the bulb .
X Gently push in retaining spring of lamp
holder 9and detach it downwards .Practical advice
* optional
204_AKB; 2; 3, en-GB
mkalafa,
2007-06-26T23:11:51+02:00 - Seite 308
Page 312 of 377

Changing the bulbs
309
X
Remove the bulb from the bulb holder,
holding the base (not the glass tube).
X Insert the new bulb so that the base fits flat
into the recess in the bulb holder.
X Clip in the retaining spring of bulb
holder 9.
X Attach the connector to the bulb .
X Put on the housing cover and turn it clock -
wise until it clips into place.
Replacing the bulbs in the main-beam
headlamp s 8
Bulb holder for main-beam headlamp
X Switch off the lights .
X Open the bonnet. X
Turn housing cover 4anti-clockwise and
remove it.
X Push down the lamp on the connector until
it is released.
X Remove the bulb from bulb holder 8, hold-
ing the base (not the glass tube).
X Disconnect the connector from the bulb .
X Attach the connector to the new bulb .
X Put the bulb in at the bottom and push it up
until it clips into place, so that the base fits
flush in the recess on the bulb holder.
X Put on the housing cover and turn it clock -
wise until it clips into place .
Changing the bulbs in the side lamps
and parking lamps X
Switch off the lights .
X Open the bonnet.
X Turn housing cover 2or3 anti-clockwis e
and remove it.
X Pull out bulb holder 6or7 with the bulb.
X Pull the bulb out of the bulb holder.
X Push the new bulb into the bulb holder. X
Insert the bulb holder into the headlamp
and push it in.
X Put on the housing cover and turn it clock -
wise until it clips into place.
Replacing the turn signal lamps X
Switch off the lights .
X Open the bonnet.
X Turn bulb holder 1anti-clockwise and
remove it along with the bulb.
X Turn the bulb anti-clockwise, applying
slight pressure, and remove it from the bulb
holder.
X Insert the new bulb into the bulb holder and
turn it clockwise. Practical advice
204_AKB; 2; 3, en-GB
mkalafa
, 2007-06-26T23:11:51+02:00 - Seite 309
Page 313 of 377

Changing the bulbs
310Bulb holder for turn signal
1
Mark
2 Retainer
X Place bulb holder in the headlamp so that
retainer 2is upright and mark 1is at the
top .
X Turn bulb holder clockwise until it engages. Changing the rear bulbs
Tail lamps Saloon
X
Switch off the lights .
X Open the boot. Saloon
1
Retaining clips
X Remove the side panel.
or
X Open the left-hand* or right-hand stowage
compartment in the boot. X
Press retaining clips 1together and pull
the bulb holder with the bulb out a short
distance.
X Vehicles with LED turn signals: discon-
nect the cables of the LED turn signal from
the connectors of the bulb holder.
X Remove the bulb holder with the bulb. Saloon: bulb holder without LED turn signal (right
-
hand side, left mirror image)
1 Rear foglamp/side marker lamp
2 Side marker lamp
3 Turn signal lamp
4 Parking lamp/brake lamp/tail lamp
5 Brake lamp/tail lamp
6 Reversing lamp Practical advice
* optional
204_AKB; 2; 3, en-GB
mkalafa,
2007-06-26T23:11:51+02:00 - Seite 31
0
Page 314 of 377
Changing the bulbs
311
X
Rear foglamp/turn signal/parkin g
lamp/brake lamp/tail lamp/reversing
lamp: press the respective lamp back -
wards and turn it out of the bulb holder in
an anti-clockwise direction.
X Side marker lamp: pull bulb2out of the
bulb holder.
X Rear foglamp/turn signal/parkin g
lamp/brake lamp/tail lamp/reversing
lamp: insert the new bulb in the bulb holder
and turn in a clockwise direction .
X Side marker lamp: insert the new bulb in
the bulb holder and press in.
X Vehicles with LED turn signals: connect
the cables of the LED turn signal to the
connectors of the bulb holder.
X Reinsert the bulb holder and lock in posi-
tion .
X Close the side trim panel.
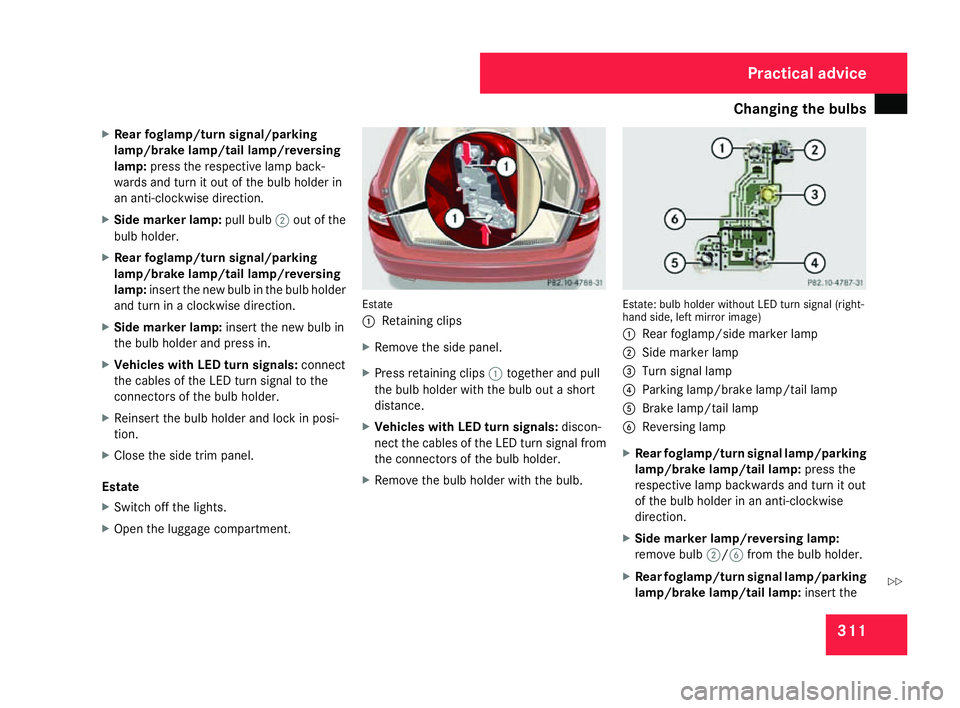
Estat e
X Switch off the lights .
X Open the luggage compartment. Estate
1
Retaining clips
X Remove the side panel.
X Press retaining clips 1together and pull
the bulb holder with the bulb out a short
distance.
X Vehicles with LED turn signals: discon-
nect the cables of the LED turn signal from
the connectors of the bulb holder.
X Remove the bulb holder with the bulb. Estate: bulb holder without LED turn signal (right
-
hand side, left mirror image)
1 Rear foglamp/side marker lamp
2 Side marker lamp
3 Turn signal lamp
4 Parking lamp/brake lamp/tail lamp
5 Brake lamp/tail lamp
6 Reversing lamp
X Rear foglamp/turn signal lamp/parkin g
lamp/brake lamp/tail lamp: press the
respective lamp backwards and turn it out
of the bulb holder in an anti-clockwise
direction .
X Side marker lamp/reversing lamp:
remove bulb 2/6 from the bulb holder.
X Rear foglamp/turn signal lamp/parkin g
lamp/brake lamp/tail lamp: insert the Practical advice
204_AKB; 2; 3, en-GB
mkalafa,
2007-06-26T23:11:51+02:00 - Seite 311 Z
Page 315 of 377

Replacing the wiper blades
31
2
new bulb in the bulb holder and turn in
a
clockwise direction.
X Side marker lamp/reversing lamp:
insert the new bulb in the bulb holder and
press in.
X Vehicles with LED turn signals: connect
the cables of the LED turn signal to the
connectors of the bulb holder.
X Reinsert the bulb holder and lock in posi-
tion .
X Close the side trim panel. Replacing the wiper blades
Windscreen wiper blades
G
Risk of accident
The windscreen will no longer be properly
wiped if the wiper blades are worn. Thi s
may prevent you from observing the traffic
conditions, thereby causing an accident.
Replace the wiper blades twice a year, ide-
ally in spring and autumn. G
Risk of accident
The wiper arms could start moving and
cause an injury if you leave the windscreen
wipers switched on.
Remove the key from the ignition lock
before replacing the wiper blades.
! Make sure you touch only the wiper arm
of the windscreen wiper to avoid damaging
the windscreen wiper blades.
Removin g X
Remove the key.
X Fold the wiper arm away from the wind-
screen until it engages . X
Set the wiper blade at right angles to the
wiper arm . X
Remove the wiper blade from the retainer
on the wiper arm in the direction of th e
arrow.
Fitting X
Slide the new wiper blade into the retaine r
on the wiper arm in the opposite direction
to the arrow.
X Turn the wiper blade parallel to the wiper
arm.
X Fold the wiper arm back onto the wind-
screen. Practical advic
e
204_AKB; 2; 3, en-GB
mkalafa,
2007-06-26T23:11:51+02:00 - Seite 312
Page 316 of 377

Flat tyre
313Rear window wiper blade (Estate)
Removin g G
Risk of injury
The wiper arm could be set in motion and
injure you if the windscreen wipers are
switched on.
Remove the key from the ignition lock
before replacing the wiper blade. 1
Wiper arm
2 Wiper blade
X Remove the key from the ignition lock.
X Fold the wiper arm away from the rear win-
dow until it engages . X
Position wiper blade 2at a right angle to
wiper arm 1.
X Hold wiper arm 1and press wiper
blade 2in the direction of the arrow until
it releases .
X Remove wiper blade 2.
Fitting X
Slide the new wiper blade 2onto wiper
arm 1.
X Hold wiper arm 1and press wiper blade
2 in the opposite direction to the arrow
until it engages.
X Make sure that wiper blade 2is seated
correctly.
X Position wiper blade 2parallel to wiper
arm 1and fold it back onto the rear win-
dow. Flat tyre
Your vehicle may be equipped with:
R a TIREFIT kit (Y page 235 )
R a "Minispare" emergency spare wheel*
R a spare wheel* (Y page 235 )
R the MOExtended run-flat sys-
tem* (Y page 323 ) Preparing the vehicle
i Vehicle preparation is not necessary on
vehicles with MOE tyres.
X Stop your vehicle as far away from traffic
as possible on solid, non-slippery, level
ground .
X Switch on the hazard warning lamps .
X Firmly depress the parking brake.
X All occupants must get out of the vehicle.
Make sure that they are not endangered as
they do so.
Vehicles with manual transmission X
Shift to either first or reverse gear. Practical advice
* optiona l
204_AKB; 2; 3, en-GB
mkalafa,
2007-06-26T23:11:51+02:00 - Seite 313