lights MERCEDES-BENZ C-CLASS SALOON 2007 Owner's Manual
[x] Cancel search | Manufacturer: MERCEDES-BENZ, Model Year: 2007, Model line: C-CLASS SALOON, Model: MERCEDES-BENZ C-CLASS SALOON 2007Pages: 377, PDF Size: 6.19 MB
Page 106 of 377
Light
s 103
!
Switch off the side lamps or parking lamp
when you leave the vehicle. This prevents
the battery from discharging.
Dipped-beam headlamps X
Make sure that the key is in position 2of
the ignition lock or that the engine is run-
ning.
X To switch on :turn the light switch to
B .
The dipped-beam headlamps, parking
lamps and licence plate lamps are switched
on. The parking lamp indicator lamp next to
the light switch is lit.
i On some country-specific vehicle models,
the dipped-beam headlamps come on as
soon as the ignition is switched on.
Daytime driving lights* On vehicles with a luxury multi-function steer-
ing wheel*, you can set the daytime driving
lights using the on-board computer
(
Y page 143). X
To switch on :turn the light switch to
M or* .
The dipped-beam headlamps, side lamps
and licence plate lighting are switched on
when the engine is running.
Automatic headlamp mode The side lamps, dipped-beam headlamps and
licence plate lighting are switched on or off
automatically, depending on the brightness of
the ambient light.
G
Risk of accident
If the light switch is set to *the head -
lamps may temporarily switch off due to
exposure to light, or the lights may not
come on automatically if it is foggy. This can
endanger yourself and others. Therefore,
turn the light switch to Bin the dark or
in fog.
The automatic headlamp feature is only an
aid. The driver is responsible for the vehicle
lighting at all times. G
Risk of accident
When it is dark or foggy, turn the light
switch quickly from *toB . You could otherwise cause an accident if the
headlamps were to switch off temporarily.
X To switch on :turn the light switch to
* .
The side lamps are switched on and off
automatically when the key is in position
1 in the ignition lock .
The dipped-beam headlamps, side lamps
and licence plate lighting are switched on
automatically when the engine is running.
When the parking lamp or dipped-beam
headlamps are switched on, the indicator
lamp next to the light switch lights up.
Front foglamps/rear foglamp G
Risk of accident
If you suspect that driving conditions will be
foggy, turn the light switch to Bbefore
you start your journey. Otherwise, your
vehicle may not be visible and you could
therefore endanger yourself and others. G
Risk of accident
When it is dark or foggy, turn the light
switch quickly from *toB . You Cont
rols
* optional
204_AKB; 2; 3, en-GB
mkalafa,
2007-06-26T23:11:51+02:00 - Seite 103 Z
Page 107 of 377
Light
s 104 could otherwise cause an accident if the
headlamps were to switch off temporarily.
i When the light switch is set to *you
cannot switch on the front or rear fog-
lamps.
X Make sure that the key is in position 2in
the ignition lock .
X To switch on the front foglamps: turn the
light switch to the BorC position .
X Pull the light switch out to the first stop.
The ¥ green indicator lamp next to the
light switch lights up.
X To switch on the rear foglamp: turn the
light switch to the Bposition .
X Pull the light switch out to the second stop.
The † yellow indicator lamp next to th e
light switch lights up.
X To switch off the front foglamps/rear
foglamp: push in the light switch to the
stop .
The corresponding indicator lamp goes out. Combination switch (turn signals,
main-beam headlamps and headlam
p
flasher)
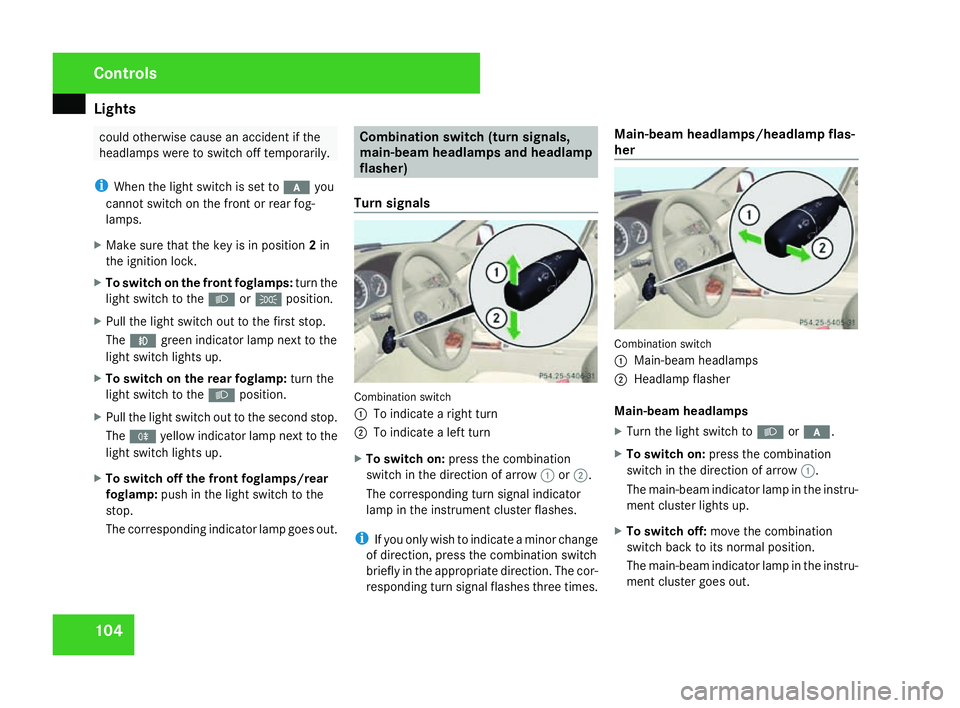
Turn signals Combination switch
1 To indicate a right turn
2 To indicate a left turn
X To switch on :press the combination
switch in the direction of arrow 1or2 .
The corresponding turn signal indicator
lamp in the instrument cluster flashes.
i If you only wish to indicate a minor change
of direction, press the combination switch
briefly in the appropriate direction. The cor-
responding turn signal flashes three times. Main-beam headlamps/headlamp flas-
her
Combination switch
1
Main-beam headlamps
2 Headlamp flasher
Main-beam headlamps
X Turn the light switch to Bor* .
X To switch on: press the combinatio n
switch in the direction of arrow 1.
The main-beam indicator lamp in the instru-
ment cluster lights up.
X To switch off: move the combinatio n
switch back to its normal position.
The main-beam indicator lamp in the instru-
ment cluster goes out. Controls
204_AKB; 2; 3, en-GB
mkalafa,
2007-06-26T23:11:51+02:00 - Seite 104
Page 109 of 377
Light
s 106 Headlamp cleaning system*
i The headlamps are cleaned automatically
if the "Wipe with windscreen washer fluid"
function is operated while the lights are on
and the engine is running. The headlamps
are cleaned again every tenth time the
windscreen is wiped with washer fluid.
When the ignition is switched off, the auto-
matic headlamp cleaning feature is reset
and counting resumes from 0. Intelligent Light System* (vehicles
with bi-xenon headlamps*)
The Intelligent Light System adapts the light-
ing of the front headlamps to the prevailing
driving conditions so that the road is illumi-
nated better .
On vehicles with a luxury multi-function steer-
ing wheel* you can activate or deactivate the
function using the on-board computer .
i The Intelligent Light System is only active
when it is dark.
The Intelligent Light System comprises:
R Active light functio n
R Cornering light function R
Motorway mode
R Extended range foglamps
Active light function For the active light function, the dipped-beam
headlamps swivel horizontally. The swivel
angle changes according to the respectiv
e
driving situation .
i The active light function is not active
when the vehicle is stationary.
Cornering light function Specially designed headlamps light up the
area into which you are driving when turnin
g
corners.
The cornering lights only light up :
R when it is dark
R at speeds below 40 km/h
R when the front foglamps are switched off
Switching on
X Make sure that the engine is running.
X Switch on the dipped-beam headlamps. X
Switch on the turn signal .
The cornering light on the same side as the
turn signal comes on, even if you turn the
steering wheel in the opposite direction
after indicating.
or
X Turn the steering wheel in the required
direction .
When in a forward gear: the cornering light
on the inside of the bend comes on.
When in reverse gear: the cornering light on
the outside of the bend comes on.
Switching off
X Switch off the turn signal .
i The cornering light is activated until you
turn the steering wheel back to the straight -
ahead position and the turn signal switches
off. The cornering light may remain lit for a
short time, but no more than three minutes.
It then goes out, even if the turn signal is
still switched on.
Motorway mode Motorway mode optimises the illumination of
the road by:Controls
* optional
204_AKB; 2; 3, en-GB
mkalafa,
2007-06-26T23:11:51+02:00 - Seite 106
Page 117 of 377
Driving and pa
rking11
4
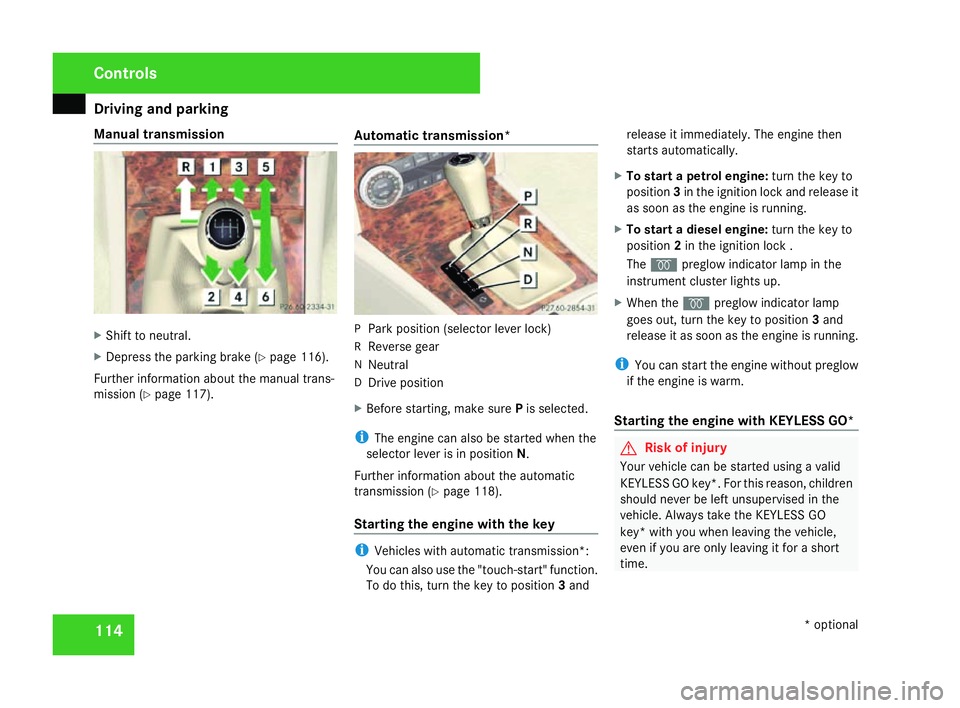
Manual transmission
X
Shift to neutral .
X Depress the parking brake (Y page 116).
Further information about the manual trans-
mission (Y page 117). Automatic transmission* P
Park position (selector lever lock)
R Reverse gear
N Neutral
D Drive positio n
X Before starting, make sure Pis selected.
i The engine can also be started when the
selector lever is in position N.
Further information about the automatic
transmission (Y page 118).
Starting the engine with the key i
Vehicles with automatic transmission*:
You can also use the "touch-start" function.
To do this, turn the key to position 3and release it immediately. The engine then
starts automatically.
X To start a petrol engine :turn the key to
position 3in the ignition lock and release it
as soon as the engine is running.
X To start a diesel engine :turn the key to
position 2in the ignition lock .
The q preglow indicator lamp in the
instrument cluster lights up.
X When the qpreglow indicator lamp
goes out, turn the key to position 3and
release it as soon as the engine is running.
i You can start the engine without preglow
if the engine is warm.
Starting the engine with KEYLESS GO* G
Risk of injury
Your vehicle can be started using a valid
KEYLESS GO key*. For this reason, childre n
should never be left unsupervised in the
vehicle. Always take the KEYLESS GO
key* with you when leaving the vehicle,
even if you are only leaving it for a short
time. Controls
* optional
204_AKB; 2; 3, en-GB
mkalafa,
2007-06-26T23:11:51+02:00 - Seite 114
Page 119 of 377
Driving and pa
rking11
6 Parking
G
Risk of accident
Only remove the key from the ignition lock
when the vehicle is stationary since yo u
cannot steer the vehicle with the key
removed .
Never leave children unsupervised in the
vehicle. They could release the parking
brake. This could lead to a serious or fatal
accident. G
Risk of fire
Make sure that the exhaust system doe s
not under any circumstances come into
contact with easily ignitable material such
as dry grass or petrol. The material could
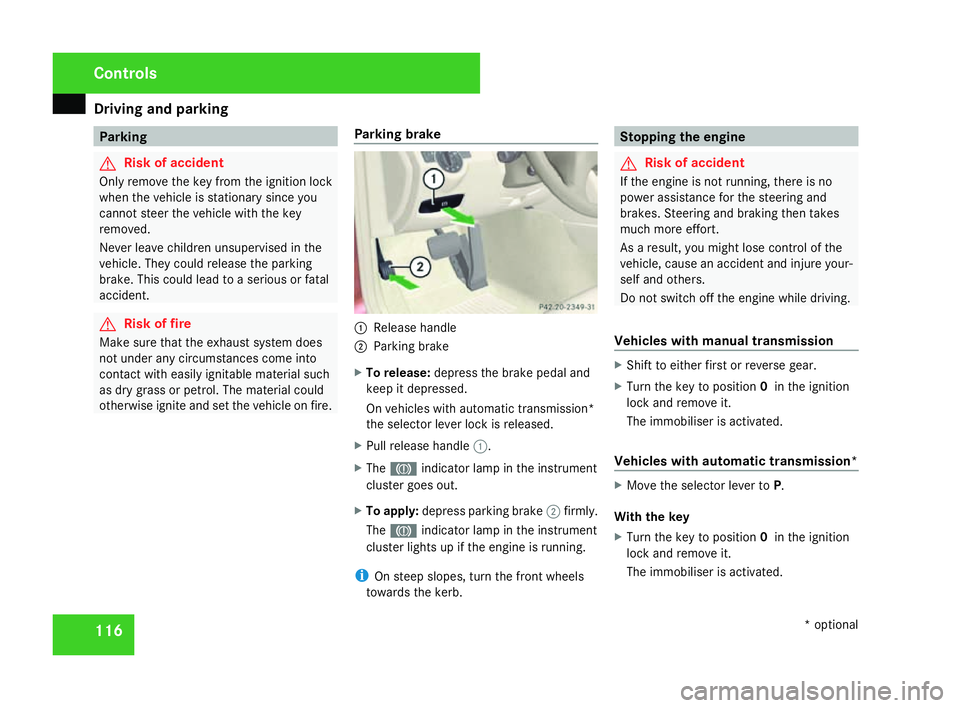
otherwise ignite and set the vehicle on fire. Parking brake 1
Release handle
2 Parking brake
X To release: depress the brake pedal and
keep it depressed.
On vehicles with automatic transmission*
the selector lever lock is released .
X Pull release handle 1.
X The 3 indicator lamp in the instrumen t
cluster goes out.
X To apply :depress parking brake 2firmly .
The 3 indicator lamp in the instrumen t
cluster lights up if the engine is running.
i On steep slopes, turn the front wheels
towards the kerb. Stopping the engine
G
Risk of accident
If the engine is not running, there is no
power assistance for the steering and
brakes. Steering and braking then takes
much more effort.
As a result, you might lose control of the
vehicle, cause an accident and injure your-
self and others.
Do not switch off the engine while driving .
Vehicles with manual transmission X
Shift to either first or reverse gear.
X Turn the key to position 0in the ignition
lock and remove it.
The immobiliser is activated.
Vehicles with automatic transmission* X
Move the selector lever to P.
With the key
X Turn the key to position 0in the ignition
lock and remove it.
The immobiliser is activated. Controls
* optional
204_AKB; 2; 3, en-GB
mkalafa,
2007-06-26T23:11:51+02:00 - Seite 116
Page 126 of 377

Instrument cluste
r 123Instrument cluster
You will find an illustration of the instrumen t
cluster in the "At a glance" section
( Y page 28). G
Risk of accident
No messages can be displayed if instru -
ment cluster and/or the multi-function dis-
play fail .
This means that you will not see information
about the driving situation, such as the
speed, outside temperature, warning/indi-
cator lamps, display messages or system
failures. The vehicle's handling character-
istics may be affected. Adjust your driving
style and speed accordingly.
Immediately consult a qualified specialist
workshop which has the necessary special-
ist knowledge and tools to carry out the
work required. Mercedes-Benz recom-
mends that you use a Mercedes-Benz
Service Centre for this purpose. In particu-
lar, work relevant to safety or on safety-
related systems must be carried out at a
qualified specialist workshop. Activating the multi-function displa
y
X Switch on the ignition.
The multi-function display is also activate d
when you switch on the lights or open th e
driver's door. Adjusting the instrument cluster
lighting
1
Brightness control
X Brighter or dimmer: turn clockwise or
anti-clockwise. Coolant temperature gaug
e
The coolant temperature gauge is in the
instrument cluster on the left-hand side. The
coolant temperature may rise to 120 †under
normal operating conditions and if the con-
centration of antifreeze/corrosion inhibitor is
correct. The coolant temperature may rise to
the top end of the scale at high outside tem-
peratures and on long uphill stretches. Resetting the trip meter
Vehicles with a 4-button multi-function
steering wheel: you can reset the trip meter
in the standard displa ymenu
( Y page 128).
Vehicles with a 12-button luxury multi-
function steering wheel* :you can find th e
"Reset values" function in the Tripmenu in
the on-board computer (Y page 135). Controls
* optional
204_AKB; 2; 3, en-GB
mkalafa,
2007-06-26T23:11:51+02:00 - Seite 123
Page 145 of 377
On-board computer (vehicles with the luxury multi-function steering wheel*, 12 buttons)
142
X
Press %or$ to select the Dig.
speedo (mph) function.
You will see the selected setting: Onor
Off.
X Press #to change the selected setting .
Selecting the permanent display* on vehi-
cles with automatic transmission*
i Vehicles for the United Kingdom: this
menu is not available.
The Permanent display function allows you
to choose whether the multi-function display
always shows the outside temperature or the
speed in mph.
X Press %or$ to select the Instru-
ment cluster submenu.
X Press #to confirm.
X Press %or$ to select the Perma-
nent displa yfunction.
You will see the selected setting: Outside
temperature orSpeedometer (mph).
X Press #to change the selected setting .Time/date This menu is only available on vehicles with-
out audio equipment or with Audio 20*
.
i Vehicles with Audio 50 APS* or COMAND
APS*: this function is not available, since
the time/date of the audio equipment* is
used.
The Time/date menu allows you to set the
time and the date.
X Press %or$ to select the Time/
Dat esubmenu.
X Press #to confirm.
Setting the time
X Press %or$ to select the Time
function.
You will see the time currently set.
X Press #to change it.
X Press (or& to select the display to
be changed: hours, minutes.
X Press %and$ to set the selected
display.
X Press #to store the entry .Setting the date
X
Press %or$ to select the Date
function.
You will see the date currently set.
X Press #to change it.
X Press (or& to select the display to
be changed: day, month, year .
X Press %and$ to set the selected
display.
X Press #to store the entry .
Light s The
Lights menu contains the following
functions:
R Intelligent Light System
R Daytime driving lamps
R Surround lighting
R Interior lighting delayed switch-off
Switching the Intelligent Light System*
on/off
When you activate Intell. Light System,
you activate the following functions: Cont
rols
* optional
204_AKB; 2; 3, en-GB
mkalafa,
2007-06-26T23:11:51+02:00 - Seite 142
Page 146 of 377
On-board computer (vehicles with the luxury multi-function steering wheel*, 12 buttons)
143
R
Motorway mode
R Active light functio n
R Extended range foglamps
X Press %or$ to select the Light
submenu.
X Press #to confirm.
X Press %or$ to select the Intell.
Light System function.
You will see the selected setting: Onor
Off.
X Press #to change the selected setting .
Switching the daytime driving lights on/
off
If you have activated the Daylight driving
lights function and the light switch is in the
M or* position, the parking lamp,
dipped-beam headlamps and licence plate
lighting are switched on automatically when
the engine is running.
In countries where daytime driving lamps are
legally required, Onis the factory setting.
X Press %or$ to select the Light
submenu.
X Press #to confirm. X
Press %or$ to select the Daytime
driving lamps function.
You will see the selected setting: Onor
Off.
X Press #to change the selected setting .
Switching the surround lighting on or off
If you activate the Surround lighting func-
tion and you unlock the vehicle with the key
when it is dark, the following will light up:
R The side lamps
R The tail lamps
R The licence plate lighting
R The front foglamps
The surround lighting switches off automati-
cally after 40 seconds or if the driver's door
is opened.
X Press %or$ to select the Light
submenu.
X Press #to confirm.
X Press %or$ to select the Surround
lighting function.
You will see the selected setting: Onor
Off .
X Press #to change the selected setting .Activating or deactivating the interior
lighting delayed switch-off
If you activate the
Interior lighting
delay sw. off function and pull the key out
of the ignition lock, the interior lighting
remains on for around 10 seconds if it is dark .
X Press %or$ to select the Light
submenu.
X Press #to confirm.
X Press %or$ to select the Interior
Lighting Delay function.
You will see the selected setting: Onor
Off .
X Press #to change the selected setting .
Vehicl e In the
Vehicle menu, you can activate/deac-
tivate the automatic locking feature or set the
permanent Speedtronic with Speed limit
(winter tyres) function(Y page 151).
Activating/deactivating automatic door
locking
If you select the Automatic Door Lock func-
tion, the vehicle is centrally locked above a
speed of around 15 km/h. Controls
* optional
204_AKB; 2; 3, en-GB
mkalafa,
2007-06-26T23:11:51+02:00 - Seite 143 Z
Page 148 of 377
Driving sys
tems 14
5
X
Press %or$ to select Reset all
settings? SelectNoorYes .
X Select Yesif you want to reset all the set-
tings .
X Press #to confirm the selection.
The multi-function display shows a confir -
mation message. Driving systems
Your vehicle's driving systems are described
on the following pages:
R Cruise control* and Speedtronic*, whic h
you can use to control the speed of th e
vehicl e
R Hill start assist, which makes pulling away
on steep uphill gradients easie r
R ADVANCED AGILITY package with sports
mode*
R 4MATIC* (permanent four-wheel drive )
R Parktronic*, which assists you in parking
and manoeuvrin g
The ABS, BAS, adaptive brake lights, ESP ®
and EBV (electronic brake-power distribution )
driving safety systems are described in the
"Driving safety systems" section
( Y page 67). Cruise control*
Cruise control maintains a constant road
speed for you. It brakes automatically in order
to avoid exceeding the set speed. On long and
steep downhill gradients, especially if the
vehicle is laden or towing a trailer, you must
shift to a lower gear in good time or select
shift range 1,2 or 3in vehicles with automatic
transmission*. In this way you will make use
of the braking effect of the engine, which
relieves the load on the brake system and
prevents the brakes from overheating and
wearing too quickly. G
Risk of accident
Do not change down for additional engine
braking on a slippery road surface. Thi s
could cause the drive wheels to lose thei r
grip and the vehicle could skid.
Use cruise control only if road and traffic con-
ditions make it appropriate to maintain a
steady speed for a prolonged period. You can
store any road speed above 30 km/h. G
Risk of accident
Cruise control cannot take account of roa d
and traffic conditions. Controls
* optional
204_AKB; 2; 3, en-GB
mkalafa
, 2007-06-26T23:11:51+02:00 - Seite 145 Z
Page 151 of 377
Driving sys
tems 14
8
Making adjustments in 1 km/h incre-
ments X
Briefly press the cruise control lever up to
pressure point 1for a higher speed or
down 4for a lower speed.
The last speed stored is increased or
reduced.
Making adjustments in 10 km/h incre-
ments X
Briefly press the cruise control lever up
beyond pressure point 1for a higher
speed or down 4for a lower speed.
The last speed stored is increased or
reduced.
Deactivating cruise control There are several ways to deactivate cruis
e
control :
X Briefly press the cruise control lever for-
wards 6.
or
X Brake .
or X
Briefly press the cruise control lever in the
direction of arrow 5.
Variable Speedtronic is selected. LIM indi-
cator lamp 2in the cruise control lever
lights up.
Cruise control is automatically deactivated if:
R you depress the parking brak e
R you are driving at less than 30 km/h
R ESP ®
(Y page 68) is intervening or if you
deactivate ESP ®
R with a vehicle with manual transmission ,
you change into neutral or if the clutch is
depressed for longer than 6 seconds
R you move the selector lever to Nin vehicles
with automatic transmission* while drivin g
If cruise control is deactivated, you will hear
a warning tone. You see the Cruise control
off message in the multi-function display for
approximately five seconds.
i The last speed stored is cleared when you
switch off the engine. Speedtronic*
Speedtronic brakes automatically so that you
do not exceed the set speed. On long and
steep downhill gradients, especially if the
vehicle is laden or towing a trailer, you must
shift to a lower gear in good time or select
shift range 1,2 or 3in vehicles with automatic
transmission*. In this way you will make use
of the braking effect of the engine, which
relieves the load on the brake system and
prevents the brakes from overheating and
wearing too quickly. If you need additional
braking, depress the brake pedal repeatedly
rather than continuously. G
Risk of accident
Never depress the brake pedal continu -
ously while the vehicle is in motion, e.g.
never cause the brakes to rub by applying
constant slight pedal pressure. This causes
the brake system to overheat, increases
the braking distance and can lead to the
brakes failing completely. G
Risk of accident
Do not change down for additional engine
braking on a slippery road surface. Thi s
could cause the drive wheels to lose thei r
grip and the vehicle could skid. Controls
* optional
204_AKB; 2; 3, en-GB
mkalafa,
2007-06-26T23:11:51+02:00 - Seite 148