fog light MERCEDES-BENZ C-CLASS SALOON 2011 User Guide
[x] Cancel search | Manufacturer: MERCEDES-BENZ, Model Year: 2011, Model line: C-CLASS SALOON, Model: MERCEDES-BENZ C-CLASS SALOON 2011Pages: 401, PDF Size: 9.74 MB
Page 211 of 401

the trailer lighting
.Blind Spot Assist is then
deactivated. The indicator lamp in the exte-
rior mirrors lights up yellow, and the BlindSpot Assist currently unavailable
See Owner's Manual message appears in
the multifunction display.
i You can deactivate the indicator lamps in
the exterior mirrors.
To do so, switch off Blind Spot Assist if:
R the key is in position 2in the ignition
lock.
R the engine is not running.
R the electrical connection to the trailer
has been established.
Lane Keeping Assist Important safety notes
Lane Keeping Assist monitors the area in
front of your vehicle by means of a camera at
the top of the windscreen. Lane Keeping
Assist detects lane markings on the road and
warns you before you leave your lane unin-
tentionally. :
Lane Keeping Assist camera
If you have chosen the Display unitSpeed-/odometer (Y
page 239) function in
the on-board computer and select km as the
unit of measurement, Active Lane Keeping
Assist is active from speeds of 60 km/h. If
the miles display unit is selected, the assis-
tance range begins at 40 mph. G
WARNING
Lane Keeping Assist does not keep your vehi-
cle in its lane. It is only an aid and may detect
the lane markings on the road incorrectly or
not at all.
The system may be impaire dormay notfunc-
tion if:
R there is poor visibility, e.g .due to insuffi-
cient illumination of the road, or due to
snow, rain, fog or spray.
R there is glare, e.g. from oncoming traffic,
the sun, or reflection from other vehicles.
R the windscree nis dirty, misted up or cov-
ered, for instance by a sticker, in the vicinity
of the camera
R several or no lane markings for a single lane
are present.
R the lane markings are worn away, dark or
covered up, e.g. by dirt or snow.
R the distance to the vehicle in front is too
small and the lane markings thus cannot be
detected.
R the lane markings on the road are unclear,
e.g. near roadworks.
R the lane markings change quickly, e.g.
lanes branch off, cross one another or
merge.
R the road is narrow and winding.
Lane Keeping Assist cannot detect road and
traffic conditions. It is not a substitute for
attentive driving. You are responsible for the
vehicle's speed, braking in good time, and
steering correctly. Always adapty our driving
style to suit the prevailing road and weather
conditions. Always pay attention to traffic
conditions and your surroundings. Otherwise,
you may fail to recognise dangers in time,
cause an accident and injure yourself and oth-
ers.
A warning may be given if a front wheel
passes over a lane marking. It will warn you
by means of intermittent vibration in the
steering wheel for up to 1.5 seconds. 208
Driving systemsDriving and parking
Page 216 of 401
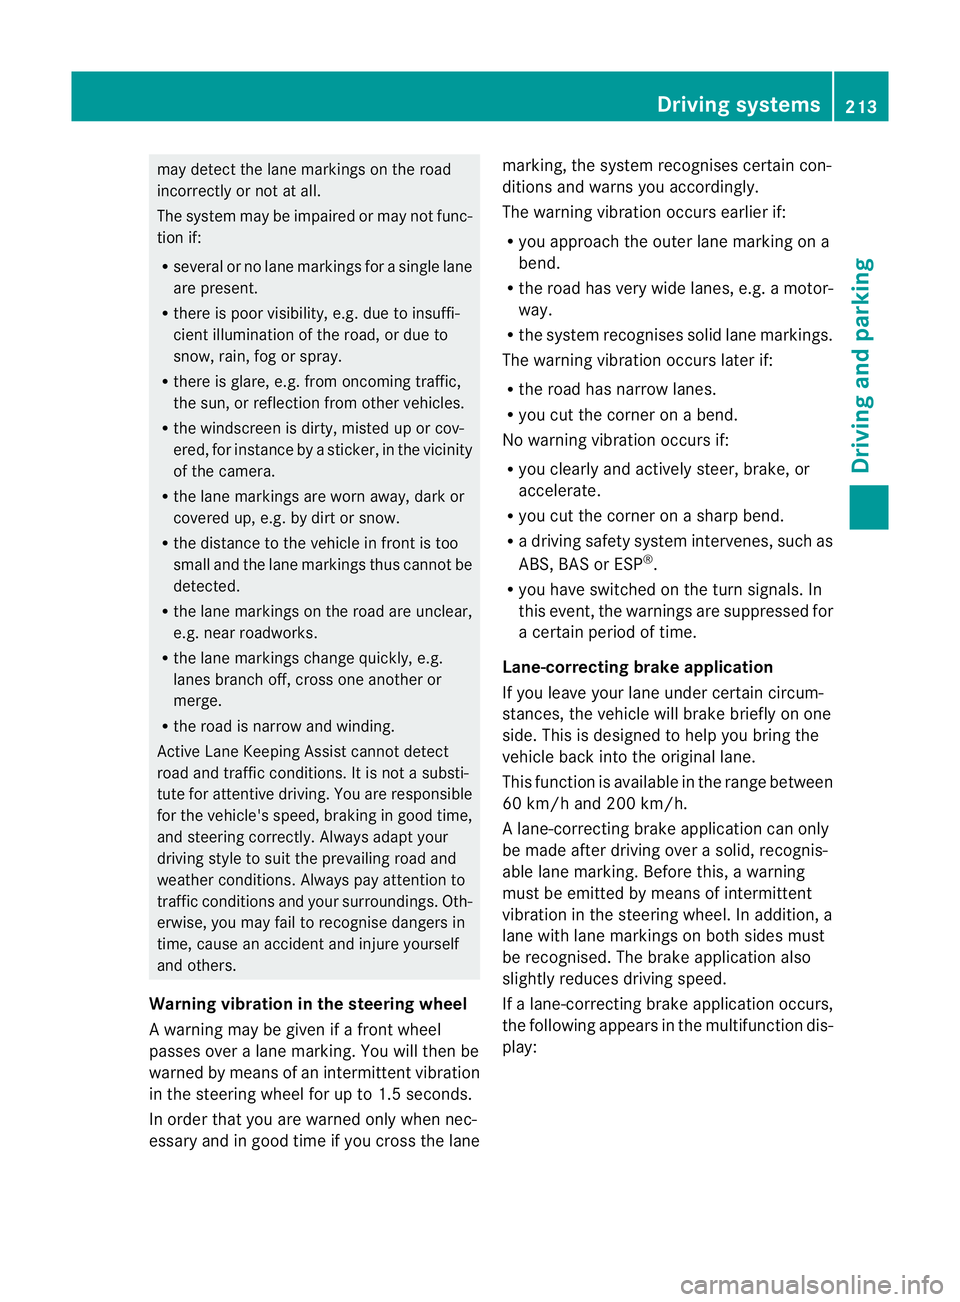
may detect the lane markings on the road
incorrectly or not at all.
The system may be impaired or may not func-
tion if:
R
several or no lane markings for a single lane
are present.
R there is poor visibility, e.g. due to insuffi-
cient illumination of the road, or due to
snow, rain, fog or spray.
R there is glare, e.g. from oncoming traffic,
the sun, or reflection from other vehicles.
R the windscreen is dirty, misted up or cov-
ered, for instance by a sticker, in the vicinity
of the camera.
R the lane markings are worn away, dark or
covered up, e.g. by dirt or snow.
R the distance to the vehicle in front is too
small and the lane markings thus cannot be
detected.
R the lane markings on the road are unclear,
e.g. near roadworks.
R the lane markings change quickly, e.g.
lanes branch off, cross one another or
merge.
R the road is narrow and winding.
Active Lane Keeping Assist cannot detect
road and traffic conditions. It is not a substi-
tute for attentive driving. You are responsible
for the vehicle's speed, braking in good time,
and steering correctly. Always adapt your
driving style to suitt he prevailing road and
weather conditions.A lways pay attention to
traffic conditions and your surroundings. Oth-
erwise, you may fail to recognise dangers in
time, cause an accident and injure yourself
and others.
Warning vibration in the steering wheel
A warning may be given if a front wheel
passes over a lane marking. You will the nbe
warned by means of an intermittent vibration
in the steering wheel for up to 1. 5seconds.
In order that you are warned only when nec-
essary and in good time if you cross the lane marking, the system recognises certain con-
ditions and warns you accordingly.
The warning vibration occurs earlier if:
R
you approach the outer lane marking on a
bend.
R the road has very wide lanes, e.g. a motor-
way.
R the system recognises solid lane markings.
The warning vibration occurs later if:
R the road has narrow lanes.
R you cut the corner on a bend.
No warning vibration occurs if:
R you clearly and actively steer, brake, or
accelerate.
R you cut the corner on a sharp bend.
R a driving safety system intervenes, such as
ABS, BAS or ESP ®
.
R you have switched on the turn signals. In
this event, the warnings are suppressed for
a certain period of time.
Lane-correcting brake application
If you leave your lane under certain circum-
stances, the vehicle will brake briefly on one
side. This is designed to help you bring the
vehicle back into the original lane.
This function is available in the range between
60 km/h and 200 km/h.
A lane-correcting brake application can only
be made after driving over a solid, recognis-
able lane marking. Befor ethis, a warning
must be emitted by means of intermittent
vibration in the steering wheel. In addition, a
lane with lane markings on both sides must
be recognised. The brake application also
slightly reduces driving speed.
If a lane-correcting brake application occurs,
the following appears in the multifunction dis-
play: Driving systems
213Driving and parking Z
Page 243 of 401

daytime driving lights are automatically
switched on during daylight hours when the
engine is running. When it is dark, the side
lamps and the dipped-beam headlamps are
also switched on automatically.
X
Switch off the engine.
X Press the =or; button on the steer-
ing wheel to select the Settings menu.
X Press the :or9 button to select the
Light submenu.
X Press the abutton to confirm.
X Press the :or9 button to select the
Day lights function.
If the Day lights have been switched on,
the cone of light and the Wsymbol in
the multifunction display are shown in red.
X Press the abutton to save the setting.
Switching the Intelligent Light System
on/off
If you activate the Intell. Light Sys.function, you activate the following functions:
R
motorway mode
R active light function
R cornering light function
R extended range foglamps
X Press the =or; button on the steer-
ing wheel to select the Settings menu.
X Press the :or9 button to select the
Light submenu.
X Press the abutton to confirm.
X Press :or9 to select the Intell. Light Sys. function.
If the Intell. Light Sys. function has
been switched on, the cone of light and the
L symbol in the multifunction display
are shown in red.
X Press the abutton to save the setting.
If you set the dipped-beam headlamps for
driving on the right/left (Y page 240), the
multifunction display shows the Systeminoperative display message under the image of the vehicle for the
Intell. Light
Sys. function in the
Light submenu.
Setting the dipped-beam headlamps for
driving on the left/right
This function is only available on vehicles with
the Intelligent Light System.
You can use this function to switch between
symmetrical beam and asymmetrical dipped
beam (Y page 118).
If you set the dipped-beam headlamps for
driving on the right/left, then motorway
mode and the extended range foglamps are
not available.
X Press the =or; button on the steer-
ing wheel to select the Settings menu.
X Press the :or9 button to select the
Light submenu.
X Press the abutton to confirm.
X Press :or9 to select the Dipped beams Setting for function.
You will see the selected setting: Right- side traffic or
Left-side traffic .
X Press the abutton to save the setting.
When you change the setting, conversion
does not take place until the nex ttime the
vehicle is stationary.
You can also have the dipped-beam head-
lamps set for driving on the right or left at a
qualified specialist workshop.
Switching Adaptive Highbeam Assist on/
off
X Press the =or; button on the steer-
ing wheel to selec tthe Settings menu.
X Press the :or9 button to select the
Light submenu.
X Press the abutton to confirm.
X Press the :or9 button to select the
Adapt. main beam function.
If the Adapt. main beam function has
been switched on, the cone of light and the 240
Displays and operation (12-button multifunction steering wheel)On-board computer and displays
Page 244 of 401
_
symbol in the multifunction display
are shown in red.
X Press the abutton to save the setting.
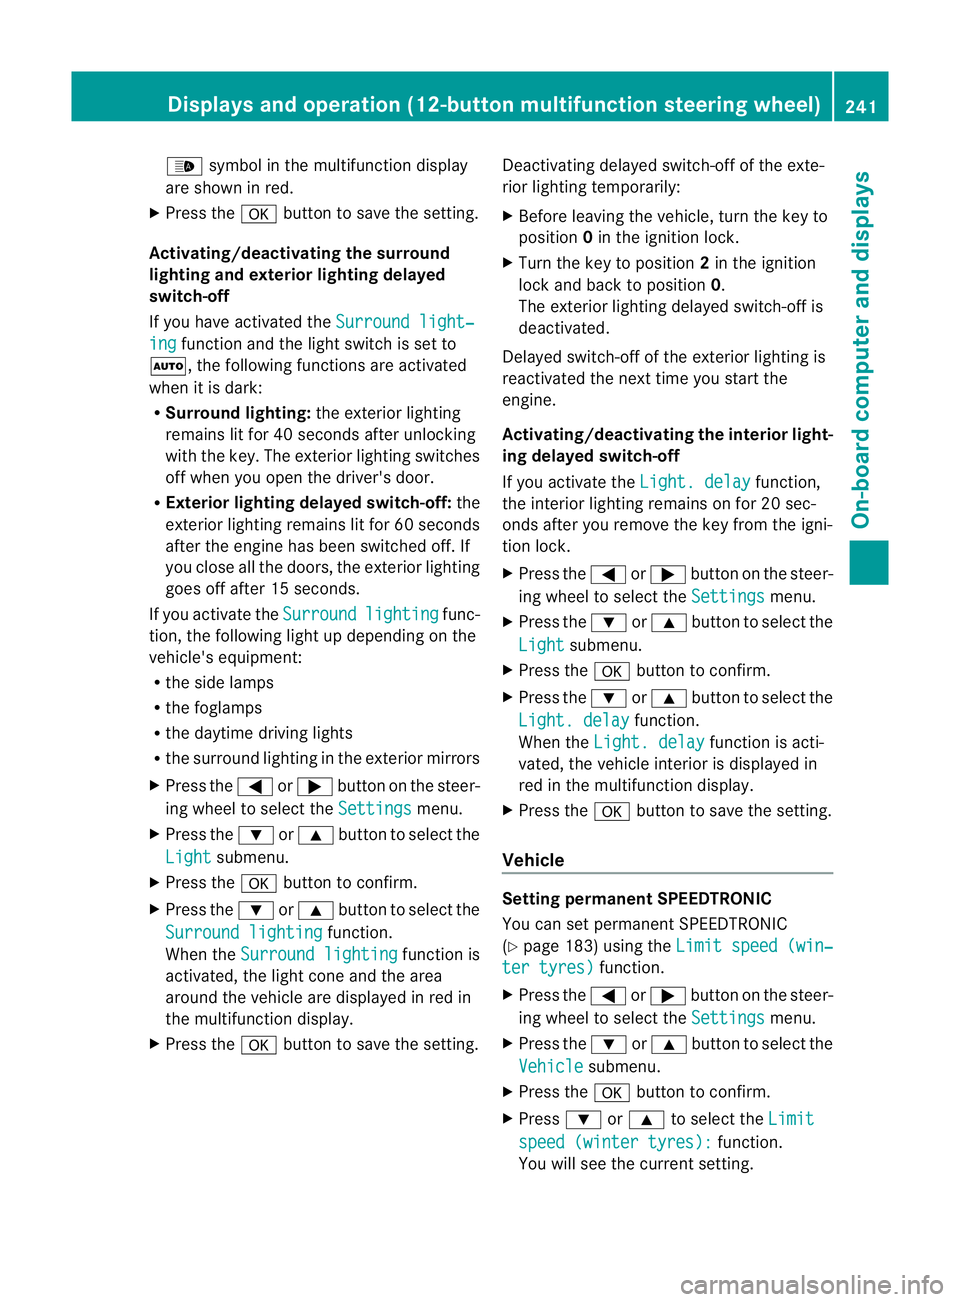
Activating/deactivating the surround
lighting and exterior lighting delayed
switch-off
If you have activated the Surround light‐ing function and the light switch is set to
Ã, the following functions are activated
when it is dark:
R Surround lighting: the exterior lighting
remains lit for 40 seconds after unlocking
with the key. The exterior lighting switches
off when you open the driver's door.
R Exterior lighting delayed switch-off: the
exterior lighting remains lit for 60 seconds
after the engine has been switched off. If
you close all the doors, the exterior lighting
goes off after 15 seconds.
If you activate the Surround lighting func-
tion, the following light up depending on the
vehicle's equipment:
R the side lamps
R the foglamps
R the daytime driving lights
R the surround lighting in the exterior mirrors
X Press the =or; button on the steer-
ing wheel to select the Settings menu.
X Press the :or9 button to select the
Light submenu.
X Press the abutton to confirm.
X Press the :or9 button to select the
Surround lighting function.
When the Surround lighting function is
activated, the light cone and the area
around the vehicle are displayed in red in
the multifunction display.
X Press the abutton to save the setting. Deactivating delayed switch-off of the exte-
rior lighting temporarily:
X
Before leaving the vehicle, turn the key to
position 0in the ignition lock.
X Turn the key to position 2in the ignition
lock and back to position 0.
The exterior lighting delayed switch-off is
deactivated.
Delayed switch-off of the exterior lighting is
reactivated the next time you start the
engine.
Activating/deactivating the interior light-
ing delayed switch-off
If you activate the Light. delay function,
the interior lighting remains on for 20 sec-
onds after you remove the key from the igni-
tion lock.
X Press the =or; button on the steer-
ing wheel to select the Settings menu.
X Press the :or9 button to select the
Light submenu.
X Press the abutton to confirm.
X Press the :or9 button to select the
Light. delay function.
When the Light. delay function is acti-
vated, the vehicle interior is displayed in
red in the multifunction display.
X Press the abutton to save the setting.
Vehicle Setting permanent SPEEDTRONIC
You can set permanent SPEEDTRONIC
(Y
page 183) using the Limit speed (win‐ ter tyres) function.
X Press the =or; button on the steer-
ing wheel to select the Settings menu.
X Press the :or9 button to select the
Vehicle submenu.
X Press the abutton to confirm.
X Press :or9 to select the Limit speed (winter tyres): function.
You will see the current setting. Displays and operation (12-button multifunction steering wheel)
241On-board computer and displays Z
Page 266 of 401
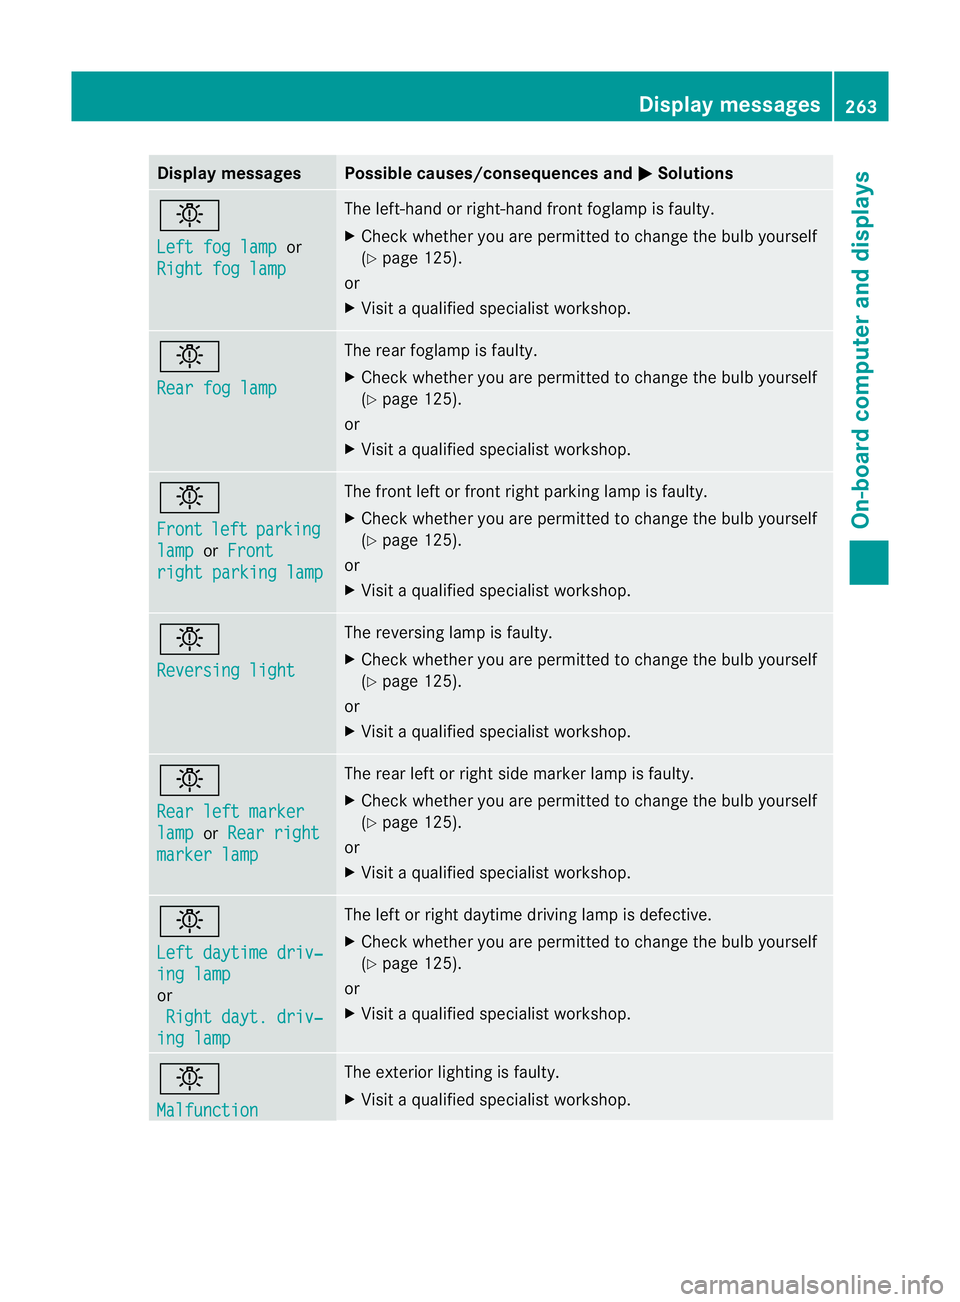
Display messages Possible causes/consequences and
M Solutions
b
Left fog lamp
or
Right fog lamp The left-hand or right-hand fron
tfoglamp is faulty.
X Check whether you are permitted to change the bulb yourself
(Y page 125).
or
X Visit a qualified specialist workshop. b
Rear fog lamp The rear foglamp is faulty.
X
Check whether you are permitted to change the bulb yourself
(Y page 125).
or
X Visit a qualified specialist workshop. b
Front
left parking
lamp or
Front right parking lamp The front left or front right parking lamp is faulty.
X
Check whether you are permitted to change the bulb yourself
(Y page 125).
or
X Visit a qualified specialist workshop. b
Reversing light The reversing lamp is faulty.
X
Check whether you are permitted to change the bulb yourself
(Y page 125).
or
X Visit a qualified specialist workshop. b
Rear left marker
lamp or
Rear right marker lamp The rear left or right side marker lamp is faulty.
X
Check whether you are permitted to change the bulb yourself
(Y page 125).
or
X Visit a qualified specialist workshop. b
Left daytime driv‐
ing lamp
or
Right dayt. driv‐ ing lamp The left or right daytime driving lamp is defective.
X
Check whether you are permitted to change the bulb yourself
(Y page 125).
or
X Visit a qualified specialist workshop. b
Malfunction The exterior lighting is faulty.
X
Visit a qualified specialist workshop. Display messages
263On-board computer and displays Z
Page 269 of 401
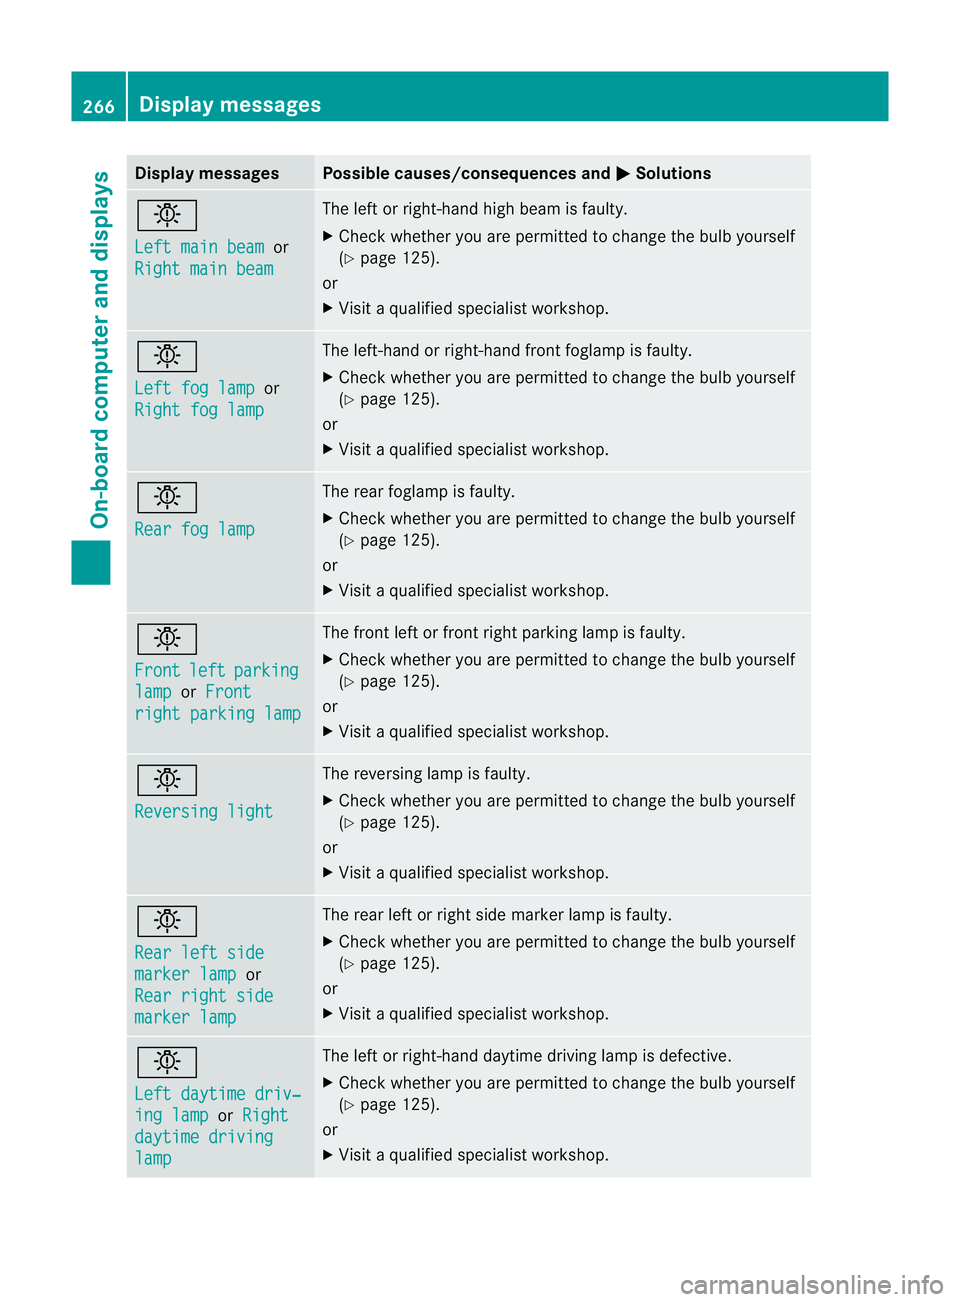
Display messages Possible causes/consequences and
M Solutions
b
Left main beam
or
Right main beam The lef
torright-hand high beam is faulty.
X Check whether you are permitted to change the bulb yourself
(Y page 125).
or
X Visit a qualified specialist workshop. b
Left fog lamp
or
Right fog lamp The left-hand or right-hand front foglamp is faulty.
X
Check whether you are permitted to change the bulb yourself
(Y page 125).
or
X Visit a qualified specialist workshop. b
Rear fog lamp The rear foglamp is faulty.
X
Check whether you are permitted to change the bulb yourself
(Y page 125).
or
X Visit a qualified specialist workshop. b
Front
left parking
lamp or
Front right parking lamp The front left or front right parking lamp is faulty.
X
Check whether you are permitted to change the bulb yourself
(Y page 125).
or
X Visit a qualified specialist workshop. b
Reversing light The reversing lamp is faulty.
X
Check whether you are permitted to change the bulb yourself
(Y page 125).
or
X Visit a qualified specialist workshop. b
Rear left side
marker lamp or
Rear right side marker lamp The rear left or right side marker lamp is faulty.
X
Check whether you are permitted to change the bulb yourself
(Y page 125).
or
X Visit a qualified specialist workshop. b
Left daytime driv‐
ing lamp or
Right daytime driving
lamp The left or right-hand daytime driving lamp is defective.
X
Check whether you are permitted to change the bulb yourself
(Y page 125).
or
X Visit a qualified specialist workshop. 266
Display messagesOn-board computer and displays
Page 270 of 401
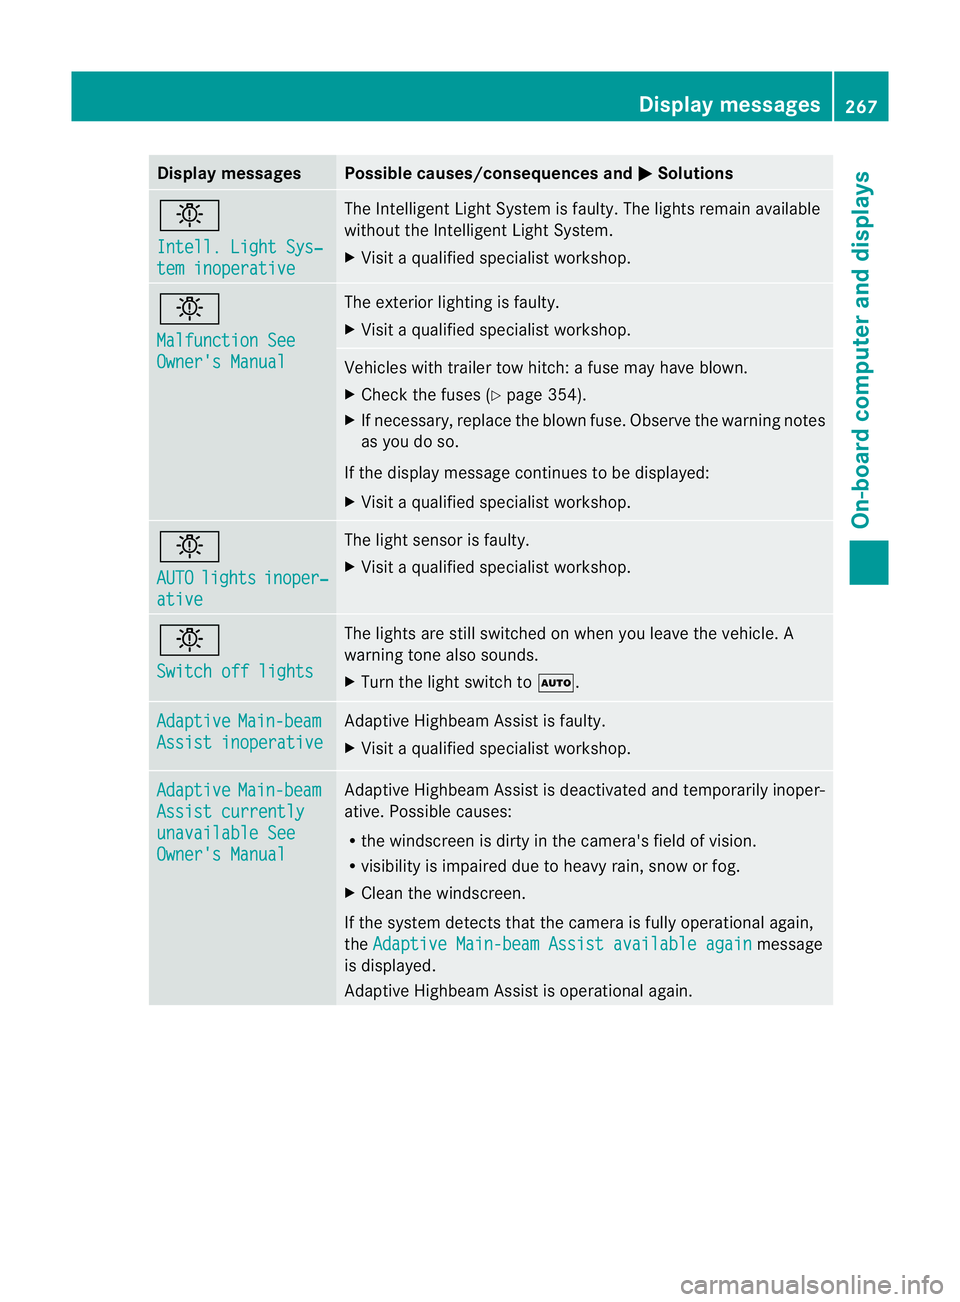
Display messages Possible causes/consequences and
M Solutions
b
Intell. Light Sys‐
tem inoperative The Intelligent Light Syste
mis faulty. The lights remain available
without the Intelligent Light System.
X Visit a qualified specialist workshop. b
Malfunction See
Owner's Manual The exterior lighting is faulty.
X
Visit a qualified specialist workshop. Vehicles with trailer tow hitch: a fuse may have blown.
X
Check the fuses (Y page 354).
X If necessary, replace the blown fuse. Observe the warning notes
as you do so.
If the display message continues to be displayed:
X Visit a qualified specialist workshop. b
AUTO
lights inoper‐
ative The light sensor is faulty.
X
Visit a qualified specialist workshop. b
Switch off lights The lights are still switched on when you leave the vehicle. A
warning tone also sounds.
X
Turn the light switch to Ã.Adaptive Main-beam
Assist inoperative Adaptive Highbeam Assist is faulty.
X
Visit a qualified specialist workshop. Adaptive Main-beam
Assist currently
unavailable See
Owner's Manual Adaptive Highbeam Assist is deactivated and temporarily inoper-
ative. Possible causes:
R
the windscreen is dirty in the camera's field of vision.
R visibility is impaired due to heavy rain, snow or fog.
X Cleant he windscreen.
If the system detects that the camera is fully operational again,
the Adaptive Main-beam Assist available again message
is displayed.
Adaptive Highbeam Assist is operational again. Display messages
267On-board computer and displays Z