child restraint MERCEDES-BENZ C-CLASS SALOON 2011 Owner's Manual
[x] Cancel search | Manufacturer: MERCEDES-BENZ, Model Year: 2011, Model line: C-CLASS SALOON, Model: MERCEDES-BENZ C-CLASS SALOON 2011Pages: 401, PDF Size: 9.74 MB
Page 72 of 401
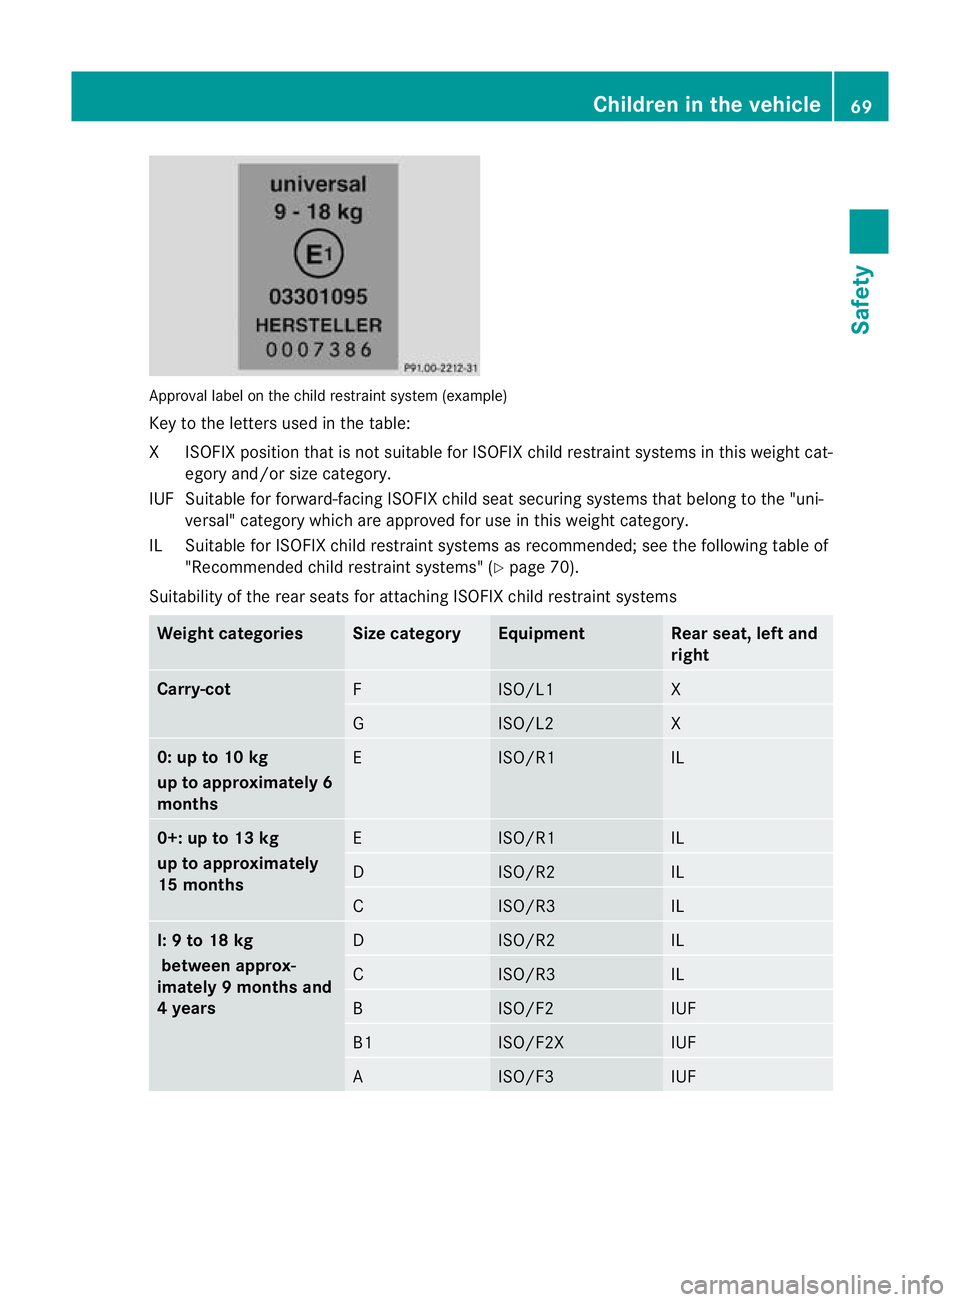
Approval label on the child restraint system (example)
Key to the letters used in the table:
XI SOFIX position tha tis not suitable for ISOFIX child restraint systems in this weight cat-
egory and/or size category.
IUF Suitable for forward-facing ISOFIX child seat securing systems that belong to the "uni- versal" category which are approved for use in this weight category.
IL Suitable for ISOFIX child restraint systems as recommended; see the following table of "Recommended child restraint systems" (Y page 70).
Suitability of the rear seats for attaching ISOFIX child restraint systems Weight categories Size category Equipment Rear seat, left and
right
Carry-cot
F ISO/L1 X
G ISO/L2 X
0: up to 10 kg
up to approximately 6
months
E ISO/R1 IL
0+: up to 13 kg
up to approximately
15 months
E ISO/R1 IL
D ISO/R2 IL
C ISO/R3 IL
I: 9 to 18 kg
between approx-
imately 9 months and
4 years D ISO/R2 IL
C ISO/R3 IL
B ISO/F2 IUF
B1 ISO/F2X IUF
A ISO/F3 IUFChildren in the vehicle
69Safety Z
Page 73 of 401
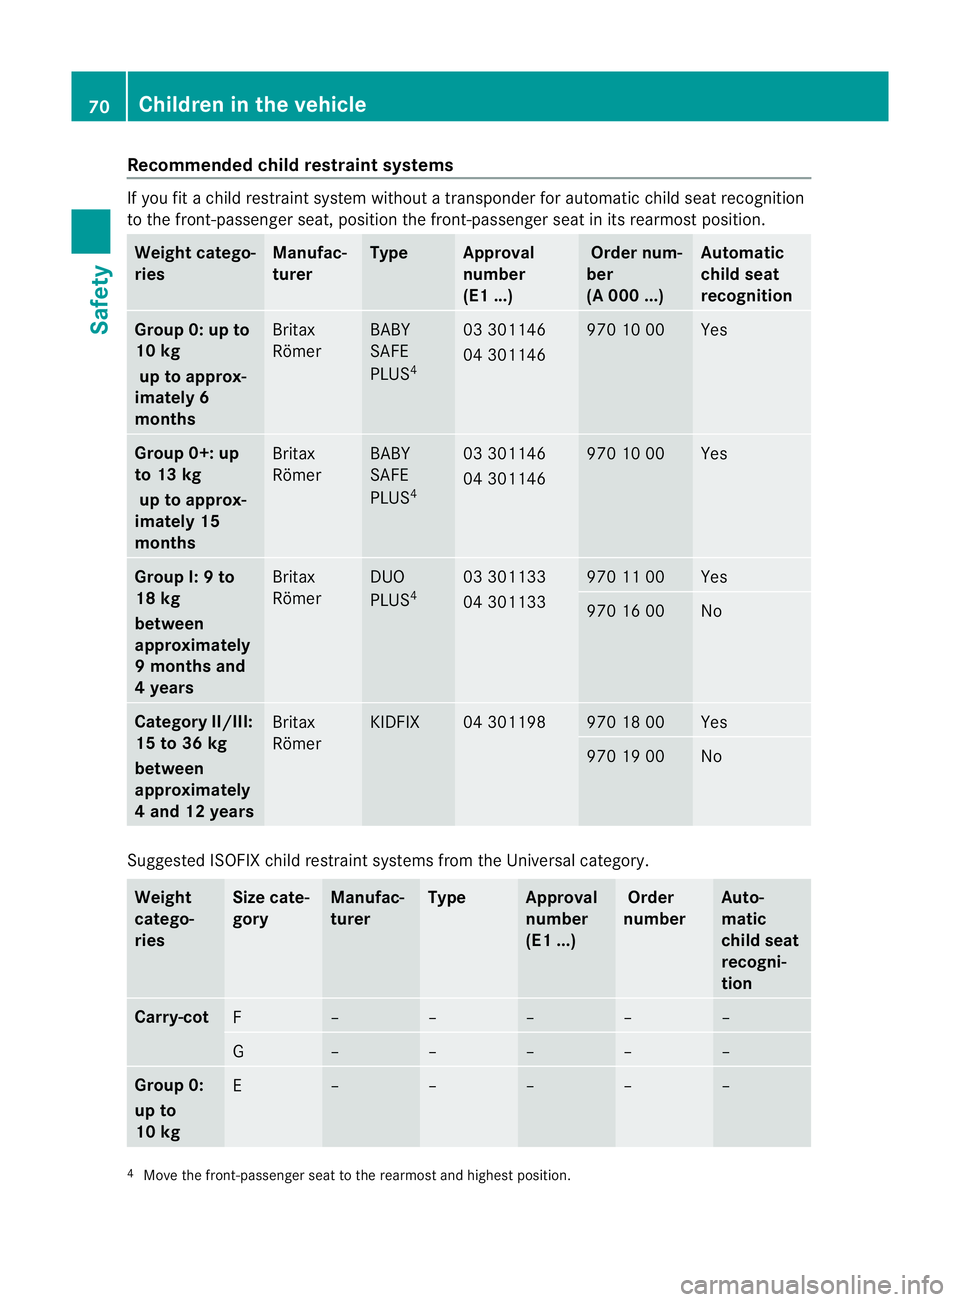
Recommended child restraint systems
If you fit a child restraint system withou
tatransponderfor automatic child seat recognition
to the front-passenger seat, position the front-passenger seat in its rearmost position. Weight catego-
ries Manufac-
turer Type Approval
number
(E1 ...) Order num-
ber
(A 000 ...) Automatic
child seat
recognition
Group 0: up to
10 kg
up to approx-
imately 6
months Britax
Römer BABY
SAFE
PLUS
4 03 301146
04 301146 970 10 00 Yes
Group 0+: up
to 13 kg
up to approx-
imately 15
months Britax
Römer BABY
SAFE
PLUS
4 03 301146
04 301146 970 10 00 Yes
Group I: 9 to
18 kg
between
approximately
9 months and
4 years
Britax
Römer DUO
PLUS
4 03 301133
04 301133 970 11 00 Yes
970 16 00 No
Category II/III:
15 to 36 kg
between
approximately
4 and 12 years
Britax
Römer KIDFIX 04 301198 970 18 00 Yes
970 19 00 No
Suggested ISOFIX child restraint systems from the Universal category.
Weight
catego-
ries Size cate-
gory Manufac-
turer Type Approval
number
(E1 ...) Order
number Auto-
matic
child seat
recogni-
tion
Carry-cot
F – – – – –
G – – – – –
Group 0:
up to
10 kg
E – – – – –
4
Move the front-passenger seat to the rearmost and highest position. 70
Children in the vehicleSafety
Page 74 of 401
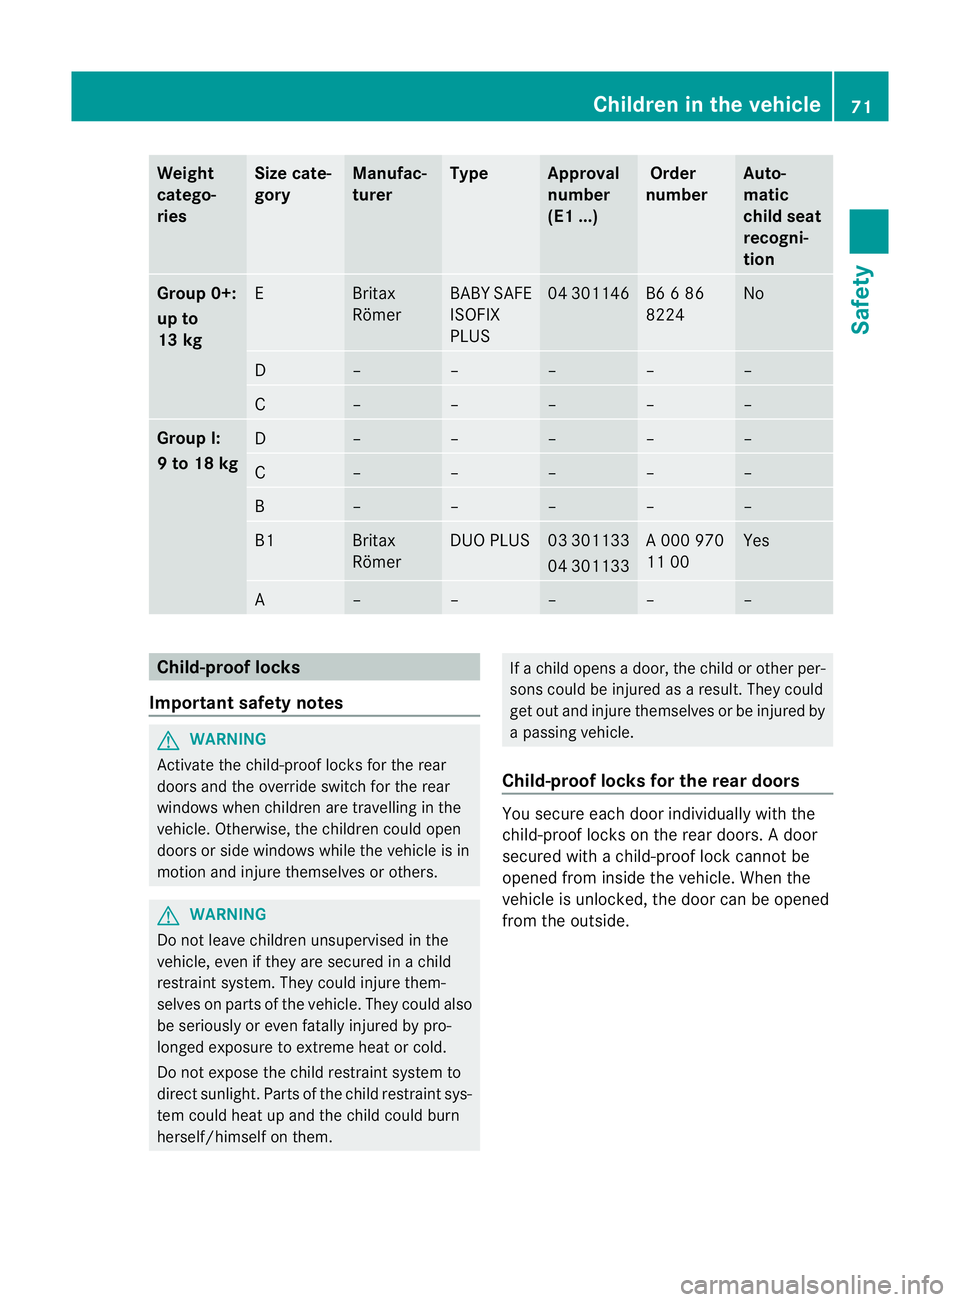
Weight
catego-
ries Size cate-
gory Manufac-
turer Type Approval
number
(E1 ...) Order
number Auto-
matic
chil
dseat
recogni-
tion Group 0+:
up to
13 kg
E Britax
Römer BABY SAFE
ISOFIX
PLUS 04 301146 B6 6 86
8224 No
D – – – – –
C – – – – –
Group I:
9 to 18 kg
D – – – – –
C – – – – –
B – – – – –
B1 Britax
Römer DUO PLUS 03 301133
04 301133 A 000 970
11 00 Yes
A – – – – –
Child-proof locks
Important safety notes G
WARNING
Activate the child-proof locks for the rear
doors and the override switch for the rear
windows when children are travelling in the
vehicle. Otherwise, the children could open
doors or side windows while th evehicle is in
motion and injure themselves or others. G
WARNING
Do not leave children unsupervised in the
vehicle, even if they are secured in a child
restraint system. They could injure them-
selves on parts of the vehicle. They could also
be seriously or even fatally injured by pro-
longed exposure to extreme heat or cold.
Do not expose the child restraint system to
direct sunlight. Parts of the child restraint sys-
tem could heat up and the child could burn
herself/himself on them. If a child opens a door, the child or other per-
sons could be injured as a result. They could
get out and injure themselves or be injured by
a passing vehicle.
Child-proof locks for the rear doors You secure each door individually with the
child-proof locks on the rear doors.
Adoor
secured with a child-proof lock cannot be
opened from inside the vehicle. When the
vehicle is unlocked, the door can be opened
from the outside. Children in the vehicle
71Safety Z
Page 99 of 401
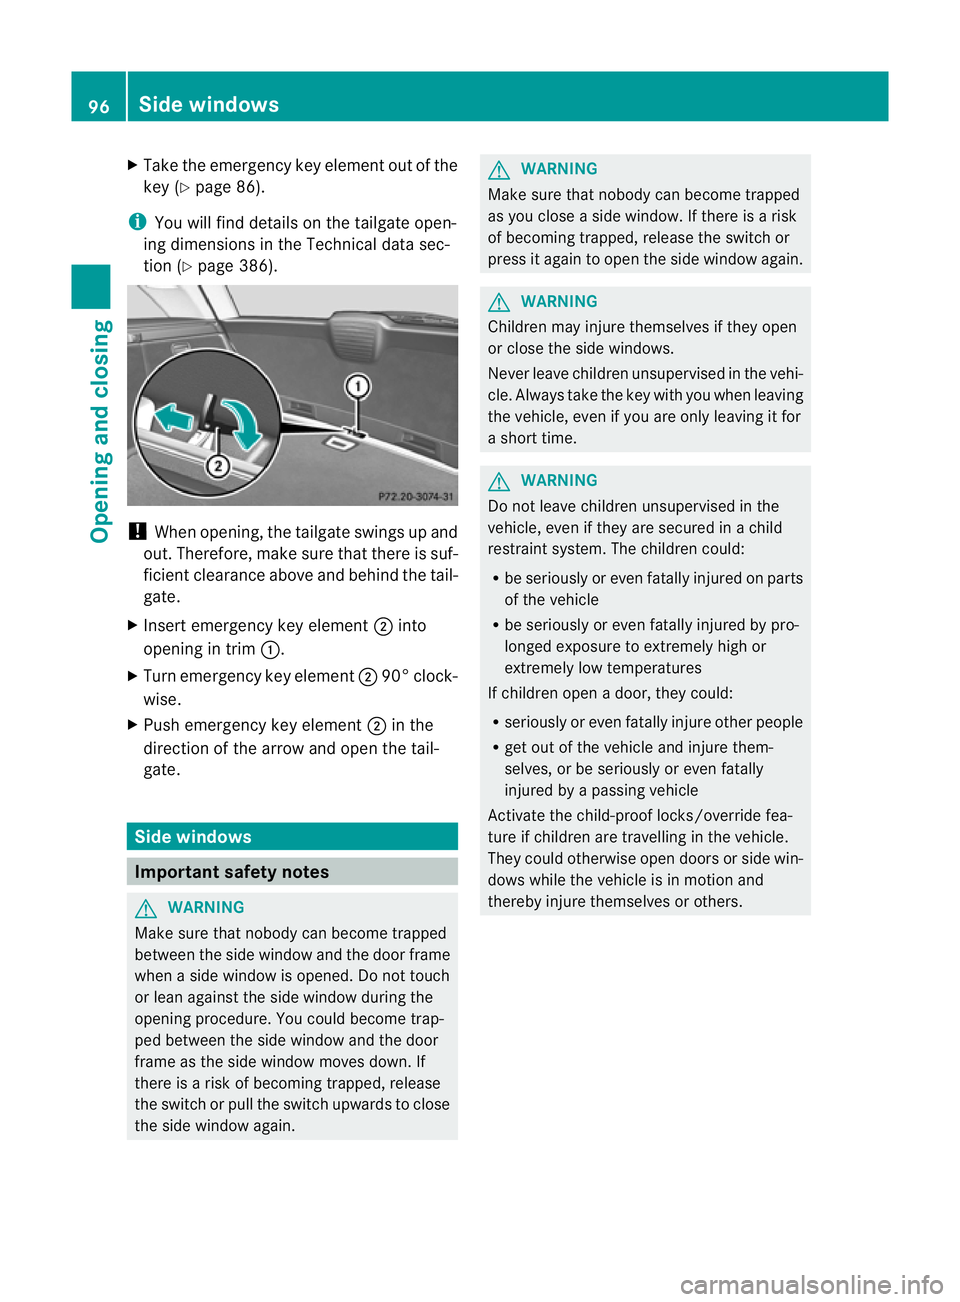
X
Take the emergency key element out of the
key (Y page 86).
i You will find details on the tailgate open-
ing dimensions in the Technical data sec-
tion (Y page 386). !
When opening, the tailgate swings up and
out. Therefore, make sure that there is suf-
ficient clearance above and behind the tail-
gate.
X Insert emergency key element ;into
opening in trim :.
X Turn emergency key element ;90° clock-
wise.
X Push emergency key element ;in the
direction of the arrow and open the tail-
gate. Side windows
Important safety notes
G
WARNING
Make sure that nobody can become trapped
between the side window and the door frame
when a side window is opened. Do not touch
or lean against the side window during the
opening procedure. You could become trap-
ped between the side window and the door
frame as the side window moves down. If
there is a risk of becoming trapped, release
the switch or pull the switch upwards to close
the side window again. G
WARNING
Make sure that nobody can become trapped
as you close a side window. If there is a risk
of becoming trapped, release the switch or
press it again to open the side window again. G
WARNING
Children may injure themselves if they open
or close the side windows.
Never leave children unsupervised in the vehi-
cle. Always take the key with you when leaving
the vehicle, even if you are only leaving it for
a short time. G
WARNING
Do not leave children unsupervised in the
vehicle, even if they are secured in a child
restraint system. The children could:
R be seriously or even fatally injured on parts
of the vehicle
R be seriously or even fatally injured by pro-
longed exposure to extremely high or
extremely low temperatures
If children open a door, they could:
R seriously or even fatally injure other people
R get out of the vehicle and injure them-
selves, or be seriously or even fatally
injured by a passing vehicle
Activate the child-proof locks/override fea-
ture if children are travelling in the vehicle.
They could otherwise open doors or side win-
dows while the vehicle is in motion and
thereby injure themselves or others. 96
Side windowsOpening and closing
Page 108 of 401
in such a way that you have a good view of
road and traffic conditions.
X Vehicles with a memory function: save
the seat, steering wheel and exterior mirror
settings (Y page 115). Seats
Important safety notes
G
WARNING
The seats can still be adjusted when there is
no key in the ignition lock. For this reason,
children should never be left unsupervised in
the vehicle. They could adjust the seats and
become trapped. G
WARNING
Only adjust the driver's seat when the vehicle
is stationary. You will otherwise be distracted
from the road and traffic conditions and you
could lose control of the vehicle as a result of
the seat moving. This could cause an acci-
dent. G
WARNING
If you adjust the seat height carelessly, you or
others could be trapped and thereby injured.
Children in particular could unintentionally
press the buttons to electrically adjust the
seats and become trapped.
Take care that:
R while moving the seats, your hands do not
get under the lever assembly of the seat
adjustmen tsystem.
R children in the vehicle do no tslide their
hands under the levers. G
WARNING
Make sure that nobody can become trapped
when adjusting the seats.
Observe the notes on airbags.
Secure children as recommended; see the
"Children in the vehicle" section. G
WARNING
Make sure that the back of your head is sup-
ported at eye level by the central area of the
head restraint .Ifyour head is not supported
correctly by the head restraint, you could suf-
fer a severe neck injury in the event of an
accident .Never drive if the head restraints are
not engaged and set correctly. G
WARNING
As eat belt can only offer its intended degree
of protection when the backrest is almost ver-
tical and the occupant is sitting upright. Avoid
seat positions that do not allow the seat belt
to be routed correctly. Adjust the backrest so
that it is as upright as possible. Never travel
with the backrest reclined too far backwards.
You could otherwise be seriously or even
fatally injured in the event of an accident or
sudden braking.
! To avoid damage to the seats and the seat
heating, observe the following information:
R do not spill any liquids on the seats. If
liquid is spilled on the seats, dry them as
soon as possible.
R if the seat covers are damp or wet, do not
switch on the seat heating. The seat
heating should also not be used to dry
the seats.
R clean the seat covers as recommended;
see the "Interior care" section.
R do not transport heavy loads on the
seats. Do not place sharp objects on the
seat cushions, e.g. knives, nails or tools.
The seats should only be occupied by
passengers, if possible.
R when the seat heating is in operation, do
not cover the seats with insulating mate-
rials, e.g. blankets, coats, bags, seat cov-
ers, child seats or booster seats.
! When you move the seats, make sure that
there are no objects in the footwell or
behind the seats. Otherwise, you could
damage the seats and the objects. Seats
105Seats, steering wheel and mirrors Z
Page 118 of 401
The exterior mirror on the front-passenger
side moves back to its original position:
R
as soon as you exceed a speed of
10 km/h
R about ten seconds after you have disen-
gaged reverse gear
R if you press button :for the exterior mir-
ror on the driver's side Memory function
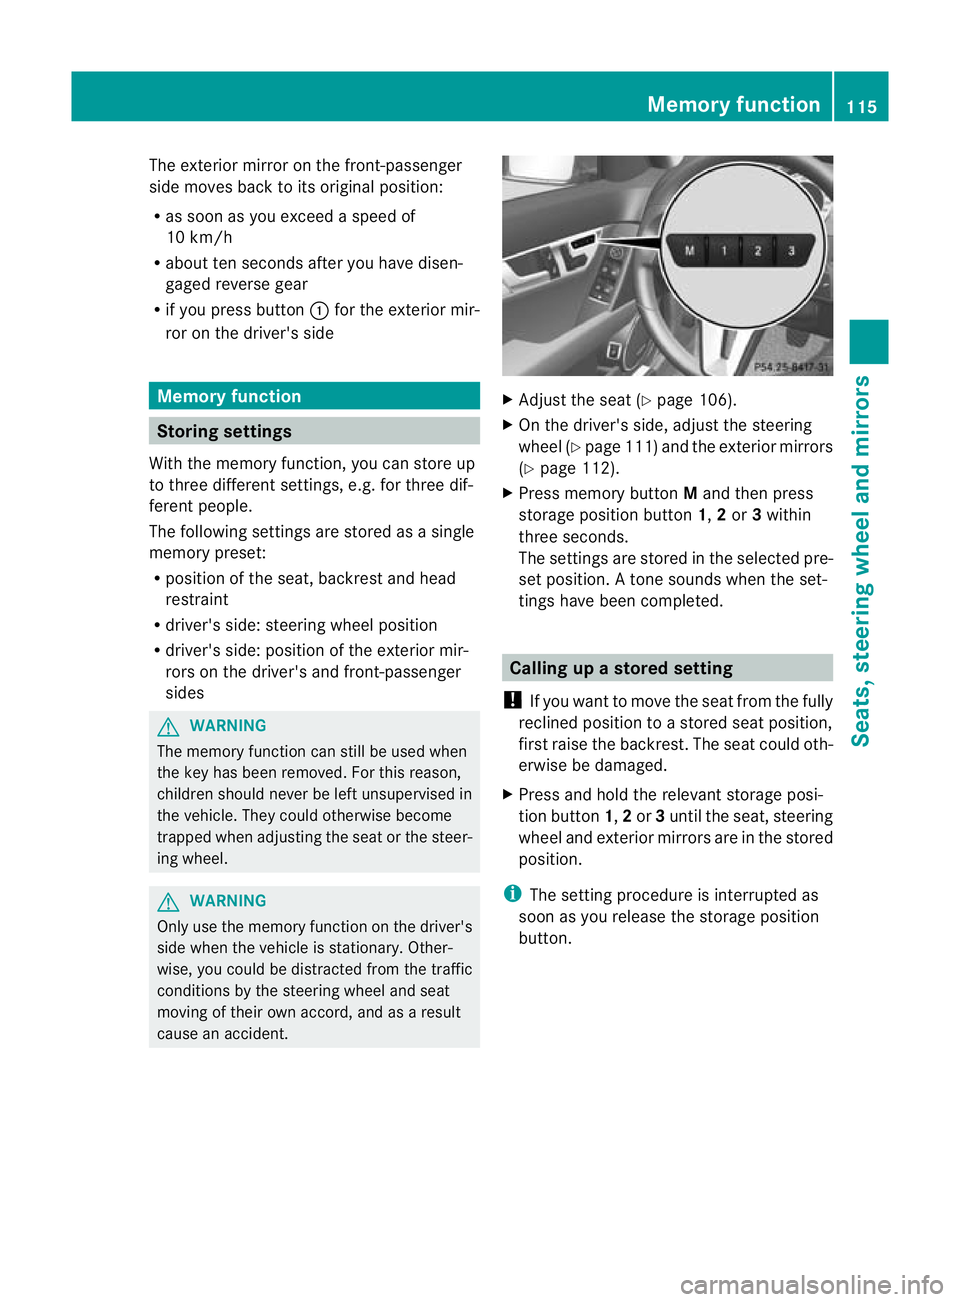
Storing settings
With the memory function, you can store up
to three different settings, e.g. for three dif-
ferent people.
The following settings are stored as a single
memory preset:
R position of the seat, backrest and head
restraint
R driver's side: steering wheel position
R driver's side: position of the exterior mir-
rors on the driver's and front-passenger
sides G
WARNING
The memory function can still be used when
the key has been removed. For this reason,
children should never be left unsupervised in
the vehicle. They could otherwise become
trapped when adjusting the seat or the steer-
ing wheel. G
WARNING
Only use the memory function on the driver's
side when the vehicle is stationary. Other-
wise, you could be distracted from the traffic
conditions by the steering wheel and seat
moving of their own accord, and as a result
cause an accident. X
Adjust the seat (Y page 106).
X On the driver's side, adjust the steering
wheel (Y page 111) and the exterior mirrors
(Y page 112).
X Press memory button Mand then press
storage position button 1,2or 3within
three seconds.
The settings are stored in the selected pre-
set position. Atone sounds when the set-
tings have been completed. Calling up
astore dsetting
! If you want to move the seat from the fully
reclined position to a stored seat position,
first raise the backrest. The seat could oth-
erwise be damaged.
X Press and hold the relevant storage posi-
tio nb utton 1,2or 3until the seat, steering
wheel and exterio rmirrors are in the stored
position.
i The setting procedure is interrupted as
soon as you release the storage position
button. Memory function
115Seats, steering wheel and mirrors Z
Page 247 of 401
G
WARNING
The steering wheel moves when the EASY-
ENTRY/EXIT feature is active. There is a risk
of occupants becoming trapped. Before acti-
vating the EASY-ENTRY/EXIT feature, make
sure that nobody can become trapped.
Do not leave children unsupervised in the
vehicle, even if they are secured in a child
restraint system. The children could open the
driver's door and thereby unintentionally acti-
vate the EASY-ENTRY/EXIT feature and
become trapped.
X Press the =or; button on the steer-
ing wheel to select the Settings menu.
X Press the :or9 button to select the
Convenience submenu.
X Press the abutton to confirm.
X Press the :or9 button to select the
Easy Entry/Exit function.
If the Easy Entry/Exit function is activa-
ted, the vehicle steering wheel is displayed
in red in the multifunction display.
X Press the abutton to save the setting.
Switching the belta djustmenton/off
For further information on belt adjustment,
see (Y page 55).
X Press the =or; button on the steer-
ing wheel to select the Settings menu.
X Press the :or9 button to select the
Convenience submenu.
X Press the abutton to confirm.
X Press the :or9 button to select the
Belt adjustment function.
When the Belt adjustment function is
activated, the vehicle seat belt is displayed
in red in the multifunction display.
X Press the abutton to save the setting.
Switching the fold in mirrors when lock-
ing function on/off
If you switch on the Auto. fold in function,
the exterior mirrors fold in when you lock the
vehicle. When you unlock the vehicle and then open the driver's or front-passenger door, the
exterior mirrors fold out again.
If you have switched the function on and you
fold the exterior mirror
sinusing the button
on the door (Y page 113), they will not fold
out automatically. The exterior mirrors can
then only be folded out using the button on
the door.
X Press the =or; button on the steer-
ing wheel to select the Settings menu.
X Press the :or9 button to select the
Convenience submenu.
X Press the abutton to confirm.
X Press the :or9 to select the
Auto. fold in function.
If the Auto. fold in function is activated,
the vehicle's exterior mirror is displayed in
red in the multifunction display.
X Press the abutton to save the setting.
Resetting to factory settings For safety reasons, not all functions are reset:
the Limit Speed (winter tyres) function
in permanent SPEEDTRONIC can only be set
in the Vehicle submenu. If you want to reset
the Daytime driving lights function in
the Light submenu, you must turn the key in
the ignition lock to position 1.
X Press the =or; button on the steer-
ing wheel to select the Settings menu.
X Press the :or9 button to select the
Factory setting submenu.
X Press the abutton to confirm.
The Reset all settings? message
appears.
X Press the :or9 button to select
No or
Yes .
X Press the abutton to confirm the selec-
tion.
If you select Yes , the multifunction display
shows a confirmation message. 244
Displays and operation (12-button multifunction steering wheel)On-board computer and displays
Page 256 of 401
Display messages Possible causes/consequences and
M Solutions
ý G
Risk of injury
If the symbol appears in the multifunction display, aseat belt
tongue has not been clipped into a rear seat belt buckle.
X If necessary, ask the occupants in the rear to fasten their seat
belts.
For further information on the status indicator for the rear seat
belts: (Y page 56). Child seat position
G
Risk of injury
Vehicles with automatic child seat recognition on the front-
passenger seat: the child seat is positioned incorrectly.
X Fit the child seat in the correct position. G
Risk of injury
Vehicles with automatic child seat recognition on the front-
passenger seat: the automatic child seat recognition sensor is
faulty.
X Visit a qualified specialist workshop. 6
Malfunction -Work‐
shop- G
Risk of injury
There is a malfunction in the SRS (Supplemental Restraint Sys-
tem). The 6warning lamp also lights up in the instrument clus-
ter.
X Visit a qualified specialist workshop. 6
FL malfunc. -Work‐
shop- or
FR mal‐ func. -Workshop- G
Risk of injury
SRS has malfunctioned at the front on the left or right. The 6
warning lamp also lights up in the instrument cluster.
X Visit a qualified specialist workshop. 6
RL malfunc. -work‐
shop- or
RR mal‐ func. -Workshop- G
Risk of injury
SRS has malfunctioned at the rear on the left or right. The 6
warning lamp also lights up in the instrument cluster.
X Visit a qualified specialist workshop. Display messages
253On-board computer and displays Z
Page 263 of 401
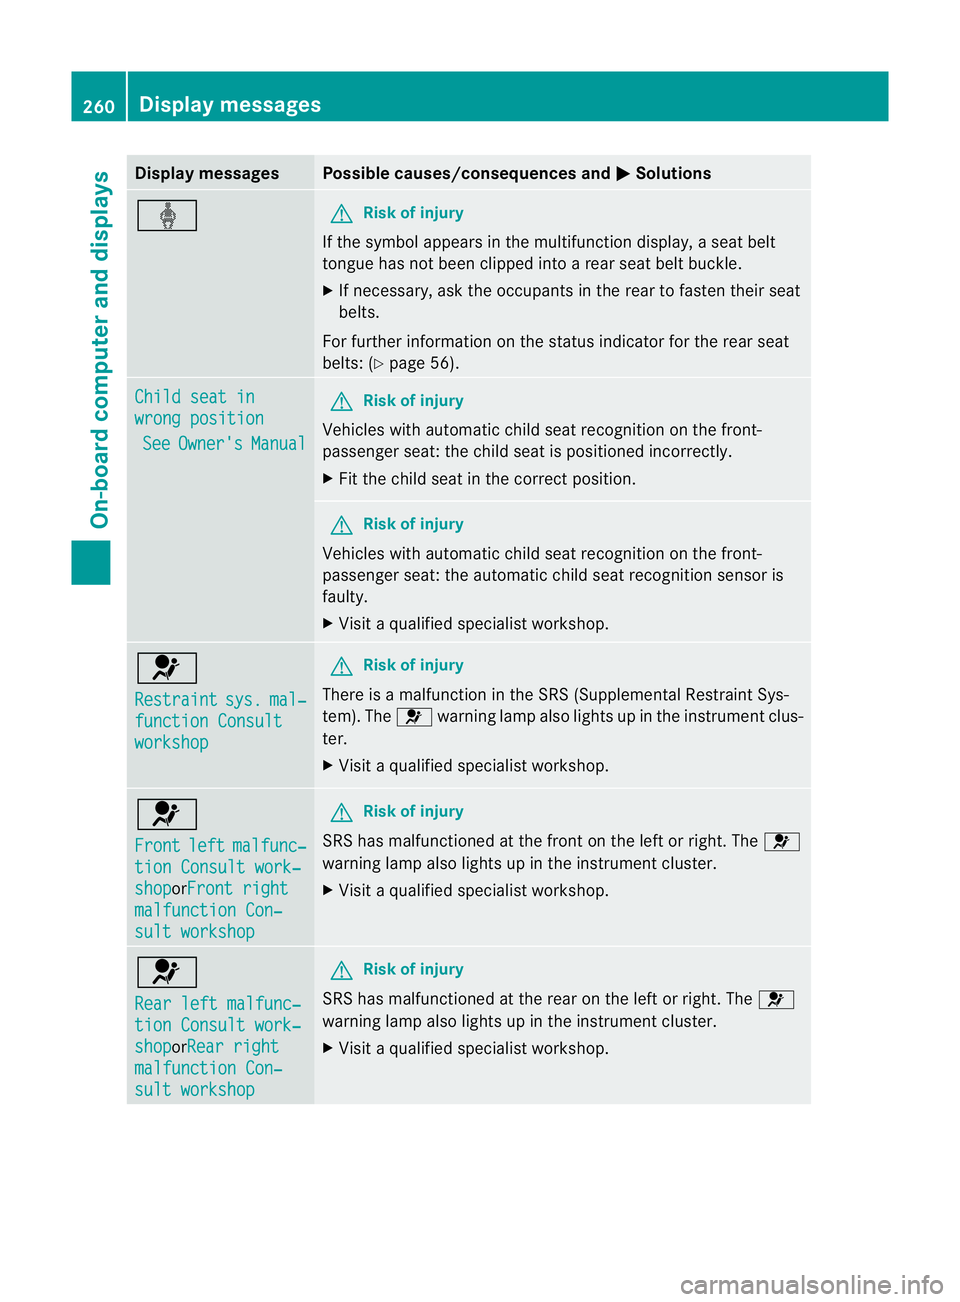
Display messages Possible causes/consequences and
M Solutions
ý G
Risk of injury
If the symbol appears in the multifunction display, aseat belt
tongue has not been clipped into a rear seat belt buckle.
X If necessary, ask the occupants in the rear to fasten their seat
belts.
For further information on the status indicator for the rear seat
belts: (Y page 56). Child seat in
wrong position
See Owner's Manual G
Risk of injury
Vehicles with automatic child seat recognition on the front-
passenger seat: the child seat is positioned incorrectly.
X Fit the child seat in the correct position. G
Risk of injury
Vehicles with automatic child seat recognition on the front-
passenger seat: the automatic child seat recognition sensor is
faulty.
X Visit a qualified specialist workshop. 6
Restraint
sys. mal‐
function Consult
workshop G
Risk of injury
There is a malfunction in the SRS (Supplemental Restraint Sys-
tem). The 6warning lamp also lights up in the instrument clus-
ter.
X Visit a qualified specialist workshop. 6
Front
left malfunc‐
tion Consult work‐
shop orFront right
malfunction Con‐
sult workshop G
Risk of injury
SRS has malfunctioned at the front on the left or right. The 6
warning lamp also lights up in the instrument cluster.
X Visit a qualified specialist workshop. 6
Rear left malfunc‐
tion Consult work‐
shop orRear right
malfunction Con‐
sult workshop G
Risk of injury
SRS has malfunctioned at the rear on the left or right. The 6
warning lamp also lights up in the instrument cluster.
X Visit a qualified specialist workshop. 260
Display messagesOn-board computer and displays
Page 308 of 401
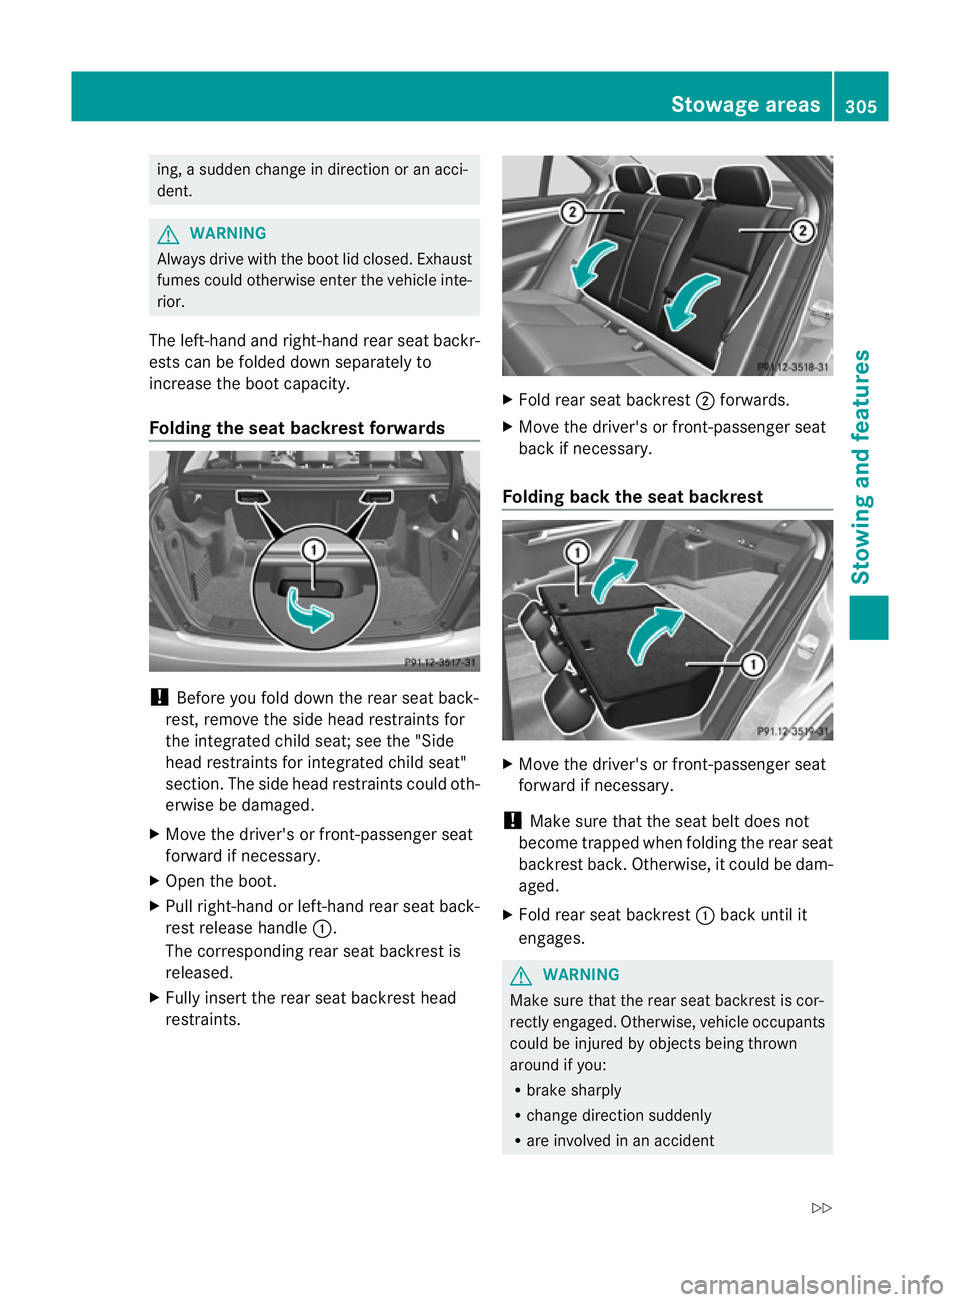
ing, a sudden change in direction or an acci-
dent. G
WARNING
Always drive with the boot lid closed. Exhaust
fumes could otherwise enter the vehicle inte-
rior.
The left-hand and right-hand rear seat backr-
ests can be folded down separately to
increase the boot capacity.
Folding the seat backrest forwards !
Before you fold down the rear seat back-
rest, remove the side head restraints for
the integrated child seat; see the "Side
head restraints for integrated child seat"
section. The side head restraints could oth-
erwise be damaged.
X Move the driver's or front-passenge rseat
forward if necessary.
X Open the boot.
X Pull right-hand or left-hand rear seat back-
rest release handle :.
The corresponding rear seat backrest is
released.
X Fully insert the rear seat backrest head
restraints. X
Fold rear seat backrest ;forwards.
X Move the driver's or front-passenger seat
back if necessary.
Folding back the seat backrest X
Move the driver's or front-passenger seat
forward if necessary.
! Make sure that the seat belt does not
become trapped when folding the rear seat
backrest back. Otherwise, it could be dam-
aged.
X Fold rear seat backrest :back until it
engages. G
WARNING
Make sure that the rear seat backrest is cor-
rectly engaged. Otherwise, vehicle occupants
could be injured by objects being thrown
around if you:
R brake sharply
R change direction suddenly
R are involved in an accident Stowage areas
305Stowing and features
Z