boot MERCEDES-BENZ C-CLASS SALOON 2011 Owners Manual
[x] Cancel search | Manufacturer: MERCEDES-BENZ, Model Year: 2011, Model line: C-CLASS SALOON, Model: MERCEDES-BENZ C-CLASS SALOON 2011Pages: 401, PDF Size: 9.74 MB
Page 9 of 401
Problem (display message)
............147
Remote control .............................. 144
Axle load, permissible (traile rtow-
ing) ...................................................... 389 B
Bag hook ............................................ 308
Ball coupling Folding in ....................................... 218
Folding out ..................................... 217
BAS (Brake Assist System) .................73
Basic settings see Settings
BAS PLUS (Brake Assist System
PLUS) .................................................... 73
Battery (key) Checking .......................................... 87
Important safety notes ....................86
Replacing ......................................... 87
Battery (vehicle)
Charging ........................................ 349
Connecting .................................... 348
Disconnecting ................................ 348
Display message (12-button mul-
tifunctio nsteering wheel) ..............271
Display message (4-button multi-
function steering wheel) ................269
Important safety notes ..................346
Jump starting ................................. 350
Location ......................................... 347
Removing/fitting ........................... 348
Belt
see Seat belt
Belt force limiters (activation) ...........47
Belt tensioner Activation ......................................... 47
Function .......................................... .56
Blind Spo tAssist
Activating/deactivating .................238
Display message (12-button mul-
tifunctio nsteering wheel) ..............276
Notes/function .............................. 205
Trailer towing ................................. 207
see Active Blind Spot Assist Bonnet
Closing .......................................... .323
Display message (12-button mul-
tifunctio nsteering wheel) ..............286
Display message (4-button multi-
function steering wheel) ................284
Opening ......................................... 322
Boot
Emergency release ..........................95
Important safety guidelines .............92
Locking separatel y........................... 95
Opening/closing (automatically
from outside) ................................... 93
Opening (automatically from
inside) .............................................. 94
Boot lid
Display message (12-button mul-
tifunctio nsteering wheel) ..............286
Display message (4-button multi-
function steering wheel) ................284
Opening/closing .............................. 92
Opening dimensions ......................386
Brake Assist System
see BAS (Brake Assist System)
Brake fluid
Display message (12-button mul-
tifunctio nsteering wheel) ..............258
Display message (4-button multi-
function steering wheel) ................252
Notes ............................................. 383
Brake lamp
Display message (12-button mul-
tifunctio nsteering wheel) ..............265
Display message (4-button multi-
function steering wheel) ................262
Brake lamps
Adaptive .......................................... .74
Changin gbulbs .............................. 128
Brakes
ABS .................................................. 72
BAS .................................................. 73
BAS PLUS ........................................ 73
Brake fluid (notes) .........................383
Display message (12-button mul-
tifunctio nsteering wheel) ..............255
Display message (4-button multi-
function steering wheel) ................250
Driving tips .................................... 1756
Index
Page 14 of 401
Symmetrical dipped beam
.............118
Towing atrailer .............................. 215
Tyr egrip ........................................ 177
Wet road surface ........................... 176
Dynamic handling package with
sports mode ....................................... 192 E
EASY-ENTRY feature Activating/deactivating (12-but-
ton multifunctio nsteering wheel) ..243
Function/notes ............................. 111
EASY-EXIT feature
Activating/deactivating (12-but-
ton multifunctio nsteering wheel) ..243
Crash-responsive ........................... 112
Function/notes ............................. 111
EASY-PACK load-securing kit ...........310
EBD (electronic brake force distri-
bution)
Function/notes ................................ 78
EBD (Electronic Brake force Distri-
bution)
Display message (12 button mul-
tifunctio nsteering wheel) ..............257
EBD (Electronic Brake-force Distri-
bution)
Display message (4-button multi-
function steering wheel) ................251
ECO start/stop function
Deactivating/activating .................158
General information .......................156
Electrical fuses
see Fuses
Electronic Brake force Distribution
see EBD (Electronic Brake force
Distribution)
Electronic Stability Program
see ESP ®
(Electroni cStability Program)
Electronic Traction System
see ETS/4ETS (Electronic Trac-
tionS ystem)
Emergency key
Unlocking the driver's door ..............91
Emergency key element
Function/notes ................................ 86
Locking vehicle ................................ 91Emergency release
Driver's door .................................... 91
Fuel filler fla p................................. 172
Emergency spare wheel
Notes/data .................................... 369
Storage location ............................ 336
Emergency unlocking
Boot ................................................. 95
Tailgate ............................................ 95
Vehicle ............................................. 91
Engine
ECO start/stop function ................156
Emergency starting ........................354
Engine number ............................... 379
Running irregularl y......................... 159
Starting problems ..........................159
Starting the engine with the key ....155
Starting with KEYLESS GO .............155
Stopping ........................................ 174
Warning lamp (engine diagnos-
tics) ............................................... 298
Engine electronics
Notes ............................................. 377
Problem (fault) ............................... 159
Engine oil
Additives ........................................ 382
Checking the oil level ..................... 323
Checking the oil level using the
dipstick .......................................... 323
Display message (12-button mul-
tifunctio nsteering wheel) ..............271
Display message (4-button multi-
function steering wheel) ................269
Filling capacity ............................... 382
Notes about oil grades ................... 381
Notes on oil level/consumption ....323
Temperature (12-button multi-
function steering wheel) ................245
Topping up ..................................... 324
Viscosity ........................................ 382
Environmental protection
Note ................................................ .26
Returning an end-of-life vehicle .......26
ESP ®
(Electronic Stability Pro-
gram) AMG menu (on-board computer) ...245
Deactivating/activating (AMG
vehicles) .......................................... 76 Index
11
Page 16 of 401
Fuel reserve
Display message (12-button mul-
tifunctio nsteering wheel) ..............271
Display message (4-button multi-
function steering wheel) ................269
see Fuel
Fuel tank
Capacity ........................................ 380
Problem (malfunction) ...................173
Fuse allocation chart (vehicle tool
kit) ...................................................... 335
Fuses Allocation chart ............................. 355
Before changing ............................. 355
Dashboard fuse box .......................355
Fuse box in the boot ......................356
Fuse box in the engine compart-
ment .............................................. 355
Fuse box in the luggage compart-
ment .............................................. 356
Important safety notes ..................354 G
Gear indicator (12-button multi-
function steering wheel) ..................245
Gear or selector lever (cleaning
instructions) ...................................... 332
Gearshift program SETUP (on-board computer) ..........245
Genuine Mercedes-Benz parts .........376
Glove compartment ..........................303 H
Handbrake see Parking brake
Hazard warning lamps ......................121
Headlamp Cleaning system (function) ............120
Headlamps
Misting up ...................................... 123
Topping up the cleaning system ....325
see Automatic headlamp mode
Head restraints
Adjusting ....................................... 107
Adjusting (electrically). ..................107
Adjusting (manually). .....................107Adjusting (rear)
.............................. 107
Fitting/removing (rear) ..................108
Luxury ............................................ 107
see NECK-PR Ohead restraints
see NECK-PRO head restraints/
NECK-PRO luxury head restraints
Heating
see Climate control
High-pressure cleaners ....................328
Hill start assist .................................. 156
HOLD function Display message (12-button mul-
tifunctio nsteering wheel) ..............273
Display message (4-button multi-
function steering wheel) ................272
Function/notes ............................. 193
Hook ................................................... 308 I
ICS padded play table .........................65
Ignition lock see Key positions
Immobiliser .......................................... 80
Indicator and warning lamps Coolant .......................................... 298
DISTRONI CPLUS ........................... 300
Engine diagnostics .........................298
Fuel tank ........................................ 298
Overview (12-button multifunc-
tion steering wheel) .........................39
Overview (4-button multifunction
steering wheel) ................................ 36
SPORT handling mode ...................296
Indicator lamps
see Warning and indicator lamps
Indicators
see Turn signals
Insectp rotection on the radiator ....323
Instrument cluster (12-button mul-
tifunction steering wheel)
Indicator and warning lamps ............39
Overview .......................................... 37
Settings ......................................... 239
Instrument cluster (4-button mul-
tifunction steering wheel) Indicator and warning lamps ............36
Overview .......................................... 34 Index
13
Page 24 of 401
Speed, controlling
see Cruise control
Speed Limit Assist
Activating/deactivating the warn-
ing function .................................... 236
Displaying ...................................... 236
Display message (12-button mul-
tifunctio nsteering wheel) ..............273
Display message in the multifunc-
tion displa y.................................... 205
Important safety notes ..................204
Speedometer
Activating/deactivating the addi-
tional speedometer ........................239
Digita l............................................ 231
In the instrument cluster (12-but-
ton multifunctio nsteering wheel) ....37
In the instrument cluster (4-but-
ton multifunctio nsteering wheel) ....34
Segments ...................................... 227
Selecting the unit of measure-
ment .............................................. 239
see Instrument cluster
SPEEDTRONIC
Deactivating variabl e..................... 182
Display message (12-button mul-
tifunctio nsteering wheel) ..............278
Display message (4-button multi-
function steering wheel) ................272
Function/notes ............................. 180
Important safety notes ..................180
LIM indicator lamp .........................181
Permanent ..................................... 183
Selecting ........................................ 181
Storing the current spee d.............. 182
Variabl e......................................... 181
SPORT handling mode
Activating/deactivating (AMG
vehicles) .......................................... 76
Warning lamp ................................. 296
SRS (Supplemental Restraint Sys-
tem)
Display message (12-button mul-
tifunctio nsteering wheel) ..............260
Display message (4-button multi-
function steering wheel) ................253
Introduction ..................................... 47Warning lamp ................................. 297
Warning lamp (function) ................... 47
Starting (engine) ................................ 154
Station see Radio
Steering
Display message (12-button mul-
tifunctio nsteering wheel) ..............287
Display message (4-button multi-
function steering wheel) ................285
Steering wheel
Adjusting (electrically). ..................111
Adjusting (manually). .....................111
Buttons (12-button multifunction
steering wheel) .............................. 227
Buttons (4-button multifunction
steering wheel) .............................. 223
Cleaning ......................................... 332
Gearshift paddles ........................... 164
Important safety notes ..................110
Storing settings (memory func-
tion) ............................................... 115
Steering wheel gearshift paddles ....164
Stopwatch (RACETIMER) ................... 245
Stowage compartment Spectacles compartment ...............303
Stowage compartments
Armrest (under) ............................. 303
Centre console .............................. 303
Cuph older..................................... 314
Glove compartment .......................303
Important safety information .........302
Luggage net ................................... 304
Rea r............................................... 304
Under driver's seat/front-
passenger sea t.............................. 304
Stowage well beneath the boot
floor .................................................... 312
Summer opening see Convenience opening feature
Summer tyres .................................... 359
Sun blind Rea rside windows ......................... 315
Sun visor ............................................ 315
Supplement Restraint System see SRS (Supplemental Restraint
System) Index
21
Page 47 of 401
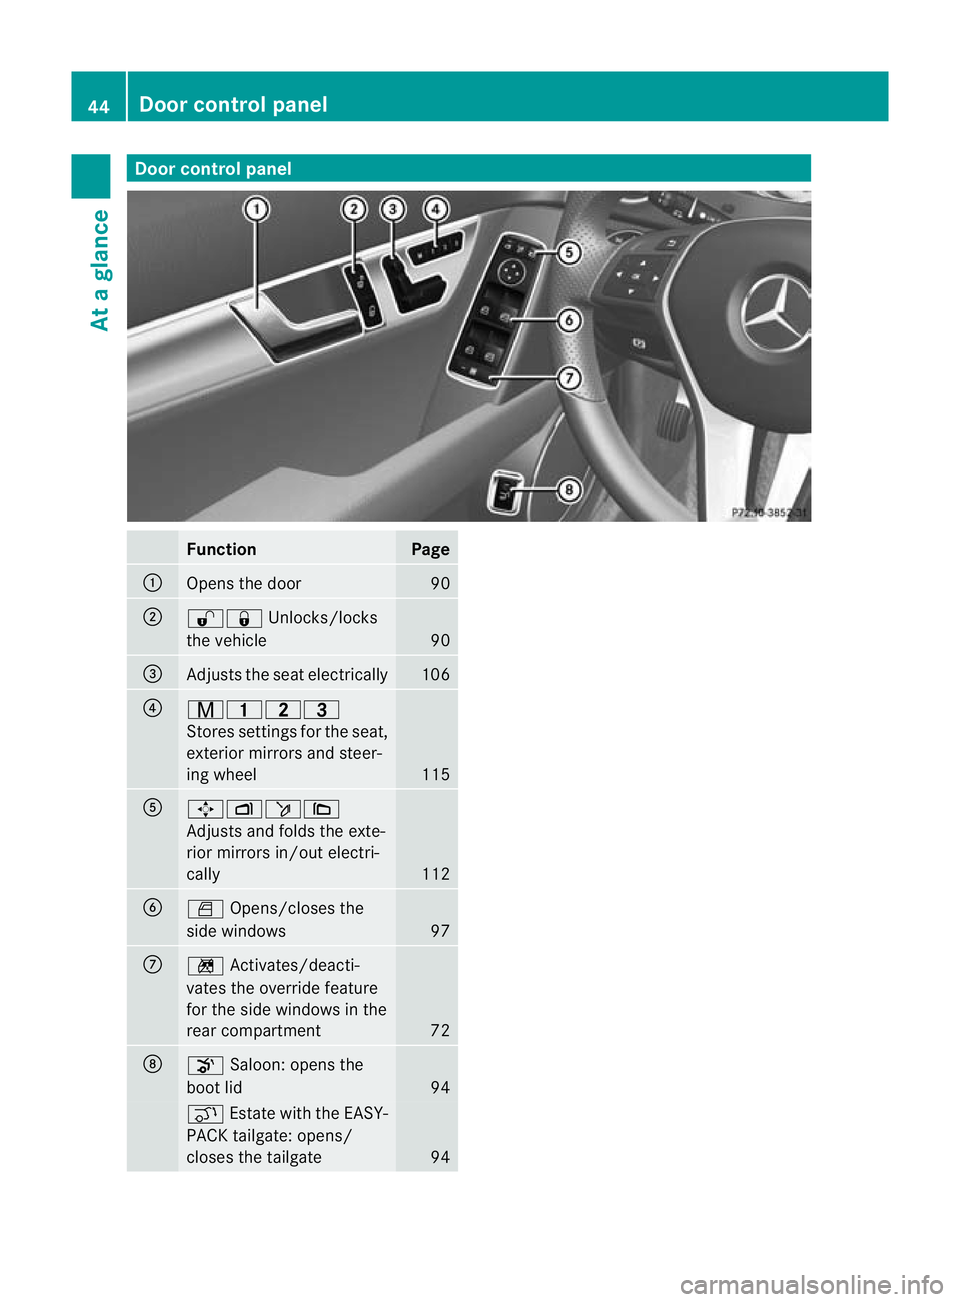
Door control panel
Function Page
:
Opens the door 90
;
%&
Unlocks/locks
the vehicle 90
=
Adjusts the seat electrically 106
?
r45=
Stores settings fo
rthe seat,
exterior mirrors and steer-
ing wheel 115
A
7Zö\
Adjusts and folds the exte-
rior mirrors in/out electri-
cally
112
B
W
Opens/closes the
side windows 97
C
n
Activates/deacti-
vates the override feature
for the side windows in the
rear compartment 72
D
o
Saloon: opens the
boot lid 94
q
Estate with the EASY-
PACK tailgate: opens/
closes the tailgate 9444
Doorc
ontrol panelAt a glance
Page 70 of 401
Only attach the side head restraint to the
intended anchor points on the rear head
restraint.
For safety reasons, Mercedes-Benz recom-
mends that you only use side head restraints
which have been approved by Mercedes-Benz
for your vehicle.
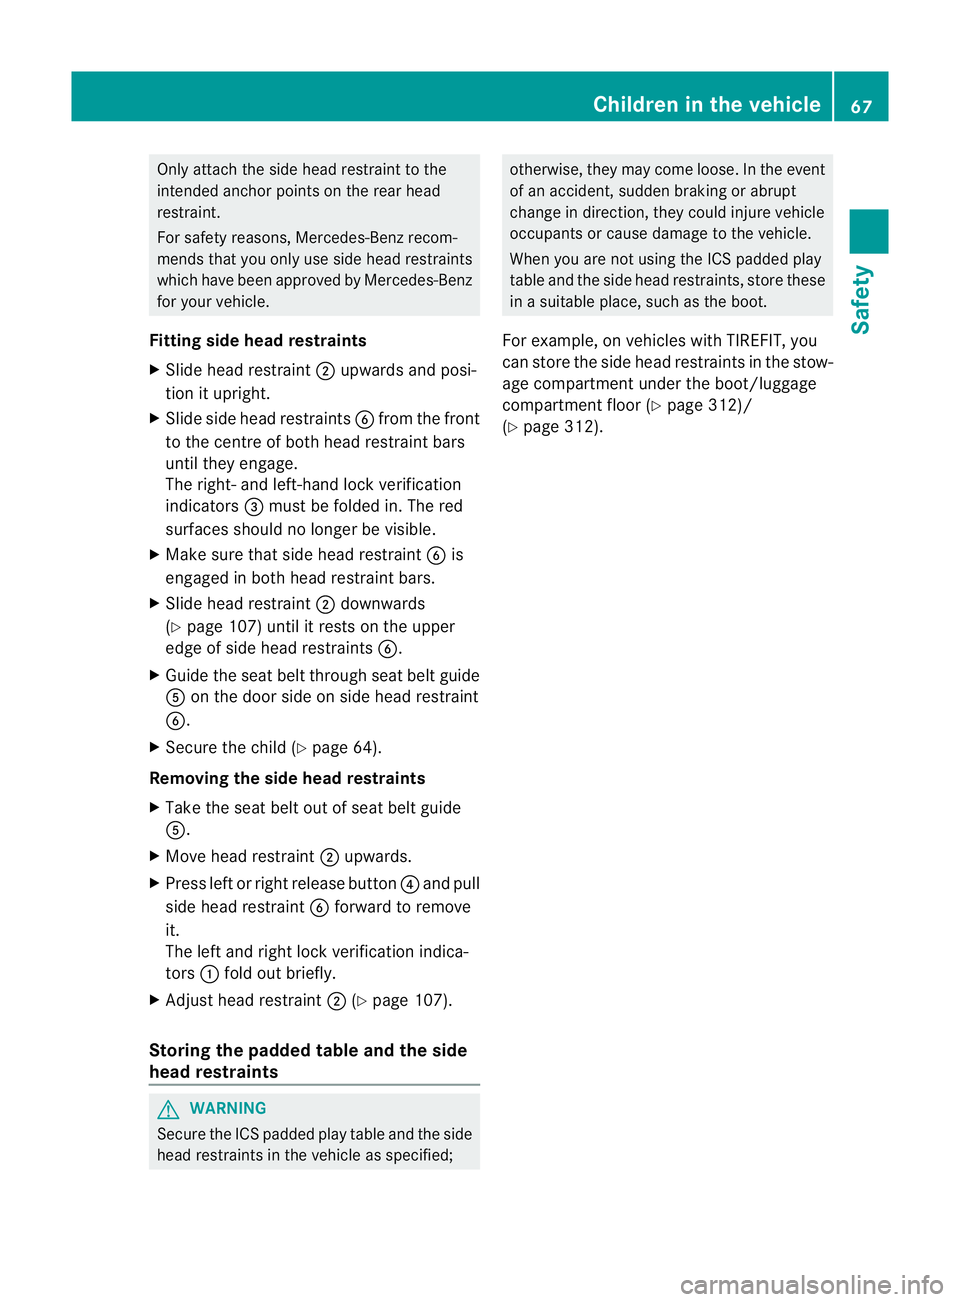
Fitting side head restraints
X Slide head restraint ;upwards and posi-
tion it upright.
X Slide side head restraints Bfrom the front
to the centre of both head restraint bars
until they engage.
The right- and left-hand lock verification
indicators =must be folded in. The red
surfaces should no longer be visible.
X Make sure that side head restraint Bis
engaged in both head restraint bars.
X Slide head restraint ;downwards
(Y page 107) until it rests on the upper
edge of side head restraints B.
X Guide the seat belt through seat belt guide
A on the door side on side head restraint
B.
X Secure the child (Y page 64).
Removing the side head restraints
X Take the seat belt out of seat belt guide
A.
X Move head restraint ;upwards.
X Press left or right release button ?and pull
side head restraint Bforward to remove
it.
The left and right lock verification indica-
tors :fold out briefly.
X Adjust head restraint ;(Ypage 107).
Storing the padded table and the side
head restraints G
WARNING
Secure the ICS padded play table and the side
head restraints in the vehicle as specified; otherwise, they may come loose. In the event
of an accident, sudden braking or abrupt
change in direction, they could injure vehicle
occupants or cause damage to the vehicle.
When you are not using the ICS padded play
table and the side head restraints, store these
in a suitable place, such as the boot.
For example, on vehicles with TIREFIT, you
can store the side head restraints in the stow-
age compartment under the boot/luggage
compartment floor (Y page 312)/
(Y page 312). Children in the vehicle
67Safety Z
Page 83 of 401
As a result, PRE-SAFE
®
Brake may not give
warnings or intervene in critical situations.
There is a ris kofanaccident. Always pay
careful attention to the traffi csituation and be
ready to brake.
In order to maintain the appropriate distance
to the vehicle in front and thus prevent a col-
lision, you must apply the brakes yourself.
X To activate/deactivate: activate or deac-
tivate PRE-SAFE ®
Brake in the on-board
computer (Y page 237).
The Ä symbol appears in the multifunc-
tion display as long as the HOL Dfunction
is not activated (Y page 193).
On vehicles with parking guidance, the
Ä symbol is displayed when Pis
engaged or you are driving faste rthan
35 km/h.
Vehicles with COMAND and navigation sys-
tem: the radar sensor system is switched off
automatically in the vicinity of radio telescope
facilities (Y page 389).
Vehicles without COMAND and a navigation
system and vehicles for Australia: the radar
sensor system and on-board computer must
be switched off in the vicinity of radio tele-
scope facilities (Y page 242).
For PRE-SAFE ®
Brake to assist you when driv-
ing, the radar sensor system must be
switched on (Y page 242) and be opera-
tional.
Following damage to the front end of the vehi-
cle, have the configuration and operation of
the radar sensors checked at a qualified spe-
cialist workshop. This also applies to colli-
sions at slow speeds where there is no visible
damage to the front of the vehicle. Anti-theft systems
Immobiliser
The immobiliser prevents your vehicle from
being started without the correct key. X
To activate with the key: remove the key
from the ignition lock.
X To activate with KEYLESS-GO: switch the
ignition off and open the driver's door.
X To deactivate: switch on the ignition.
i The immobiliser is always deactivated
when you start the engine. ATA (Anti-Theft Alarm system)
Av isual and audible alarm is triggered if the
alarm system is primed and you open:
R a door
R the vehicle with the emergency key ele-
ment
R the boot lid/tailgate
R the bonnet
The alarm is not switched off, even if you
close the open door that has triggered it, for
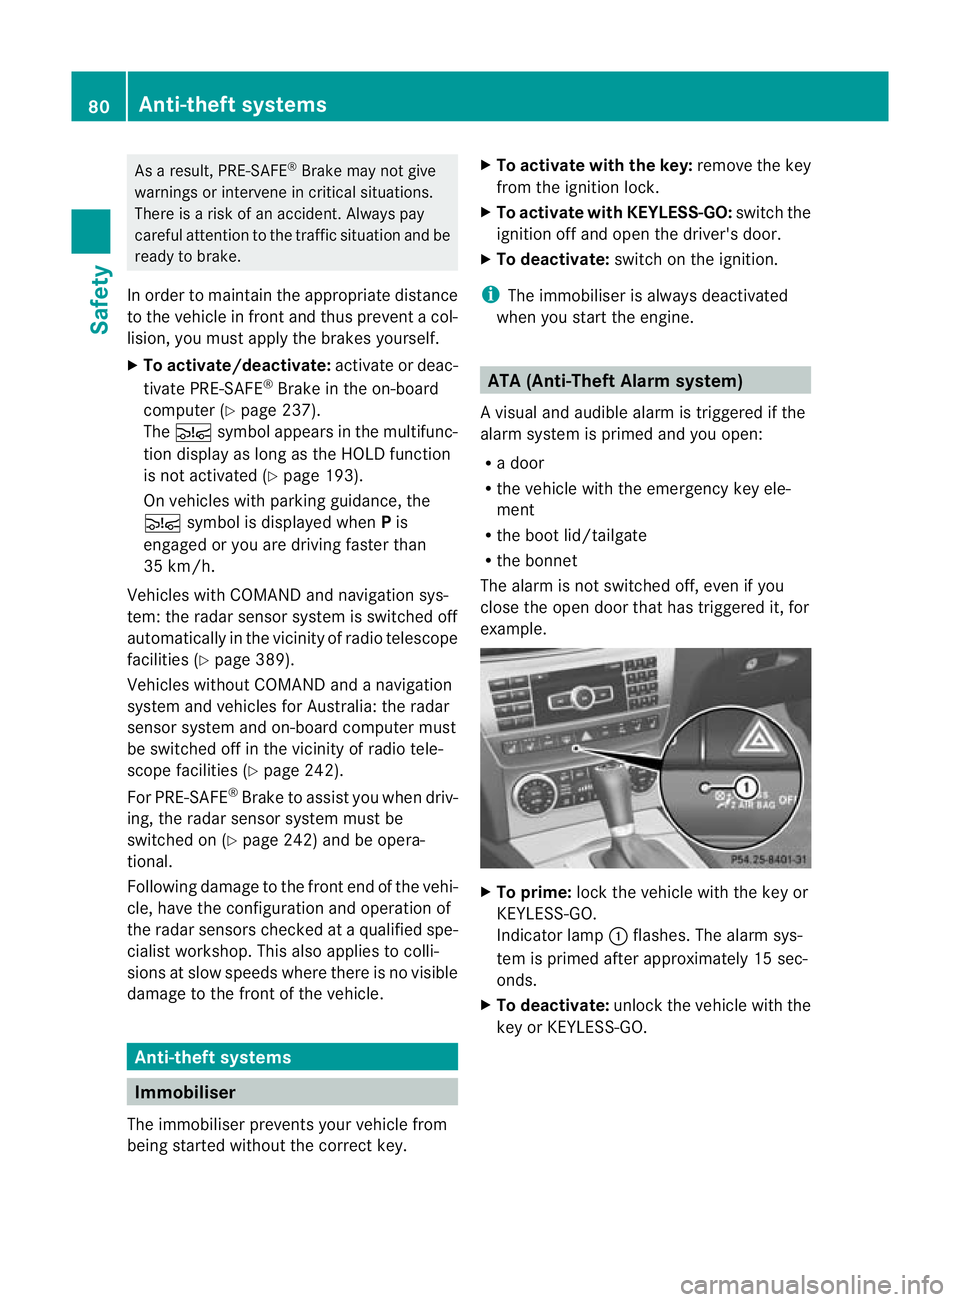
example. X
To prime: lock the vehicle with the key or
KEYLESS-GO.
Indicator lamp :flashes .The alarm sys-
tem is primed after approximately 15 sec-
onds.
X To deactivate: unlock the vehicle with the
key or KEYLESS-GO. 80
Anti-theft systemsSafety
Page 86 of 401
Useful information
..............................84
Key ....................................................... 84
Doors .................................................... 89
Boot/luggage compartment ..............92
Side windows ...................................... 96
Sliding sunroof .................................... 99 83Opening and closing
Page 87 of 401
Useful information
i This Owner's Manual describes all models
and all standard and optional equipment
available to your vehicle at the time of pub-
lication of the Owner's Manual. Country-
specific deviations are possible. Please
note that your vehicle may not be equipped
with all features described. This also
applies to safety-relevan tsystems and
functions.
i Please read the information on qualified
specialist workshops (Y page 28).Key
Key functions
Locking an dunlocking centrally The key centrally locks/unlocks:
R
the doors
R the boot lid/tailgate
R the fuel filler flap G
WARNING
Only for the United Kingdom: if the vehicle
has been locked with the key, the double lock
function is activated as standard. It is then not
possible to open the doors from inside the
vehicle.
Therefore, do not leave any people behind in
the vehicle, particularly children, elderly peo-
ple or people in need of special assistance if
the vehicle has been locked with the key. As
a result, they may not be able to free them-
selves in the event of an emergency. As a
result, they could be seriously or even fatally
injured by prolonged exposure to extremely
high or low temperatures, for example. In this
case, rescuing people from outside the vehi-
cle is difficult.
Deactivate the interior motion sensor before
you lock the vehicle with the key. The doors
can then be opened from the inside after the vehicle has been locked from the outside with
the key. G
WARNING
If children are left unsupervised in the vehicle,
they could:
R open a door from inside the vehicle at any
time, even if it has been locked
R start the vehicle using akey which has been
left in the vehicle
R release the parking brake
They could thereby endanger themselves and
others. Never leave children unsupervised in
the vehicle. Always take the key with you
when leaving the vehicle, even if you are only
leaving it for a short time. G
WARNING
If a key ring is too heavy or too large, the
weight acting on the key could cause it to turn
in the ignition lock or catch on the steering
wheel. This could cause the engine to be
switched off suddenly. You may lose control
of the vehicle and cause an accident. Do not
attach any heavy or large key rings to the key
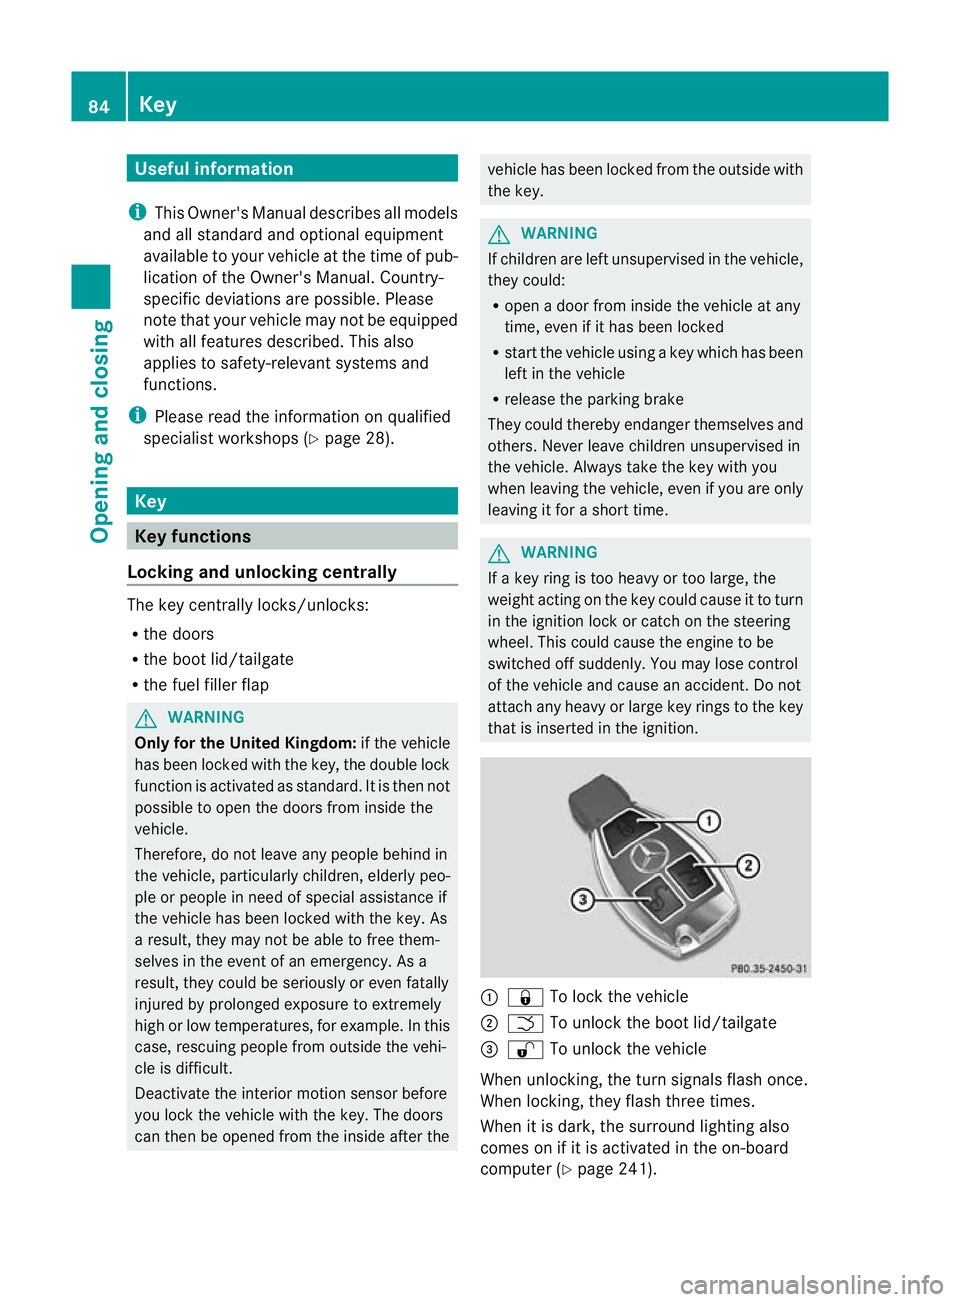
that is inserted in the ignition. :
& To lock the vehicle
; F To unlock the boot lid/tailgate
= % To unlock the vehicle
When unlocking, the turn signals flash once.
When locking, they flash three times.
When it is dark, the surround lighting also
comes on if it is activated in the on-board
computer (Y page 241).84
KeyOpening and closing
Page 88 of 401
If you activate the acoustic locking confirma-
tion function, you will hear the following,
depending on the date of production of the
vehicle:
R an acoustic signal when locking
or
R one acoustic signal when unlocking and
three when locking.
The audible signal can be activated and deac-
tivated using the on-board computer
(Y page 242).
X To unlockc entrally:press the%but-
ton.
If you do not open th evehicle within approx-
imately 40 seconds of unlocking:
R the vehicle is locked again.
R the anti-thef tsystem is primed again.
X To lock centrally: press the&button. KEYLESS-GO
You can start, loc korunlock the vehicle using
KEYLESS-GO .To do this, you only need carry
the key with you. When you touch the surface
of the sensors on the vehicle's outside door
handles, KEYLESS-GO establishes a radio
connection between the vehicle and the key.
When the engine is started and whilst you are
driving, KEYLESS-GO also checks whether a
valid key is in the vehicle by periodically
establishing radio contact.
When locking or unlockin gwith KEYLESS-GO,
the distance between the key and the door
handle you wish to lock or unloc kmust not
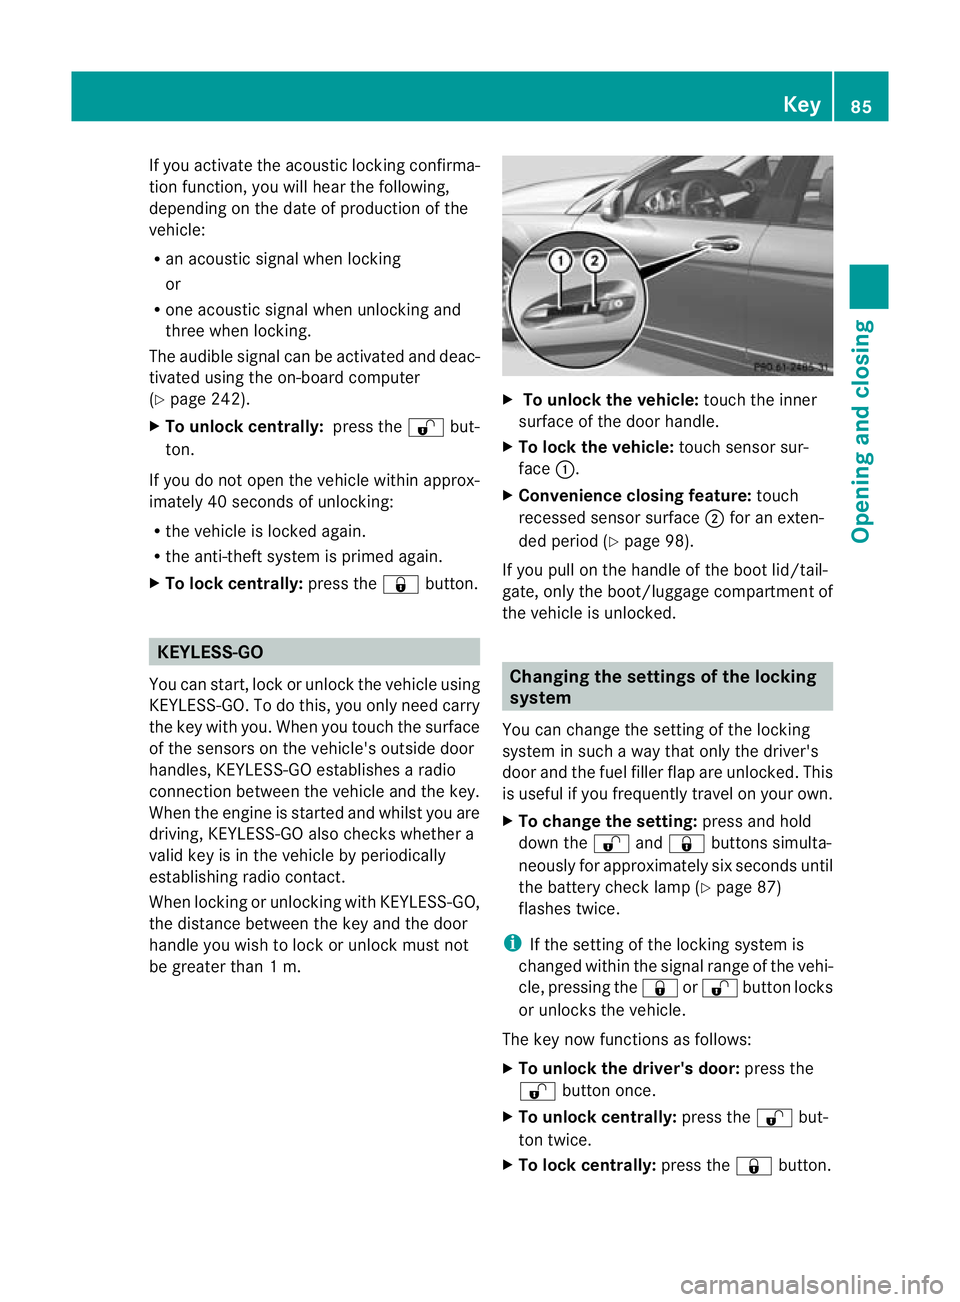
be greater than 1 m. X
To unlock the vehicle: touch the inner
surface of the door handle.
X To lock the vehicle: touch sensor sur-
face :.
X Convenience closing feature: touch
recessed sensor surface ;for an exten-
ded period (Y page 98).
If you pull on the handle of the boot lid/tail-
gate, only the boot/luggage compartmen tof
the vehicle is unlocked. Changing the settings of the locking
system
You can change the setting of the locking
syste mins uch a way that only the driver's
door and the fuel filler flap are unlocked. This
is useful if you frequently travel on your own.
X To change the setting: press and hold
down the %and& buttons simulta-
neously for approximately six seconds until
the battery check lamp (Y page 87)
flashes twice.
i If the setting of the locking system is
changed within the signal range of the vehi-
cle, pressing the &or% buttonlocks
or unlocks the vehicle.
The key now functions as follows:
X To unlock the driver's door: press the
% button once.
X To unlock centrally: press the%but-
ton twice.
X To lock centrally: press the&button. Key
85Opening and closing Z