MERCEDES-BENZ C-CLASS SALOON 2014 Owners Manual
Manufacturer: MERCEDES-BENZ, Model Year: 2014, Model line: C-CLASS SALOON, Model: MERCEDES-BENZ C-CLASS SALOON 2014Pages: 489, PDF Size: 14.88 MB
Page 201 of 489
Drive program S+ (Sport Plus)
Drive program
S+is characterised by the fol-
lowing:
R the vehicle exhibits extremely sporty driv-
ing characteristics
R the vehicle pulls away in first gear
R the automatic transmission shifting up
later
R as a result of the later automatic transmis-
sion shift points, the fuel consumption pos-sibly being higher
R the suspension exhibits particularly stiff
springing and damping settings (vehicles
with AIRMATIC)
R the ECO start/stop function is not available
Drive program S (Sport) Drive program
Sis characterised by the fol-
lowing:
R the vehicle exhibits sporty driving charac-
teristics
R the vehicle pulls away in first gear
R the automatic transmission shifting up
later
R as a result of the later automatic transmis-
sion shift points, the fuel consumption pos-sibly being higher
R the suspension exhibits stiff springing and
damping settings (vehicles with AIRMATIC)
Drive program C (Comfort) Drive program
Cis characterised by the fol-
lowing:
R the vehicle delivers comfortable, economi-
cal driving characteristics.
R the vehicle pulling away more gently in
forward and reverse gears unless the accel- erator pedal is depressed fully.
R increased sensitivity. This improves driving
stability on slippery road surfaces, for
example.
R optimal fuel consumption resulting from
the automatic transmission shifting up sooner. The vehicle is driven in the low
engine speed range and the wheels are less
likely to spin.
Drive program E (Eco) Drive program
Eis characterised by the fol-
lowing:
R the vehicle exhibits comfortable, economi-
cal driving characteristics.
R the vehicle pulling away more gently in
forward and reverse gears unless the accel-
erator pedal is depressed fully.
R increased sensitivity. This improves driving
stability on slippery road surfaces, for
example.
R optimal fuel consumption resulting from
the automatic transmission shifting up
sooner. The vehicle is driven in the low
engine speed range and the wheels are less likely to spin.
R during deceleration, the engine is discon-
nected from the drive train. The vehicle
uses kinetic energy and consumes less fuel
(overrun mode).
R the performance of the air-conditioning and
heating systems are reduced. Manual gearshifting
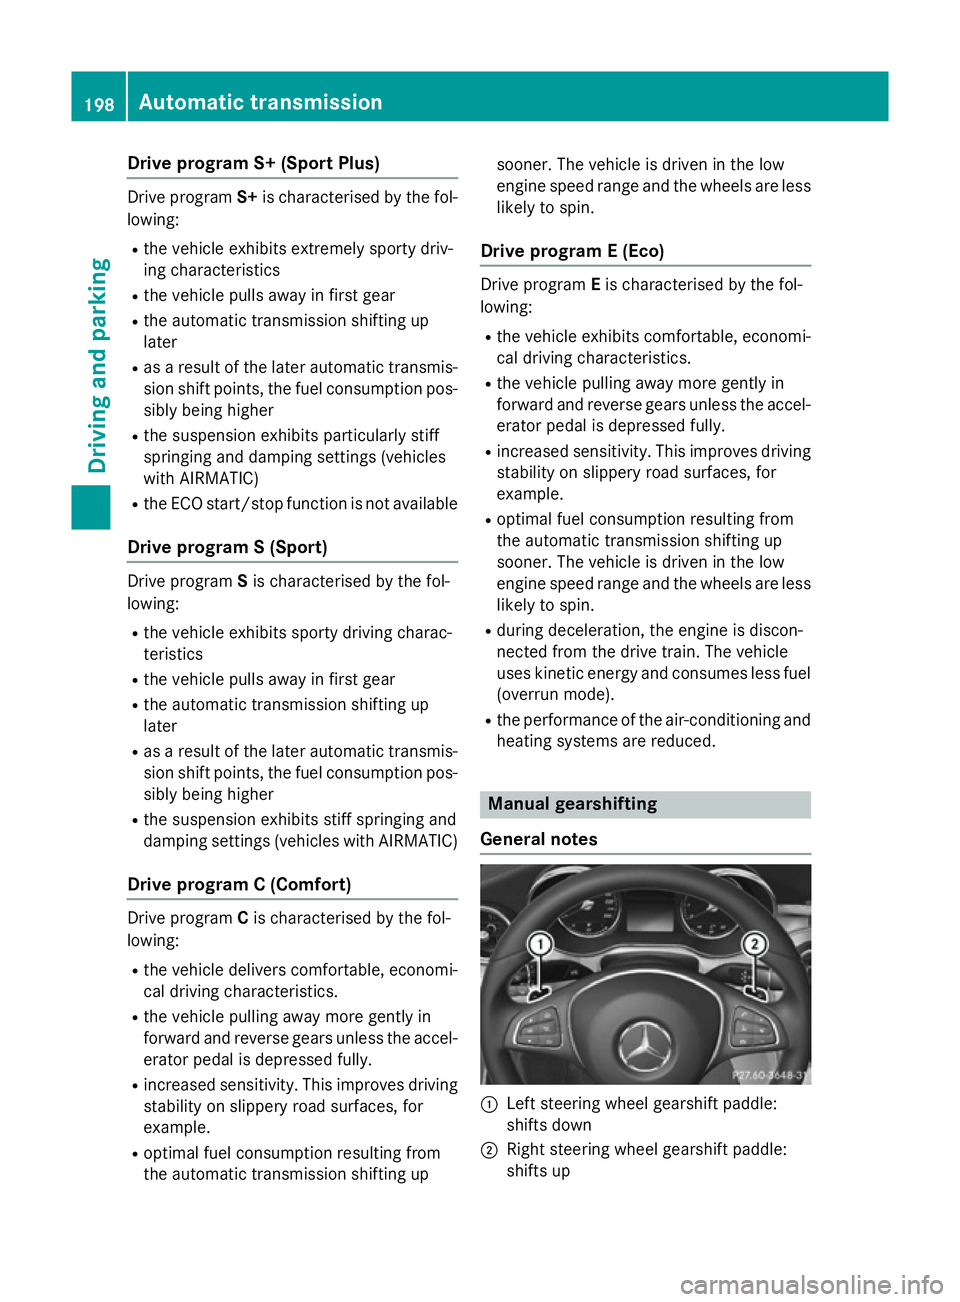
General notes :
Left steering wheel gearshift paddle:
shifts down
; Right steering wheel gearshift paddle:
shifts up 198
Automatic transmissionDriving and pa
rking
Page 202 of 489
Using the steering wheel gearshift paddles,
you can temporarily change gear yourself.
The transmission must be in position D.
Activating X
Shift the transmission to position D.
X Pull the left or right steering wheel gearshift
paddle (Y page 198).
Manual gearshifting is activated tempora-
rily. The selected gear appears in the mul-
tifunction display.
Further information on activating manual
gearshifting in hybrid vehicles (Y page 278).
Shifting gears Pulling on the left or right gear shift paddle
allows you to shift gears yourself for a limited
time. Depending on which gearshift paddle is pulled, the automatic transmission immedi-
ately shifts into the next gear up or down, if
permitted.
X To shift up: pull the right-hand steering
wheel gearshift paddle (Y page 198).
The automatic transmission shifts up to the
next gear.
If the maximum engine speed on the cur-
rently engaged gear is reached and you
continue to accelerate, the automatic
transmission automatically shifts up in
order to prevent engine damage.
X To shift down: pull on the left-hand steer-
ing wheel gearshift paddle (Y page 198).
The automatic transmission shifts down to
the next gear.
If the engine exceeds the maximum engine speed when shifting down, the automatic
transmission protects against engine dam- age by not shifting down.
Automatic downshifting occurs when
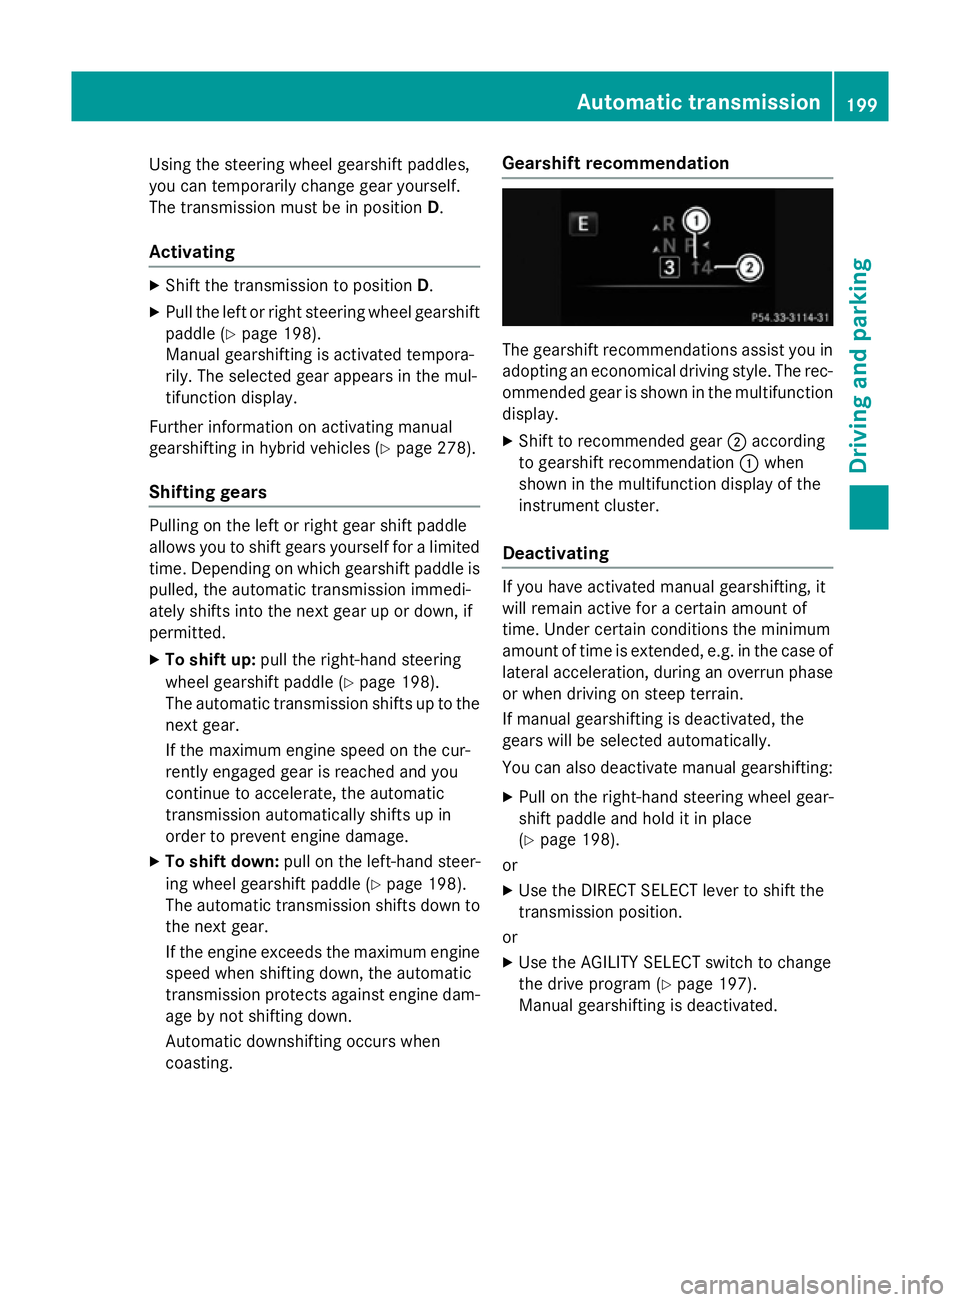
coasting. Gearshift recommendation The gearshift recommendations assist you in
adopting an economical driving style. The rec- ommended gear is shown in the multifunction
display.
X Shift to recommended gear ;according
to gearshift recommendation :when
shown in the multifunction display of the
instrument cluster.
Deactivating If you have activated manual gearshifting, it
will remain active for a certain amount of
time. Under certain conditions the minimum
amount of time is extended, e.g. in the case of
lateral acceleration, during an overrun phase
or when driving on steep terrain.
If manual gearshifting is deactivated, the
gears will be selected automatically.
You can also deactivate manual gearshifting:
X Pull on the right-hand steering wheel gear-
shift paddle and hold it in place
(Y page 198).
or
X Use the DIRECT SELECT lever to shift the
transmission position.
or X Use the AGILITY SELECT switch to change
the drive program (Y page 197).
Manual gearshifting is deactivated. Automatic transmission
199Driving and parking Z
Page 203 of 489
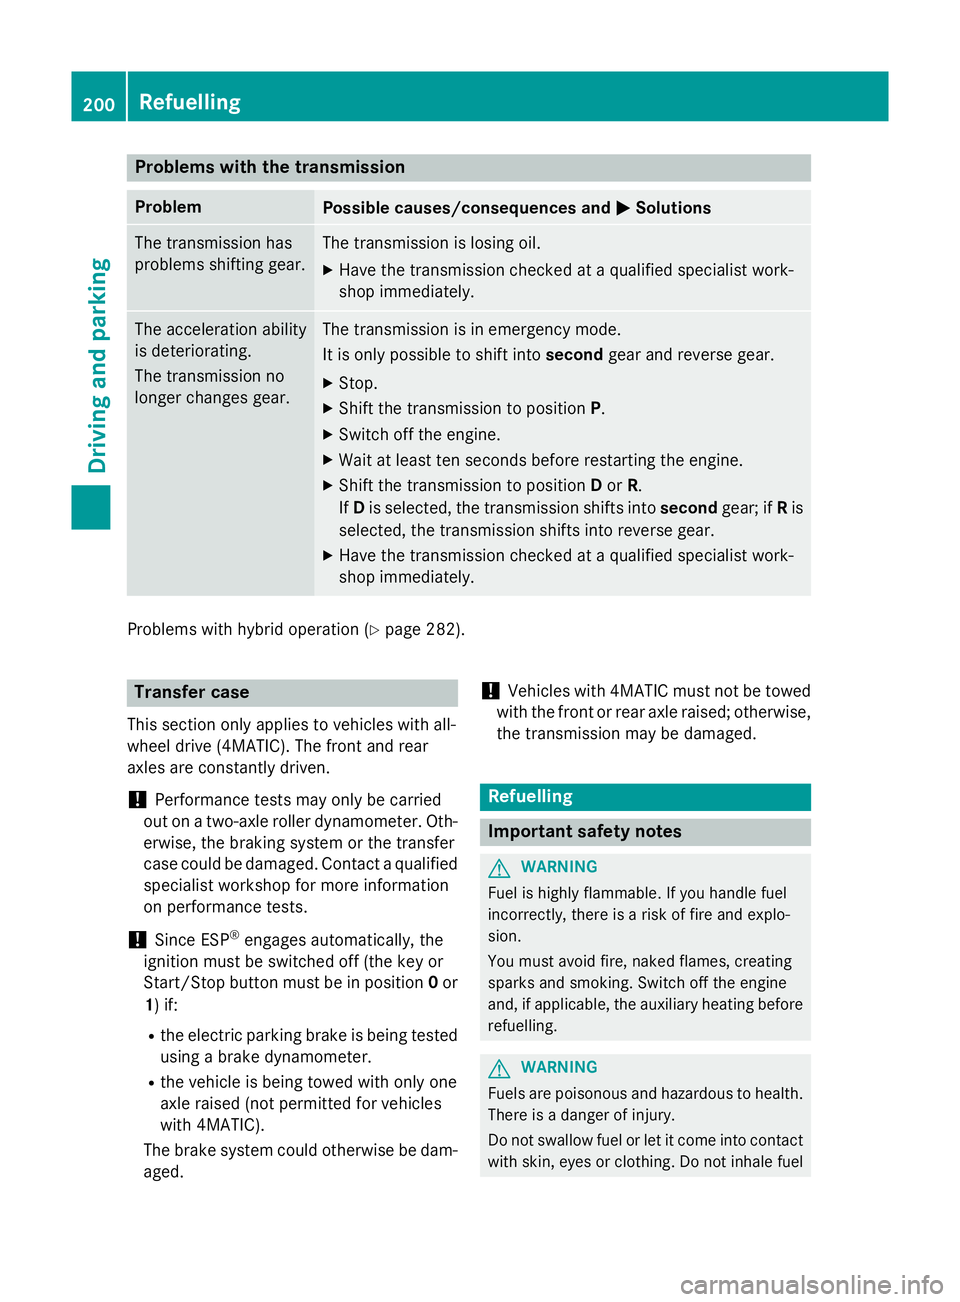
Problems with the transmission
Problem
Possible causes/consequences and
M
MSolutions The transmission has
problems shifting gear. The transmission is losing oil.
X Have the transmission checked at a qualified specialist work-
shop immediately. The acceleration ability
is deteriorating.
The transmission no
longer changes gear. The transmission is in emergency mode.
It is only possible to shift into
secondgear and reverse gear.
X Stop.
X Shift the transmission to position P.
X Switch off the engine.
X Wait at least ten seconds before restarting the engine.
X Shift the transmission to position Dor R.
If D is selected, the transmission shifts into secondgear; ifRis
selected, the transmission shifts into reverse gear.
X Have the transmission checked at a qualified specialist work-
shop immediately. Problems with hybrid operation (Y
page 282).Transfer case
This section only applies to vehicles with all-
wheel drive (4MATIC). The front and rear
axles are constantly driven.
! Performance tests may only be carried
out on a two-axle roller dynamometer. Oth-
erwise, the braking system or the transfer
case could be damaged. Contact a qualified
specialist workshop for more information
on performance tests.
! Since ESP ®
engages automatically, the
ignition must be switched off (the key or
Start/Stop button must be in position 0or
1) if:
R the electric parking brake is being tested
using a brake dynamometer.
R the vehicle is being towed with only one
axle raised (not permitted for vehicles
with 4MATIC).
The brake system could otherwise be dam-
aged. !
Vehicles with 4MATIC must not be towed
with the front or rear axle raised; otherwise,
the transmission may be damaged. Refuelling
Important safety notes
G
WARNING
Fuel is highly flammable. If you handle fuel
incorrectly, there is a risk of fire and explo-
sion.
You must avoid fire, naked flames, creating
sparks and smoking. Switch off the engine
and, if applicable, the auxiliary heating before refuelling. G
WARNING
Fuels are poisonous and hazardous to health. There is a danger of injury.
Do not swallow fuel or let it come into contact
with skin, eyes or clothing. Do not inhale fuel 200
RefuellingDriving and parking
Page 204 of 489
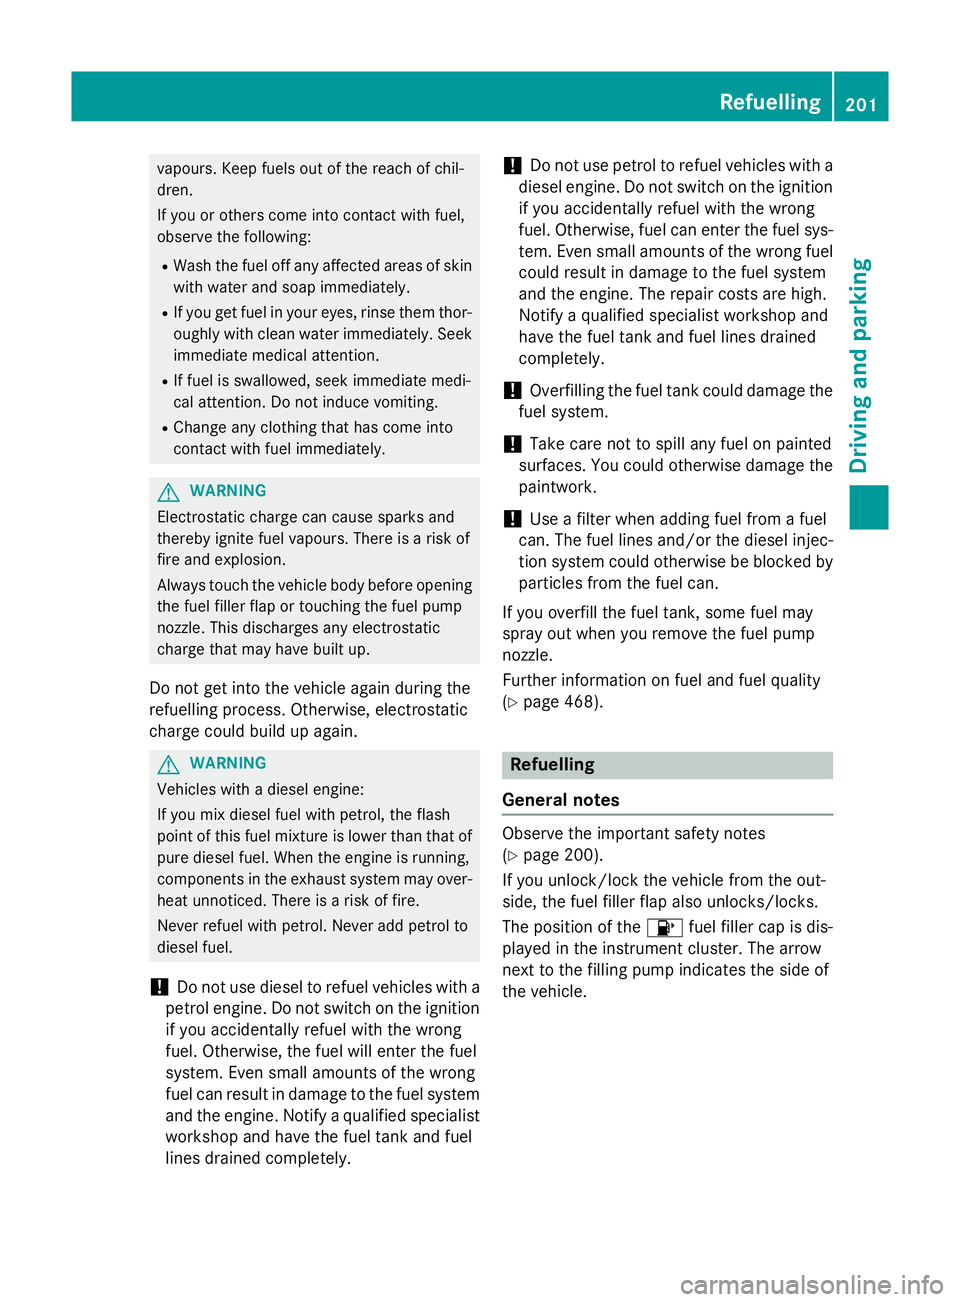
vapours. Keep fuels out of the reach of chil-
dren.
If you or others come into contact with fuel,
observe the following:
R Wash the fuel off any affected areas of skin
with water and soap immediately.
R If you get fuel in your eyes, rinse them thor-
oughly with clean water immediately. Seek
immediate medical attention.
R If fuel is swallowed, seek immediate medi-
cal attention. Do not induce vomiting.
R Change any clothing that has come into
contact with fuel immediately. G
WARNING
Electrostatic charge can cause sparks and
thereby ignite fuel vapours. There is a risk of
fire and explosion.
Always touch the vehicle body before opening the fuel filler flap or touching the fuel pump
nozzle. This discharges any electrostatic
charge that may have built up.
Do not get into the vehicle again during the
refuelling process. Otherwise, electrostatic
charge could build up again. G
WARNING
Vehicles with a diesel engine:
If you mix diesel fuel with petrol, the flash
point of this fuel mixture is lower than that of pure diesel fuel. When the engine is running,
components in the exhaust system may over-
heat unnoticed. There is a risk of fire.
Never refuel with petrol. Never add petrol to
diesel fuel.
! Do not use diesel to refuel vehicles with a
petrol engine. Do not switch on the ignition if you accidentally refuel with the wrong
fuel. Otherwise, the fuel will enter the fuel
system. Even small amounts of the wrong
fuel can result in damage to the fuel system
and the engine. Notify a qualified specialist
workshop and have the fuel tank and fuel
lines drained completely. !
Do not use petrol to refuel vehicles with a
diesel engine. Do not switch on the ignition if you accidentally refuel with the wrong
fuel. Otherwise, fuel can enter the fuel sys-tem. Even small amounts of the wrong fuel
could result in damage to the fuel system
and the engine. The repair costs are high.
Notify a qualified specialist workshop and
have the fuel tank and fuel lines drained
completely.
! Overfilling the fuel tank could damage the
fuel system.
! Take care not to spill any fuel on painted
surfaces. You could otherwise damage the
paintwork.
! Use a filter when adding fuel from a fuel
can. The fuel lines and/or the diesel injec-
tion system could otherwise be blocked by
particles from the fuel can.
If you overfill the fuel tank, some fuel may
spray out when you remove the fuel pump
nozzle.
Further information on fuel and fuel quality
(Y page 468). Refuelling
General notes Observe the important safety notes
(Y
page 200).
If you unlock/lock the vehicle from the out-
side, the fuel filler flap also unlocks/locks.
The position of the 8fuel filler cap is dis-
played in the instrument cluster. The arrow
next to the filling pump indicates the side of
the vehicle. Refuelling
201Driving and parking Z
Page 205 of 489
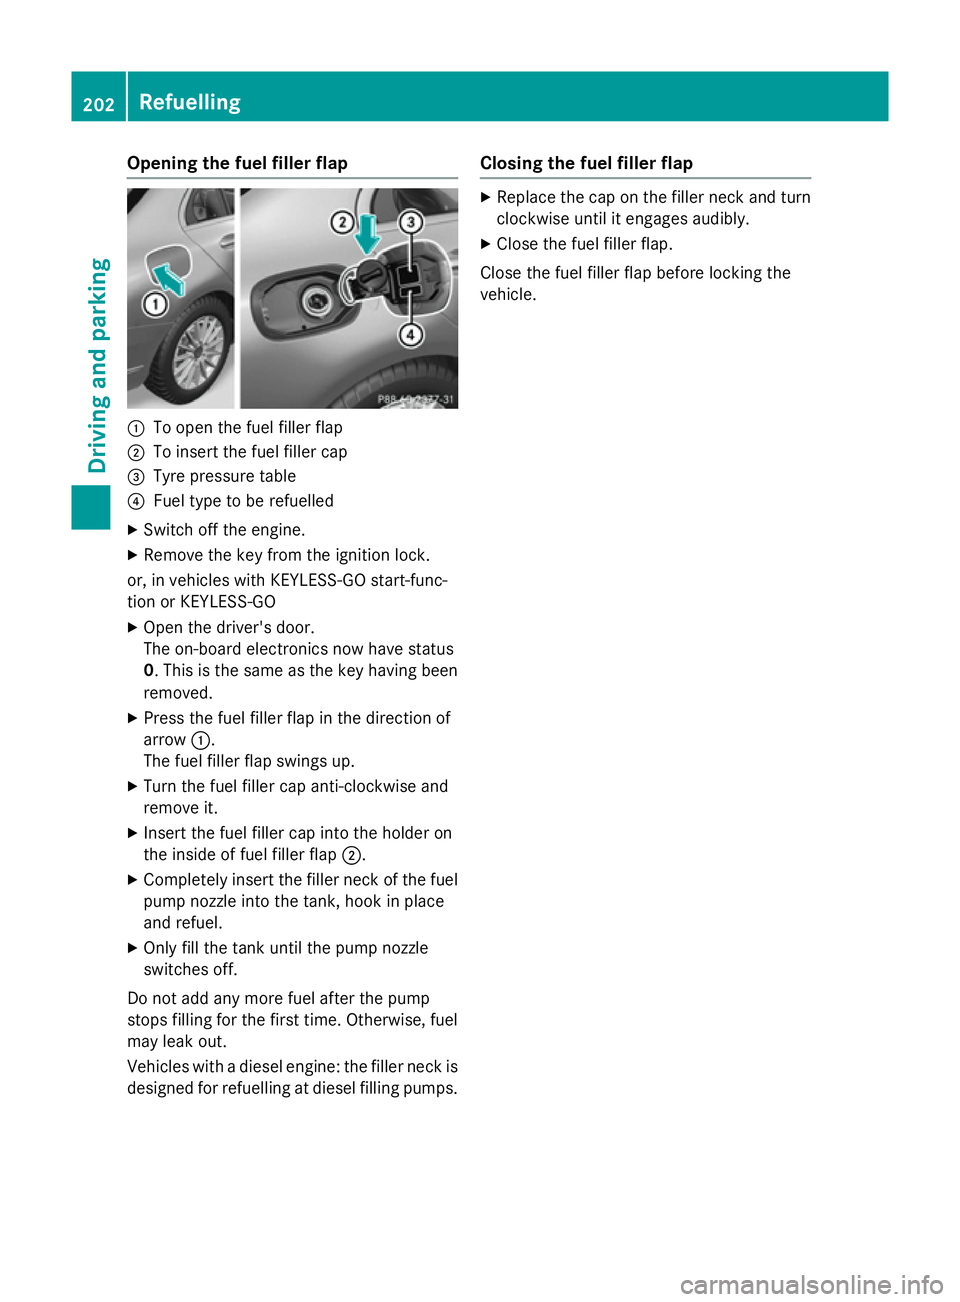
Opening the fuel filler flap
:
To open the fuel filler flap
; To insert the fuel filler cap
= Tyre pressure table
? Fuel type to be refuelled
X Switch off the engine.
X Remove the key from the ignition lock.
or, in vehicles with KEYLESS-GO start-func-
tion or KEYLESS ‑GO
X Open the driver's door.
The on-board electronics now have status
0. This is the same as the key having been
removed.
X Press the fuel filler flap in the direction of
arrow :.
The fuel filler flap swings up.
X Turn the fuel filler cap anti-clockwise and
remove it.
X Insert the fuel filler cap into the holder on
the inside of fuel filler flap ;.
X Completely insert the filler neck of the fuel
pump nozzle into the tank, hook in place
and refuel.
X Only fill the tank until the pump nozzle
switches off.
Do not add any more fuel after the pump
stops filling for the first time. Otherwise, fuel
may leak out.
Vehicles with a diesel engine: the filler neck is designed for refuelling at diesel filling pumps. Closing the fuel filler flap X
Replace the cap on the filler neck and turn
clockwise until it engages audibly.
X Close the fuel filler flap.
Close the fuel filler flap before locking the
vehicle. 202
RefuellingDriving and parking
Page 206 of 489
Problems with the fuel and fuel tank
Problem
Possible causes/consequences and
M
MSolutions Fuel is leaking from the
vehicle. G
WARNING
The fuel line or the fuel tank is faulty.
There is a risk of fire or explosion. X Apply the electric parking brake.
X Switch off the engine.
X Remove the key from the ignition lock.
or, in vehicles with KEYLESS-GO start-function or KEYLESS ‑GO
X Open the driver's door.
The on-board electronics now have status 0. This is the same as
the key having been removed.
X Do not restart the engine under any circumstances.
X Consult a qualified specialist workshop. The engine does not
start. The fuel tank of a vehicle with a diesel engine has been run com-
pletely dry.
X Refuel the vehicle with at least 5 litres of diesel.
X Turn the ignition on for approximately ten seconds
(Y page 181).
X Start the engine continuously for a maximum of ten seconds
until it runs smoothly.
If the engine does not start:
X Turn the ignition on again a maximum of ten seconds
(Y page 181).
X Start the engine again continuously for a maximum of ten sec-
onds until it runs smoothly.
If the engine does not start after three attempts:
X Consult a qualified specialist workshop. Refuelling
203Driving and parking Z
Page 207 of 489
Problem
Possible causes/consequences and
M
MSolutions The fuel filler flap can-
not be opened. The fuel filler flap is not unlocked.
or
The key battery is discharged.
X Unlock the vehicle (Y page 91).
or
X Unlock the vehicle using the emergency key element
(Y page 93). The fuel filler flap is unlocked, but the opening mechanism is jam-
med.
X Consult a qualified specialist workshop. AdBlue
®
(BlueTEC vehicles only)
Important notes on use To function properly, BlueTEC exhaust gas
aftertreatment must be operated with the
reducing agent AdBlue ®
. Topping up AdBlue ®
is part of the maintenance work.
When the supply of AdBlue ®
is down to
approximately 3.0 litres, the Refill
Refill
AdBlue See Owner's Manual AdBlue See Owner's Manual message is
shown in the multifunction display.
When the AdBlue ®
supply drops to a mini-
mum, the Refill
Refill AdBlue
AdBlueNo
No start
start in
inX
X
km
km message is shown in the multifunction dis-
play.
If you drive the vehicle faster than 15 km/h,
the Refill AdBlue See Owner's Manual Refill AdBlue See Owner's Manual
message goes out after approximately one
minute.
If the Refill AdBlue No start in X km Refill AdBlue No start in X km
message is shown in the multifunction dis-
play, you can still drive the vehicle over the
distance shown. If the AdBlue ®
is not topped
up, you will subsequently be unable to
start the engine. If the Refill AdBlue
Refill AdBlue
Start not possible
Start not possible message appears in
the multifunction display and the engine does
not start, you must top up AdBlue ®
. X
Add at least 3.5 l of AdBlue ®
.
X Switch on the ignition for at least 60 sec-
onds.
X Start the engine.
i You can also have the AdBlue ®
tank refil-
led at a qualified specialist workshop.
Before driving your vehicle outside Europe,
have the AdBlue ®
supply checked at a quali-
fied specialist workshop.
Further information about BlueTEC exhaust
gas aftertreatment and about AdBlue ®
can
be obtained from any Mercedes-Benz Service Centre.
Important notes on the refilling proce-
dure AdBlue
®
is a water-soluble fluid for the
exhaust gas aftertreatment of diesel engines. It is:
R non-toxic
R colourless and odourless
R non-flammable
If you open the AdBlue ®
tank, small amounts
of ammonia vapour may be released.
Ammonia vapours have a pungent odour and
are particularly irritating to the skin, to
mucous membranes and to the eyes. You may experience a burning sensation in your eyes, 204
RefuellingDriving and parking
Page 208 of 489
nose and throat. You may also experience
coughing and watery eyes.
Do not inhale any ammonia vapours that may
be released. Only fill the AdBlue ®
tank in well-
ventilated areas.
Do not swallow AdBlue ®
or let it come into
contact with skin, eyes or clothing. Keep
AdBlue ®
away from children.
If you or others come into contact with
AdBlue ®
, observe the following:
R immediately rinse AdBlue ®
off your skin
with soap and water.
R if AdBlue ®
comes into contact with your
eyes, immediately rinse them thoroughly
with clean water. Seek medical attention
immediately.
R if AdBlue ®
is swallowed, immediately rinse
your mouth out thoroughly. Drink plenty of
water. Seek medical attention immedi-
ately.
R change immediately out of clothing that
has come into contact with AdBlue ®
.
! Only use AdBlue ®
in accordance with
ISO 22241. Do not mix any additives with
AdBlue ®
, and do not dilute AdBlue ®
with
water. This may destroy the BlueTEC
exhaust gas aftertreatment system.
! In order to fill the AdBlue ®
tank, the vehi-
cle must be parked on a level surface. The
AdBlue ®
tank can only be filled as intended
with the vehicle parked on a level surface.
Fluctuations in capacity will thus be avoi-
ded. Filling a vehicle standing on an uneven
surface is not permitted. There is a danger of overfilling, which can cause damage to
BlueTEC exhaust gas aftertreatment com-
ponents.
! Surfaces which have come into contact
with AdBlue ®
while refilling should be
rinsed immediately with water, or remove
AdBlue ®
with a moist cloth and cold water.
If AdBlue ®
has already crystallised, use a
sponge and cold water to clean the area. AdBlue
®
residue crystallises after a certain
amount of time and soils the affected sur-
faces.
! AdBlue ®
is not a fuel additive and must
not be added to the fuel tank. If AdBlue ®
is
added to the fuel tank, this can lead to
engine damage.
Have the AdBlue ®
tank refilled at a qualified
specialist workshop. However, you can also
top up the AdBlue ®
tank:
R at a filling station with an AdBlue ®
filling
pump
R with AdBlue ®
refill bottles
R with an AdBlue ®
refill canister
When the pump nozzle switches off automat-
ically during filling at a filling pump, the
AdBlue ®
tank has been completely filled. Do
not fill the AdBlue ®
tank any further. AdBlue ®
may leak out.
To avoid transporting already opened refill
containers in the vehicle, completely empty
refill bottles or canisters when filling the
AdBlue ®
tank, if possible.
Further information on AdBlue ®
(Y page 472).
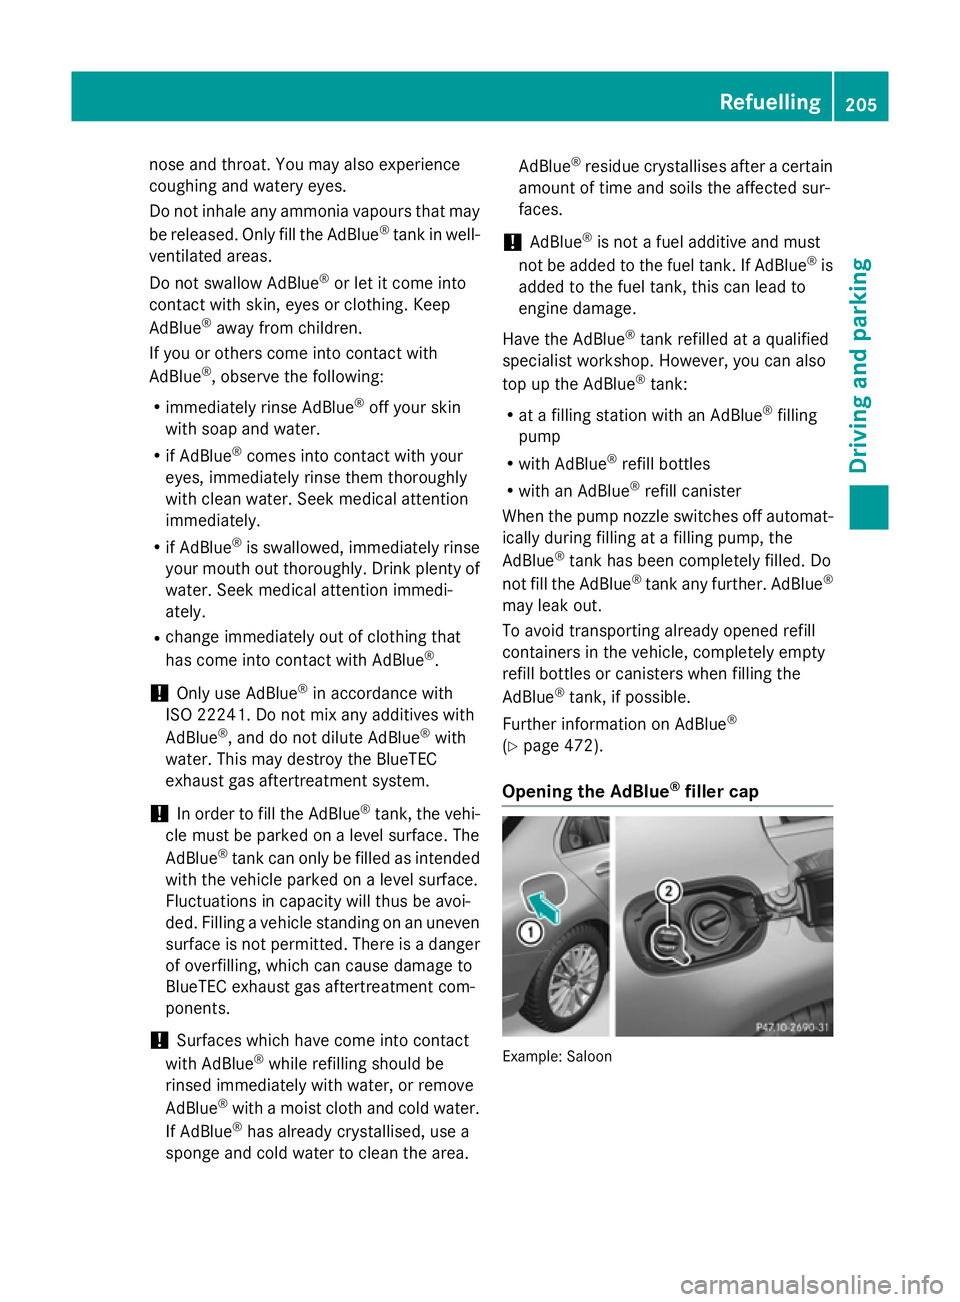
Opening the AdBlue ®
filler cap Example: Saloon Refuelling
205Driving and parking Z
Page 209 of 489
X
Switch the ignition off.
X Press the fuel filler flap in the direction of
arrow :.
The fuel filler flap swings up.
X Turn blue AdBlue ®
filler cap ;anti-clock-
wise and remove it.
AdBlue ®
filler cap ;is secured with a plas-
tic strip.
i The fuel filler flap is unlocked or locked
automatically when you unlock or lock the
vehicle.
AdBlue ®
refill canisters !
Do not tighten the disposable hose with
too much force. The disposable hose may
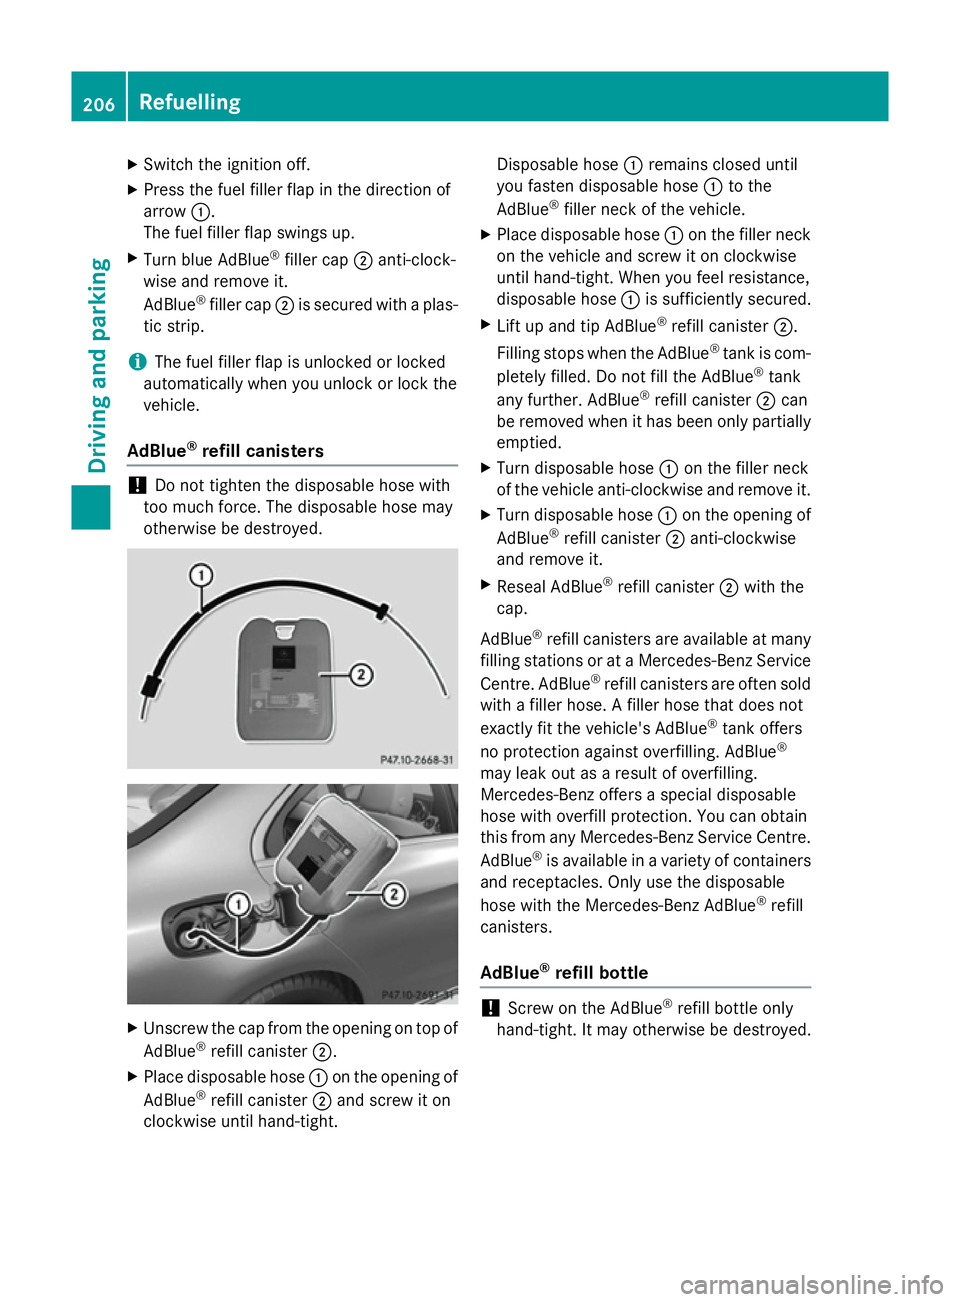
otherwise be destroyed. X
Unscrew the cap from the opening on top of
AdBlue ®
refill canister ;.
X Place disposable hose :on the opening of
AdBlue ®
refill canister ;and screw it on
clockwise until hand-tight. Disposable hose
:remains closed until
you fasten disposable hose :to the
AdBlue ®
filler neck of the vehicle.
X Place disposable hose :on the filler neck
on the vehicle and screw it on clockwise
until hand-tight. When you feel resistance,
disposable hose :is sufficiently secured.
X Lift up and tip AdBlue ®
refill canister ;.
Filling stops when the AdBlue ®
tank is com-
pletely filled. Do not fill the AdBlue ®
tank
any further. AdBlue ®
refill canister ;can
be removed when it has been only partially emptied.
X Turn disposable hose :on the filler neck
of the vehicle anti-clockwise and remove it.
X Turn disposable hose :on the opening of
AdBlue ®
refill canister ;anti-clockwise
and remove it.
X Reseal AdBlue ®
refill canister ;with the
cap.
AdBlue ®
refill canisters are available at many
filling stations or at a Mercedes-Benz Service
Centre. AdBlue ®
refill canisters are often sold
with a filler hose. A filler hose that does not
exactly fit the vehicle's AdBlue ®
tank offers
no protection against overfilling. AdBlue ®
may leak out as a result of overfilling.
Mercedes-Benz offers a special disposable
hose with overfill protection. You can obtain
this from any Mercedes-Benz Service Centre.
AdBlue ®
is available in a variety of containers
and receptacles. Only use the disposable
hose with the Mercedes-Benz AdBlue ®
refill
canisters.
AdBlue ®
refill bottle !
Screw on the AdBlue ®
refill bottle only
hand-tight. It may otherwise be destroyed. 206
RefuellingDriving and parking
Page 210 of 489
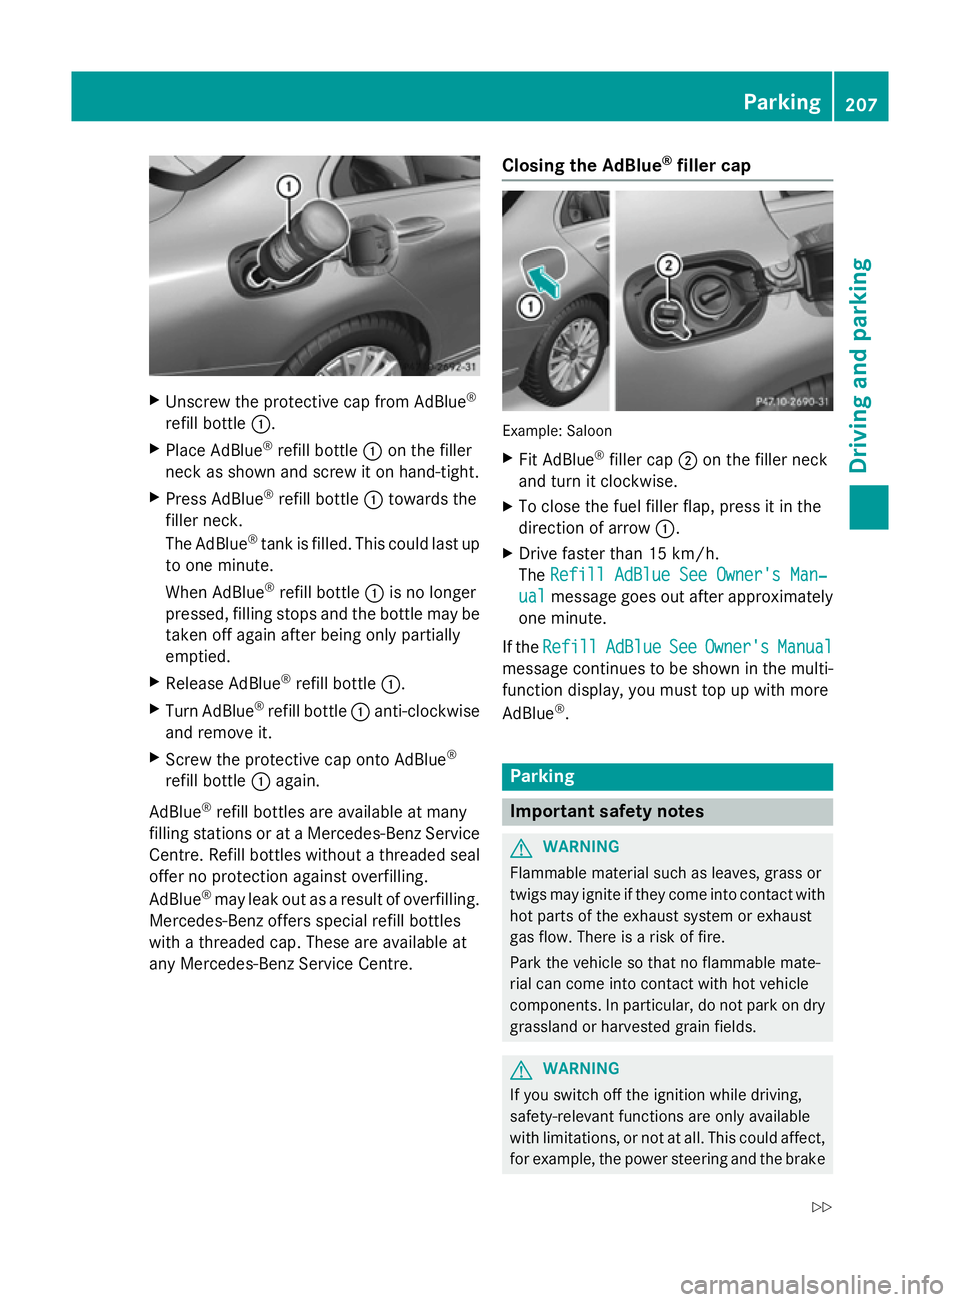
X
Unscrew the protective cap from AdBlue ®
refill bottle :.
X Place AdBlue ®
refill bottle :on the filler
neck as shown and screw it on hand-tight.
X Press AdBlue ®
refill bottle :towards the
filler neck.
The AdBlue ®
tank is filled. This could last up
to one minute.
When AdBlue ®
refill bottle :is no longer
pressed, filling stops and the bottle may be
taken off again after being only partially
emptied.
X Release AdBlue ®
refill bottle :.
X Turn AdBlue ®
refill bottle :anti-clockwise
and remove it.
X Screw the protective cap onto AdBlue ®
refill bottle :again.
AdBlue ®
refill bottles are available at many
filling stations or at a Mercedes-Benz Service
Centre. Refill bottles without a threaded seal offer no protection against overfilling.
AdBlue ®
may leak out as a result of overfilling.
Mercedes-Benz offers special refill bottles
with a threaded cap. These are available at
any Mercedes-Benz Service Centre. Closing the AdBlue
®
filler cap Example: Saloon
X Fit AdBlue ®
filler cap ;on the filler neck
and turn it clockwise.
X To close the fuel filler flap, press it in the
direction of arrow :.
X Drive faster than 15 km/h.
The Refill AdBlue See Owner's Man‐ Refill AdBlue See Owner's Man‐
ual
ual message goes out after approximately
one minute.
If the Refill
Refill AdBlue
AdBlueSee
SeeOwner's
Owner's Manual
Manual
message continues to be shown in the multi-
function display, you must top up with more
AdBlue ®
. Parking
Important safety notes
G
WARNING
Flammable material such as leaves, grass or
twigs may ignite if they come into contact with hot parts of the exhaust system or exhaust
gas flow. There is a risk of fire.
Park the vehicle so that no flammable mate-
rial can come into contact with hot vehicle
components. In particular, do not park on dry grassland or harvested grain fields. G
WARNING
If you switch off the ignition while driving,
safety-relevant functions are only available
with limitations, or not at all. This could affect, for example, the power steering and the brake Parking
207Driving and parking
Z