keyless MERCEDES-BENZ C-CLASS SALOON 2014 Owner's Manual
[x] Cancel search | Manufacturer: MERCEDES-BENZ, Model Year: 2014, Model line: C-CLASS SALOON, Model: MERCEDES-BENZ C-CLASS SALOON 2014Pages: 489, PDF Size: 14.88 MB
Page 129 of 489
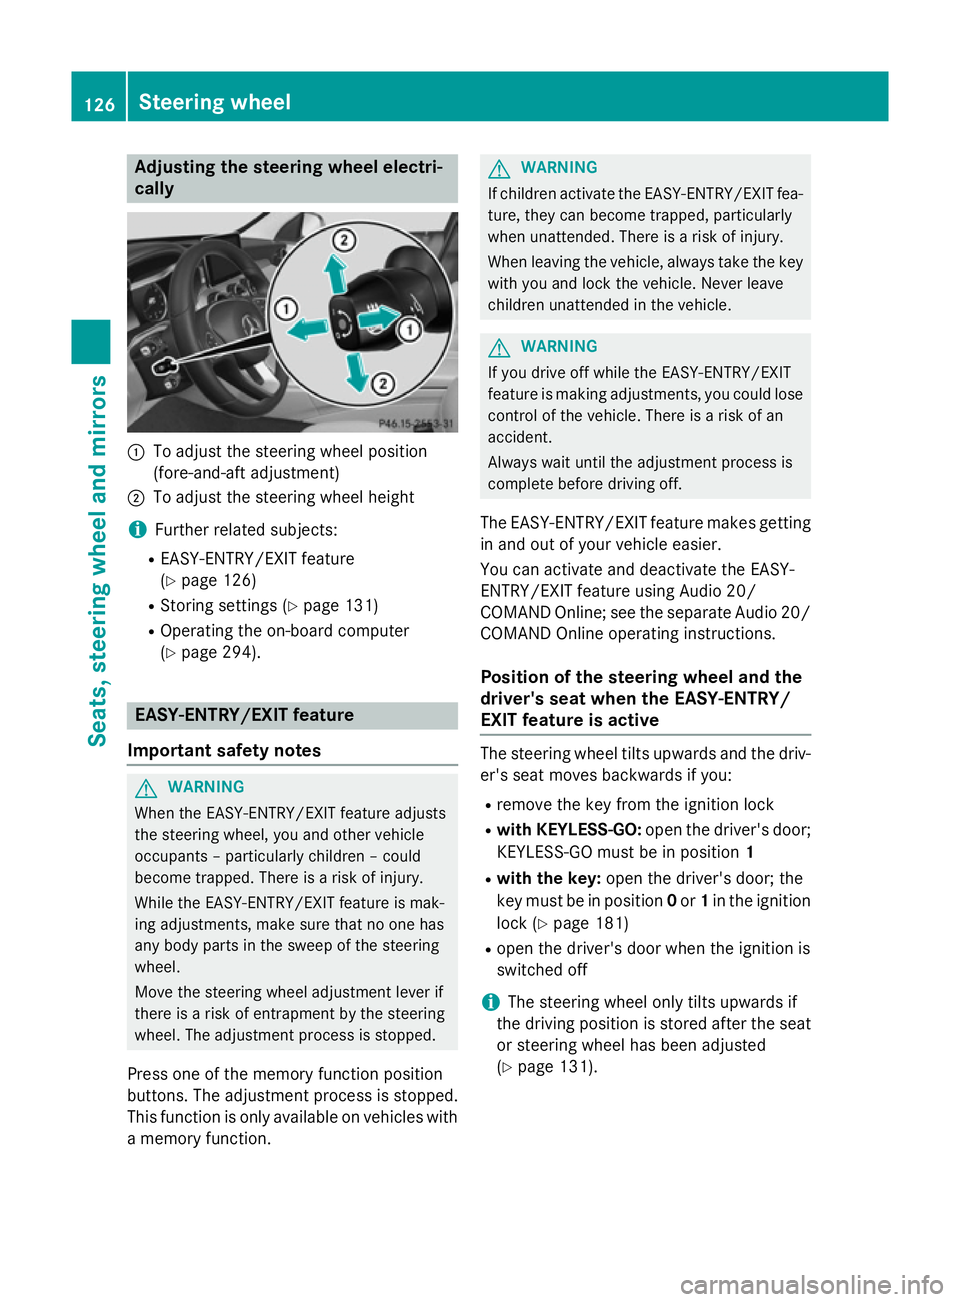
Adjusting the steering wheel electri-
cally :
To adjust the steering wheel position
(fore-and-aft adjustment)
; To adjust the steering wheel height
i Further related subjects:
R EASY-ENTRY/EXIT feature
(Y page 126)
R Storing settings (Y page 131)
R Operating the on-board computer
(Y page 294). EASY-ENTRY/EXIT feature
Important safety notes G
WARNING
When the EASY-ENTRY/EXIT feature adjusts
the steering wheel, you and other vehicle
occupants – particularly children – could
become trapped. There is a risk of injury.
While the EASY-ENTRY/EXIT feature is mak-
ing adjustments, make sure that no one has
any body parts in the sweep of the steering
wheel.
Move the steering wheel adjustment lever if
there is a risk of entrapment by the steering
wheel. The adjustment process is stopped.
Press one of the memory function position
buttons. The adjustment process is stopped.
This function is only available on vehicles with
a memory function. G
WARNING
If children activate the EASY-ENTRY/EXIT fea- ture, they can become trapped, particularly
when unattended. There is a risk of injury.
When leaving the vehicle, always take the key with you and lock the vehicle. Never leave
children unattended in the vehicle. G
WARNING
If you drive off while the EASY-ENTRY/EXIT
feature is making adjustments, you could lose
control of the vehicle. There is a risk of an
accident.
Always wait until the adjustment process is
complete before driving off.
The EASY-ENTRY/EXIT feature makes getting in and out of your vehicle easier.
You can activate and deactivate the EASY-
ENTRY/EXIT feature using Audio 20/
COMAND Online; see the separate Audio 20/ COMAND Online operating instructions.
Position of the steering wheel and the
driver's seat when the EASY-ENTRY/
EXIT feature is active The steering wheel tilts upwards and the driv-
er's seat moves backwards if you:
R remove the key from the ignition lock
R with KEYLESS-GO: open the driver's door;
KEYLESS-GO must be in position 1
R with the key: open the driver's door; the
key must be in position 0or 1in the ignition
lock (Y page 181)
R open the driver's door when the ignition is
switched off
i The steering wheel only tilts upwards if
the driving position is stored after the seat
or steering wheel has been adjusted
(Y page 131). 126
Steering wheelSeats
, steering wheel and mirrors
Page 130 of 489
The most recent driving position of the steer-
ing wheel is stored if:
R the ignition is switched off
R the setting is stored using the memory
function (Y page 131)
i The steering wheel only moves upwards if
it has not already reached the upper steer-
ing limiter.
Position of the steering wheel for driv-
ing The steering wheel is moved to the previously
set position if:
R the driver's door is closed and you insert
the key into the ignition lock
R you close the driver's door when the igni-
tion is switched on
R you press the Start/Stop button once on
vehicles with KEYLESS-GO
i The steering wheel only returns to the last
set position if the driving position is stored
after the seat or steering wheel has been
adjusted (Y page 131).
The most recent driving position of the steer-
ing wheel is stored if:
R the ignition is switched off
R the setting is stored using the memory
function (Y page 131)
Crash-responsive EASY-EXIT feature If the crash-responsive EASY-EXIT feature is
triggered in an accident, the steering column
will move upwards when the driver's door is
opened or the key is removed from the igni-
tion lock. This makes it easier to exit the vehi-
cle and rescue the occupants.
The crash-responsive EASY-EXIT feature is
only operational if the EASY-EXIT/ENTRY fea-
ture is activated in Audio 20/COMAND
Online; see the separate Audio 20/COMAND Online operating instructions. Mirrors
Rear-view mirror
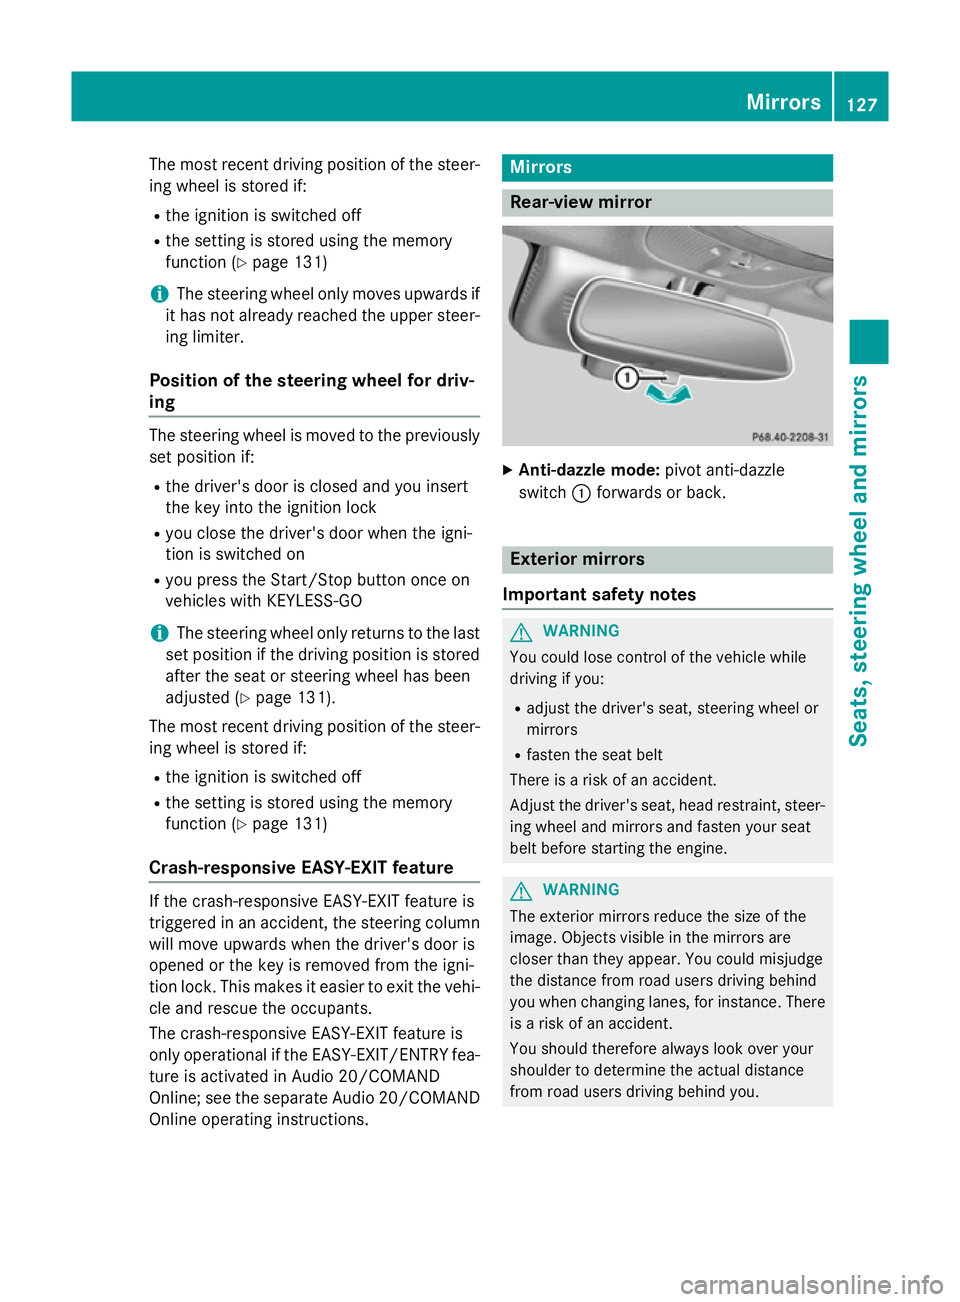
X
Anti-dazzle mode: pivot anti-dazzle
switch :forwards or back. Exterior mirrors
Important safety notes G
WARNING
You could lose control of the vehicle while
driving if you:
R adjust the driver's seat, steering wheel or
mirrors
R fasten the seat belt
There is a risk of an accident.
Adjust the driver's seat, head restraint, steer-
ing wheel and mirrors and fasten your seat
belt before starting the engine. G
WARNING
The exterior mirrors reduce the size of the
image. Objects visible in the mirrors are
closer than they appear. You could misjudge
the distance from road users driving behind
you when changing lanes, for instance. There is a risk of an accident.
You should therefore always look over your
shoulder to determine the actual distance
from road users driving behind you. Mirrors
127Seats, steering wheel and mirrors Z
Page 149 of 489
Always switch off the windscreen wipers and
ignition before changing the wiper blades.
! Never open the bonnet if a windscreen
wiper arm has been folded away from the
windscreen.
Never fold a windscreen wiper arm without
a wiper blade back onto the windscreen.
Hold the windscreen wiper arm firmly when you change the wiper blade. If you release
the windscreen wiper arm without a wiper
blade and it falls onto the windscreen, the
windscreen may be damaged by the force
of the impact.
Mercedes-Benz recommends that you have the wiper blades changed at a qualified
specialist workshop.
! To avoid damaging the windscreen wiper
blades, make sure that you touch only the
wiper arm of the windscreen wiper.
Replacing the windscreen wiper blades Moving the wiper blades to the vertical
position
On vehicles without KEYLESS-GO:
X Turn the key to position 1or 2in the ignition
lock (Y page 181).
X Set the windscreen wipers to position
°.
X When the wiper arms have reached the ver-
tical position, turn the key to position 0and
remove it from the ignition lock.
X Fold the wiper arm away from the wind-
screen.
On vehicles with KEYLESS-GO:
X Switch off the engine.
X Remove your foot from the brake pedal.
X Set the windscreen wipers to position
°.
X Press the Start/Stop button repeatedly
until the windscreen wipers start. X
When the wiper arms have reached the ver-
tical position, press the Start/Stop button.
X Fold the wiper arm away from the wind-
screen.
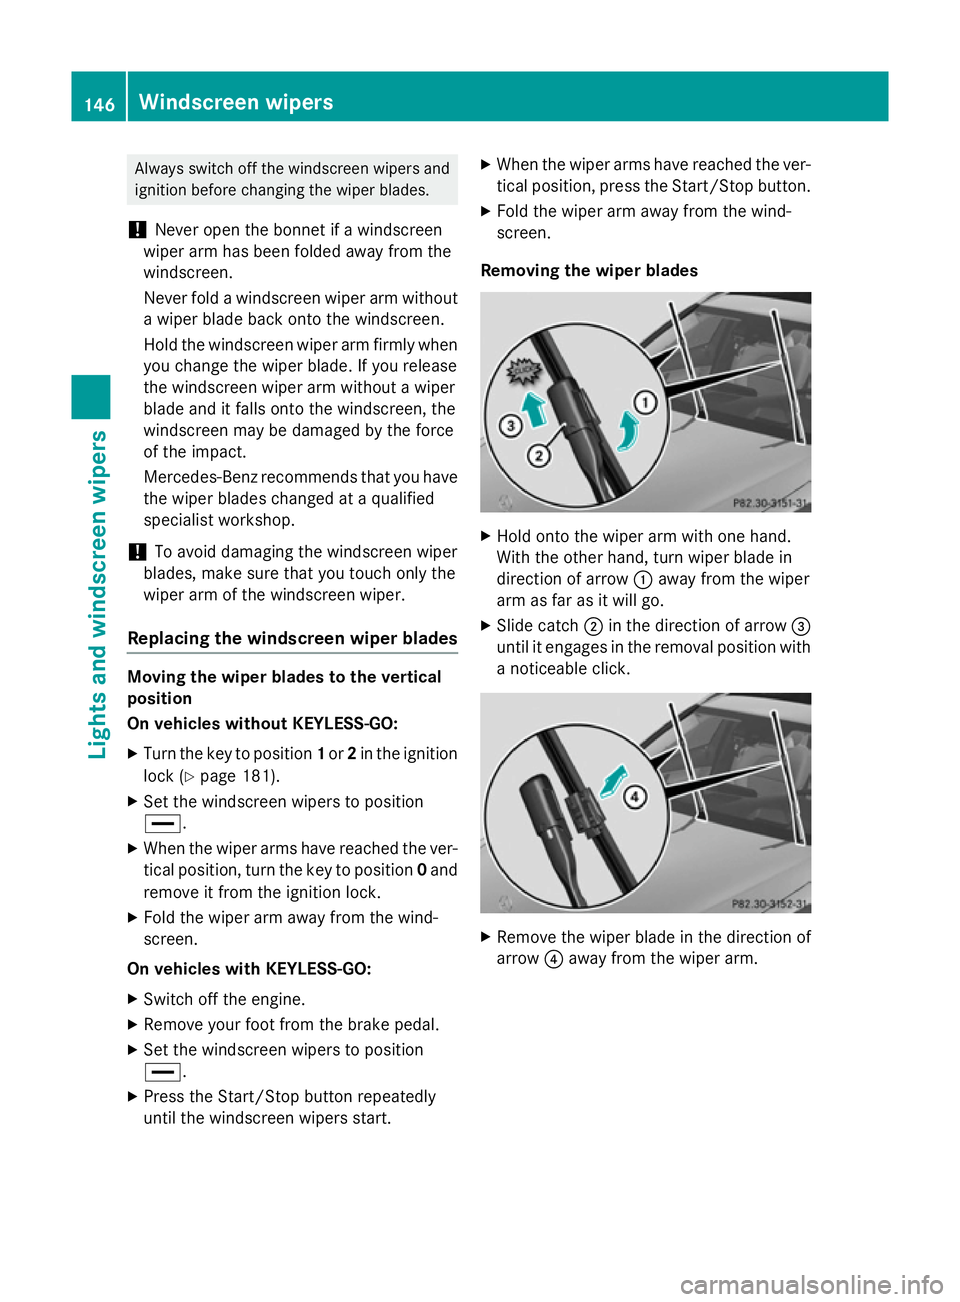
Removing the wiper blades X
Hold onto the wiper arm with one hand.
With the other hand, turn wiper blade in
direction of arrow :away from the wiper
arm as far as it will go.
X Slide catch ;in the direction of arrow =
until it engages in the removal position with
a noticeable click. X
Remove the wiper blade in the direction of
arrow ?away from the wiper arm. 146
Windscreen wipersLights and
windscreen wipers
Page 173 of 489
X
To activate pre-entry climate control:
unlock the vehicle with the key or KEYLESS-
GO.
The air-conditioning functions are activatedfor up to 120 seconds for preheating and
for up to 60 seconds for pre-cooling.
The pre-entry climate control switches off
automatically when the engine is started.
Seat heating (heating), seat ventilation (ven-
tilation), perfume atomiser and ionisation
remain switched on after starting the engine. 170
Operating the climate control systemClimate control
Page 184 of 489
boosting effect. You will require considerably
more effort to steer and brake. There is a riskof an accident.
Do not switch off the ignition while driving. G
WARNING
If the parking brake has not been fully
released when driving, the parking brake can:
R overheat and cause a fire
R lose its hold function.
There is a risk of fire and an accident. Release
the parking brake fully before driving off.
! Warm up the engine quickly. Do not use
the engine's full performance until it has
reached operating temperature.
Only set the automatic transmission to the
respective drive positions when the vehicle
is stationary.
Where possible, avoid spinning the drive
wheels when pulling away on slippery
roads. Otherwise, you could damage the
drive train.
Hybrid vehicles: observe the safety instruc-
tions for hybrid vehicles (Y page 269).Key positions
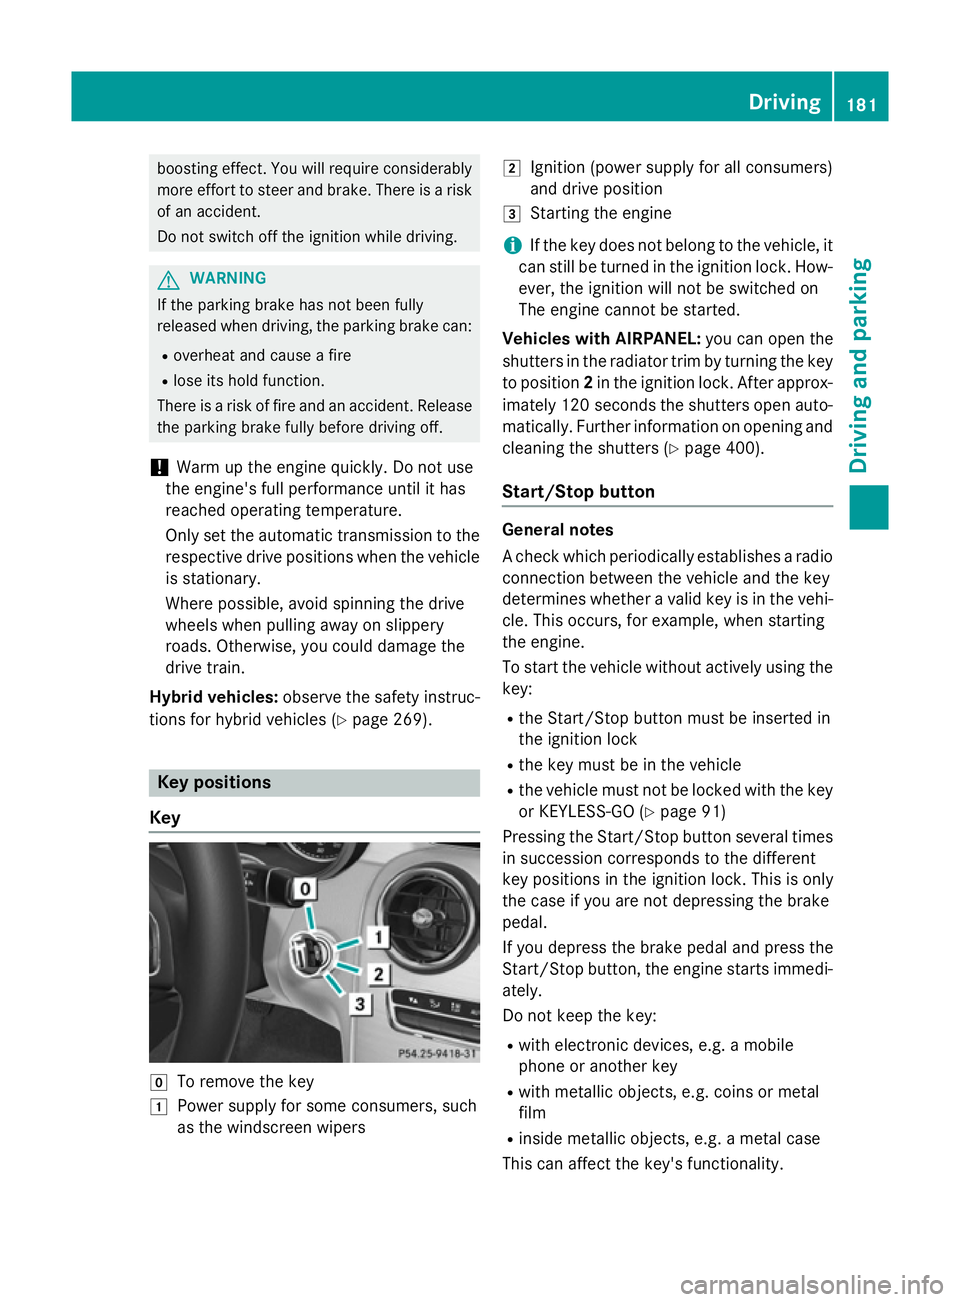
Key g
To remove the key
1 Power supply for some consumers, such
as the windscreen wipers 2
Ignition (power supply for all consumers)
and drive position
3 Starting the engine
i If the key does not belong to the vehicle, it
can still be turned in the ignition lock. How-
ever, the ignition will not be switched on
The engine cannot be started.
Vehicles with AIRPANEL: you can open the
shutters in the radiator trim by turning the key to position 2in the ignition lock. After approx-
imately 120 seconds the shutters open auto-
matically. Further information on opening and cleaning the shutters (Y page 400).
Start/Stop button General notes
A check which periodically establishes a radio
connection between the vehicle and the key
determines whether a valid key is in the vehi-
cle. This occurs, for example, when starting
the engine.
To start the vehicle without actively using the key:
R the Start/Stop button must be inserted in
the ignition lock
R the key must be in the vehicle
R the vehicle must not be locked with the key
or KEYLESS-GO (Y page 91)
Pressing the Start/Stop button several times
in succession corresponds to the different
key positions in the ignition lock. This is only
the case if you are not depressing the brake
pedal.
If you depress the brake pedal and press the
Start/Stop button, the engine starts immedi-
ately.
Do not keep the key:
R with electronic devices, e.g. a mobile
phone or another key
R with metallic objects, e.g. coins or metal
film
R inside metallic objects, e.g. a metal case
This can affect the key's functionality. Driving
181Driving and parking Z
Page 185 of 489
If you lock the vehicle with the key's remote
control or with KEYLESS-GO, after a short
time:
R you will not be able to switch on the ignition
with the Start/Stop button
R you will not be able to start the engine with
the Start/Stop button until the vehicle is
unlocked again
If you lock the vehicle centrally using the but-
ton on the front door (Y page 97), you can
continue to start the engine with the Start/
Stop button.
The engine can be switched off while the vehi-
cle is in motion by pressing and holding the
Start/Stop button for three seconds. This
function operates independently of the ECO
start/stop automatic engine switch-off func-
tion.
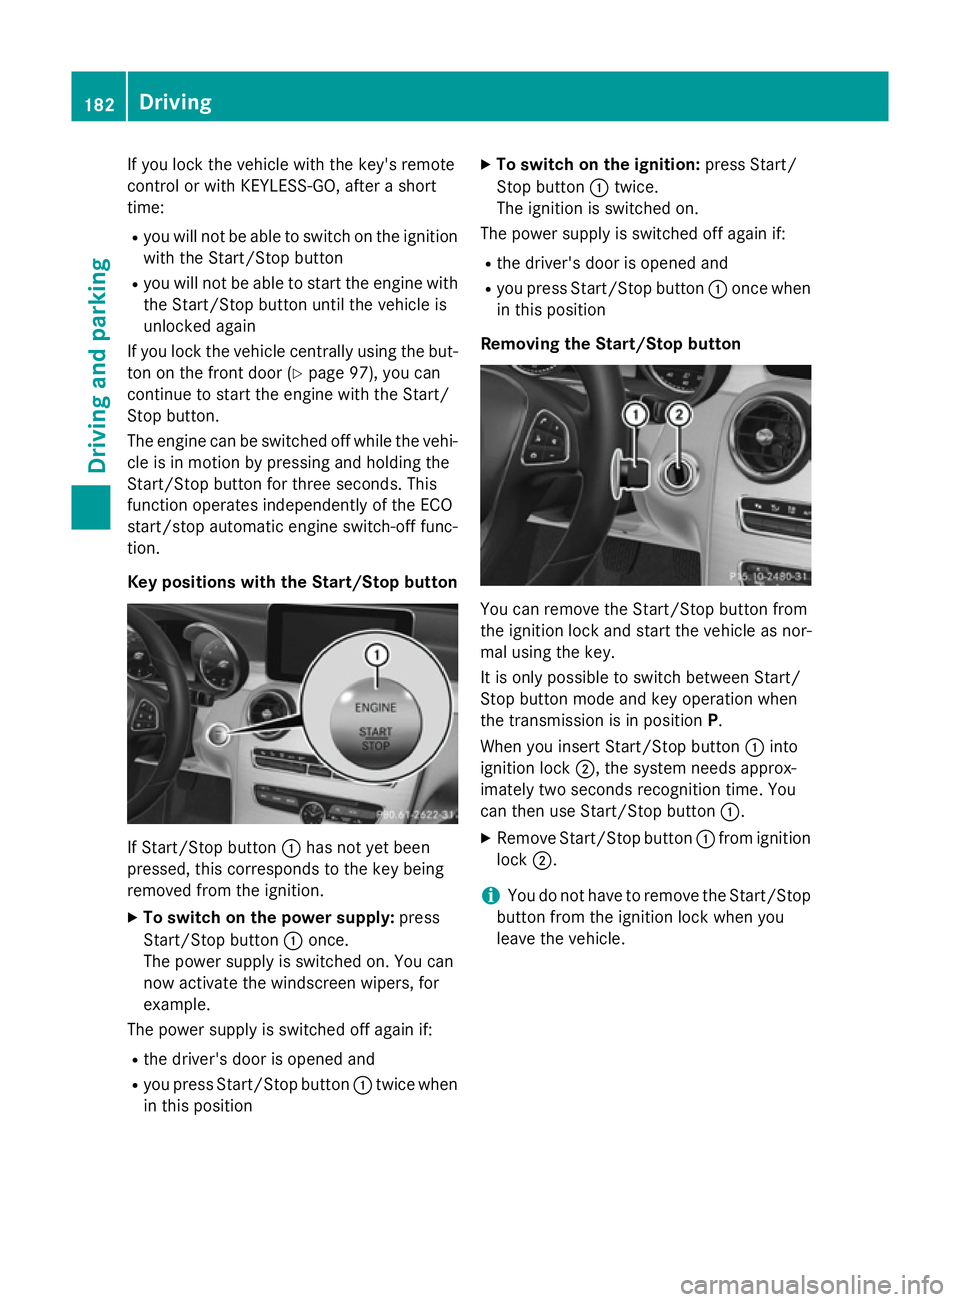
Key positions with the Start/Stop button If Start/Stop button
:has not yet been
pressed, this corresponds to the key being
removed from the ignition.
X To switch on the power supply: press
Start/Stop button :once.
The power supply is switched on. You can
now activate the windscreen wipers, for
example.
The power supply is switched off again if:
R the driver's door is opened and
R you press Start/Stop button :twice when
in this position X
To switch on the ignition: press Start/
Stop button :twice.
The ignition is switched on.
The power supply is switched off again if:
R the driver's door is opened and
R you press Start/Stop button :once when
in this position
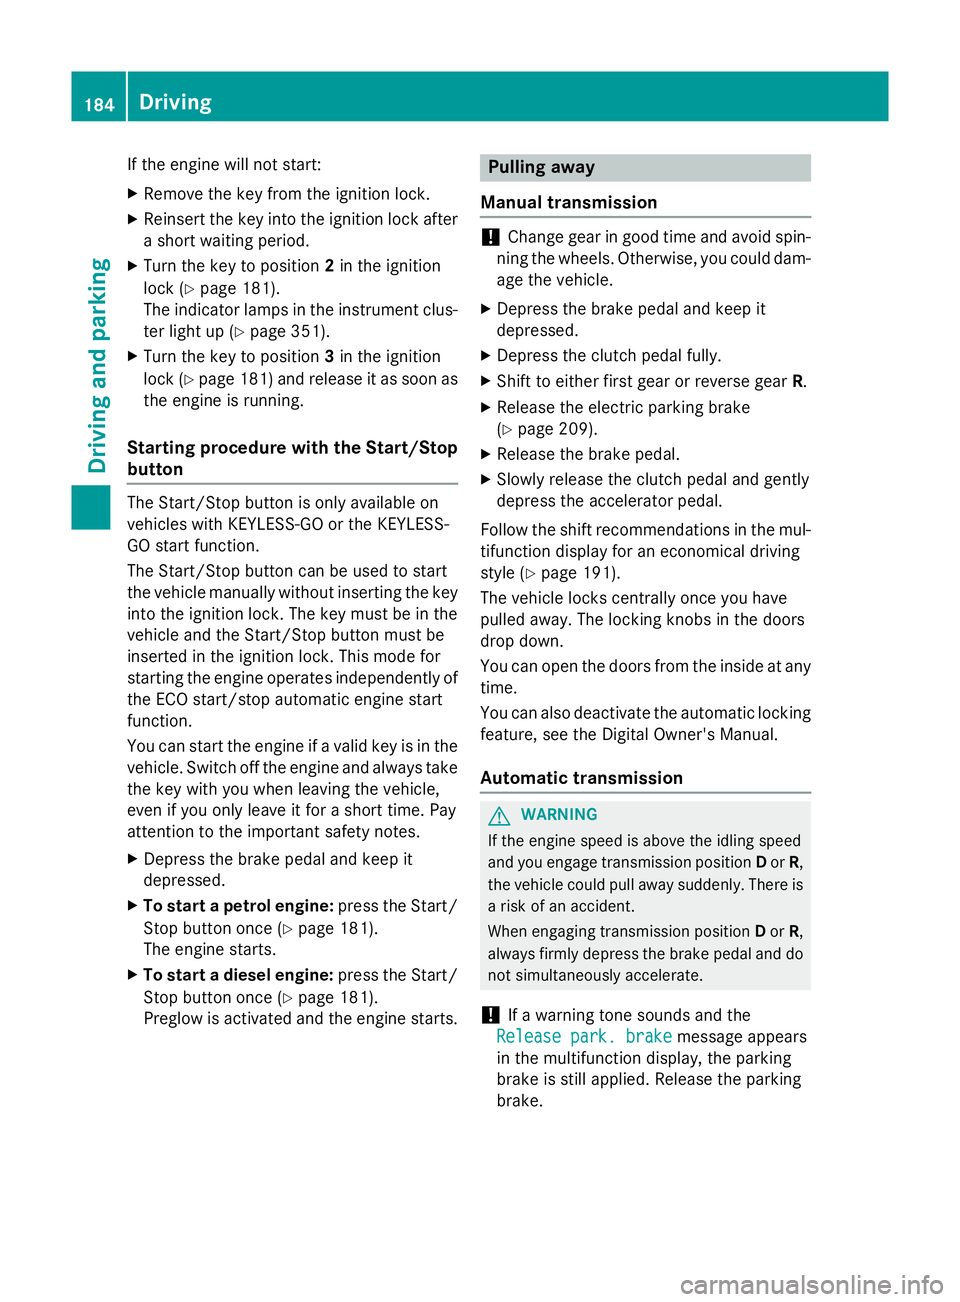
Removing the Start/Stop button You can remove the Start/Stop button from
the ignition lock and start the vehicle as nor-
mal using the key.
It is only possible to switch between Start/
Stop button mode and key operation when
the transmission is in position P.
When you insert Start/Stop button :into
ignition lock ;, the system needs approx-
imately two seconds recognition time. You
can then use Start/Stop button :.
X Remove Start/Stop button :from ignition
lock ;.
i You do not have to remove the Start/Stop
button from the ignition lock when you
leave the vehicle. 182
DrivingDriving and parking
Page 187 of 489
If the engine will not start:
X Remove the key from the ignition lock.
X Reinsert the key into the ignition lock after
a short waiting period.
X Turn the key to position 2in the ignition
lock (Y page 181).
The indicator lamps in the instrument clus-
ter light up (Y page 351).
X Turn the key to position 3in the ignition
lock (Y page 181) and release it as soon as
the engine is running.
Starting procedure with the Start/Stop button The Start/Stop button is only available on
vehicles with KEYLESS-GO or the KEYLESS-
GO start function.
The Start/Stop button can be used to start
the vehicle manually without inserting the key
into the ignition lock. The key must be in the
vehicle and the Start/Stop button must be
inserted in the ignition lock. This mode for
starting the engine operates independently of the ECO start/stop automatic engine start
function.
You can start the engine if a valid key is in thevehicle. Switch off the engine and always take
the key with you when leaving the vehicle,
even if you only leave it for a short time. Pay
attention to the important safety notes.
X Depress the brake pedal and keep it
depressed.
X To start a petrol engine: press the Start/
Stop button once (Y page 181).
The engine starts.
X To start a diesel engine: press the Start/
Stop button once (Y page 181).
Preglow is activated and the engine starts. Pulling away
Manual transmission !
Change gear in good time and avoid spin-
ning the wheels. Otherwise, you could dam- age the vehicle.
X Depress the brake pedal and keep it
depressed.
X Depress the clutch pedal fully.
X Shift to either first gear or reverse gear R.
X Release the electric parking brake
(Y page 209).
X Release the brake pedal.
X Slowly release the clutch pedal and gently
depress the accelerator pedal.
Follow the shift recommendations in the mul- tifunction display for an economical driving
style (Y page 191).
The vehicle locks centrally once you have
pulled away. The locking knobs in the doors
drop down.
You can open the doors from the inside at any
time.
You can also deactivate the automatic locking feature, see the Digital Owner's Manual.
Automatic transmission G
WARNING
If the engine speed is above the idling speed
and you engage transmission position Dor R,
the vehicle could pull away suddenly. There is a risk of an accident.
When engaging transmission position Dor R,
always firmly depress the brake pedal and do not simultaneously accelerate.
! If a warning tone sounds and the
Release park. brake Release park. brake message appears
in the multifunction display, the parking
brake is still applied. Release the parking
brake. 184
DrivingDriving and parking
Page 205 of 489
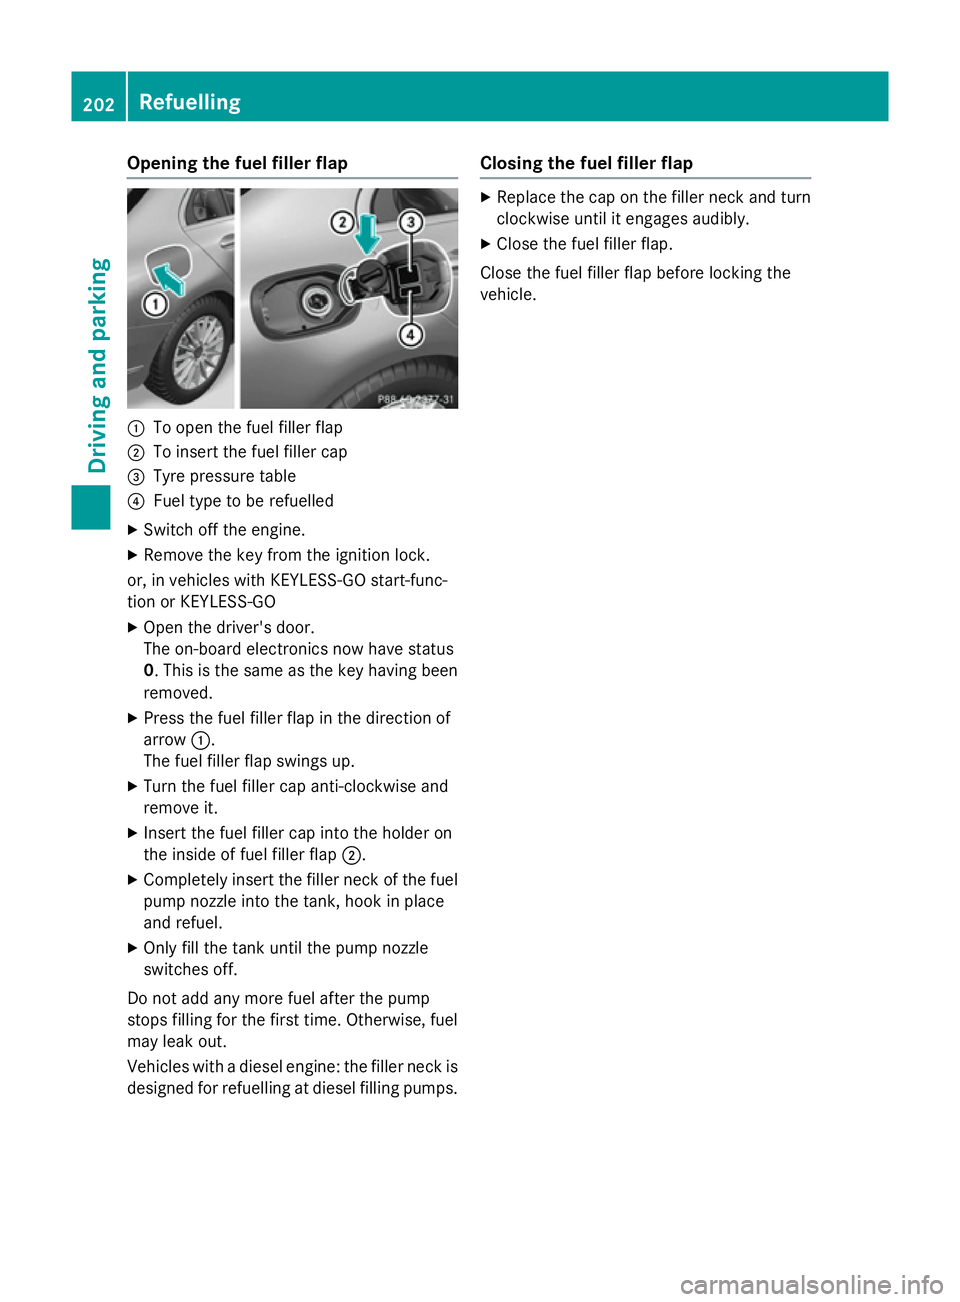
Opening the fuel filler flap
:
To open the fuel filler flap
; To insert the fuel filler cap
= Tyre pressure table
? Fuel type to be refuelled
X Switch off the engine.
X Remove the key from the ignition lock.
or, in vehicles with KEYLESS-GO start-func-
tion or KEYLESS ‑GO
X Open the driver's door.
The on-board electronics now have status
0. This is the same as the key having been
removed.
X Press the fuel filler flap in the direction of
arrow :.
The fuel filler flap swings up.
X Turn the fuel filler cap anti-clockwise and
remove it.
X Insert the fuel filler cap into the holder on
the inside of fuel filler flap ;.
X Completely insert the filler neck of the fuel
pump nozzle into the tank, hook in place
and refuel.
X Only fill the tank until the pump nozzle
switches off.
Do not add any more fuel after the pump
stops filling for the first time. Otherwise, fuel
may leak out.
Vehicles with a diesel engine: the filler neck is designed for refuelling at diesel filling pumps. Closing the fuel filler flap X
Replace the cap on the filler neck and turn
clockwise until it engages audibly.
X Close the fuel filler flap.
Close the fuel filler flap before locking the
vehicle. 202
RefuellingDriving and parking
Page 206 of 489
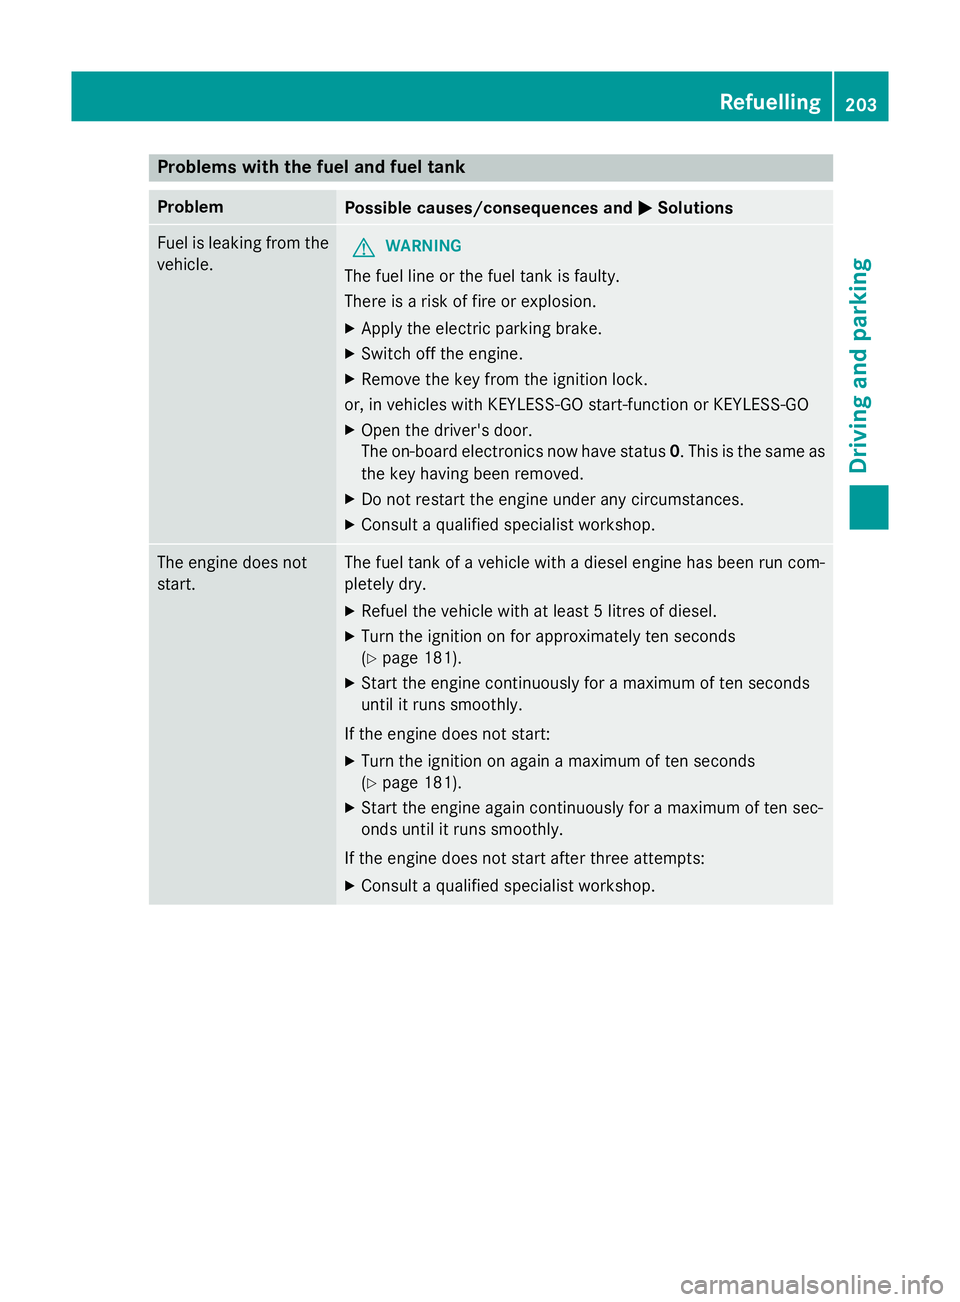
Problems with the fuel and fuel tank
Problem
Possible causes/consequences and
M
MSolutions Fuel is leaking from the
vehicle. G
WARNING
The fuel line or the fuel tank is faulty.
There is a risk of fire or explosion. X Apply the electric parking brake.
X Switch off the engine.
X Remove the key from the ignition lock.
or, in vehicles with KEYLESS-GO start-function or KEYLESS ‑GO
X Open the driver's door.
The on-board electronics now have status 0. This is the same as
the key having been removed.
X Do not restart the engine under any circumstances.
X Consult a qualified specialist workshop. The engine does not
start. The fuel tank of a vehicle with a diesel engine has been run com-
pletely dry.
X Refuel the vehicle with at least 5 litres of diesel.
X Turn the ignition on for approximately ten seconds
(Y page 181).
X Start the engine continuously for a maximum of ten seconds
until it runs smoothly.
If the engine does not start:
X Turn the ignition on again a maximum of ten seconds
(Y page 181).
X Start the engine again continuously for a maximum of ten sec-
onds until it runs smoothly.
If the engine does not start after three attempts:
X Consult a qualified specialist workshop. Refuelling
203Driving and parking Z
Page 397 of 489
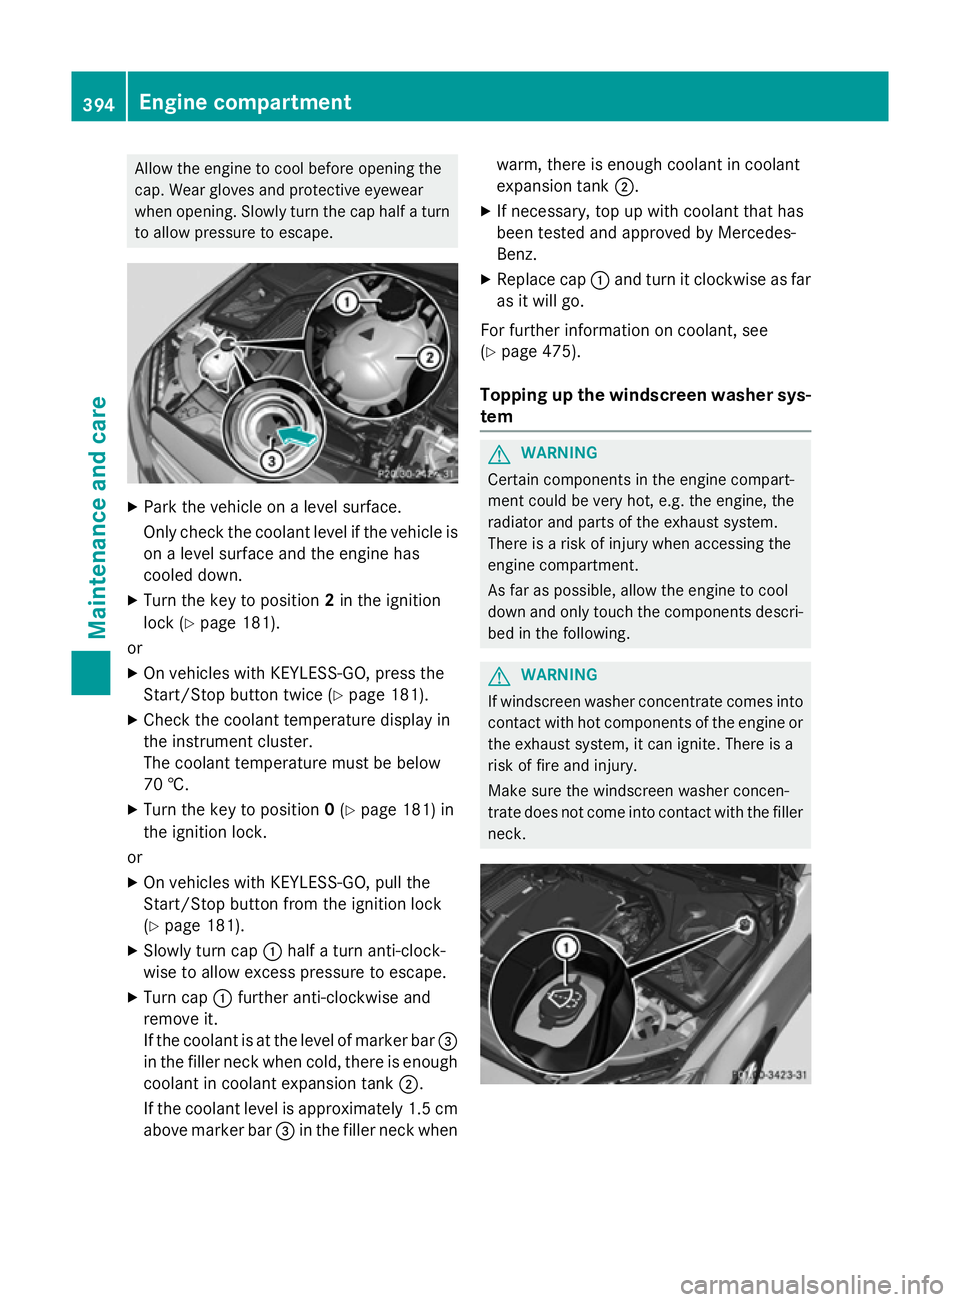
Allow the engine to cool before opening the
cap. Wear gloves and protective eyewear
when opening. Slowly turn the cap half a turn to allow pressure to escape. X
Park the vehicle on a level surface.
Only check the coolant level if the vehicle is
on a level surface and the engine has
cooled down.
X Turn the key to position 2in the ignition
lock (Y page 181).
or
X On vehicles with KEYLESS-GO, press the
Start/Stop button twice (Y page 181).
X Check the coolant temperature display in
the instrument cluster.
The coolant temperature must be below
70 †.
X Turn the key to position 0(Y page 181) in
the ignition lock.
or
X On vehicles with KEYLESS-GO, pull the
Start/Stop button from the ignition lock
(Y page 181).
X Slowly turn cap :half a turn anti-clock-
wise to allow excess pressure to escape.
X Turn cap :further anti-clockwise and
remove it.
If the coolant is at the level of marker bar =
in the filler neck when cold, there is enough coolant in coolant expansion tank ;.
If the coolant level is approximately 1.5 cm above marker bar =in the filler neck when warm, there is enough coolant in coolant
expansion tank
;.
X If necessary, top up with coolant that has
been tested and approved by Mercedes-
Benz.
X Replace cap :and turn it clockwise as far
as it will go.
For further information on coolant, see
(Y page 475).
Topping up the windscreen washer sys-
tem G
WARNING
Certain components in the engine compart-
ment could be very hot, e.g. the engine, the
radiator and parts of the exhaust system.
There is a risk of injury when accessing the
engine compartment.
As far as possible, allow the engine to cool
down and only touch the components descri- bed in the following. G
WARNING
If windscreen washer concentrate comes into contact with hot components of the engine or
the exhaust system, it can ignite. There is a
risk of fire and injury.
Make sure the windscreen washer concen-
trate does not come into contact with the filler neck. 394
Engine compartmentMaintenance and care