reset MERCEDES-BENZ C-CLASS SALOON 2014 Owner's Manual
[x] Cancel search | Manufacturer: MERCEDES-BENZ, Model Year: 2014, Model line: C-CLASS SALOON, Model: MERCEDES-BENZ C-CLASS SALOON 2014Pages: 489, PDF Size: 14.88 MB
Page 301 of 489
Trip menu
Standard display X
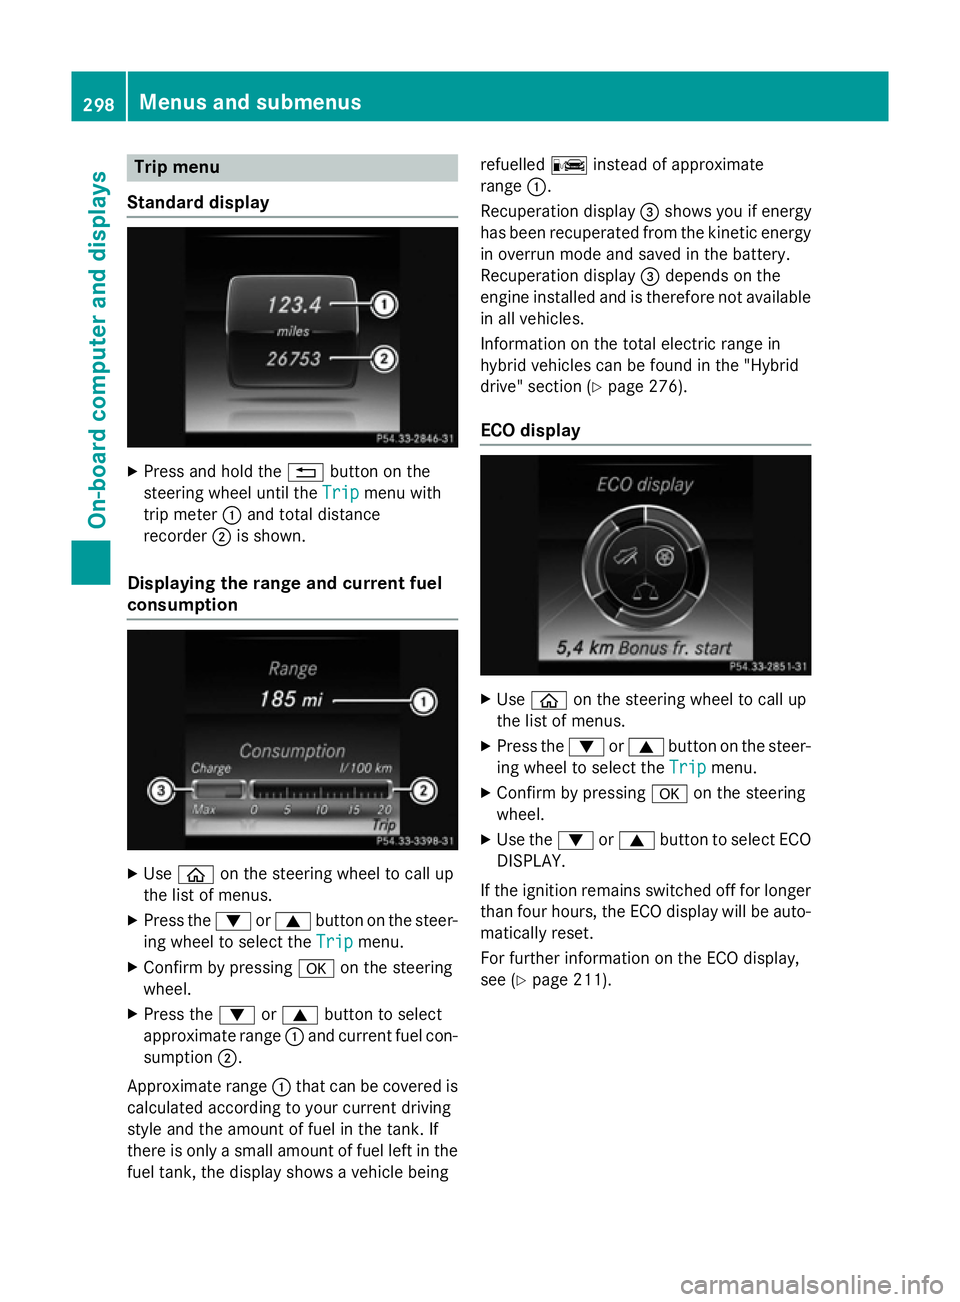
Press and hold the %button on the
steering wheel until the Trip
Tripmenu with
trip meter :and total distance
recorder ;is shown.
Displaying the range and current fuel
consumption X
Use ò on the steering wheel to call up
the list of menus.
X Press the :or9 button on the steer-
ing wheel to select the Trip
Tripmenu.
X Confirm by pressing aon the steering
wheel.
X Press the :or9 button to select
approximate range :and current fuel con-
sumption ;.
Approximate range :that can be covered is
calculated according to your current driving
style and the amount of fuel in the tank. If
there is only a small amount of fuel left in the fuel tank, the display shows a vehicle being refuelled
Cinstead of approximate
range :.
Recuperation display =shows you if energy
has been recuperated from the kinetic energy
in overrun mode and saved in the battery.
Recuperation display =depends on the
engine installed and is therefore not available
in all vehicles.
Information on the total electric range in
hybrid vehicles can be found in the "Hybrid
drive" section (Y page 276).
ECO display X
Use ò on the steering wheel to call up
the list of menus.
X Press the :or9 button on the steer-
ing wheel to select the Trip Tripmenu.
X Confirm by pressing aon the steering
wheel.
X Use the :or9 button to select ECO
DISPLAY.
If the ignition remains switched off for longer than four hours, the ECO display will be auto-
matically reset.
For further information on the ECO display,
see (Y page 211). 298
Menus and submenusOn-board computer and displays
Page 302 of 489
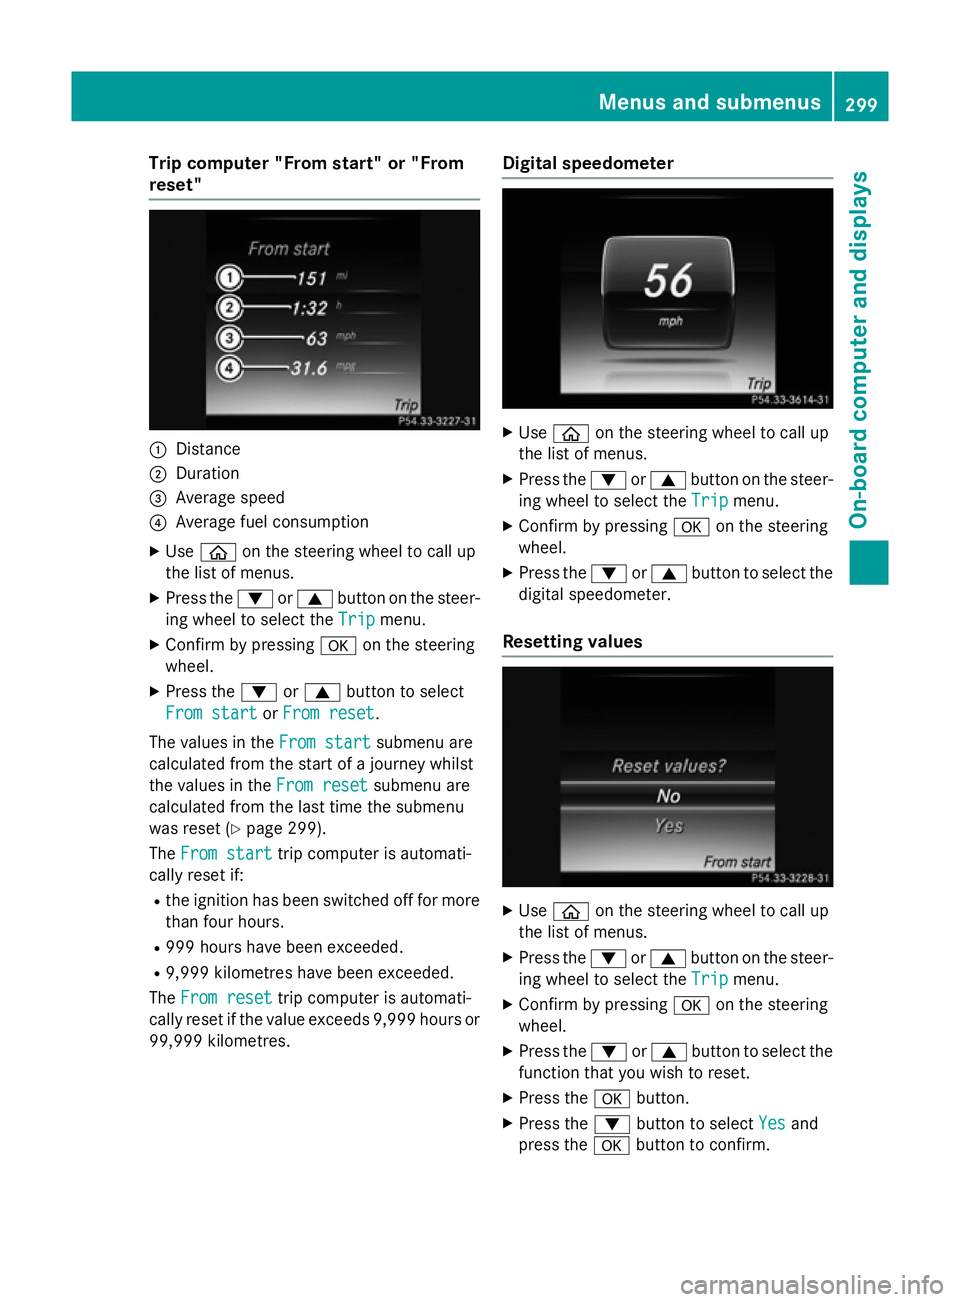
Trip computer "From start" or "From
reset" :
Distance
; Duration
= Average speed
? Average fuel consumption
X Use ò on the steering wheel to call up
the list of menus.
X Press the :or9 button on the steer-
ing wheel to select the Trip
Tripmenu.
X Confirm by pressing aon the steering
wheel.
X Press the :or9 button to select
From start
From start orFrom reset
From reset.
The values in the From start
From startsubmenu are
calculated from the start of a journey whilst
the values in the From reset
From reset submenu are
calculated from the last time the submenu
was reset (Y page 299).
The From start
From start trip computer is automati-
cally reset if:
R the ignition has been switched off for more
than four hours.
R 999 hours have been exceeded.
R 9,999 kilometres have been exceeded.
The From reset
From reset trip computer is automati-
cally reset if the value exceeds 9,999 hours or
99,999 kilometres. Digital speedometer
X
Use ò on the steering wheel to call up
the list of menus.
X Press the :or9 button on the steer-
ing wheel to select the Trip
Tripmenu.
X Confirm by pressing aon the steering
wheel.
X Press the :or9 button to select the
digital speedometer.
Resetting values X
Use ò on the steering wheel to call up
the list of menus.
X Press the :or9 button on the steer-
ing wheel to select the Trip
Tripmenu.
X Confirm by pressing aon the steering
wheel.
X Press the :or9 button to select the
function that you wish to reset.
X Press the abutton.
X Press the :button to select Yes
Yesand
press the abutton to confirm. Menus and submenus
299On-board computer and displays Z
Page 303 of 489
You can reset the values of the following func-
tions:
R Trip meter
R "From start" trip computer
R "From reset" trip computer
R ECO display
If you reset the values in the ECO display, the values in the "From start" trip computer are
also reset. If you reset the values in the "From start" trip computer, the values in the ECO
display are also reset. Navigation menu
Displaying navigation instructions In the
Navi Navimenu, the multifunction display
shows navigation messages.
Further information on navigation can be
found in the separate Audio 20 or COMAND
Online operating instructions.
X Switch on Audio 20 or COMAND Online,
see the separate operating instructions.
X Use ò on the steering wheel to call up
the list of menus.
X Press the :or9 button on the steer-
ing wheel to select the Navi
Navi menu.
X Confirm by pressing aon the steering
wheel.
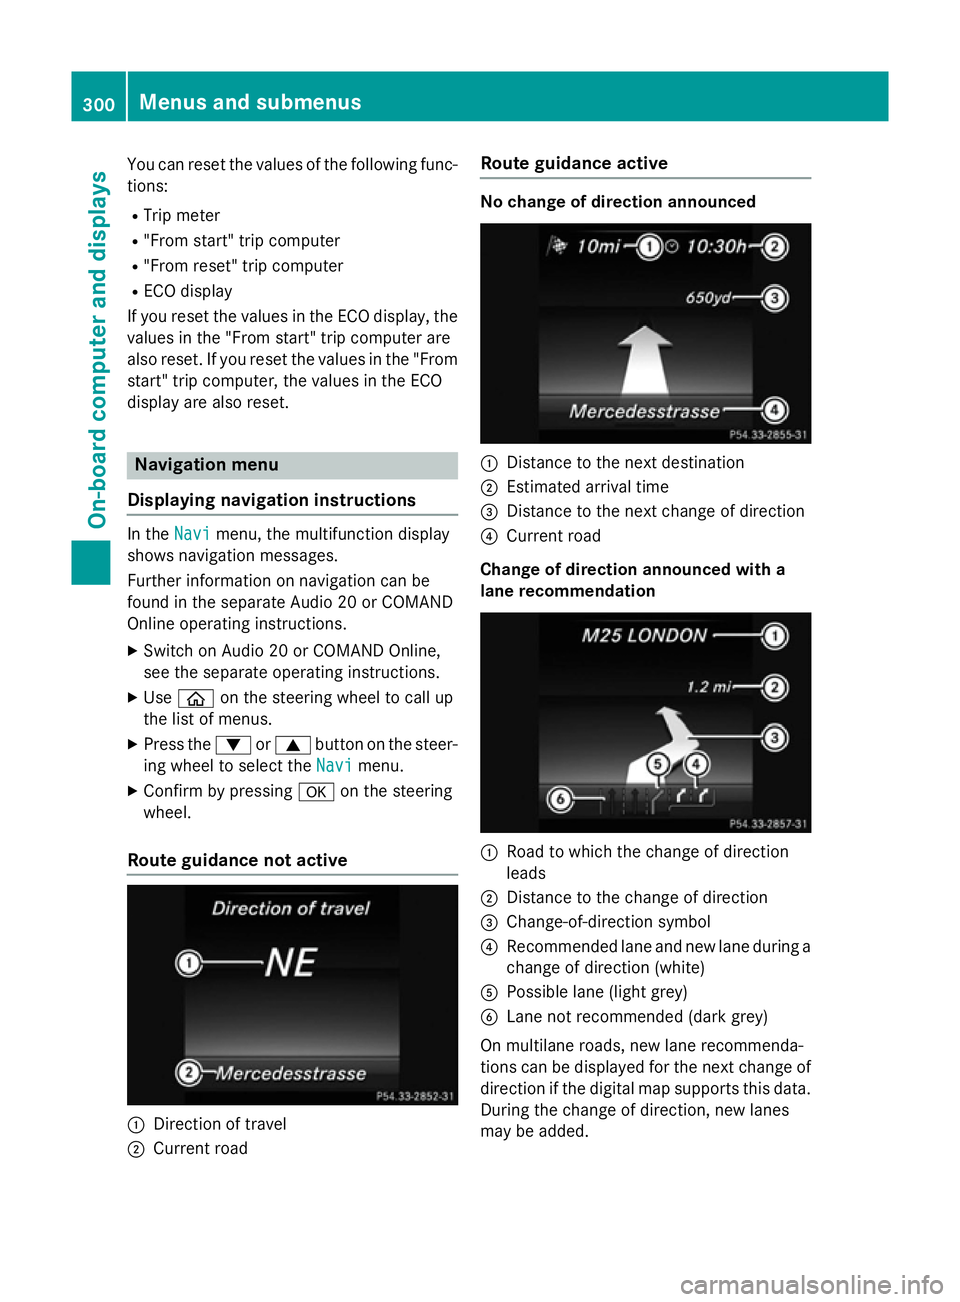
Route guidance not active :
Direction of travel
; Current road Route guidance active No change of direction announced
:
Distance to the next destination
; Estimated arrival time
= Distance to the next change of direction
? Current road
Change of direction announced with a
lane recommendation :
Road to which the change of direction
leads
; Distance to the change of direction
= Change-of-direction symbol
? Recommended lane and new lane during a
change of direction (white)
A Possible lane (light grey)
B Lane not recommended (dark grey)
On multilane roads, new lane recommenda-
tions can be displayed for the next change of
direction if the digital map supports this data. During the change of direction, new lanes
may be added. 300
Menus and submenusOn-board computer and displays
Page 305 of 489
You have reached the destination or an
intermediate destination. Radio menu
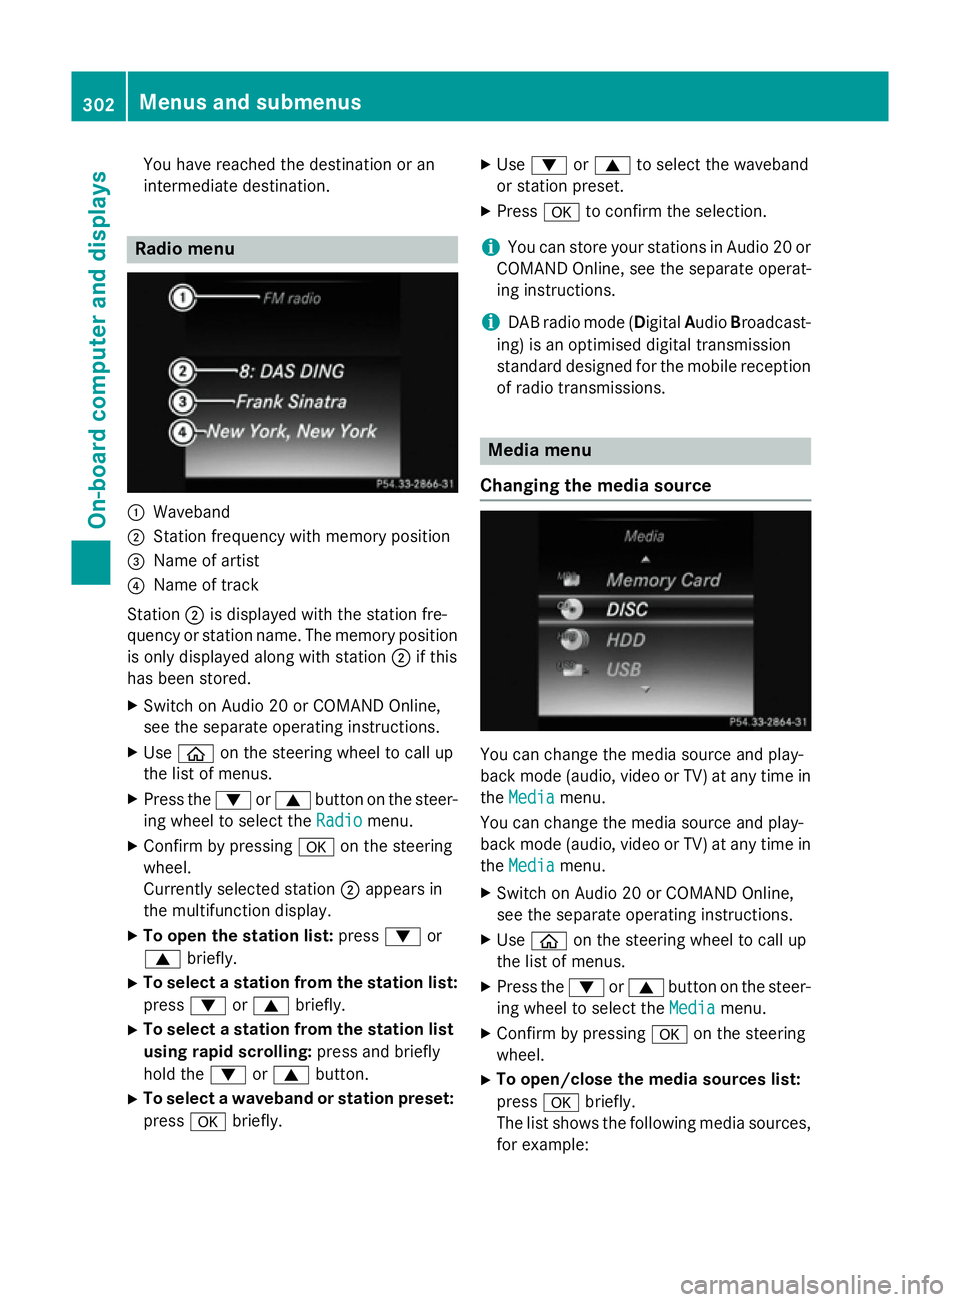
:
Waveband
; Station frequency with memory position
= Name of artist
? Name of track
Station ;is displayed with the station fre-
quency or station name. The memory position is only displayed along with station ;if this
has been stored.
X Switch on Audio 20 or COMAND Online,
see the separate operating instructions.
X Use ò on the steering wheel to call up
the list of menus.
X Press the :or9 button on the steer-
ing wheel to select the Radio Radiomenu.
X Confirm by pressing aon the steering
wheel.
Currently selected station ;appears in
the multifunction display.
X To open the station list: press:or
9 briefly.
X To select a station from the station list:
press :or9 briefly.
X To select a station from the station list
using rapid scrolling: press and briefly
hold the :or9 button.
X To select a waveband or station preset:
press abriefly. X
Use : or9 to select the waveband
or station preset.
X Press ato confirm the selection.
i You can store your stations in Audio 20 or
COMAND Online, see the separate operat-
ing instructions.
i DAB radio mode (Digital
AudioBroadcast-
ing) is an optimised digital transmission
standard designed for the mobile reception
of radio transmissions. Media menu
Changing the media source You can change the media source and play-
back mode (audio, video or TV) at any time in
the Media Media menu.
You can change the media source and play-
back mode (audio, video or TV) at any time in the Media Media menu.
X Switch on Audio 20 or COMAND Online,
see the separate operating instructions.
X Use ò on the steering wheel to call up
the list of menus.
X Press the :or9 button on the steer-
ing wheel to select the Media Mediamenu.
X Confirm by pressing aon the steering
wheel.
X To open/close the media sources list:
press abriefly.
The list shows the following media sources,
for example: 302
Menus and submenusOn-board computer and displays
Page 313 of 489
X
Press ato confirm.
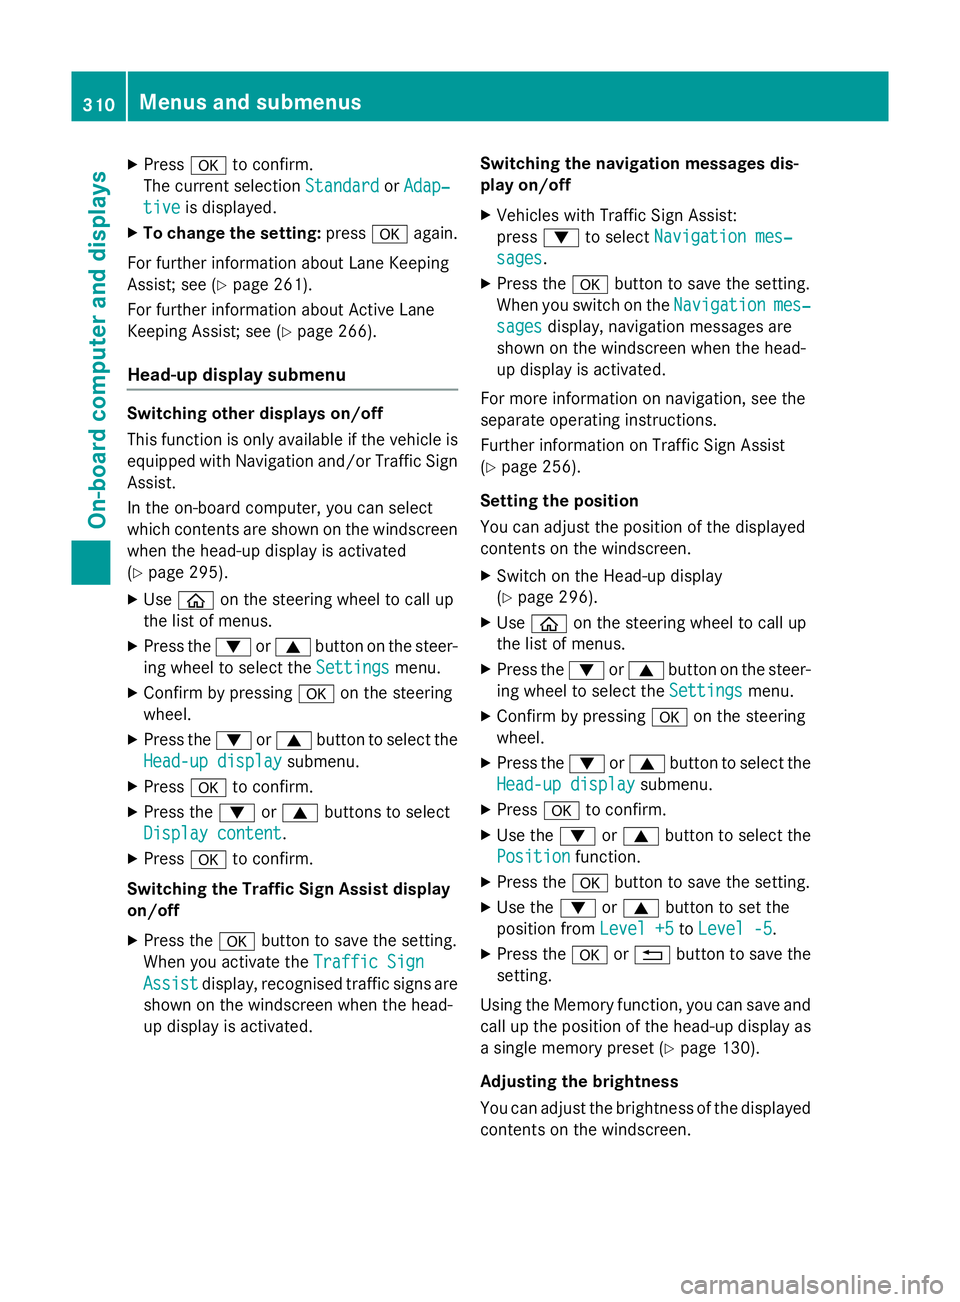
The current selection Standard StandardorAdap‐ Adap‐
tive
tive is displayed.
X To change the setting: pressaagain.
For further information about Lane Keeping
Assist; see (Y page 261).
For further information about Active Lane
Keeping Assist; see (Y page 266).
Head-up display submenu Switching other displays on/off
This function is only available if the vehicle is
equipped with Navigation and/or Traffic Sign
Assist.
In the on-board computer, you can select
which contents are shown on the windscreen when the head-up display is activated
(Y page 295).
X Use ò on the steering wheel to call up
the list of menus.
X Press the :or9 button on the steer-
ing wheel to select the Settings Settingsmenu.
X Confirm by pressing aon the steering
wheel.
X Press the :or9 button to select the
Head-up display
Head-up display submenu.
X Press ato confirm.
X Press the :or9 buttons to select
Display content
Display content.
X Press ato confirm.
Switching the Traffic Sign Assist display
on/off
X Press the abutton to save the setting.
When you activate the Traffic Sign
Traffic Sign
Assist
Assist display, recognised traffic signs are
shown on the windscreen when the head-
up display is activated. Switching the navigation messages dis-
play on/off
X Vehicles with Traffic Sign Assist:
press :to select Navigation mes‐ Navigation mes‐
sages sages.
X Press the abutton to save the setting.
When you switch on the Navigation
Navigationmes‐
mes‐
sages
sages display, navigation messages are
shown on the windscreen when the head-
up display is activated.
For more information on navigation, see the
separate operating instructions.
Further information on Traffic Sign Assist
(Y page 256).
Setting the position
You can adjust the position of the displayed
contents on the windscreen. X Switch on the Head-up display
(Y page 296).
X Use ò on the steering wheel to call up
the list of menus.
X Press the :or9 button on the steer-
ing wheel to select the Settings
Settings menu.
X Confirm by pressing aon the steering
wheel.
X Press the :or9 button to select the
Head-up display Head-up display submenu.
X Press ato confirm.
X Use the :or9 button to select the
Position
Position function.
X Press the abutton to save the setting.
X Use the :or9 button to set the
position from Level +5
Level +5toLevel -5
Level -5.
X Press the aor% button to save the
setting.
Using the Memory function, you can save and
call up the position of the head-up display as a single memory preset (Y page 130).
Adjusting the brightness
You can adjust the brightness of the displayed
contents on the windscreen. 310
Menus and submenusOn-board computer and displays
Page 316 of 489
Vehicle submenu
Setting permanent SPEEDTRONIC
X Use ò on the steering wheel to call up
the list of menus.
X Press the :or9 button on the steer-
ing wheel to select the Settings
Settings menu.
X Confirm by pressing aon the steering
wheel.
X Press the :or9 button to select the
Vehicle
Vehicle submenu.
X Press ato confirm.
X Press the :or9 button to select the
Limit speed (winter tyres)
Limit speed (winter tyres) function.
You will see the current setting.
X Press ato confirm.
X Press the :or9 button to adjust
permanent SPEEDTRONIC in increments of
ten ( 240 km/h
240 km/h to160 km/h
160 km/h). The Off
Offset-
ting switches permanent SPEEDTRONIC
off.
X Press the abutton to store the entry.
For further information on permanent SPEED-
TRONIC (Y page 221).
Restoring the factory settings X
Use ò on the steering wheel to call up
the list of menus.
X Press the :or9 button on the steer-
ing wheel to select the Settings
Settingsmenu.
X Confirm by pressing aon the steering
wheel.
X Press the :or9 button to select the
Factory settings
Factory settings submenu.
X Press ato confirm.
The Reset all settings?
Reset all settings? message
appears.
X Press the :or9 button to select No
No
or Yes
Yes .
X Press the abutton to confirm the selec-
tion.
If you have selected Yes
Yes , the multifunction
display shows a confirmation message. For safety reasons, not all functions are reset:
the Limit Limit speed
speed(winter
(winter tyres)
tyres)function
in permanent SPEEDTRONIC can only be set
in the Vehicle Vehicle submenu. Menus and submenus
313On-board computer and displays Z
Page 394 of 489
For the drive to the workshop, reset the trig-
gered active bonnet yourself. If the active
bonnet has been triggered, pedestrian pro-
tection may be limited.
Resetting G
WARNING
Certain components in the engine compart-
ment could be very hot, e.g. the engine, the
radiator and parts of the exhaust system.
There is a risk of injury when accessing the
engine compartment.
As far as possible, allow the engine to cool
down and only touch the components descri- bed in the following. X
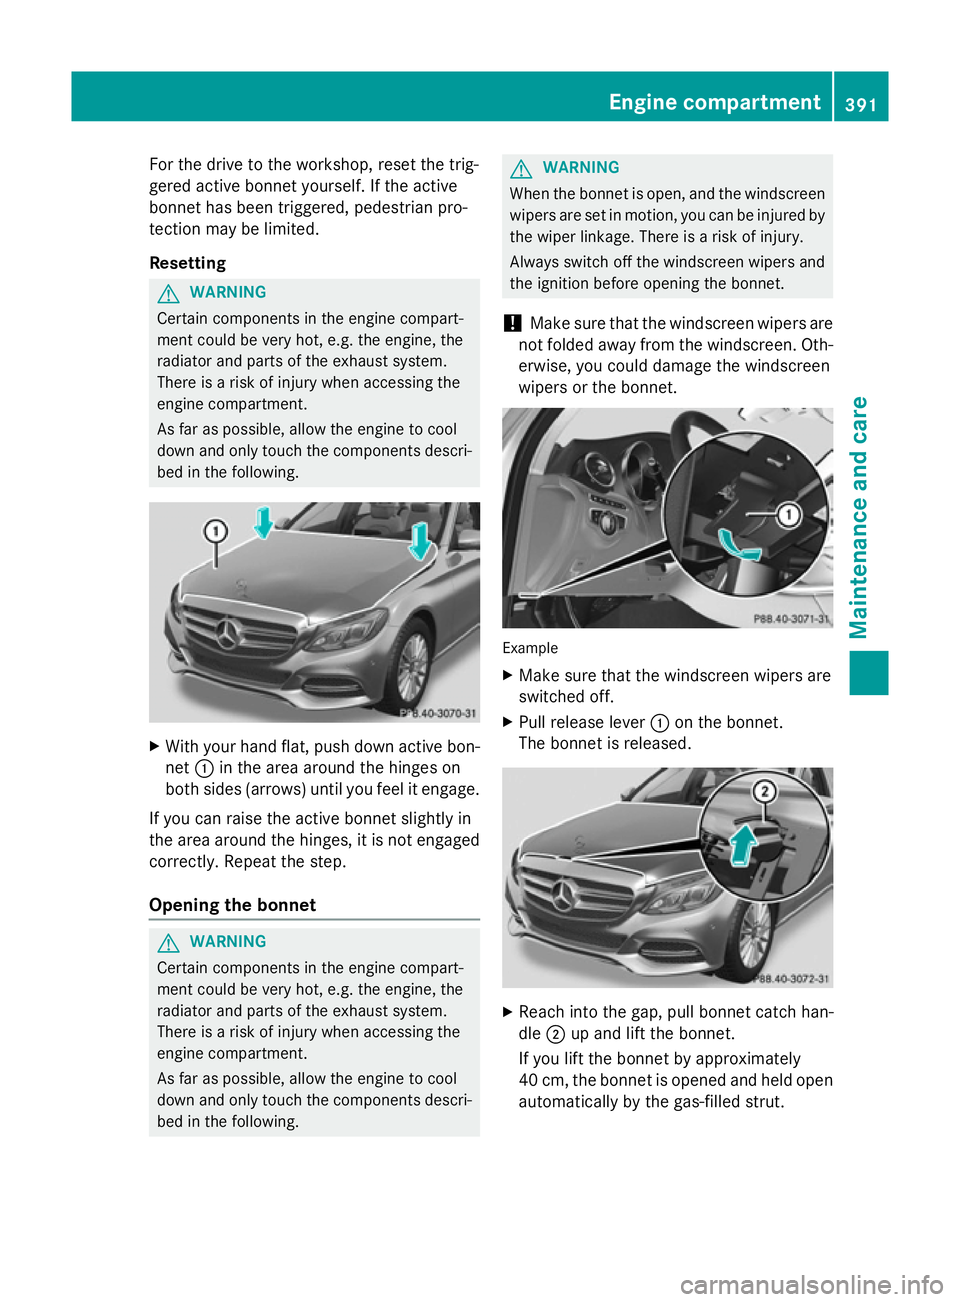
With your hand flat, push down active bon-
net :in the area around the hinges on
both sides (arrows) until you feel it engage.
If you can raise the active bonnet slightly in
the area around the hinges, it is not engaged correctly. Repeat the step.
Opening the bonnet G
WARNING
Certain components in the engine compart-
ment could be very hot, e.g. the engine, the
radiator and parts of the exhaust system.
There is a risk of injury when accessing the
engine compartment.
As far as possible, allow the engine to cool
down and only touch the components descri- bed in the following. G
WARNING
When the bonnet is open, and the windscreen wipers are set in motion, you can be injured by
the wiper linkage. There is a risk of injury.
Always switch off the windscreen wipers and
the ignition before opening the bonnet.
! Make sure that the windscreen wipers are
not folded away from the windscreen. Oth-
erwise, you could damage the windscreen
wipers or the bonnet. Example
X Make sure that the windscreen wipers are
switched off.
X Pull release lever :on the bonnet.
The bonnet is released. X
Reach into the gap, pull bonnet catch han-
dle ;up and lift the bonnet.
If you lift the bonnet by approximately
40 cm, the bonnet is opened and held open automatically by the gas-filled strut. Engine compartment
391Maintenance and care Z
Page 398 of 489
X
To open: pull cap:upwards by the tab
and open.
X Top up with the premixed washer fluid.
X To close: press cap :onto the filler neck
until it engages.
If the washer fluid level drops below the rec-
ommended minimum of 1 litre, a message
appears in the multifunction display prompt-
ing you to top up the washer fluid
(Y page 349).
Further information on windscreen washer
fluid/antifreeze (Y page 476). ASSYST PLUS
Service message
The ASSYST PLUS service interval display
informs you of the next service due date.
Information on the type of service and service intervals (see separate Service Booklet).
You can obtain further information from a
Mercedes-Benz Service Centre.
i The ASSYST PLUS service interval display
does not show any information on the
engine oil level. Observe the notes on the
engine oil level (Y page 392).
The multifunction display shows a service
message for a few seconds, e.g.:
R Service A in .. days
Service A in .. days
R Service A due Service A due
R Service A overdue by .. days
Service A overdue by .. days
Depending on the operating conditions of the vehicle, the remaining time or distance until
the next service due date is displayed.
The letter indicates which service is due. A
A
stands for a minor service and B
B for a major
service. A number or another letter may be
displayed after the letter.
Only for certain countries: the position after
the letter A
A or B Bindicates any necessary addi-
tional maintenance work. If you notify a quali- fied specialist workshop of this display, you will receive a statement on the associated
costs.
The ASSYST PLUS service interval display
does not take into account any periods of
time during which the battery is disconnec-
ted.
Maintaining the time-dependent service
schedule:
X Note down the service due date shown in
the multifunction display before discon-
necting the battery.
or
X After reconnecting the battery, subtract
the battery disconnection periods from the
service date shown on the display. Hiding service messages
X Press the aor% button on the steer-
ing wheel. Displaying service messages
X Switch the ignition on.
X Use ò on the steering wheel to call up
the list of menus.
X Press the 9or: button on the steer-
ing wheel to select the Service Servicemenu and
press ato confirm.
X Press the 9or: button on the steer-
ing wheel to select the ASSYST PLUS
ASSYST PLUS sub-
menu and press ato confirm.
The service due date appears in the multi-
function display. Information about Service
Resetting the ASSYST PLUS service
interval display !
If the ASSYST PLUS service interval dis-
play has been inadvertently reset, this set-
ting can be corrected at a qualified special-
ist workshop. ASSYST PLUS
395Maintenance and care Z
Page 399 of 489
Have service work carried out as described
in the Service Booklet. This may otherwise
lead to increased wear and damage to the
major assemblies or the vehicle.
A qualified specialist workshop, e.g. a
Mercedes-Benz Service Centre, will reset the ASSYST PLUS service interval display after
the service work has been carried out. You
can also obtain further information on main-
tenance work, for example.
Special service requirements The prescribed service interval is based on
normal operation of the vehicle. Service work
will need to be performed more often if the
vehicle is operated under arduous conditions or increased loads, for example:
R regular city driving with frequent intermedi-
ate stops
R if the vehicle is primarily used for travelling
short distances
R for frequent operation in mountainous ter-
rain or on poor road surfaces
R if the engine is often left idling for long peri-
ods
In these or similar operating conditions, have
the air filter, engine oil and oil filter, for exam-
ple, changed more frequently. The tyres must be checked more frequently if the vehicle is
operated under increased loads. Further
information can be obtained at a qualified
specialist workshop, e.g. a Mercedes-Benz
Service Centre.
Driving abroad An extensive Mercedes-Benz Service network
is also available in other countries. You can
obtain further information from any
Mercedes-Benz Service Centre. Care
General notes
H
Environmental note
Dispose of empty packaging and cleaning
cloths in an environmentally responsible man- ner.
! For cleaning your vehicle, do not use any
of the following:
R dry, rough or hard cloths
R abrasive cleaning agents
R solvents
R cleaning agents containing solvents
Do not scrub.
Do not touch the surfaces or protective
films with hard objects, e.g. a ring or ice
scraper. You could otherwise scratch or
damage the surfaces and protective film.
! Do not park up the vehicle for an extended
period straight after cleaning it, particularly after having cleaned the wheels with wheel cleaner. Wheel cleaners could cause
increased corrosion of the brake discs and
brake pads/linings. For this reason, you
should drive for a few minutes after clean-
ing. Braking heats the brake discs and the
brake pads/linings, thus drying them. The
vehicle can then be parked up.
Regular care of your vehicle is a condition for
retaining the quality in the long term.
Use care products and cleaning agents rec-
ommended and approved by Mercedes-Benz. Washing the vehicle and cleaning the
paintwork
Automatic car wash G
WARNING
Braking efficiency is reduced after the vehicle has been washed. There is a risk of an acci-
dent. 396
CareMaintenance and care
Page 426 of 489
the towing speed must not exceed 10 km/h.
For longer distances, have the vehicle loaded
and transported or towed with the rear axle
raised.
Vehicles with automatic transmission: the
automatic transmission automatically shifts
to position Pwhen you open the driver's or
front-passenger door or when you remove the
key from the ignition lock. In order to ensure that the automatic transmission stays in posi- tion Nwhen towing the vehicle, you must
observe the following points:
X Make sure that the vehicle is stationary.
X Turn the key to position 2in the ignition
lock.
X Depress and hold the brake pedal.
X Shift the automatic transmission to posi-
tion N.
Vehicles with manual transmission:
X Turn the key to position 2in the ignition
lock.
X Depress and hold the brake pedal.
X Depress the clutch pedal fully and shift to
neutral.
Vehicles with manual or automatic trans- mission:
X Leave the key in position 2in the ignition
lock.
X Release the brake pedal.
X Release the electric parking brake.
X Switch on the hazard warning lamps
(Y page 137).
In order to signal a change of direction when towing the vehicle with the hazard warning
lamps switched on, use the combination
switch as usual. In this case, only the turn
signals for the desired direction flash. When
you reset the combination switch, the hazard
warning lamps start flashing again. Transporting the vehicle
Hybrid vehicles: transportation of the vehi-
cle should only be carried out by professional
recovery companies.
! You may only secure the vehicle by the
wheels, not by parts of the vehicle such as
axle or steering components. Otherwise,
the vehicle could be damaged.
The towing eyes or trailer tow hitch can be
used to pull the vehicle onto a trailer or trans-
porter if you wish to transport it.
X Vehicles with manual transmission:
depress the clutch pedal fully and shift to
neutral.
X Vehicles with automatic transmission:
turn the key to position 2in the ignition
lock.
X Shift the automatic transmission to posi-
tion N.
As soon as the vehicle is loaded: X Prevent the vehicle from rolling away by
applying the electric parking brake.
X Vehicles with manual transmission:
depress the clutch pedal fully and engage
first or reverse gear.
X Vehicles with automatic transmission:
shift the automatic transmission to posi-
tion P.
X Turn the key to position 0in the ignition
lock and remove it.
X Secure the vehicle. Notes for 4MATIC vehicles
! Vehicles with 4MATIC must not be towed
with the front or rear axle raised; otherwise,
the transmission may be damaged.
Vehicles with 4MATIC may either be towed
away with both axles on the ground or be loa- ded up and transported.
If the vehicle has transmission damage or
damage to the front or rear axle, have it trans-
ported on a transporter or trailer. Towing away and tow-starting
423Breakdown assistance Z