display MERCEDES-BENZ C-CLASS SALOON 2014 Repair Manual
[x] Cancel search | Manufacturer: MERCEDES-BENZ, Model Year: 2014, Model line: C-CLASS SALOON, Model: MERCEDES-BENZ C-CLASS SALOON 2014Pages: 489, PDF Size: 14.88 MB
Page 210 of 489
X
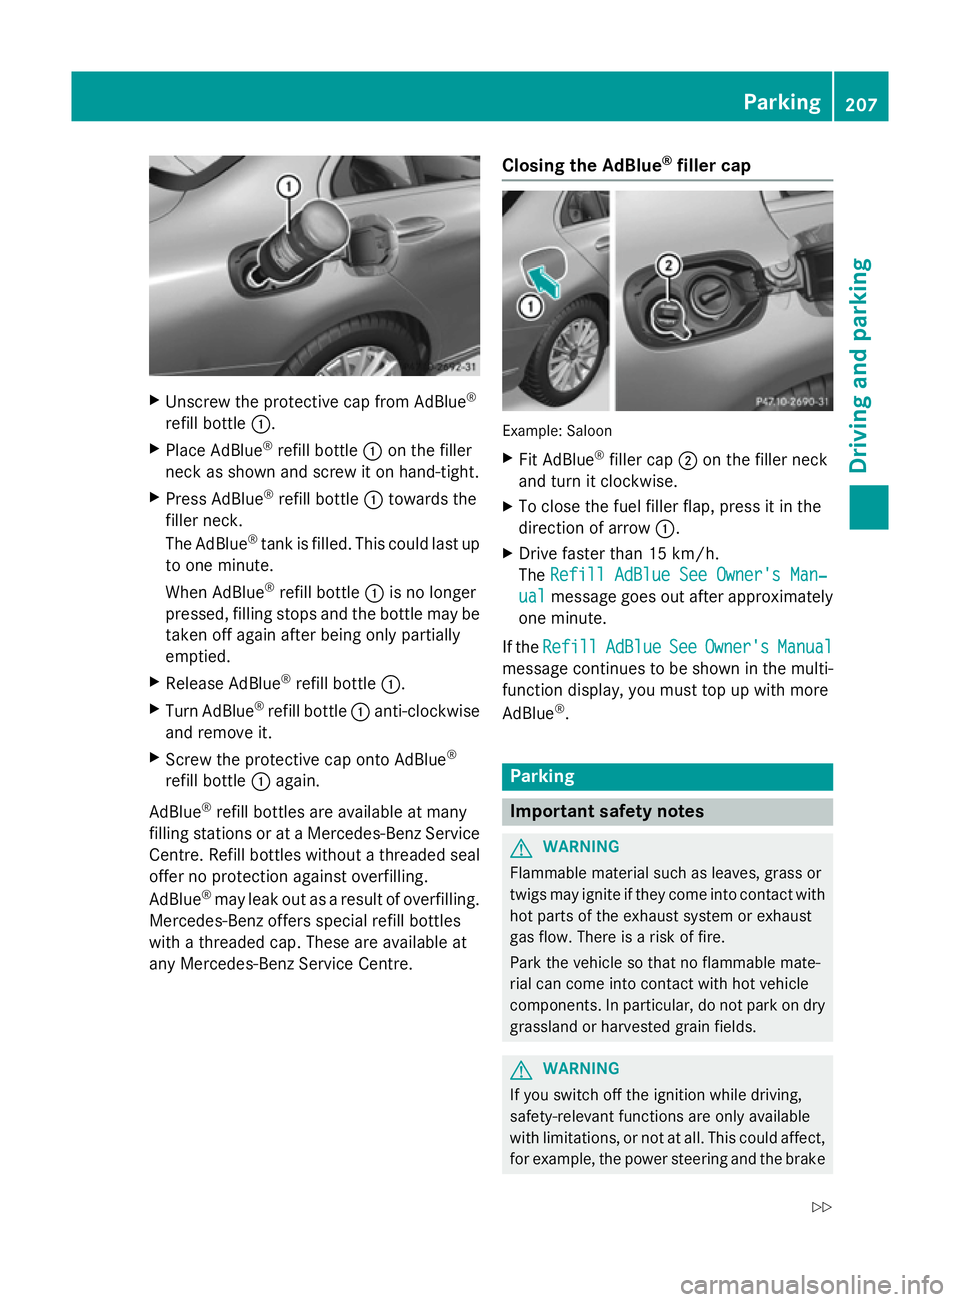
Unscrew the protective cap from AdBlue ®
refill bottle :.
X Place AdBlue ®
refill bottle :on the filler
neck as shown and screw it on hand-tight.
X Press AdBlue ®
refill bottle :towards the
filler neck.
The AdBlue ®
tank is filled. This could last up
to one minute.
When AdBlue ®
refill bottle :is no longer
pressed, filling stops and the bottle may be
taken off again after being only partially
emptied.
X Release AdBlue ®
refill bottle :.
X Turn AdBlue ®
refill bottle :anti-clockwise
and remove it.
X Screw the protective cap onto AdBlue ®
refill bottle :again.
AdBlue ®
refill bottles are available at many
filling stations or at a Mercedes-Benz Service
Centre. Refill bottles without a threaded seal offer no protection against overfilling.
AdBlue ®
may leak out as a result of overfilling.
Mercedes-Benz offers special refill bottles
with a threaded cap. These are available at
any Mercedes-Benz Service Centre. Closing the AdBlue
®
filler cap Example: Saloon
X Fit AdBlue ®
filler cap ;on the filler neck
and turn it clockwise.
X To close the fuel filler flap, press it in the
direction of arrow :.
X Drive faster than 15 km/h.
The Refill AdBlue See Owner's Man‐ Refill AdBlue See Owner's Man‐
ual
ual message goes out after approximately
one minute.
If the Refill
Refill AdBlue
AdBlueSee
SeeOwner's
Owner's Manual
Manual
message continues to be shown in the multi-
function display, you must top up with more
AdBlue ®
. Parking
Important safety notes
G
WARNING
Flammable material such as leaves, grass or
twigs may ignite if they come into contact with hot parts of the exhaust system or exhaust
gas flow. There is a risk of fire.
Park the vehicle so that no flammable mate-
rial can come into contact with hot vehicle
components. In particular, do not park on dry grassland or harvested grain fields. G
WARNING
If you switch off the ignition while driving,
safety-relevant functions are only available
with limitations, or not at all. This could affect, for example, the power steering and the brake Parking
207Driving and parking
Z
Page 214 of 489
Emergency braking
The vehicle can also be braked during an
emergency by using the electric parking
brake.
X While driving, push handle :of the elec-
trical parking brake (Y page 209).
The vehicle is braked as long as you keep
handle :of the electric parking brake
depressed. The longer the electric parking
brake handle :is depressed, the greater the
braking force.
During braking:
R a warning tone sounds
R the Release park. brake
Release park. brake message
appears
R the red !indicator lamp in the instru-
ment cluster flashes
When the vehicle has been braked to a stand- still, the electric parking brake is applied. Parking up the vehicle
If you leave the vehicle parked up for longer
than four weeks, the battery may be damaged by exhaustive discharging and further dam-
aged in the event of this occurring again.
X Disconnect the battery or connect it to a
trickle charger.
i You can obtain information about trickle
chargers from a qualified specialist work-
shop.
If you leave the vehicle parked up for longer
than six weeks, it may suffer from lack of use.
X Visit a qualified specialist workshop and
seek advice.
Hybrid vehicles: observe the safety notes
for the high-voltage battery (Y page 269). Driving tips
General driving tips
Important safety notes G
WARNING
If you switch off the ignition while driving,
safety-relevant functions are only available
with limitations, or not at all. This could affect, for example, the power steering and the brake
boosting effect. You will require considerably
more effort to steer and brake. There is a risk of an accident.
Do not switch off the ignition while driving.
Drive sensibly – save fuel Observe the following tips to save fuel:
X The tyres should always be inflated to the
recommended tyre pressure.
X Remove unnecessary loads.
X Remove roof racks when they are not nee-
ded.
X Warm up the engine at low engine speeds.
X Avoid frequent acceleration or braking.
X Have all maintenance work carried out as
indicated by the service intervals in the
Service Booklet or by the service interval
display.
Fuel consumption also increases when driv-
ing in cold weather, in stop-start traffic, on
short journeys and in hilly terrain. ECO display
The ECO display shows you how economical
your driving style is. The ECO display assists
you in achieving the most economical driving
style for the selected settings and prevailing
conditions. Consumption can be significantly influenced by your driving style. Driving tips
211Driving and parking Z
Page 215 of 489
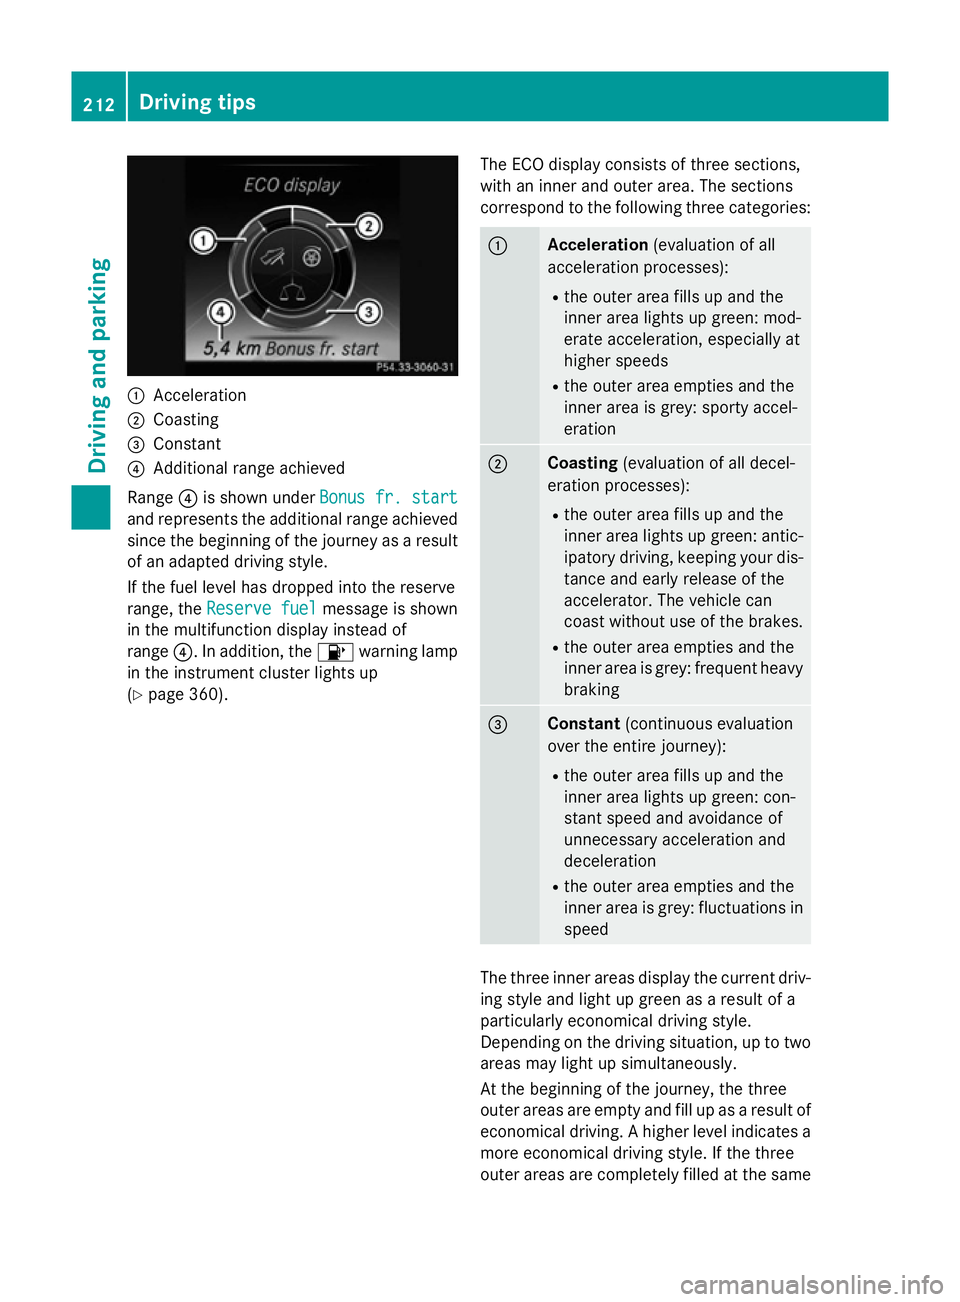
:
Acceleration
; Coasting
= Constant
? Additional range achieved
Range ?is shown under Bonus fr. start
Bonus fr. start
and represents the additional range achieved
since the beginning of the journey as a result of an adapted driving style.
If the fuel level has dropped into the reserve
range, the Reserve fuel Reserve fuel message is shown
in the multifunction display instead of
range ?. In addition, the 8warning lamp
in the instrument cluster lights up
(Y page 360). The ECO display consists of three sections,
with an inner and outer area. The sections
correspond to the following three categories: :
Acceleration
(evaluation of all
acceleration processes):
R the outer area fills up and the
inner area lights up green: mod-
erate acceleration, especially at
higher speeds
R the outer area empties and the
inner area is grey: sporty accel-
eration ;
Coasting
(evaluation of all decel-
eration processes):
R the outer area fills up and the
inner area lights up green: antic-
ipatory driving, keeping your dis- tance and early release of the
accelerator. The vehicle can
coast without use of the brakes.
R the outer area empties and the
inner area is grey: frequent heavy
braking =
Constant
(continuous evaluation
over the entire journey):
R the outer area fills up and the
inner area lights up green: con-
stant speed and avoidance of
unnecessary acceleration and
deceleration
R the outer area empties and the
inner area is grey: fluctuations in
speed The three inner areas display the current driv-
ing style and light up green as a result of a
particularly economical driving style.
Depending on the driving situation, up to two
areas may light up simultaneously.
At the beginning of the journey, the three
outer areas are empty and fill up as a result of economical driving. A higher level indicates a more economical driving style. If the three
outer areas are completely filled at the same 212
Driving tipsDriving an
d parking
Page 216 of 489
time, the driver has adopted the most eco-
nomical driving style for the selected settings
and prevailing conditions. The ECO display
border lights up.
The ECO display does not indicate the actual fuel consumption. The additionally achieved
range displayed under Bonus fr. start Bonus fr. start
does not indicate a fixed consumption reduc-
tion.
In addition to driving style, the actual con-
sumption is affected by other factors, such
as:
R load
R tyre pressure
R cold start
R choice of route
R the use of electrical consumers
These factors are not included in the ECO dis-
play.
An economical driving style involves driving at a moderate engine speed.
To achieve a higher value in the categories
"acceleration" and "smooth driving":
R observe the gearshift recommendation
R drive the vehicle in drive program E(vehi-
cles with the AGILITY SELECT switch)
On long journeys at a constant speed, e.g. on the motorway, only the outer area for "con-
stant" will change.
The ECO display summarises the driving style
from the start of the journey to its completion. Therefore, there are more marked changes in
the outer areas at the start of a journey. Dur- ing a prolonged driving time, these changes
are smaller. For more marked changes, per-
form a manual rest (Y page 299).
Further information on the ECO display
(Y page 298). Brakes
Important safety notes G
WARNING
If you shift down on a slippery road surface in an attempt to increase the engine's braking
effect, the drive wheels could lose their grip.
This increases the risk of skidding and having
an accident.
Do not shift down for additional engine brak-
ing on a slippery road surface.
Downhill gradients Change into a lower gear in good time on long
and steep downhill gradients. Take particular note of this when driving a laden vehicle and
when towing a trailer.
This also applies if cruise control, DISTRONIC
PLUS or SPEEDTRONIC are activated.
This will use the braking effect of the engine,
so less braking will be required to maintain
vehicle speed. This relieves the load on the
brake system and prevents the brakes from
overheating and wearing too quickly.
Heavy and light loads G
WARNING
The braking system can overheat if you leave your foot on the brake pedal while driving.
This increases the braking distance and could
even cause the braking system to fail. There is
a risk of an accident.
Never use the brake pedal as a footrest. Do
not simultaneously depress both the brake
pedal and the accelerator pedal while driving.
! Depressing the brake pedal constantly
results in excessive and premature wear to
the brake pads.
If heavy demands are made on the brakes, do not park the vehicle immediately. Drive on for
a short while. This allows the airflow to cool
the brakes more quickly. Driving
tips
213Driving an d parking Z
Page 220 of 489
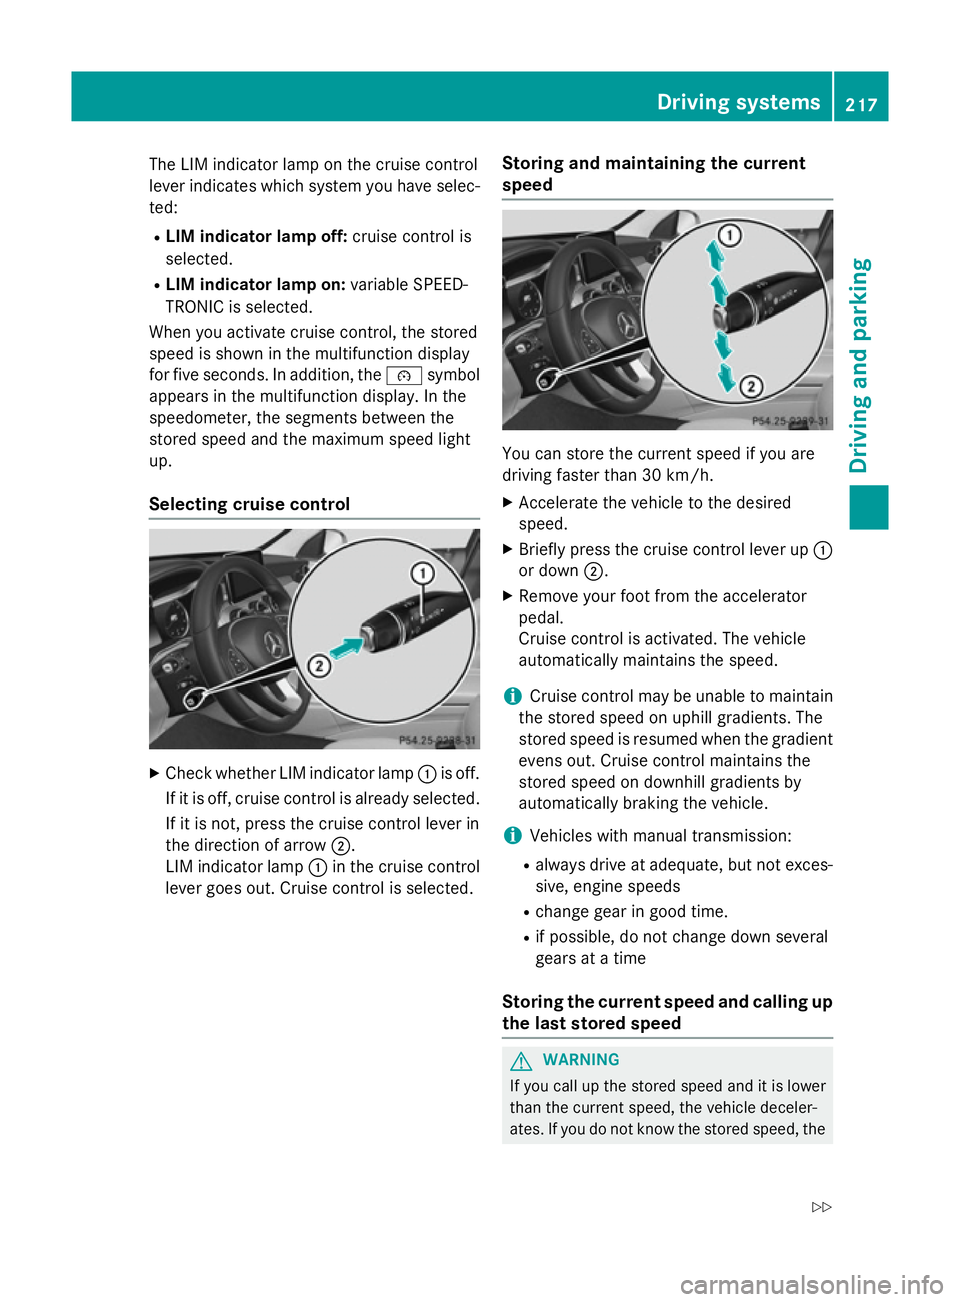
The LIM indicator lamp on the cruise control
lever indicates which system you have selec- ted:
R LIM indicator lamp off: cruise control is
selected.
R LIM indicator lamp on: variable SPEED-
TRONIC is selected.
When you activate cruise control, the stored
speed is shown in the multifunction display
for five seconds. In addition, the ésymbol
appears in the multifunction display. In the
speedometer, the segments between the
stored speed and the maximum speed light
up.
Selecting cruise control X
Check whether LIM indicator lamp :is off.
If it is off, cruise control is already selected. If it is not, press the cruise control lever in
the direction of arrow ;.
LIM indicator lamp :in the cruise control
lever goes out. Cruise control is selected. Storing and maintaining the current
speed You can store the current speed if you are
driving faster than 30 km/h.
X Accelerate the vehicle to the desired
speed.
X Briefly press the cruise control lever up :
or down ;.
X Remove your foot from the accelerator
pedal.
Cruise control is activated. The vehicle
automatically maintains the speed.
i Cruise control may be unable to maintain
the stored speed on uphill gradients. The
stored speed is resumed when the gradient evens out. Cruise control maintains the
stored speed on downhill gradients by
automatically braking the vehicle.
i Vehicles with manual transmission:
R always drive at adequate, but not exces-
sive, engine speeds
R change gear in good time.
R if possible, do not change down several
gears at a time
Storing the current speed and calling up
the last stored speed G
WARNING
If you call up the stored speed and it is lower
than the current speed, the vehicle deceler-
ates. If you do not know the stored speed, the Driving systems
217Driving and parking
Z
Page 223 of 489
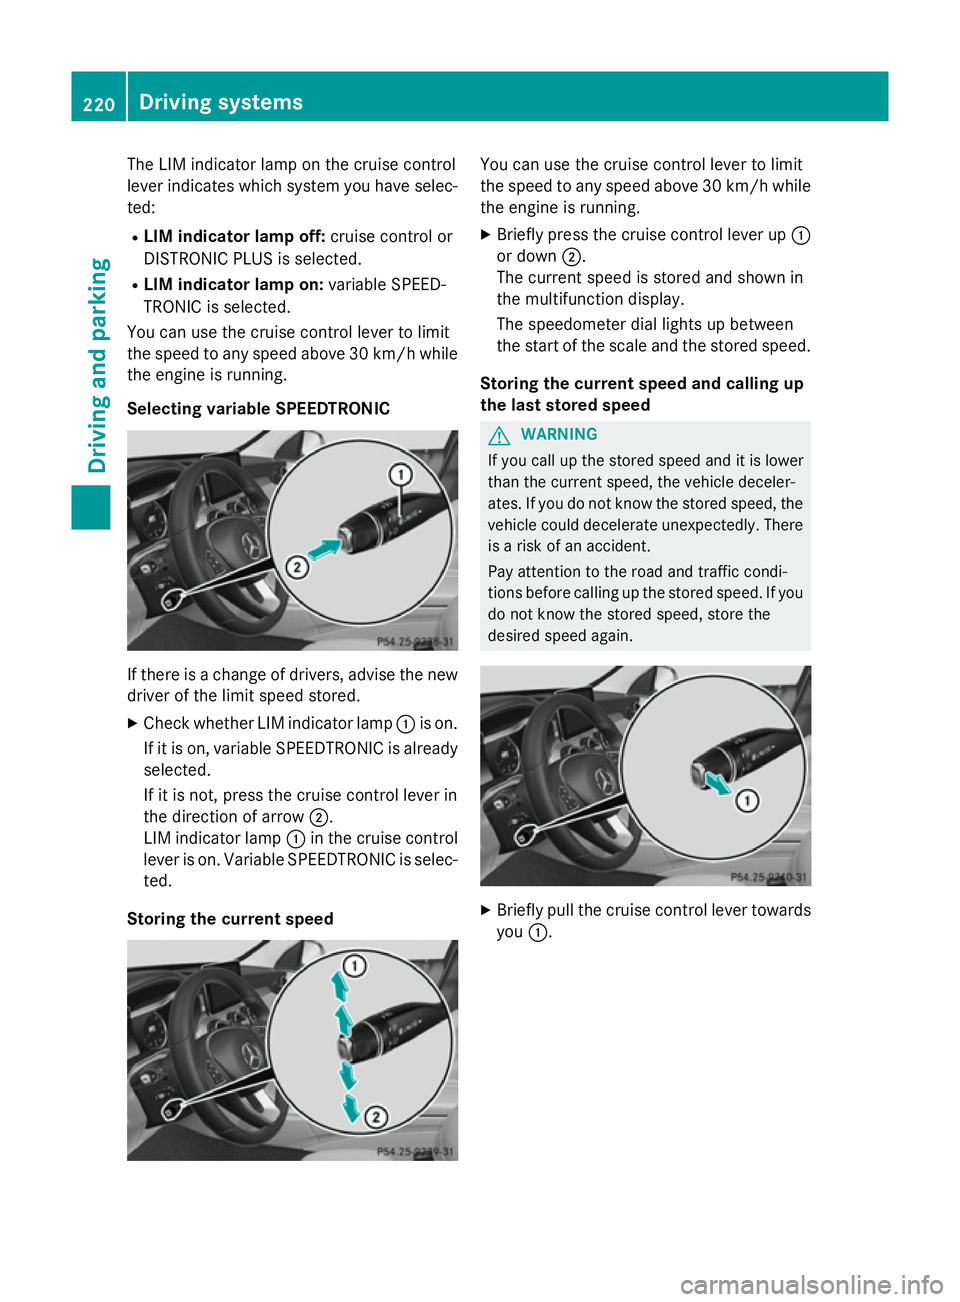
The LIM indicator lamp on the cruise control
lever indicates which system you have selec- ted:
R LIM indicator lamp off: cruise control or
DISTRONIC PLUS is selected.
R LIM indicator lamp on: variable SPEED-
TRONIC is selected.
You can use the cruise control lever to limit
the speed to any speed above 30 km/hw hile
the engine is running.
Selecting variable SPEEDTRONIC If there is a change of drivers, advise the new
driver of the limit speed stored.
X Check whether LIM indicator lamp :is on.
If it is on, variable SPEEDTRONIC is already
selected.
If it is not, press the cruise control lever in
the direction of arrow ;.
LIM indicator lamp :in the cruise control
lever is on. Variable SPEEDTRONIC is selec-
ted.
Storing the current speed You can use the cruise control lever to limit
the speed to any speed above 30 km/h while
the engine is running.
X Briefly press the cruise control lever up :
or down ;.
The current speed is stored and shown in
the multifunction display.
The speedometer dial lights up between
the start of the scale and the stored speed.
Storing the current speed and calling up
the last stored speed G
WARNING
If you call up the stored speed and it is lower
than the current speed, the vehicle deceler-
ates. If you do not know the stored speed, the vehicle could decelerate unexpectedly. There
is a risk of an accident.
Pay attention to the road and traffic condi-
tions before calling up the stored speed. If you do not know the stored speed, store the
desired speed again. X
Briefly pull the cruise control lever towards
you :. 220
Driving systemsDriving and parking
Page 224 of 489
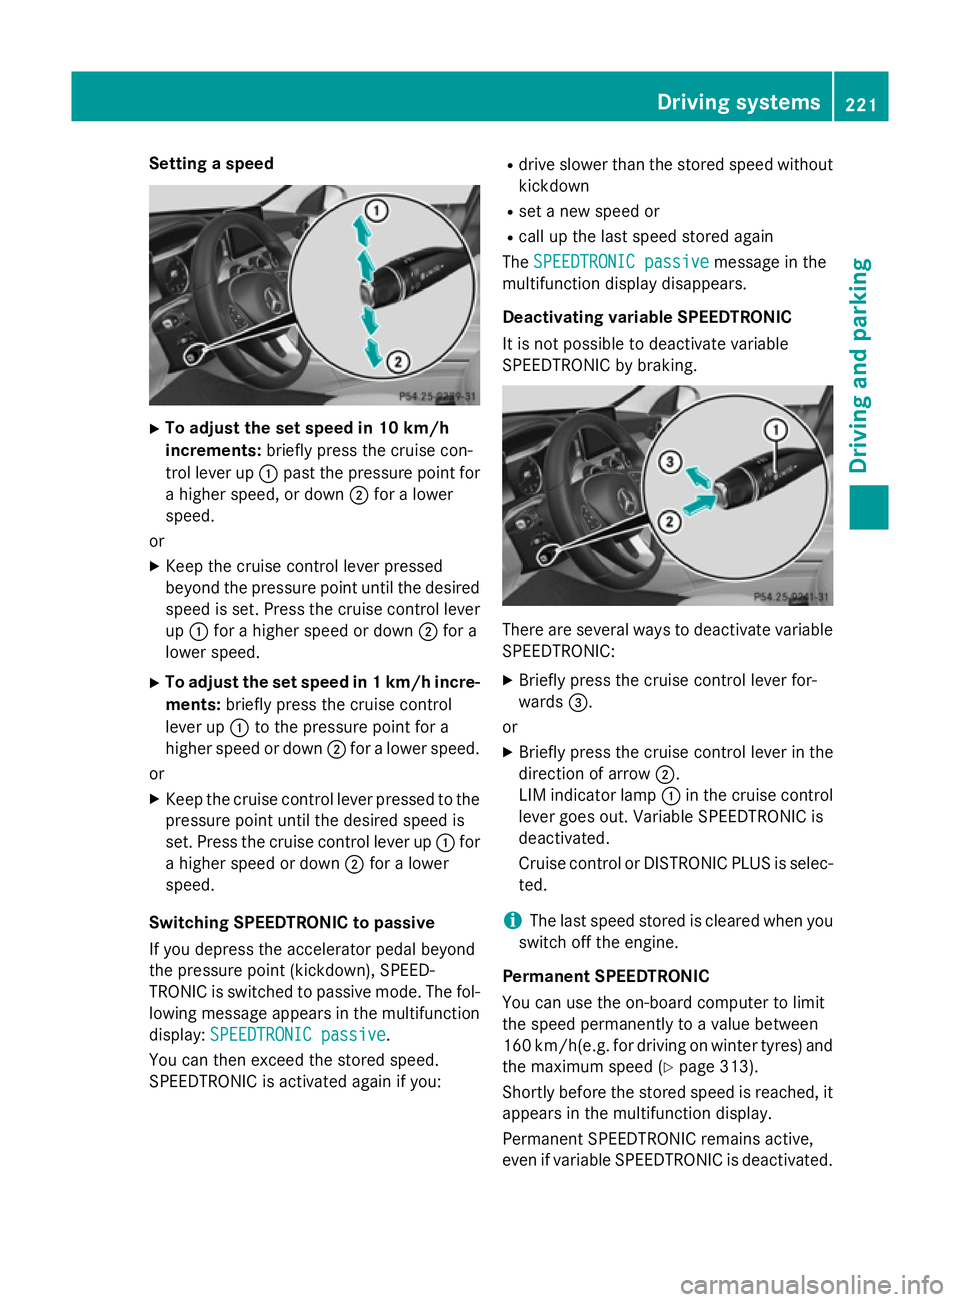
Setting a speed
X
To adjust the set speed in 10 km/h
increments: briefly press the cruise con-
trol lever up :past the pressure point for
a higher speed, or down ;for a lower
speed.
or
X Keep the cruise control lever pressed
beyond the pressure point until the desired
speed is set. Press the cruise control lever
up : for a higher speed or down ;for a
lower speed.
X To adjust the set speed in 1 km/h incre-
ments: briefly press the cruise control
lever up :to the pressure point for a
higher speed or down ;for a lower speed.
or
X Keep the cruise control lever pressed to the
pressure point until the desired speed is
set. Press the cruise control lever up :for
a higher speed or down ;for a lower
speed.
Switching SPEEDTRONIC to passive
If you depress the accelerator pedal beyond
the pressure point (kickdown), SPEED-
TRONIC is switched to passive mode. The fol-
lowing message appears in the multifunction
display: SPEEDTRONIC passive
SPEEDTRONIC passive.
You can then exceed the stored speed.
SPEEDTRONIC is activated again if you: R
drive slower than the stored speed without
kickdown
R set a new speed or
R call up the last speed stored again
The SPEEDTRONIC passive SPEEDTRONIC passive message in the
multifunction display disappears.
Deactivating variable SPEEDTRONIC
It is not possible to deactivate variable
SPEEDTRONIC by braking. There are several ways to deactivate variable
SPEEDTRONIC:
X Briefly press the cruise control lever for-
wards =.
or X Briefly press the cruise control lever in the
direction of arrow ;.
LIM indicator lamp :in the cruise control
lever goes out. Variable SPEEDTRONIC is
deactivated.
Cruise control or DISTRONIC PLUS is selec-
ted.
i The last speed stored is cleared when you
switch off the engine.
Permanent SPEEDTRONIC
You can use the on-board computer to limit
the speed permanently to a value between
160 km/h(e.g. for driving on winter tyres) and the maximum speed (Y page 313).
Shortly before the stored speed is reached, it
appears in the multifunction display.
Permanent SPEEDTRONIC remains active,
even if variable SPEEDTRONIC is deactivated. Driving systems
221Driving and parking Z
Page 230 of 489
R
a system fault occurs
R the power supply is insufficient
If a malfunction occurs, then the transmission may also be shifted into position Pautomat-
ically.
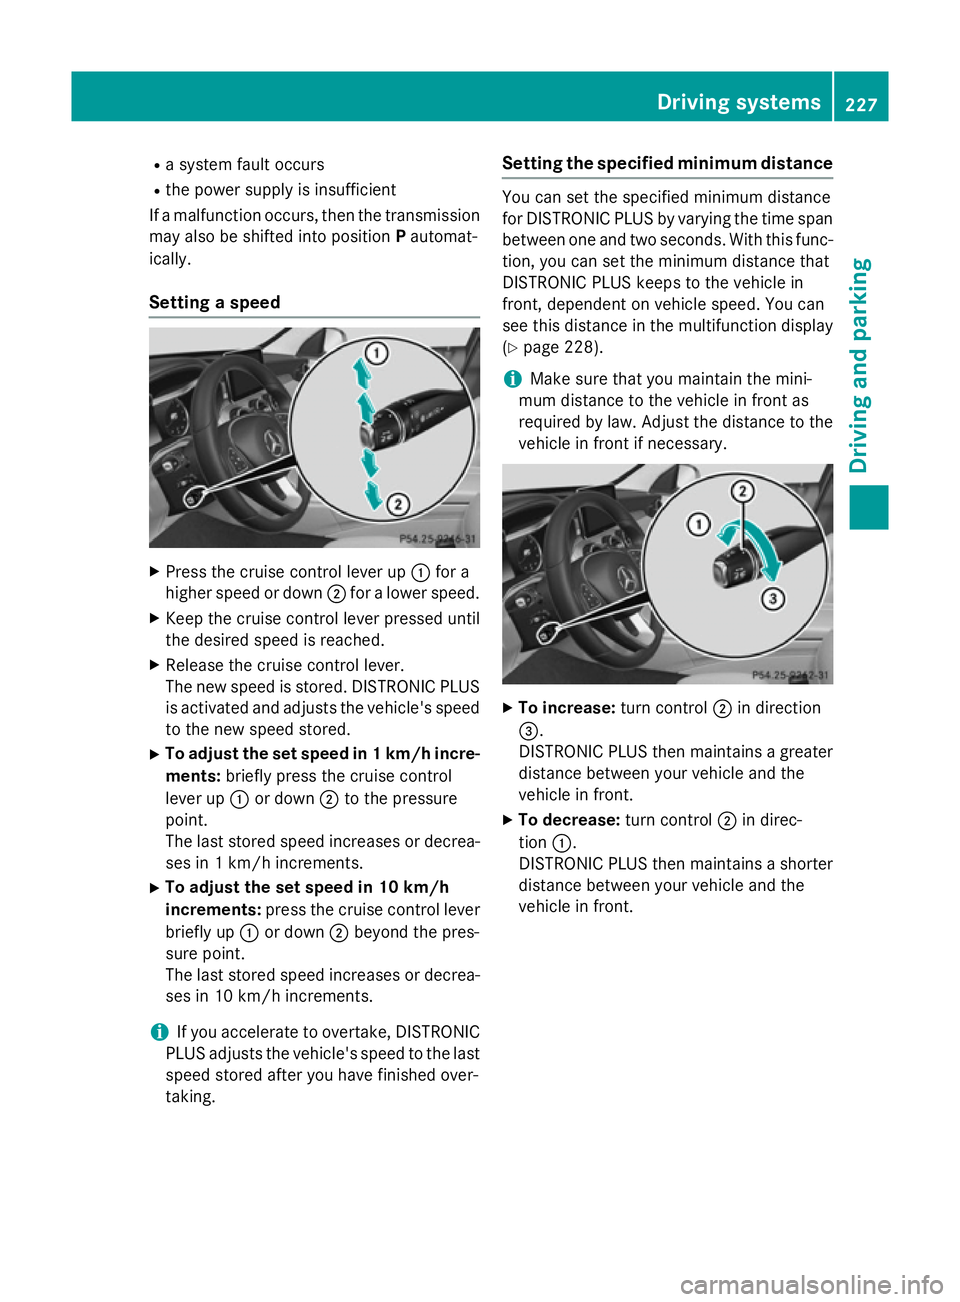
Setting a speed X
Press the cruise control lever up :for a
higher speed or down ;for a lower speed.
X Keep the cruise control lever pressed until
the desired speed is reached.
X Release the cruise control lever.
The new speed is stored. DISTRONIC PLUS
is activated and adjusts the vehicle's speed
to the new speed stored.
X To adjust the set speed in 1 km/h incre-
ments: briefly press the cruise control
lever up :or down ;to the pressure
point.
The last stored speed increases or decrea- ses in 1 km/h increments.
X To adjust the set speed in 10 km/h
increments: press the cruise control lever
briefly up :or down ;beyond the pres-
sure point.
The last stored speed increases or decrea- ses in 10 km/h increments.
i If you accelerate to overtake, DISTRONIC
PLUS adjusts the vehicle's speed to the last
speed stored after you have finished over-
taking. Setting the specified minimum distance You can set the specified minimum distance
for DISTRONIC PLUS by varying the time span between one and two seconds. With this func-
tion, you can set the minimum distance that
DISTRONIC PLUS keeps to the vehicle in
front, dependent on vehicle speed. You can
see this distance in the multifunction display
(Y page 228).
i Make sure that you maintain the mini-
mum distance to the vehicle in front as
required by law. Adjust the distance to the
vehicle in front if necessary. X
To increase: turn control;in direction
=.
DISTRONIC PLUS then maintains a greater distance between your vehicle and the
vehicle in front.
X To decrease: turn control;in direc-
tion :.
DISTRONIC PLUS then maintains a shorter
distance between your vehicle and the
vehicle in front. Driving systems
227Driving and parking Z
Page 231 of 489
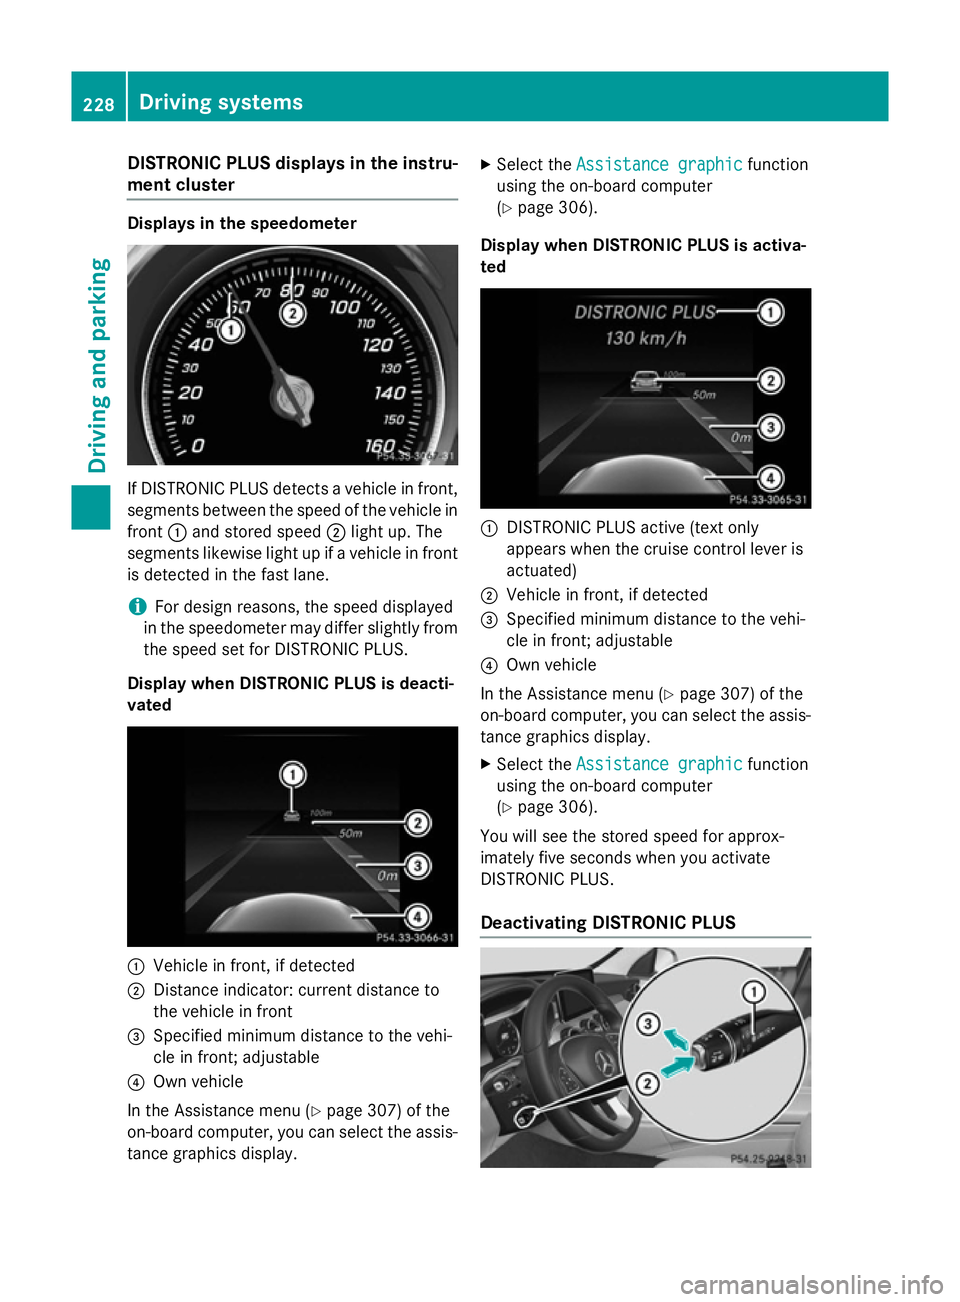
DISTRONIC PLUS displays in the instru-
ment cluster Displays in the speedometer
If DISTRONIC PLUS detects a vehicle in front,
segments between the speed of the vehicle in
front :and stored speed ;light up. The
segments likewise light up if a vehicle in front
is detected in the fast lane.
i For design reasons, the speed displayed
in the speedometer may differ slightly from the speed set for DISTRONIC PLUS.
Display when DISTRONIC PLUS is deacti-
vated :
Vehicle in front, if detected
; Distance indicator: current distance to
the vehicle in front
= Specified minimum distance to the vehi-
cle in front; adjustable
? Own vehicle
In the Assistance menu (Y page 307) of the
on-board computer, you can select the assis- tance graphics display. X
Select the Assistance graphic
Assistance graphic function
using the on-board computer
(Y page 306).
Display when DISTRONIC PLUS is activa-
ted :
DISTRONIC PLUS active (text only
appears when the cruise control lever is
actuated)
; Vehicle in front, if detected
= Specified minimum distance to the vehi-
cle in front; adjustable
? Own vehicle
In the Assistance menu (Y page 307) of the
on-board computer, you can select the assis-
tance graphics display.
X Select the Assistance graphic Assistance graphic function
using the on-board computer
(Y page 306).
You will see the stored speed for approx-
imately five seconds when you activate
DISTRONIC PLUS.
Deactivating DISTRONIC PLUS 228
Driving syste
msDriving and parking
Page 232 of 489
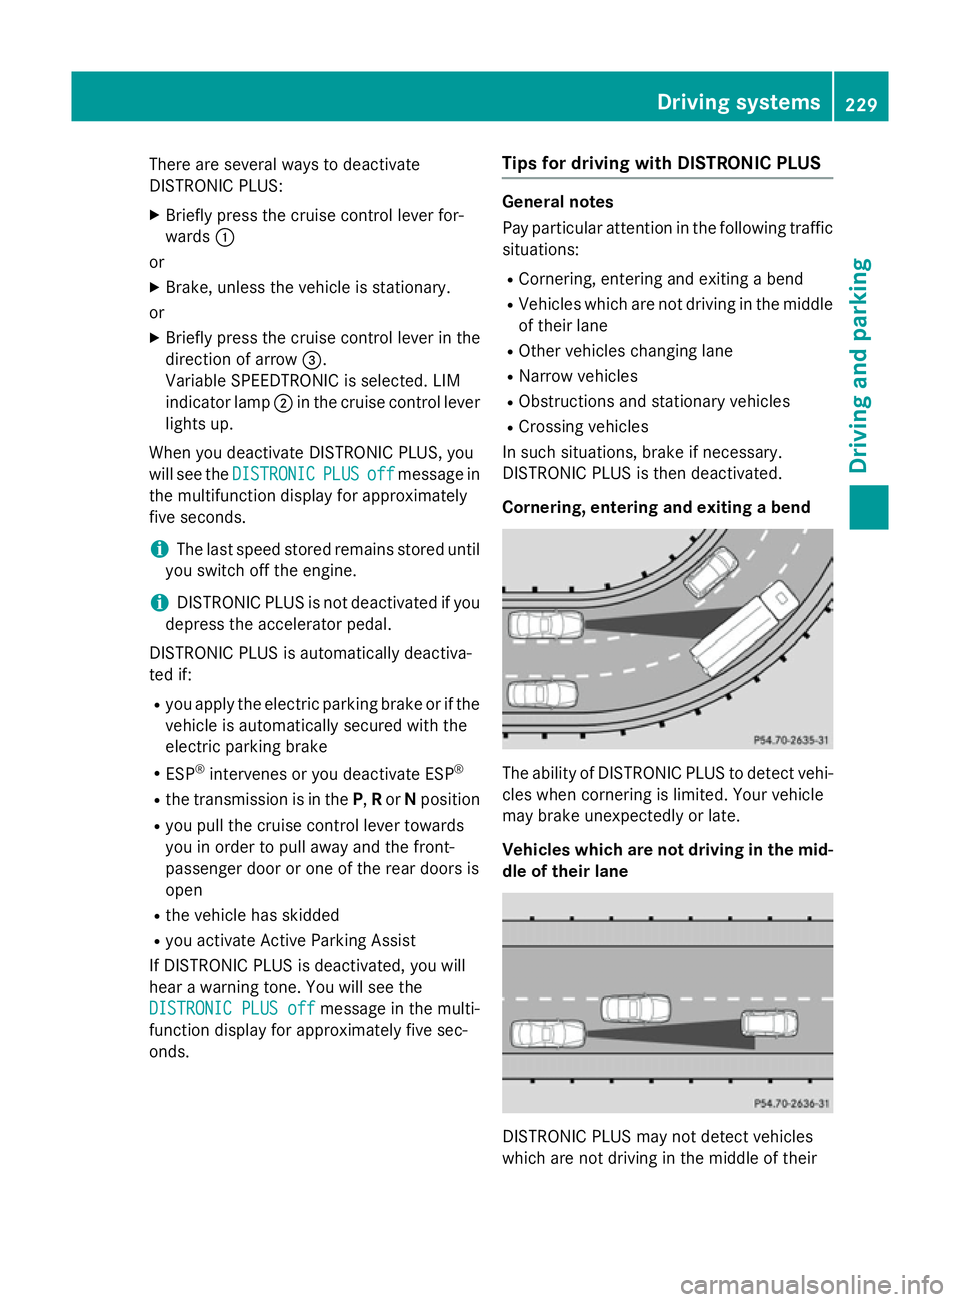
There are several ways to deactivate
DISTRONIC PLUS:
X Briefly press the cruise control lever for-
wards :
or
X Brake, unless the vehicle is stationary.
or X Briefly press the cruise control lever in the
direction of arrow =.
Variable SPEEDTRONIC is selected. LIM
indicator lamp ;in the cruise control lever
lights up.
When you deactivate DISTRONIC PLUS, you
will see the DISTRONIC
DISTRONIC PLUS PLUSoff
offmessage in
the multifunction display for approximately
five seconds.
i The last speed stored remains stored until
you switch off the engine.
i DISTRONIC PLUS is not deactivated if you
depress the accelerator pedal.
DISTRONIC PLUS is automatically deactiva-
ted if: R you apply the electric parking brake or if the
vehicle is automatically secured with the
electric parking brake
R ESP ®
intervenes or you deactivate ESP ®
R the transmission is in the P,Ror Nposition
R you pull the cruise control lever towards
you in order to pull away and the front-
passenger door or one of the rear doors is
open
R the vehicle has skidded
R you activate Active Parking Assist
If DISTRONIC PLUS is deactivated, you will
hear a warning tone. You will see the
DISTRONIC PLUS off
DISTRONIC PLUS off message in the multi-
function display for approximately five sec-
onds. Tips for driving with DISTRONIC PLUS General notes
Pay particular attention in the following traffic
situations:
R Cornering, entering and exiting a bend
R Vehicles which are not driving in the middle
of their lane
R Other vehicles changing lane
R Narrow vehicles
R Obstructions and stationary vehicles
R Crossing vehicles
In such situations, brake if necessary.
DISTRONIC PLUS is then deactivated.
Cornering, entering and exiting a bend The ability of DISTRONIC PLUS to detect vehi-
cles when cornering is limited. Your vehicle
may brake unexpectedly or late.
Vehicles which are not driving in the mid- dle of their lane DISTRONIC PLUS may not detect vehicles
which are not driving in the middle of their Driving systems
229Driving and parking Z