display MERCEDES-BENZ C-CLASS SALOON 2014 Owner's Manual
[x] Cancel search | Manufacturer: MERCEDES-BENZ, Model Year: 2014, Model line: C-CLASS SALOON, Model: MERCEDES-BENZ C-CLASS SALOON 2014Pages: 489, PDF Size: 14.88 MB
Page 26 of 489
Warnings
Stickers .......................................... .42
Washer fluid
Display message ............................ 349
Wheel and tyre combinations
see Tyres
Wheel bolt tightening torque ........... 443
Wheel chock ...................................... 439
Wheels
Changing a wheel .......................... 437
Changing/replacing ....................... 438
Checking ........................................ 429
Cleaning ......................................... 399
Emergency spare wheel ................. 461
Fitting a new wheel ........................ 442
Fitting a wheel .............................. .438
Important safety notes .................. 428
Removing a wheel .......................... 442
Storing .......................................... .438
Tightening torque ........................... 443
Wheel size/tyre size ..................... .444
Windowbag
Display message ............................ 326
Operation ......................................... 53
Windows
Cleaning ......................................... 399
see Side windows
Windscreen
Demisting ...................................... 163
Windscreen washer fluid
see Windscreen washer system
Windscreen washer system
Notes ............................................. 476
Topping up ..................................... 394
Windscreen wipers
Problem (malfunction) ................... 148
Replacing the wiper blades ............ 145
Switching on/off ........................... 145
Winter operation
Important safety notes .................. 430
Radiator cover ............................... 392
Slippery road surfaces ................... 215
Snow chains .................................. 431
Summer tyres ................................ 430
Winter tyres
Limiting the speed (on-board com-
puter) ............................................. 313
M+S tyres ...................................... 430 Wiper blades
Cleaning ......................................... 400
Important safety notes .................. 145
Replacing ....................................... 145
Replacing (windscreen) .................. 146
Wooden trim (cleaning instruc-
tions) ................................................. .403
Workshop
see Qualified specialist workshop Index
23
Page 35 of 489
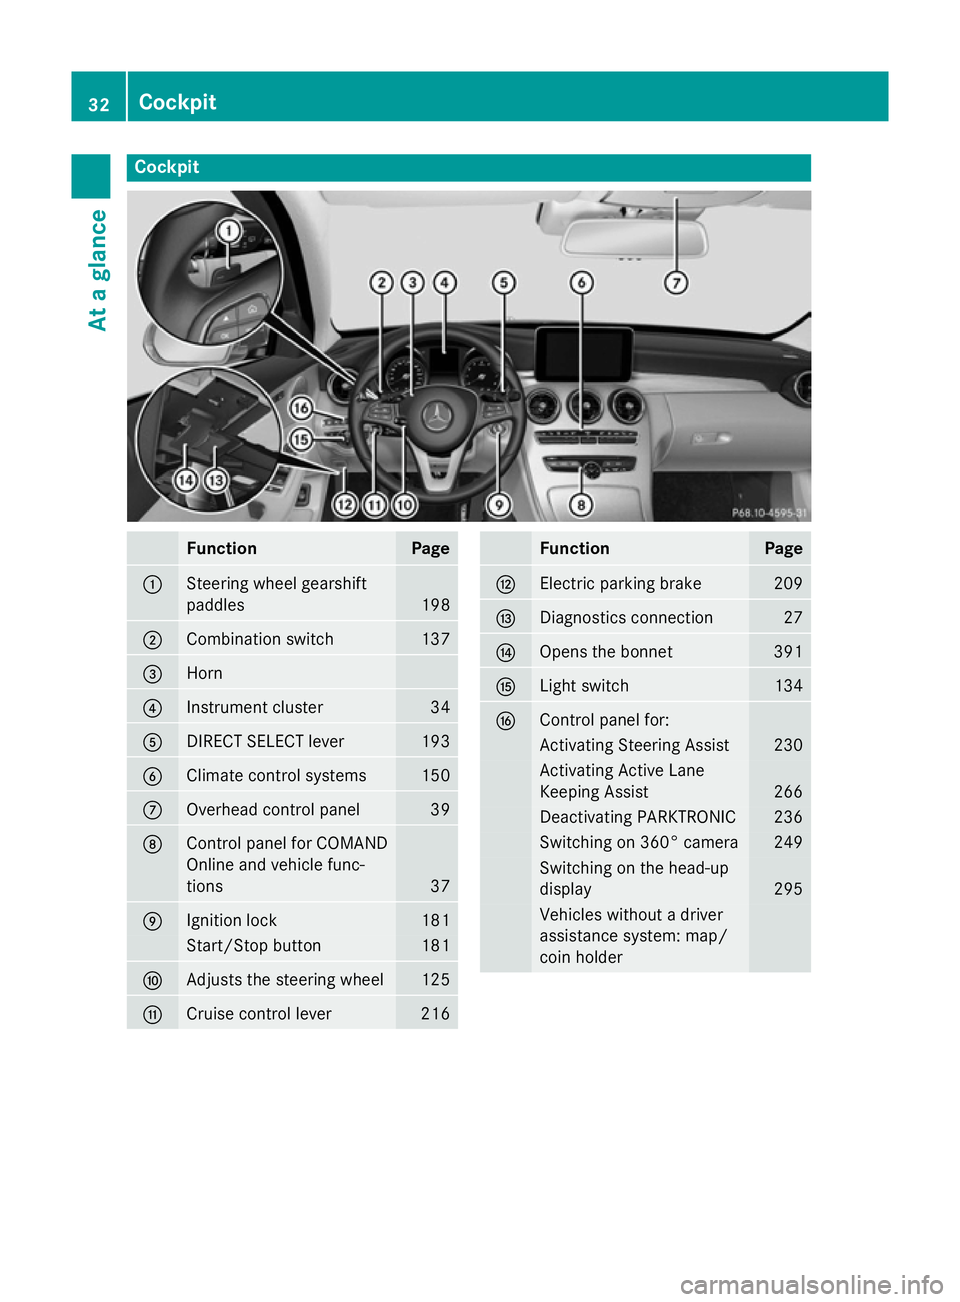
Cockpit
Function Page
:
Steering wheel gearshift
paddles
198
;
Combination switch 137
=
Horn
?
Instrument cluster 34
A
DIRECT SELECT lever 193
B
Climate control systems 150
C
Overhead control panel 39
D
Control panel for COMAND
Online and vehicle func-
tions
37
E
Ignition lock 181
Start/Stop button 181
F
Adjusts the steering wheel 125
G
Cruise control lever 216 Function Page
H
Electric parking brake 209
I
Diagnostics connection 27
J
Opens the bonnet 391
K
Light switch 134
L
Control panel for:
Activating Steering Assist 230
Activating Active Lane
Keeping Assist 266
Deactivating PARKTRONIC 236
Switching on 360° camera 249
Switching on the head-up
display
295
Vehicles without a driver
assistance system: map/
coin holder32
CockpitAt a glance
Page 36 of 489
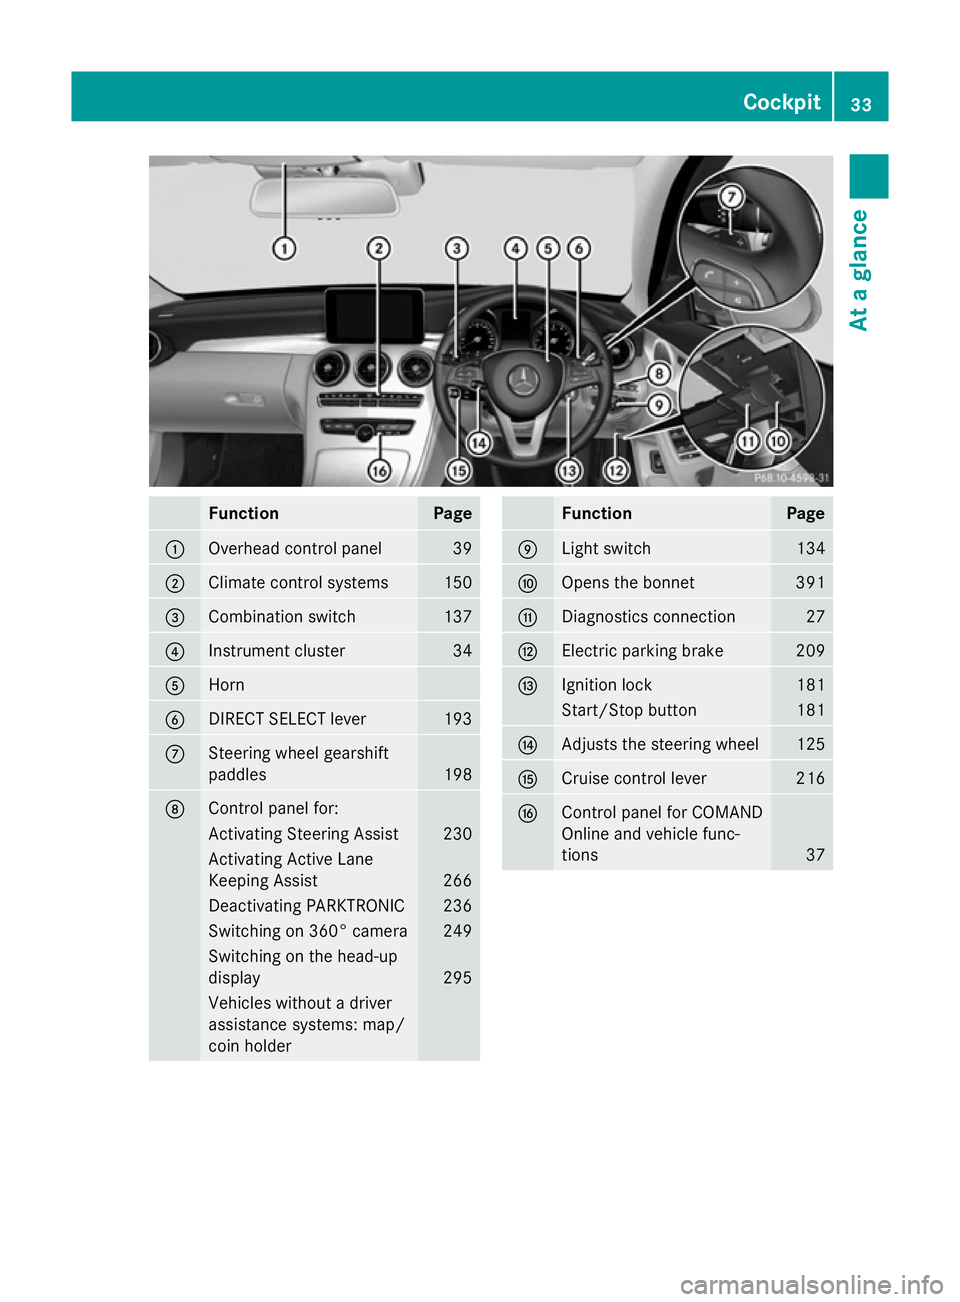
Function Page
:
Overhead control panel 39
;
Climate control systems 150
=
Combination switch 137
?
Instrument cluster 34
A
Horn
B
DIRECT SELECT lever 193
C
Steering wheel gearshift
paddles
198
D
Control panel for:
Activating Steering Assist 230
Activating Active Lane
Keeping Assist
266
Deactivating PARKTRONIC 236
Switching on 360° camera 249
Switching on the head-up
display
295
Vehicles without a driver
assistance systems: map/
coin holder Function Page
E
Light switch 134
F
Opens the bonnet 391
G
Diagnostics connection 27
H
Electric parking brake 209
I
Ignition lock 181
Start/Stop button 181
J
Adjusts the steering wheel 125
K
Cruise control lever 216
L
Control panel for COMAND
Online and vehicle func-
tions
37Cockpit
33At a glance
Page 37 of 489
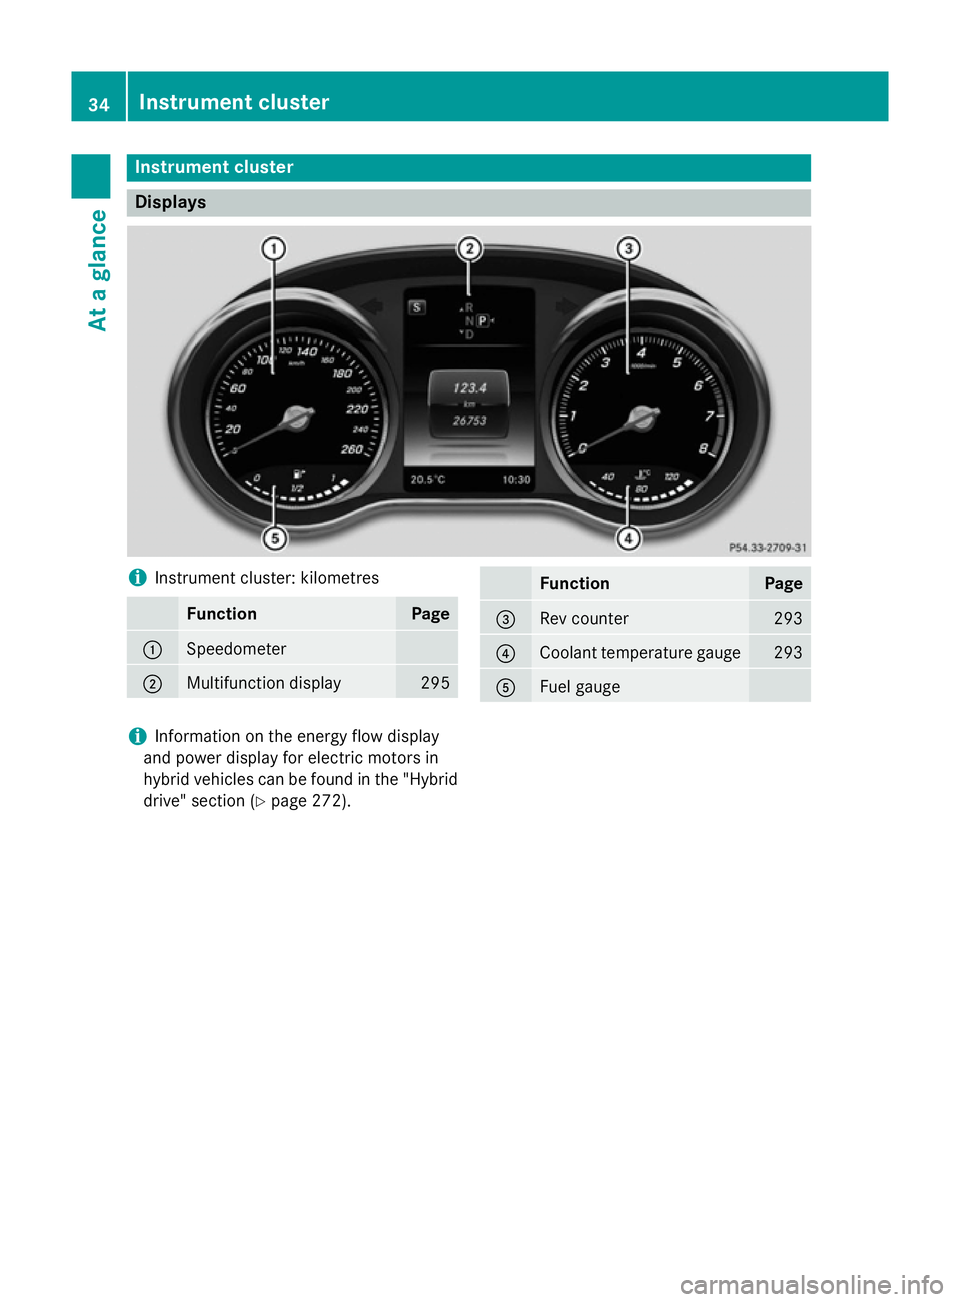
Instrument cluster
Displays
i
Instrument cluster: kilometres Function Page
:
Speedometer
;
Multifunction display 295 Function Page
=
Rev counter 293
?
Coolant temperature gauge 293
A
Fuel gauge
i
Information on the energy flow display
and power display for electric motors in
hybrid vehicles can be found in the "Hybrid drive" section (Y page 272).34
Instrument clusterAt a glance
Page 39 of 489
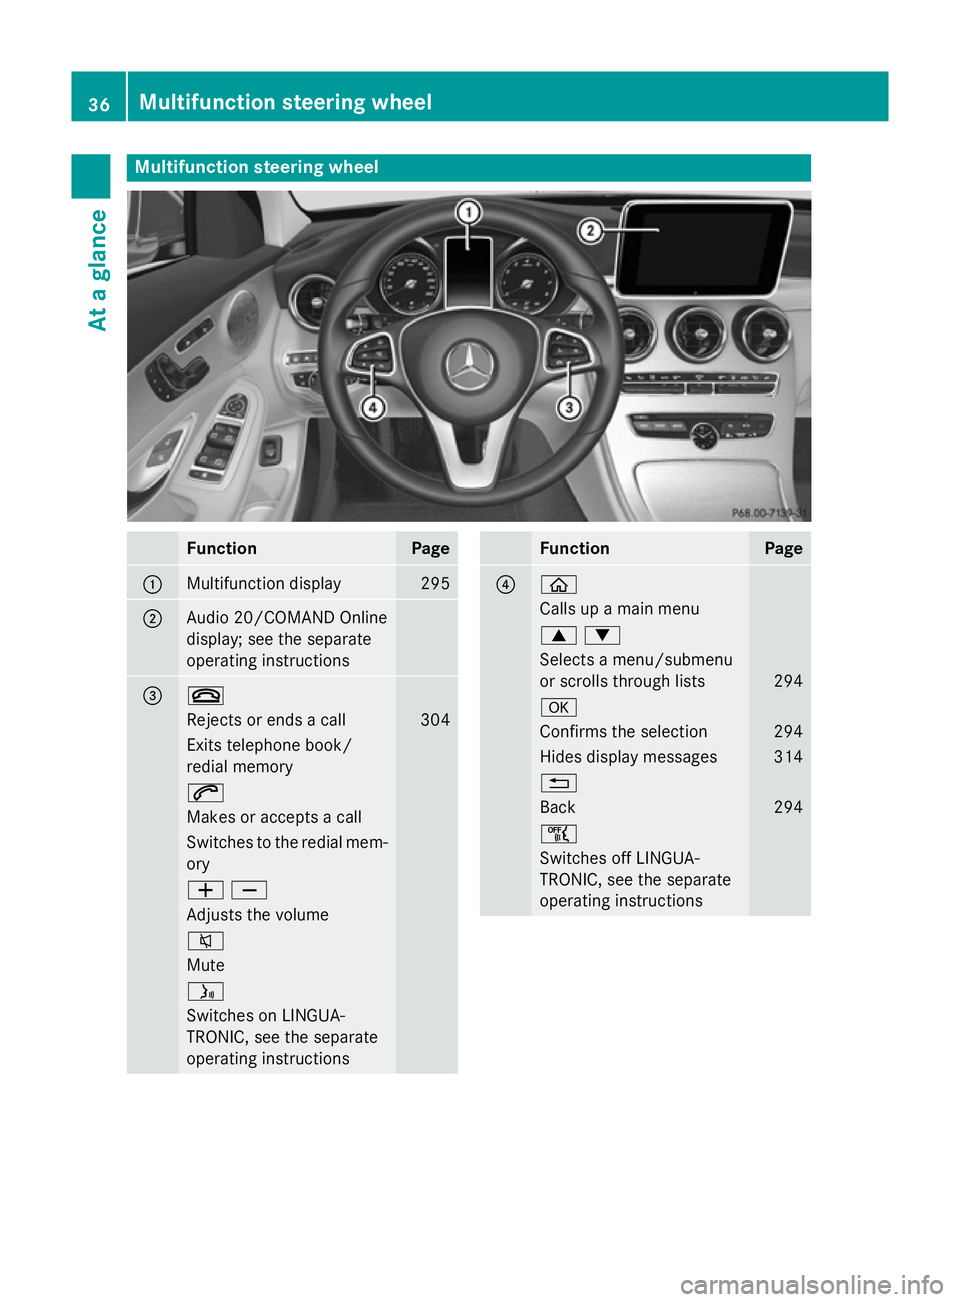
Multifunction steering wheel
Function Page
:
Multifunction display 295
;
Audio 20/COMAND Online
display; see the separate
operating instructions
= ~
Rejects or ends a call 304
Exits telephone book/
redial memory 6
Makes or accepts a call
Switches to the redial mem-
ory WX
Adjusts the volume
8
Mute
ó
Switches on LINGUA-
TRONIC, see the separate
operating instructions Function Page
? ò
Calls up a main menu
9:
Selects a menu/submenu
or scrolls through lists
294
a
Confirms the selection 294
Hides display messages 314
%
Back 294
ñ
Switches off LINGUA-
TRONIC, see the separate
operating instructions36
Multifunction steering wheelAt a glance
Page 49 of 489
There is an increased risk of serious or even
fatal injuries.
Have the restraint system checked and
repaired immediately at a qualified specialist
workshop.
Hybrid vehicles: G
DANGER
If the restraint system is malfunctioning,
restraint system components may be trig-
gered unintentionally or might not be trig-
gered at all in the event of an accident with a high rate of vehicle deceleration. This can
effect belt tensioners or airbags, for example. In addition, the vehicle's high-voltage electri-
cal system may not be deactivated as inten-
ded in the event of an accident. Touching
damaged components of the vehicle's high-
voltage electrical system could result in an
electric shock. There is an increased risk of
injury, possibly even fatal.
Have the restraint system checked and
repaired immediately at a qualified specialist
workshop. After an accident, immediately
switch the ignition off and remove the key
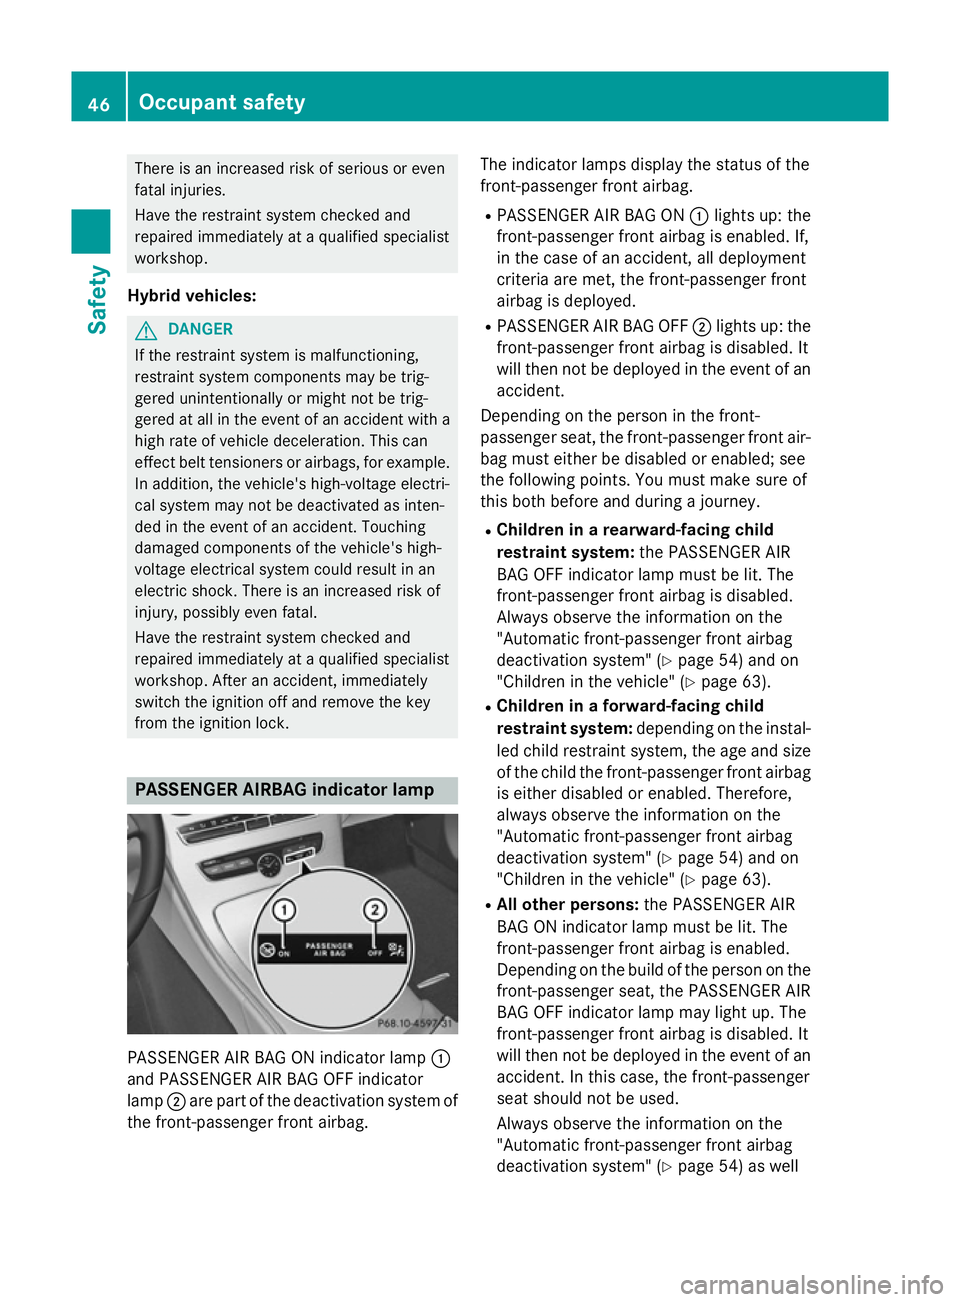
from the ignition lock. PASSENGER AIRBAG indicator lamp
PASSENGER AIR BAG ON indicator lamp
:
and PASSENGER AIR BAG OFF indicator
lamp ;are part of the deactivation system of
the front-passenger front airbag. The indicator lamps display the status of the
front-passenger front airbag.
R PASSENGER AIR BAG ON :lights up: the
front-passenger front airbag is enabled. If,
in the case of an accident, all deployment
criteria are met, the front-passenger front
airbag is deployed.
R PASSENGER AIR BAG OFF ;lights up: the
front-passenger front airbag is disabled. It
will then not be deployed in the event of an accident.
Depending on the person in the front-
passenger seat, the front-passenger front air-
bag must either be disabled or enabled; see
the following points. You must make sure of
this both before and during a journey.
R Children in a rearward-facing child
restraint system: the PASSENGER AIR
BAG OFF indicator lamp must be lit. The
front-passenger front airbag is disabled.
Always observe the information on the
"Automatic front-passenger front airbag
deactivation system" (Y page 54) and on
"Children in the vehicle" (Y page 63).
R Children in a forward-facing child
restraint system: depending on the instal-
led child restraint system, the age and size of the child the front-passenger front airbag
is either disabled or enabled. Therefore,
always observe the information on the
"Automatic front-passenger front airbag
deactivation system" (Y page 54) and on
"Children in the vehicle" (Y page 63).
R All other persons: the PASSENGER AIR
BAG ON indicator lamp must be lit. The
front-passenger front airbag is enabled.
Depending on the build of the person on the front-passenger seat, the PASSENGER AIR
BAG OFF indicator lamp may light up. The
front-passenger front airbag is disabled. It
will then not be deployed in the event of an
accident. In this case, the front-passenger
seat should not be used.
Always observe the information on the
"Automatic front-passenger front airbag
deactivation system" (Y page 54) as well46
Occupant safetySafety
Page 57 of 489
In the event of a side impact, the windowbag
is deployed on the side on which the impact
occurs.
If the system determines that they can offer
additional protection to that provided by the
seat belt, a windowbag may be deployed in
other accident situations (Y page 60).Automatic front-passenger front air-
bag deactivation
Introduction In order to recognise a child restraint system
on the front-passenger seat, the automatic
front-passenger front airbag deactivation sys- tem categorises the person in the front-
passenger seat. Depending on that result, the
front-passenger front airbag is either enabled or disabled. If a rearward-facing child
restraint system is fitted to the front-
passenger seat, the PASSENGER AIR BAG
OFF indicator lamp must light up after the
system self-test and remain lit. The front-
passenger front airbag is disabled.
The system does not disable:
R the sidebag
R the windowbag
R the seat belt tensioner
Make sure that your vehicle is equipped with
the automatic front-passenger front airbag
deactivation system (Y page 66). If this is
not the case, always fit the child restraint sys- tem on a suitable rear seat (Y page 68).
If it is absolutely necessary to install a child
restraint system on the front-passenger seat,
be sure to observe the correct positioning of
the child restraint system. Never place
objects under or behind the child restraint
system, e.g. cushions. Fully retract the seat
cushion length. The entire base of the child
restraint system must always rest on the seat cushion of the front-passenger seat. The
backrest of the forwards-facing child restraint
system must, as far as possible, be resting on the backrest of the front-passenger seat. The child restraint system must not touch the roof
or be put under strain by the head restraint.
Adjust the angle of the seat backrest and the
head restraint position accordingly. Only then is the correct function of the automatic front- passenger front airbag deactivation system
guaranteed. Always observe the information
on suitable positioning of the child restraint
system (Y page 68) in addition to the child
restraint system manufacturer's installation
instructions.
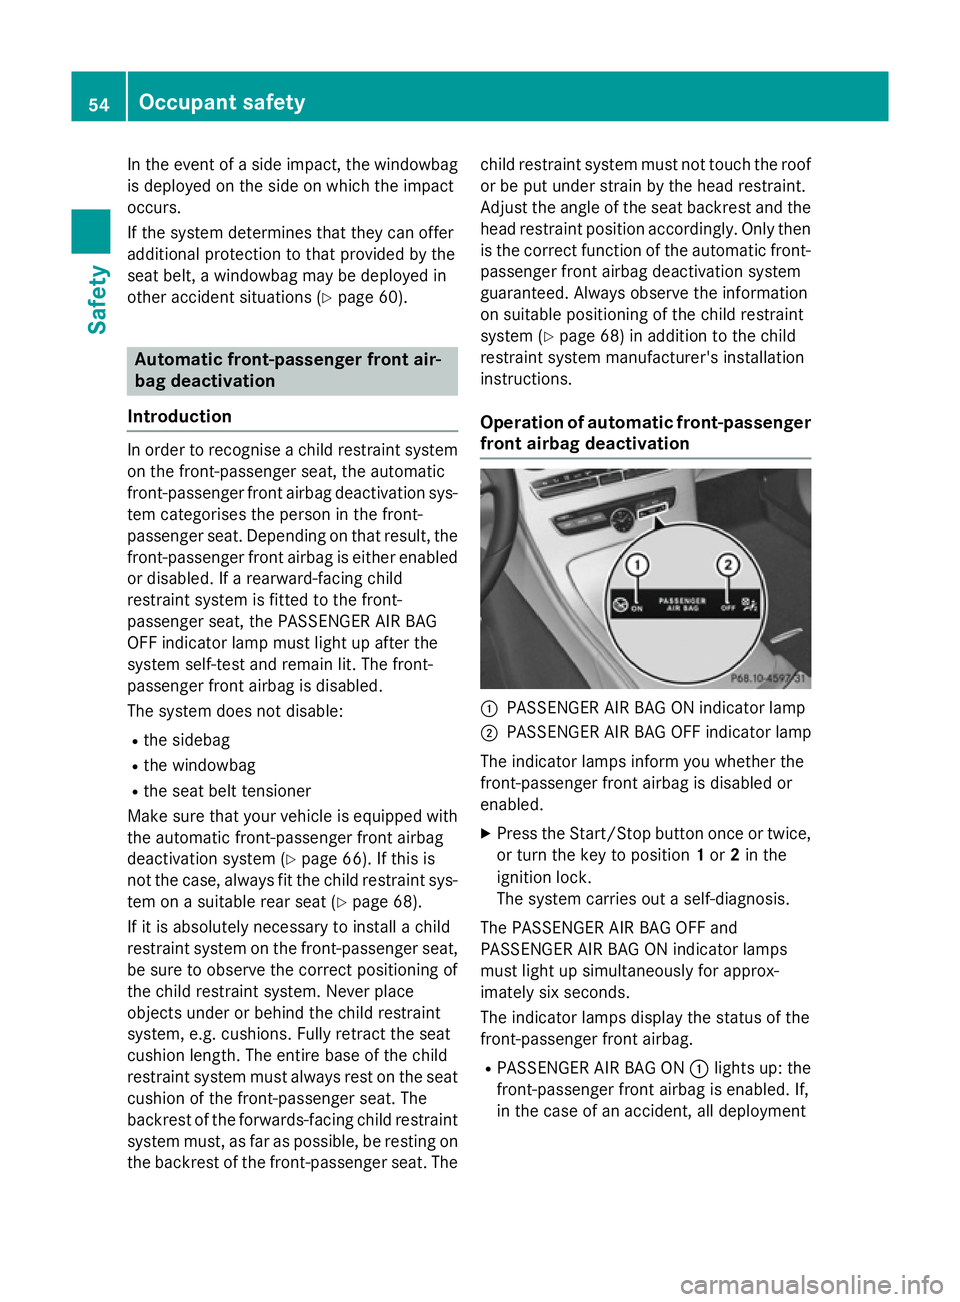
Operation of automatic front-passenger front airbag deactivation :
PASSENGER AIR BAG ON indicator lamp
; PASSENGER AIR BAG OFF indicator lamp
The indicator lamps inform you whether the
front-passenger front airbag is disabled or
enabled.
X Press the Start/Stop button once or twice,
or turn the key to position 1or 2in the
ignition lock.
The system carries out a self-diagnosis.
The PASSENGER AIR BAG OFF and
PASSENGER AIR BAG ON indicator lamps
must light up simultaneously for approx-
imately six seconds.
The indicator lamps display the status of the
front-passenger front airbag.
R PASSENGER AIR BAG ON :lights up: the
front-passenger front airbag is enabled. If,
in the case of an accident, all deployment 54
Occupant safetySafety
Page 58 of 489
criteria are met, the front-passenger front
airbag is deployed.
R PASSENGER AIR BAG OFF ;lights up: the
front-passenger front airbag is disabled. It
will then not be deployed in the event of an accident.
If the status of the front-passenger front air-
bag changes while the vehicle is in motion, an
airbag display message appears in the instru-
ment cluster (Y page 328). When the front-
passenger seat is occupied, always pay atten-
tion to the PASSENGER AIR BAG ON and
PASSENGER AIR BAG OFF indicator lamps. Be aware of the status of the front-passenger
front airbag both before and during the jour-
ney.
If there is no child restraint system fitted to
the front-passenger seat, the front-passenger
must sit:
R with the seat belt fastened correctly
R in an almost upright position with their
back against the seat backrest
R with their feet resting on the floor, if possi-
ble
If the front passenger does not observe these
conditions, the automatic front-passenger
front airbag deactivation system may be influ-
enced, e.g. because the front passenger:
R transfers their weight by supporting them-
selves on a vehicle armrest
R sits in such a way that their weight is raised
from the seat cushion
The front-passenger front airbag may be dis-
abled by mistake as a result of these or similar actions. In this case, the PASSENGER AIR
BAG OFF indicator lamp lights up perma-
nently. The front-passenger front airbag does not then deploy during an accident. G
WARNING
If the PASSENGER AIRBAG OFF indicator lamp is lit, the front-passenger front airbag is disa-
bled. It will not be deployed in the event of an
accident and cannot perform its intended pro-
tective function. A person in the front-
passenger seat could then, for example, come into contact with the vehicle's interior, espe-
cially if the person is sitting too close to the
dashboard. This poses an increased risk of
injury or even fatal injury.
When the front-passenger seat is occupied,
always make sure that:
R the classification of the person in the front-
passenger seat is correct and that the front- passenger front airbag is enabled or disa-
bled in accordance with the person in the
front-passenger seat.
R the front-passenger seat has been moved
back as far back as possible.
R the person is seated correctly.
Make sure, both before and during the jour-
ney, that the status of the front-passenger
front airbag is correct. G
WARNING
If you secure a child on the co-driver's seat in a rearward-facing child restraint system and
the PASSENGER AIR BAG ON indicator lamp
lights up, the co-driver's airbag could be
deployed in the event of an accident. The childcould be struck by the airbag. There is an
increased risk of injury, possibly even fatal.
In this case, always ensure that the co-driver's
airbag is disabled. The PASSENGER AIRBAG
OFF indicator lamp must light up.
If the PASSENGER AIR BAG OFF indicator
lamp remains off and/or the PASSENGER AIR BAG ON indicator lamp lights up, do not install
a rearward-facing child restraint system on
the front-passenger seat. Further information can be found under "Problems with the auto-matic front-passenger front airbag deactiva-
tion system" (Y page 59). Occupant safety
55Safety Z
Page 61 of 489
always rest on the seat cushion of the front-
passenger seat. The backrest of the forwards- facing child restraint system must, as far as
possible, be resting on the backrest of the
rear reclining seat. Always comply with the
child restraint system manufacturer's instal-
lation instructions.
After the system self-test, the PASSENGER
AIR BAG OFF or PASSENGER AIR BAG ON
indicator lamp display the status of the front- passenger front airbag (Y page 54).
Further information can be found under
"Problems with the automatic front-
passenger front airbag deactivation system"
(Y page 59). 58
Occupant safetySafety
Page 69 of 489
restraint system is fitted with a Top Tether
belt, this should always be used.
Important safety notes G
WARNING
If the rear seat backrests are not locked, they
could fold forwards in the event of an acci-
dent, heavy braking or sudden changes of
direction. As a result, child restraint systems
cannot perform their intended protective
function. Rear seat backrests that are not
locked can also cause additional injuries, e.g. in the event of an accident. This poses an
increased risk of injury or even fatal injury.
Always lock rear seat backrests after fitting a Top Tether belt. Observe the lock verificationindicator. Adjust the rear seat backrests so
that they are in an upright position.
If the rear seat backrest is not engaged and
locked, this will be shown in the multifunction display in the instrument cluster. A warning
tone also sounds.
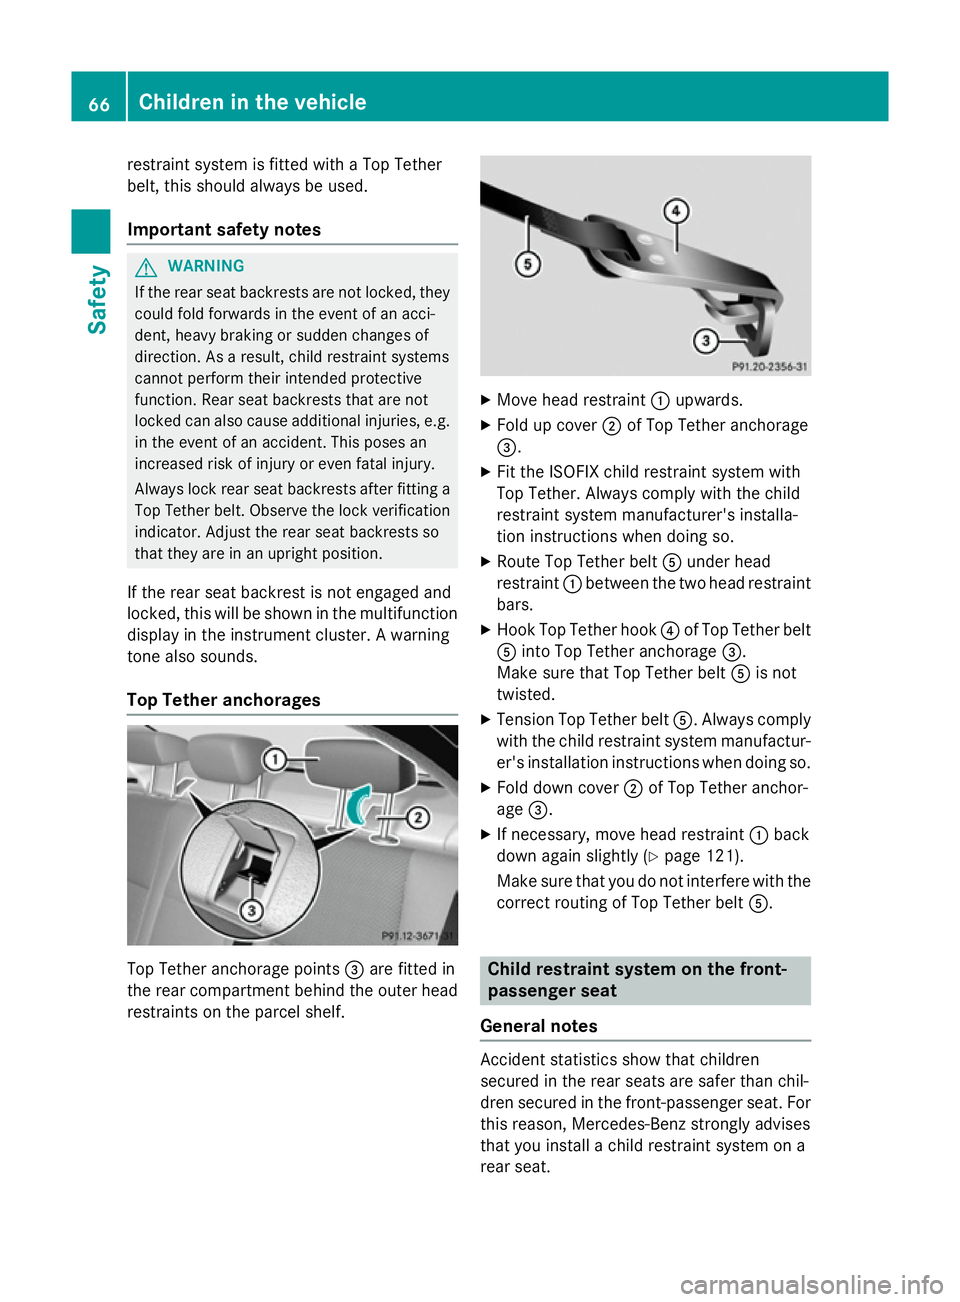
Top Tether anchorages Top Tether anchorage points
=are fitted in
the rear compartment behind the outer head
restraints on the parcel shelf. X
Move head restraint :upwards.
X Fold up cover ;of Top Tether anchorage
=.
X Fit the ISOFIX child restraint system with
Top Tether. Always comply with the child
restraint system manufacturer's installa-
tion instructions when doing so.
X Route Top Tether belt Aunder head
restraint :between the two head restraint
bars.
X Hook Top Tether hook ?of Top Tether belt
A into Top Tether anchorage =.
Make sure that Top Tether belt Ais not
twisted.
X Tension Top Tether belt A. Always comply
with the child restraint system manufactur- er's installation instructions when doing so.
X Fold down cover ;of Top Tether anchor-
age =.
X If necessary, move head restraint :back
down again slightly (Y page 121).
Make sure that you do not interfere with the
correct routing of Top Tether belt A. Child restraint system on the front-
passenger seat
General notes Accident statistics show that children
secured in the rear seats are safer than chil-
dren secured in the front-passenger seat. For
this reason, Mercedes-Benz strongly advises
that you install a child restraint system on a
rear seat. 66
Children in the vehicleSafety