lights MERCEDES-BENZ C-CLASS SALOON 2014 Repair Manual
[x] Cancel search | Manufacturer: MERCEDES-BENZ, Model Year: 2014, Model line: C-CLASS SALOON, Model: MERCEDES-BENZ C-CLASS SALOON 2014Pages: 489, PDF Size: 14.88 MB
Page 213 of 489
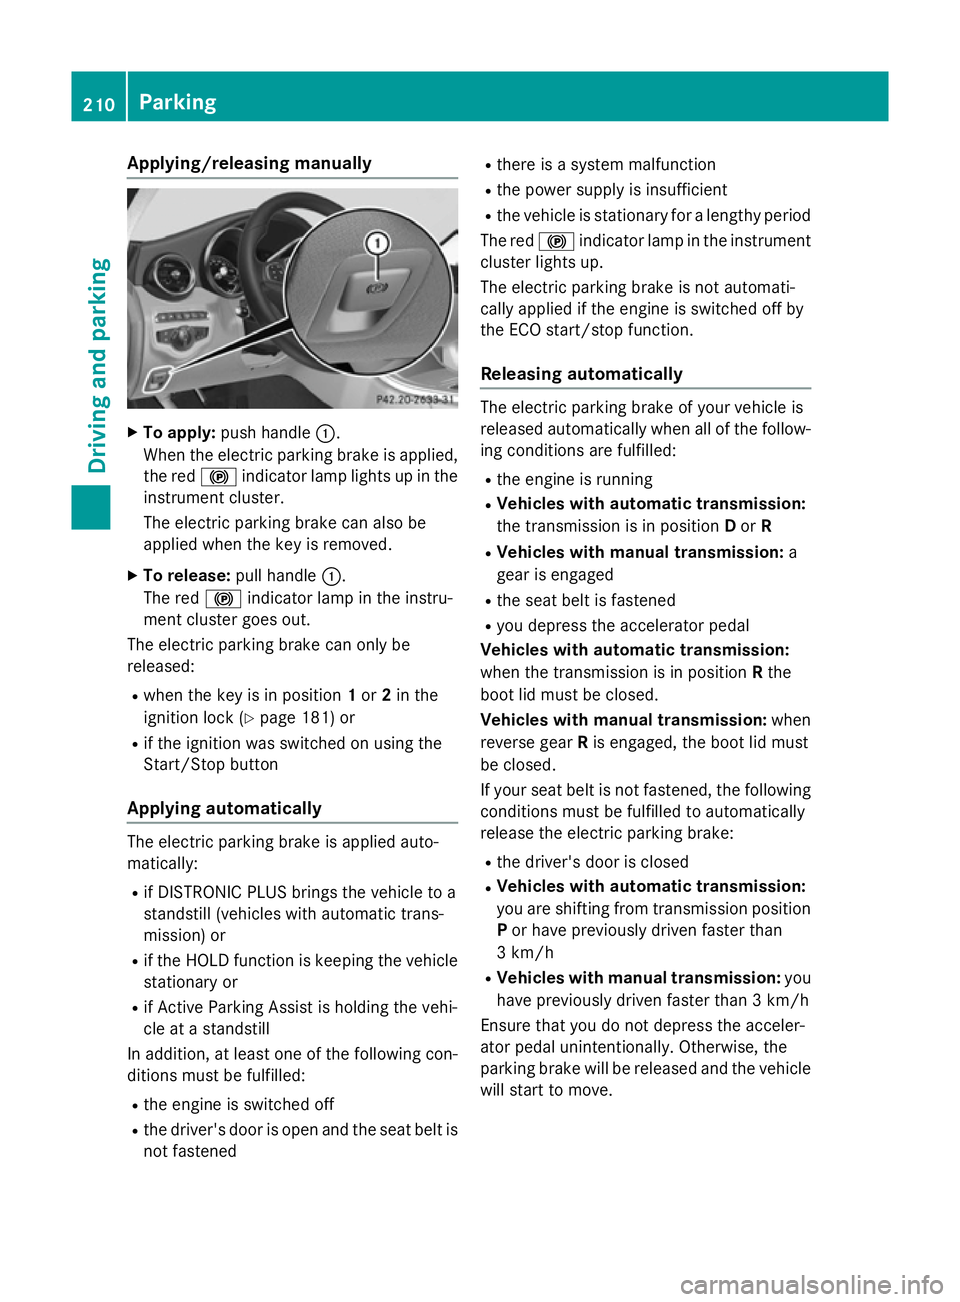
Applying/releasing manually
X
To apply: push handle :.
When the electric parking brake is applied, the red !indicator lamp lights up in the
instrument cluster.
The electric parking brake can also be
applied when the key is removed.
X To release: pull handle:.
The red !indicator lamp in the instru-
ment cluster goes out.
The electric parking brake can only be
released:
R when the key is in position 1or 2in the
ignition lock (Y page 181) or
R if the ignition was switched on using the
Start/Stop button
Applying automatically The electric parking brake is applied auto-
matically:
R if DISTRONIC PLUS brings the vehicle to a
standstill (vehicles with automatic trans-
mission) or
R if the HOLD function is keeping the vehicle
stationary or
R if Active Parking Assist is holding the vehi-
cle at a standstill
In addition, at least one of the following con-
ditions must be fulfilled:
R the engine is switched off
R the driver's door is open and the seat belt is
not fastened R
there is a system malfunction
R the power supply is insufficient
R the vehicle is stationary for a lengthy period
The red !indicator lamp in the instrument
cluster lights up.
The electric parking brake is not automati-
cally applied if the engine is switched off by
the ECO start/stop function.
Releasing automatically The electric parking brake of your vehicle is
released automatically when all of the follow-
ing conditions are fulfilled:
R the engine is running
R Vehicles with automatic transmission:
the transmission is in position Dor R
R Vehicles with manual transmission: a
gear is engaged
R the seat belt is fastened
R you depress the accelerator pedal
Vehicles with automatic transmission:
when the transmission is in position Rthe
boot lid must be closed.
Vehicles with manual transmission: when
reverse gear Ris engaged, the boot lid must
be closed.
If your seat belt is not fastened, the following conditions must be fulfilled to automatically
release the electric parking brake:
R the driver's door is closed
R Vehicles with automatic transmission:
you are shifting from transmission position
P or have previously driven faster than
3 km/h
R Vehicles with manual transmission: you
have previously driven faster than 3 km/h
Ensure that you do not depress the acceler-
ator pedal unintentionally. Otherwise, the
parking brake will be released and the vehicle will start to move. 210
ParkingDriving and pa
rking
Page 215 of 489
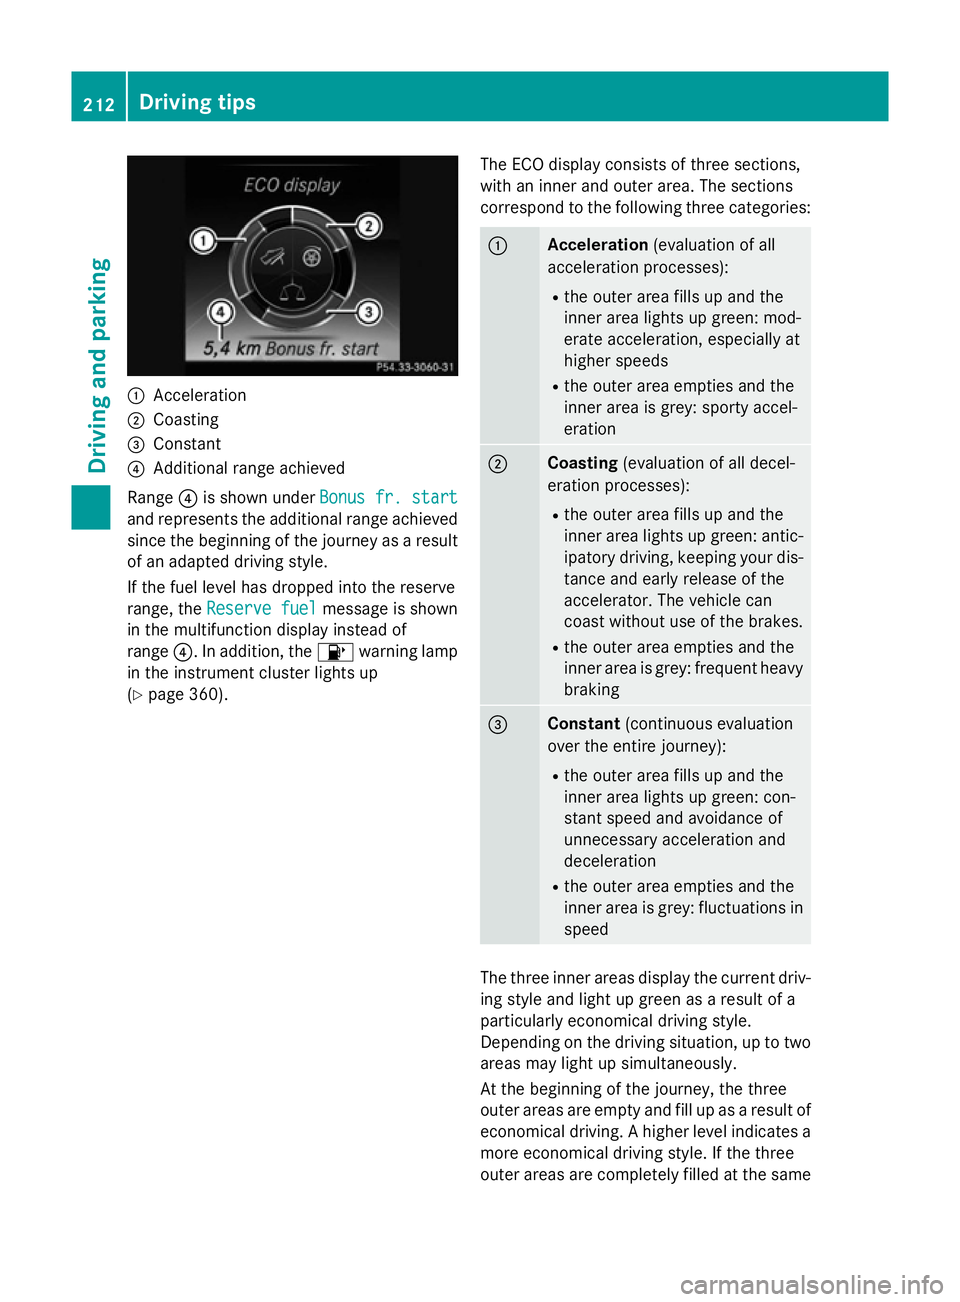
:
Acceleration
; Coasting
= Constant
? Additional range achieved
Range ?is shown under Bonus fr. start
Bonus fr. start
and represents the additional range achieved
since the beginning of the journey as a result of an adapted driving style.
If the fuel level has dropped into the reserve
range, the Reserve fuel Reserve fuel message is shown
in the multifunction display instead of
range ?. In addition, the 8warning lamp
in the instrument cluster lights up
(Y page 360). The ECO display consists of three sections,
with an inner and outer area. The sections
correspond to the following three categories: :
Acceleration
(evaluation of all
acceleration processes):
R the outer area fills up and the
inner area lights up green: mod-
erate acceleration, especially at
higher speeds
R the outer area empties and the
inner area is grey: sporty accel-
eration ;
Coasting
(evaluation of all decel-
eration processes):
R the outer area fills up and the
inner area lights up green: antic-
ipatory driving, keeping your dis- tance and early release of the
accelerator. The vehicle can
coast without use of the brakes.
R the outer area empties and the
inner area is grey: frequent heavy
braking =
Constant
(continuous evaluation
over the entire journey):
R the outer area fills up and the
inner area lights up green: con-
stant speed and avoidance of
unnecessary acceleration and
deceleration
R the outer area empties and the
inner area is grey: fluctuations in
speed The three inner areas display the current driv-
ing style and light up green as a result of a
particularly economical driving style.
Depending on the driving situation, up to two
areas may light up simultaneously.
At the beginning of the journey, the three
outer areas are empty and fill up as a result of economical driving. A higher level indicates a more economical driving style. If the three
outer areas are completely filled at the same 212
Driving tipsDriving an
d parking
Page 216 of 489
time, the driver has adopted the most eco-
nomical driving style for the selected settings
and prevailing conditions. The ECO display
border lights up.
The ECO display does not indicate the actual fuel consumption. The additionally achieved
range displayed under Bonus fr. start Bonus fr. start
does not indicate a fixed consumption reduc-
tion.
In addition to driving style, the actual con-
sumption is affected by other factors, such
as:
R load
R tyre pressure
R cold start
R choice of route
R the use of electrical consumers
These factors are not included in the ECO dis-
play.
An economical driving style involves driving at a moderate engine speed.
To achieve a higher value in the categories
"acceleration" and "smooth driving":
R observe the gearshift recommendation
R drive the vehicle in drive program E(vehi-
cles with the AGILITY SELECT switch)
On long journeys at a constant speed, e.g. on the motorway, only the outer area for "con-
stant" will change.
The ECO display summarises the driving style
from the start of the journey to its completion. Therefore, there are more marked changes in
the outer areas at the start of a journey. Dur- ing a prolonged driving time, these changes
are smaller. For more marked changes, per-
form a manual rest (Y page 299).
Further information on the ECO display
(Y page 298). Brakes
Important safety notes G
WARNING
If you shift down on a slippery road surface in an attempt to increase the engine's braking
effect, the drive wheels could lose their grip.
This increases the risk of skidding and having
an accident.
Do not shift down for additional engine brak-
ing on a slippery road surface.
Downhill gradients Change into a lower gear in good time on long
and steep downhill gradients. Take particular note of this when driving a laden vehicle and
when towing a trailer.
This also applies if cruise control, DISTRONIC
PLUS or SPEEDTRONIC are activated.
This will use the braking effect of the engine,
so less braking will be required to maintain
vehicle speed. This relieves the load on the
brake system and prevents the brakes from
overheating and wearing too quickly.
Heavy and light loads G
WARNING
The braking system can overheat if you leave your foot on the brake pedal while driving.
This increases the braking distance and could
even cause the braking system to fail. There is
a risk of an accident.
Never use the brake pedal as a footrest. Do
not simultaneously depress both the brake
pedal and the accelerator pedal while driving.
! Depressing the brake pedal constantly
results in excessive and premature wear to
the brake pads.
If heavy demands are made on the brakes, do not park the vehicle immediately. Drive on for
a short while. This allows the airflow to cool
the brakes more quickly. Driving
tips
213Driving an d parking Z
Page 223 of 489
The LIM indicator lamp on the cruise control
lever indicates which system you have selec- ted:
R LIM indicator lamp off: cruise control or
DISTRONIC PLUS is selected.
R LIM indicator lamp on: variable SPEED-
TRONIC is selected.
You can use the cruise control lever to limit
the speed to any speed above 30 km/hw hile
the engine is running.
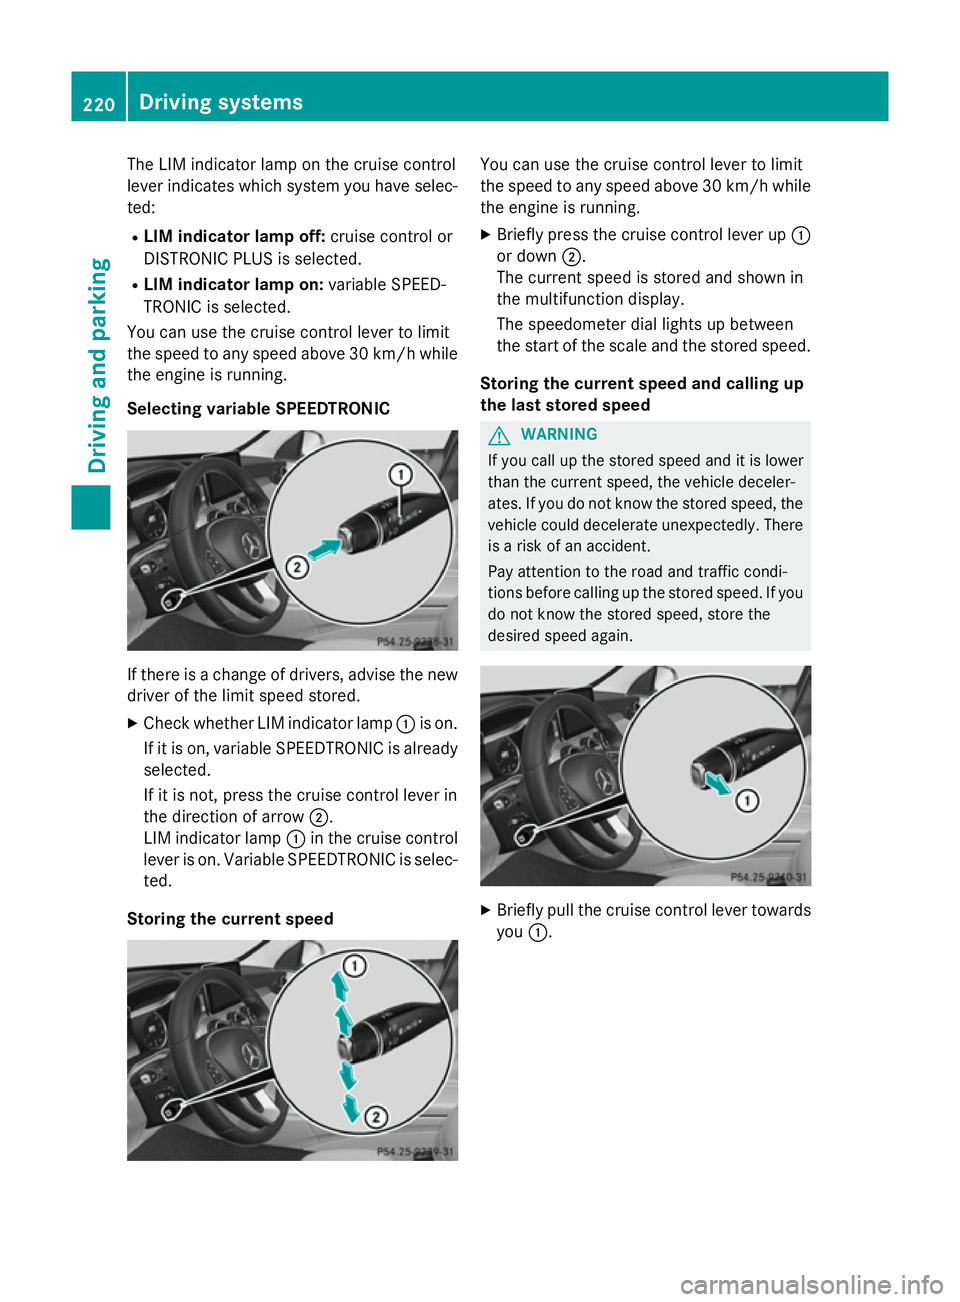
Selecting variable SPEEDTRONIC If there is a change of drivers, advise the new
driver of the limit speed stored.
X Check whether LIM indicator lamp :is on.
If it is on, variable SPEEDTRONIC is already
selected.
If it is not, press the cruise control lever in
the direction of arrow ;.
LIM indicator lamp :in the cruise control
lever is on. Variable SPEEDTRONIC is selec-
ted.
Storing the current speed You can use the cruise control lever to limit
the speed to any speed above 30 km/h while
the engine is running.
X Briefly press the cruise control lever up :
or down ;.
The current speed is stored and shown in
the multifunction display.
The speedometer dial lights up between
the start of the scale and the stored speed.
Storing the current speed and calling up
the last stored speed G
WARNING
If you call up the stored speed and it is lower
than the current speed, the vehicle deceler-
ates. If you do not know the stored speed, the vehicle could decelerate unexpectedly. There
is a risk of an accident.
Pay attention to the road and traffic condi-
tions before calling up the stored speed. If you do not know the stored speed, store the
desired speed again. X
Briefly pull the cruise control lever towards
you :. 220
Driving systemsDriving and parking
Page 232 of 489
There are several ways to deactivate
DISTRONIC PLUS:
X Briefly press the cruise control lever for-
wards :
or
X Brake, unless the vehicle is stationary.
or X Briefly press the cruise control lever in the
direction of arrow =.
Variable SPEEDTRONIC is selected. LIM
indicator lamp ;in the cruise control lever
lights up.
When you deactivate DISTRONIC PLUS, you
will see the DISTRONIC
DISTRONIC PLUS PLUSoff
offmessage in
the multifunction display for approximately
five seconds.
i The last speed stored remains stored until
you switch off the engine.
i DISTRONIC PLUS is not deactivated if you
depress the accelerator pedal.
DISTRONIC PLUS is automatically deactiva-
ted if: R you apply the electric parking brake or if the
vehicle is automatically secured with the
electric parking brake
R ESP ®
intervenes or you deactivate ESP ®
R the transmission is in the P,Ror Nposition
R you pull the cruise control lever towards
you in order to pull away and the front-
passenger door or one of the rear doors is
open
R the vehicle has skidded
R you activate Active Parking Assist
If DISTRONIC PLUS is deactivated, you will
hear a warning tone. You will see the
DISTRONIC PLUS off
DISTRONIC PLUS off message in the multi-
function display for approximately five sec-
onds. Tips for driving with DISTRONIC PLUS General notes
Pay particular attention in the following traffic
situations:
R Cornering, entering and exiting a bend
R Vehicles which are not driving in the middle
of their lane
R Other vehicles changing lane
R Narrow vehicles
R Obstructions and stationary vehicles
R Crossing vehicles
In such situations, brake if necessary.
DISTRONIC PLUS is then deactivated.
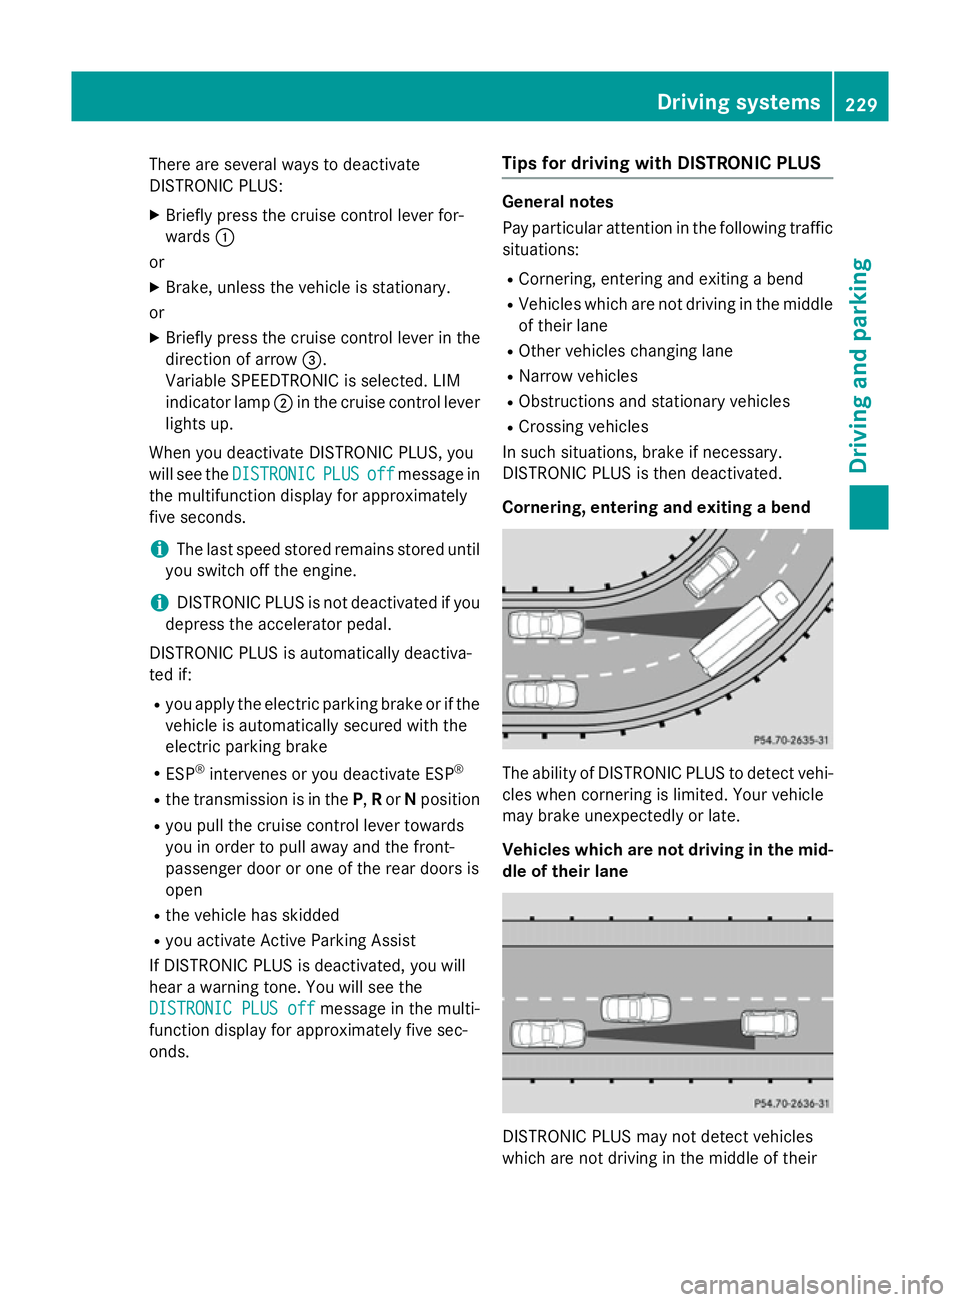
Cornering, entering and exiting a bend The ability of DISTRONIC PLUS to detect vehi-
cles when cornering is limited. Your vehicle
may brake unexpectedly or late.
Vehicles which are not driving in the mid- dle of their lane DISTRONIC PLUS may not detect vehicles
which are not driving in the middle of their Driving systems
229Driving and parking Z
Page 233 of 489
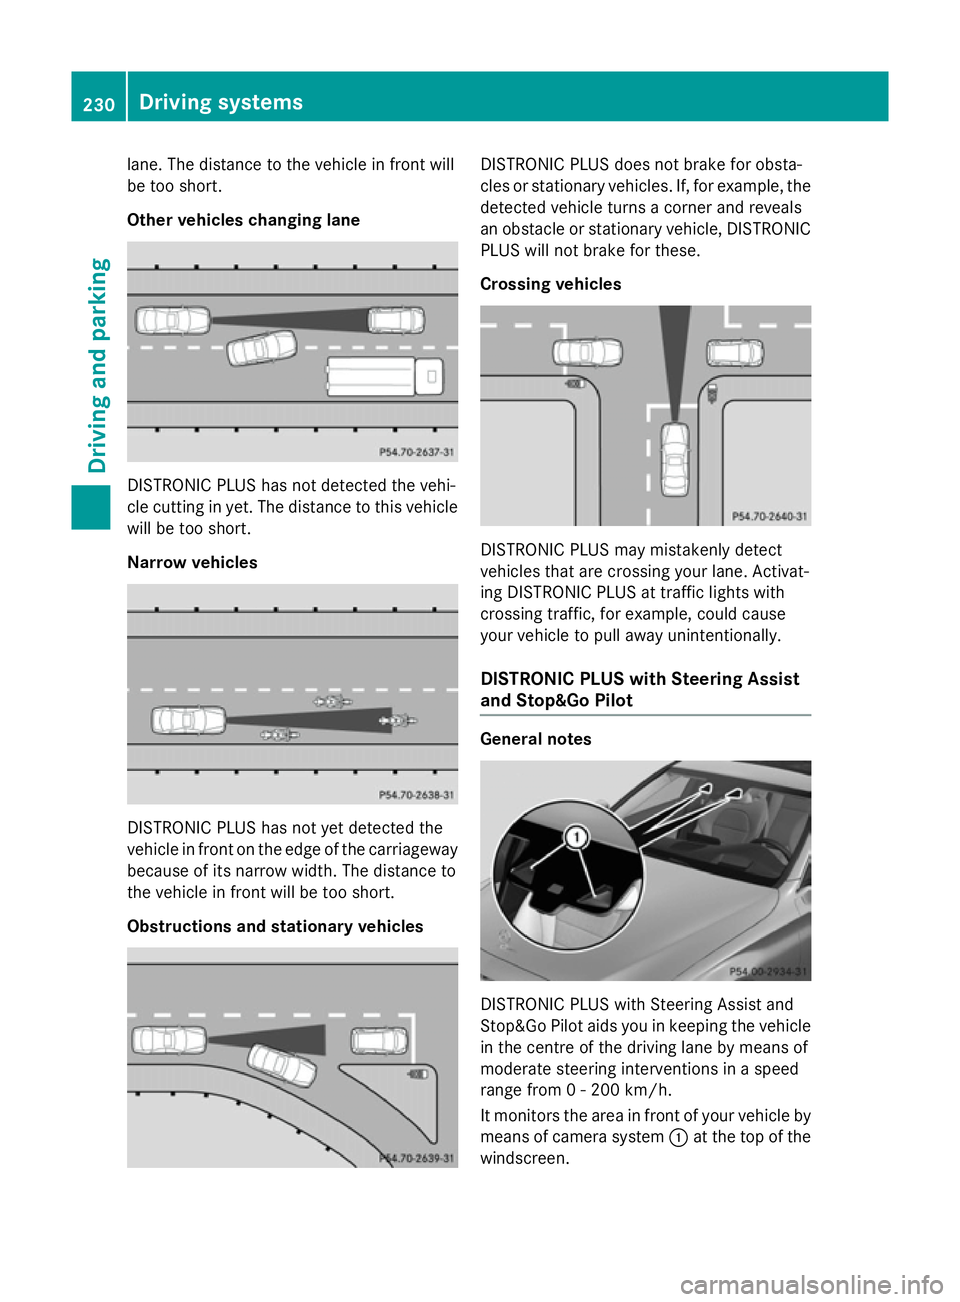
lane. The distance to the vehicle in front will
be too short.
Other vehicles changing lane DISTRONIC PLUS has not detected the vehi-
cle cutting in yet. The distance to this vehicle will be too short.
Narrow vehicles DISTRONIC PLUS has not yet detected the
vehicle in front on the edge of the carriageway
because of its narrow width. The distance to
the vehicle in front will be too short.
Obstructions and stationary vehicles DISTRONIC PLUS does not brake for obsta-
cles or stationary vehicles. If, for example, the
detected vehicle turns a corner and reveals
an obstacle or stationary vehicle, DISTRONIC PLUS will not brake for these.
Crossing vehicles DISTRONIC PLUS may mistakenly detect
vehicles that are crossing your lane. Activat-
ing DISTRONIC PLUS at traffic lights with
crossing traffic, for example, could cause
your vehicle to pull away unintentionally.
DISTRONIC PLUS with Steering Assist
and Stop&Go Pilot General notes
DISTRONIC PLUS with Steering Assist and
Stop&Go Pilot aids you in keeping the vehicle
in the centre of the driving lane by means of
moderate steering interventions in a speed
range from 0 - 200 km/h.
It monitors the area in front of your vehicle by means of camera system :at the top of the
windscreen. 230
Driving systemsDriving and parking
Page 235 of 489
Also observe the important safety notes for
DISTRONIC PLUS (Y page 222).
The steering interventions are carried out
with a limited steering moment. The system
requires the driver to keep his hands on the
steering wheel and to steer himself.
If you do not steer yourself or if you take your hands off the steering wheel for a prolonged
period of time, the system will first alert you
with a visual warning. A steering wheel sym-
bol appears in the multifunction display. If youhave still not started to steer and have not
taken hold of the steering wheel after five
seconds at the latest, a warning tone also
sounds to remind you to take control of the
vehicle. Steering Assist and Stop&Go Pilot
switch to passive mode. DISTRONIC PLUS
remains active.
Activating Steering Assist and Stop&Go
Pilot X
Press button ;.
Indicator lamp :lights up. The DTR+: DTR+:
steering assist. on
steering assist. onmessage appears
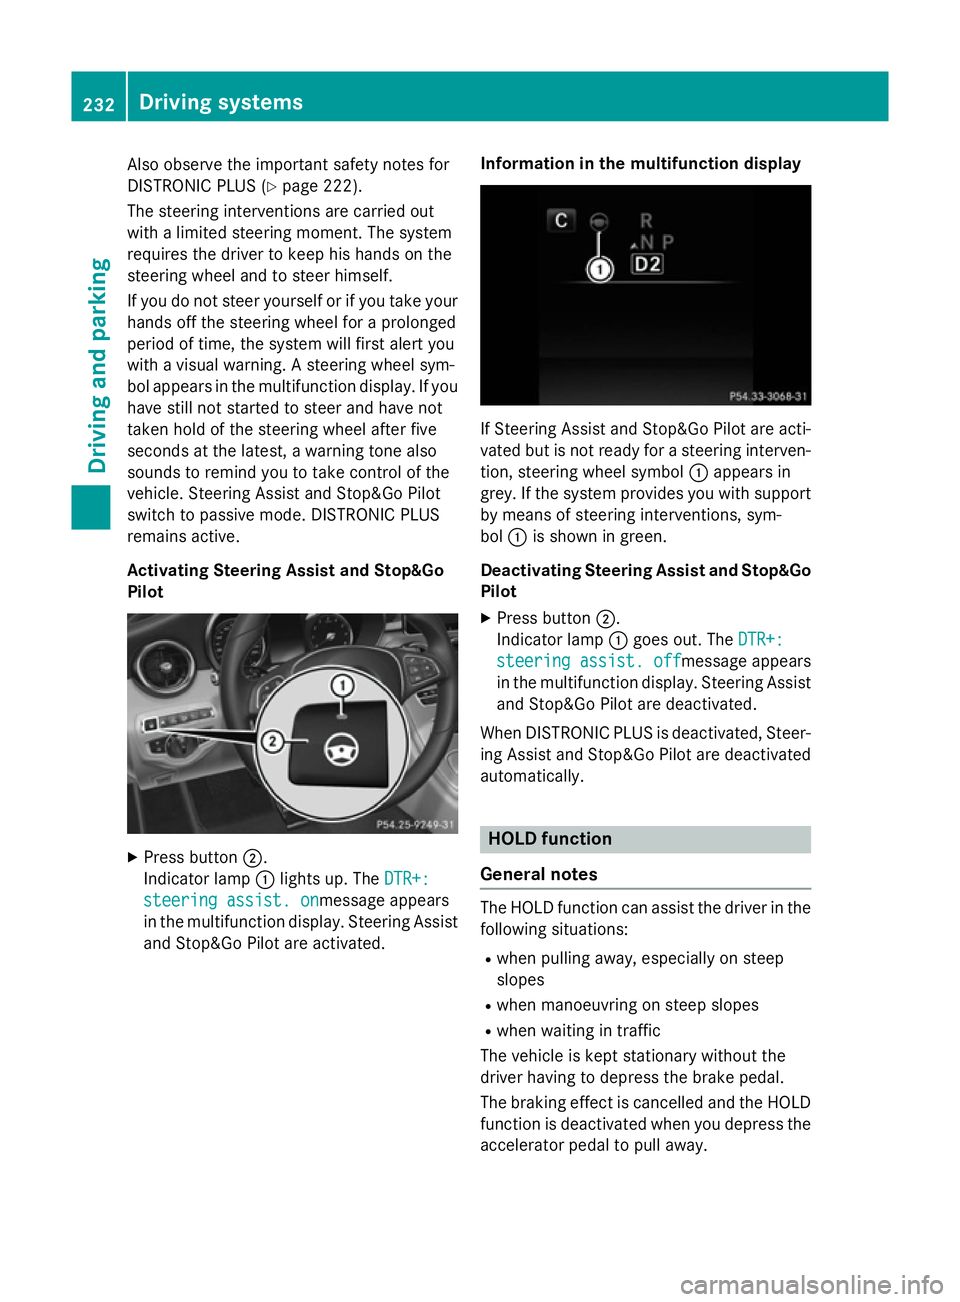
in the multifunction display. Steering Assist and Stop&Go Pilot are activated. Information in the multifunction display If Steering Assist and Stop&Go Pilot are acti-
vated but is not ready for a steering interven- tion, steering wheel symbol :appears in
grey. If the system provides you with support
by means of steering interventions, sym-
bol :is shown in green.
Deactivating Steering Assist and Stop&Go Pilot
X Press button ;.
Indicator lamp :goes out. The DTR+: DTR+:
steering assist. off
steering assist. off message appears
in the multifunction display. Steering Assist
and Stop&Go Pilot are deactivated.
When DISTRONIC PLUS is deactivated, Steer- ing Assist and Stop&Go Pilot are deactivatedautomatically. HOLD function
General notes The HOLD function can assist the driver in the
following situations:
R when pulling away, especially on steep
slopes
R when manoeuvring on steep slopes
R when waiting in traffic
The vehicle is kept stationary without the
driver having to depress the brake pedal.
The braking effect is cancelled and the HOLD function is deactivated when you depress theaccelerator pedal to pull away. 232
Driving systemsDriving an
d parking
Page 238 of 489
with snow chains or on particularly poor road
surfaces. Your selection remains stored even
if you remove the key from the ignition lock.
X Start the engine.
If indicator lamp ;is not lit:
X Press button :.
Indicator lamp ;lights up. The vehicle is
raised by 25 mm compared to the normal
level.
The Vehicle rising Vehicle rising message appears in
the multifunction display.
i The message disappears after ten sec-
onds, irrespective of the level reached. If
necessary, the vehicle is raised further.
The "Raised level" setting is cancelled if you:
R drive faster than 120 km/h
R drive for approximately three minutes at a
speed over 80 km/h.
The "Raised level" remains saved when you
are not driving within these speed ranges.
Setting the normal vehicle level
X Start the engine.
If indicator lamp ;is lit:
X Press button :.
Indicator lamp ;goes out. The vehicle is
adjusted to the height of the currently
selected drive program (Y page 197).
Suspension setting General notes
The Adaptive Damping System automatically
controls the calibration of the dampers.
The damping is tuned individually to each
wheel and depends on:
R your driving style, e.g. sporty
R the road surface condition, e.g. bumps
R your individual selection, i.e. sport or com-
fort
Your selection remains stored even if you
remove the key from the ignition lock. Sport mode
In the "Sport" and "Sport Plus" drive pro-
grams, the firmer suspension setting ensures even better contact with the road. Select this
mode when employing a sporty driving style,
e.g. on winding country roads.
X Vehicles with automatic transmission:
select the Sor S+ drive program with the
AGILITY SELECT switch (Y page 197).
Vehicles with manual transmission:
select the Sor S+ drive program with the
AGILITY SELECT switch (Y page 191).
The vehicle is lowered by 15 mm compared to the normal level.
Comfort mode
In the "Eco" and "Comfort" drive programs,
the driving characteristics of your vehicle are
more comfortable. Therefore, select this
mode if you prefer a more comfortable driving
style. Select Comfort mode also when driving
fast on straight roads, e.g. on straight
stretches of motorway.
X Vehicles with automatic transmission:
select the Eor Cdrive program with the
AGILITY SELECT switch (Y page 197).
Vehicles with manual transmission:
select the Eor Cdrive program with the
AGILITY SELECT switch (Y page 191).
The vehicle is raised to the normal level.
When driving at speeds above 125 km/h, the
vehicle is automatically lowered by 15 mm in the Eand Cdrive programs. When driving at
speeds below 80 km/h, the vehicle is raised
again. 4MATIC (permanent all-wheel drive)
4MATIC ensures that all four wheels are per-
manently driven. Together with ESP ®
, it
improves the traction of your vehicle when-
ever a drive wheel spins due to insufficient
grip.
If you fail to adapt your driving style, 4MATIC
can neither reduce the risk of an accident nor Driving systems
235Driving and parking Z
Page 240 of 489
:
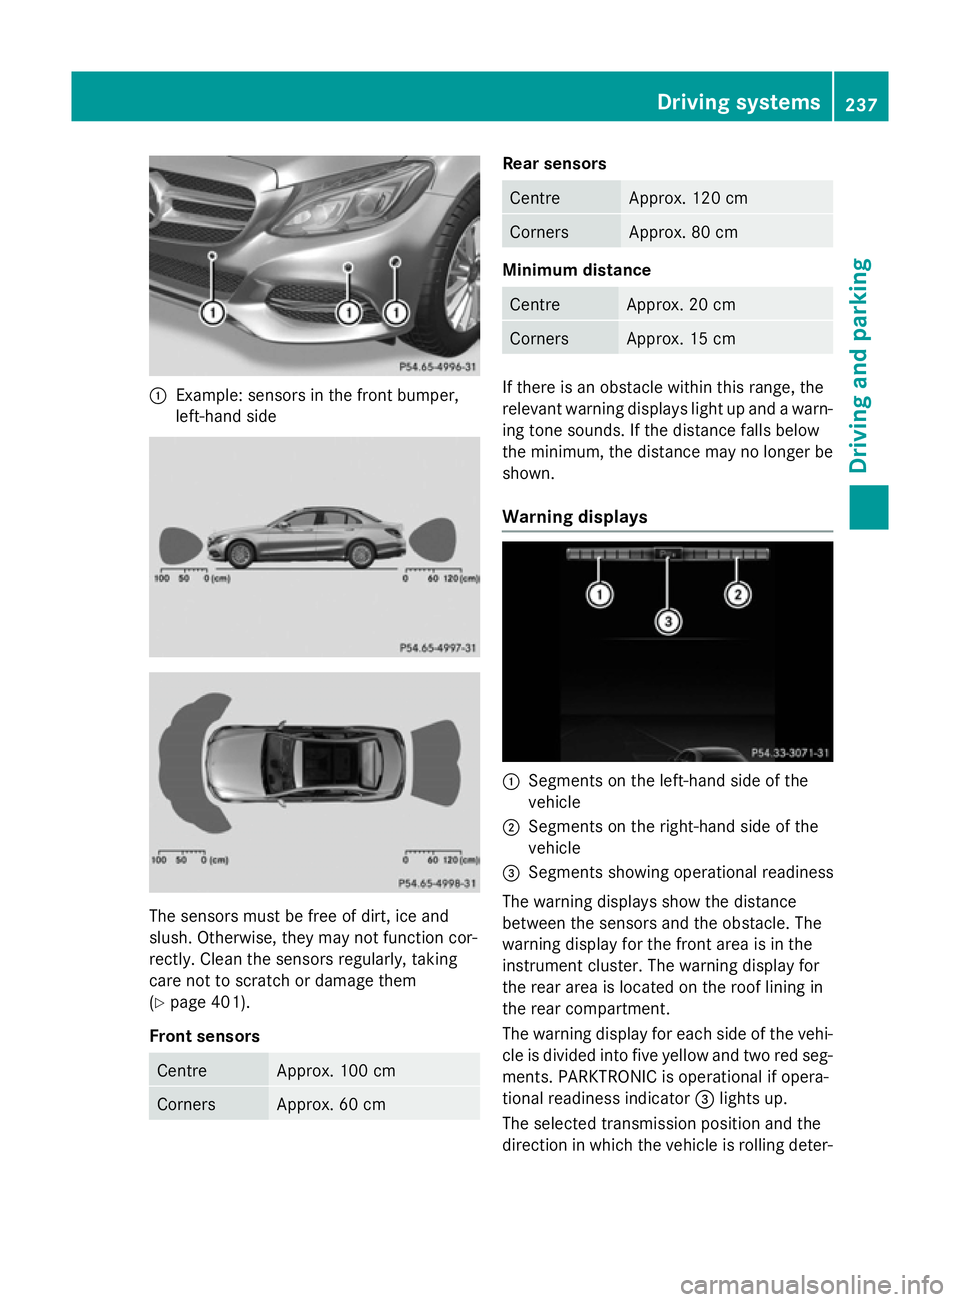
Example: sensors in the front bumper,
left-hand side The sensors must be free of dirt, ice and
slush. Otherwise, they may not function cor-
rectly. Clean the sensors regularly, taking
care not to scratch or damage them
(Y page 401).
Front sensors Centre Approx. 100 cm
Corners Approx. 60 cm Rear sensors
Centre Approx. 120 cm
Corners Approx. 80 cm
Minimum distance
Centre Approx. 20 cm
Corners Approx. 15 cm
If there is an obstacle within this range, the
relevant warning displays light up and a warn- ing tone sounds. If the distance falls below
the minimum, the distance may no longer be
shown.
Warning displays :
Segments on the left-hand side of the
vehicle
; Segments on the right-hand side of the
vehicle
= Segments showing operational readiness
The warning displays show the distance
between the sensors and the obstacle. The
warning display for the front area is in the
instrument cluster. The warning display for
the rear area is located on the roof lining in
the rear compartment.
The warning display for each side of the vehi-
cle is divided into five yellow and two red seg- ments. PARKTRONIC is operational if opera-
tional readiness indicator =lights up.
The selected transmission position and the
direction in which the vehicle is rolling deter- Driving systems
237Driving and parking Z
Page 241 of 489
mine which warning display is active when the
engine is running. Transmission
position Warning display
D
Front area activated
R,
Nor the vehicle
is rolling back-
wards Rear and front areas
activated P
No areas activated
One or more segments light up as the vehicle
approaches an obstacle, depending on the
vehicle's distance from the obstacle.
From the:
R sixth segment onwards, you will hear an
intermittent warning tone for approx-
imately two seconds.
R seventh segment onwards, you will hear a
warning tone for approximately two sec-
onds. This indicates that you have now
reached the minimum distance.
Deactivating/activating PARKTRONIC Vehicles with AIRMATIC
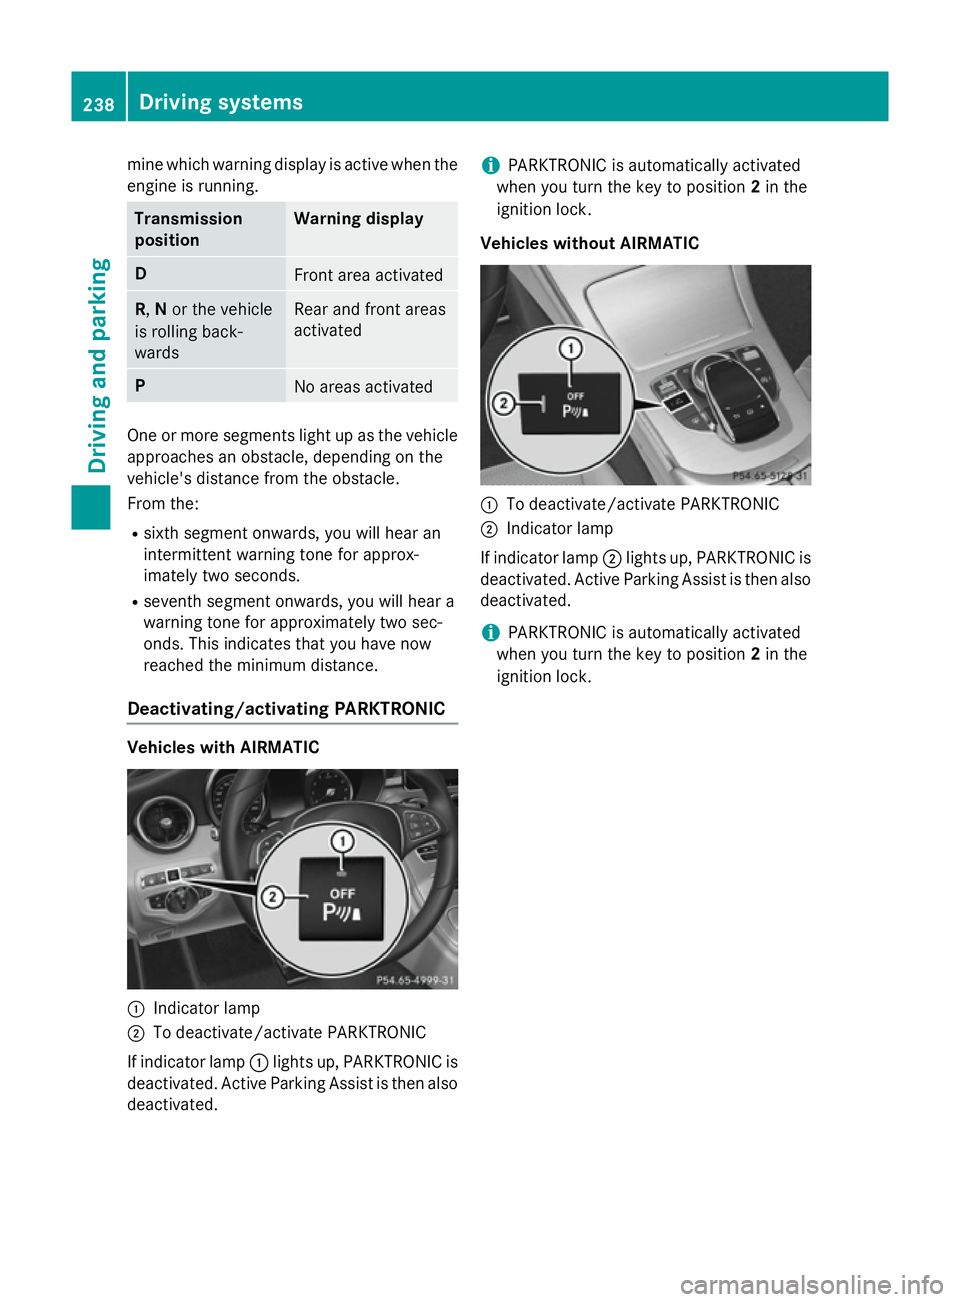
:
Indicator lamp
; To deactivate/activate PARKTRONIC
If indicator lamp :lights up, PARKTRONIC is
deactivated. Active Parking Assist is then also
deactivated. i
PARKTRONIC is automatically activated
when you turn the key to position 2in the
ignition lock.
Vehicles without AIRMATIC :
To deactivate/activate PARKTRONIC
; Indicator lamp
If indicator lamp ;lights up, PARKTRONIC is
deactivated. Active Parking Assist is then also
deactivated.
i PARKTRONIC is automatically activated
when you turn the key to position 2in the
ignition lock. 238
Driving systemsDriving and parking