change wheel MERCEDES-BENZ C-CLASS SALOON 2014 Owners Manual
[x] Cancel search | Manufacturer: MERCEDES-BENZ, Model Year: 2014, Model line: C-CLASS SALOON, Model: MERCEDES-BENZ C-CLASS SALOON 2014Pages: 489, PDF Size: 14.88 MB
Page 10 of 489
BAS .................................................. 75
BAS PLUS with Cross-Traffic
Assist ............................................... 75
Brake fluid (notes) ......................... 475
Display messag e............................ 315
Driving tips .................................... 213
Hill start assist ............................... 185
HOLD function ............................... 232
Important safety notes .................. 213
Parking brake ................................ 209
RBS (Recuperative Brake Sys-
tem) ................................................. 44
RBS warning lamp .......................... 362
Warning lamp ................................. 353
Breakdown
see Flat tyre
see Towing away
Brightness control (instrument
cluster lighting) ................................... 32
Bulbs
see Replacing bulbs
Buttons on the steering column ...... 294C
Calling up a fault see Display messages
Camera
see 360° camera
Car
see Vehicle
Car key
see Key
Car wash (care) ................................. 396
Care
360° camera ................................. 401
AIRPANEL ...................................... 400
Automatic car wash ....................... 396
Carpets .......................................... 404
Display ........................................... 402
Exhaust pipe .................................. 402
Exterior lighting ............................. 400
Gear or selector lever .................... 403
High-pressure cleaner .................... 398
Interior ........................................... 402
Matt paintwork .............................. 399
Note s............................................. 396
Paint .............................................. 398 Plastic trim .................................... 403
Reversing camera .......................... 401
Roof lining ...................................... 404
Seat belt ........................................ 404
Seat cove r..................................... 403
Sensors ......................................... 401
Steering wheel ............................... 403
Trim pieces .................................... 403
Washing by hand ........................... 398
Wheels ........................................... 399
Windows ........................................ 399
Wiper blades .................................. 400
Wooden trim .................................. 403
CD player/CD changer(on-board
computer) .......................................... 303
Central locking
Locking/unlocking (key) .................. 91
Centre console
Lower section .................................. 38
Upper section .................................. 37
Changing bulbs
Dipped-beam headlamp s............... 143
Main-beam headlamp s................... 143
Reversing lamps ............................ 144
Turn signals (front) ......................... 144
Turn signals (rear) .......................... 144
Charge status of high-voltage bat-
tery ..................................................... 273
Child seat
Forward-facing restraint system ...... 68
ISOFIX .............................................. 65
On the front-passenger sea t............ 66
Rearward-facing restraint system .... 67
Recommendations ........................... 71
Suitable positions ............................ 68
Top Tether ....................................... 65
Child-proof locks
Important safety notes .................... 72
Rear doors ....................................... 73
Children
In the vehicl e................................... 63
Restraint systems ............................ 64
Cigarette lighter ................................ 380
Cleaning
Mirror turn signal ........................... 400
Trailer tow hitch ............................. 402
Climate control
Auxiliary heating/ventilation .......... 172 Index
7
Page 28 of 489
!
Airbags and seat belt tensioners, as well
as control units and sensors for these
restraint systems, may be installed in the
following areas of your vehicle:
R doors
R door pillars
R door sills
R seats
R dashboard
R instrument cluster
R centre console
Do not install accessories such as audio
systems in these areas. Do not carry out
repairs or welding. You could impair the
operating efficiency of the restraint sys-
tems.
Have accessories retrofitted at a qualified
specialist workshop.
You could jeopardise the operating safety of
your vehicle if you use parts, tyres and wheels
as well as accessories relevant to safety
which have not been approved by Mercedes. This could lead to malfunctions in safety-rel-
evant systems, e.g. the brake system. Use
only genuine Mercedes-Benz parts or parts of
equal quality. Only use tyres, wheels and
accessories that have been specifically
approved for your vehicle.
Mercedes-Benz tests genuine parts and con-
version parts and accessories that have been specifically approved for your vehicle for their
reliability, safety and suitability. Despite
ongoing market research, Mercedes-Benz is
unable to assess other parts. Mercedes-Benz therefore accepts no responsibility for the
use of such parts in Mercedes-Benz vehicles, even if they have been officially approved or
independently approved by a testing centre.
In Germany, certain parts are only officially
approved for installation or modification if
they comply with legal requirements. This
also applies to some other countries. All gen-
uine Mercedes-Benz parts meet the approval
requirements. The use of non-approved parts may invalidate the vehicle's general operating
permit.
This is the case:
R if they cause a change of the vehicle type
from that for which the vehicle's general
operating permit was granted
R if other road users could be endangered
R if the emission or noise levels are adversely
affected
Always specify the vehicle identification num- ber (VIN) when ordering genuine Mercedes-
Benz parts (Y page 468). Owner's Manual
Vehicle equipment
This Owner's Manual describes all models
and all standard and optional equipment
available for your vehicle at the time of pub-
lication of the Owner's Manual. Country-spe-
cific differences are possible. Note that your
vehicle may not be fitted with all features
described. This is also the case for systems
and functions relevant to safety. Therefore,
the equipment on your vehicle may differ from that in the descriptions and illustrations.
The original purchase contract documenta-
tion for your vehicle contains a list of all of the
systems in your vehicle.
Should you have any questions concerning
equipment and operation, please consult a
Mercedes-Benz Service Centre.
The Owner's Manual and Service Booklet are important documents and should kept in the
vehicle. Operating safety
Important safety notes
G
WARNING
If you do not have the prescribed service/
maintenance work or necessary repairs car- Introduction
25 Z
Page 29 of 489
ried out, this could result in malfunctions or
system failures. There is a risk of an accident.
Always have the prescribed service/mainte-
nance work as well as necessary repairs car-
ried out at a qualified specialist workshop. G
WARNING
Flammable material such as leaves, grass or
twigs may ignite if they come into contact with hot parts of the exhaust system. There is a risk of fire.
When driving off road or on unpaved roads,
check the vehicle's underside regularly. In
particular, remove parts of plants or other
flammable materials which have become
trapped. In the case of damage, contact a
qualified specialist workshop. G
WARNING
Modifications to electronic components, their software as well as wiring could affect their
function and/or the operation of other net-
worked components. This could in particular
also be the case for systems relevant to
safety. They might not function properly any-
more and/or jeopardise the operational
safety of the vehicle. There is an increased
risk of an accident and injury.
Do not attempt to modify the wiring as well as
electronic components or their software.
Always have work on electrical and electronic components carried out at a qualified special-
ist workshop.
If you make any changes to the vehicle elec-
tronics, the general operating permit is ren-
dered invalid.
! There is a risk of damage to the vehicle if:
R the vehicle becomes stuck, e.g. on a high
kerb or an unpaved road
R you drive too fast over an obstacle, e.g. a
kerb or a pothole in the road
R a heavy object strikes the underbody or
parts of the chassis In situations like this, the body, the under-
body, chassis parts, wheels or tyres could
be damaged without the damage being visi-
ble. Components damaged in this way can
unexpectedly fail or, in the case of an acci-
dent, no longer withstand the strain they
are designed for.
If the underbody panelling is damaged,
combustible materials such as leaves,
grass or twigs can gather between the
underbody and the underbody panelling. If
these materials come in contact with hot
parts of the exhaust system, they can catch fire.
In such situations, have the vehicle
checked and repaired immediately at a
qualified specialist workshop. If, upon con-
tinuing your journey, you notice that driving
safety is impaired, pull over and stop the
vehicle immediately, paying attention to
road and traffic conditions. In such cases,
consult a qualified specialist workshop.
Hybrid vehicles have a combustion engine
and an electric motor. The voltage supply for
operating the vehicle electrically is provided
by the vehicle's high-voltage electrical sys-
tem. G
DANGER
The vehicle's high voltage electrical system is under high voltage. If you modify components
in the vehicle's high-voltage electrical system or touch damaged components, you may be
electrocuted. The components in the vehi-
cle's high-voltage electrical system may be
damaged in an accident, although the damage
is not visible. There is a risk of fatal injury.
Do not touch any high-voltage components
after an accident and never modify the vehi-
cle's high-voltage electrical system. Have the vehicle towed away after an accident and the vehicle's high-voltage electrical system
checked by a qualified specialist workshop.
The components of the vehicle's high-voltage
electrical system are marked with yellow 26
Introduction
Page 31 of 489
R
work on electronic components
R work on the hybrid system
Mercedes-Benz recommends that you use a
Mercedes-Benz Service Centre. Vehicle registration
Mercedes-Benz may ask its Service Centres
to carry out technical inspections on certain
vehicles. The quality or safety of the vehicle is
improved as a result of the inspection.
Mercedes-Benz can only inform you about
vehicle checks if it has your registration data.
It is possible that your vehicle has not yet
been registered in your name in the following
cases:
R if your vehicle was not purchased at an
authorised specialist dealer.
R if your vehicle has not yet been examined at
a Mercedes-Benz Service Centre.
It is advisable to register your vehicle with a
Mercedes-Benz Service Centre.
Inform Mercedes-Benz as soon as possible
about any change in address or vehicle own-
ership. You can do this at a Mercedes-Benz
Service Centre, for example. Correct use
If you remove any warning stickers, you or
others could fail to recognise certain dangers. Leave warning stickers in position.
Observe the following information when driv-ing your vehicle:
R the safety notes in this manual
R the technical data in this manual
R traffic rules and regulations
R laws and safety standards pertaining to
motor vehicles Implied warranty
! Follow the instructions in this manual
about the proper operation of your vehicle as well as about possible vehicle damage.
Damage to your vehicle that arises from
culpable contraventions against these
instructions are not covered either by
Mercedes-Benz implied warranty or by the
New or Used-Vehicle Warranty.
Data stored in the vehicle
A wide range of electronic components in
your vehicle contain data memories.
These data memories temporarily or perma-
nently store technical information about:
R the vehicle's operating state
R events
R faults
In general, this technical information docu-
ments the state of a component, a module, a
system or the surroundings.
These include, for example:
R operating conditions of system compo-
nents, e.g. fluid levels
R the vehicle's status messages and those of
its individual components, e.g. number of
wheel revolutions/speed, deceleration in
movement, lateral acceleration, accelera-
tor pedal position
R malfunctions and defects in important sys-
tem components, e.g. lights, brakes
R vehicle reactions and operating conditions
in special driving situations, e.g. airbag
deployment, intervention of stability con-
trol systems
R ambient conditions, e.g. outside tempera-
ture
This data is of an exclusively technical nature and can be used to:
R assist in detecting and rectifying faults and
defects
R analyse vehicle functions, e.g. after an acci-
dent
R optimise vehicle functions 28
Introduction
Page 77 of 489
er's door. If indicator lamp
:is off, oper-
ation is possible using the switches in the
rear compartment. Pets in the vehicle
G
WARNING
If you leave animals unsupervised or unse-
cured in the vehicle, they may push a button
or a switch, for example.
They could:
R activate vehicle equipment and become
trapped, for example
R switch vehicle systems on or off, thus
endangering other road users
In the event of an accident, sudden braking or
abrupt changes of direction, unsecured ani-
mals could be flung around the vehicle, injur-
ing the vehicle occupants. There is a risk of an accident and injury.
Never leave animals unattended in the vehi-
cle. Always secure animals correctly during a
journey, e.g. in an animal transport box. Driving safety systems
Driving safety systems overview
In this section, you will find information about the following driving safety systems:
R ABS ( Anti-lock BrakingSystem)
(Y page 74)
R BAS ( Brake Assist System) (Y page 75)
R BAS PLUS with Cross-Traffic Assist ( Brake
Assist System PLUS with Cross-Traffic
Assist) (Y page 75)
R COLLISION PREVENTION ASSIST PLUS
(distance warning function and adaptive
Brake Assist) (Y page 77)
R Adaptive brake lamps (Y page 80)
R ESP ®
(Electronic StabilityProgram)
(Y page 80) R
EBD ( electronic brake force distribution)
(Y page 82)
R ADAPTIVE BRAKE (Y page 82)
R PRE-SAFE ®
Brake (Y page 82)
R STEER CONTROL (Y page 85) Important safety notes
If you fail to adapt your driving style or if you
are inattentive, the driving safety systems can neither reduce the risk of an accident nor
override the laws of physics. Driving safety
systems are merely aids designed to assist
driving. You are responsible for the distance
to the vehicle in front, for vehicle speed and
for braking in good time. Always adapt your
driving style to suit the prevailing road,
weather and traffic conditions and maintain a
safe distance from the vehicle in front. Drive
carefully.
The driving safety systems described only
work as effectively as possible when there is
adequate contact between the tyres and the
road surface. Please pay special attention to
the notes on tyres, recommended minimum
tyre tread depths etc. (Y page 428).
In wintry driving conditions, always use winter
tyres (M+S tyres) and, if necessary, snow
chains. Only in this way will the driving safety systems described in this section work as
effectively as possible. ABS (Anti-lock Braking System)
General notes ABS regulates brake pressure in such a way
that the wheels do not lock when you brake.
This allows you to continue steering the vehi-
cle when braking.
The ! ABS warning lamp in the instrument
cluster lights up when the ignition is switched on. It goes out when the engine is running. 74
Driving safety systemsSafety
Page 124 of 489
Adjusting the seat fore-and-aft
Vehicles without the seating comfort
package
X Lift handle =and slide the seat forwards
or rearwards.
X Release lever =again.
Make sure that you hear the seat engage in
position.
Vehicles with the seating comfort pack-
age
X Lift handle ?and slide the seat forwards
or rearwards.
X Release lever ?again.
Make sure that you hear the seat engage in
position.
Adjusting the seat cushion length man-
ually X
Lift handle Aand slide the seat cushion
forwards or backwards.
X Release lever Aagain.
The seat cushion engages.
i Manual seat cushion length adjustment is
only available in vehicles with the seating
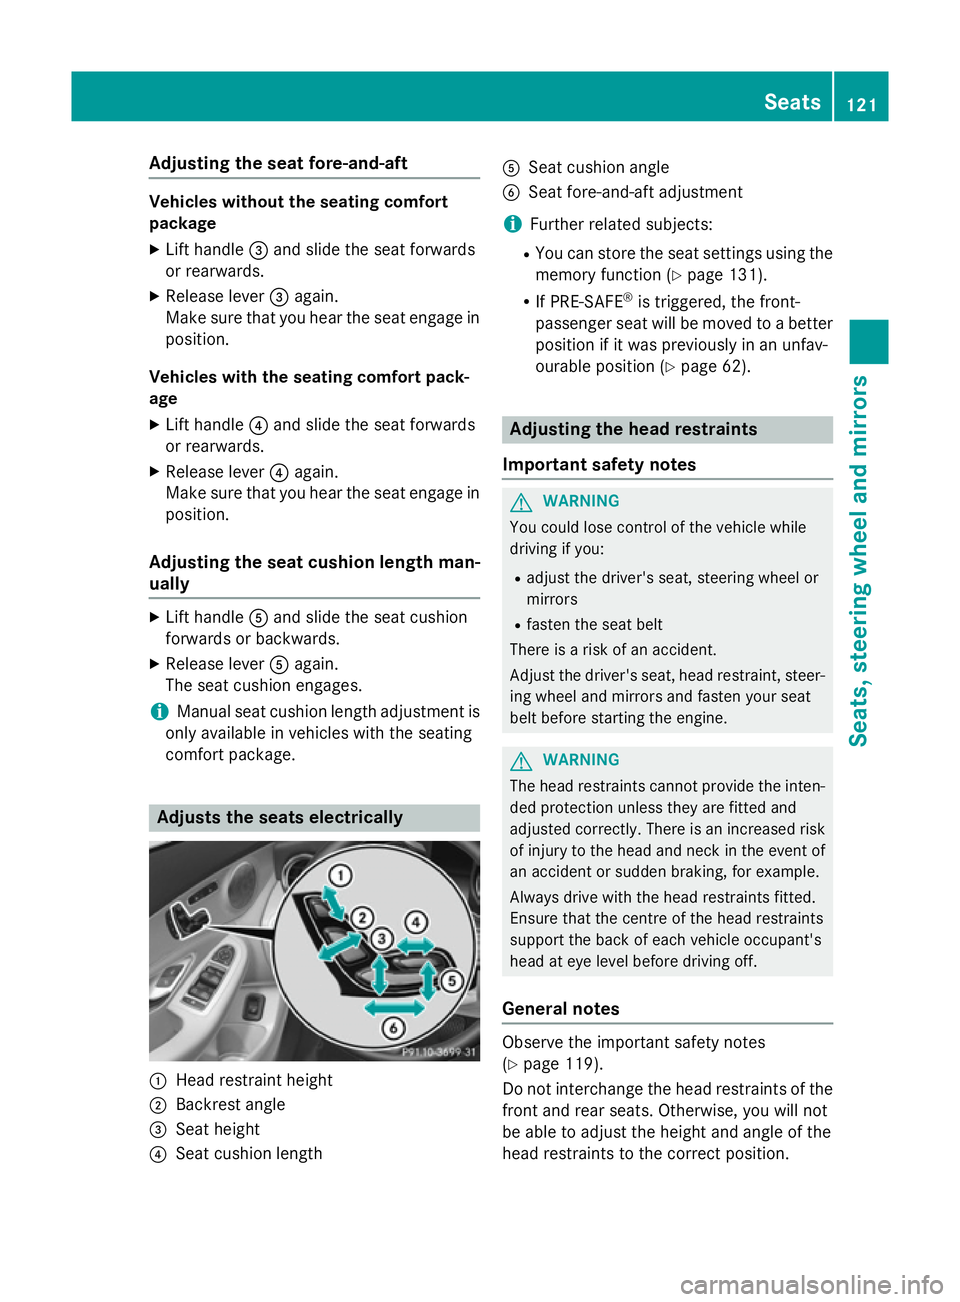
comfort package. Adjusts the seats electrically
:
Head restraint height
; Backrest angle
= Seat height
? Seat cushion length A
Seat cushion angle
B Seat fore-and-aft adjustment
i Further related subjects:
R You can store the seat settings using the
memory function (Y page 131).
R If PRE-SAFE ®
is triggered, the front-
passenger seat will be moved to a better
position if it was previously in an unfav-
ourable position (Y page 62). Adjusting the head restraints
Important safety notes G
WARNING
You could lose control of the vehicle while
driving if you:
R adjust the driver's seat, steering wheel or
mirrors
R fasten the seat belt
There is a risk of an accident.
Adjust the driver's seat, head restraint, steer-
ing wheel and mirrors and fasten your seat
belt before starting the engine. G
WARNING
The head restraints cannot provide the inten-
ded protection unless they are fitted and
adjusted correctly. There is an increased risk of injury to the head and neck in the event of
an accident or sudden braking, for example.
Always drive with the head restraints fitted.
Ensure that the centre of the head restraints
support the back of each vehicle occupant's
head at eye level before driving off.
General notes Observe the important safety notes
(Y
page 119).
Do not interchange the head restraints of the
front and rear seats. Otherwise, you will not
be able to adjust the height and angle of the
head restraints to the correct position. Seats
121Seats, steering wheel and mirrors Z
Page 132 of 489

R
the exterior mirrors fold in automatically as
soon as you lock the vehicle from the out-
side
R the exterior mirrors fold out automatically
again as soon as you unlock the vehicle
i If the exterior mirrors have been folded in
manually, they do not fold out.
Exterior mirror pushed out of position If an exterior mirror has been pushed out of
position (forwards or backwards), proceed as
follows:
X Vehicles without electrically folding
exterior mirrors: move the exterior mirror
into the correct position manually.
X Vehicles with electrically folding exte-
rior mirrors: press and hold button :
until you hear a click and then the mirror
engaging in position (Y page 128).
The mirror housing is engaged again and
you can adjust the exterior mirrors as usual
(Y page 128). Automatic anti-dazzle mirrors
G
WARNING
Electrolyte may escape if the glass of an auto- matic anti-dazzle mirror breaks. Electrolyte is
harmful and causes irritation. It must not
come into contact with your skin, eyes, res-
piratory organs or clothing or be swallowed.
There is a risk of injury.
If you come into contact with electrolyte,
observe the following:
R immediately rinse off electrolyte from your
skin with water.
R immediately and thoroughly rinse electro-
lyte out of eyes using clean water.
R if electrolyte is swallowed, immediately
rinse out your mouth thoroughly. Do not
induce vomiting. R
if electrolyte comes into contact with skin
or eyes or is swallowed, seek medical atten-
tion immediately.
R immediately change out of clothing that has
been in contact with electrolyte.
R if an allergic reaction occurs, seek medical
attention immediately.
The rear-view mirror and the exterior mirror
on the driver's side automatically go into anti- dazzle mode if the following conditions are
met simultaneously:
R the ignition is switched on
R incident light from headlamps strikes the
sensor in the rear-view mirror
The mirrors do not dip if reverse gear is
engaged or if the interior lighting is switched
on. Parking position of the exterior mirror
on the front-passenger side
Using reverse gear :
Memory button M
; Adjustment button
= Button for the exterior mirror on the front-
passenger side
? Button for the exterior mirror on the driv-
er's side
You can set the front-passenger side exterior
mirror so that you can see the rear wheel on
that side as soon as you engage reverse gear.
You can store this position. Mirrors
129Seats, steering wheel and mirrors Z
Page 146 of 489
Replacing the front bulbs
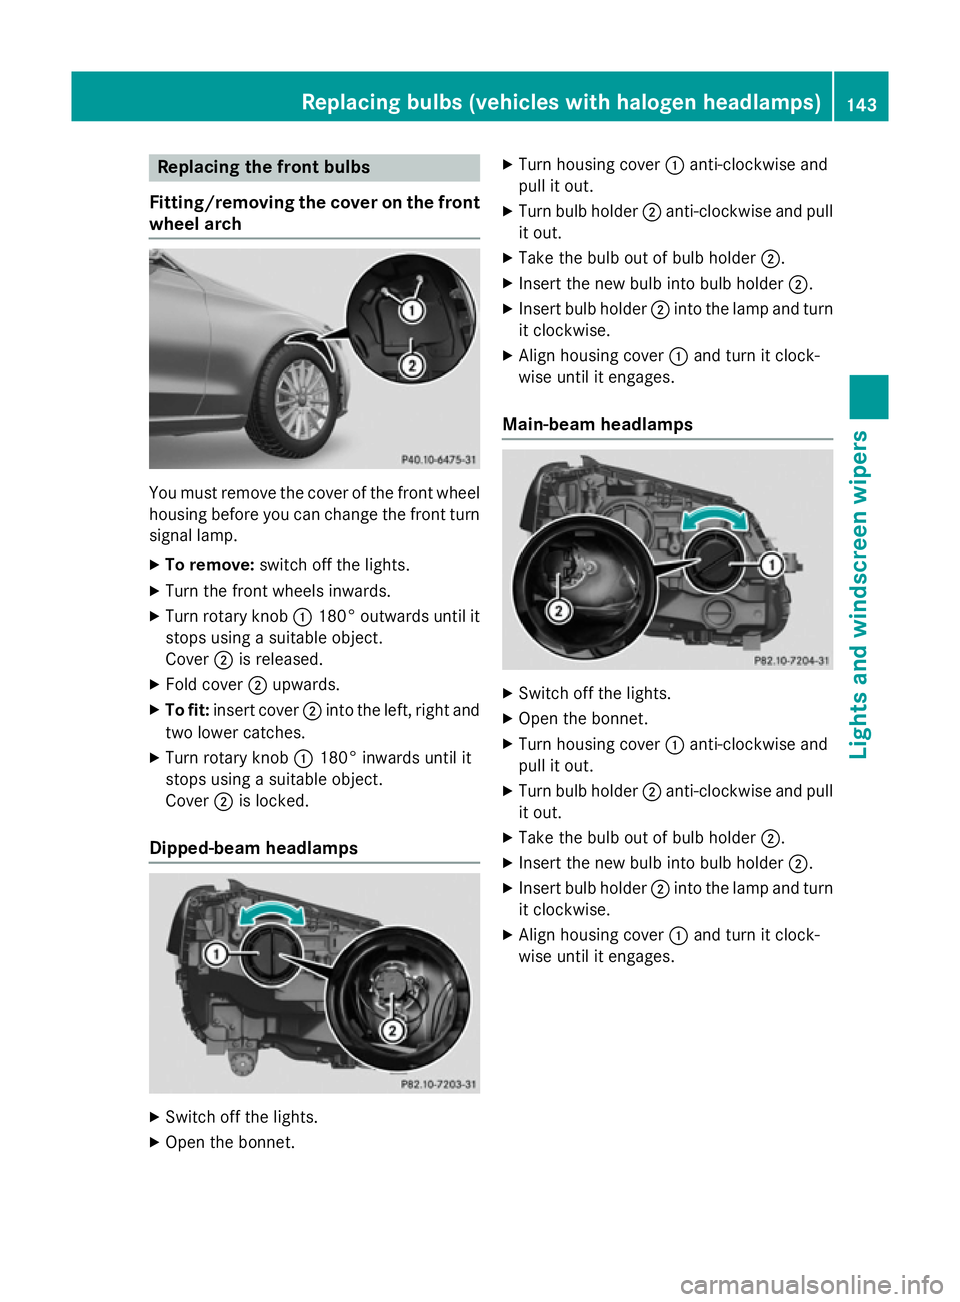
Fitting/removing the cover on the front wheel arch You must remove the cover of the front wheel
housing before you can change the front turn signal lamp.
X To remove: switch off the lights.
X Turn the front wheels inwards.
X Turn rotary knob :180° outwards until it
stops using a suitable object.
Cover ;is released.
X Fold cover ;upwards.
X To fit: insert cover ;into the left, right and
two lower catches.
X Turn rotary knob :180° inwards until it
stops using a suitable object.
Cover ;is locked.
Dipped-beam headlamps X
Switch off the lights.
X Open the bonnet. X
Turn housing cover :anti-clockwise and
pull it out.
X Turn bulb holder ;anti-clockwise and pull
it out.
X Take the bulb out of bulb holder ;.
X Insert the new bulb into bulb holder ;.
X Insert bulb holder ;into the lamp and turn
it clockwise.
X Align housing cover :and turn it clock-
wise until it engages.
Main-beam headlamps X
Switch off the lights.
X Open the bonnet.
X Turn housing cover :anti-clockwise and
pull it out.
X Turn bulb holder ;anti-clockwise and pull
it out.
X Take the bulb out of bulb holder ;.
X Insert the new bulb into bulb holder ;.
X Insert bulb holder ;into the lamp and turn
it clockwise.
X Align housing cover :and turn it clock-
wise until it engages. Replacing bulbs (vehicles with halogen headlamps)
143Lights and windscreen wipers Z
Page 175 of 489
Problems with remote activation
Problem
Possible causes/consequences and
M
MSolutions Remote activation can-
not be switched on or
has switched itself off. Remote activation was started more than three times when the
engine was switched off.
X Switch on the engine and let it run for more than ten seconds.
X Try again to switch remote activation on. The starter battery is not sufficiently charged.
X Charge the starter battery.
X Try again to switch remote activation on. Auxiliary heating
Important safety notes G
DANGER
If the exhaust pipe is blocked or sufficient
ventilation is not possible, toxic exhaust
fumes can enter the vehicle, especially car-
bon monoxide. This is the case, e.g. in
enclosed spaces, or if the vehicle is stuck in
snow. There is a risk of fatal injuries.
You should switch off the auxiliary heating in
enclosed spaces which do not have an extrac- tion system, e.g. a garage. If the vehicle is
stuck in snow and you must leave the auxiliary
heating running, keep the exhaust pipe and
the area around the vehicle clear of snow. To guarantee a sufficient supply of fresh air, open
a window on the side of the vehicle away from the wind. G
WARNING
When the auxiliary heating is switched on,
parts of the vehicle can become very hot.
Flammable materials such as leaves, grass or twigs may ignite if they come into contact
with:
R hot parts of the exhaust system
R the exhaust gas itself
There is a risk of fire. When the auxiliary heating is switched on,
make sure that:
R no flammable materials come into contact
with hot vehicle components
R the exhaust gas can escape from the
exhaust pipe unhindered
R the exhaust gas does not come into contact
with flammable materials.
The auxiliary heating is fitted under the front
wing on the right-hand side of the vehicle. The emissions outlet is found behind the front
wheel on the right hand side of the vehicle.
! Operating the auxiliary heating/ventila-
tion draws on the vehicle battery. After you
have heated or ventilated the vehicle a
maximum of two times, drive for a longer
distance.
Switch the auxiliary heating on regularly once a month for about ten minutes.
The auxiliary heating heats the air in the vehi-
cle interior to the set temperature. This
occurs without using the heat of the running
engine. The auxiliary heating is operated
directly using the vehicle's fuel. For this rea-
son, the tank content must be at least at
reserve fuel level to ensure that the auxiliary
heating functions.
The auxiliary heating/ventilation automati-
cally adjusts to changes in temperature and
weather conditions. For this reason, the aux- 172
Operating the climate control systemClimate control
Page 187 of 489
If the engine will not start:
X Remove the key from the ignition lock.
X Reinsert the key into the ignition lock after
a short waiting period.
X Turn the key to position 2in the ignition
lock (Y page 181).
The indicator lamps in the instrument clus-
ter light up (Y page 351).
X Turn the key to position 3in the ignition
lock (Y page 181) and release it as soon as
the engine is running.
Starting procedure with the Start/Stop button The Start/Stop button is only available on
vehicles with KEYLESS-GO or the KEYLESS-
GO start function.
The Start/Stop button can be used to start
the vehicle manually without inserting the key
into the ignition lock. The key must be in the
vehicle and the Start/Stop button must be
inserted in the ignition lock. This mode for
starting the engine operates independently of the ECO start/stop automatic engine start
function.
You can start the engine if a valid key is in thevehicle. Switch off the engine and always take
the key with you when leaving the vehicle,
even if you only leave it for a short time. Pay
attention to the important safety notes.
X Depress the brake pedal and keep it
depressed.
X To start a petrol engine: press the Start/
Stop button once (Y page 181).
The engine starts.
X To start a diesel engine: press the Start/
Stop button once (Y page 181).
Preglow is activated and the engine starts. Pulling away
Manual transmission !
Change gear in good time and avoid spin-
ning the wheels. Otherwise, you could dam- age the vehicle.
X Depress the brake pedal and keep it
depressed.
X Depress the clutch pedal fully.
X Shift to either first gear or reverse gear R.
X Release the electric parking brake
(Y page 209).
X Release the brake pedal.
X Slowly release the clutch pedal and gently
depress the accelerator pedal.
Follow the shift recommendations in the mul- tifunction display for an economical driving
style (Y page 191).
The vehicle locks centrally once you have
pulled away. The locking knobs in the doors
drop down.
You can open the doors from the inside at any
time.
You can also deactivate the automatic locking feature, see the Digital Owner's Manual.
Automatic transmission G
WARNING
If the engine speed is above the idling speed
and you engage transmission position Dor R,
the vehicle could pull away suddenly. There is a risk of an accident.
When engaging transmission position Dor R,
always firmly depress the brake pedal and do not simultaneously accelerate.
! If a warning tone sounds and the
Release park. brake Release park. brake message appears
in the multifunction display, the parking
brake is still applied. Release the parking
brake. 184
DrivingDriving and parking