display MERCEDES-BENZ C-CLASS SALOON 2018 User Guide
[x] Cancel search | Manufacturer: MERCEDES-BENZ, Model Year: 2018, Model line: C-CLASS SALOON, Model: MERCEDES-BENZ C-CLASS SALOON 2018Pages: 609, PDF Size: 11.19 MB
Page 32 of 609
of an accident,
rescue services can use the QR
code toquickly find the appropriate rescue card
fo ryo ur vehicle. The cur rent rescue card con‐
ta ins the most impor tant information about your
ve hicle in a compact form , e.g. thero uting of the
electric lines.
Fu rther information can be obtained at http://
www.mercedes-benz.de/qr-code. Data
storage Electronic control units
Elect
ronic control units are fitted in your vehicle.
Some of these are necessary forth e safe opera‐
tion of your vehicle, while some assist you when
driving (driver assis tance sy stems). In addition,
yo ur vehicle pr ovides com fort and enter tainment
functions, which are also made possible byelec‐
tronic control units.
Elect ronic control units contain da tamemories
which can temp orarily or permanently store
te ch nical information about theve hicle's operat‐
ing state, component loads, main tenance
re qu irements and tech nical events or faults. In
general, this information documents thest ate
of a component part, a module, a sy stem or the
sur roundings such as:
R operating status of sy stem components (e.g.
fi ll le vels, battery status, tyre pressure)
R status messages concerning theve hicle or
its individual components (e.g. number of
wheel revo lutions/speed, longitudinal accel‐
eration, lateral acceleration, display of fas‐
te ned seat belts)
R malfunctions or faults in impor tant sy stem
components (e.g. lights, brakes)
R information on events leading tovehicle
damage
R system reactions in special driving situations
(e.g. airbag deployment, inter vention of sta‐
bility control sy stems)
R ambient conditions (e.g. temp erature, rain
sensor)
In addition toprov iding the actual control unit
function, this data assists the manufacturer in
de tecting and rectifying faults and optimising
ve hicle functions. The majority of this data is te
mp orary and is only processed in theve hicle
itself. Only a small portion of the data is stored
in theeve nt or fault memor y.
When your vehicle is serviced, tech nical da ta
from theve hicle can be read out byservice net‐
wo rkemplo yees (e.g. workshops, manufactur‐
ers) or third parties (e.g. breakdown services).
Services include repair services, maintenance
processes, warranty claims and quality assur‐
ance measures, forex ample. The read out is per‐
fo rm ed via the legally prescribed port forthe
diagnostics connection in theve hicle. The
re spective service network locations or third
parties collect, process and use the data. They
document tech nical statuses of theve hicle,
assist in finding faults and impr oving quality and
are transmitted tothe manufacturer, if neces‐
sar y.Fu rthermore, the manufacturer is subject
to product liability. Forth is, the manufacturer
requ irestech nical da tafrom vehicles.
Fa ult memories in theve hicle can be reset by a
service outlet as part of repair or maintenance
wo rk. Gene
ral no tes 29
Page 41 of 609
000E
NO
TEDeployment of the seat belt ten‐
sioner when the front passenger seat is
unoccupied If
th e seat belt tongue is engaged in the seat
belt buckle of the unoccupied front
passenger seat, the seat belt tensioner may
also depl oyintheev ent of an accident along
with other sy stems. 0007
Only one person should use each seat
belt at any one time. Seat belt adjustment function
Ve
hicles with PRE-SAFE ®
:if th e front seat belt
is not pulled tight across your body, the seat belt
adjustment may automatically apply a cer tain
tigh tening forc e. Do not hold the seat belt tightly
while it is adjusting.
Yo u can activate and deactivate the seat belt
adjustment function using the multimedia sys‐
te m (0013 page 38). Re
leasing a seat belt 0007
Press there lease button in the seat belt
buckle and guide the seat belt back with the
seat belt tongue. Ac
tivating/deactivating seat belt adjustment
via the multimedia sy stem Multimedia sy
stem:
0018 Vehicle 0019
î Vehicle settings
0019 Belt adjustment 0007
Activate 0073or deacti vate 0053 the function. Seat belt
warning function for the driver and
front passen ger The
00E9 seat belt warning lamp in the instru‐
ment display is a reminder that all vehicle occu‐
pants must weartheir seat belts cor rectly.
In addition, a warning tone may sound.
As soon as the driver and front passenger fasten
th eir seat belts, the seat belt warning goes out. Fu
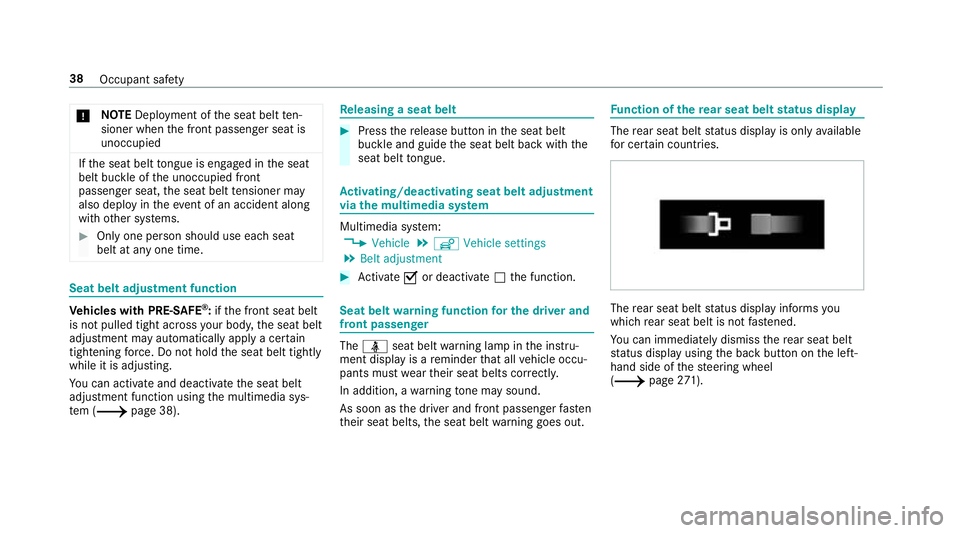
nction of there ar seat belt status display The
rear seat belt status display is on lyavailable
fo r cer tain countries. The
rear seat belt status display informs you
which rear seat belt is not fastened.
Yo u can immediately dismiss there ar seat belt
st atus display using the back button on the left-
hand side of thesteering wheel
(0013 page271). 38
Occupant saf ety
Page 47 of 609
front airbag. The
PASSENGER AIR BAG OFF indi‐
cator lamp may be lit continuously or be off.
If th ePA SSENGER AIR BAG OFF indicator lamp
and the0075 restra int sy stem warning lamp
light up simultaneousl y,the front passenger seat
may not be used. Also in this case, do not fit a
ch ild restra int sy stem tothe front passenger
seat. Ha veautomatic front passenger front air‐
bag shutoff checked and repaired immediately at
a qu alified specialist workshop.
St atus display
If th e front passenger seat is occupied, ensure,
bo th before and during the journe y,that thest a‐
tus of the front passenger front airbag is cor rect
fo rth e cur rent situation.
Af terfitting a rear wa rd-facing child restra int
sy stem tothe front passenger seat:
PA SSENGER AIR BAG OFF must be lit continu‐
ousl y. 000A
WARNING Risk of inju ryor death from
using a rear wa rd-facing child restra int
sy stem when the front passenger front
airbag is enabled
If yo u secure a child in a rear wa rd-facing
ch ild restra int sy stem on the front passenger
seat and thePA SSENGER AIR BAG OFF indi‐
cator lamp is off, the front passenger airbag
can deploy in theev ent of an accident.
The child could be stru ck bythe airbag.
Alw ays ensure that the front passenger air‐
bag is disabled. The PASSENGER AIR BAG
OFF indicator lamp must be lit.
NEVER use a rear wa rd-facing child restra int
sy stem on a seat pr otected byan ENABLED
FRONT AIRB AGin front of it, DE ATH or SERI‐
OUS INJU RYtotheCH ILD can occur. When
fitting a child restra int sy stem tothe front
passenger seat, obser vetheve hicle-specific
information (0013 page 68).
Depending on thech ild restra int sy stem and the
st ature of thech ild, thePA SSENGER AIR BAG
OFF indicator lamp may be off. In this case, do not
fit th ere ar wa rd-facing child restra int sy stem
to the front passenger seat.
Ins tead, fit th ere ar wa rd-facing child restra int
sy stem toa suitable rear seat.
Af terfitting a forw ard-facing child restra int
sy stem tothe front passenger seat: depend‐
ing on thech ild restra int sy stem and thest ature
of thech ild, PASSENGER AIR BAG OFF may be lit
continuously or be off. Alw ays obser vethefo l‐
lowing information. 000A
WARNING Risk of inju ryor death due to
incor rect positioning of thefo rw ard-
fa cing child restra int sy stem
If yo u secure a child in a forw ard-facing child
re stra int sy stem on the front passenger seat
and you position the front passenger seat too
close tothe cockpit, in theev ent of an acci‐
dent, thech ild could:
R Come into con tact wi th theve hicle inte‐
ri or if thePA SSENGER AIR BAG OFF indi‐
cator lamp is lit, forex ample.
R Bestru ck bythe airbag if thePA SSENGER
AIR BAG OFF indicator lamp is off. 44
Occupant saf ety
Page 117 of 609

0007
When leaving theve hicle, alw aysta ke
th eke y with you and lock theve hicle.
This also applies tothe digital vehicle
ke y if the "Digital Vehicle Key" function
is activated via Mercedes me connect. The memory function can be used when
the igni‐
tion is switched off.
St oring
Seat adjustments for up tothre e people can be
st ored and called up using the memory function.
The following sy stems can be selected:
R Seat, backrest and head restra int
R Steering wheel
R Outside mir rors
R Head-up display 0007
Set the seat, thesteering wheel, the head-up
display and the outside mir rors to the
desired position. 0007
Press memory button M and then press pre‐
set position button 1,2 or 3 within thre e sec‐
onds.
An acoustic signal sounds. The settings are
st ored. 0007
Tocall up: press and hold there leva nt pre‐
set position button 1,2 or 3 until the front
seat, thesteering wheel, head-up display and
outside mir ror are in thestored position.
0009 When youre lease the preset position button,
st eering wheel, the seat and mir ror setting
functions stop immediatel y.The head-up dis‐
play continues tobe adjus ted. St
ow age areas Note
s on loading theve hicle 000A
DANG ER Risk of exhaust gas poisoning
Combustion engines emit poisonous exhaust
ga ses such as carbon monoxide. Exhaust
ga ses can enter theve hicle interior if the
boot lid is open when the engine is running,
especially if theve hicle is in motion. 0007
Alw ays switch off the engine before
opening the boot lid. 0007
Never drive with the boot lid open. 11 4
Seats and stowing
Page 120 of 609
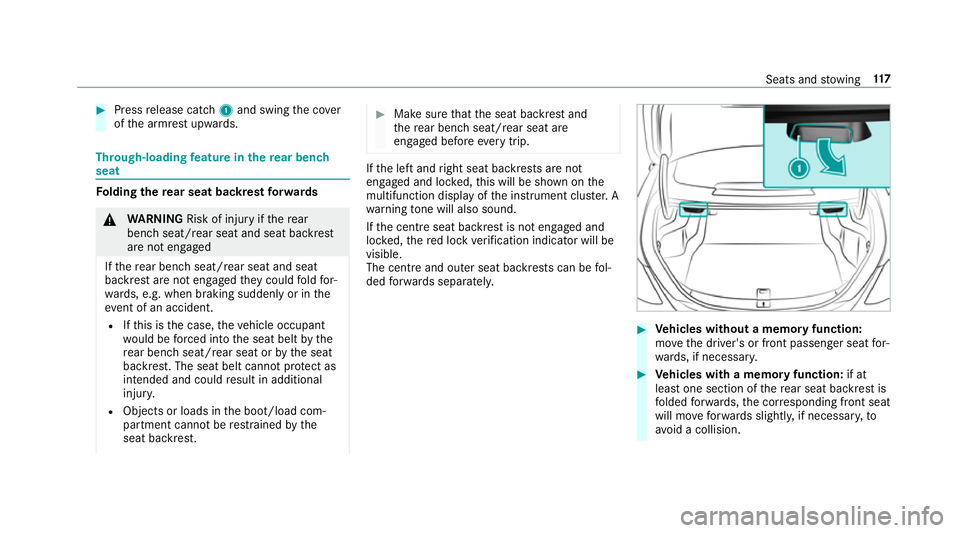
0007
Press release cat ch1 and swing the co ver
of the armrest upwards. Through-loading
feature in there ar ben ch
seat Fo
lding there ar seat backrest forw ards 000A
WARNING Risk of inju ryifth ere ar
ben chseat/rear seat and seat backrest
are not engaged
If th ere ar ben chseat/rear seat and seat
backrest are not engaged they could fold for‐
wa rds, e.g. when braking suddenly or in the
ev ent of an accident.
R Ifth is is the case, theve hicle occupant
wo uld be forc ed into the seat belt bythe
re ar ben chseat/rear seat or bythe seat
backrest. The seat belt cann otprotect as
intended and could result in additional
injur y.
R Objects or loads in the boot/load com‐
partment cann otbe restra ined bythe
seat backrest. 0007
Make sure that the seat backrest and
th ere ar ben chseat/rear seat are
engaged before everytrip. If
th e left and right seat backrests are not
engaged and loc ked, this will be shown on the
multifunction display of the instrument clus ter. A
wa rning tone will also sound.
If th e cent reseat backrest is not engaged and
loc ked, there d lock verification indicator will be
visible.
The centre and ou ter seat backrests can be fol‐
ded forw ards separatel y. 0007
Vehicles without a memory function:
mo vethe driver's or front passenger seat for‐
wa rds, if necessar y. 0007
Vehicles with a memory function: if at
lea stone section of there ar seat backrest is
fo lded forw ards, the cor responding front seat
will mo veforw ards slightl y,if necessar y,to
av oid a collision. Seats and
stowing 117
Page 121 of 609
0007
If necessar y,fully insert there ar seat back‐
re st head restra ints. 0007
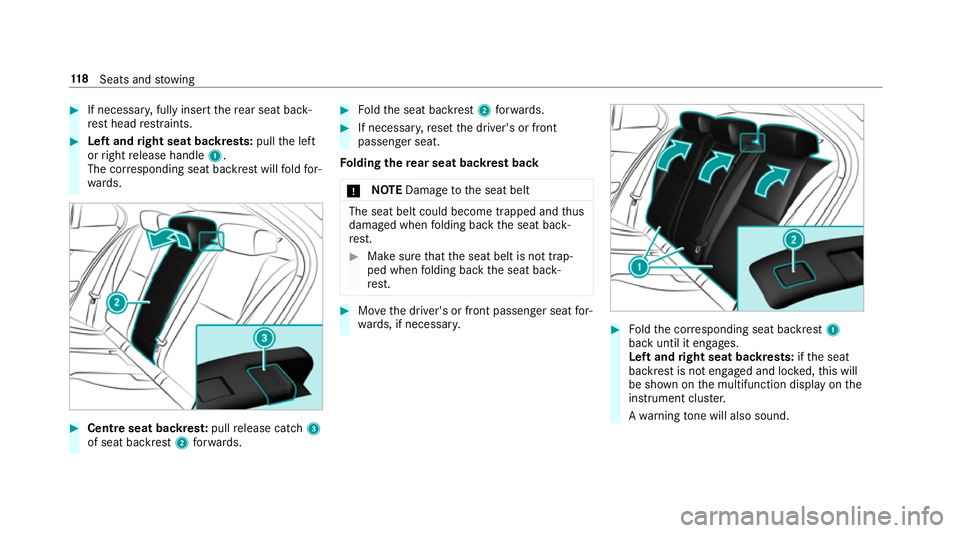
Left and right seat backrests: pullthe left
or right release handle 1.
The cor responding seat backrest will fold for‐
wa rds. 0007
Centre seat backres t:pull release cat ch3
of seat backrest 2forw ards. 0007
Foldthe seat backrest 2forw ards. 0007
If necessar y,reset the driver's or front
passenger seat.
Fo lding there ar seat backrest back
000E NO
TEDama getothe seat belt The seat belt could become trapped and
thus
damaged when folding back the seat back‐
re st. 0007
Make sure that the seat belt is not trap‐
ped when folding back the seat back‐
re st. 0007
Movethe driver's or front passenger seat for‐
wa rds, if necessar y. 0007
Foldthe cor responding seat backrest 1
back until it engages.
Left and right seat backrests: ifth e seat
backrest is not engaged and loc ked, this will
be shown on the multifunction display on the
instrument clus ter.
A wa rning tone will also sound. 11 8
Seats and stowing
Page 136 of 609
000E
NO
TEDama getoobjects caused by
placing them in the mobile phone stow‐
age compartment If objects are placed in
the mobile phone
stow age compartment, they may be dam‐
aged byelectromagnetic fields. 0007
Do not place credit cards, storage
media or other objects sensitive to
electromagnetic fields in the mobile
phone stowage compartment. 000E
NO
TEDama getothe mobile phone
stow age compartment caused byliquids If liquids enter
the mobile phone stowage
compartment, the compartment may be
damaged. 0007
Ensure that no liquids enter the mobile
phone stowage compartment. R
Depending on theve hicle equipment, the
mobile phone is connected totheve hicle's
ex terior aerial via thech arging module. R
The charging function and wireless connec‐
tion of the mobile phone totheve hicle's
ex terior aerial are only available if the ignition
is switched on.
R Small mobile phones may not be able tobe
ch arge d in everyposition of the mobile
phone stowage compartment.
R Largemobile phones which do not rest flat in
th e mobile phone stowage compartment may
not be able tobe charge d or connec ted with
th eve hicle's exterior aerial.
R The mobile phone may heat up during the
ch arging process. This may also depend on
th e applications (apps) cur rently open.
R Toensure more ef ficient charging and con‐
nection with theve hicle's exterior aerial,
re mo vethe pr otective co ver from the mobile
phone. Pr otective co vers which are neces‐
sary for wireless charging are excluded. Wire
lesscharging of the mobile phone Re
quirements:
R The mobile phone is suitable for wireless
ch arging. You can find a li stof compatible
mobile phones at:
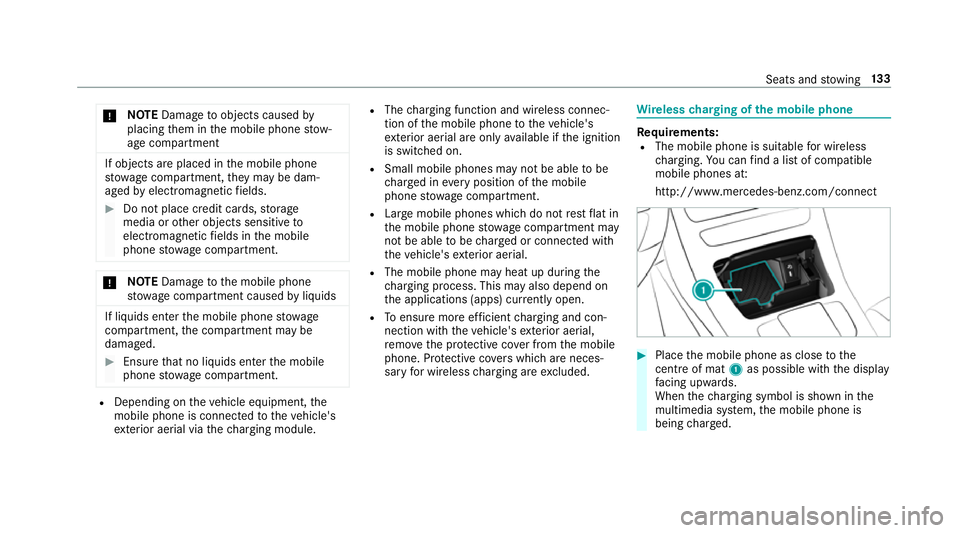
http://www.mercedes-benz.com/connect 0007
Place the mobile phone as close tothe
centre of mat 1as possible wi th the display
fa cing up wards.
When thech arging symbol is shown in the
multimedia sy stem, the mobile phone is
being charge d. Seats and
stowing 13 3
Page 144 of 609

In
this, or in similar situations, the automatic
main beam will not be deactivated or will be
activated despite the presence of other road
users. 0007
Alw ays obser vethe tra ffic carefully and
switch off the main beam in good time. Ad
aptive Highbeam Assist cannot take into
account road, weather or traf fic conditions.
De tection may be restricted in thefo llowing
cases:
R in poor visibilit y,e.g. fog, heavy rain or snow
R ifth ere is dirt on the sensors or the sensors
are obscured
Ad aptive Highbeam Assist is on lyan aid. You are
re sponsible for adju sting theve hicle's lighting to
th e pr evailing light, visibility and traf fic condi‐
tions. The
Adaptive Highbeam Assist automatically
swit ches between thefo llowing types of light:
R Low beam
R High beam
At speeds abo ve30 km/h:
R If no other road users are de tected, the high
beam will be switched on automaticall y.The high beam switches off automatically in
the
fo llowing cases:
R Atspeeds below 25 km/h.
R Ifot her road users are de tected.
R Ifstre et lighting is suf ficient.
At speeds abo veappr oximately 50 km/h:
R The headlamp range of the low beam is regu‐
lated automatically based on the dis tance to
ot her road users.
The sy stem's optical sensor is located behind
th e windscreen near theov erhead control panel.
Switching Adaptive Highbeam Assist on/off 0007
Toswitch on: turnthe light switch tothe
0058 position. 0007
Switch on the main beam using the combina‐
tion switch.
When the main beam is switched on auto‐
matically in the dar k,the 00CE indicator
lamp on the multifunction display comes on. 0007
Toswitch off: switch offthe main beam
using the combination switch. Light and sight
141
Page 146 of 609

ULTRA RANGE Highbeam increases
the bright‐
ness of the cone of light tothe legally permitted
maximum.
Pa rtial high beam uses the high beam toshine
past other road users rath er than dazzling them.
The vehicle in front is illuminated bythe low
beam.
At speeds below 25 km/h or when there is suf fi‐
cient stre et lighting:
R The partial high beam and the high beam
switch off automaticall y.
At speeds abo ve30 km/h:
R If no other road users are de tected, the high
beam is switched on automaticall y.
R Ifot her road users are de tected, the partial
high beam is switched on automaticall y.
At speeds abo ve40 km/h:
R If no other road users are de tected on a
st ra ight road, ULTRA RANGE Highbeam is
swit ched on automaticall y.
R Ifot her road users are de tected, the partial
high beam is switched on automaticall y.R
If highly reflective signs are de tected, ULTRA
RANGE Highbeam is switched off au tomati‐
cally.
At speeds abo veappr oximately 50 km/h:
R The headlamp range of the low beam is regu‐
lated automatically based on the dis tance to
ot her road users.
The sy stem's optical sensor is located behind
th e windscreen near theove rhead control panel.
Switching Adaptive Highbeam Assist Plus
on/off 0007
Toswitch on: turnthe light switch tothe
0058 position. 0007
Switch on the main beam using the combina‐
tion switch.
When the main beam is switched on auto‐
matically in the dar k,the 00CE indicator
lamp on the multifunction display will light
up. 0007
Toswitch off: switch offthe main beam
using the combination switch. Setting
the dipped beam Multimedia sy
stem:
0018 Vehicle 0019
÷ Light settings
0019 Dipped-beams 0007
Select Left-side traffic orRight-side traffic. Setting
theex terior lighting switch-off delay
time Multimedia sy
stem:
0018 Vehicle 0019
÷ Light settings
0019 Exterior light shut-off 0007
Set the switch-off delay time. Setting
the sur round lighting Multimedia sy
stem:
0018 Vehicle 0019
÷ Light settings
0019 Locator lighting 0007
Activate 0073or deacti vate 0053 the function.
If th e sur round lighting is swit ched on, theex te‐
ri or lighting remains lit for 40 seconds af terthe Light and sight
14 3
Page 147 of 609
ve
hicle is unloc ked. When youstart theve hicle,
th e sur round lighting is deactivated and the
automatic driving lights are activated. Interior lighting
Ad
justing the in terior lighting Fr
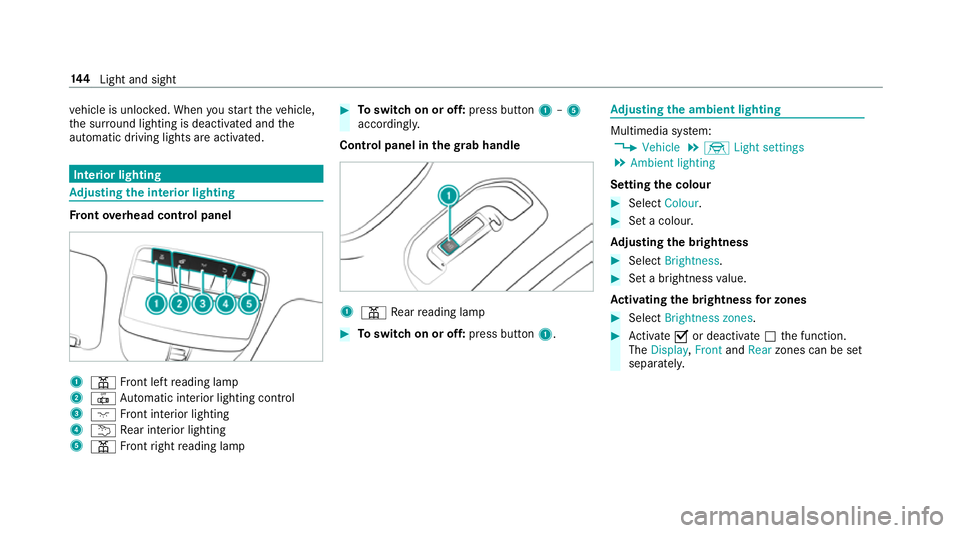
ont overhead control panel 1
003D Front left reading lamp
2 0033 Automatic interior lighting control
3 004A Front interior lighting
4 0042 Rear interior lighting
5 003D Front right reading lamp 0007
Toswitch on or off: press button1–5
accordingly.
Control panel in thegr ab handle 1
003D Rear reading lamp 0007
Toswitch on or off: press button1. Ad
justing the ambient lighting Multimedia sy
stem:
0018 Vehicle 0019
÷ Light settings
0019 Ambient lighting
Setting the colour 0007
Select Colour. 0007
Set a colour.
Ad justing the brightness 0007
Select Brightness . 0007
Set a brightness value.
Ac tivating the brightness for zones 0007
Select Brightness zones . 0007
Activate 0073or deacti vate 0053 the function.
The Display ,Front andRear zones can be set
separately. 14 4
Light and sight