maintenance MERCEDES-BENZ C-Class SEDAN 2013 W204 User Guide
[x] Cancel search | Manufacturer: MERCEDES-BENZ, Model Year: 2013, Model line: C-Class SEDAN, Model: MERCEDES-BENZ C-Class SEDAN 2013 W204Pages: 358, PDF Size: 4.85 MB
Page 163 of 358
X
Warm up the engine at low engine speeds.
X Avoid frequent acceleration or braking.
X Have all maintenance work carried out as
indicated by the service intervals in the
Maintenance Booklet or by the service
interval display.
Fuel consumption also increases when
driving in cold weather, in stop-start traffic
and in hilly terrain.
Drinking and driving G
WARNING
Drinking and driving and/or taking drugs and
driving are very dangerous combinations.
Even a small amount of alcohol or drugs can
affect your reflexes, perceptions and
judgment.
The possibility of a serious or even fatal
accident are greatly increased when you drink
or take drugs and drive.
Do not drink or take drugs and drive or allow
anyone to drive who has been drinking or
taking drugs.
Emission control G
WARNING
Combustion engines emit poisonous exhaust
gases such as carbon monoxide. Inhaling
these exhaust gases leads to poisoning .There
is a risk of fatal injury. Therefore never leave
the engine running in enclosed spaces
without sufficient ventilation.
Certain engine systems are designed to keep
the level of poisonous components in exhaust
fumes within legal limits.
These systems only work at peak efficiency if
they are serviced exactly in accordance with
the manufacturer's specifications. For this
reason, all work on the engine must be carried
out by qualified and authorized Mercedes-
Benz technicians.
The engine settings must not be changed
under any circumstances. Furthermore, all specific service work must be carried out at
regular intervals and in accordance with the
Mercedes-Ben
zservice requirements. Details
can be found in the Maintenance Booklet. ECO display
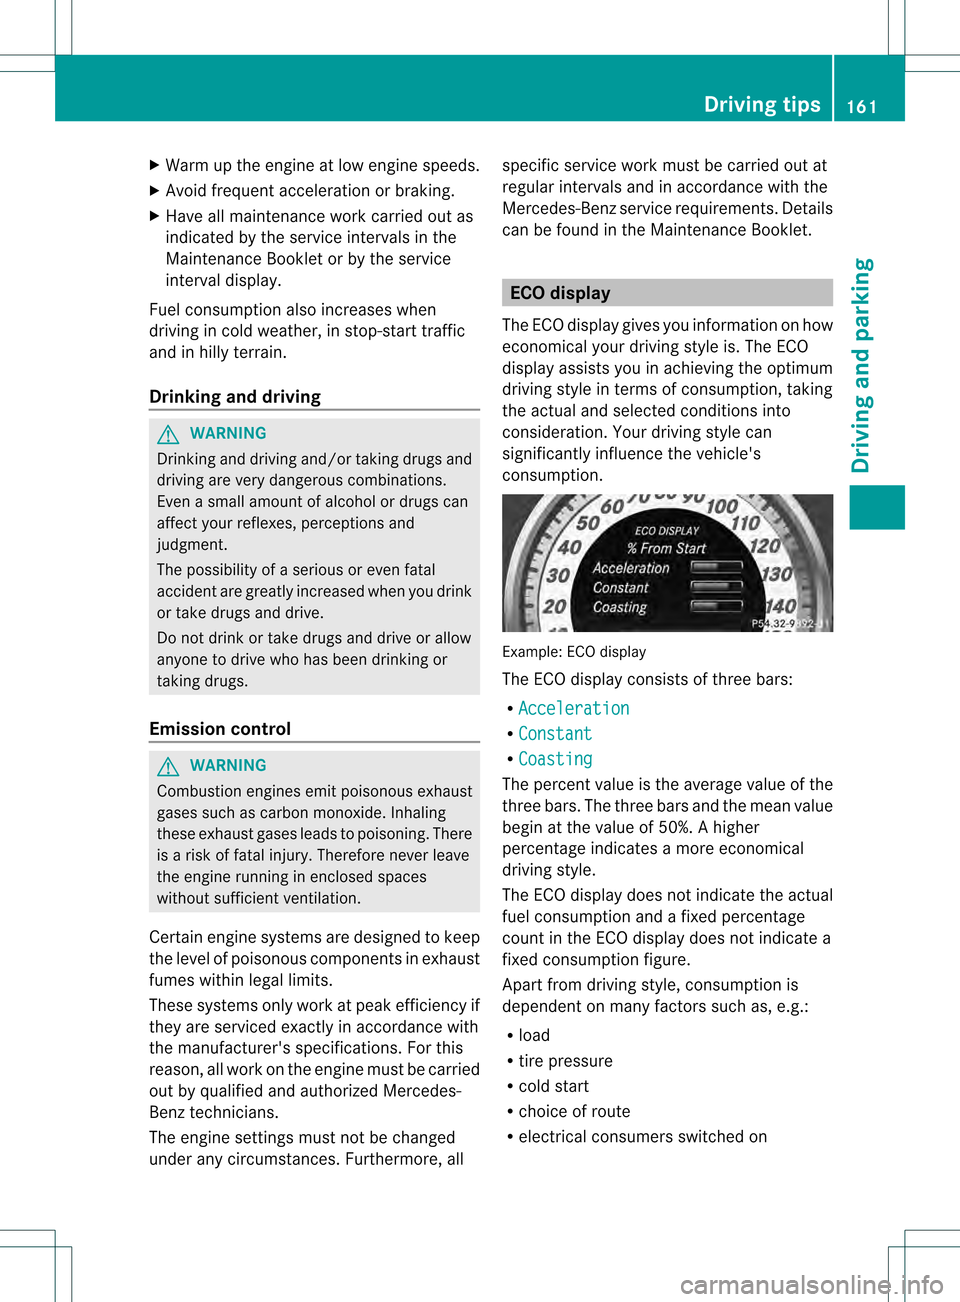
The ECO display gives you information on how
economical your driving style is. The ECO
display assists you in achieving the optimum
driving style in terms of consumption, taking
the actual and selected conditions into
consideration .Your driving style can
significantly influence the vehicle's
consumption. Example: ECO display
The ECO display consists of three bars:
R
Acceleration R
Constant R
Coasting The percent value is the average value of the
three bars. The three bars and the mean value
begin at the value of 50%.
Ahigher
percentage indicates a mor eeconomical
driving style.
The ECO display does not indicate the actual
fuel consumption and a fixed percentage
count in the ECO display does not indicate a
fixed consumption figure.
Apart from driving style, consumption is
dependent on many factors such as, e.g.:
R load
R tire pressure
R cold start
R choice of route
R electrical consumers switched on Driving tips
161Driving and parking Z
Page 165 of 358
Wet roads
If you have drive
nfor a long time in heavy rain
without braking, there may be a delayed
reaction from the brakes when braking for the
first time. This may also occur after the
vehicle has been washed.
You have to depress the brake pedal more
firmly. Maintain a greater distance from the
vehicle in front.
After driving on a wet road or having the
vehicle washed, brake firmly while paying
attention to the traffic conditions. This will
warm up the brake discs, thereby drying them
more quickly and protecting them against
corrosion.
Limited braking performance on salt-
treated roads If you drive on salted roads, a layer of salt
residue may form on the brake discs and
brake pads. This can result in a significantly
longer braking distance.
R Brake occasionally to remove any possible
salt residue. Make sure that you do not
endanger other road users when doing so.
R Carefully depress the brake pedal and the
beginning and end of a journey.
R Maintain a greater distance to the vehicle
ahead.
Servicing the brakes !
If the red brake warning lamp lights up in
the instrument cluster and you hear a
warning tone while the engine is running,
the brake fluid level may be too low.
Observe additional warning messages in
the multifunction display.
The brake fluid level may be too low due to
brake pad wear or leaking brake lines.
Have the brake system checked
immediately. This work should be carried
out at a qualified specialist workshop.
All checks and maintenance work on the
brake system must be carried out at a qualified specialist workshop. Consult a
qualified specialist workshop to arrange this.
Have brake pads installed and brake fluid
replaced at a qualified specialist workshop.
!
Vehicles with 4MATIC: function or
performance tests may only be carried out
on a 2-axle dynamometer. If you are
planning to have the vehicle tested on such
a dynamometer, contact an authorized
Mercedes-Benz Center to obtain further
information first. Otherwise, you could
damage the drive train or the brake system.
! Vehicles with 4MATIC: as the ESP®
system operates automatically, the engine
and the ignition must be switched off
(SmartKey in position 0or 1in the ignition
lock or Start/Stop button in position 0or
1) while the parking brake is being tested
on a brake dynamometer.
Braking maneuvers triggered automatically
by ESP ®
may seriously damage the brake
system.
! Vehicles with 4MATIC: as the ESP®
system operates automatically, the engine
and the ignition system must be switched
off (SmartKey in position 0or 1in the
ignition lock or Start/Stop button in
position 0or 1) when:
R testing the parking brake on a brake
dynamometer.
R you intend to have the vehicle towed with
the front axle raised.
Braking maneuvers triggered automatically
by ESP ®
may seriously damage the brake
system.
If the brake system has only been subject to
moderate loads, you should test the
functionality of your brakes at regular
intervals. To do so, press firmly on the brake
pedal when driving at a high speed. This
improves the grip of the brake pads.
You can find a description of Brake Assist
(BAS) on (Y page 65) or of BAS PLUS on
(Y page 65). Driving tips
163Driving and parking Z
Page 210 of 358
When ATTENTION ASSIST(
Ypage 185) is
activated, the 0003symbol appears in the
multifunction display when the ignition is on.
For further information about ATTENTION
ASSIST, see (Y page 185).
Activating/deactivating Blind Spot
Assist X
Press the 0002or0005 button on the
steering wheel to select the DriveAssistmenu.
X Press the 0003or0004 button to select
Blind Spot Assist .
X Press the 000Bbutton.
The curren tselection is displayed.
X To activate/deactivate: press the000B
button again.
If the Blind Spot Assist Sensors Deactivated or
Act. Blind Spot Asst. Sensors Deactivated message appears,
the radar sensor system is deactivated.
X Switch on the radar sensor system
(Y page 211).
For further information about Blind Spot
Assist, see (Y page 186).
For further information about Active Blind
Spot Assist, see (Y page 190).
Activating/deactivating Lane Keeping
Assist X
Press the 0002or0005 button on the
steering wheel to select the DriveAssistmenu.
X Press the 0003or0004 button to select
Lane Keep. Asst. X
Press the 000Bbutton.
The curren tselection is displayed.
X Press 000Bto confirm.
X Press the 0004or0003 button to set Off ,
Standard or
Adaptive .
X Press the 000Bbutton to save the setting. When Lane Keeping Assist or Active Lane
Keeping Assist is activated, the
0001symbol
appears in the multifunction display when the
ignition is on.
For further information about Lane Keeping
Assist, see (Y page 188).
For further information about Active Lane
Keeping Assist, see (Y page 193). Maintenance menu
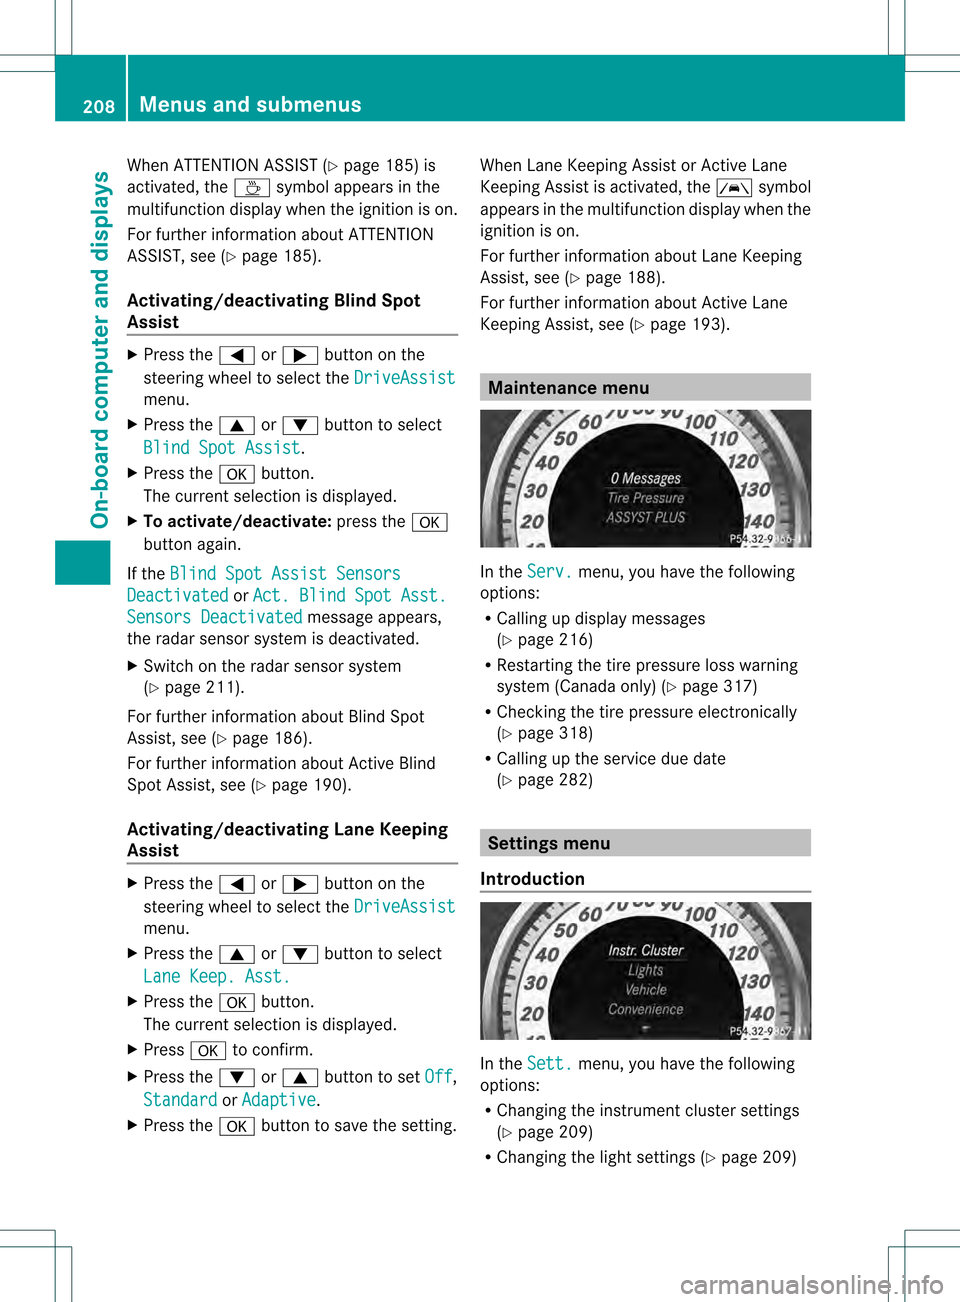
In the
Serv. menu, you have the following
options:
R Calling up display messages
(Y page 216)
R Restarting the tire pressure loss warning
system (Canada only) (Y page 317)
R Checking the tire pressure electronically
(Y page 318)
R Calling up the service due date
(Y page 282) Settings menu
Introduction In the
Sett. menu, you have the following
options:
R Changing the instrument cluster settings
(Y page 209)
R Changing the light settings (Y page 209)208
Menus and submenusOn-board computer and displays
Page 276 of 358
appears. The vehicle data can now be sen
tto
the Customer Assistance center.
X Press OK to confirm the message.
The voice connectio nwith the Customer
Assistance center is terminated.
The Vehicle Diagnosis: Transferring data... appears.
The vehicle data is sen ttothe Customer
Assistance center.
Depending on what the customer service
representative agreed with you, the voice
connection is re-established after the transfer
is complete. If necessary, you will be
contacted at a later time by another means,
e.g. by E-Mail or telephone.
Further functions of the vehicle remote
malfunction diagnosis include, for example:
R transfer of service data to the Customer
Assistance center. If aservice is overdue,
the COMAND display shows a message
about various special offers at your
workshop.
R monthly status information E-Mail on oil
level, air pressure, maintenance, brakes,
etc.Ifa pplicable, you will receive
information on special offers in the E-Mail.
USA only: this information can also be
called up under "Owners Online" at http://
www.mbusa.com.
Information on the data stored in the vehicle
(Y page 26).
Information on roadside assistance
(Y page 23).
Downloading routes Downloading routes allows you to transfer
and save predefined routes in the navigation
system. To do this, an SD memory card must
be inserted into the COMAND system. If no
SD memory card is inserted, you must insert
the card into the card slot on the COMAND
system before saving.
Ar oute can be prepared and sent either by a
customer service representative or via the
mbrace portal on the Internet. Each route can include up to 20 way points. When a route has
been received by the navigation system, the
'Route name' has been saved to memory card. Do you want to start
route guidance? message appears on the
COMAND display .The route is saved to the
SD memory card.
X To start route guidance: selectYes .
An overview of the route is shown in the
display.
i If you select No , the saved route can be
called up later in the navigation menu.
X Select Start .
Route guidance is started.
i Downloaded and saved data can be called
up again in COMAND.
You can find further information in the
separate COMAND operating instructions.
Speed alert You can define the upper speed limit, which
must not be exceeded by the vehicle. If this
selected speed is exceeded by the vehicle, a
message will be sent to the Customer
Assistance center. The Customer Assistance
center then forwards this information to you.
You can select the way in which you receive
this information beforehand. Possible options
include SMS, E-Mail or an automated call.
The data which is sent to the Customer
Assistance center contains the following
information:
R the location where the speed limit was
exceeded
R the time at which the speed limit was
exceeded
R the selected speed limit which was
exceeded
Geo fencing Geo fencing allows you to select areas which
the vehicle should not enter or leave. You will
be informed if the vehicle crosses the
boundaries of the selected areas. You can274
FeaturesStowage and features
Page 283 of 358
Useful information
............................282
ASSYST PLUS .................................... 282
Engine compartment ........................283
Care .................................................... 287 281Maintenance and care
Page 284 of 358
Useful information
i This Operator's Manual describes all
models and all standard and optional
equipment of your vehicle available at the
time of publication of the Operator's
Manual. Country-specific differences are
possible. Please note that your vehicle may
not be equipped with all features
described. This also applies to safety-
related systems and functions.
i Read the information on qualified
specialist workshops: (Y page 25).ASSYST PLUS
Service messages
The ASSYST PLUS service interval display
informs you of the nex tservice due date.
Information on the type of service and service
intervals (see the separate Maintenance
Booklet).
You can obtain further information from an
authorized Mercedes-Benz Center or at
http://www.mbusa.com (USA only).
i The ASSYST PLUS servic einterval display
does not show any informatio nonthe
engine oil level. Observe the notes on the
engine oil level (Y page 284).
The multifunction display shows a service
message for several seconds, e.g.:
R Next Service A in .. days R
Service A Due R
Service A Exceeded by .. days Depending on the operating conditions of the
vehicle, the remaining time or distance until
the next service due date is displayed.
The letter
A or
B , possibly in connection with
a number or another letter, shows the type of
service. A stands for a minor service and
B for
a major service.
You can obtain further information from an
authorized Mercedes-Ben zCenter. The ASSYST PLUS service interval display
does not take into accoun
tany periods of
time during which the battery is
disconnected.
Maintaining the time-dependent service
schedule:
X Note down the service due date displayed
in the multifunctio ndisplay before
disconnecting the battery.
or
X After reconnecting the battery, subtract
the battery disconnection periods fro mthe
service date shown on the display. Hiding
aservice message
X Press the 0006or000B button on the
steering wheel. Displaying service messages
X Switch on the ignition.
X Press the 0002or0005 button on the
steering wheel to selec tthe Serv. menu.
X Press the 0003or0004 button to select the
ASSYST PLUS submenu and confirm with
000B.
The service due date appears in the
multifunction display. Information about Service
Resetting the ASSYST PLUS service
interval display !
If the ASSYST PLUS service interval
display has been inadvertently reset, this
setting can be corrected at a qualified
specialist workshop.
Have service work carried out as described
in the Maintenance Booklet. This may
otherwise lead to increased wear and
damage to the major assemblies or the
vehicle. 282
ASSYST PLUSMaintenance and care
Page 285 of 358
Aq
ualified specialist workshop, e.g. an
authorized Mercedes-Ben zCenter, will reset
the ASSYST PLUS service interval display
after the service work has been carried out.
You can also obtain further information on
maintenance work, for example.
Special service requirements The specified maintenance interval takes only
the normal operation of the vehicle into
account. Under arduous operating conditions
or increased load on the vehicle,
maintenance work must be carried out more
frequently, for example:
R regular city driving with frequent
intermediate stops
R if the vehicle is primarily used to travel
short distances
R use in mountainous terrain or on poor road
surfaces
R if the engine is often left idling for long
periods
Under these or similar conditions, have, for
example, the air filter, engine oil and oil filter
replaced or changed more frequently. Under
arduous operating conditions, the tires must
be checked more often. Further information
can be obtained at a qualified specialist
workshop, e.g. an authorized Mercedes-Benz
Center.
Driving abroad An extensive Mercedes-Benz Service network
is also available in other countries. You can
obtain further information from any
authorized Mercedes-BenzC
enter. Engine compartment
Hood
Important safety notes G
WARNING
If the hood is unlatched, it may open up when
the vehicle is in motion and block your view.
There is a risk of an accident.
Never unlatch the hood while driving. G
WARNING
When opening and closing the hood, it may
suddenly fall into the closed position .There is
a risk of injury to persons within range of
movement of the hood.
Open and close the hood only when no one is
within its range of movement. G
WARNING
Certain components in the engine
compartment, such as the engine, radiator
and parts of the exhaust system, can become
very hot. Working in the engine compartment
poses a risk of injury.
Where possible, let the engine cool down and
touch only the components described in the
following. G
WARNING
Opening the hood when the engine is
overheated or when there is a fire in the
engine compartmentc ould expose you to hot
gases or other service products. There is a
risk of injury.
Let an overheated engine cool down before
opening the hood. If there is a fire in the
engine compartment, keep the hood closed
and contact the fire department. G
WARNING
The engine compartment contains moving
components. Certain components, such as
the radiator fan, may continue to run or start
again suddenly when the ignition is off. There
is a risk of injury. Engine compartment
283Maintenance and care
Z
Page 286 of 358

If you need to do any work inside the engine
compartment,
R
switch off the ignition
R never reach into the area where there is a
risk of danger from moving components,
such as the fan rotation area
R keep clothing away from moving parts G
WARNING
The ignition system and the fuel injection
system work under high voltage. If you touch
components which are under voltage, you
could get an electric shock. There is a risk of
injury.
Never touch components of the ignition
system or fuel injection system when the
ignition is switched on.
Opening the hood G
WARNING
The windshield wipers and wiper linkage
could be set in motion.
When the hood is open, you or others could
be injured by the wiper linkage.
Make sure that the windshield wipers are
switched off. Remove the SmartKey or make
sure that no ignition positio nhas been
selected with KEYLESS-GO. All indicator
lamps must be off in the instrument panel.
! Make sure that the windshiel dwipers are
not folded away fro mthe windshield. You
could otherwise damage the windshield
wipers or the hood.
X Make sure that the windshield wipers are
turned off. X
Pull release lever 0002on the hood.
The hood is released. X
Reach into the gap, pull hood catch
handle 0003up and lift the hood.
If you lift the hood by approximately
15 inches (40c m), the hood is opened and
held open automatically by the gas-filled
strut.
Closing the hood X
Lower the hood and let it fall from a height
of approximately 8 in (20 cm).
X Check that the hood has engaged properly.
If the hood can be raised slightly, it is not
properly engaged. Open it again and close
it with a little more force. Engine oil
General notes on the oil level Depending on the driving style, the vehicle
consumes up to 0.9 US qt (0.8 liters
)of oil
over adistanc eof600 miles (1,000 km). The 284
Engine compartmentMaintenance and care
Page 287 of 358
oil consumption may be higher than this when
the vehicle is new or if you frequently drive at
high engine speeds.
Depending on the engine, the oil dipstick may
be in a different location.
When checking the oil level:
R park the vehicle on a level surface.
R the engine should be switched off for
approximately five minutes if the engine is
at normal operating temperature.
R if the engine is not at normal operating
temperature, e.g. if the engine was only
started briefly: wait about 30 minutes
before carrying out the measurement.
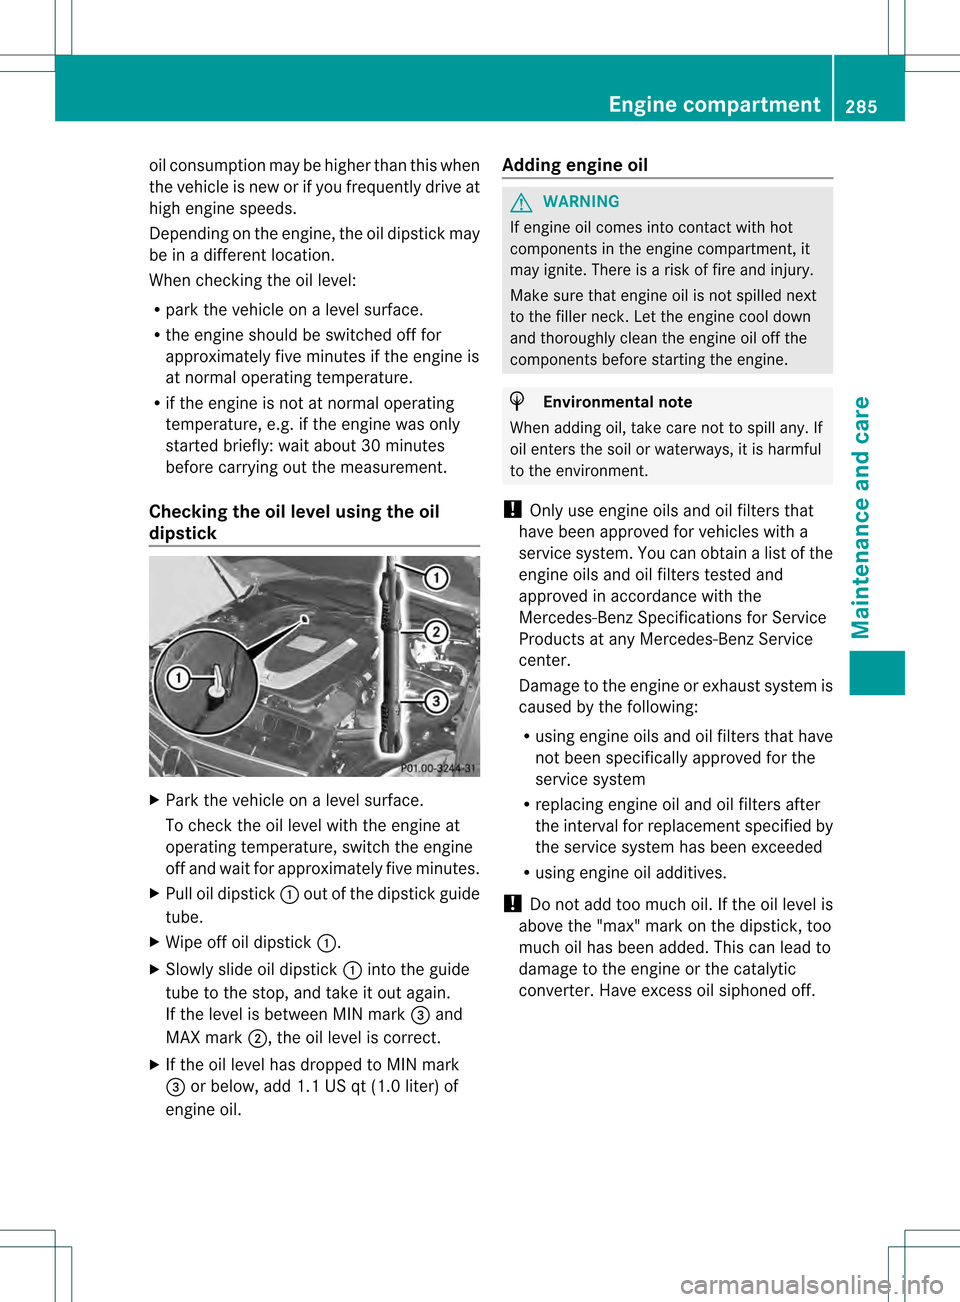
Checking the oil level using the oil
dipstick X
Park the vehicle on a level surface.
To check the oil level with the engine at
operating temperature, switch the engine
off and wait for approximately five minutes.
X Pull oil dipstick 0002out of the dipstick guide
tube.
X Wipe off oil dipstick 0002.
X Slowly slide oil dipstick 0002into the guide
tube to the stop, and take it out again.
If the level is between MIN mark 0022and
MAX mark 0003, the oil level is correct.
X If the oil level has dropped to MIN mark
0022 or below, add 1.1 US qt (1.0 liter) of
engine oil. Adding engine oil G
WARNING
If engine oil comes into contact with hot
components in the engine compartment, it
may ignite. There is a risk of fire and injury.
Make sure that engine oil is not spilled next
to the filler neck. Let the engine cool down
and thoroughly clean the engine oil off the
components before starting the engine. H
Environmental note
When adding oil, take care not to spill any. If
oil enters the soil or waterways, it is harmful
to the environment.
! Only use engine oils and oil filters that
have been approved for vehicles with a
service system. You can obtain a list of the
engine oils and oil filters tested and
approved in accordance with the
Mercedes-Benz Specifications for Service
Products at any Mercedes-Benz Service
center.
Damage to the engine or exhaust system is
caused by the following:
R using engine oils and oil filters that have
not been specifically approved for the
service system
R replacing engine oil and oil filters after
the interval for replacement specified by
the service system has been exceeded
R using engine oil additives.
! Do not add too much oil. If the oil level is
above the "max" mark on the dipstick, too
much oil has been added. This can lead to
damage to the engine or the catalytic
converter. Have excess oil siphoned off. Engine compartment
285Maintenance and care Z
Page 288 of 358
Example: engine oil cap
X Turn cap 0002counter-clockwise and remove
it.
X Add engine oil.
If the oil level is at or below the MIN mark
on the oil dipstick, add 1.1 US qt (1.0 liter)
of engine oil.
X Replace cap 0002on the filler neck and turn
clockwise.
Ensure that the cap locks into place
securely.
X Check the oil level agai nwith the oil
dipstick (Y page 285).
Further information on engine oil
(Y page 351). Checking and adding other service
products
Checking coolant level G
WARNING
The engine cooling system is pressurized,
particularly when the engine is warm. When
opening the cap, you could be scalded by hot
coolan tspraying out. There is a risk of injury.
Let the engine cool down before opening the
cap. Wear eye and hand protection when
opening the cap. Open the cap slowly half a
turn to allow pressure to escape.
Only chec kthe coolant level when the vehicle
is on a level surface and the engine has cooled
down. X
Turn the SmartKey to position 2in the
ignition lock (Y page 141).
On vehicles with KEYLESS-GO, press the
Start/Stop button twice (Y page 142).
X Check the coolant temperature display in
the instrument cluster.
The coolant temperature must be below
158 ‡ (70 †). X
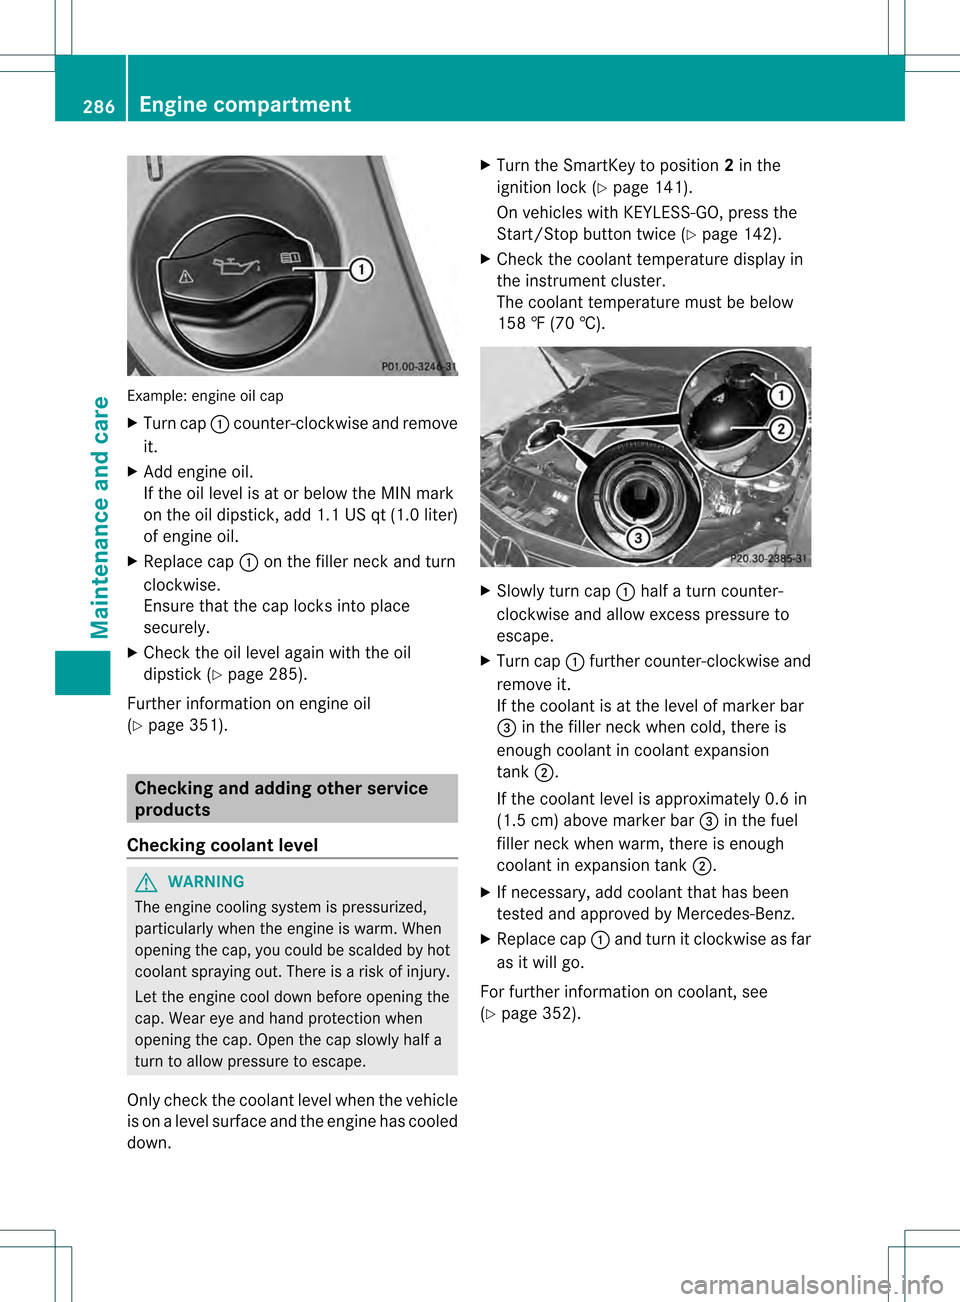
Slowly turn cap 0002half a turn counter-
clockwise and allow excess pressure to
escape.
X Turn cap 0002further counter-clockwise and
remove it.
If the coolant is at the level of marker bar
0022 in the filler neck when cold, there is
enough coolant in coolant expansion
tank 0003.
If the coolant level is approximately 0.6 in
(1.5 cm) above marker bar 0022in the fuel
filler neck when warm, there is enough
coolant in expansion tank 0003.
X If necessary, add coolant that has been
tested and approved by Mercedes-Benz.
X Replace cap 0002and turn it clockwise as far
as it will go.
For further information on coolant, see
(Y page 352). 286
Engine compartmentMaintenance and care