buttons MERCEDES-BENZ C-Class SEDAN 2014 W204 Owner's Manual
[x] Cancel search | Manufacturer: MERCEDES-BENZ, Model Year: 2014, Model line: C-Class SEDAN, Model: MERCEDES-BENZ C-Class SEDAN 2014 W204Pages: 362, PDF Size: 4.8 MB
Page 18 of 362
Settings
Factory (on-board computer) .........219
On-board computer .......................215
Setting the air distribution ...............138
Setting the airflow ............................139
SETUP (on-board computer) .............219
Side impact air bag .............................45
Side marker lamp (display
message) ............................................ 232
Side windows Cleaning ......................................... 294
Convenience closing feature ............89
Convenience opening feature ..........89
Important safety information ...........87
Opening/closing .............................. 88
Problem (malfunction) .....................90
Resetting ......................................... 90
Sliding sunroof
Important safety notes ....................91
Opening/closing .............................. 92
Problem (malfunction) .....................94
Resetting ......................................... 92
see Panorama roof with power
tilt/sliding panel
SmartKey
Changing the battery .......................79
Changing the programming .............77
Checking the battery .......................79
Convenience closing feature ............89
Convenience opening feature ..........89
Display message ............................ 246
Door central locking/unlocking .......76
Important safety notes ....................76
Loss ................................................. 80
Mechanical key ................................ 78
Positions (ignition lock) .................147
Problem (malfunction) .....................80
Starting the engine ........................149
Snow chains ...................................... 317
Sockets General notes ................................ 271
Rea rcompartmen t......................... 271
Spare wheel
Storage location ............................ 346
Specialist workshop ............................ 25
Special seat bel tretractor .................. 61 Speed
,controlling
see Cruise control
Speedometer
Digital ............................................ 208
In the Instrument cluster .................31
Segments ...................................... 205
Selecting the unit of measurement 215
see Instrument cluster
SPORT handling mode
Activating/deactivating (AMG
vehicles) .......................................... 69
Warning lamp ................................. 253
SRS
see SRS (Supplemental Restraint
System)
SRS (Supplemental Restraint
System)
Display message ............................ 226
Introduction ..................................... 41
Warning lamp ................................. 255
Warning lamp (function) ................... 41
Standing lamps
Changing bulbs .............................. 123
Display message ............................ 231
Switching on/off ........................... 116
Start/stop function
see ECO start/stop function
Starting (engine) ................................ 149
Steering (display message) ..............246
Steering wheel Adjusting (electrically). ..................106
Adjusting (manually). .....................106
Button overview ............................... 33
Buttons (on-board computer) ......... 205
Cleaning ......................................... 296
Important safety notes ..................105
Paddle shifters ............................... 157
Storing settings (memory function) 110
Steering wheel paddle shifters ........157
Stopwatch (RACETIMER) ................... 220
Stowage areas ................................... 262
Stowage compartments Armrest (under) ............................. 263
Cuph olders ................................... 267
Eyeglasses compartment ...............263
Glove box ...................................... .263
Important safety information .........262
Rea r............................................... 26416
Index
Page 38 of 362
Overhea
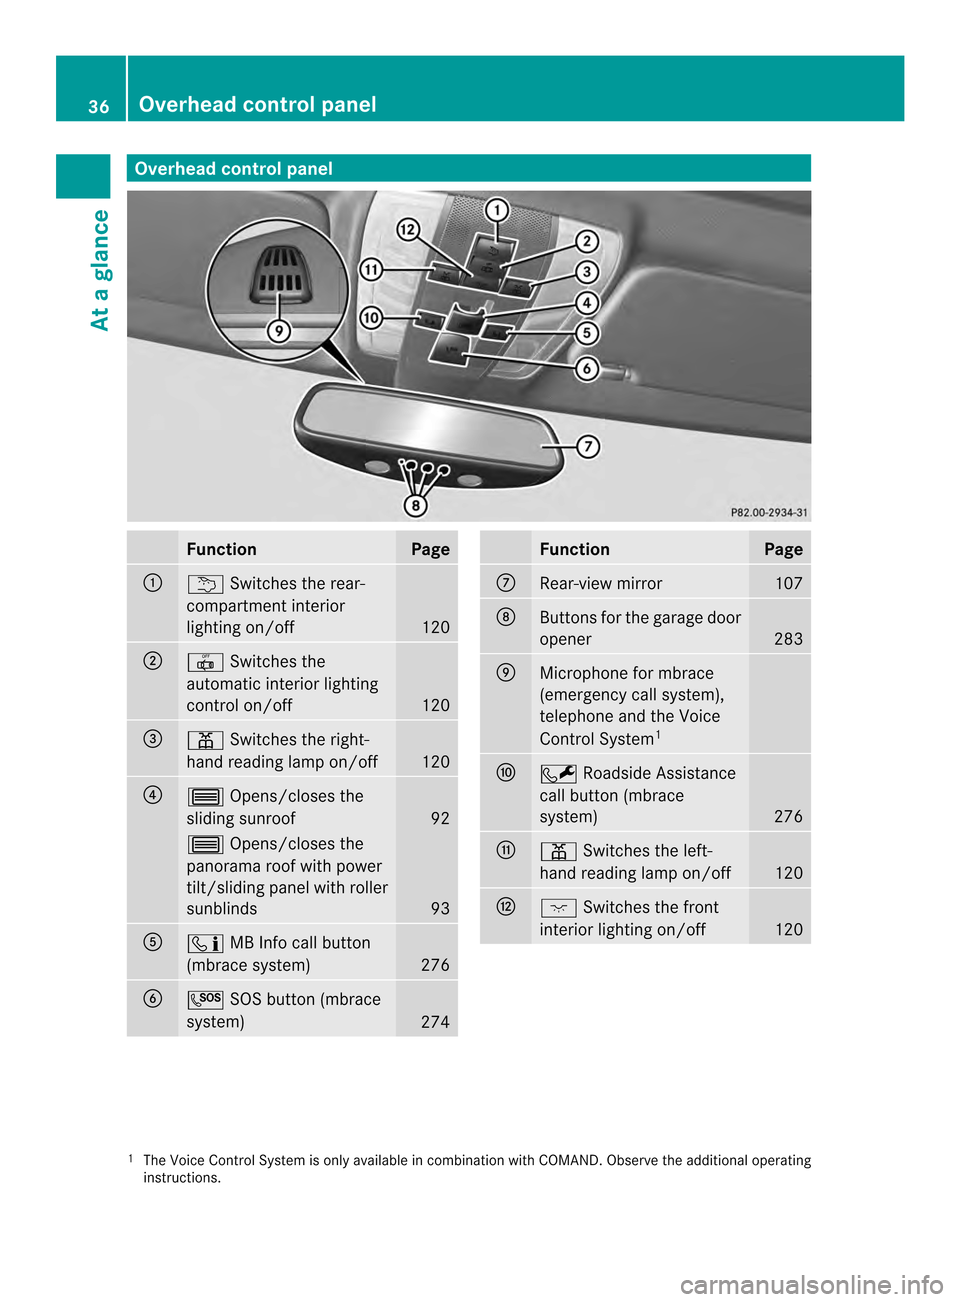
dcontrol panel Function Page
0002
0001
Switches the rear-
compartment interior
lighting on/off 120
0003
001C
Switches the
automatic interio rlighting
control on/off 120
0022
0013
Switches the right-
hand reading lamp on/off 120
0021
0002
Opens/closes the
sliding sunroof 92
0002
Opens/closes the
panorama roof with power
tilt/sliding panel with roller
sunblinds 93
001F
0009
MB Info call button
(mbrace system) 276
0020
0008
SOS button (mbrace
system) 274 Function Page
0012
Rear-view mirror 107
0013
Buttons for the garage door
opener 283
0014
Microphone for mbrace
(emergency call system),
telephone and the Voice
Control System 1 0015
0007
Roadside Assistance
call button (mbrace
system) 276
0016
0013
Switches the left-
hand reading lamp on/off 120
0018
0004
Switches the front
interior lighting on/off 120
1
The Voice Control System is only available in combination with COMAND. Observe the additional operating
instructions. 36
Overhead control panelAt a glance
Page 80 of 362

vehicle is unlocked
.This is useful if you
frequently travel on your own.
X To change the setting: press and hold
down the 000Band000A buttons
simultaneously for approximately six
seconds until the battery check lamp
(Y page 79) flashes twice.
i If the setting of the locking system is
changed within the signal range of the
vehicle, pressing the 000Aor000B button:
R locks or
R unlocks the vehicle
The SmartKey now functions as follows:
X To unlock the driver's door: press the
000B button once.
X To unlock centrally: press the000B
button twice.
X To lock centrally: press the000Abutton.
The KEYLESS-GO function is changed as
follows:
X To unlock the driver's door: touch the
inner surface of the door handle on the
driver's door.
X To unlock centrally: touch the inner
surface of the door handle on the front-
passenger door or the rear door.
X To lock centrally: touch the outer sensor
surface on one of the door handles
(Y page 77).
X To restore the factory settings: press
and hold down the 000Band000A buttons
simultaneously for approximately six
seconds until the battery check lamp
flashes twice. Mechanical key
General notes If the vehicle can no longer be locked or
unlocked with the SmartKey or the KEYLESS-
GO key, use the mechanical key. If you use the mechanical key to unlock and
open the driver's door or the trunk lid, the
anti-theft alarm system will be triggered
(Y
page 73).
X To end the alarm: insert the SmartKey into
the ignition lock.
i With KEYLESS-GO: remove the Start/
Stop button from the ignition lock
beforehand.
If you unlock the vehicle using the mechanical
key, the fuel filler flap will not be unlocked
automatically.
X To unlock the fuel filler flap: insert the
SmartKey into the ignition lock.
Removing the mechanical key X
Push release catch 0002in the direction of
the arrow and at the same time remove
mechanical key 0003from the SmartKey. SmartKey battery
Important safety notes Mercedes-Ben
zrecommends that you have
the batteries replaced at a qualified specialist
workshop. G
WARNING
Batteries contain toxic and corrosive
substances. If batteries are swallowed, it can
result in severe health problems. There is a
risk of fatal injury. 78
SmartKeyOpening and closing
Page 81 of 362

Keep batteries out of the reach of children. If
a battery is swallowed, seek medical attention
immediately.
Checking the battery X
Press the 000Aor000B button.
The battery is working properly if battery
check lamp 0002lights up briefly.
If battery check lamp 0002does not lightup
briefly during the test, the battery is
discharged.
i If the SmartKey battery is checked within
the signal reception range of the vehicle,
pressing the 000Aor000B button:
R locks or
R unlocks the vehicle
X Change the battery (Y page 79).
i You can get a battery at a qualified
specialist workshop.
Replacing the battery You require a CR 2025 3 V cell battery.
X Take the mechanical key out of the
SmartKey (Y page 78). X
Press mechanical key 0003intothe SmartKey
opening in the direction of the arrow until
battery compartment cover 0002opens. Do
not hold battery compartment cover 0002
closed while doing so.
X Remove battery compartment cover 0002. X
Repeatedly tap the SmartKey against your
palm until battery 0022falls out.
X Insert the new battery with the positive
terminal facing upwards. Use a lint-free
cloth to do so.
X Make sure that the surface of the battery is
free from lint, grease and all other forms of
contamination.
X Insert the front tabs of battery
compartment cover 0002into the housing
first and then press to close it.
X Insert mechanical key 0003into the
SmartKey.
X Check the function of all SmartKey buttons
on the vehicle. SmartKey
79Opening and closing Z
Page 85 of 362

Automatic locking feature
The vehicle is locked automatically when the
ignition is switched on and the vehicle's
wheels are turning at a speed in excess of
9 mph (15 km/h).
You could therefore be locke dout if:
R the vehicle is being pushed.
R the vehicle is being towed.
R the vehicle is on a roller dynamometer. X
To deactivate: press and hold button 0002
for about five seconds until a tone sounds.
X To activate: press and hold button 0003for
about five seconds until a tone sounds.
i If you press one of th etwo buttons and
do not hear a tone, the relevant setting has
already been selected.
You can also switch the automatic locking
function on and off using the on-board
computer (Y page 217). Unlocking the driver's door
(mechanical key)
If the vehicle can no longer be unlocked with
the SmartKey, use the mechanical key.
If you use the mechanical key to unloc kand
open the driver's door, the anti-thef talarm
system will be triggered ( Ypage 73).
X Take the mechanical key out of the
SmartKey (Y page 78).
X Insert the mechanical key into the lock of
the driver's door as far as it will go. X
Turn the mechanical key counter-clockwise
to position 0005.
The door is unlocked.
X Turn the mechanical key back and remove
it.
X Insert the mechanical key into the
SmartKey. Locking the vehicle (mechanical key)
If the vehicle can no longer be locked with the
SmartKey, use the mechanical key.
X Open the driver's door.
X Close the front-passenger door, the rear
doors and the trunk lid.
X Press the locking button (Y page 82).
X Check whether the locking knobs on the
front-passenger door and the rear doors
are still visible. Press down the locking
knobs manually, if necessary ( Ypage 82).
X Close the driver's door.
X Take the mechanical key out of the
SmartKey (Y page 78).
X Insert the mechanical key into the lock of
the driver's door as far as it will go. Doors
83Opening and closing Z
Page 101 of 362
settings with the memory function
(Y
page 110). Seats
Important safety notes
G
WARNING
Children could become trapped if they adjust
the seats, particularly when unattended.
There is a risk of injury.
When leaving the vehicle, always take the
SmartKey with you and lock the vehicle. Never
leave children unsupervised in the vehicle. G
WARNING
You could lose control of your vehicle if you
do the following while driving:
R adjust the driver's seat, head restraint,
steering wheel or mirrors
R fasten the seat belt
There is a risk of an accident.
Adjust the driver's seat, head restraint,
steering wheel and mirror and fasten your
seat belt before starting the engine. G
WARNING
If you adjust the seat height carelessly, you or
other vehicle occupants could be trapped and
thereby injured. Children in particular could
accidentally press the electrical seat
adjustment buttons and become trapped.
There is a risk of injury.
While moving the seats, make sure that your
hands or other body parts do not get under
the lever assembly of the seat adjustment
system. G
WARNING
When you adjust a seat, you or other vehicle
occupants could become trapped, e.g. on the
seat guide rail. There is arisk of injury.
Make sure when adjusting aseat that no one
has any body parts in the sweep of the seat. G
WARNING
If head restraints are not installed and
adjusted correctly, they cannot provide
protection as intended. There is an increased
risk of injury in the head and neck area, e.g.
in the event of an accident or when braking.
Always drive with the head restraints
installed. Before driving off, make sure for
every vehicle occupant that the center of the
head restraint supports the back of the head
at about eye level. G
WARNING
The seat belt does not offer the intended level
of protection if the backrest is not in the
upright position .When braking or in the event
of an accident, you could slide underneath the
seat belt and sustain abdomen or neck
injuries, for example. This poses an increased
risk of injury or even fatal injury.
Adjust the seat properly before beginning
your journey. Always make sure that the seat
is in the upright position. G
WARNING
According to accident statistics, children are
safer when properly restrained on the rear
seats than on the front-passenger seat. Thus,
we strongly recommend that children be
placed in the rear seat whenever possible.
Regardless of seating position, children 12
years old and under must be seated and
properly secured in an appropriately sized
child restraint system or booster seat
recommended for the size and weight of the
child. For additional information, see the
"Children in the vehicle" section.
Ac hild's risk of serious or fatal injuries is
significantly increased if the child restraints
are not properly secured in the vehicle and/
or the child is not properly secured in the child
restraint. Seats
99Seats, steering wheel and mirrors Z
Page 103 of 362

The time period starts over again if, within
these three minutes, you:
R open or close a frontd oor
R insert the SmartKey into the ignition lock
or remove it from the ignition lock
R switch the ignition on or off
If the SmartKey is in position 2in the
ignition lock, the seats can be adjusted at
any time.
Depending on the equipment, the seat
adjustmen tbuttons are either located on the
side of the seat or on the door control panel. 0002
Head restraint height
0003 Seat cushion angle
0022 Seat height
0021 Seat fore-and-aft adjustment
001F Backrest angle 0002
Seat cushion angle
0003 Seat height
0022 Seat fore-and-aft adjustment
0021 Backrest angle i
You can store the seat settings using the
memory function (Y page 110).
i AMG vehicles are equipped with a seat
with an integrated head restraint. It is
therefore no tpossible to set the height and
angle of the head restraint. Adjusting the head restraints
G
WARNING
You could lose control of your vehicle if you
do the following while driving:
R adjust the driver's seat, head restraint,
steering wheel or mirrors
R fasten the seat belt
There is a risk of an accident.
Adjust the driver's seat, head restraint,
steering wheel and mirror and fasten your
seat belt before starting the engine. G
WARNING
If head restraints are not installed and
adjusted correctly, they cannot provide
protection as intended. There is an increased
risk of injury in the head and neck area, e.g.
in the event of an accident or when braking.
Always drive with the head restraints
installed. Before driving off, make sure for
every vehicle occupant that the center of the
head restraint supports the back of the head
at about eye level.
General notes Pay attention to the important safety notes
(Y
page 99).
Do not rotate the head restraints of the front
and rear seats. Otherwise, you cannot adjust
the height and angle of the head restraints to
the correc tposition. Seats
101Seats, steering wheel and mirrors Z
Page 107 of 362
Problems with the seat heating
Problem Possible causes/consequences and
0001 Solutions
The seat heating has
switched off
prematurely or cannot
be switched on. The on-board voltage is too low because too many electrical
consumers are switched on.
X
Switch off electrical consumers that you do not need, such as
the rear window defroster or interior lighting. Switching the seat ventilation on/off
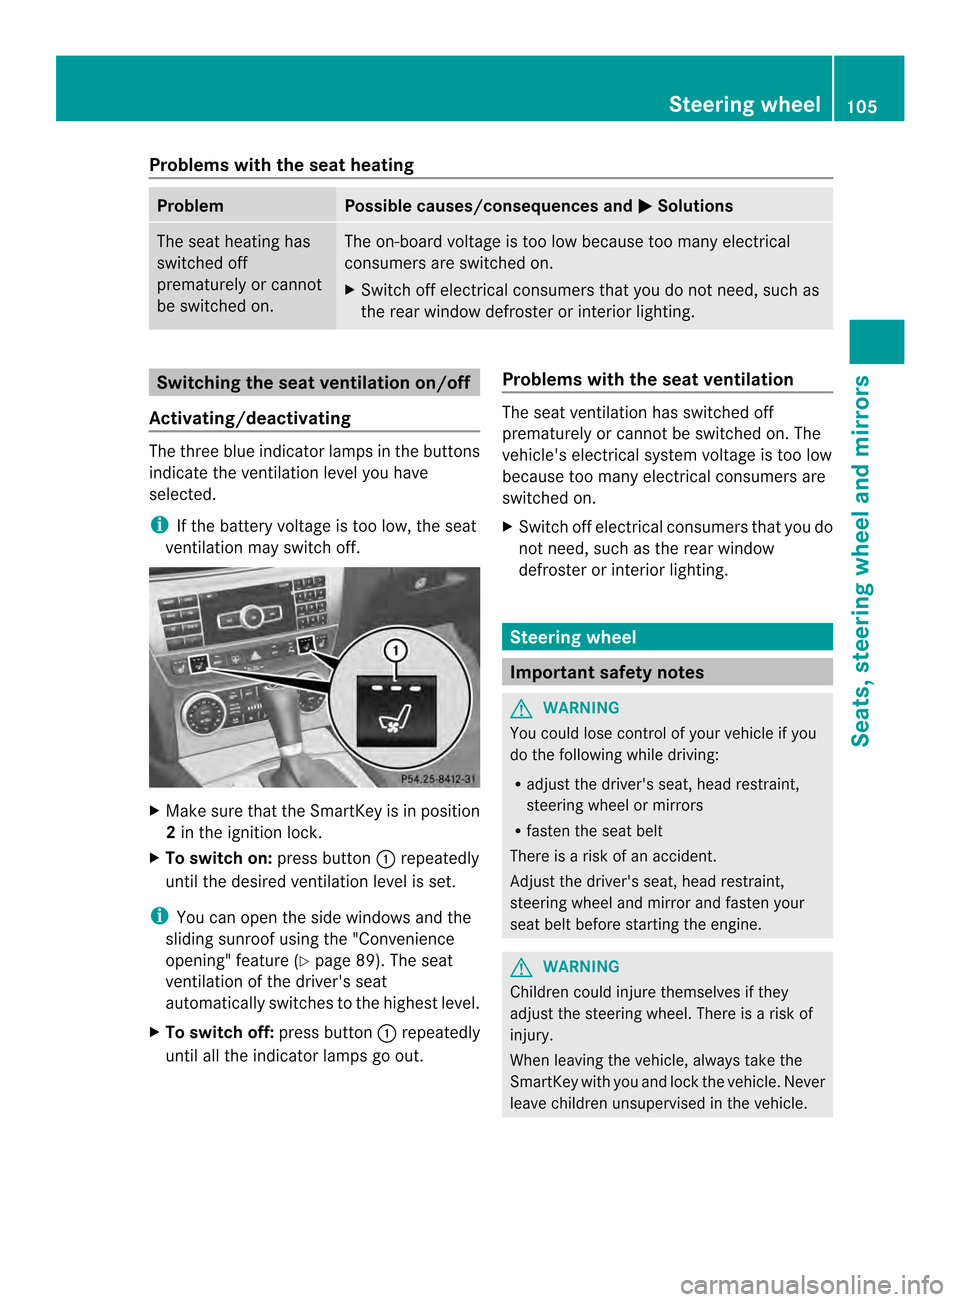
Activating/deactivating The three blue indicator lamps in the buttons
indicate the ventilation level you have
selected.
i If the battery voltage is too low, the seat
ventilation may switch off. X
Make sure that the SmartKey is in position
2 in the ignition lock.
X To switch on: press button0002repeatedly
until the desired ventilation level is set.
i You can open the side windows and the
sliding sunroof using the "Convenience
opening" feature (Y page 89). The seat
ventilation of the driver's seat
automatically switches to the highest level.
X To switch off: press button0002repeatedly
until all the indicator lamps go out. Problems with the seat ventilation The seat ventilation has switched off
prematurely or cannot be switched on. The
vehicle's electrical system voltage is too low
because too many electrical consumers are
switched on.
X
Switch off electrical consumers that you do
not need, such as the rear window
defroster or interior lighting. Steering wheel
Important safety notes
G
WARNING
You could lose control of your vehicle if you
do the following while driving:
R adjust the driver's seat, head restraint,
steering wheel or mirrors
R fasten the seat belt
There is a risk of an accident.
Adjust the driver's seat, head restraint,
steering wheel and mirror and fasten your
seat belt before starting the engine. G
WARNING
Children could injure themselves if they
adjust the steering wheel. There is a risk of
injury.
When leaving the vehicle, always take the
SmartKey with you and lock the vehicle. Never
leave children unsupervised in the vehicle. Steering wheel
105Seats, steering wheel and mirrors Z
Page 108 of 362

Adjusting the steering wheel
manually
G
WARNING
If the steering wheel is unlocked while the
vehicle is in motion, it could change position
unexpectedly. This could caus eyou to lose
control of the vehicle. There is a risk of an
accident.
Before starting off, make sure the steering
wheel is locked. Never unlock the steering
wheel while the vehicle is in motion. 0002
Release lever
0003 To adjust the steering wheel height
0022 To adjust the steering wheel position
(fore-and-aft adjustment)
X Push release lever 0002down completely.
The steering column is unlocked.
X Adjust the steering wheel to the desired
position.
X Push release lever 0002up completely.
The steering column is locked.
X Check if the steering column is locked.
When doing so, try to push the steering
wheel up or down or try to move it in the
fore-and-aft direction. Adjusting the steering wheel
electrically
0002
To adjust the steering wheel height
0003 To adjust the steering wheel position
(fore-and-aft adjustment)
The steering wheel can also be adjusted when
the SmartKey is removed from the ignition
lock.
i Further related subjects:
R EASY-ENTRY/EXIT feature
(Y page 106)
R Storing settings (Y page 110) EASY-ENTRY/EXIT feature
Important safety notes G
WARNING
When the EASY-ENTRY/EXIT feature adjusts
the steering wheel, you and other vehicle
occupants –particularly childre n–could
become trapped. There is a risk of injury.
While the EASY-ENTRY/EXIT feature is
making adjustments, make sure that no one
has any body parts in the sweep of the
steering wheel.
If somebody becomes trapped:
R press one of the memory function position
buttons, or
R move the switch for steering wheel
adjustmen tinthe opposite direction to that
in which the steering wheel is moving.
The adjustment process is stopped. 106
Steering wheelSeats, steering wheel and mirrors
Page 134 of 362
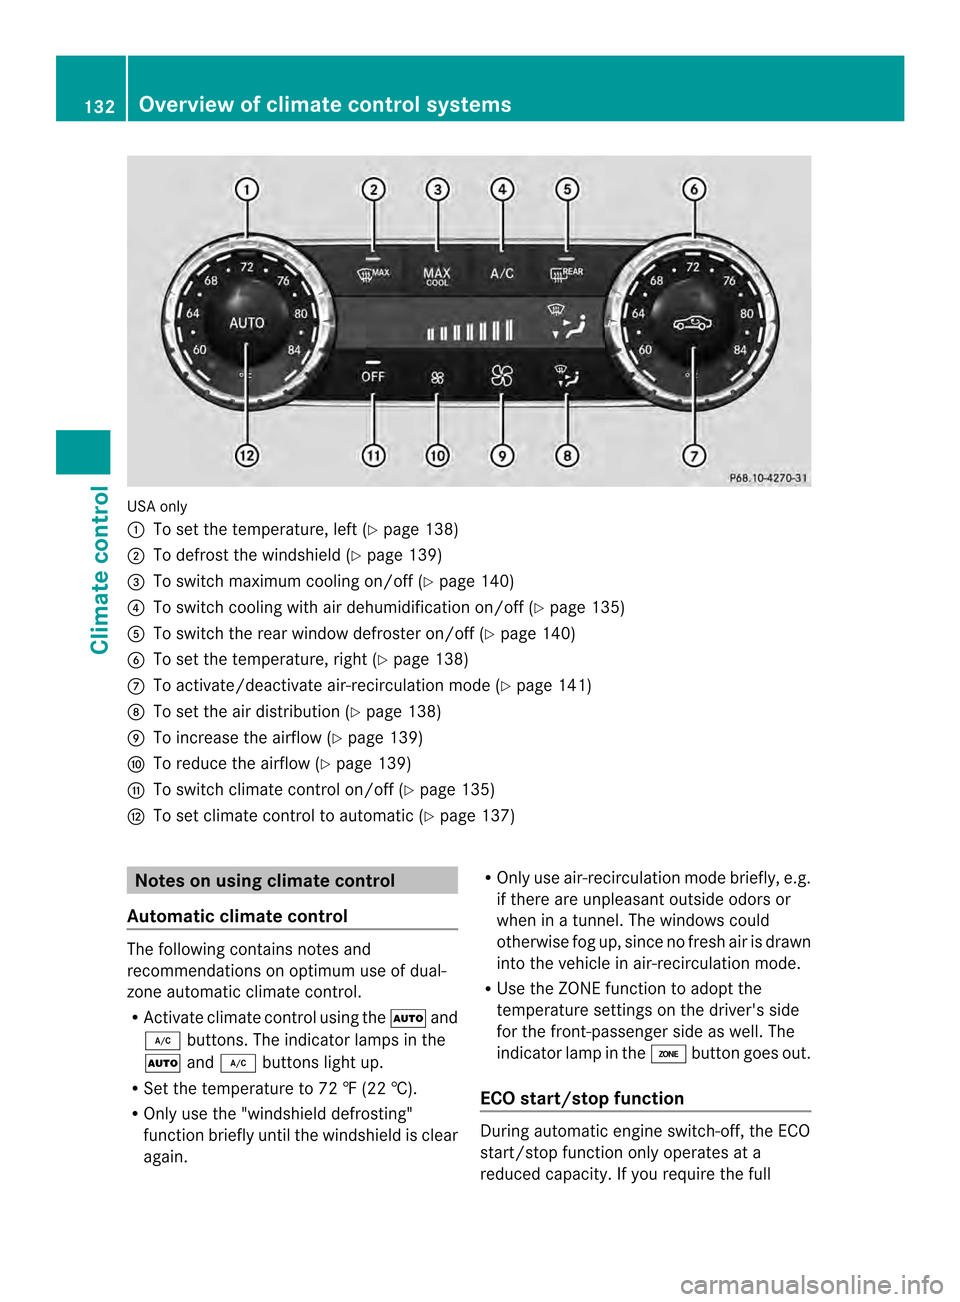
USA only
0002
To set the temperature, left (Y page 138)
0003 To defrost the windshield (Y page 139)
0022 To switch maximum cooling on/off (Y page 140)
0021 To switch cooling with air dehumidification on/off (Y page 135)
001F To switch the rear window defroster on/off (Y page 140)
0020 To set the temperature, right (Y page 138)
0012 To activate/deactivate air-recirculation mode (Y page 141)
0013 To set the air distribution (Y page 138)
0014 To increase the airflow (Y page 139)
0015 To reduce the airflow (Y page 139)
0016 To switch climate control on/off (Y page 135)
0018 To set climate control to automatic (Y page 137)Notes on using climate control
Automatic climate control The following contains notes and
recommendations on optimum use of dual-
zone automatic climate control.
R
Activate climate control using the 0004and
0005 buttons. The indicator lamps in the
0004 and0005 buttons light up.
R Set the temperature to 72 ‡ (22 †).
R Only use the "windshield defrosting"
function briefly until the windshield is clear
again. R
Only use air-recirculation mode briefly, e.g.
if there are unpleasant outside odors or
when in a tunnel. The windows could
otherwise fog up, since no fresh air is drawn
into the vehicle in air-recirculation mode.
R Use the ZONE function to adopt the
temperature settings on the driver's side
for the front-passenger side as well.T he
indicator lamp in the 0003button goes out.
ECO start/stop function During automatic engine switch-off, the ECO
start/stop function only operates at a
reduced capacity. If you require the full132
Overview of climate control systemsClimate control