weight MERCEDES-BENZ C-Class SEDAN 2015 W205 User Guide
[x] Cancel search | Manufacturer: MERCEDES-BENZ, Model Year: 2015, Model line: C-Class SEDAN, Model: MERCEDES-BENZ C-Class SEDAN 2015 W205Pages: 406, PDF Size: 7.62 MB
Page 184 of 406
The use of brake disks other than those
approved by Mercedes-Benz can change the
track width and is subject to approval, if appli-
cable.
Shock-type loads when handling the brake
disks, such as when changing wheels, can
lead to a reduction in comfort when driving
with lightweight brake disks. Avoid shock-
type loads on the lightweight brake disks,
particularly on the brake plate.
Mercedes-Benz recommends that you only
use brake fluid that has been specially
approved for your vehicle by Mercedes-Benz, or which corresponds to an equivalent quality
standard. Brake fluid which has not been
approved for Mercedes-Benz vehicles or
which is not of an equivalent quality could
affect your vehicle's operating safety. Driving on wet roads
Hydroplaning If water has accumulated to a certain depth
on the road surface, there is a danger of
hydroplaning occurring, even if:
R you drive at low speeds.
R the tires have adequate tread depth.
For this reason, in the event of heavy rain or in conditions in which hydroplaning may occur,
you must drive in the following manner:
R lower your speed.
R avoid ruts.
R avoid sudden steering movements.
R brake carefully.
Driving on flooded roads !
Bear in mind that vehicles traveling in
front or in the opposite direction create
waves. This may cause the maximum per-
missible water depth to be exceeded.
Failure to observe these notes may result in damage to the engine, electrical systems
and transmission. If you have to drive on stretches of road on
which water has collected, please bear in
mind that:
R the water level, in the case of still water,
may not exceed a maximum point of the
lower edge of the vehicle body
R you should drive no faster than at a walking
pace Winter driving
G
WARNING
If you shift down on a slippery road surface in an attempt to increase the engine's braking
effect, the drive wheels could lose their grip.
There is an increased danger of skidding and
accidents.
Do not shift down for additional engine brak-
ing on a slippery road surface. G
DANGER
If the exhaust pipe is blocked or adequate
ventilation is not possible, poisonous gases
such as carbon monoxide (CO) may enter the vehicle. This is the case, e.g. if the vehicle
becomes trapped in snow. There is a risk of
fatal injury.
If you leave the engine or the auxiliary heating
running, make sure the exhaust pipe and area
around the vehicle are clear of snow. To
ensure an adequate supply of fresh air, open a window on the side of the vehicle that is not
facing into the wind.
Have your vehicle winter-proofed at a quali-
fied specialist workshop at the onset of win-
ter.
Drive particularly carefully on slippery road
surfaces. Avoid sudden acceleration, steering and braking maneuvers. Do not use the cruise
control or DISTRONIC PLUS.
If the vehicle threatens to skid or cannot be
stopped when moving at low speed:
X Shift the transmission to position N.182
Driving tipsDriving and parking
Page 264 of 406

Display messages
Possible causes/consequences and
0050
0050Solutions Front Passenger
Front Passenger
Airbag Disabled Airbag Disabled
See See
Operator's
Operator's Man‐
Man‐
ual
ual The front-passenger air bag is deactivated during the journey, even
though:
R an adult
or
R a person larger than a certain size is occupying the front-
passenger seat
If additional forces are applied to the seat, the system may inter-
pret the occupant's weight as lower than it actually is.
G WARNING
The front-passenger air bag does not deploy during an accident.
There is an increased risk of injury. X Pull over and stop the vehicle safely as soon as possible, paying
attention to road and traffic conditions.
X Secure the vehicle against rolling away (Y page 174).
X Switch the ignition off.
X Have the occupant get out of the vehicle.
X Keep the seat unoccupied, close the front-passenger door and
switch on the ignition.
X Observe the PASSENGER AIR BAG indicator lamps in the center
console and the multifunction display and check the following:
Seat unoccupied and ignition switched on:
R the PASSENGER AIR BAG OFF and PASSENGER AIR BAG ON
indicator lamps must light up simultaneously for approx-
imately six seconds.
R after this, the PASSENGER AIR BAG OFF indicator lamp must
be lit and remain lit. If the indicator lamp is on, OCS has dis-
abled the front-passenger air bag (Y page 52).
R the display messages Front FrontPassenger
Passenger Airbag
AirbagEnabled
Enabled
See Operator's Manual
See Operator's Manual orFront Passenger Airbag
Front Passenger Airbag
Disabled
Disabled See
SeeOperator's
Operator's Manual
Manualmust not appear in the
multifunction display.
X Wait for a period of at least 60 seconds until the necessary sys-
tem checks have been completed.
X Make sure that the display messages do not appear in the mul-
tifunction display.
If these conditions are fulfilled, the front-passenger seat can be
occupied again. Whether the PASSENGER AIR BAG OFF or ON
indicator lamps remain lit or go out depends on how OCS classifies the occupant.
If the conditions are not fulfilled, the system is not operating cor-
rectly. 262
Display
messagesOn-board computer and displays
Page 265 of 406

Display messages
Possible causes/consequences and
0050
0050Solutions X
Visit a qualified specialist workshop immediately.
For further information about the Occupant Classification System, see (Y page 52). Front Passenger
Front Passenger
Airbag Airbag
Enabled
Enabled See
See
Operator's Manual
Operator's Manual The front-passenger air bag is enabled during the journey, even
though:
R a child, a small adult or an object weighing less than the sys-
tem's weight threshold is located on the front-passenger seat
or
R the front-passenger seat is unoccupied
The system may detect objects or forces applying additional
weight on the seat.
G WARNING
The air bag may deploy unintentionally.
There is an increased risk of injury. X Pull over and stop the vehicle safely as soon as possible, paying
attention to road and traffic conditions.
X Secure the vehicle against rolling away (Y page 174).
X Switch the ignition off.
X Open the front-passenger door.
X Remove the child and the child restraint system from the front-
passenger seat.
X Make sure that there are no objects on the seat adding to the
weight.
The system may otherwise detect the additional weight and
interpret the seat occupant's weight as greater than it actually
is.
X Keep the seat unoccupied, close the front-passenger door and
switch on the ignition.
X Observe the PASSENGER AIR BAG indicator lamps in the center
console and the multifunction display and check the following:
Seat unoccupied and ignition switched on:
R the PASSENGER AIR BAG OFF and PASSENGER AIR BAG ON
indicator lamps must light up simultaneously for approx-
imately six seconds.
R after this, the PASSENGER AIR BAG OFF indicator lamp must
be lit and remain lit. If the indicator lamp is on, OCS (Occupant
Classification System) has disabled the front-passenger air
bag (Y page 52).
R the display messages Front
Front Passenger Passenger Airbag
AirbagEnabled
Enabled
See Operator's Manual
See Operator's Manual orFront Passenger Airbag
Front Passenger Airbag Display
messages
263On-board computer and displays Z
Page 300 of 406

Useful information
i This Operator's Manual describes all
models and all standard and optional equip- ment of your vehicle available at the time of
publication of the Operator's Manual.
Country-specific differences are possible.
Please note that your vehicle may not be
equipped with all features described. This
also applies to safety-related systems and
functions.
i Read the information on qualified special-
ist workshops (Y page 26). Stowage areas
Loading guidelines
G
WARNING
Combustion engines emit poisonous exhaust
gases such as carbon monoxide. Exhaust
gases can enter the vehicle interior if the
trunk lid is open when the engine is running,
especially if the vehicle is in motion. There is a risk of poisoning.
Always switch off the engine before opening
the trunk lid. Never drive with the trunk lid
open. G
WARNING
If objects, luggage or loads are not secured or not secured sufficiently, they could slip, tip
over or be flung around and thereby hit vehicle
occupants. There is a risk of injury, particu-
larly in the event of sudden braking or a sud-
den change in direction.
Always store objects so that they cannot be
flung around. Secure objects, luggage or
loads against slipping or tipping before the
journey. G
WARNING
The exhaust tail pipe and tail pipe trim can
become very hot. If you come into contact
with these parts of the vehicle, you could burn
yourself. There is a risk of injury. Always be particularly careful around the
exhaust tail pipe and the tail pipe trim. Allow
these components to cool down before touch-
ing them.
The handling characteristics of a laden vehi-
cle are dependent on the distribution of the
load within the vehicle. For this reason, you
should observe the following notes when
transporting a load:
R Never exceed the maximum permissible
gross vehicle weight or the gross axle
weight rating of the vehicle (including occu-
pants). The values are specified on the vehi-
cle identification plate on the B-pillar of the
driver's door.
R The trunk is the preferred place to carry
objects.
R Position heavy loads as far forwards as pos-
sible and as low down in the trunk as pos-
sible.
R The load must not protrude above the
upper edge of the seat backrests.
R Always place the load behind unoccupied
seats if possible.
R Secure the load with sufficiently strong and
wear-resistant tie-downs. Pad sharp edges
for protection. Stowage spaces
Important safety notes G
WARNING
If you do not correctly store objects in the
vehicle interior, they can slip or be flung
around, thus striking vehicle occupants.
There is a risk of injury, especially when brak- ing or abruptly changing directions.
R Always store objects so that they cannot be
flung around in these or in similar situa-
tions.
R Always make sure that objects do not pro-
trude from stowage compartments, parcel
nets or stowage nets. 298
Stowage areasStowage and features
Page 302 of 406
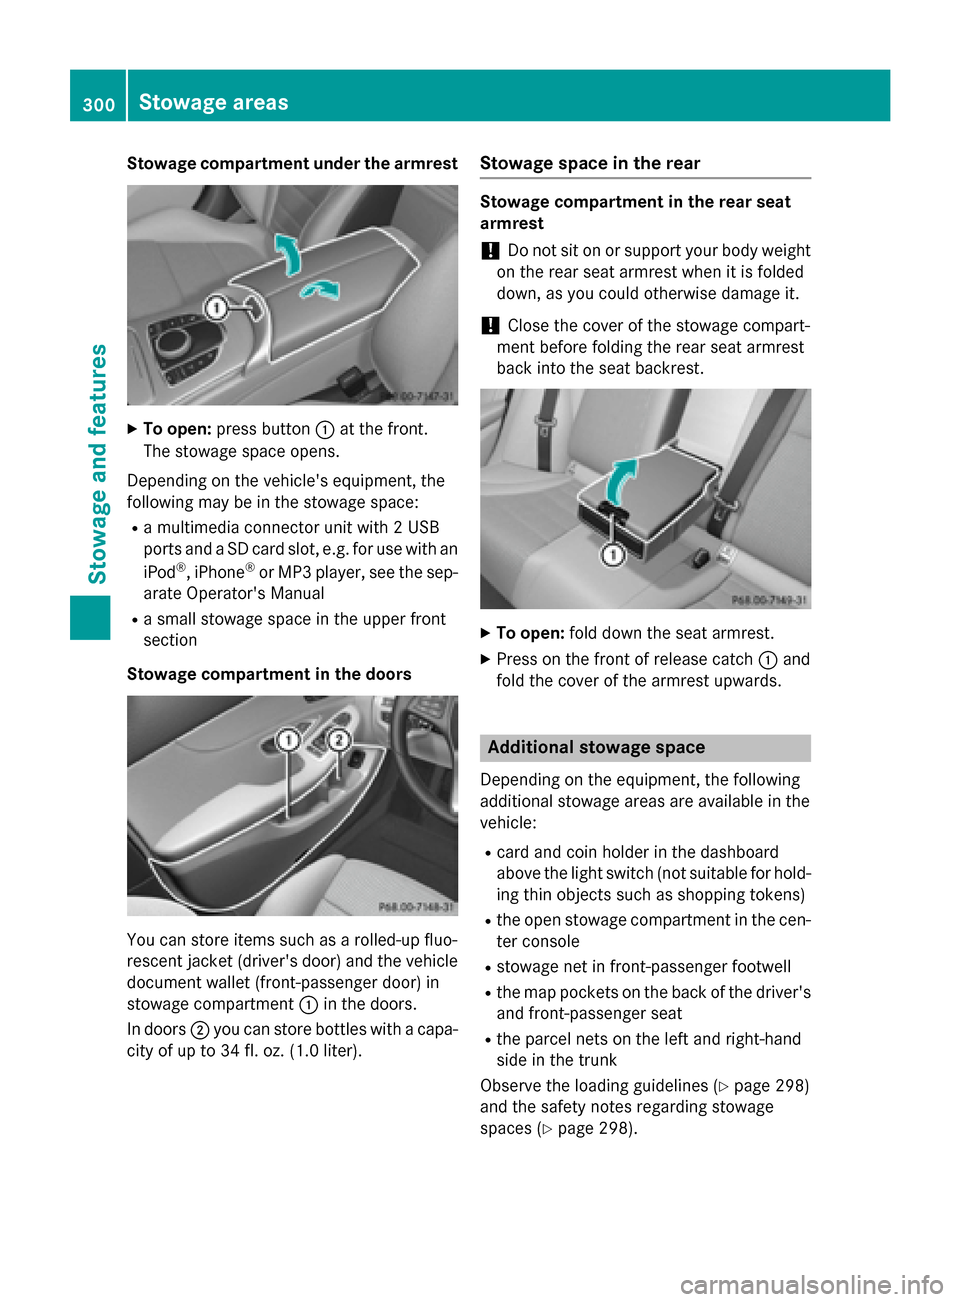
Stowage compartment under the armrest
X
To open: press button 0043at the front.
The stowage space opens.
Depending on the vehicle's equipment, the
following may be in the stowage space: R a multimedia connector unit with 2 USB
ports and a SD card slot, e.g. for use with an
iPod ®
, iPhone ®
or MP3 player, see the sep-
arate Operator's Manual
R a small stowage space in the upper front
section
Stowage compartment in the doors You can store items such as a rolled-up fluo-
rescent jacket (driver's door) and the vehicle document wallet (front-passenger door) in
stowage compartment 0043in the doors.
In doors 0044you can store bottles with a capa-
city of up to 34 fl. oz. (1.0 liter). Stowage space in the rear Stowage compartment in the rear seat
armrest
! Do not sit on or support your body weight
on the rear seat armrest when it is folded
down, as you could otherwise damage it.
! Close the cover of the stowage compart-
ment before folding the rear seat armrest
back into the seat backrest. X
To open: fold down the seat armrest.
X Press on the front of release catch 0043and
fold the cover of the armrest upwards. Additional stowage space
Depending on the equipment, the following
additional stowage areas are available in the
vehicle:
R card and coin holder in the dashboard
above the light switch (not suitable for hold-
ing thin objects such as shopping tokens)
R the open stowage compartment in the cen-
ter console
R stowage net in front-passenger footwell
R the map pockets on the back of the driver's
and front-passenger seat
R the parcel nets on the left and right-hand
side in the trunk
Observe the loading guidelines (Y page 298)
and the safety notes regarding stowage
spaces (Y page 298). 300
Stowage areasStowage and features
Page 309 of 406
G
WARNING
If you do not correctly store objects in the
vehicle interior, they can slip or be flung
around, thus striking vehicle occupants.
There is a risk of injury, especially when brak- ing or abruptly changing directions.
R Always store objects so that they cannot be
flung around in these or in similar situa-
tions.
R Always make sure that objects do not pro-
trude from stowage compartments, parcel
nets or stowage nets.
R Close lockable stowage compartments
while driving.
R Stow and secure objects that are heavy,
hard, pointy, sharp-edged, fragile or too
large in the trunk.
Observe the loading guidelines (Y page 298).
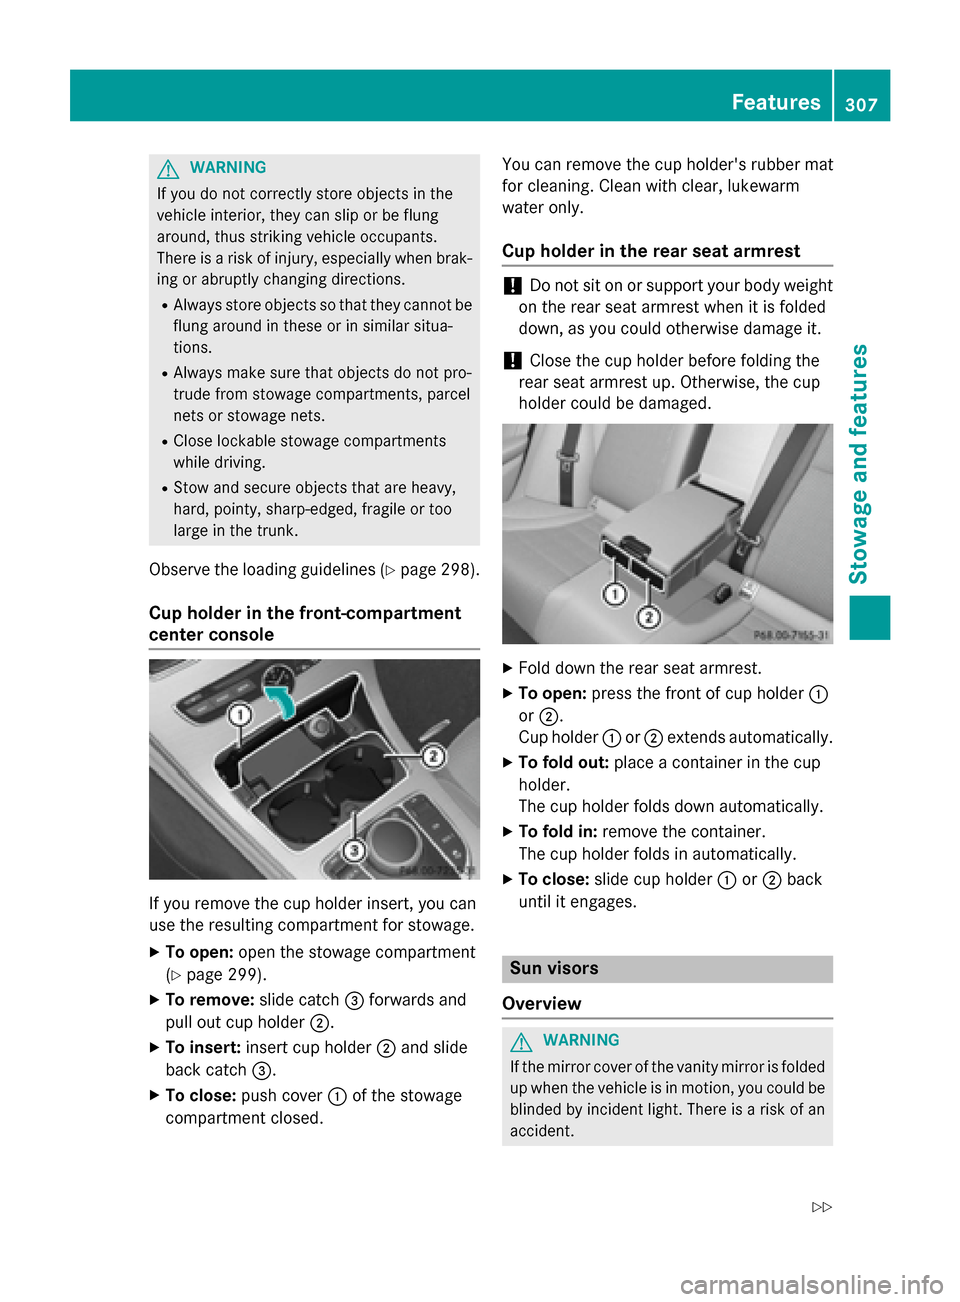
Cup holder in the front-compartment
center console If you remove the cup holder insert, you can
use the resulting compartment for stowage.
X To open: open the stowage compartment
(Y page 299).
X To remove: slide catch0087forwards and
pull out cup holder 0044.
X To insert: insert cup holder 0044and slide
back catch 0087.
X To close: push cover 0043of the stowage
compartment closed. You can remove the cup holder's rubber mat
for cleaning. Clean with clear, lukewarm
water only.
Cup holder in the rear seat armrest !
Do not sit on or support your body weight
on the rear seat armrest when it is folded
down, as you could otherwise damage it.
! Close the cup holder before folding the
rear seat armrest up. Otherwise, the cup
holder could be damaged. X
Fold down the rear seat armrest.
X To open: press the front of cup holder 0043
or 0044.
Cup holder 0043or0044 extends automatically.
X To fold out: place a container in the cup
holder.
The cup holder folds down automatically.
X To fold in: remove the container.
The cup holder folds in automatically.
X To close: slide cup holder 0043or0044 back
until it engages. Sun visors
Overview G
WARNING
If the mirror cover of the vanity mirror is folded up when the vehicle is in motion, you could be
blinded by incident light. There is a risk of an
accident. Features
307Stowage and features
Z
Page 353 of 406

X
Slide cover 0083of positive terminal 0043in the direction of the arrow.
X Connect positive terminal 0043on your vehicle to positive terminal 0044of donor battery 0084
using the jumper cable. Always begin with positive terminal 0043on your own vehicle first.
X Start the engine of the donor vehicle and run it at idling speed.
X Connect negative terminal 0087of donor battery 0084to ground point 0085of your vehicle using
the jumper cable, connecting the jumper cable to donor battery 0084first.
X Start the engine.
X Before disconnecting the jumper cables, let the engine run for several minutes.
X First, remove the jumper cables from ground point 0085and negative terminal 0087, then from
positive clamp 0043and positive terminal 0044. Begin each time at the contacts on your own
vehicle first.
X Close cover 0083of positive clamp 0043after removing the jumper cables.
X Have the battery checked at a qualified specialist workshop.
Jump-starting is not considered to be a normal operating condition.
i Jumper cables and further information regarding jump-starting can be obtained at any
qualified specialist workshop. Towing and tow-starting
Important safety notes
G
WARNING
Functions relevant to safety are restricted or
no longer available if:
R the engine is not running.
R the brake system or the power steering is
malfunctioning.
R there is a malfunction in the voltage supply
or the vehicle's electrical system.
If your vehicle is being towed, much more
force may be necessary to steer or brake.
There is a risk of an accident.
In such cases, use a tow bar. Before towing,
make sure that the steering moves freely. G
WARNING
You can no longer steer the vehicle if the
steering wheel lock has been engaged. There is a risk of an accident.
Always switch off the ignition when towing the
vehicle with a tow cable or a tow bar. G
WARNING
When towing or tow-starting another vehicle
and its weight is greater than the permissible gross weight of your vehicle, the:
R the towing eye could detach itself
R the vehicle/trailer combination could roll-
over.
There is a risk of an accident.
When towing or tow-starting another vehicle,
its weight should not be greater than the per- missible gross weight of your vehicle.
! When COLLISION PREVENTION ASSIST
PLUS, DISTRONIC PLUS or the HOLD func- tion is activated, the vehicle brakes auto-
matically in certain situations. To avoid
damage to the vehicle, deactivate these
systems in the following or similar situa-
tions:
R when towing the vehicle
R in the car wash
! Make sure that the electric parking brake
is released. If the electric parking brake is
faulty, visit a qualified specialist workshop. Towing and tow-starting
351Roadside Assistance Z
Page 354 of 406

!
Secure the tow rope or tow bar to the
towing eye only. Otherwise, the vehicle
could become damaged.
! Do not use the towing eyes for recovery
purposes as this could damage the vehicle.
If in doubt, recover the vehicle with a crane.
! When towing, pull away slowly and
smoothly. If the tractive power is too high,
the vehicles could be damaged.
! Shift the automatic transmission to
Nand
do not open the driver's or front passeng-
er's door during towing. The automatic
transmission may otherwise shift to posi-
tion P, which could damage the transmis-
sion.
! Do not tow with sling-type equipment.
This could damage the vehicle.
! The vehicle can be towed a maximum of
30 miles (50km). The towing speed of
30 mph (50 km/h) must not be exceeded.
If the vehicle has to be towed more than
30 miles (50km), the entire vehicle must be raised and transported.
! If you tow or tow-start another vehicle, its
weight must not exceed the maximum per-
missible gross vehicle weight of your vehi-
cle.
Details on the permissible gross vehicle
weight of your vehicle can be found on the
vehicle identification plate (Y page 396).
It is better to have the vehicle transported
than to have it towed away.
If the vehicle has suffered transmission dam-
age, have it transported on a transporter or
trailer.
The automatic transmission must be in posi-
tion Nwhen the vehicle is being towed. If the
automatic transmission cannot be shifted to
position N, have the vehicle transported on a
transporter or trailer. The battery must be connected and charged.
Otherwise, you:
R cannot turn the SmartKey to position 2in
the ignition lock
R cannot release the electric parking brake
R cannot shift the automatic transmission to
position N
Disarm the automatic locking feature before
the vehicle is towed (Y page 88). You could
otherwise be locked out when pushing or
towing the vehicle. Installing/removing the towing eye
Installing the towing eye The brackets for the screw-in towing eyes are
located in the bumpers. They are at the rear
and at the front, under covers 0043.
X Remove the towing eye from the vehicle
tool kit/stowage tray (Y page 340).
X Press the mark on cover 0043inwards and
remove.
X Screw in and tighten the towing eye clock-
wise to the stop. 352
Towing and tow-startingRoadside Assistance
Page 372 of 406

sible vehicle load. It also contains details
of the tire sizes and corresponding pres-
sures for tires mounted at the factory.
(2) The vehicle identification plate is on the B-pillar on the driver's side. The vehicle
identification plate informs you of the
gross vehicle weight rating. It is made up
of the vehicle weight, all vehicle occu-
pants, the fuel and the cargo. You can
also find information about the maximum gross axle weight rating on the front and
rear axle.
The maximum gross axle weight rating is the maximum weight that can be carried
by one axle (front or rear axle). Never
exceed the maximum load or the maxi-
mum gross axle weight rating for the
front or rear axle. 0043
B-pillar, driver's side Maximum permissible gross vehicle
weight rating X
Specification for maximum gross vehicle
weight 0043is listed in the Tire and Loading Information placard: "The combined weight
of occupants and cargo should never
exceed XXX kilograms or XXX lbs."
The gross weight of all vehicle occupants,
load and luggage must not exceed the speci-
fied value.
i The specifications shown on the Tire and
Loading Information placard in the illustra-
tion are examples. The maximum permis-
sible gross vehicle weight rating is vehicle- specific and may differ from that in the
illustration. You can find the valid maximum
permissible gross vehicle weight rating for
your vehicle on the Tire and Loading Infor-
mation placard. Number of seats
Maximum number of seats
0043indicates the
maximum number of occupants allowed to
travel in the vehicle. This information can be
found on the Tire and Loading Information
placard.
i The specifications shown on the Tire and
Loading Information placard in the illustra-
tion are examples. The number of seats is
vehicle-specific and can differ from the
details shown. The number of seats in your vehicle can be found on the Tire and Load-
ing Information placard. 370
Loading the vehicleWheels and tires
Page 373 of 406

Determining the correct load limit
Step-by-step instructions The following steps have been developed as
required of all manufacturers under Title 49,
Code of U.S. Federal Regulations, Part 575
pursuant to the "National Traffic and Motor
Vehicle Safety Act of 1966".
X Step 1: Locate the statement "The com-
bined weight of occupants and cargo
should never exceed XXX kg or XXX lbs." on your vehicle’s Tire and Loading Information
placard.
X Step 2: Determine the combined weight of
the driver and passengers that will be riding
in your vehicle.
X Step 3: Subtract the combined weight of
the driver and passengers from XXX kilo-
grams or XXX lbs.
X Step 4: The resulting figure equals the
available amount of cargo and luggage load
capacity. For example, if the "XXX" amount
equals 1400 lbs and there will be five
150-lb passengers in your vehicle, the
amount of available cargo and luggage load
capacity is 650 lbs (1400 - 750 (5 x 150) = 650 lbs).
X Step 5: Determine the combined weight of
luggage and cargo being loaded on the
vehicle. That weight may not safely exceed
the available cargo and luggage load capa- city calculated in step 4. Loading the vehicle
371Wheels andtires Z