MERCEDES-BENZ C-Class SEDAN 2015 W205 Owner's Manual
Manufacturer: MERCEDES-BENZ, Model Year: 2015, Model line: C-Class SEDAN, Model: MERCEDES-BENZ C-Class SEDAN 2015 W205Pages: 406, PDF Size: 7.62 MB
Page 301 of 406
R
Close lockable stowage compartments
while driving.
R Stow and secure objects that are heavy,
hard, pointy, sharp-edged, fragile or too
large in the trunk.
Observe the loading guidelines (Y page 298).
Stowage compartments in the front Glove box
X
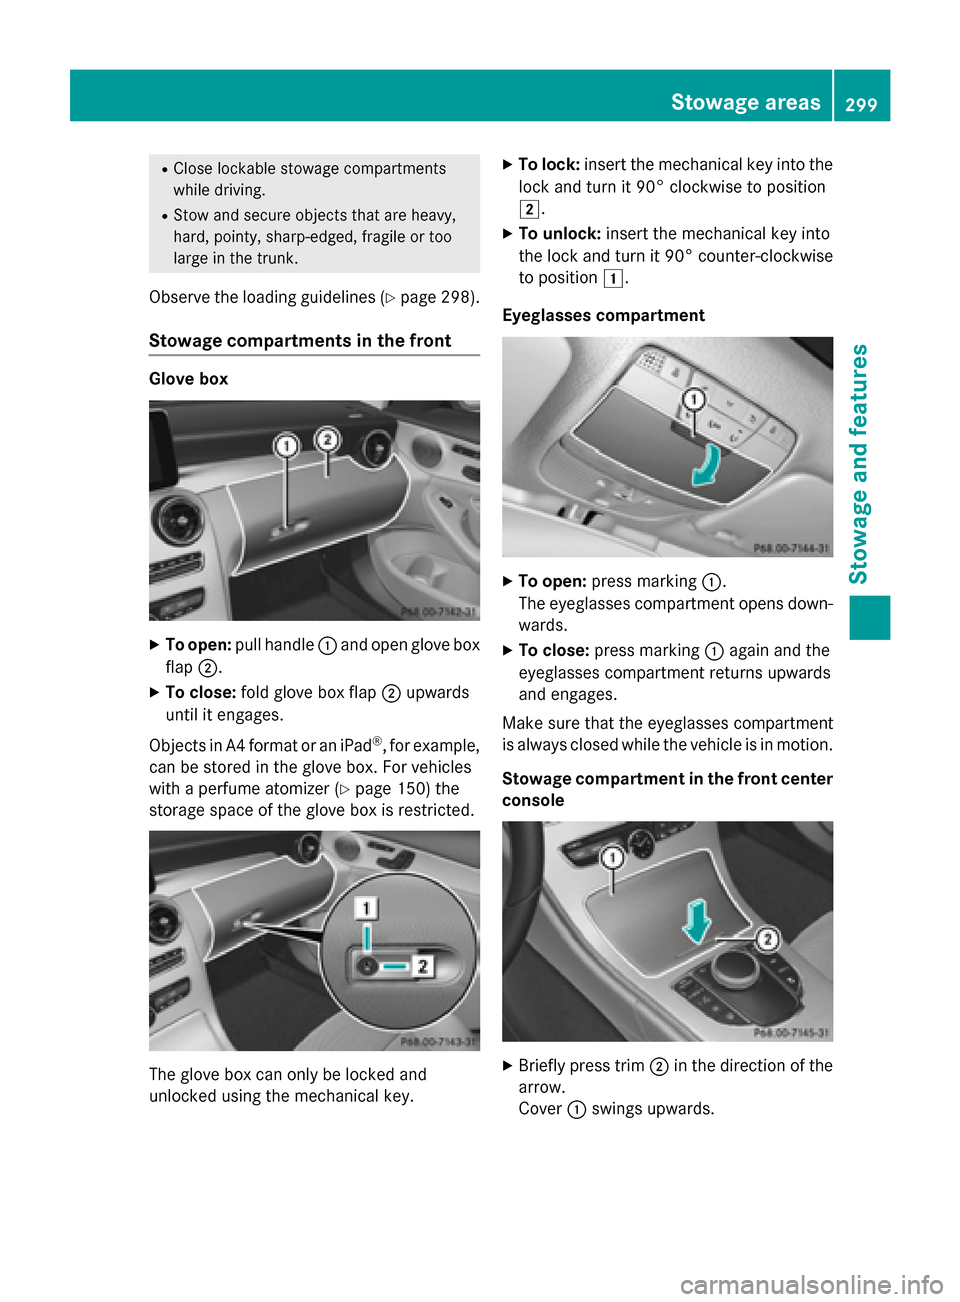
To open: pull handle 0043and open glove box
flap 0044.
X To close: fold glove box flap 0044upwards
until it engages.
Objects in A4 format or an iPad ®
, for example,
can be stored in the glove box. For vehicles
with a perfume atomizer (Y page 150) the
storage space of the glove box is restricted. The glove box can only be locked and
unlocked using the mechanical key. X
To lock: insert the mechanical key into the
lock and turn it 90° clockwise to position
0048.
X To unlock: insert the mechanical key into
the lock and turn it 90° counter-clockwise
to position 0047.
Eyeglasses compartment X
To open: press marking 0043.
The eyeglasses compartment opens down- wards.
X To close: press marking 0043again and the
eyeglasses compartment returns upwards
and engages.
Make sure that the eyeglasses compartment
is always closed while the vehicle is in motion.
Stowage compartment in the front center console X
Briefly press trim 0044in the direction of the
arrow.
Cover 0043swings upwards. Stowage areas
299Stowage and features Z
Page 302 of 406
Stowage compartment under the armrest
X
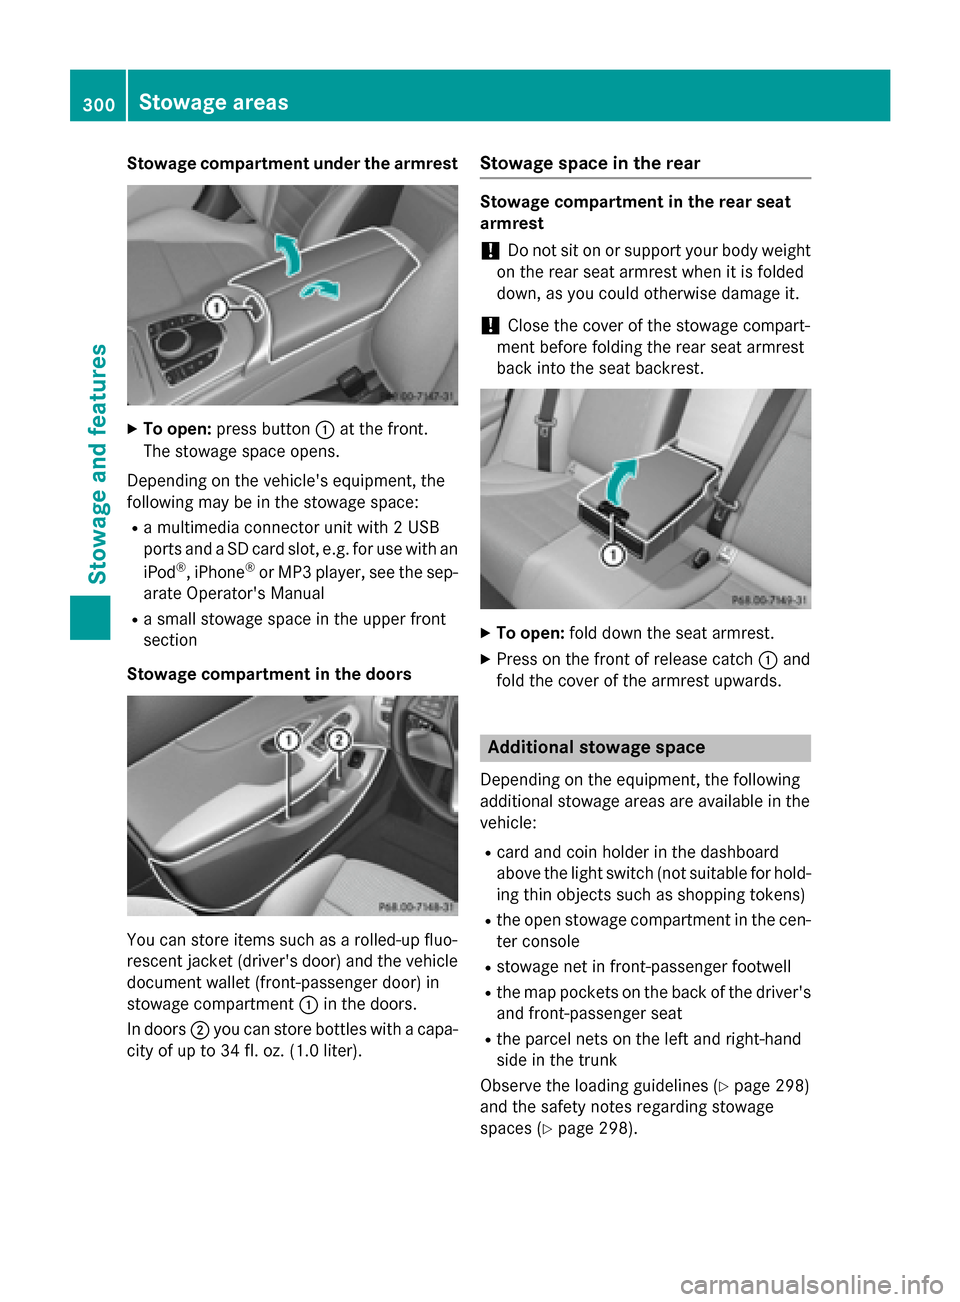
To open: press button 0043at the front.
The stowage space opens.
Depending on the vehicle's equipment, the
following may be in the stowage space: R a multimedia connector unit with 2 USB
ports and a SD card slot, e.g. for use with an
iPod ®
, iPhone ®
or MP3 player, see the sep-
arate Operator's Manual
R a small stowage space in the upper front
section
Stowage compartment in the doors You can store items such as a rolled-up fluo-
rescent jacket (driver's door) and the vehicle document wallet (front-passenger door) in
stowage compartment 0043in the doors.
In doors 0044you can store bottles with a capa-
city of up to 34 fl. oz. (1.0 liter). Stowage space in the rear Stowage compartment in the rear seat
armrest
! Do not sit on or support your body weight
on the rear seat armrest when it is folded
down, as you could otherwise damage it.
! Close the cover of the stowage compart-
ment before folding the rear seat armrest
back into the seat backrest. X
To open: fold down the seat armrest.
X Press on the front of release catch 0043and
fold the cover of the armrest upwards. Additional stowage space
Depending on the equipment, the following
additional stowage areas are available in the
vehicle:
R card and coin holder in the dashboard
above the light switch (not suitable for hold-
ing thin objects such as shopping tokens)
R the open stowage compartment in the cen-
ter console
R stowage net in front-passenger footwell
R the map pockets on the back of the driver's
and front-passenger seat
R the parcel nets on the left and right-hand
side in the trunk
Observe the loading guidelines (Y page 298)
and the safety notes regarding stowage
spaces (Y page 298). 300
Stowage areasStowage and features
Page 303 of 406
Ski and snowboard bag
Important safety notes G
WARNING
The skibag in conjunction with the lashing
straps cannot restrain any objects other than skis.
Vehicle occupants could be struck in the
event of sudden braking or an accident, for
instance, if you:
R transport other heavy or sharp-edged
objects in the skibag
R do not secure the skibag with the lashing
straps
There is a risk of accident and injury.
Store only skis in the skibag. Always secure
the skibag with the lashing straps so that it
cannot move around.
A maximum of four pairs of skis or two snow- boards can be transported in the ski and
snowboard bag.
Securing the ski and snowboard bag in
the trunk X
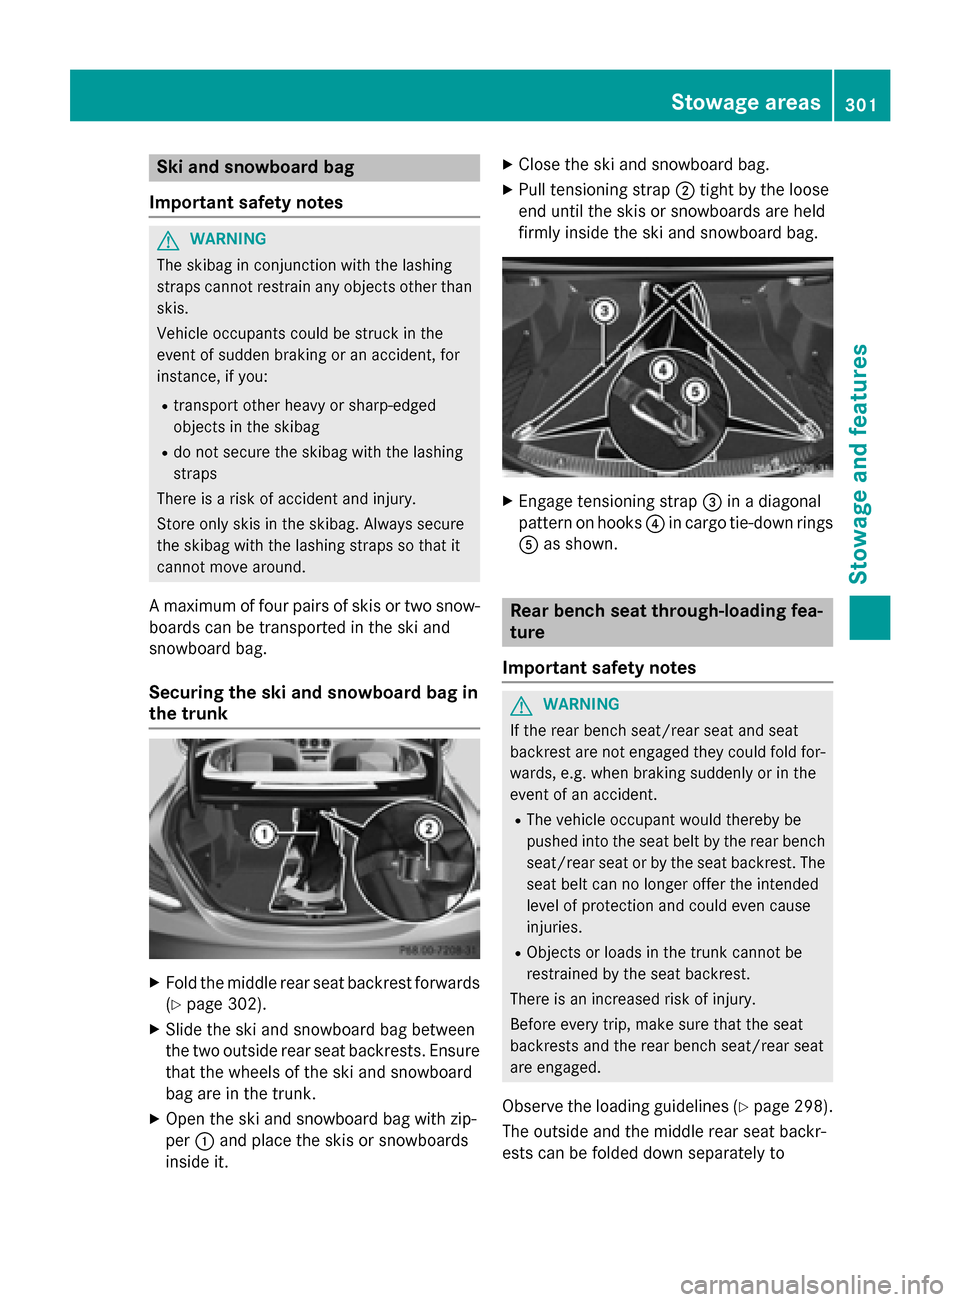
Fold the middle rear seat backrest forwards
(Y page 302).
X Slide the ski and snowboard bag between
the two outside rear seat backrests. Ensure
that the wheels of the ski and snowboard
bag are in the trunk.
X Open the ski and snowboard bag with zip-
per 0043and place the skis or snowboards
inside it. X
Close the ski and snowboard bag.
X Pull tensioning strap 0044tight by the loose
end until the skis or snowboards are held
firmly inside the ski and snowboard bag. X
Engage tensioning strap 0087in a diagonal
pattern on hooks 0085in cargo tie-down rings
0083 as shown. Rear bench seat through-loading fea-
ture
Important safety notes G
WARNING
If the rear bench seat/rear seat and seat
backrest are not engaged they could fold for- wards, e.g. when braking suddenly or in the
event of an accident.
R The vehicle occupant would thereby be
pushed into the seat belt by the rear bench
seat/rear seat or by the seat backrest. The
seat belt can no longer offer the intended
level of protection and could even cause
injuries.
R Objects or loads in the trunk cannot be
restrained by the seat backrest.
There is an increased risk of injury.
Before every trip, make sure that the seat
backrests and the rear bench seat/rear seat
are engaged.
Observe the loading guidelines (Y page 298).
The outside and the middle rear seat backr-
ests can be folded down separately to Stowage areas
301Stowage and features Z
Page 304 of 406
increase the trunk capacity. The division ratio
is 40% to 20% to 40%.
Folding the rear seat backrests forward X
Vehicles without memory function: if nec-
essary, move the driver's or front-
passenger seat forward.
X Vehicles with memory function: when one
or both parts of the rear seat backrest are
folded forward, the respective front seat
moves forward slightly, when necessary, in
order to avoid contact.
X Open the trunk.
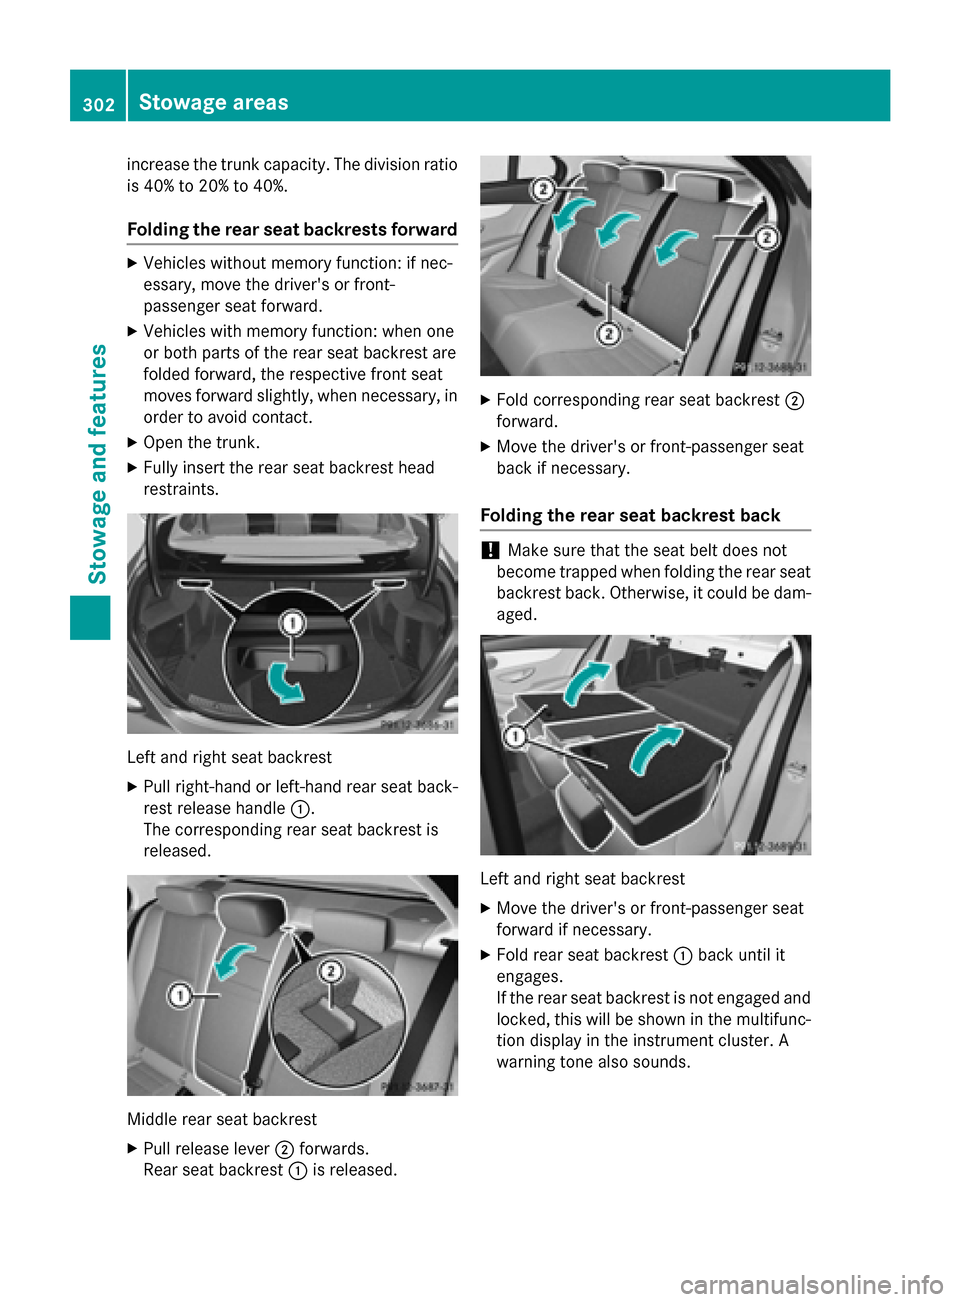
X Fully insert the rear seat backrest head
restraints. Left and right seat backrest
X Pull right-hand or left-hand rear seat back-
rest release handle 0043.
The corresponding rear seat backrest is
released. Middle rear seat backrest
X
Pull release lever 0044forwards.
Rear seat backrest 0043is released. X
Fold corresponding rear seat backrest 0044
forward.
X Move the driver's or front-passenger seat
back if necessary.
Folding the rear seat backrest back !
Make sure that the seat belt does not
become trapped when folding the rear seat backrest back. Otherwise, it could be dam- aged. Left and right seat backrest
X Move the driver's or front-passenger seat
forward if necessary.
X Fold rear seat backrest 0043back until it
engages.
If the rear seat backrest is not engaged and
locked, this will be shown in the multifunc-
tion display in the instrument cluster. A
warning tone also sounds. 302
Stowage areasStowage and features
Page 305 of 406
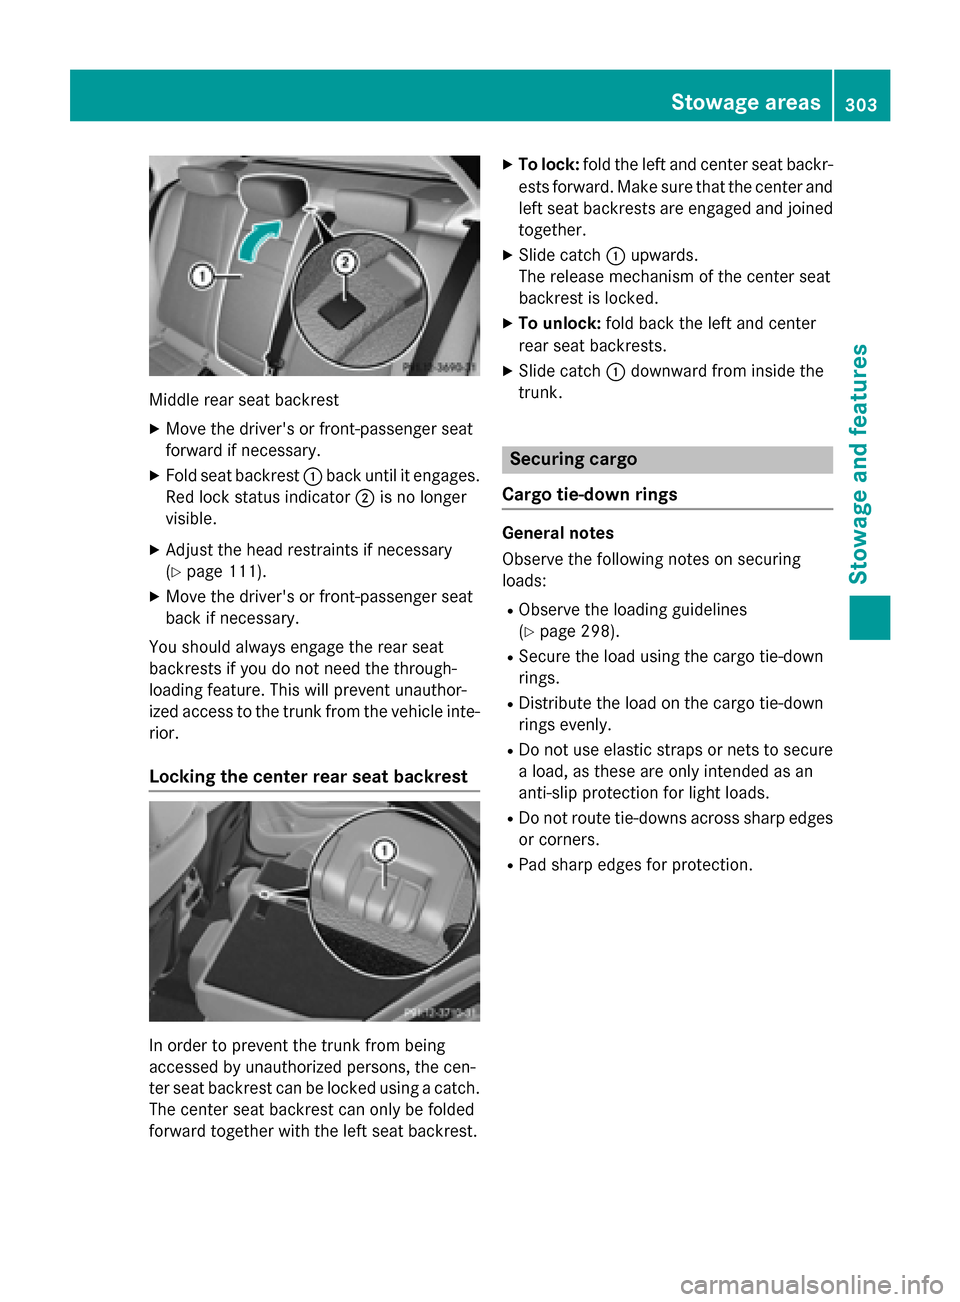
Middle rear seat backrest
X
Move the driver's or front-passenger seat
forward if necessary.
X Fold seat backrest 0043back until it engages.
Red lock status indicator 0044is no longer
visible.
X Adjust the head restraints if necessary
(Y page 111).
X Move the driver's or front-passenger seat
back if necessary.
You should always engage the rear seat
backrests if you do not need the through-
loading feature. This will prevent unauthor-
ized access to the trunk from the vehicle inte- rior.
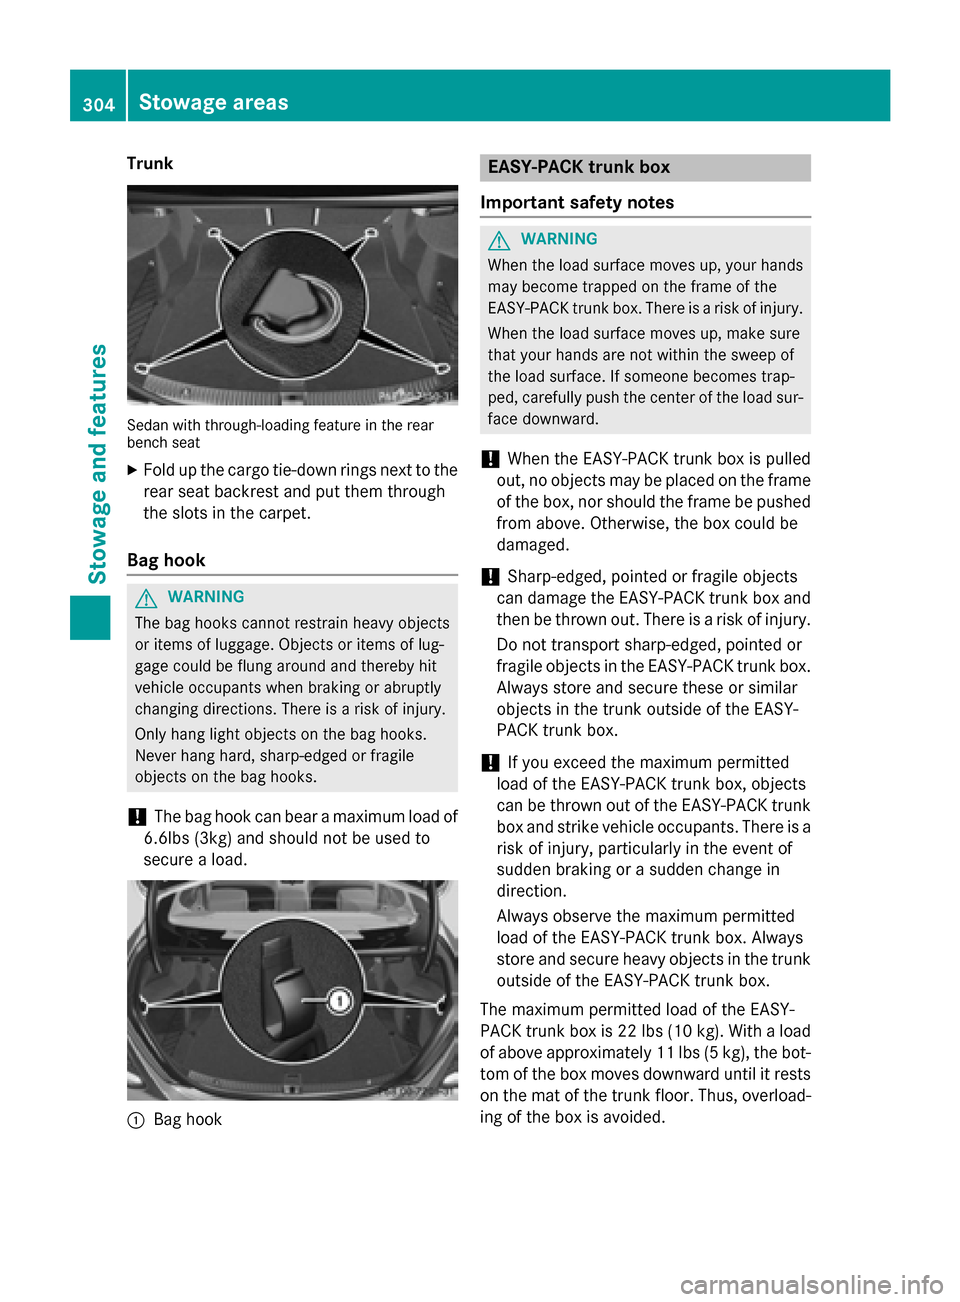
Locking the center rear seat backrest In order to prevent the trunk from being
accessed by unauthorized persons, the cen-
ter seat backrest can be locked using a catch.
The center seat backrest can only be folded
forward together with the left seat backrest. X
To lock: fold the left and center seat backr-
ests forward. Make sure that the center and
left seat backrests are engaged and joined together.
X Slide catch 0043upwards.
The release mechanism of the center seat
backrest is locked.
X To unlock: fold back the left and center
rear seat backrests.
X Slide catch 0043downward from inside the
trunk. Securing cargo
Cargo tie-down rings General notes
Observe the following notes on securing
loads:
R Observe the loading guidelines
(Y page 298).
R Secure the load using the cargo tie-down
rings.
R Distribute the load on the cargo tie-down
rings evenly.
R Do not use elastic straps or nets to secure
a load, as these are only intended as an
anti-slip protection for light loads.
R Do not route tie-downs across sharp edges
or corners.
R Pad sharp edges for protection. Stowage areas
303Stowage and features Z
Page 306 of 406
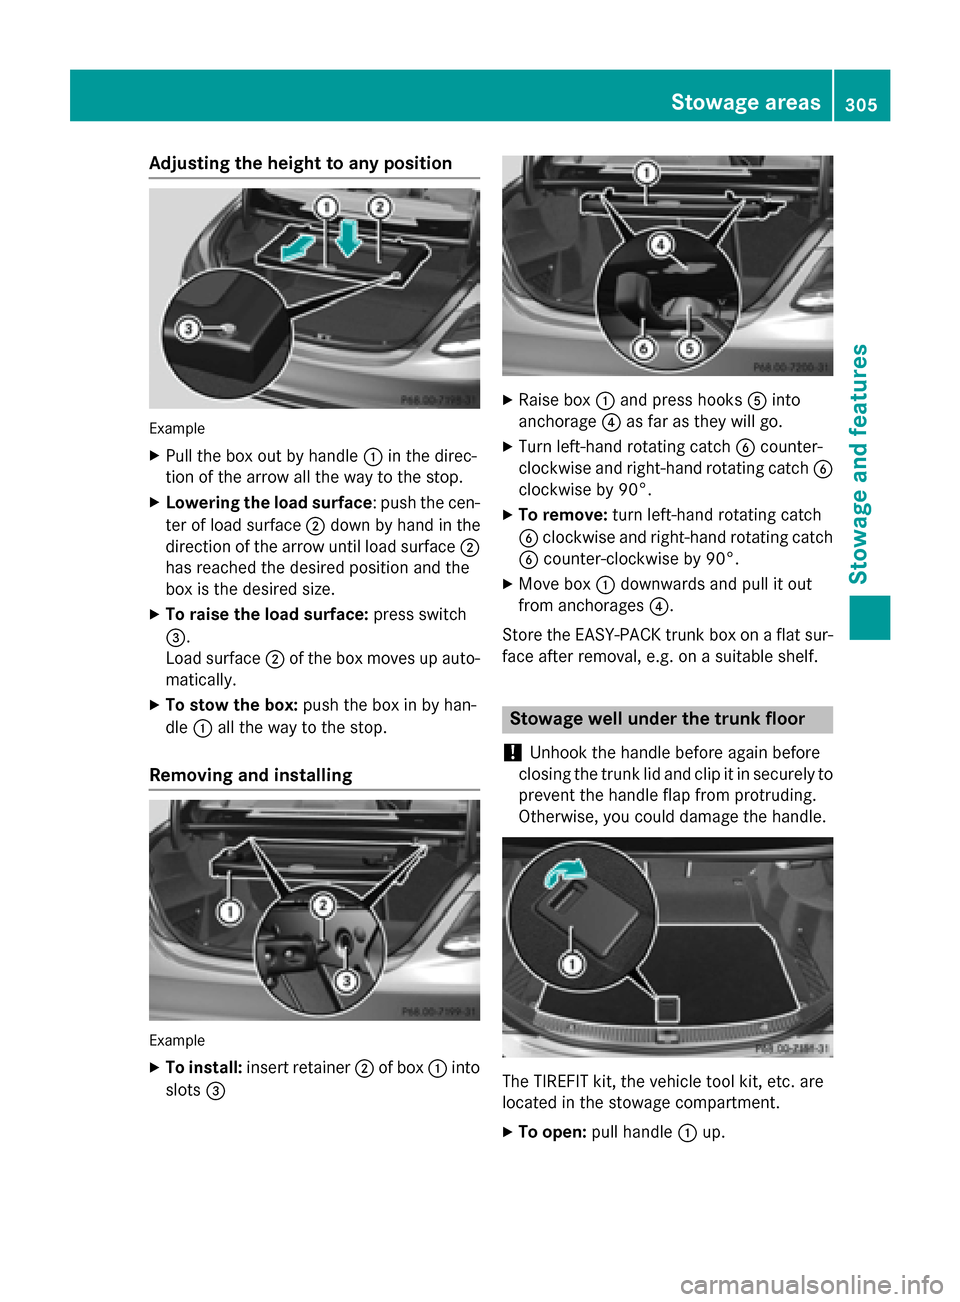
Trunk
Sedan with through-loading feature in the rear
bench seat
X Fold up the cargo tie-down rings next to the
rear seat backrest and put them through
the slots in the carpet.
Bag hook G
WARNING
The bag hooks cannot restrain heavy objects
or items of luggage. Objects or items of lug-
gage could be flung around and thereby hit
vehicle occupants when braking or abruptly
changing directions. There is a risk of injury.
Only hang light objects on the bag hooks.
Never hang hard, sharp-edged or fragile
objects on the bag hooks.
! The bag hook can bear a maximum load of
6.6lbs (3kg) and should not be used to
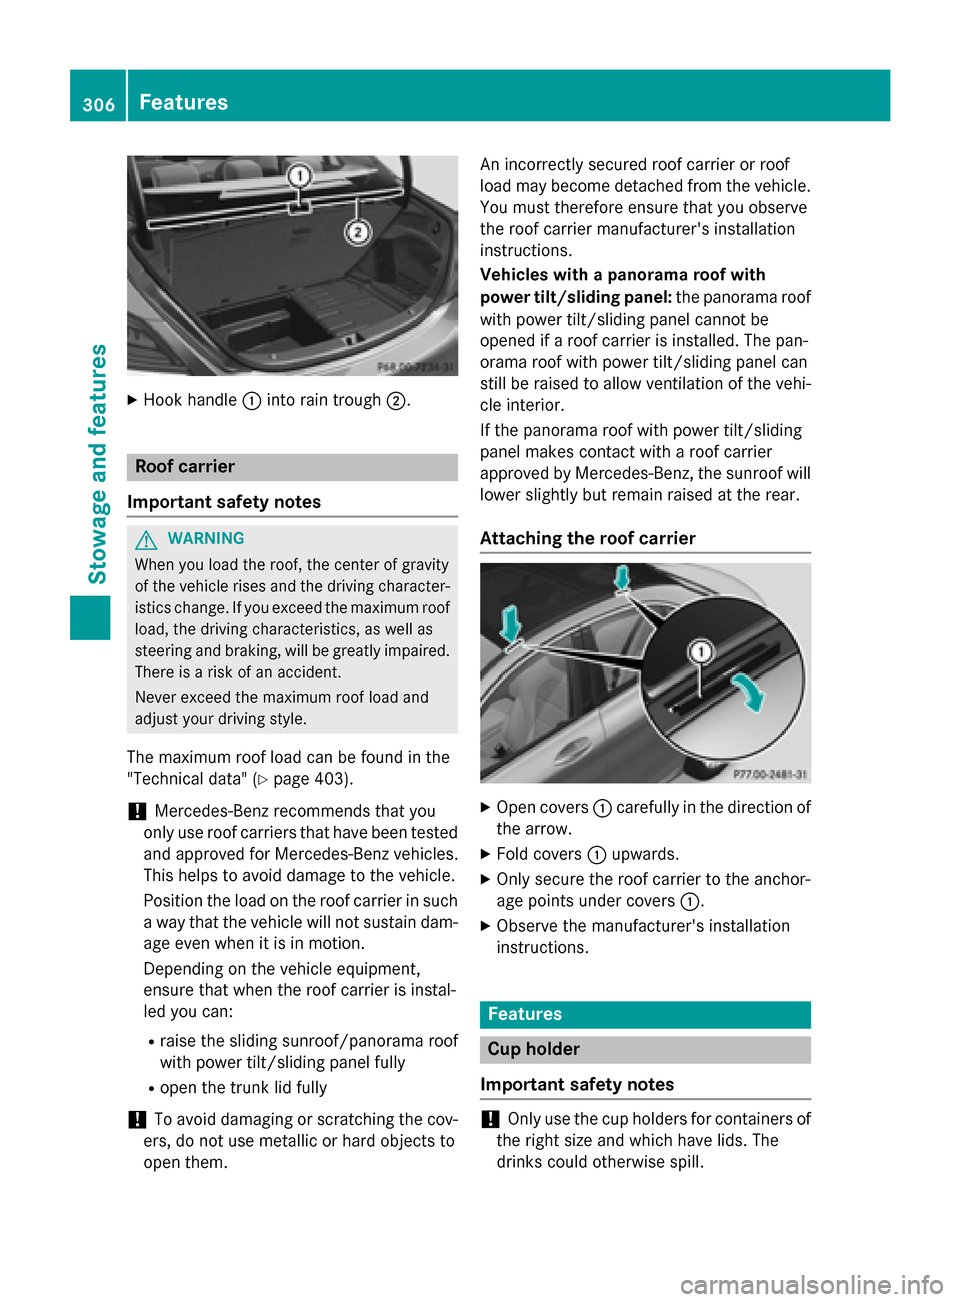
secure a load. 0043
Bag hook EASY-PACK trunk box
Important safety notes G
WARNING
When the load surface moves up, your hands may become trapped on the frame of the
EASY-PACK trunk box. There is a risk of injury.
When the load surface moves up, make sure
that your hands are not within the sweep of
the load surface. If someone becomes trap-
ped, carefully push the center of the load sur-
face downward.
! When the EASY-PACK trunk box is pulled
out, no objects may be placed on the frame
of the box, nor should the frame be pushed from above. Otherwise, the box could be
damaged.
! Sharp-edged, pointed or fragile objects
can damage the EASY-PACK trunk box and
then be thrown out. There is a risk of injury.
Do not transport sharp-edged, pointed or
fragile objects in the EASY-PACK trunk box. Always store and secure these or similar
objects in the trunk outside of the EASY-
PACK trunk box.
! If you exceed the maximum permitted
load of the EASY-PACK trunk box, objects
can be thrown out of the EASY-PACK trunk box and strike vehicle occupants. There is arisk of injury, particularly in the event of
sudden braking or a sudden change in
direction.
Always observe the maximum permitted
load of the EASY-PACK trunk box. Always
store and secure heavy objects in the trunk
outside of the EASY-PACK trunk box.
The maximum permitted load of the EASY-
PACK trunk box is 22 lb s(10 kg). With a load
of above approximately 11 lbs (5 kg), the bot-
tom of the box moves downward until it rests on the mat of the trunk floor. Thus, overload-
ing of the box is avoided. 304
Stowage areasStowage and features
Page 307 of 406
Adjusting the height to any position
Example
X Pull the box out by handle 0043in the direc-
tion of the arrow all the way to the stop.
X Lowering the load surface: push the cen-
ter of load surface 0044down by hand in the
direction of the arrow until load surface 0044
has reached the desired position and the
box is the desired size.
X To raise the load surface: press switch
0087.
Load surface 0044of the box moves up auto-
matically.
X To stow the box: push the box in by han-
dle 0043all the way to the stop.
Removing and installing Example
X To install: insert retainer 0044of box 0043into
slots 0087 X
Raise box 0043and press hooks 0083into
anchorage 0085as far as they will go.
X Turn left-hand rotating catch 0084counter-
clockwise and right-hand rotating catch 0084
clockwise by 90°.
X To remove: turn left-hand rotating catch
0084 clockwise and right-hand rotating catch
0084 counter-clockwise by 90°.
X Move box 0043downwards and pull it out
from anchorages 0085.
Store the EASY-PACK trunk box on a flat sur-
face after removal, e.g. on a suitable shelf. Stowage well under the trunk floor
! Unhook the handle before again before
closing the trunk lid and clip it in securely to
prevent the handle flap from protruding.
Otherwise, you could damage the handle. The TIREFIT kit, the vehicle tool kit, etc. are
located in the stowage compartment.
X To open: pull handle 0043up. Stowage areas
305Stowage and featu res Z
Page 308 of 406
X
Hook handle 0043into rain trough 0044. Roof carrier
Important safety notes G
WARNING
When you load the roof, the center of gravity
of the vehicle rises and the driving character- istics change. If you exceed the maximum roof
load, the driving characteristics, as well as
steering and braking, will be greatly impaired. There is a risk of an accident.
Never exceed the maximum roof load and
adjust your driving style.
The maximum roof load can be found in the
"Technical data" (Y page 403).
! Mercedes-Benz recommends that you
only use roof carriers that have been tested
and approved for Mercedes-Benz vehicles.
This helps to avoid damage to the vehicle.
Position the load on the roof carrier in such
a way that the vehicle will not sustain dam-
age even when it is in motion.
Depending on the vehicle equipment,
ensure that when the roof carrier is instal-
led you can:
R raise the sliding sunroof/panorama roof
with power tilt/sliding panel fully
R open the trunk lid fully
! To avoid damaging or scratching the cov-
ers, do not use metallic or hard objects to
open them. An incorrectly secured roof carrier or roof
load may become detached from the vehicle.
You must therefore ensure that you observe
the roof carrier manufacturer's installation
instructions.
Vehicles with a panorama roof with
power tilt/sliding panel: the panorama roof
with power tilt/sliding panel cannot be
opened if a roof carrier is installed. The pan-
orama roof with power tilt/sliding panel can
still be raised to allow ventilation of the vehi-
cle interior.
If the panorama roof with power tilt/sliding
panel makes contact with a roof carrier
approved by Mercedes-Benz, the sunroof will
lower slightly but remain raised at the rear.
Attaching the roof carrier X
Open covers 0043carefully in the direction of
the arrow.
X Fold covers 0043upwards.
X Only secure the roof carrier to the anchor-
age points under covers 0043.
X Observe the manufacturer's installation
instructions. Features
Cup holder
Important safety notes !
Only use the cup holders for containers of
the right size and which have lids. The
drinks could otherwise spill. 306
FeaturesStowage and features
Page 309 of 406
G
WARNING
If you do not correctly store objects in the
vehicle interior, they can slip or be flung
around, thus striking vehicle occupants.
There is a risk of injury, especially when brak- ing or abruptly changing directions.
R Always store objects so that they cannot be
flung around in these or in similar situa-
tions.
R Always make sure that objects do not pro-
trude from stowage compartments, parcel
nets or stowage nets.
R Close lockable stowage compartments
while driving.
R Stow and secure objects that are heavy,
hard, pointy, sharp-edged, fragile or too
large in the trunk.
Observe the loading guidelines (Y page 298).
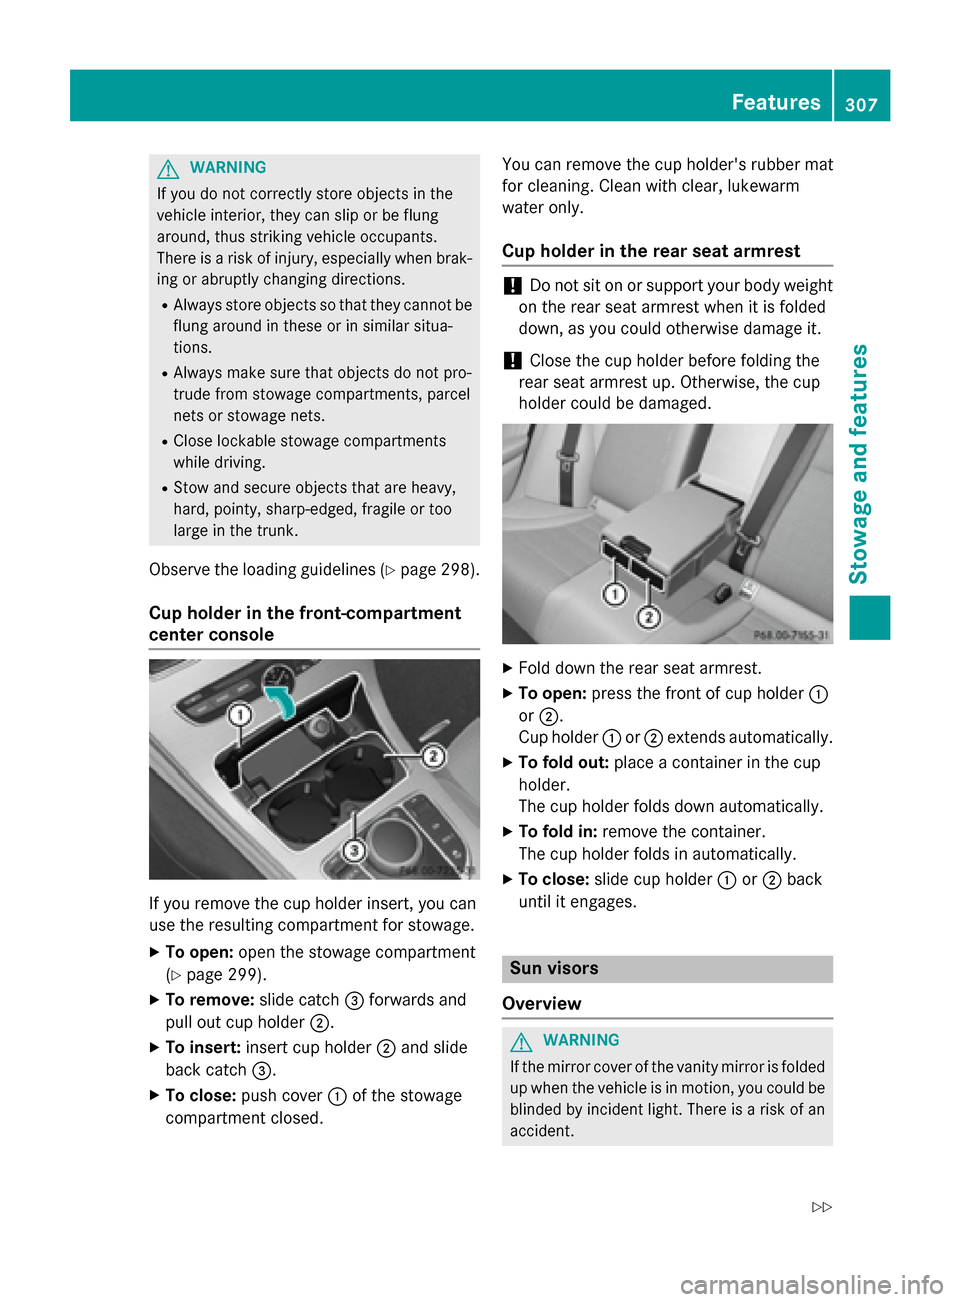
Cup holder in the front-compartment
center console If you remove the cup holder insert, you can
use the resulting compartment for stowage.
X To open: open the stowage compartment
(Y page 299).
X To remove: slide catch0087forwards and
pull out cup holder 0044.
X To insert: insert cup holder 0044and slide
back catch 0087.
X To close: push cover 0043of the stowage
compartment closed. You can remove the cup holder's rubber mat
for cleaning. Clean with clear, lukewarm
water only.
Cup holder in the rear seat armrest !
Do not sit on or support your body weight
on the rear seat armrest when it is folded
down, as you could otherwise damage it.
! Close the cup holder before folding the
rear seat armrest up. Otherwise, the cup
holder could be damaged. X
Fold down the rear seat armrest.
X To open: press the front of cup holder 0043
or 0044.
Cup holder 0043or0044 extends automatically.
X To fold out: place a container in the cup
holder.
The cup holder folds down automatically.
X To fold in: remove the container.
The cup holder folds in automatically.
X To close: slide cup holder 0043or0044 back
until it engages. Sun visors
Overview G
WARNING
If the mirror cover of the vanity mirror is folded up when the vehicle is in motion, you could be
blinded by incident light. There is a risk of an
accident. Features
307Stowage and features
Z
Page 310 of 406
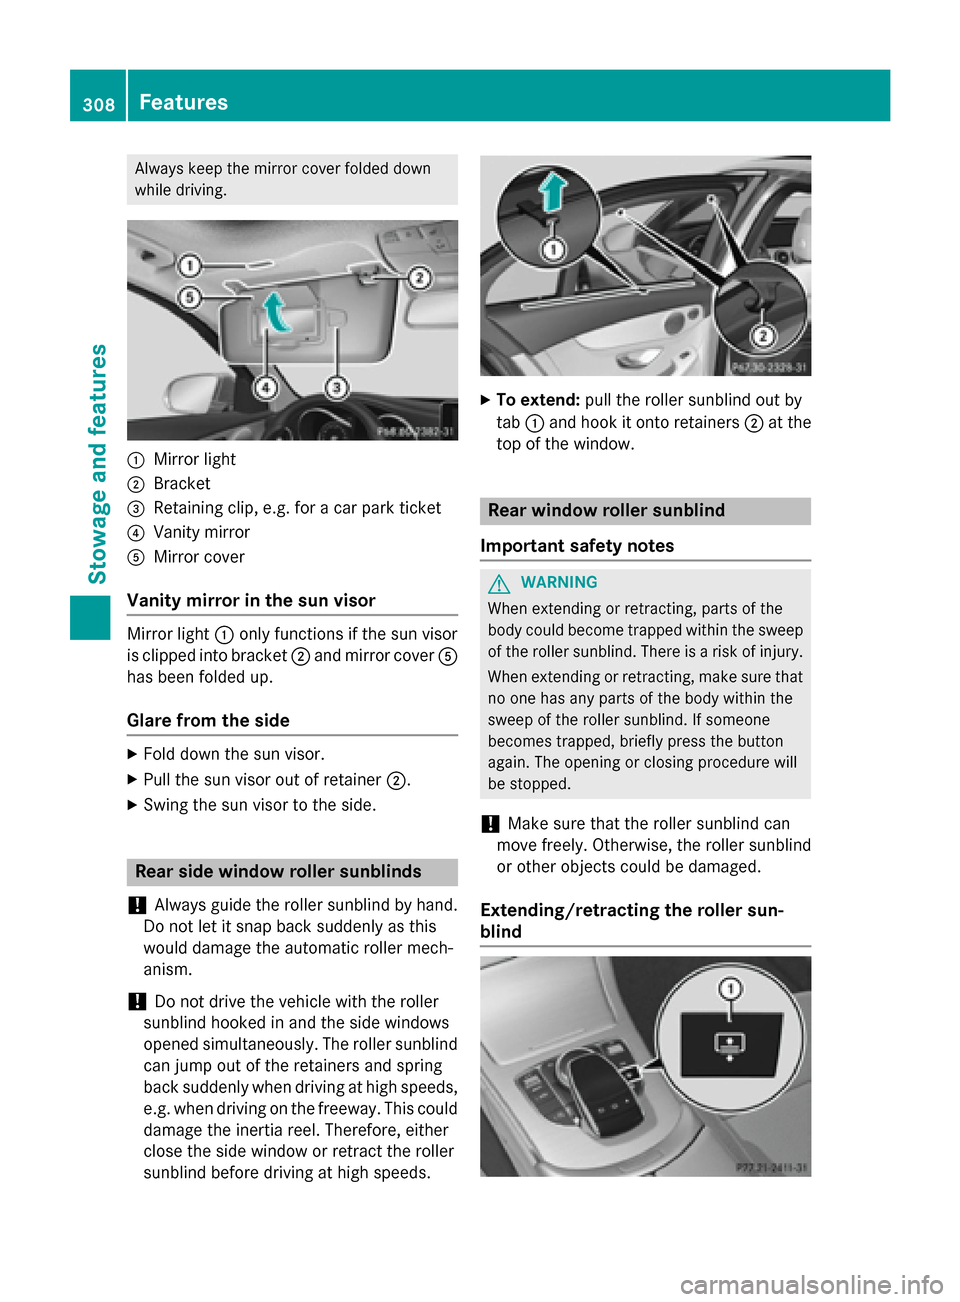
Always keep the mirror cover folded down
while driving. 0043
Mirror light
0044 Bracket
0087 Retaining clip, e.g. for a car park ticket
0085 Vanity mirror
0083 Mirror cover
Vanity mirror in the sun visor Mirror light
0043only functions if the sun visor
is clipped into bracket 0044and mirror cover 0083
has been folded up.
Glare from the side X
Fold down the sun visor.
X Pull the sun visor out of retainer 0044.
X Swing the sun visor to the side. Rear side window roller sunblinds
! Always guide the roller sunblind by hand.
Do not let it snap back suddenly as this
would damage the automatic roller mech-
anism.
! Do not drive the vehicle with the roller
sunblind hooked in and the side windows
opened simultaneously. The roller sunblind can jump out of the retainers and spring
back suddenly when driving at high speeds,
e.g. when driving on the freeway. This could damage the inertia reel. Therefore, either
close the side window or retract the roller
sunblind before driving at high speeds. X
To extend: pull the roller sunblind out by
tab 0043and hook it onto retainers 0044at the
top of the window. Rear window roller sunblind
Important safety notes G
WARNING
When extending or retracting, parts of the
body could become trapped within the sweep of the roller sunblind. There is a risk of injury.
When extending or retracting, make sure that
no one has any parts of the body within the
sweep of the roller sunblind. If someone
becomes trapped, briefly press the button
again. The opening or closing procedure will
be stopped.
! Make sure that the roller sunblind can
move freely. Otherwise, the roller sunblind
or other objects could be damaged.
Extending/retracting the roller sun-
blind 308
FeaturesSto
wage an d features