sensor MERCEDES-BENZ C-Class SEDAN 2015 W205 Service Manual
[x] Cancel search | Manufacturer: MERCEDES-BENZ, Model Year: 2015, Model line: C-Class SEDAN, Model: MERCEDES-BENZ C-Class SEDAN 2015 W205Pages: 406, PDF Size: 7.62 MB
Page 262 of 406
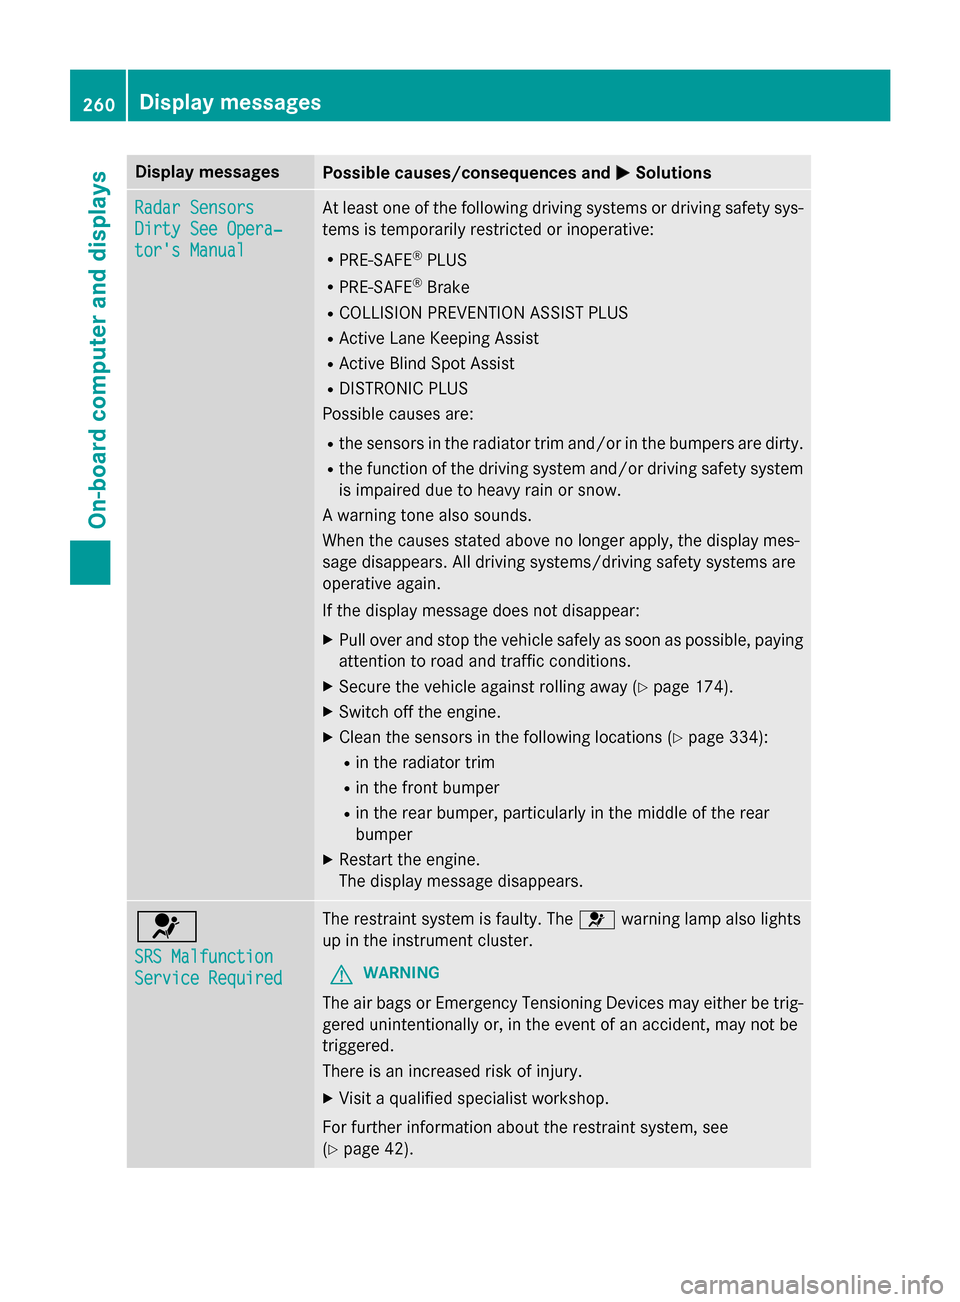
Display messages
Possible causes/consequences and
0050
0050Solutions Radar Sensors
Radar Sensors
Dirty See Opera‐ Dirty See Opera‐
tor's Manual tor's Manual At least one of the following driving systems or driving safety sys-
tems is temporarily restricted or inoperative:
R PRE-SAFE ®
PLUS
R PRE-SAFE ®
Brake
R COLLISION PREVENTION ASSIST PLUS
R Active Lane Keeping Assist
R Active Blind Spot Assist
R DISTRONIC PLUS
Possible causes are:
R the sensors in the radiator trim and/or in the bumpers are dirty.
R the function of the driving system and/or driving safety system
is impaired due to heavy rain or snow.
A warning tone also sounds.
When the causes stated above no longer apply, the display mes-
sage disappears. All driving systems/driving safety systems are
operative again.
If the display message does not disappear:
X Pull over and stop the vehicle safely as soon as possible, paying
attention to road and traffic conditions.
X Secure the vehicle against rolling away (Y page 174).
X Switch off the engine.
X Clean the sensors in the following locations (Y page 334):
R in the radiator trim
R in the front bumper
R in the rear bumper, particularly in the middle of the rear
bumper
X Restart the engine.
The display message disappears. 0075
SRS Malfunction SRS Malfunction
Service Required Service Required The restraint system is faulty. The
0075warning lamp also lights
up in the instrument cluster.
G WARNING
The air bags or Emergency Tensioning Devices may either be trig- gered unintentionally or, in the event of an accident, may not be
triggered.
There is an increased risk of injury.
X Visit a qualified specialist workshop.
For further information about the restraint system, see
(Y page 42). 260
Display
messagesOn-board computer and displays
Page 268 of 406
Display messages
Possible causes/consequences and
0050
0050Solutions 0049
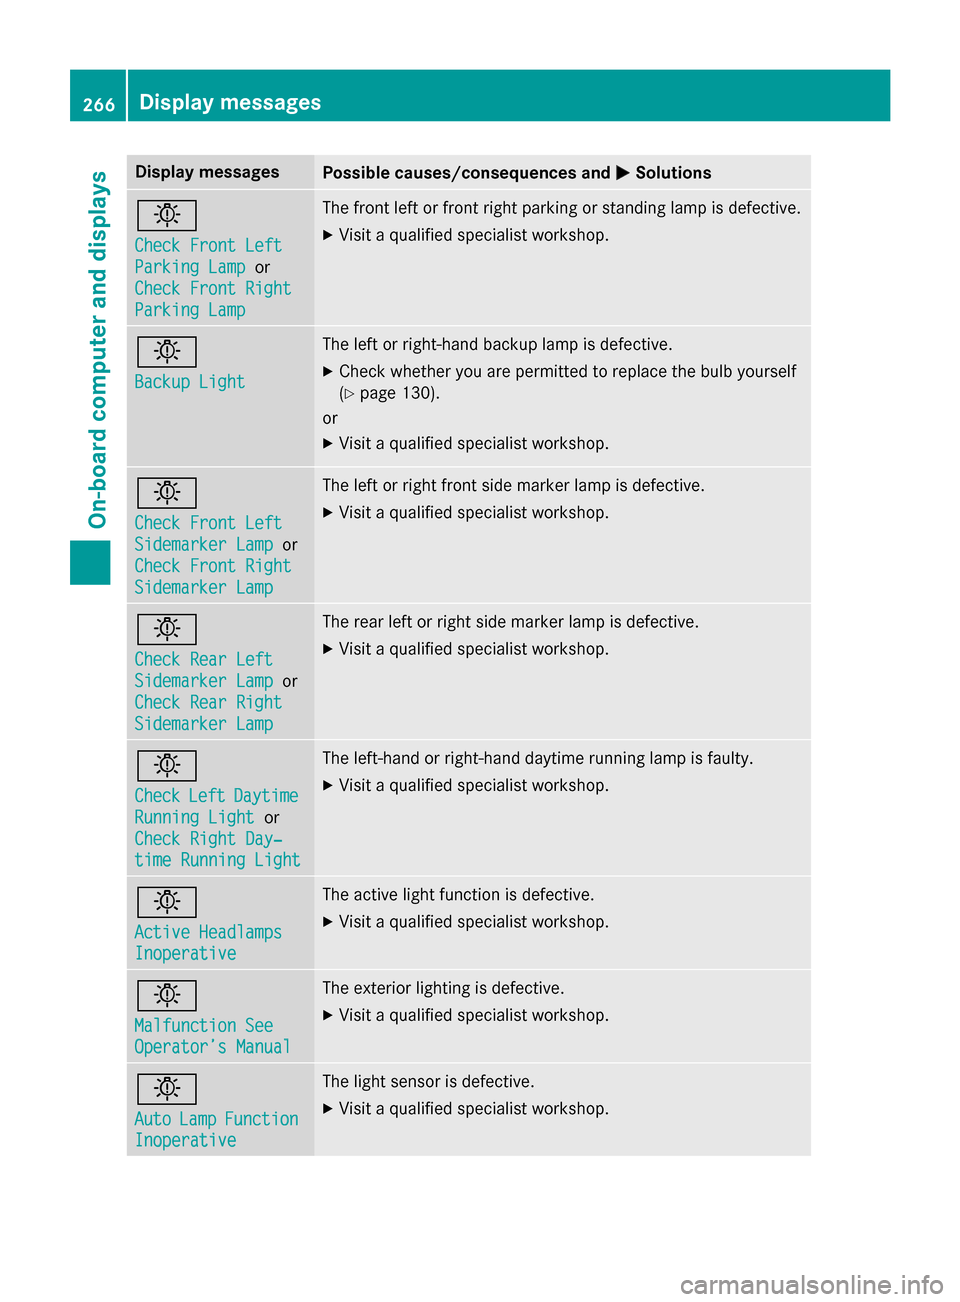
Check Front Left Check Front Left
Parking Lamp Parking Lamp
or
Check Front Right
Check Front Right
Parking Lamp Parking Lamp The front left or front right parking or standing lamp is defective.
X Visit a qualified specialist workshop. 0049
Backup Light Backup Light The left or right-hand backup lamp is defective.
X Check whether you are permitted to replace the bulb yourself
(Y page 130).
or
X Visit a qualified specialist workshop. 0049
Check Front Left Check Front Left
Sidemarker Lamp Sidemarker Lamp
or
Check Front Right
Check Front Right
Sidemarker Lamp Sidemarker Lamp The left or right front side marker lamp is defective.
X Visit a qualified specialist workshop. 0049
Check Rear Left Check Rear Left
Sidemarker Lamp Sidemarker Lamp
or
Check Rear Right
Check Rear Right
Sidemarker Lamp Sidemarker Lamp The rear left or right side marker lamp is defective.
X Visit a qualified specialist workshop. 0049
Check Check
Left
LeftDaytime
Daytime
Running Light
Running Light or
Check Right Day‐
Check Right Day‐
time Running Light time Running Light The left-hand or right-hand daytime running lamp is faulty.
X Visit a qualified specialist workshop. 0049
Active Headlamps Active Headlamps
Inoperative Inoperative The active light function is defective.
X Visit a qualified specialist workshop. 0049
Malfunction See Malfunction See
Operator’s Manual Operator’s Manual The exterior lighting is defective.
X Visit a qualified specialist workshop. 0049
Auto Auto
Lamp
LampFunction
Function
Inoperative
Inoperative The light sensor is defective.
X Visit a qualified specialist workshop. 266
Display
messagesOn-board computer and displays
Page 275 of 406
Display messages
Possible causes/consequences and
0050
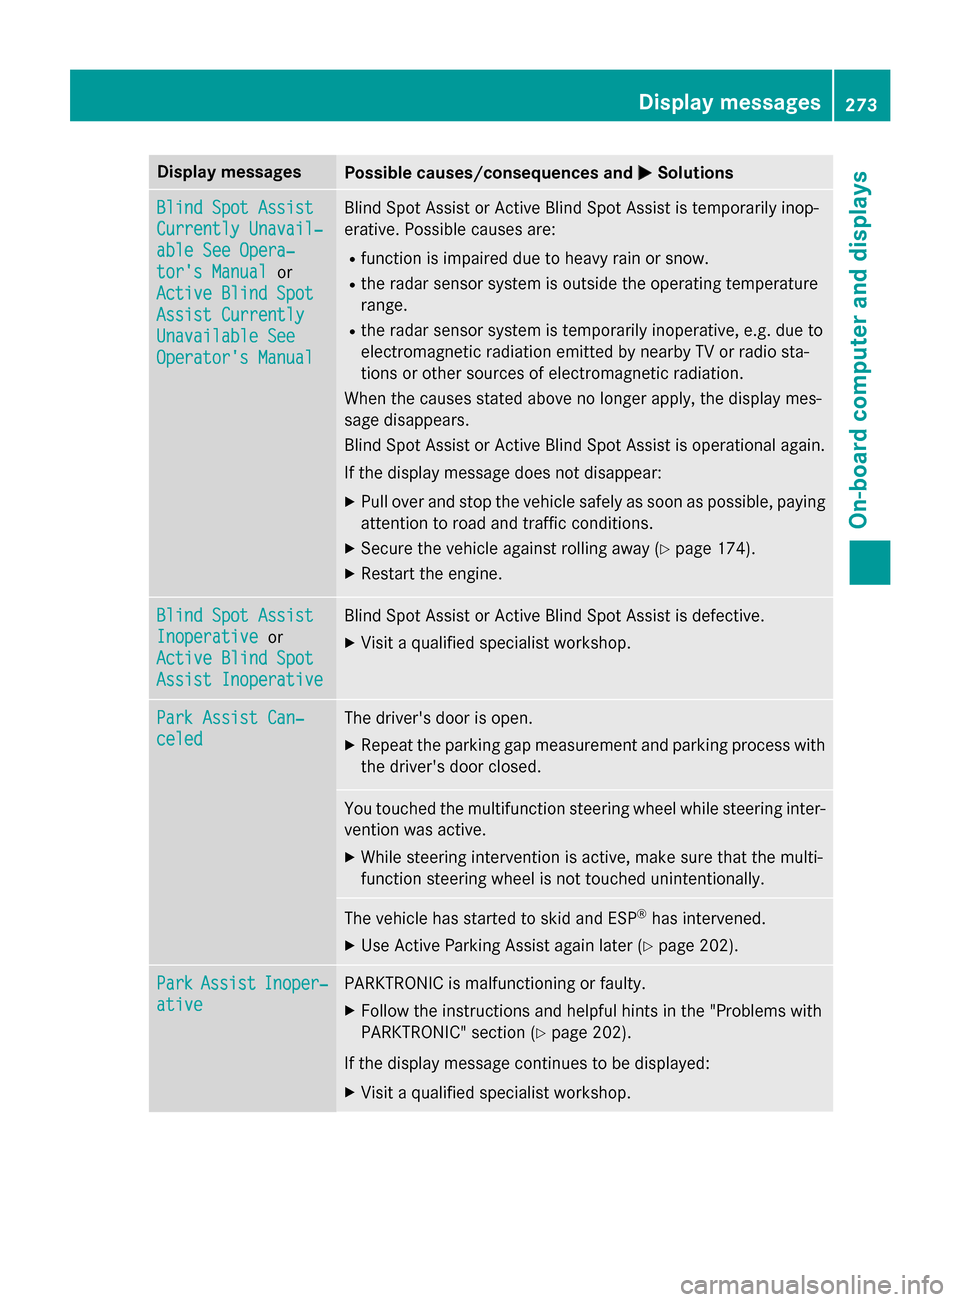
0050Solutions Blind Spot Assist
Blind Spot Assist
Currently Unavail‐ Currently Unavail‐
able See Opera‐ able See Opera‐
tor's Manual tor's Manual
or
Active Blind Spot
Active Blind Spot
Assist Currently Assist Currently
Unavailable See Unavailable See
Operator's Manual Operator's Manual Blind Spot Assist or Active Blind Spot Assist is temporarily inop-
erative. Possible causes are:
R function is impaired due to heavy rain or snow.
R the radar sensor system is outside the operating temperature
range.
R the radar sensor system is temporarily inoperative, e.g. due to
electromagnetic radiation emitted by nearby TV or radio sta-
tions or other sources of electromagnetic radiation.
When the causes stated above no longer apply, the display mes-
sage disappears.
Blind Spot Assist or Active Blind Spot Assist is operational again.
If the display message does not disappear:
X Pull over and stop the vehicle safely as soon as possible, paying
attention to road and traffic conditions.
X Secure the vehicle against rolling away (Y page 174).
X Restart the engine. Blind Spot Assist Blind Spot Assist
Inoperative Inoperative
or
Active Blind Spot
Active Blind Spot
Assist Inoperative Assist Inoperative Blind Spot Assist or Active Blind Spot Assist is defective.
X Visit a qualified specialist workshop. Park Assist Can‐
Park Assist Can‐
celed celed The driver's door is open.
X Repeat the parking gap measurement and parking process with
the driver's door closed. You touched the multifunction steering wheel while steering inter-
vention was active.
X While steering intervention is active, make sure that the multi-
function steering wheel is not touched unintentionally. The vehicle has started to skid and ESP
®
has intervened.
X Use Active Parking Assist again later (Y page 202).Park Park
Assist
Assist Inoper‐
Inoper‐
ative
ative PARKTRONIC is malfunctioning or faulty.
X Follow the instructions and helpful hints in the "Problems with
PARKTRONIC" section (Y page 202).
If the display message continues to be displayed: X Visit a qualified specialist workshop. Display
messages
273On-board computer and displays Z
Page 277 of 406
Display messages
Possible causes/consequences and
0050
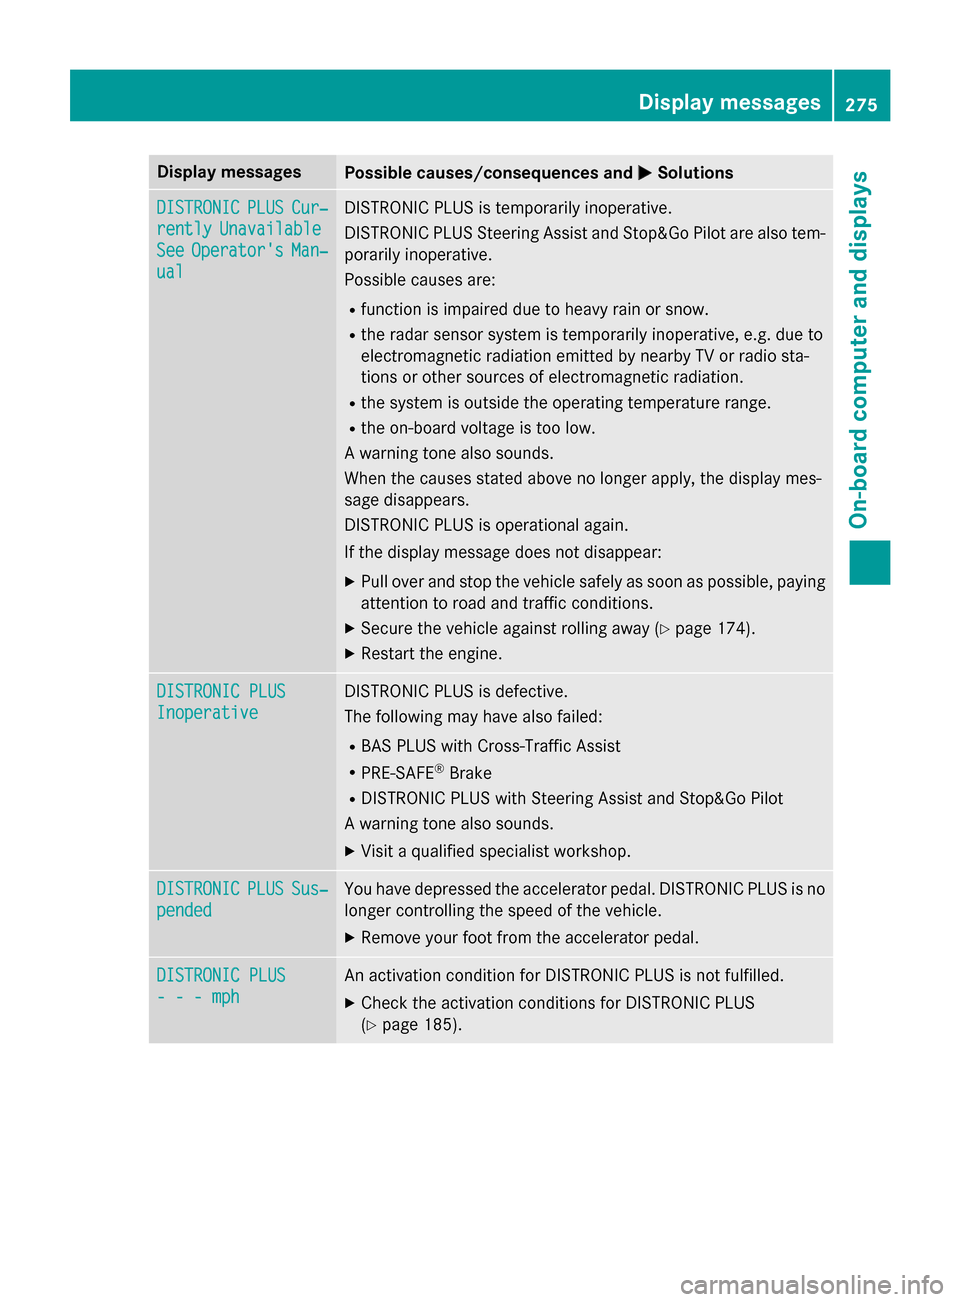
0050Solutions DISTRONIC
DISTRONIC
PLUS
PLUSCur‐
Cur‐
rently
rently Unavailable
Unavailable
See
See Operator's
Operator's Man‐
Man‐
ual
ual DISTRONIC PLUS is temporarily inoperative.
DISTRONIC PLUS Steering Assist and Stop&Go Pilot are also tem-
porarily inoperative.
Possible causes are:
R function is impaired due to heavy rain or snow.
R the radar sensor system is temporarily inoperative, e.g. due to
electromagnetic radiation emitted by nearby TV or radio sta-
tions or other sources of electromagnetic radiation.
R the system is outside the operating temperature range.
R the on-board voltage is too low.
A warning tone also sounds.
When the causes stated above no longer apply, the display mes-
sage disappears.
DISTRONIC PLUS is operational again.
If the display message does not disappear:
X Pull over and stop the vehicle safely as soon as possible, paying
attention to road and traffic conditions.
X Secure the vehicle against rolling away (Y page 174).
X Restart the engine. DISTRONIC PLUS DISTRONIC PLUS
Inoperative Inoperative DISTRONIC PLUS is defective.
The following may have also failed:
R BAS PLUS with Cross-Traffic Assist
R PRE-SAFE ®
Brake
R DISTRONIC PLUS with Steering Assist and Stop&Go Pilot
A warning tone also sounds.
X Visit a qualified specialist workshop. DISTRONIC DISTRONIC
PLUS
PLUSSus‐
Sus‐
pended
pended You have depressed the accelerator pedal. DISTRONIC PLUS is no
longer controlling the speed of the vehicle.
X Remove your foot from the accelerator pedal. DISTRONIC PLUS
DISTRONIC PLUS
- - - mph - - - mph An activation condition for DISTRONIC PLUS is not fulfilled.
X Check the activation conditions for DISTRONIC PLUS
(Y page 185). Display
messages
275On-board computer and displays Z
Page 281 of 406
Display messages
Possible causes/consequences and
0050
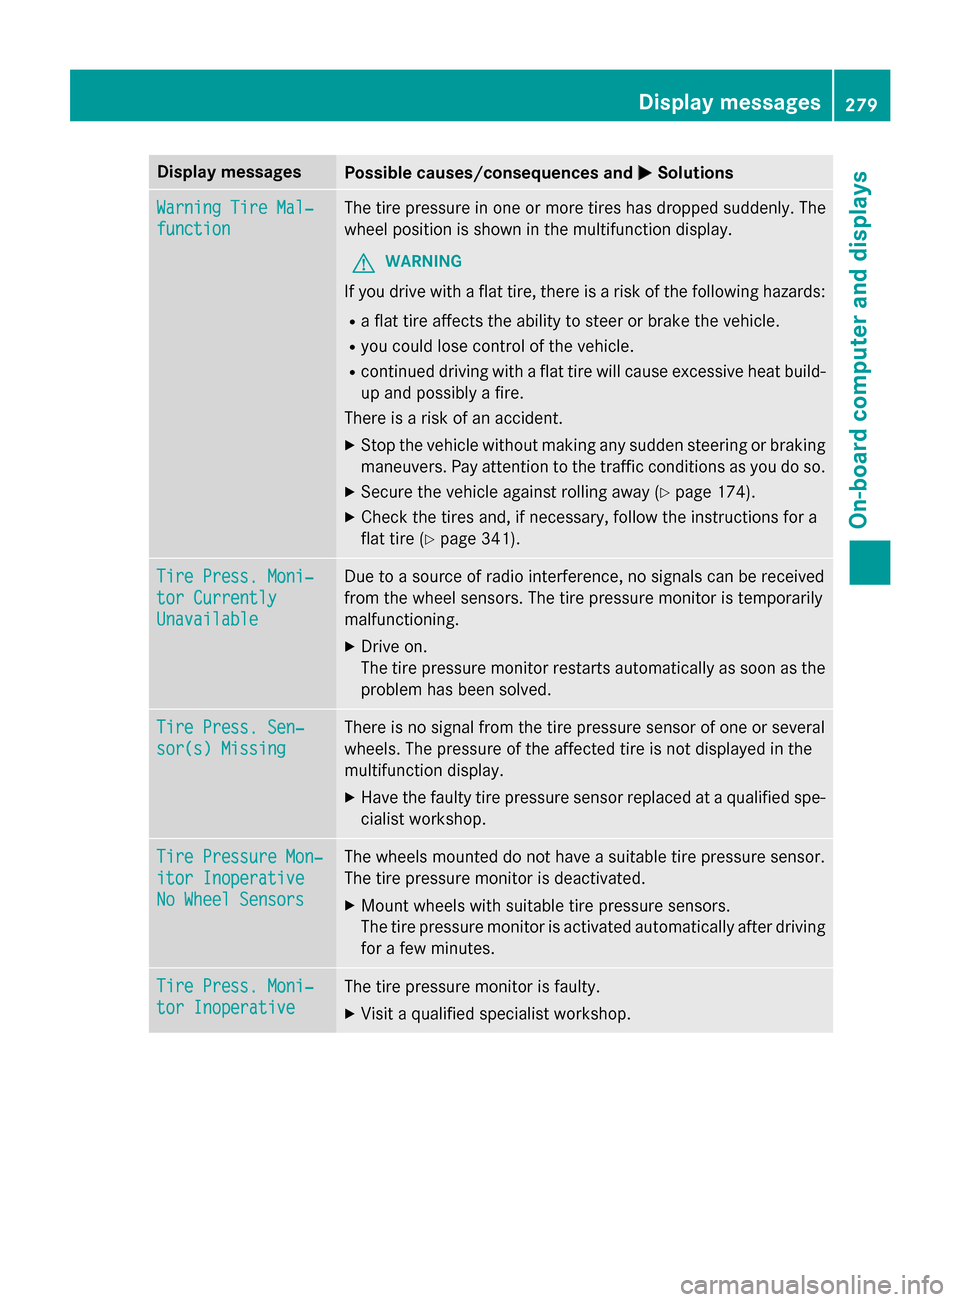
0050Solutions Warning Tire Mal‐
Warning Tire Mal‐
function function The tire pressure in one or more tires has dropped suddenly. The
wheel position is shown in the multifunction display.
G WARNING
If you drive with a flat tire, there is a risk of the following hazards: R a flat tire affects the ability to steer or brake the vehicle.
R you could lose control of the vehicle.
R continued driving with a flat tire will cause excessive heat build-
up and possibly a fire.
There is a risk of an accident.
X Stop the vehicle without making any sudden steering or braking
maneuvers. Pay attention to the traffic conditions as you do so.
X Secure the vehicle against rolling away (Y page 174).
X Check the tires and, if necessary, follow the instructions for a
flat tire (Y page 341). Tire Press. Moni‐ Tire Press. Moni‐
tor Currently tor Currently
Unavailable Unavailable Due to a source of radio interference, no signals can be received
from the wheel sensors. The tire pressure monitor is temporarily
malfunctioning.
X Drive on.
The tire pressure monitor restarts automatically as soon as the
problem has been solved. Tire Press. Sen‐ Tire Press. Sen‐
sor(s) Missing sor(s) Missing There is no signal from the tire pressure sensor of one or several
wheels. The pressure of the affected tire is not displayed in the
multifunction display.
X Have the faulty tire pressure sensor replaced at a qualified spe-
cialist workshop. Tire Pressure Mon‐ Tire Pressure Mon‐
itor Inoperative itor Inoperative
No Wheel Sensors No Wheel Sensors The wheels mounted do not have a suitable tire pressure sensor.
The tire pressure monitor is deactivated.
X Mount wheels with suitable tire pressure sensors.
The tire pressure monitor is activated automatically after driving
for a few minutes. Tire Press. Moni‐ Tire Press. Moni‐
tor Inoperative tor Inoperative The tire pressure monitor is faulty.
X Visit a qualified specialist workshop. Display
messages
279On-board computer and displays Z
Page 293 of 406
Engine
Warning/
indicator
lamp
0051 0051
Signal type
Possible causes/consequences and 0050
0050Solutions 00B9
0051
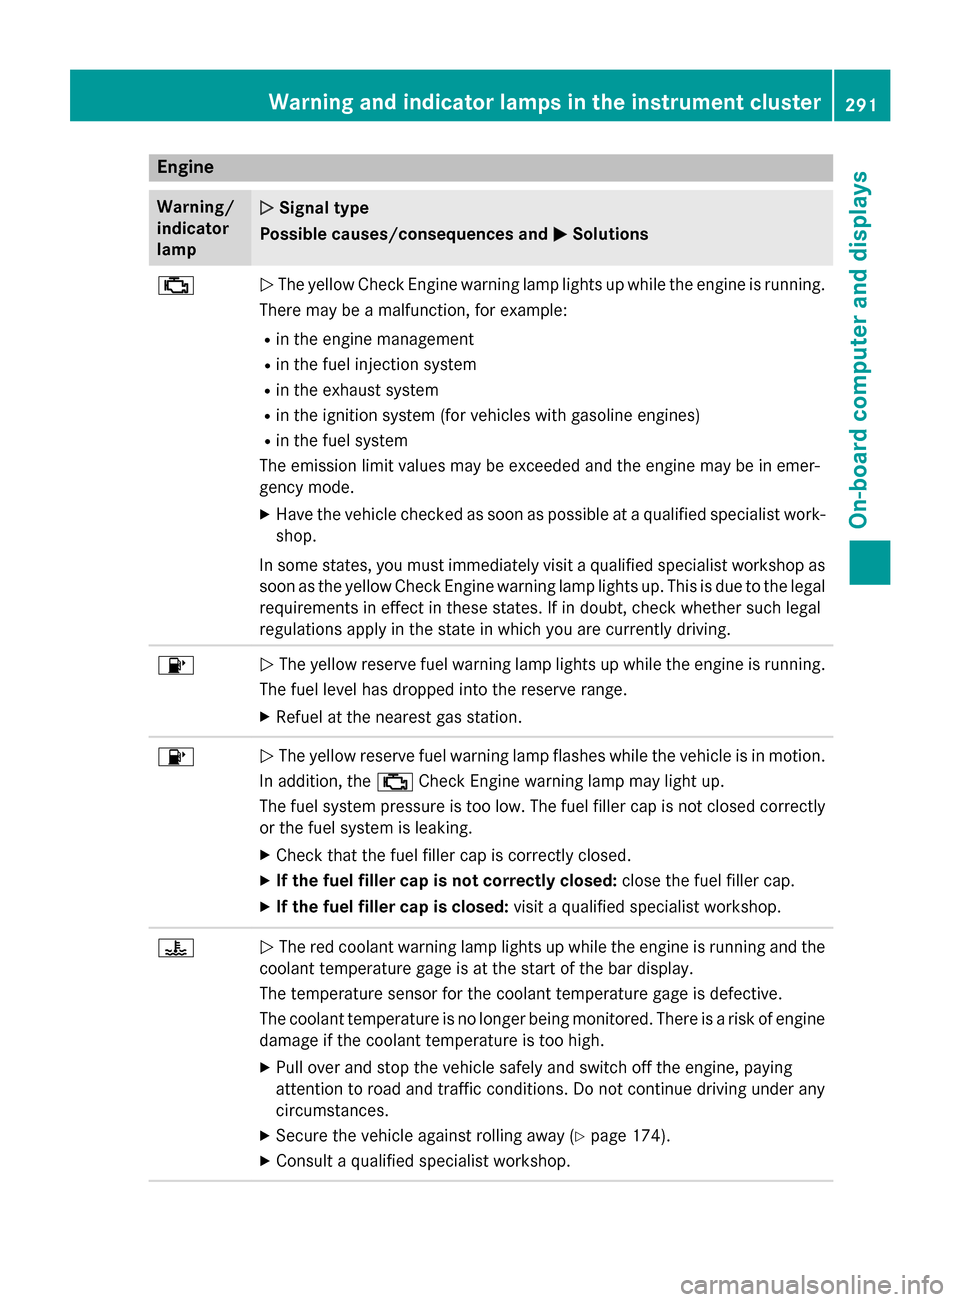
The yellow Check Engine warning lamp lights up while the engine is running.
There may be a malfunction, for example:
R in the engine management
R in the fuel injection system
R in the exhaust system
R in the ignition system (for vehicles with gasoline engines)
R in the fuel system
The emission limit values may be exceeded and the engine may be in emer-
gency mode.
X Have the vehicle checked as soon as possible at a qualified specialist work-
shop.
In some states, you must immediately visit a qualified specialist workshop as
soon as the yellow Check Engine warning lamp lights up. This is due to the legal
requirements in effect in these states. If in doubt, check whether such legal
regulations apply in the state in which you are currently driving. 00B6
0051
The yellow reserve fuel warning lamp lights up while the engine is running.
The fuel level has dropped into the reserve range.
X Refuel at the nearest gas station. 00B6
0051
The yellow reserve fuel warning lamp flashes while the vehicle is in motion.
In addition, the 00B9Check Engine warning lamp may light up.
The fuel system pressure is too low. The fuel filler cap is not closed correctly or the fuel system is leaking.
X Check that the fuel filler cap is correctly closed.
X If the fuel filler cap is not correctly closed: close the fuel filler cap.
X If the fuel filler cap is closed: visit a qualified specialist workshop.00AC
0051
The red coolant warning lamp lights up while the engine is running and the
coolant temperature gage is at the start of the bar display.
The temperature sensor for the coolant temperature gage is defective.
The coolant temperature is no longer being monitored. There is a risk of engine
damage if the coolant temperature is too high.
X Pull over and stop the vehicle safely and switch off the engine, paying
attention to road and traffic conditions. Do not continue driving under any
circumstances.
X Secure the vehicle against rolling away (Y page 174).
X Consult a qualified specialist workshop. Warning and indicator lamps in the instrument cluster
291On-board computer and displays Z
Page 336 of 406
X
Clean the plastic lenses of the exterior
lights with a wet sponge and a mild cleaning
agent, e.g. Mercedes-Benz car shampoo or
cleaning cloths.
Cleaning the mirror turn signals !
Only use cleaning agents or cleaning
cloths that are suitable for plastic lenses.
Unsuitable cleaning agents or cleaning
cloths could scratch or damage the plastic lenses of the mirror turn signals.
X Clean the plastic lenses of the mirror turn
signals in the exterior mirror housing using
a wet sponge and mild cleaning agent, e.g.
Mercedes-Benz car shampoo or cleaning
cloths.
Cleaning AIRPANEL !
If you clean the sensors with a power
washer, make sure that you keep a dis-
tance of at least 11.8 in (30 cm) between
the vehicle and the power washer nozzle.
Information about the correct distance is
available from the equipment manufac-
turer.
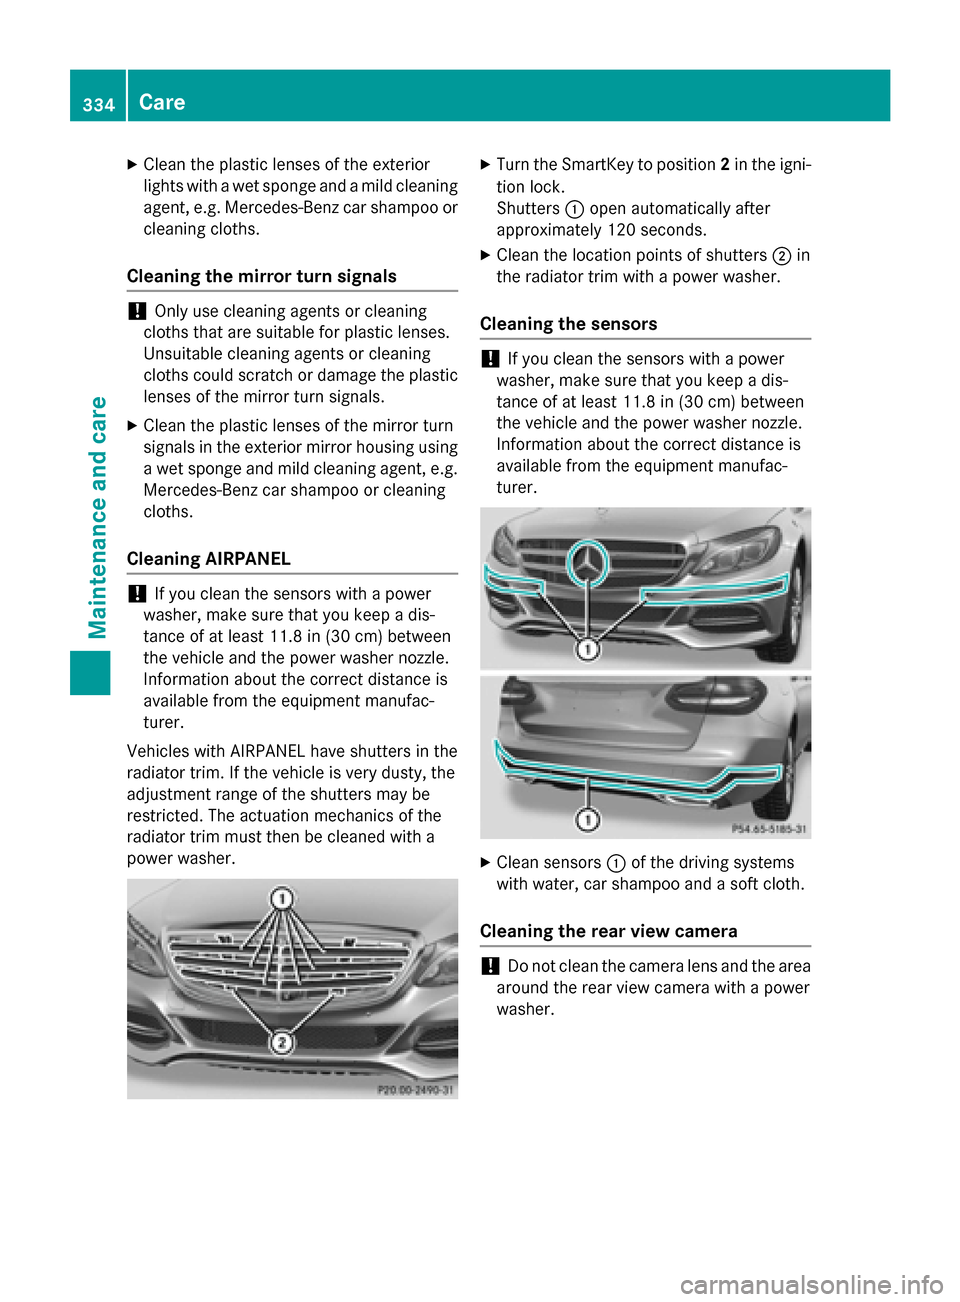
Vehicles with AIRPANEL have shutters in the
radiator trim. If the vehicle is very dusty, the
adjustment range of the shutters may be
restricted. The actuation mechanics of the
radiator trim must then be cleaned with a
power washer. X
Turn the SmartKey to position 2in the igni-
tion lock.
Shutters 0043open automatically after
approximately 120 seconds.
X Clean the location points of shutters 0044in
the radiator trim with a power washer.
Cleaning the sensors !
If you clean the sensors with a power
washer, make sure that you keep a dis-
tance of at least 11.8 in (30 cm) between
the vehicle and the power washer nozzle.
Information about the correct distance is
available from the equipment manufac-
turer. X
Clean sensors 0043of the driving systems
with water, car shampoo and a soft cloth.
Cleaning the rear view camera !
Do not clean the camera lens and the area
around the rear view camera with a power
washer. 334
CareMaintenance and care
Page 367 of 406
Checking tire pressures manually
To determine and set the correct tire pres-
sure, proceed as follows:
X Remove the valve cap of the tire that is to
be checked.
X Press the tire pressure gauge securely onto
the valve.
X Read the tire pressure and compare it with
the recommended value on the Tire and
Loading Information placard (Y page 361).
X If the tire pressure is too low, increase it to
the recommended value.
X If the tire pressure is too high, release air by
pressing down the metal pin in the valve.
Use the tip of a pen, for example. Then,
check the tire pressure again using the tire
pressure gauge.
X Screw the valve cap onto the valve.
X Repeat these steps for the other tires. Tire pressure monitor
General notes If a tire pressure monitor is installed, the vehi-
cle's wheels have sensors that monitor the
tire pressures in all four tires. The tire pres-
sure monitor warns you if the pressure drops
in one or more of the tires. The tire pressure
monitor only functions if the correct sensors
are installed on all wheels.
Information on tire pressures is displayed in
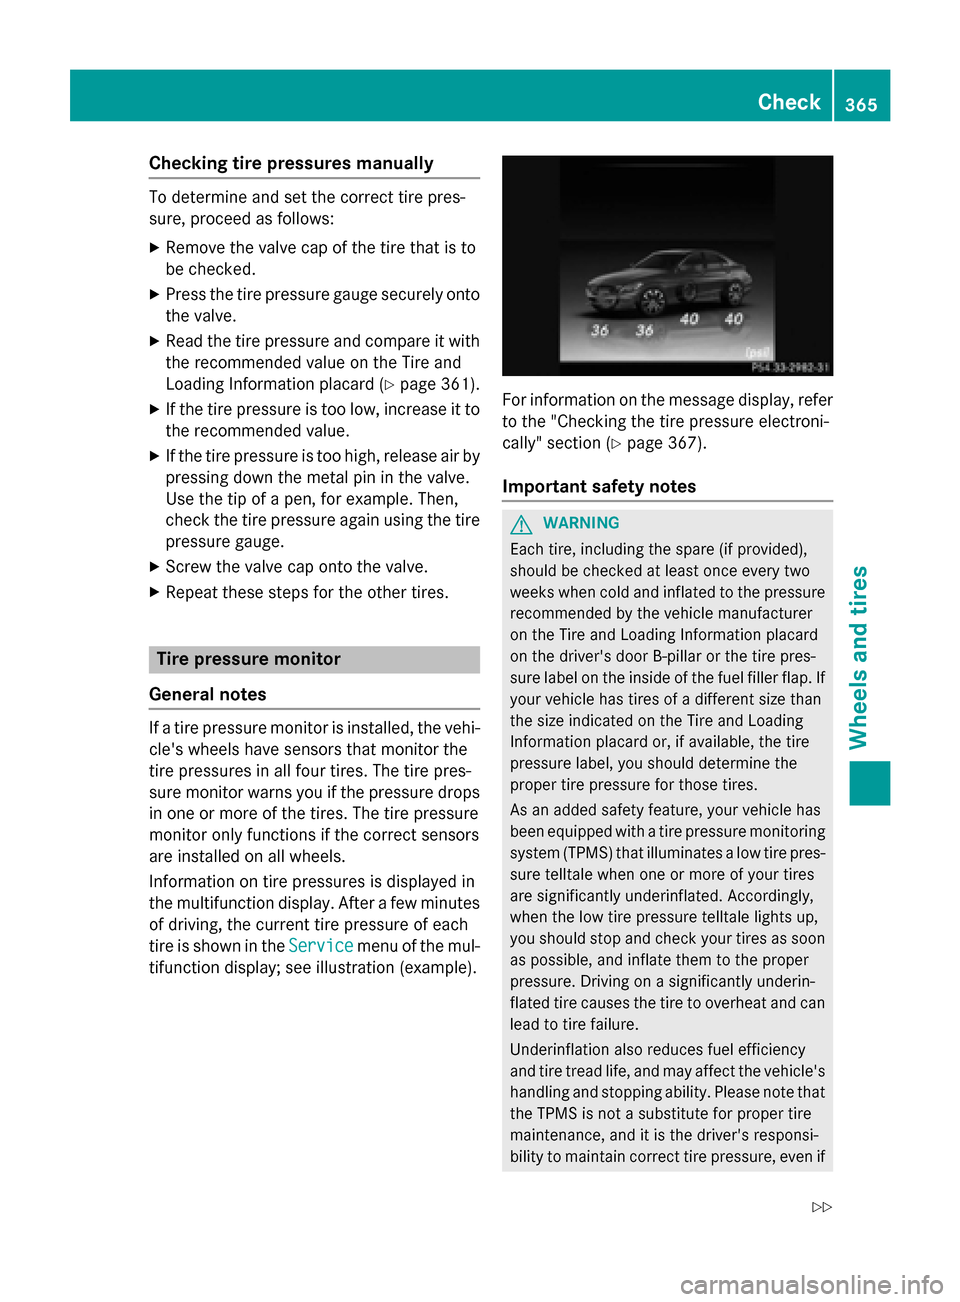
the multifunction display. After a few minutes of driving, the current tire pressure of each
tire is shown in the Service Servicemenu of the mul-
tifunction display; see illustration (example). For information on the message display, refer
to the "Checking the tire pressure electroni-
cally" section (Y page 367).
Important safety notes G
WARNING
Each tire, including the spare (if provided),
should be checked at least once every two
weeks when cold and inflated to the pressure recommended by the vehicle manufacturer
on the Tire and Loading Information placard
on the driver's door B-pillar or the tire pres-
sure label on the inside of the fuel filler flap. If
your vehicle has tires of a different size than
the size indicated on the Tire and Loading
Information placard or, if available, the tire
pressure label, you should determine the
proper tire pressure for those tires.
As an added safety feature, your vehicle has
been equipped with a tire pressure monitoring system (TPMS) that illuminates a low tire pres-
sure telltale when one or more of your tires
are significantly underinflated. Accordingly,
when the low tire pressure telltale lights up,
you should stop and check your tires as soon
as possible, and inflate them to the proper
pressure. Driving on a significantly underin-
flated tire causes the tire to overheat and can
lead to tire failure.
Underinflation also reduces fuel efficiency
and tire tread life, and may affect the vehicle's handling and stopping ability. Please note that the TPMS is not a substitute for proper tire
maintenance, and it is the driver's responsi-
bility to maintain correct tire pressure, even if Check
365Wheels and tires
Z
Page 369 of 406
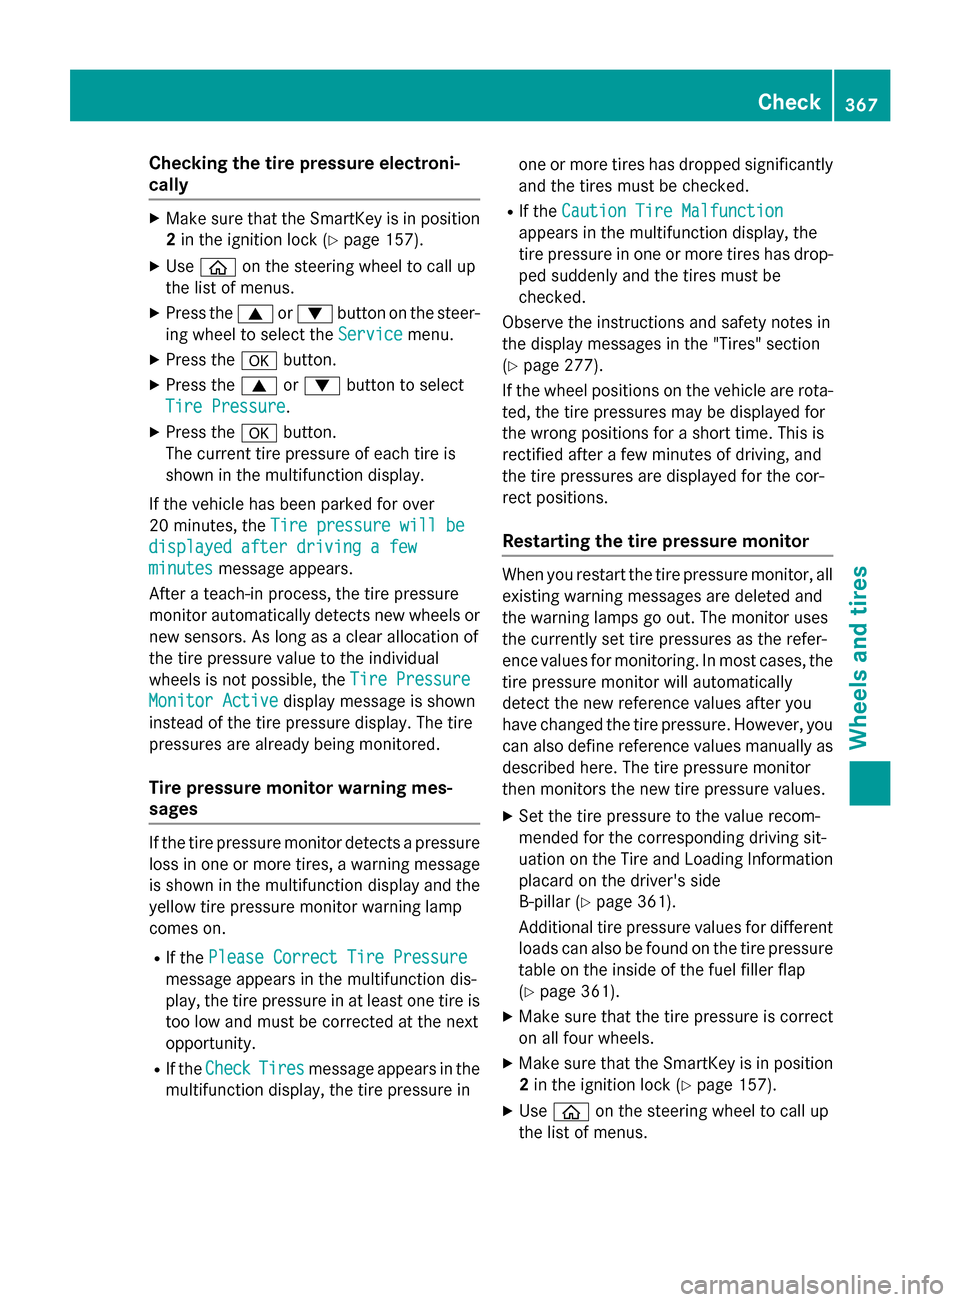
Checking the tire pressure electroni-
cally
X
Make sure that the SmartKey is in position
2 in the ignition lock (Y page 157).
X Use 00E2 on the steering wheel to call up
the list of menus.
X Press the 0063or0064 button on the steer-
ing wheel to select the Service
Service menu.
X Press the 0076button.
X Press the 0063or0064 button to select
Tire Pressure
Tire Pressure.
X Press the 0076button.
The current tire pressure of each tire is
shown in the multifunction display.
If the vehicle has been parked for over
20 minutes, the Tire pressure will be Tire pressure will be
displayed after driving a few
displayed after driving a few
minutes minutes message appears.
After a teach-in process, the tire pressure
monitor automatically detects new wheels or
new sensors. As long as a clear allocation of
the tire pressure value to the individual
wheels is not possible, the Tire Pressure Tire Pressure
Monitor Active
Monitor Active display message is shown
instead of the tire pressure display. The tire
pressures are already being monitored.
Tire pressure monitor warning mes-
sages If the tire pressure monitor detects a pressure
loss in one or more tires, a warning message is shown in the multifunction display and theyellow tire pressure monitor warning lamp
comes on.
R If the Please Correct Tire Pressure
Please Correct Tire Pressure
message appears in the multifunction dis-
play, the tire pressure in at least one tire is
too low and must be corrected at the next
opportunity.
R If the Check
Check Tires Tiresmessage appears in the
multifunction display, the tire pressure in one or more tires has dropped significantly
and the tires must be checked.
R If the Caution Tire Malfunction
Caution Tire Malfunction
appears in the multifunction display, the
tire pressure in one or more tires has drop-
ped suddenly and the tires must be
checked.
Observe the instructions and safety notes in
the display messages in the "Tires" section
(Y page 277).
If the wheel positions on the vehicle are rota-
ted, the tire pressures may be displayed for
the wrong positions for a short time. This is
rectified after a few minutes of driving, and
the tire pressures are displayed for the cor-
rect positions.
Restarting the tire pressure monitor When you restart the tire pressure monitor, all
existing warning messages are deleted and
the warning lamps go out. The monitor uses
the currently set tire pressures as the refer-
ence values for monitoring. In most cases, the tire pressure monitor will automatically
detect the new reference values after you
have changed the tire pressure. However, you
can also define reference values manually as
described here. The tire pressure monitor
then monitors the new tire pressure values.
X Set the tire pressure to the value recom-
mended for the corresponding driving sit-
uation on the Tire and Loading Information
placard on the driver's side
B-pillar (Y page 361).
Additional tire pressure values for different loads can also be found on the tire pressure
table on the inside of the fuel filler flap
(Y page 361).
X Make sure that the tire pressure is correct
on all four wheels.
X Make sure that the SmartKey is in position
2 in the ignition lock (Y page 157).
X Use 00E2 on the steering wheel to call up
the list of menus. Check
367Wheels and tires Z
Page 388 of 406
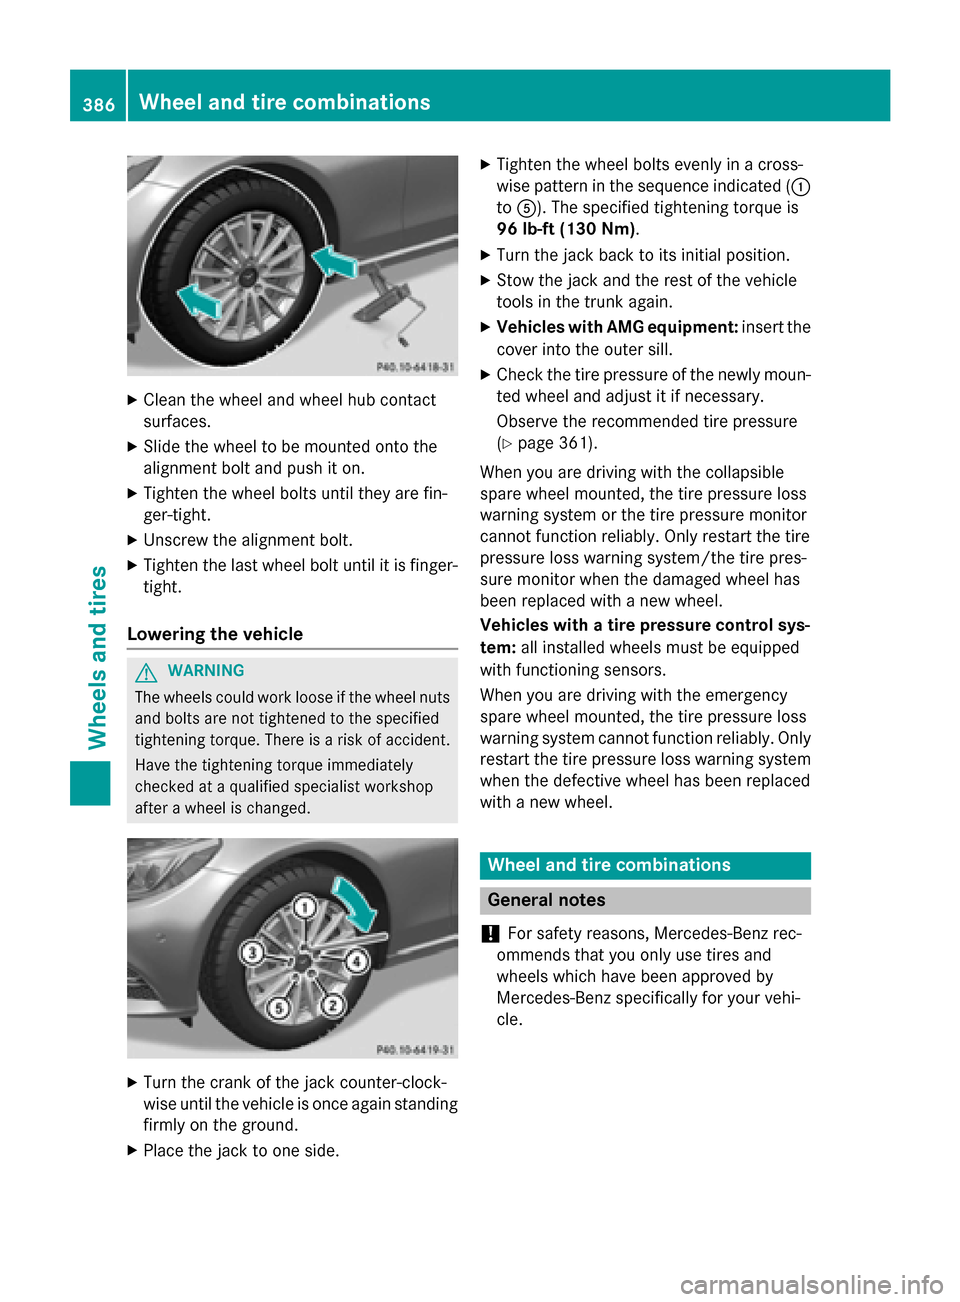
X
Clean the wheel and wheel hub contact
surfaces.
X Slide the wheel to be mounted onto the
alignment bolt and push it on.
X Tighten the wheel bolts until they are fin-
ger-tight.
X Unscrew the alignment bolt.
X Tighten the last wheel bolt until it is finger-
tight.
Lowering the vehicle G
WARNING
The wheels could work loose if the wheel nuts and bolts are not tightened to the specified
tightening torque. There is a risk of accident.
Have the tightening torque immediately
checked at a qualified specialist workshop
after a wheel is changed. X
Turn the crank of the jack counter-clock-
wise until the vehicle is once again standing
firmly on the ground.
X Place the jack to one side. X
Tighten the wheel bolts evenly in a cross-
wise pattern in the sequence indicated ( 0043
to 0083). The specified tightening torque is
96 lb-ft (130 Nm).
X Turn the jack back to its initial position.
X Stow the jack and the rest of the vehicle
tools in the trunk again.
X Vehicles with AMG equipment: insert the
cover into the outer sill.
X Check the tire pressure of the newly moun-
ted wheel and adjust it if necessary.
Observe the recommended tire pressure
(Y page 361).
When you are driving with the collapsible
spare wheel mounted, the tire pressure loss
warning system or the tire pressure monitor
cannot function reliably. Only restart the tire
pressure loss warning system/the tire pres-
sure monitor when the damaged wheel has
been replaced with a new wheel.
Vehicles with a tire pressure control sys-
tem: all installed wheels must be equipped
with functioning sensors.
When you are driving with the emergency
spare wheel mounted, the tire pressure loss
warning system cannot function reliably. Only restart the tire pressure loss warning system when the defective wheel has been replaced
with a new wheel. Wheel and tire combinations
General notes
! For safety reasons, Mercedes-Benz rec-
ommends that you only use tires and
wheels which have been approved by
Mercedes-Benz specifically for your vehi-
cle. 386
Wheel and tire combinationsWheels and ti
res