key MERCEDES-BENZ C-Class SEDAN 2016 W205 Comand Manual
[x] Cancel search | Manufacturer: MERCEDES-BENZ, Model Year: 2016, Model line: C-Class SEDAN, Model: MERCEDES-BENZ C-Class SEDAN 2016 W205Pages: 190, PDF Size: 6.21 MB
Page 61 of 190
Using an address
Calling up the address entry menu
XTo switch to navigation mode: press the
Ø button.
XTo show the menu: slide6the controller.
XTo select Destination: turn and press the
controller.
XSelect Address Entry.
Address entry options
Examples of how you can enter an address:
RCity/ZIP code, street, house number
RCity/ZIP code, street
RCity/ZIP code, center
RCity/ZIP code, street, intersection
RStreet, City/ZIP code, house number
RStreet, City/ZIP code, intersection
The address can be entered faster by entering
the street before the city if the address has an
unusual street name.
While entering an address, you can also switch
to other destination entry options:
RKeyword search (Ypage 61)
RMap (Ypage 66)
RPOI (Ypage 63)
Entering an address
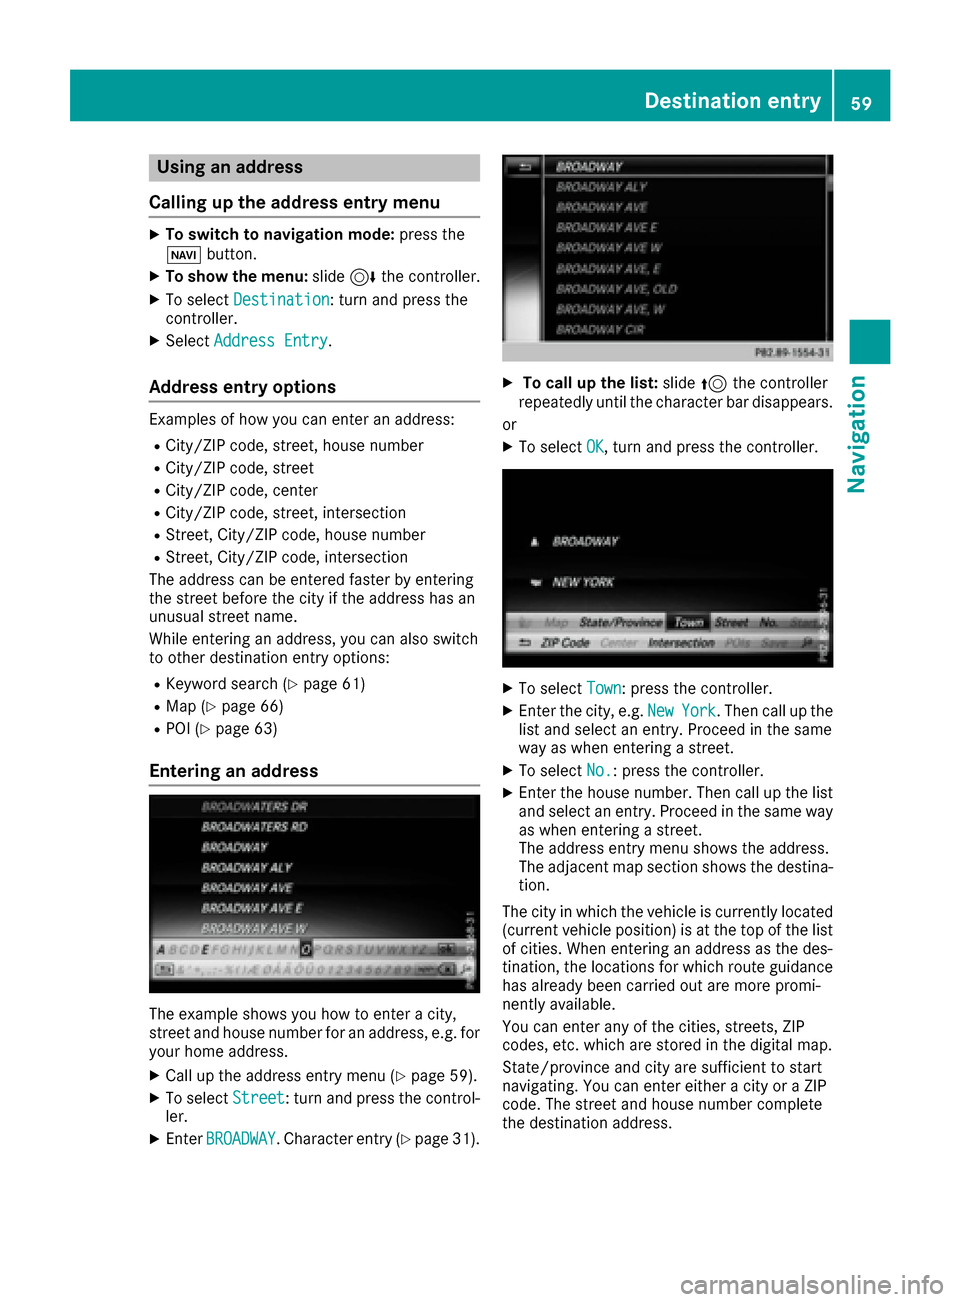
The example shows you how to enter a city,
street and house number for an address, e.g. for
your home address.
XCall up the address entry menu (Ypage 59).
XTo select Street: turn and press the control-
ler.
XEnter BROADWAY. Character entry (Ypage 31).
XTo call up the list: slide5the controller
repeatedly until the character bar disappears.
or
XTo select OK, turn and press the controller.
XTo selectTown: press the controller.
XEnter the city, e.g. NewYork. Then call up the
list and select an entry. Proceed in the same
way as when entering a street.
XTo select No.: press the controller.
XEnter the house number. Then call up the list
and select an entry. Proceed in the same way
as when entering a street.
The address entry menu shows the address.
The adjacent map section shows the destina-
tion.
The city in which the vehicle is currently located
(current vehicle position) is at the top of the list
of cities. When entering an address as the des-
tination, the locations for which route guidance
has already been carried out are more promi-
nently available.
You can enter any of the cities, streets, ZIP
codes, etc. which are stored in the digital map.
State/province and city are sufficient to start
navigating. You can enter either a city or a ZIP
code. The street and house number complete
the destination address.
Destination entry59
Navigation
Z
Page 63 of 190
iThe route is calculated using the digital map
data. The calculation time depends on the
distance from the destination, for example.
The calculated route may differ from the ideal
route, e.g. due to roadworks or incomplete
map data. Please also refer to the notes about the digital map (
Ypage 89).
XTo call up the keyword search: selectè
by sliding 6, turning and pressing the con-
troller in the address entry menu.
XTo view the vicinity of the destination: to
select :, turn and press the controller.
You can explore the destination area.
Requirement for exploring a destination
(USA): mbrace must be activated for Internet
access (
Ypage 125).
Requirement for exploring a destination (Can- ada): a mobile phone is connected to the mul-
timedia system via Bluetooth
®(Ypage 96)
or USB (Ypage 167).
Keyword search
Entering keywords
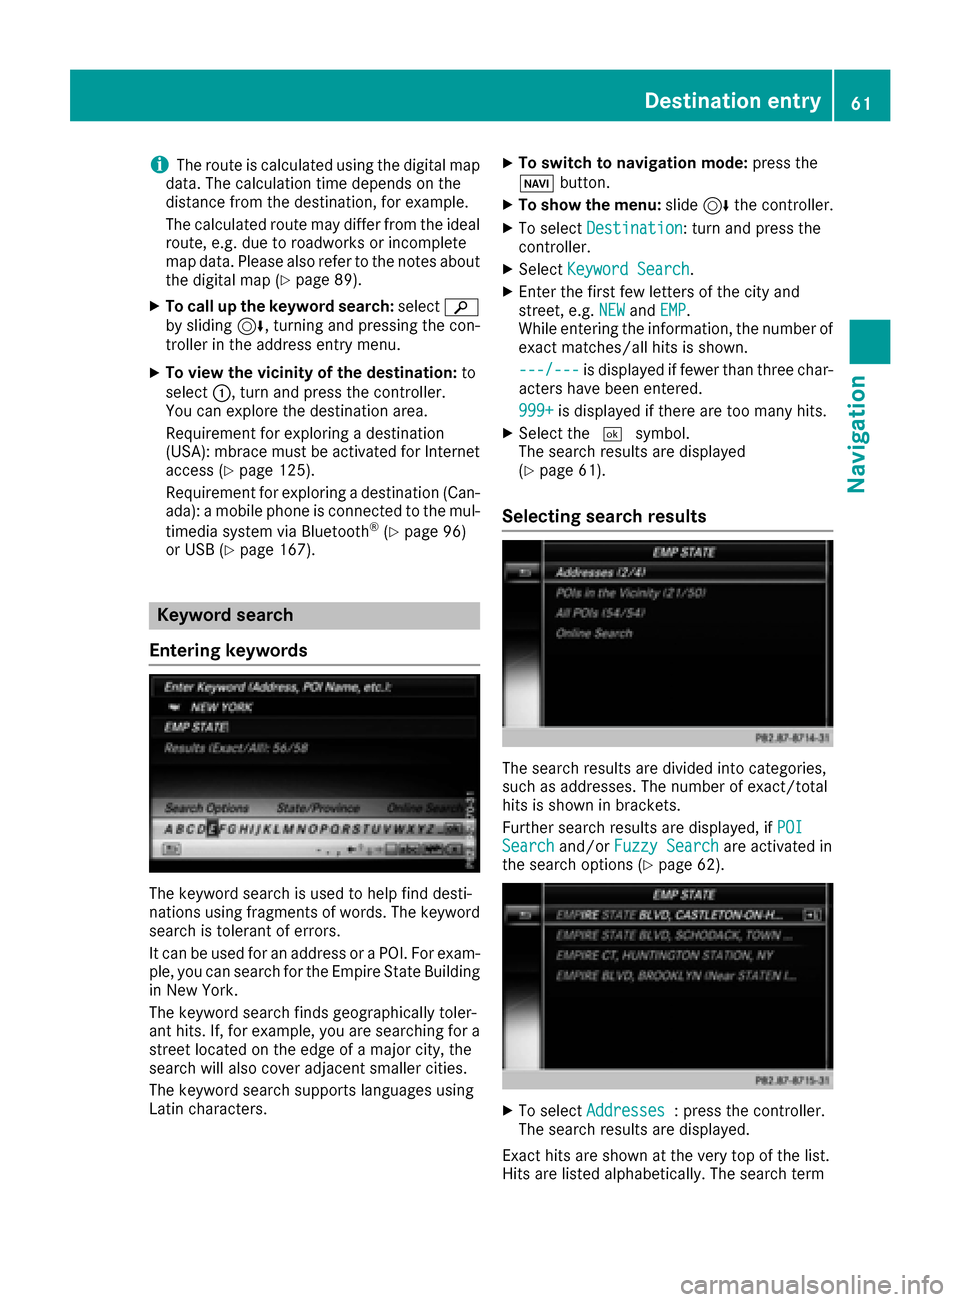
The keyword search is used to help find desti-
nations using fragments of words. The keyword
search is tolerant of errors.
It can be used for an address or a POI. For exam-
ple, you can search for the Empire State Building
in New York.
The keyword search finds geographically toler-
ant hits. If, for example, you are searching for a
street located on the edge of a major city, the
search will also cover adjacent smaller cities.
The keyword search supports languages using
Latin characters.
XTo switch to navigation mode: press the
Ø button.
XTo show the menu: slide6the controller.
XTo select Destination: turn and press the
controller.
XSelect Keyword Search.
XEnter the first few letters of the city and
street, e.g. NEWandEMP.
While entering the information, the number of
exact matches/all hits is shown.
---/---
is displayed if fewer than three char-
acters have been entered.
999+
is displayed if there are too many hits.
XSelect the ¬symbol.
The search results are displayed
(
Ypage 61).
Selecting search results
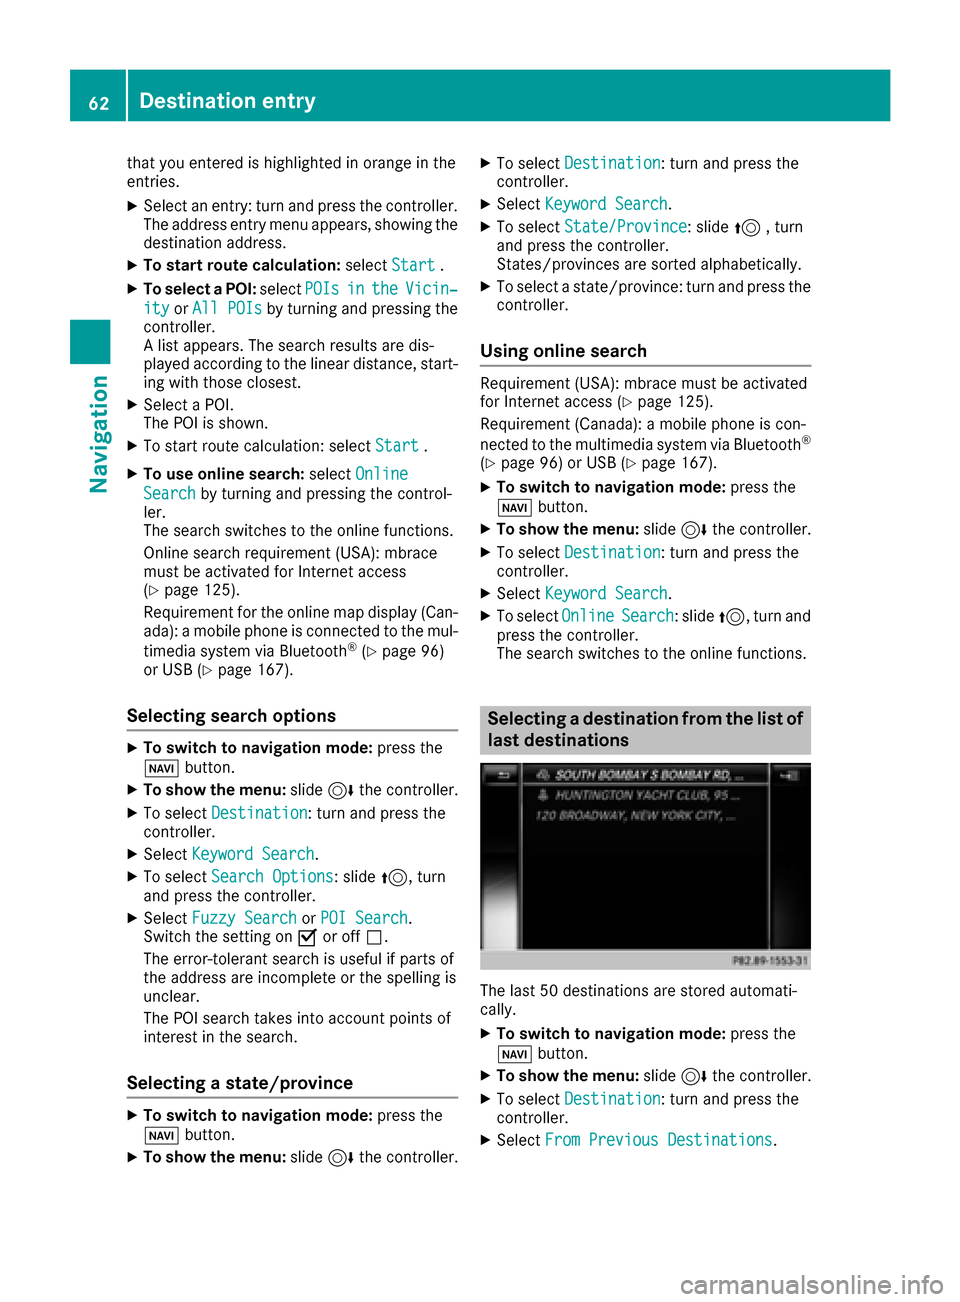
The search results are divided into categories,
such as addresses. The number of exact/total
hits is shown in brackets.
Further search results are displayed, if POI
Searchand/orFuzzy Searchare activated in
the search options (Ypage 62).
XTo select Addresses: press the controller.
The search results are displayed.
Exact hits are shown at the very top of the list.
Hits are listed alphabetically. The search term
Destination entry61
Navigation
Z
Page 64 of 190
that you entered is highlighted in orange in the
entries.
XSelect an entry: turn and press the controller.
The address entry menu appears, showing the
destination address.
XTo start route calculation:selectStart.
XTo select a POI: selectPOIsintheVicin‐
ityorAll POIsby turning and pressing the
controller.
A list appears. The search results are dis-
played according to the linear distance, start-
ing with those closest.
XSelect a POI.
The POI is shown.
XTo start route calculation: select Start.
XTo use online search:selectOnline
Searchby turning and pressing the control-
ler.
The search switches to the online functions.
Online search requirement (USA): mbrace
must be activated for Internet access
(
Ypage 125).
Requirement for the online map display (Can-
ada): a mobile phone is connected to the mul-
timedia system via Bluetooth
®(Ypage 96)
or USB (Ypage 167).
Selecting search options
XTo switch to navigation mode: press the
Ø button.
XTo show the menu: slide6the controller.
XTo select Destination: turn and press the
controller.
XSelect Keyword Search.
XTo select Search Options: slide5, turn
and press the controller.
XSelect Fuzzy SearchorPOI Search.
Switch the setting on Oor off ª.
The error-tolerant search is useful if parts of
the address are incomplete or the spelling is
unclear.
The POI search takes into account points of
interest in the search.
Selecting a state/province
XTo switch to navigation mode: press the
Ø button.
XTo show the menu: slide6the controller.
XTo select Destination: turn and press the
controller.
XSelect Keyword Search.
XTo select State/Province: slide5, turn
and press the controller.
States/provinces are sorted alphabetically.
XTo select a state/province: turn and press the
controller.
Using online search
Requirement (USA): mbrace must be activated
for Internet access (Ypage 125).
Requirement (Canada): a mobile phone is con-
nected to the multimedia system via Bluetooth
®
(Ypage 96) or USB (Ypage 167).
XTo switch to navigation mode: press the
Ø button.
XTo show the menu: slide6the controller.
XTo select Destination: turn and press the
controller.
XSelect Keyword Search.
XTo select OnlineSearch: slide5, turn and
press the controller.
The search switches to the online functions.
Selecting a destination from the list of
last destinations
The last 50 destinations are stored automati-
cally.
XTo switch to navigation mode: press the
Ø button.
XTo show the menu: slide6the controller.
XTo select Destination: turn and press the
controller.
XSelect From Previous Destinations.
62Destina tion entry
Navigation
Page 69 of 190
XTo switch to navigation mode:press the
Ø button.
XTo show the menu: slide6the controller.
XTo select Destination: turn and press the
controller.
XSelect Intermediate Destinations.
The destination is entered in the intermediate
destinations menu.
XTo select Add New:: press the controller.
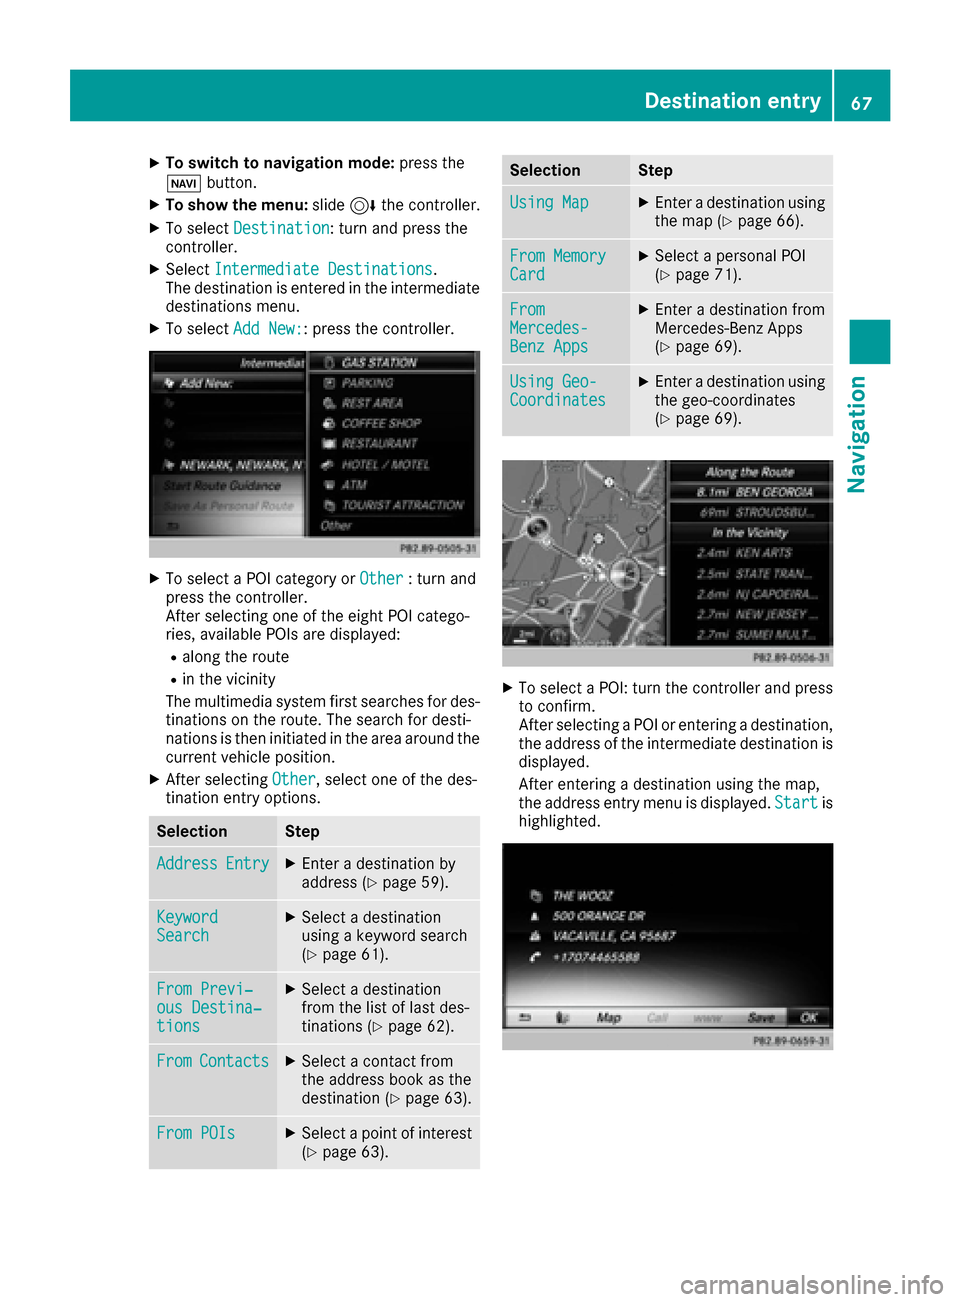
XTo select a POI category or Other: turn and
press the controller.
After selecting one of the eight POI catego-
ries, available POIs are displayed:
Ralong the route
Rin the vicinity
The multimedia system first searches for des-
tinations on the route. The search for desti-
nations is then initiated in the area around the
current vehicle position.
XAfter selecting Other, select one of the des-
tination entry options.
SelectionStep
AddressEntryXEnter a destination by
address (Ypage 59).
KeywordSearchXSelect a destination
using a keyword search
(
Ypage 61).
From Previ‐ous Destina‐tions
XSelect a destination
from the list of last des-
tinations (
Ypage 62).
FromContactsXSelect a contact from
the address book as the
destination (
Ypage 63).
From POIsXSelect a point of interest (Ypage 63).
SelectionStep
Using MapXEnter a destination using
the map (Ypage 66).
From MemoryCardXSelect a personal POI
(Ypage 71).
FromMercedes-Benz Apps
XEnter a destination from
Mercedes-Benz Apps
(
Ypage 69).
Using Geo-CoordinatesXEnter a destination using
the geo-coordinates
(
Ypage 69).
XTo select a POI: turn the controller and pressto confirm.
After selecting a POI or entering a destination,
the address of the intermediate destination is
displayed.
After entering a destination using the map,
the address entry menu is displayed. Start
is
highlighted.
Destination entry67
Navigation
Z
Page 99 of 190
On the mobile phone
XSwitch on the mobile phone and enter the PIN
when prompted to do so (see the manufac-
turer's operating instructions).
XActivate Bluetooth®and, if necessary, Blue-
tooth®visibility for other devices (see the
manufacturer's operating instructions).
This visibility is for restricted periods of time
on some mobile phones (see the manufactur-
er's operating instructions).
XSet the Bluetooth®device name for the
mobile phone if necessary.
The Bluetooth
®device names for all of one man-
ufacturer's products might be identical. To
make it possible to clearly identify your mobile
phone, change the device name (see the man-
ufacturer's operating instructions). The name
can be freely selected.
If the mobile phone supports the PBAP (Phone
Book Access Profile) and MAP (M essage
Access Profile) Bluetooth
®profiles, the follow-
ing information will be transmitted after you
connect:
RPhone book
RCall lists
RMessages
Further information on allowing or suppressing
the automatic download of the phone book
(
Ypage 112).
The battery of the mobile phone should always
be kept sufficiently charged in order to prevent
malfunctions.
iNot all mobile phones available on the mar-
ket are equally suitable. You can obtain more
detailed information about suitable mobile
phones and about the connection between
the mobile phone and the multimedia system
on the Internet at
http://www.mercedes-benz-mobile.com .
You can also obtain more information by call-
ing.
In the USA, you can get in touch with the
Mercedes-Benz Customer Assistance Center
on 1-800-FOR-MERCedes (1-800-367-6372).
In Canada, you can get in touch with the Cus-
tomer Relations Center on 1-800-387-0100.
iSome displays (e.g. the signal strength)
depend on the supported version of the
Hands-Free Profile.
Procedure and general information
Searching for and authorizing (connecting)
a mobile phone
Before using your mobile phone with the multi-
media system for the first time, you will need to search for the phone (
Ypage 98) and then
authorize it (Ypage 98). Depending on the
mobile phone, authorization either takes place
by means of Secure Simple Pairing or by enter-
ing a passkey. The multimedia system automat-
ically makes the procedure that is relevant for
your mobile phone available. You can recognize
Secure Simple Pairing by the fact that a code is
displayed on the mobile phone and on the mul-
timedia system. You can recognize the passkey
system by the fact that you have to enter a code
on the mobile phone and on the multimedia sys-
tem. The mobile phone is always connected
automatically after authorization.
If the multimedia system does not detect your
mobile phone, this may be due to particular
security settings on your mobile phone. You can
also start the search procedure and authoriza-
tion on the mobile phone (
Ypage 99).
Device-specific information on authorizing and
connecting Bluetooth
®-capable mobile phones
can be found on the Internet at http://
www.mercedes-benz.com/connect .
You can authorize up to 15 mobile phones. After authorization, the connection of the last two tel-
ephones used always functions automatically.
Only one mobile phone can be connected to the
multimedia system at any one time.
De-authorizing (disconnecting) a mobile
phone
The connection is terminated automatically if
you leave the receiver range of the multimedia
system or deactivate Bluetooth
®on your mobile
phone.
If you no longer want the Bluetooth
®connection
to be established automatically, the mobile
phone must be de-authorized (disconnected)
(
Ypage 100).
Connecting/disconnecting a mobile phone97
Telephone
Z
Page 100 of 190
Searching for a mobile phone
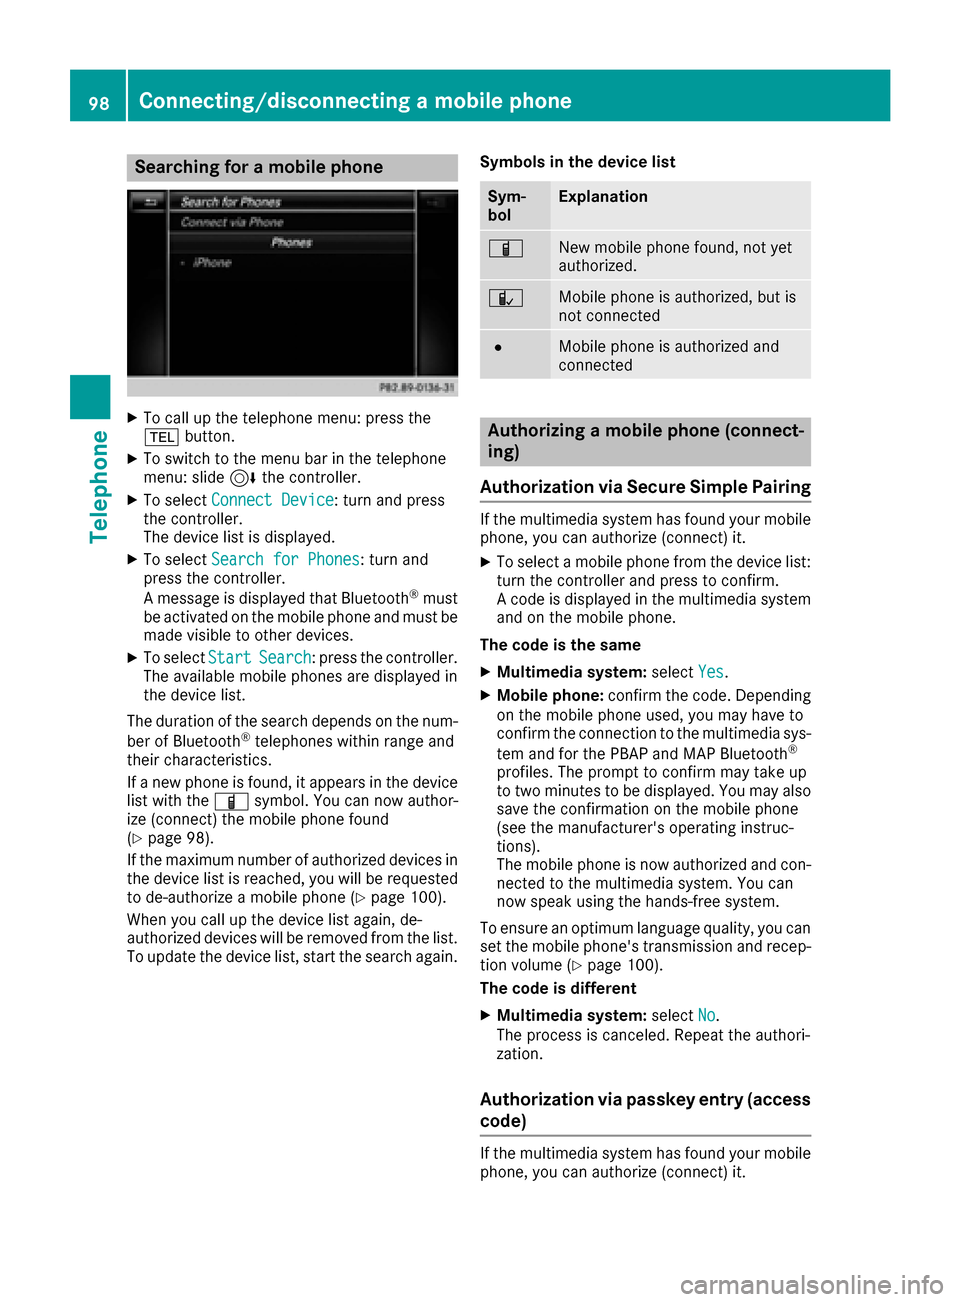
XTo call up the telephone menu: press the
%button.
XTo switch to the menu bar in the telephone
menu: slide 6the controller.
XTo select Connect Device: turn and press
the controller.
The device list is displayed.
XTo select Search for Phones: turn and
press the controller.
A message is displayed that Bluetooth
®must
be activated on the mobile phone and must be
made visible to other devices.
XTo select StartSearch: press the controller.
The available mobile phones are displayed in
the device list.
The duration of the search depends on the num-
ber of Bluetooth
®telephones within range and
their characteristics.
If a new phone is found, it appears in the device list with the Ïsymbol. You can now author-
ize (connect) the mobile phone found
(
Ypage 98).
If the maximum number of authorized devices in
the device list is reached, you will be requested
to de-authorize a mobile phone (
Ypage 100).
When you call up the device list again, de-
authorized devices will be removed from the list.
To update the device list, start the search again. Symbols in the device list
Sym-
bolExplanation
ÏNew mobile phone found, not yet
authorized.
ÑMobile phone is authorized, but is
not connected
#Mobile phone is authorized and
connected
Authorizing a mobile phone (connect-
ing)
Authorization via Secure Simple Pairing
If the multimedia system has found your mobile
phone, you can authorize (connect) it.
XTo select a mobile phone from the device list: turn the controller and press to confirm.
A code is displayed in the multimedia system
and on the mobile phone.
The code is the same
XMultimedia system: selectYes.
XMobile phone: confirm the code. Depending
on the mobile phone used, you may have to
confirm the connection to the multimedia sys-
tem and for the PBAP and MAP Bluetooth
®
profiles. The prompt to confirm may take up
to two minutes to be displayed. You may also
save the confirmation on the mobile phone
(see the manufacturer's operating instruc-
tions).
The mobile phone is now authorized and con-
nected to the multimedia system. You can
now speak using the hands-free system.
To ensure an optimum language quality, you can
set the mobile phone's transmission and recep-
tion volume (
Ypage 100).
The code is different
XMultimedia system: selectNo.
The process is canceled. Repeat the authori-
zation.
Authorization via passkey entry (access
code)
If the multimedia system has found your mobile
phone, you can authorize (connect) it.
98Connecting/disconnecting a mobile phone
Telephone
Page 101 of 190
XTo select the Bluetooth®name of the desired
mobile phone in the device list: turn and press
the controller.
The input menu for the passkey is displayed.
The passkey is a one- to sixteen-digit number
combination which you can choose yourself.
XMultimedia system: enter the passkey using
the character bar.
XSelect ¬once all the numbers have been
entered.
XMobile phone: enter the same passkey and
confirm your entry. Depending on the mobile
phone used, you may have to confirm the
connection to the multimedia system and for
the PBAP and MAP Bluetooth
®profiles. The
prompt to confirm may take up to two
minutes to be displayed. You may also save
the confirmation on the mobile phone (see the
manufacturer's operating instructions).
The mobile phone is now authorized and con-
nected to the multimedia system. You can
now speak using the hands-free system.
To ensure an optimum language quality, you can
set the mobile phone's transmission and recep-
tion volume (
Ypage 100).
If the Authorization Failed
message
appears, you may have entered a different pass-
key or exceeded the prescribed time limit.
Repeat the procedure.
iSome mobile phones require a passkey with
four or more digits.
iIf you wish to re-authorize the mobile phone
after de-authorizing it, you can choose
another passkey for it.
Establishing the connection from the
mobile phone
The Bluetooth®device name of the multimedia
system is MB Bluetooth.
XMultimedia system: call up the telephone
menu.
XTo switch to the menu bar: slide 6the con-
troller.
XTo select Connect Device: turn and press
the controller.
The device list is displayed.
XTo select Connect via Phone: turn and
press the controller.
A message is displayed, stating that you can
start the search on your mobile phone.
XMobile phone: start the search for a Blue-
tooth®device (see manufacturer's operating
instructions).
The multimedia system is displayed with the
name MB Bluetooth
in the mobile phone's
device list.
XSelect MB Bluetooth.
A prompt appears in the multimedia system's
display asking if the mobile phone should be
authorized.
XMultimedia system: selectYes.
If No
is selected, the procedure is canceled.
If your mobile phone supports Secure Simple
Pairing, a code is now displayed on both devi-
ces.
The code is the same
XMultimedia system: selectYes.
XMobile phone: confirm the code. Depending
on the mobile phone used, you may have to
confirm the connection to the multimedia sys-
tem and for the PBAP and MAP Bluetooth
®
profiles. The prompt to confirm may take up
to two minutes to be displayed. You may also
save the confirmation on the mobile phone
(see the manufacturer's operating instruc-
tions).
The mobile phone is now authorized and con-
nected to the multimedia system. You can
now speak using the hands-free system.
To ensure an optimum language quality, you can
set the mobile phone's transmission and recep-
tion volume (
Ypage 100).
The code is different
XMultimedia system: selectNo.
The process is canceled. Repeat the proce-
dure.
If your mobile phone does not support Secure
Simple Pairing, an input menu is displayed for
the passkey. The passkey is a one- to sixteen-
digit number combination which you can choose
yourself. Enter the same passkey in both the
multimedia system and on the mobile phone and
confirm. Depending on the mobile phone used,
you may have to confirm the connection to the
multimedia system and for the PBAP and MAP
Bluetooth
®profiles.
Connecting/disconnecting a mobile phone99
Telephone
Z
Page 138 of 190
XCallupInternet functions (Ypage 129).
XTo select www: turn and press the controller.
An input menu for the web addressis dis-
played.
XEnter characters using the controller or the
number keypad.
XTo finish entry and call up a website: select
¬.
Selecting a web address fr omthe list
XWhen the character bar is displayed,slide
5 the controller.
XTo select the desired web address: turn and
press the controller.
The web address can still be changed as
desired.
XTo call up a website: select ¬.
The website iscalled up.
Navigating the website
StepResult
XTurn the controller.Navigates from one
select ableitem (e.g.
lin k, text field or
menu) to the next and
highlights the respec-
tive element on the
website.
Slid ing the controller:
XLeft or right 1
XUp ordown4
XDiagonally 2
Moves thepointer on
the page.
XPress the control-
ler.Opens the selected
item.
XPress %.Callsup the menu.
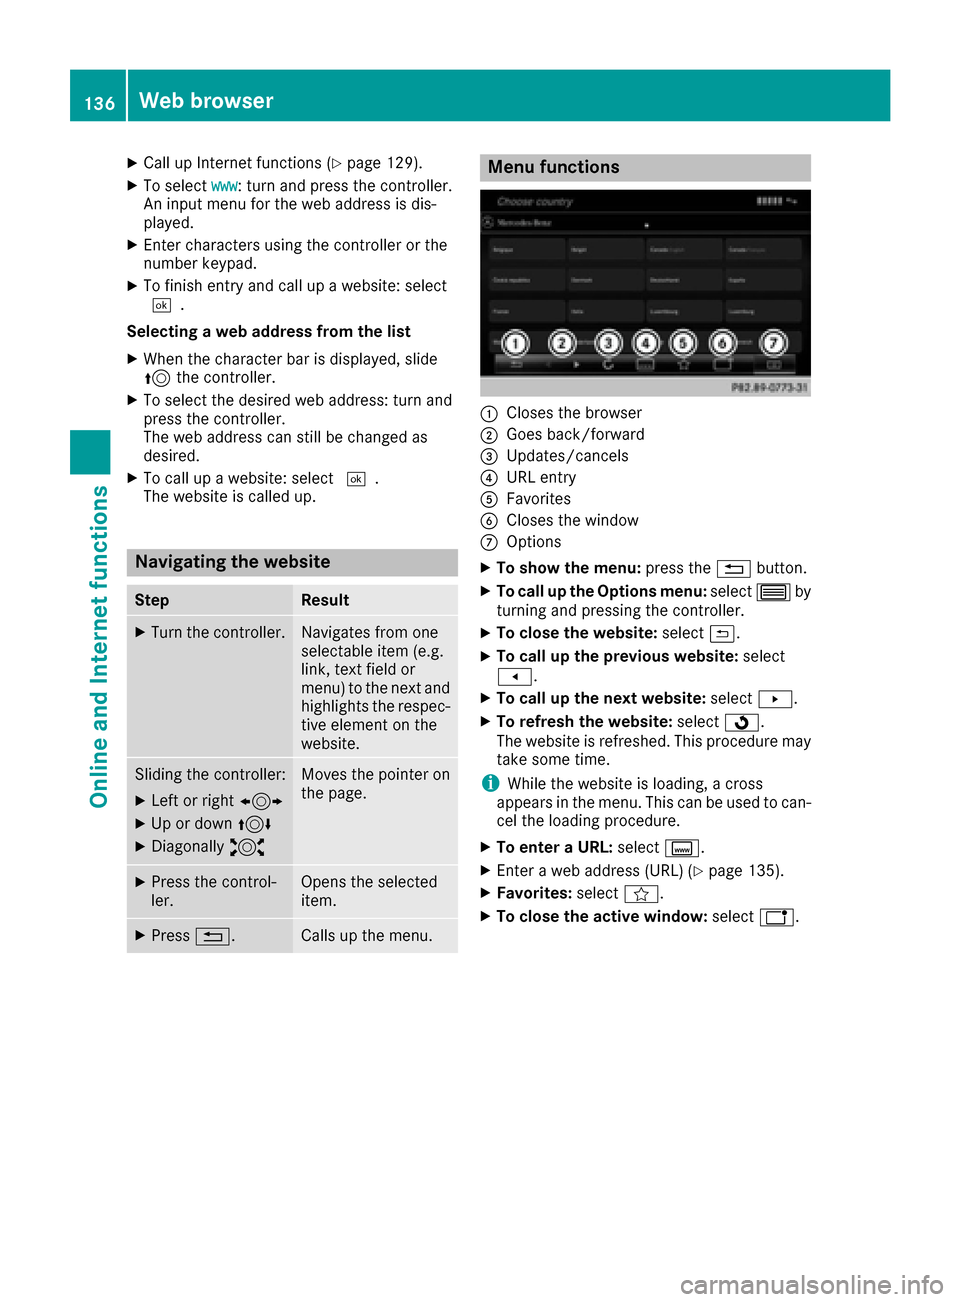
Menu functions
:Closes the browser
;Goes back /forward
=Updates/cancels
?URL entry
AFavorites
BCloses the window
COptions
XTo show the menu: press the%button.
XTo call up the Opt ionsmenu: select3by
turning and pressing the controller.
XTo close the website: select&.
XTo call up the previous website: select
t.
XTo call up the next website: selectu.
XTo refresh the website: selectÎ.
The website is refreshed. This procedure may
take some time.
iWhile the website isloading, a cross
appears in the menu. This can beused to can-
cel the loading procedure.
XTo enter a URL:select g.
XEnter a web address (URL) (Ypage 135).
XFavorites: selectf.
XTo close the active window: selecth.
136Web browser
Online and Internet functions
Page 147 of 190
iYou can also have the satellite service acti-
vated online. To do this, visit
http://www.siriusxm.com (USA) or
http://www.siriusxm.ca (Canada).
iIf registration is not included when purchas-
ing the system, your credit card details will be
required to activate your account.
If the satellite receiver is not installed correctly,
the Device
Unavailablemessage will appear.
Switching to satellite radio
XTo show the main function bar: slide 5the
controller.
XTo select Radio: turn and press the controller.
The radio display appears. You will hear the
last station played on the last waveband
selected.
XTo select Radioin radio mode: slide 5and
press the controller.
The menu with the available radio modes
appears.
XTo select SatRadio: turn and press the con-
troller.
The No
Servicemessage appears if there is no
signal.
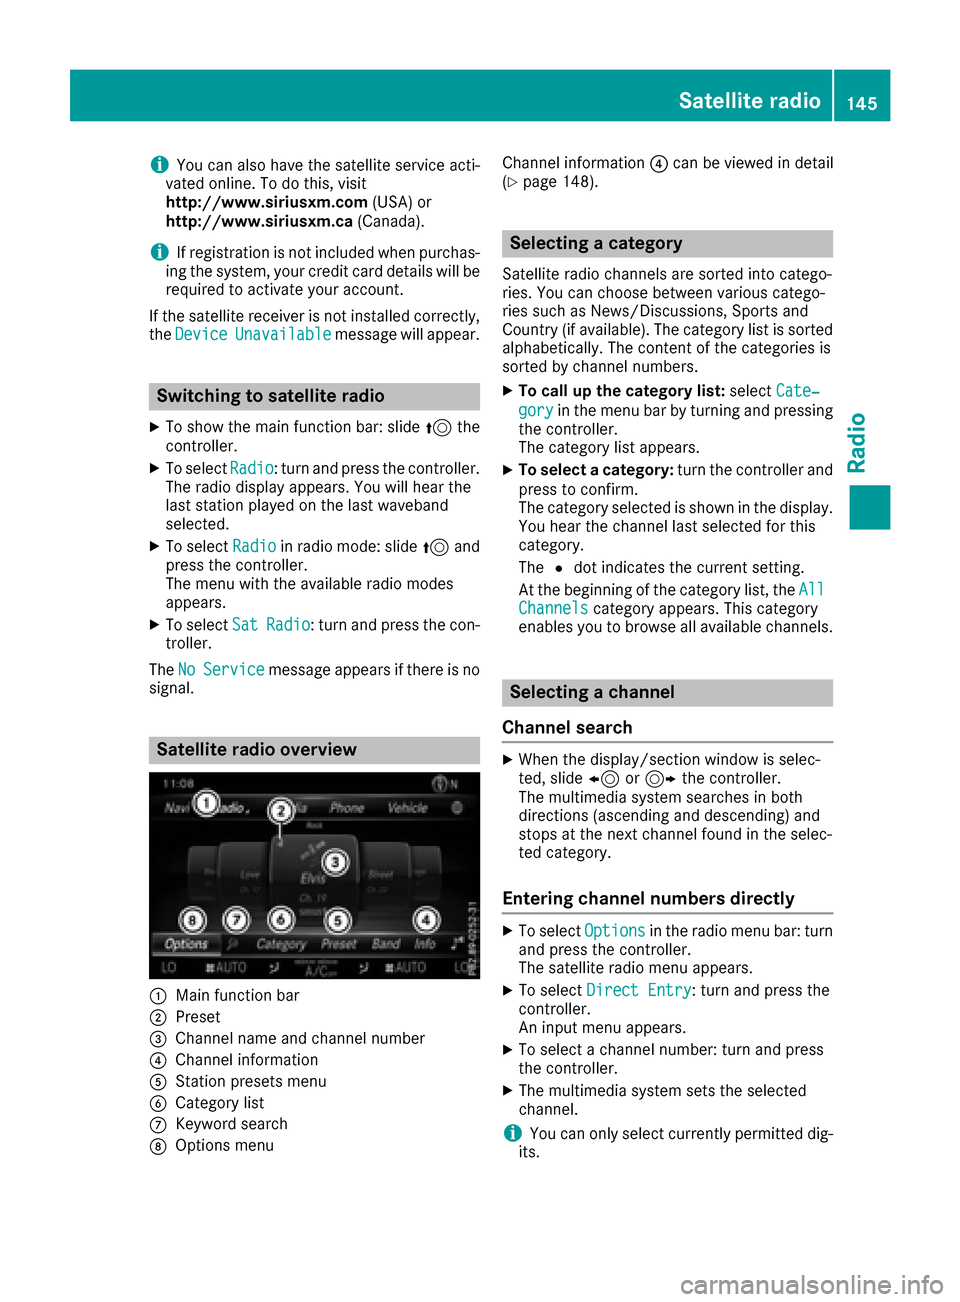
Satellite radio overview
:Main function bar
;Preset
=Channel name and channel number
?Channel information
AStation presets menu
BCategory list
CKeyword search
DOptions menu Channel information
?can be viewed in detail
(
Ypage 148).
Selecting a category
Satellite radio channels are sorted into catego-
ries. You can choose between various catego-
ries such as News/Discussions, Sports and
Country (if available). The category list is sorted alphabetically. The content of the categories is
sorted by channel numbers.
XTo call up the category list: selectCate‐
goryin the menu bar by turning and pressing
the controller.
The category list appears.
XTo select a category: turn the controller and
press to confirm.
The category selected is shown in the display.
You hear the channel last selected for this
category.
The #dot indicates the current setting.
At the beginning of the category list, the All
Channelscategory appears. This category
enables you to browse all available channels.
Selecting a channel
Channel search
XWhen the display/section window is selec-
ted, slide 8or9 the controller.
The multimedia system searches in both
directions (ascending and descending) and
stops at the next channel found in the selec-
ted category.
Entering channel numbers directly
XTo select Optionsin the radio menu bar: turn
and press the controller.
The satellite radio menu appears.
XTo select Direct Entry: turn and press the
controller.
An input menu appears.
XTo select a channel number: turn and press
the controller.
XThe multimedia system sets the selected
channel.
iYou can only select currently permitted dig-
its.
Satellite radio145
Radio
Page 148 of 190
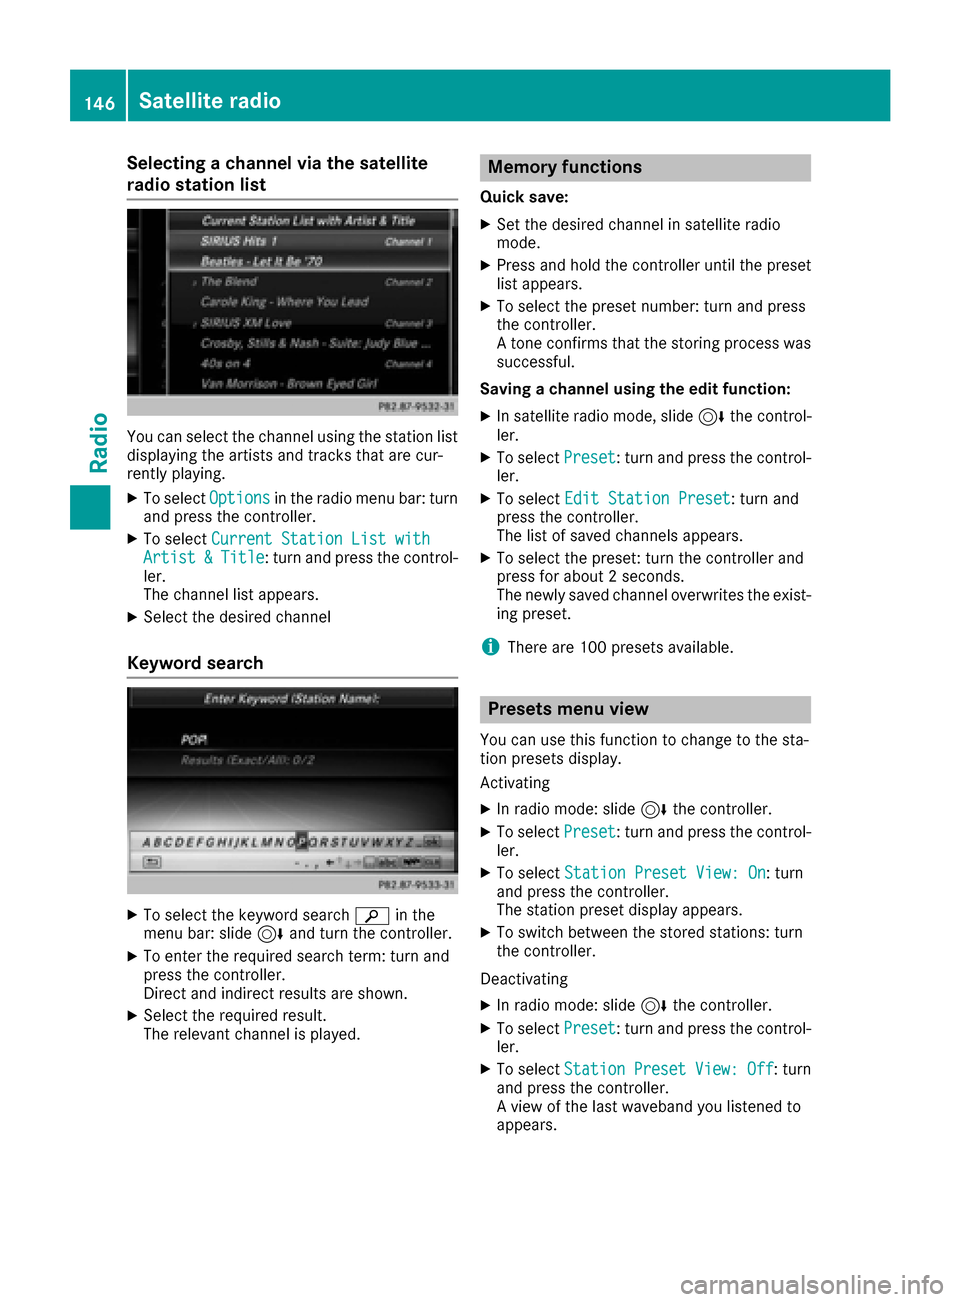
Selecting a channel via the satellite
radio station list
You can select the channel using the station list
displaying the artists and tracks that are cur-
rently playing.
XTo selectOptionsin the radio menu bar: turn
and press the controller.
XTo select Current Station List withArtist&Title: turn and press the control-
ler.
The channel list appears.
XSelect the desired channel
Keyword search
XTo select the keyword search èin the
menu bar: slide 6and turn the controller.
XTo enter the required search term: turn and
press the controller.
Direct and indirect results are shown.
XSelect the required result.
The relevant channel is played.
Memory functions
Quick save:
XSet the desired channel in satellite radio
mode.
XPress and hold the controller until the preset
list appears.
XTo select the preset number: turn and press
the controller.
A tone confirms that the storing process was
successful.
Saving a channel using the edit function:
XIn satellite radio mode, slide 6the control-
ler.
XTo select Preset: turn and press the control-
ler.
XTo select Edit Station Preset: turn and
press the controller.
The list of saved channels appears.
XTo select the preset: turn the controller and
press for about 2 seconds.
The newly saved channel overwrites the exist-
ing preset.
iThere are 100 presets available.
Presets menu view
You can use this function to change to the sta-
tion presets display.
Activating
XIn radio mode: slide 6the controller.
XTo select Preset: turn and press the control-
ler.
XTo select Station Preset View: On: turn
and press the controller.
The station preset display appears.
XTo switch between the stored stations: turn
the controller.
Deactivating
XIn radio mode: slide 6the controller.
XTo select Preset: turn and press the control-
ler.
XTo select StationPresetView:Off: turn
and press the controller.
A view of the last waveband you listened to
appears.
146Satellite radio
Radio