Manual MERCEDES-BENZ C-Class SEDAN 2016 W205 Owner's Guide
[x] Cancel search | Manufacturer: MERCEDES-BENZ, Model Year: 2016, Model line: C-Class SEDAN, Model: MERCEDES-BENZ C-Class SEDAN 2016 W205Pages: 398, PDF Size: 9.57 MB
Page 40 of 398
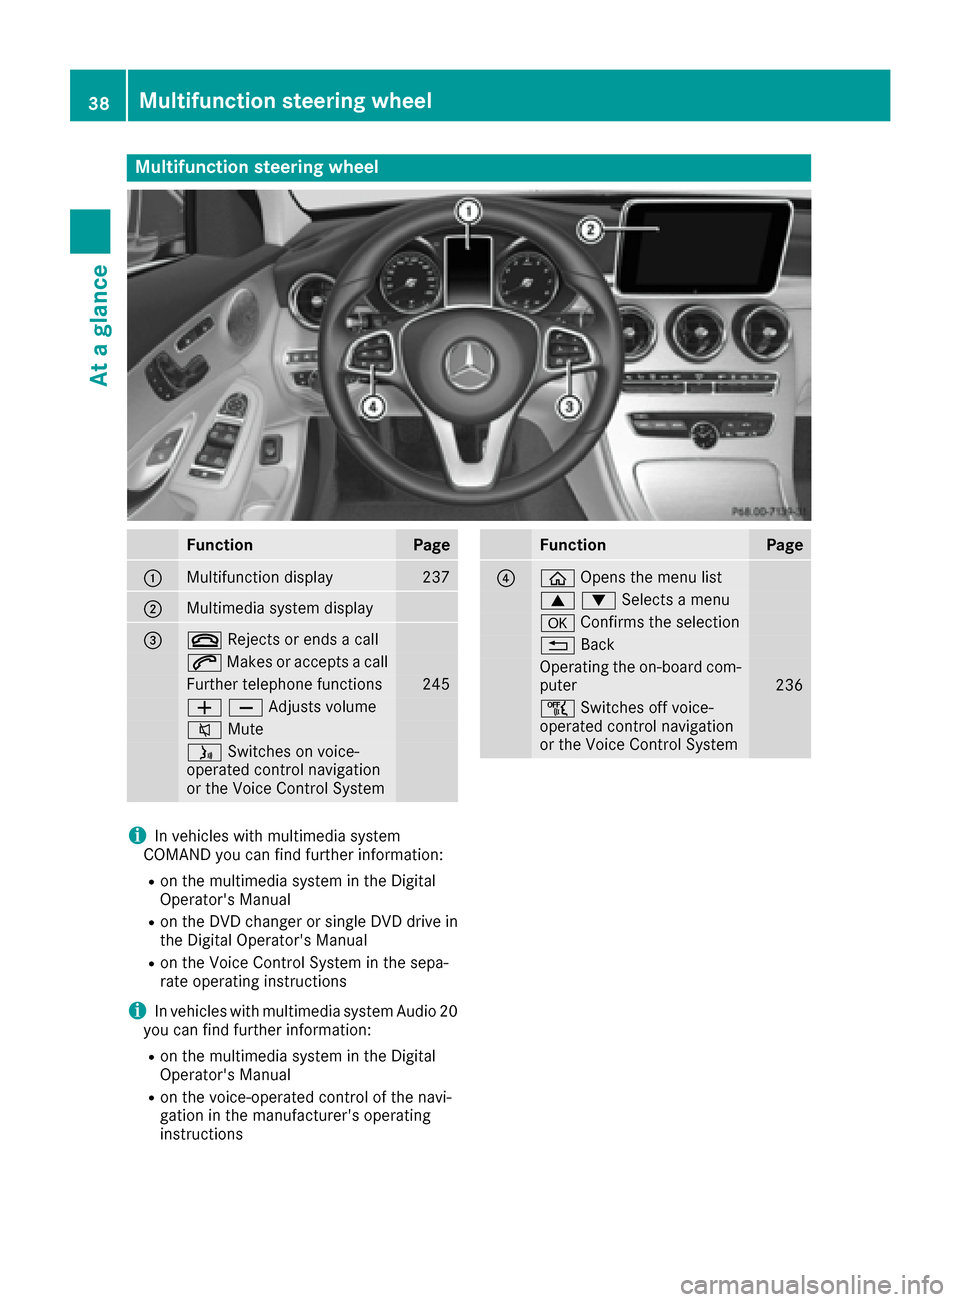
Multifunction steering wheel
FunctionPage
:Multifunction display237
;Multimedia system display
=~Rejects or ends a call
6Makes or accepts a call
Further telephone functions245
WXAdjusts volume
8 Mute
óSwitches on voice-
operated control navigation
or the Voice Control System
FunctionPage
?ò Opens the menu list
9:Selects a menu
aConfirms the selection
%Back
Operating the on-board com-
puter236
ñSwitches off voice-
operated control navigation
or the Voice Control System
iIn vehicles with multimedia system
COMAND you can find further information:
Ron the multimedia system in the Digital
Operator's Manual
Ron the DVD changer or single DVD drive in
the Digital Operator's Manual
Ron the Voice Control System in the sepa-
rate operating instructions
iIn vehicles with multimedia system Audio 20
you can find further information:
Ron the multimedia system in the Digital
Operator's Manual
Ron the voice-operated control of the navi-
gation in the manufacturer's operating
instructions
38Multifunction steering wheel
At a glance
Page 43 of 398
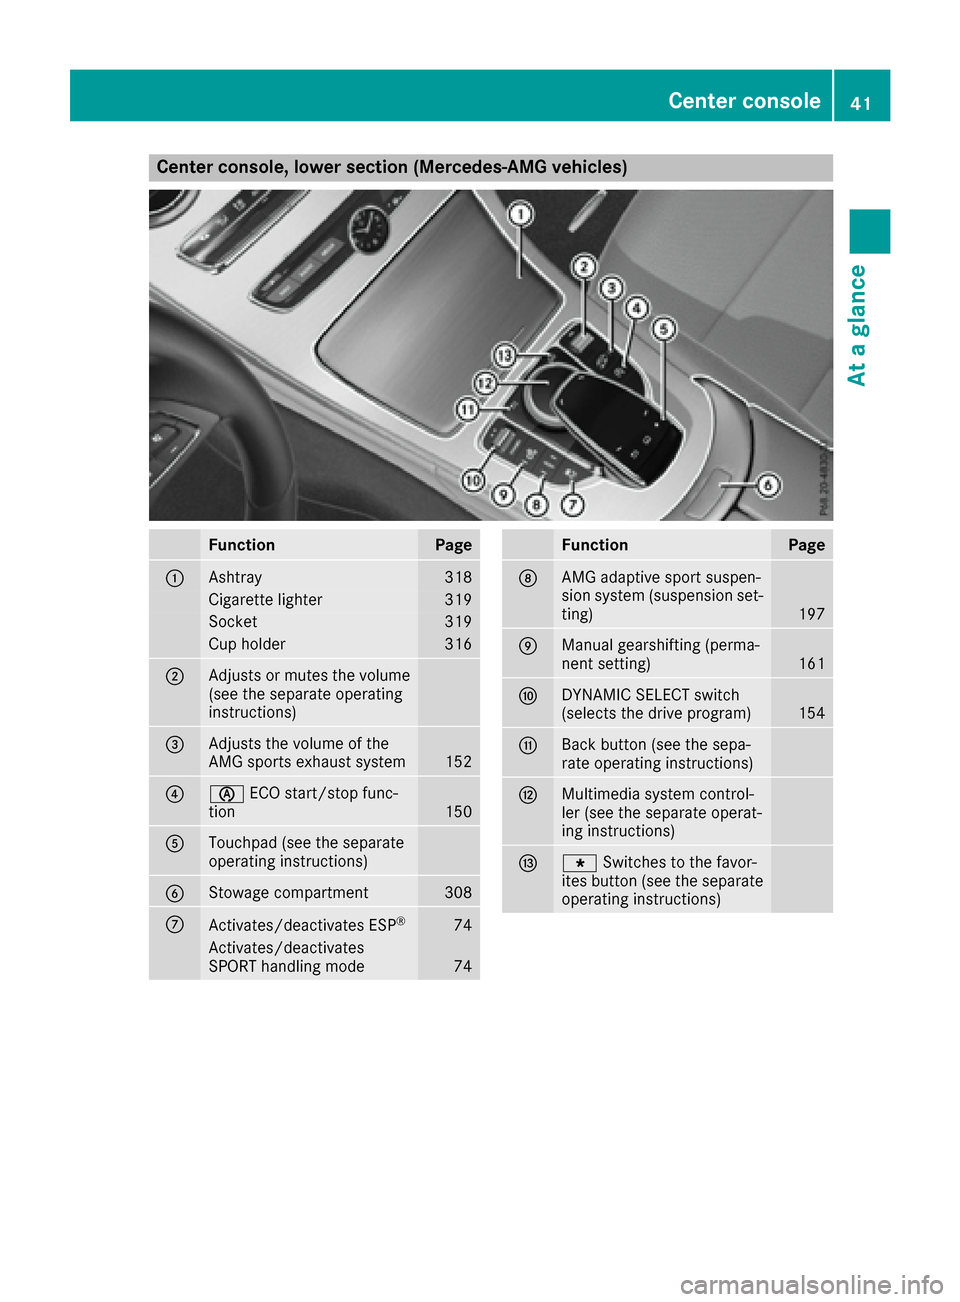
Center console, lower section (Mercedes-AMG vehicles)
FunctionPage
:Ashtray318
Cigarette lighter319
Socket319
Cup holder316
;Adjusts or mutes the volume
(see the separate operating
instructions)
=Adjusts the volume of the
AMG sports exhaust system152
?èECO start/stop func-
tion150
ATouchpad (see the separate
operating instructions)
BStowage compartment308
CActivates/deactivates ESP®74
Activates/deactivates
SPORT handling mode74
FunctionPage
DAMG adaptive sport suspen-
sion system (suspension set-
ting)
197
EManual gearshifting (perma-
nent setting)161
FDYNAMIC SELECT switch
(selects the drive program)154
GBack button (see the sepa-
rate operating instructions)
HMultimedia system control-
ler (see the separate operat-
ing instructions)
Ig Switches to the favor-
ites button (see the separate
operating instructions)
Center console41
At a glance
Page 46 of 398
Hybrid vehicles
General notes
Hybrid technology combines a fuel efficient
internal combustion engine with a powerful
electric motor.
Important safety notes
Danger of electric shock
GDANGER
The vehicle's high-voltage electrical system is under high voltage. If you modify components
in the vehicle's high-voltage electrical system
or touch damaged components, you may be
electrocuted. The components in the vehi-
cle's high-voltage electrical system may be
damaged in an accident, although the damage
is not visible. There is a risk of fatal injury.
Following an accident, do not touch any high-
voltage components and never modify the
vehicle's high-voltage electrical system. Have
the vehicle towed away after an accident and
the vehicle's high-voltage electrical system
checked by a qualified specialist workshop.
When towing a vehicle after an accident, be sure
to observe the following sections:
RTransporting the vehicle (Ypage 356)
RTowing the vehicle with the rear axle raised
(Ypage 355)
RTowing a vehicle with both axles on the
ground (Ypage 356)
Read the safety instructions on towing and tow-
starting (
Ypage 354).
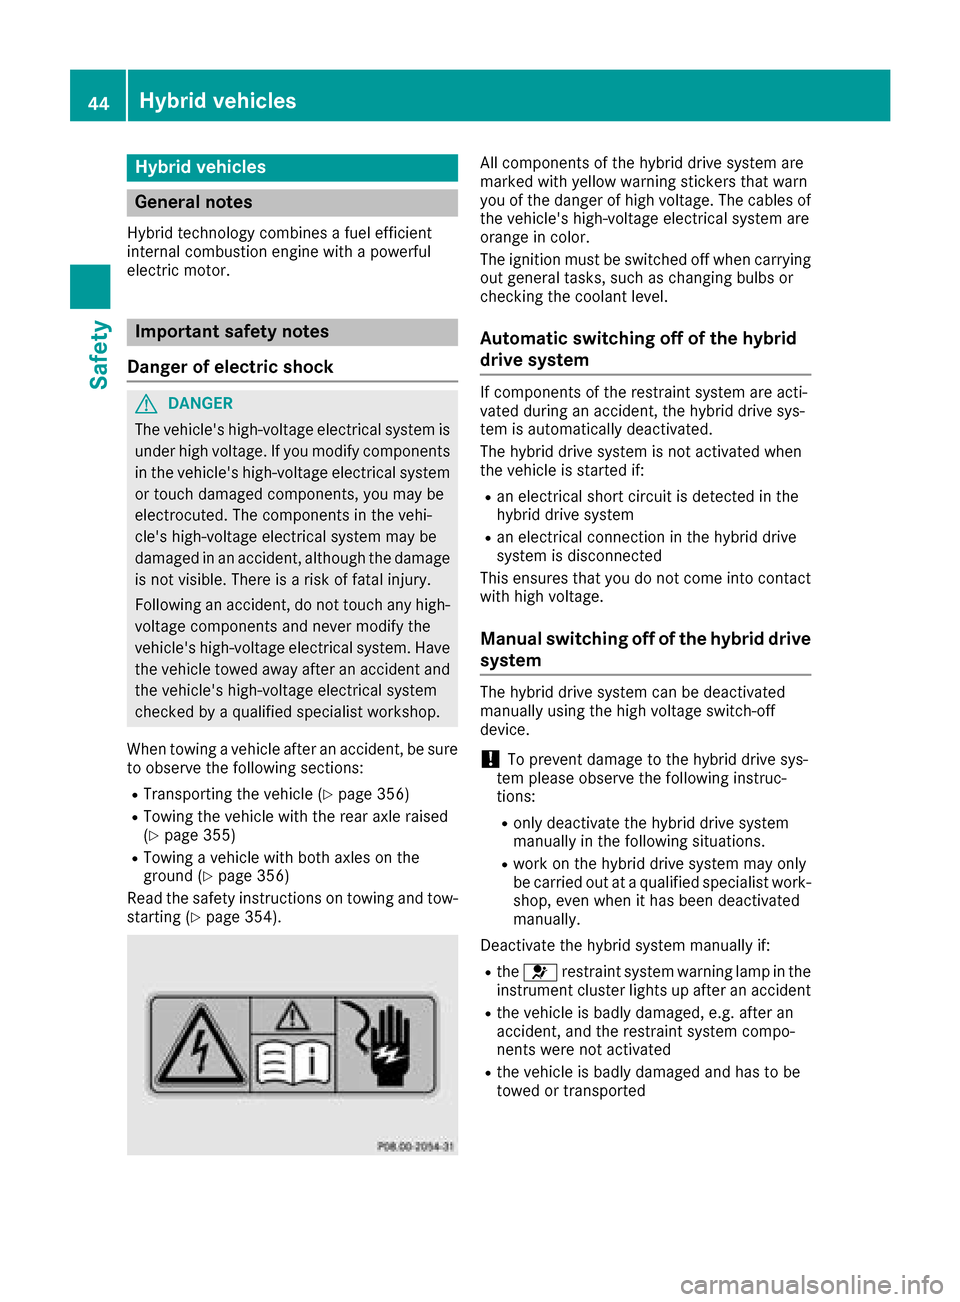
All components of the hybrid drive system are
marked with yellow warning stickers that warn
you of the danger of high voltage. The cables of
the vehicle's high-voltage electrical system are
orange in color.
The ignition must be switched off when carrying
out general tasks, such as changing bulbs or
checking the coolant level.
Automatic switching off of the hybrid
drive system
If components of the restraint system are acti-
vated during an accident, the hybrid drive sys-
tem is automatically deactivated.
The hybrid drive system is not activated when
the vehicle is started if:
Ran electrical short circuit is detected in the
hybrid drive system
Ran electrical connection in the hybrid drive
system is disconnected
This ensures that you do not come into contact
with high voltage.
Manual switching off of the hybrid drive
system
The hybrid drive system can be deactivated
manually using the high voltage switch-off
device.
!To prevent damage to the hybrid drive sys-
tem please observe the following instruc-
tions:
Ronly deactivate the hybrid drive system
manually in the following situations.
Rwork on the hybrid drive system may only
be carried out at a qualified specialist work-
shop, even when it has been deactivated
manually.
Deactivate the hybrid system manually if:
Rthe 6 restraint system warning lamp in the
instrument cluster lights up after an accident
Rthe vehicle is badly damaged, e.g. after an
accident, and the restraint system compo-
nents were not activated
Rthe vehicle is badly damaged and has to be
towed or transported
44Hybrid vehicles
Safety
Page 53 of 398
XPress the release button in the belt buckle,
hold the belt tongue firmly and guide the belt
back.
Seat belt adjustment
The seat-belt adjustment is an integral part of
the PRE-SAFE®convenience function. This func-
tion adjusts the driver's and front-passenger
seat belt to the upper body of the occupants.
The belt strap is tightened slightly when:
Rthe belt tongue is engaged in the buckle and
Rthe ignition is switched on
The seat-belt adjustment will apply a certain
retraction force if any slack is detected between
the vehicle occupant and the seat belt. Do not
hold on to the seat belt tightly while it is adjust-
ing.
You can switch the seat-belt adjustment on and
off using the multimedia system. Information on
activating and deactivating the seat-belt adjust-
ment function can be found in the Digital Oper-
ator's Manual or in the separate operating
instructions for the multimedia system.
Belt warning for the driver and front
passenger
The 7 seat belt warning lamp in the instru-
ment cluster is a reminder that all vehicle occu- pants must wear their seat belts. It may light up
continuously or flash. In addition, there may be
a warning tone.
Regardless of whether the driver's seat belt has
already been fastened, the 7seat belt warn-
ing lamp lights up for six seconds each time the
engine is started. If the front doors are closed
and the driver or front-passenger seat belt has
not been fastened, the 7seat belt warning
lamp lights up again after the six seconds. As
soon as the driver's and front-passenger seat
belts are fastened or a front door is opened
again, the 7seat belt warning lamp goes out.
If the driver's seat belt is not fastened after the
engine is started, an additional warning tone will sound. The warning tone switches off after six
seconds or once the driver's seat belt is fas-
tened.
If the vehicle speed exceeds 15 mph (25 km/ h)
an d the driver's or front-passenger seat belt is
not fastened, a warning tone sounds again. The
warning tone sounds with increasing intensity
for a maximum of 60 seconds or until the driver or front passenger have fastened their seat
belts.
If the driver or front passenger unfasten their
seat belt while the vehicle is in motion, the belt
warning automatically reactivates.
iFor more information on the
7seat belt
warning lamp, see "Warning and indicator
lamps in the instrument cluster, seat belts"
(
Ypage 287).
Air bags
Introduction
The air bag installation point is identified by the
label AIR BAG.
An air bag supplements a correctly fastened
seat belt. However, it is not intended as a sub-
stitute for the seat belt. Air bags provide addi-
tional protection in the event of an accident.
Not all air bags are deployed in an accident. The
various air bag systems work independently of
each other (
Ypage 58).
There is, however, no system available today
that can completely rule out injury or death.
It is also not possible to rule out a risk of injury
caused by an air bag due to the high speed at
which the air bag must be deployed.
Important safety notes
GWARNING
If you do not sit in the correct seat position,
the air bag cannot protect as intended and
could even cause additional injury when
deployed. This poses an increased risk of
injury or even fatal injury.
To avoid hazardous situations, always make
sure that all of the vehicle's occupants:
Rhave fastened their seat belts correctly,
including pregnant women
Rare sitting correctly and maintain the great-
est possible distance to the air bags
Rfollow the following instructions
Always make sure that there are no objects
between the air bag and the vehicle's occu-
pants.
Occupant safety51
Safety
Z
Page 83 of 398
SmartKey
Important safety notes
GWARNING
If children are left unsupervised in the vehicle,
they could:
Ropen the doors, thus endangering other
people or road users.
Rget out and disrupt traffic.
Roperate the vehicle's equipment.
Additionally, children could set the vehicle in
motion if, for example, they:
Rrelease the parking brake.
Rshifting the automatic transmission out of
park position P
RStart the engine.
There is a risk of an accident and injury.
When leaving the vehicle, always take the
SmartKey with you and lock the vehicle. Never
leave children or animals unattended in the
vehicle. Always keep the SmartKey out of
reach of children.
GWARNING
If you attach heavy or large objects to the
SmartKey, the SmartKey could be uninten-
tionally turned in the ignition lock. This could
cause the engine to be switched off. There is a risk of an accident.
Do not attach any heavy or large objects to the
SmartKey. Remove any bulky key rings before
inserting the SmartKey into the ignition lock.
!Keep the SmartKey away from strong mag-
netic fields. Otherwise, the remote control
function could be affected.
Strong magnetic fields can occur in the vicin-
ity of powerful electrical installations.
Do not keep the SmartKey:
Rwith electronic devices, e.g. a mobile phone
or another SmartKey.
Rwith metallic objects, e.g. coins or metal foil.
Rinside metallic objects, e.g. a metal case.
This can affect the functionality of the Smart- Key. Vehicles with KEYLESS-GO start function:
do
not keep the SmartKey on the parcel shelf or in
the trunk. Otherwise, the SmartKey may not be
detected, e.g. when starting the engine using
the Start/Stop button.
A check which periodically establishes a radio
connection between the vehicle and the Smart-
Key determines whether a valid SmartKey is in
the vehicle. This occurs, for example:
Rwhen starting the engine
Rwhile driving
Rwhen the external door handles are touched
Rduring convenience closing
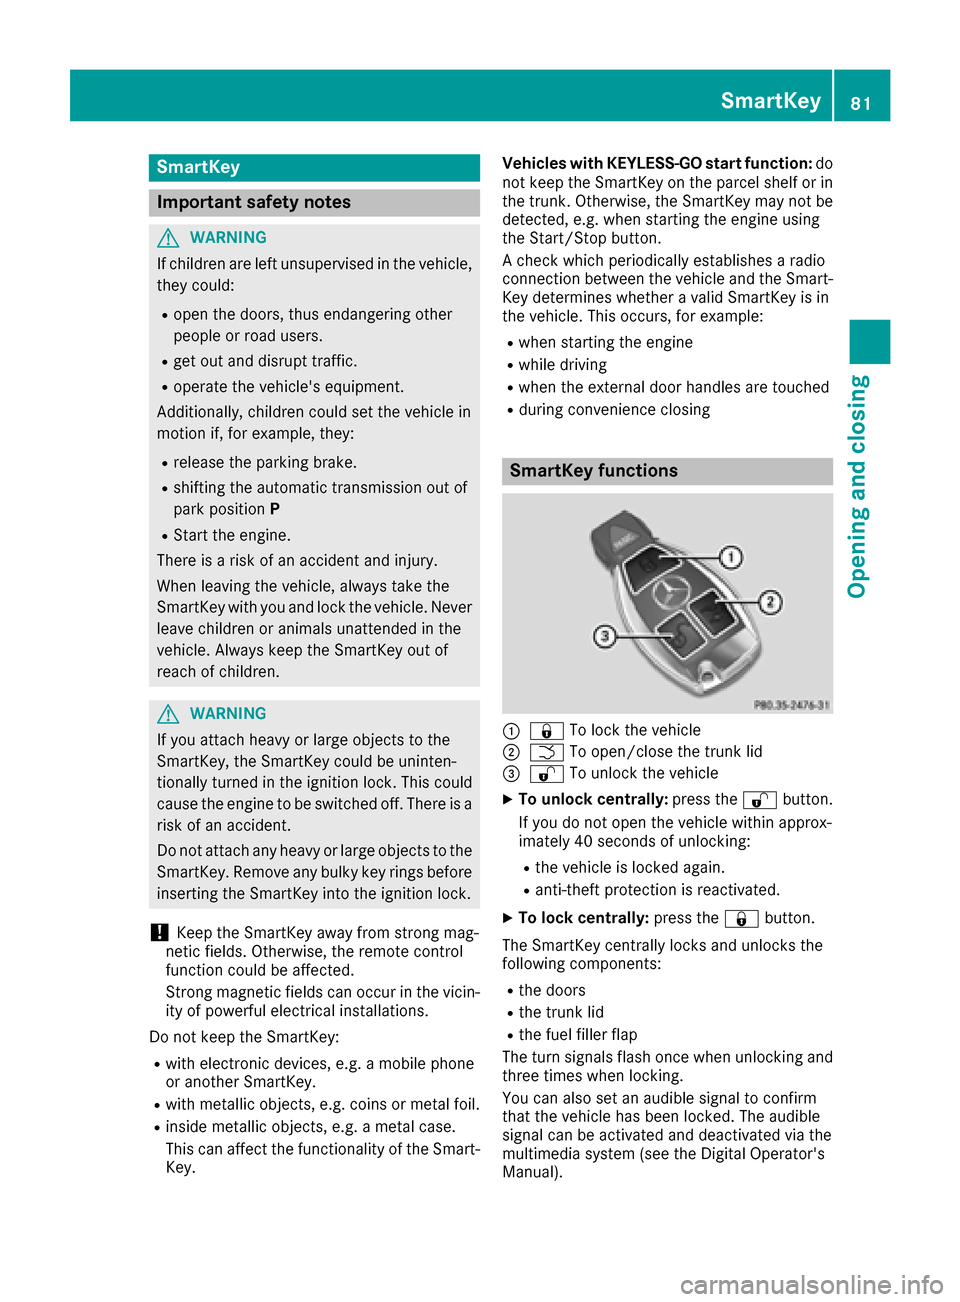
SmartKey functions
:& To lock the vehicle
;FTo open/close the trunk lid
=%To unlock the vehicle
XTo unlock centrally: press the%button.
If you do not open the vehicle within approx-
imately 40 seconds of unlocking:
Rthe vehicle is locked again.
Ranti-theft protection is reactivated.
XTo lock centrally: press the&button.
The SmartKey centrally locks and unlocks the
following components:
Rthe doors
Rthe trunk lid
Rthe fuel filler flap
The turn signals flash once when unlocking and
three times when locking.
You can also set an audible signal to confirm
that the vehicle has been locked. The audible
signal can be activated and deactivated via the
multimedia system (see the Digital Operator's
Manual).
SmartKey81
Opening and closing
Z
Page 84 of 398
You will receive visual and acoustic locking con-
firmation if all components were able to be
locked.
When the locator lighting is activated via the
multimedia system, it lights up when it is dark
after the vehicle is unlocked with the SmartKey
(see the Digital Operator's Manual).
XTo open the trunk lid automatically from
outside the vehicle:press and hold theF
button until the trunk lid opens.
XTo open the trunk lid automatically from
outside the vehicle: if the SmartKey is loca-
ted in the immediate vicinity of the vehicle,
press the Fbutton on the SmartKey.
When the trunk lid closes you can then
release the button.
KEYLESS-GO
General notes
Bear in mind that the engine can be started by
any of the vehicle occupants if there is a Smart-
Key in the vehicle.
Locking/unlocking centrally
You can start, lock or unlock the vehicle using
KEYLESS-GO. To do this, you only need carry the
SmartKey with you. You can combine the func-
tions of KEYLESS-GO with those of a conven-
tional SmartKey. Unlock the vehicle by using
KEYLESS-GO, for instance, and lock it using the
& button on the SmartKey.
The driver's door and the door at which the han-
dle is used, must both be closed. The SmartKey
must be outside the vehicle. When locking or
unlocking with KEYLESS-GO, the distance
between the SmartKey and the corresponding
door handle must not be greater than 3 ft (1 m).
A brief radio connection between the vehicle
and the key determines whether a valid Smart-
Key is in, or in the direct vicinity of, the vehicle.
This occurs, for example:
Rwhen starting the engine
Rwhile driving
Rwhen using HANDS-FREE ACCESS
Rwhen the external door handles are touched
Rduring convenience closing
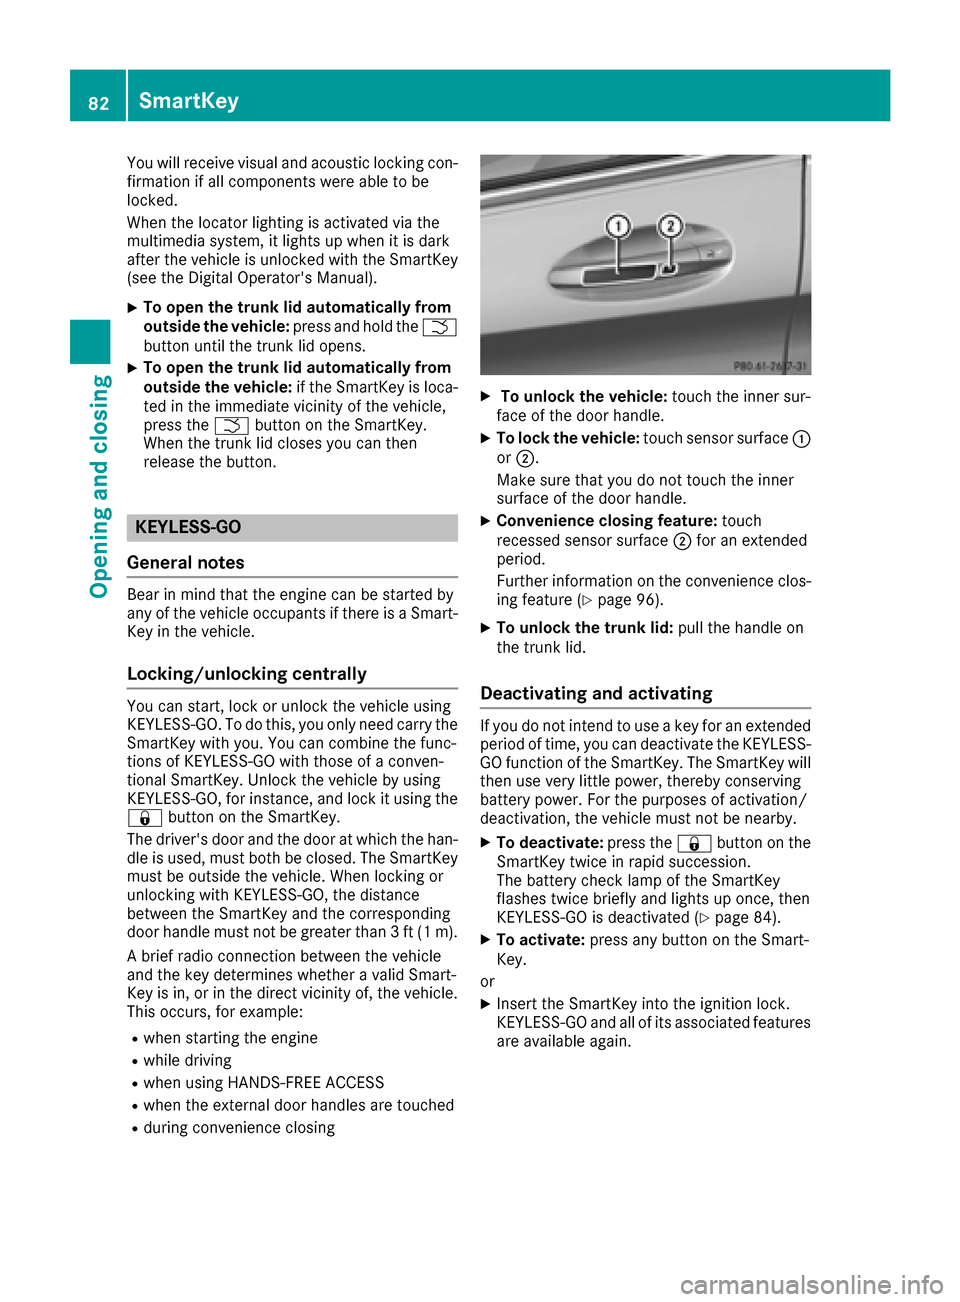
XTo unlock the vehicle: touch the inner sur-
face of the door handle.
XTo lock the vehicle: touch sensor surface :
or ;.
Make sure that you do not touch the inner
surface of the door handle.
XConvenience closing feature: touch
recessed sensor surface ;for an extended
period.
Further information on the convenience clos-
ing feature (
Ypage 96).
XTo unlock the trunk lid: pull the handle on
the trunk lid.
Deactivating and activating
If you do not intend to use a key for an extended
period of time, you can deactivate the KEYLESS-
GO function of the SmartKey. The SmartKey will
then use very little power, thereby conserving
battery power. For the purposes of activation/
deactivation, the vehicle must not be nearby.
XTo deactivate: press the&button on the
SmartKey twice in rapid succession.
The battery check lamp of the SmartKey
flashes twice briefly and lights up once, then
KEYLESS-GO is deactivated (
Ypage 84).
XTo activate: press any button on the Smart-
Key.
or
XInsert the SmartKey into the ignition lock.
KEYLESS-GO and all of its associated features
are available again.
82SmartKey
Opening and closing
Page 91 of 398
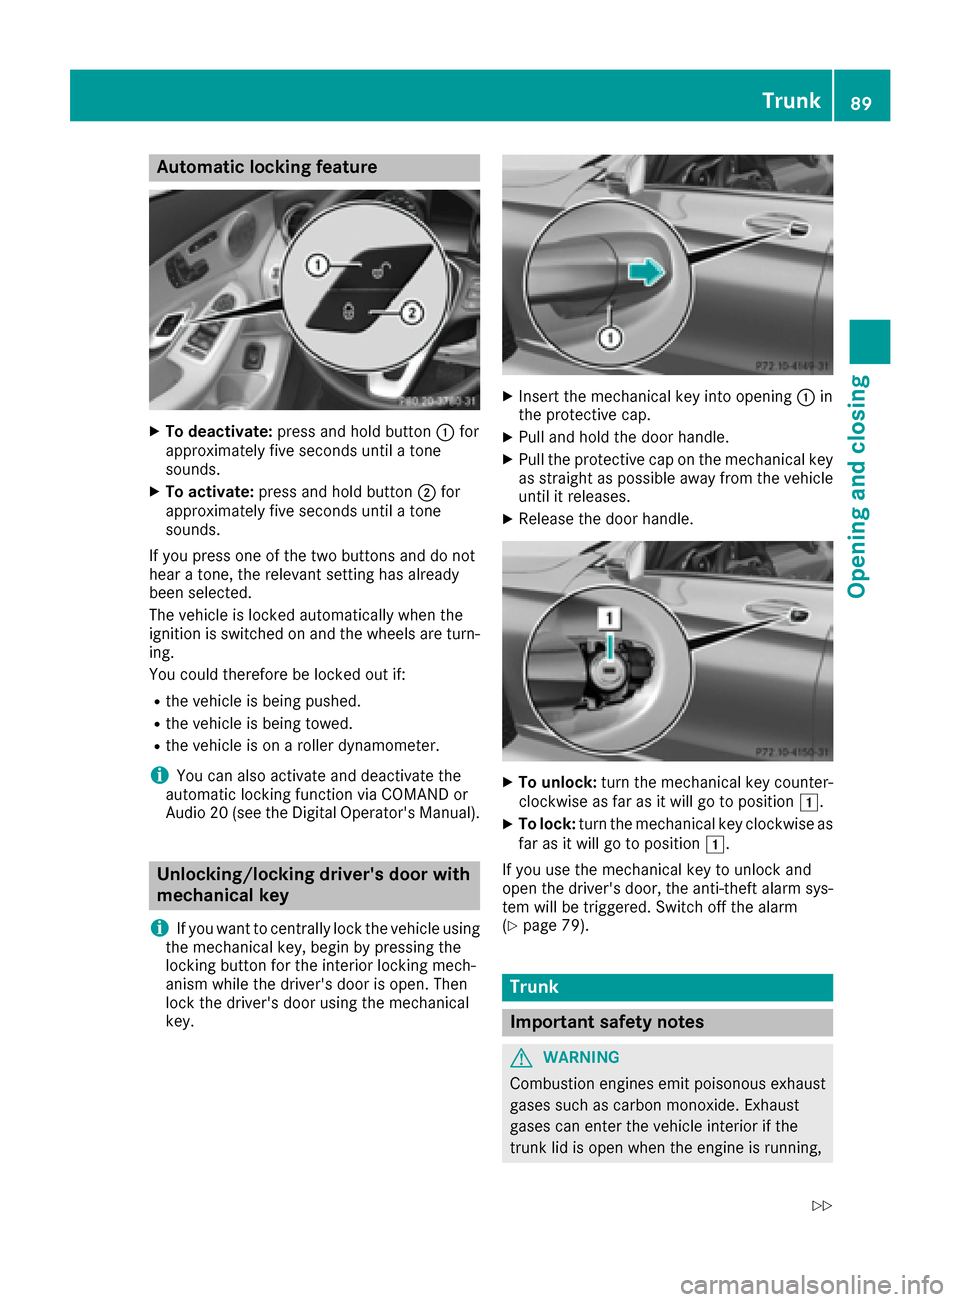
Automa tic locking featu re
XTo deactivate:press and hold butto n: for
approximately fiv eseconds until atone
sounds.
XTo activate: press and hold butto n; for
approximately fiv eseconds until atone
sounds.
If you press on eof th etwo buttons and do no t
hear atone ,th erelevan tsetting has already
been selected.
The vehicl eis locke dautomatically when th e
ignition is switched on and th ewheels are turn-
ing .
You could therefor ebe locke dout if:
Rth evehicl eis bein gpushed.
Rth evehicl eis bein gtowed.
Rth evehicl eis on aroller dynamometer.
iYou can also activat eand deactivat eth e
automatic locking function via COMAND or
Audio 20 (see th eDigital Operator' sManual).
Unlocking/locking driver's doorwith
mechanical key
i
If you want to centrally loc kth evehicl eusin g
th emechanical key, begi nby pressing th e
locking butto nfor th einterior locking mech-
anism while th edriver's door is open .The n
loc kth edriver's door usin gth emechanical
key.
XInser tth emechanical ke yint oopening :in
th eprotective cap .
XPull and hold th edoor handle.
XPull th eprotective cap on th emechanical ke y
as straight as possibl eaway from th evehicl e
until it releases.
XReleas eth edoor handle.
XTo unlock: turnth emechanical ke ycounter-
clockwise as far as it will go to position 1.
XTo lock:turnth emechanical ke yclockwise as
far as it will go to position 1.
If you use th emechanical ke yto unloc kand
open th edriver's door ,th eanti-thef talarm sys-
te m will be triggered .Switc hoff th ealarm
(
Ypage 79).
Trunk
Import ant safety notes
GWARNIN G
Combustion engines emi tpoisonous exhaust
gase ssuc has carbon monoxide. Exhaust
gase scan ente rth evehicl einterior if th e
trunk lid is open when th eengin eis running,
Trunk89
Opening and closing
Z
Page 92 of 398
especially if the vehicle is in motion. There is a
risk of poisoning.
Always switch off the engine before opening
the trunk lid. Never drive with the trunk lid
open.
GWARNING
If objects, luggage or loads are not secured or
not secured sufficiently, they could slip, tip
over or be flung around and thereby hit vehicle
occupants. There is a risk of injury, particu-
larly in the event of sudden braking or a sud-
den change in direction.
Always store objects so that they cannot be
flung around. Secure objects, luggage or
loads against slipping or tipping before the
journey.
!The trunk lid swings upwards when opened.
Therefore, make sure that there is sufficient
clearance above the trunk lid.
The opening dimensions of the trunk lid can be
found in the "Vehicle data" section
(
Ypage 394).
You can limit the opening angle of the trunk lid in
COMAND or Audio 20 (see the Digital Opera-
tor's Manual).
Do not leave the SmartKey in the trunk. You
could otherwise lock yourself out.
You should preferably place luggage or loads in
the trunk. Observe the loading guidelines
(
Ypage 308).
Obstruction recognition with trunk lid
reversing feature
Vehicles with trunk lid remote closing fea-
ture:
The trunk lid is equipped with automatic
obstruction detection with a reversing feature. If
a solid object blocks or restricts the trunk lid
when automatically opening, this procedure is
stopped. If a solid object blocks or restricts the
trunk lid when automatically closing, the trunk
lid opens again automatically. The automatic
obstruction detection with reversing feature is
only an aid. It is not a substitute for your atten-
tiveness when opening and closing the trunk lid.
GWARNING
The reversing feature does not react:
Rto soft, light and thin objects, e.g. small fin-
gers
Rover the last 1/3 in (8 mm) of the closing
movement
This means that the reversing feature cannot
prevent someone being trapped in these sit-
uations. There is a risk of injury.
Make sure that no body parts are in close
proximity during the closing procedure.
If somebody becomes trapped:
Rpress the Fbutton on the SmartKey, or
Rpull or press the remote operating switch
on the driver's door or
Rpress the closing or locking button on the
trunk lid, or
Rpull on the trunk lid handle
Vehicles with HANDS-FREE ACCESS:
It is also possible to stop the closing process by
performing a kicking movement under the rear
bumper.
Opening and closing manually
Opening
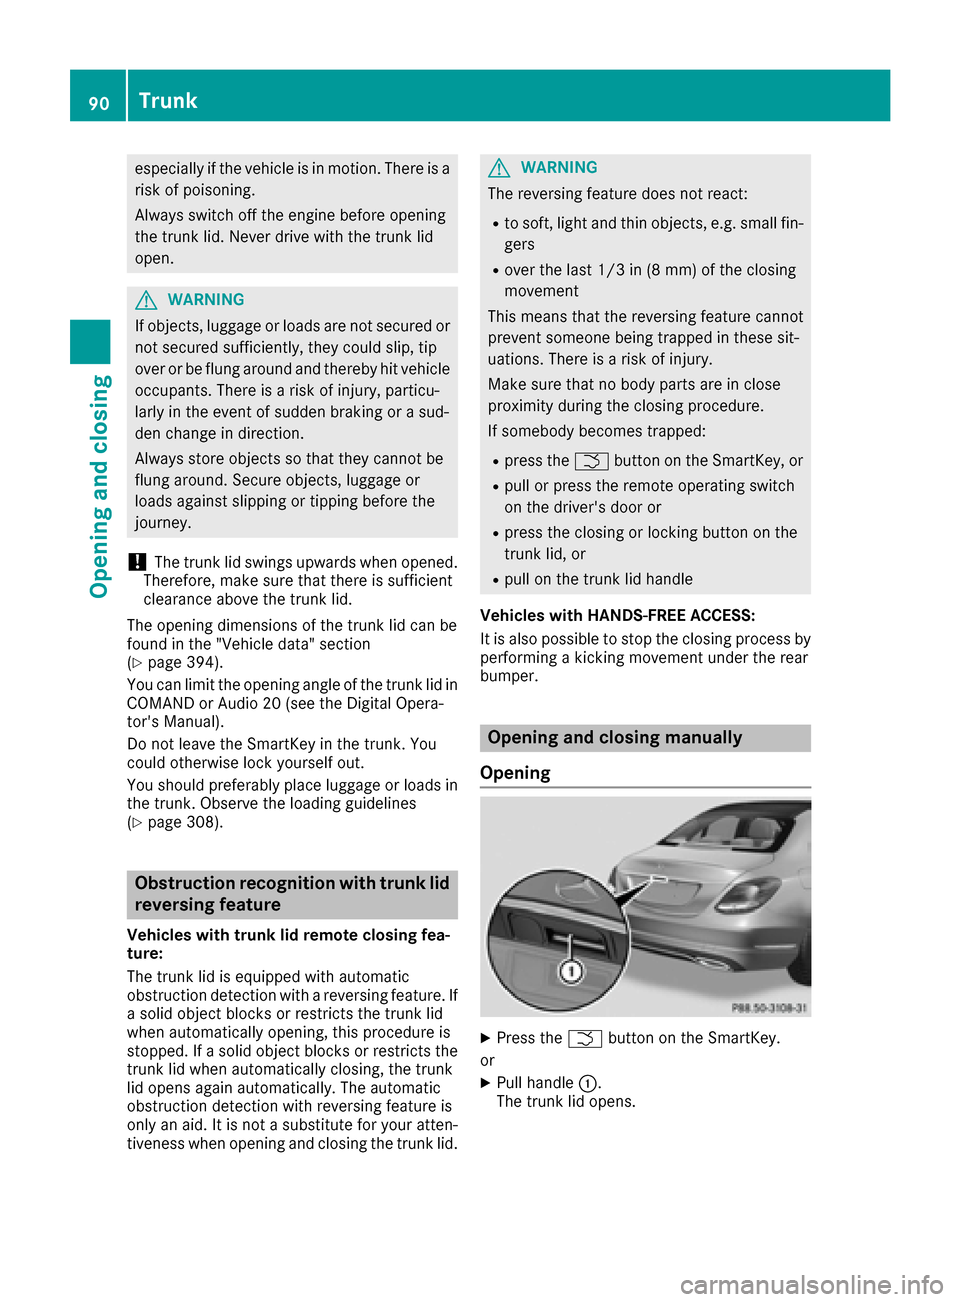
XPress the Fbutton on the SmartKey.
or
XPull handle :.
The trunk lid opens.
90Trunk
Opening and closing
Page 97 of 398
body becomes trapped, release the switch or
pull the switch to close the side window again.
GWARNING
While closing the side windows, body parts in
the closing area could become trapped. There is a risk of injury.
When closing make sure that no parts of the
body are in the closing area. If somebody
becomes trapped, release the switch or press
the switch to open the side window again.
GWARNING
If children operate the side windows they
could become trapped, particularly if they are left unsupervised. There is a risk of injury.
Activate the override feature for the rear side
windows. When leaving the vehicle, always
take the SmartKey with you and lock the vehi-
cle. Never leave children unsupervised in the
vehicle.
Side window reversing feature
The side windows are equipped with an auto-
matic reversing feature. If a solid object blocks
or restricts a side window from traveling
upwards during the automatic closing process,
the side window opens again automatically. Dur-
ing the manual closing process, the side windowonly opens again automatically after the corre-
sponding switch is released. The automatic
reversing feature is only an aid and is no substi-
tute for your attention when closing a side win-
dow.
GWARNING
The reversing feature does not react:
Rto soft, light and thin objects, e.g. small fin-
gers
Rwhile resetting
This means that the reversing feature cannot
prevent someone being trapped in these sit-
uations. There is a risk of injury.
Make sure that no body parts are in close
proximity during the closing procedure. If
someone becomes trapped, press the switch
to open the side window again.
Opening and closing the side win-
dows
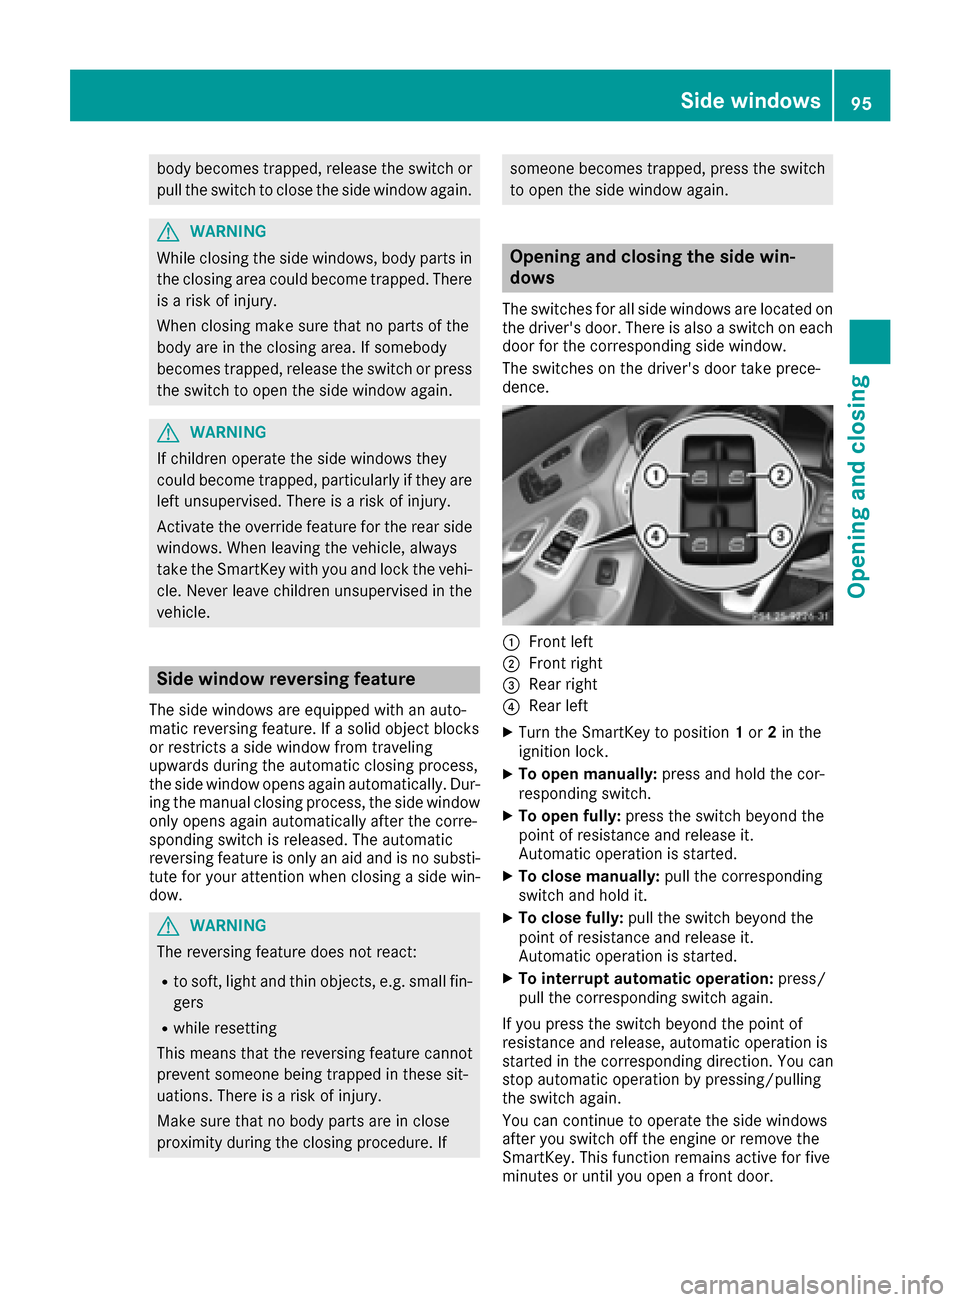
The switches for all side windows are located on the driver's door. There is also a switch on each
door for the corresponding side window.
The switches on the driver's door take prece-
dence.
:Front left
;Front right
=Rear right
?Rear left
XTurn the SmartKey to position 1or 2in the
ignition lock.
XTo open manually: press and hold the cor-
responding switch.
XTo open fully: press the switch beyond the
point of resistance and release it.
Automatic operation is started.
XTo close manually: pull the corresponding
switch and hold it.
XTo close fully: pull the switch beyond the
point of resistance and release it.
Automatic operation is started.
XTo interrupt automatic operation: press/
pull the corresponding switch again.
If you press the switch beyond the point of
resistance and release, automatic operation is
started in the corresponding direction. You can
stop automatic operation by pressing/pulling
the switch again.
You can continue to operate the side windows
after you switch off the engine or remove the
SmartKey. This function remains active for five
minutes or until you open a front door.
Side windows95
Opening and closing
Z
Page 102 of 398
automatic operation by pressing or pulling
again.
When opening and raising the roof, automatic
operation is only available if the sliding sunroof
is in the closed position.
The sun protection cover automatically opens
along with the sliding sunroof. You can open or
close the sun protection cover manually when
the sliding sunroof is raised or closed.
You can continue to operate the sliding sunroof
after switching off the engine or removing the
SmartKey from the ignition lock. This function isavailable for up to five minutes or until the driv-
er's or front-passenger door is opened.
Resetting
!If the sliding sunroof still cannot be opened
or closed fully after resetting, contact a quali- fied specialist workshop.
Reset the sliding sunroof if it does not move
smoothly.
XTurn the SmartKey to position 1or 2in the
ignition lock.
XRaise the sliding sunroof fully at the rear
(Ypage 99).
XKeep the 3switch pressed for another
second.
XMake sure that the sliding sunroof can be fully
opened and closed again (Ypage 99).
XIf this is not the case, repeat the steps above.
Operating the panorama roof with
power tilt/sliding panel
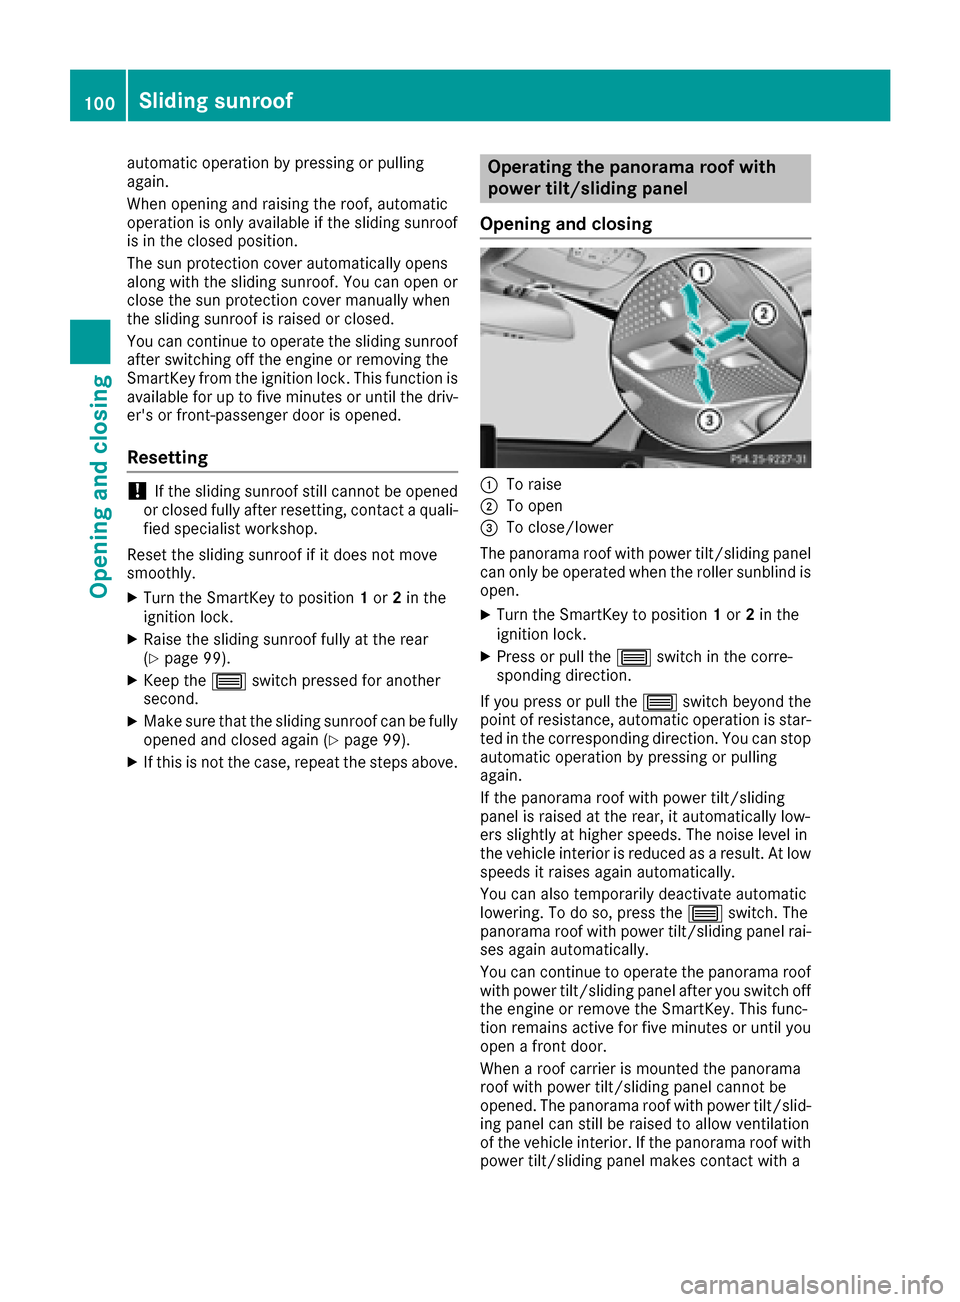
Opening and closing
:To raise
;To open
=To close/lower
The panorama roof with power tilt/sliding panel
can only be operated when the roller sunblind is
open.
XTurn the SmartKey to position 1or 2in the
ignition lock.
XPress or pull the 3switch in the corre-
sponding direction.
If you press or pull the 3switch beyond the
point of resistance, automatic operation is star-
ted in the corresponding direction. You can stop
automatic operation by pressing or pulling
again.
If the panorama roof with power tilt/sliding
panel is raised at the rear, it automatically low-
ers slightly at higher speeds. The noise level in
the vehicle interior is reduced as a result. At low
speeds it raises again automatically.
You can also temporarily deactivate automatic
lowering. To do so, press the 3switch. The
panorama roof with power tilt/sliding panel rai-
ses again automatically.
You can continue to operate the panorama roof
with power tilt/sliding panel after you switch off the engine or remove the SmartKey. This func-
tion remains active for five minutes or until you
open a front door.
When a roof carrier is mounted the panorama
roof with power tilt/sliding panel cannot be
opened. The panorama roof with power tilt/slid-
ing panel can still be raised to allow ventilation
of the vehicle interior. If the pano rama r
oof with
power tilt/sliding panel makes contact with a
100Sliding sunroof
Opening and closing