Light switch MERCEDES-BENZ C-Class SEDAN 2016 W205 Repair Manual
[x] Cancel search | Manufacturer: MERCEDES-BENZ, Model Year: 2016, Model line: C-Class SEDAN, Model: MERCEDES-BENZ C-Class SEDAN 2016 W205Pages: 398, PDF Size: 9.57 MB
Page 173 of 398
on again, the charging process resumes auto-
matically. Following an interruption in the
power supply or tripping of the building's fuse,
it may take up to 10 minutes for charging to
resume automatically.
Switch on the building protection system again
after it has been triggered. Otherwise, the
charging process cannot be continued.
General information about the charging
procedure
Pay attention to the "Important safety notes"
(Ypage 168).
The vehicle socket is located in the rear bumper
on the right below the tail lamp.
The charge socket flap and the vehicle are cen-
trally locked or unlocked simultaneously.
Charging the high-voltage battery via
the electrical outlet
Charging cable for electrical outlets
Important safety notes
!Only use the charging cable to charge the
high-voltage battery. Do not use the charging
cable for other purposes. It may otherwise be
damaged.
A charging cable for connection to the electrical outlet is included with the vehicle. Only use the
charging cable included with the vehicle or
charging cables that have been approved for the
vehicle.
iIf you use the supplied 12 A charging cable
to charge a high-voltage battery:
Rthe charge time increases considerably
Relectrical consumption increases consider-
ably
Where possible, charge the high-voltage bat-
tery at a charging station (
Ypage 174). Only
then can certified electrical energy consump-
tion levels be reached.
iThe charging process can vary depending on
the power supply. Therefore, always observe
the local information.
Information about charging from a wallbox
(
Ypage 173). Information on charging at a charging station
(
Ypage 174).
Stowing the charging cable
The charging cable can be stowed in the bag
supplied in the trunk/cargo compartment of the
vehicle and held in place with the Velcro fas-
tener.
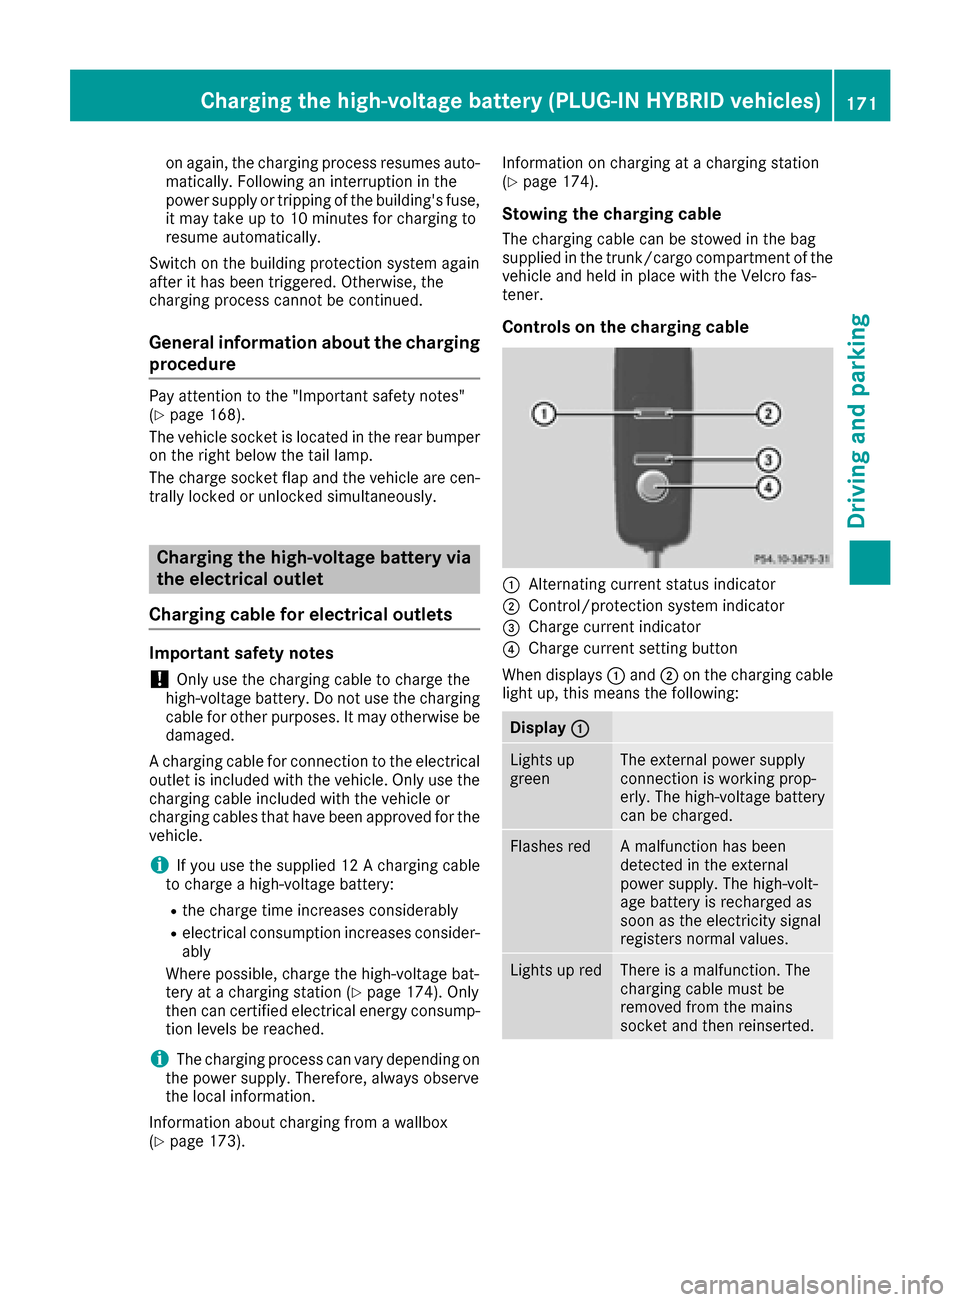
Controls on the charging cable
:Alternating current status indicator
;Control/protection system indicator
=Charge current indicator
?Charge current setting button
When displays :and ;on the charging cable
light up, this means the following:
Display :
Lights up
greenThe external power supply
connection is working prop-
erly. The high-voltage battery
can be charged.
Flashes redA malfunction has been
detected in the external
power supply. The high-volt-
age battery is recharged as
soon as the electricity signal
registers normal values.
Lights up redThere is a malfunction. The
charging cable must be
removed from the mains
socket and then reinserted.
Charging the high-voltage battery (PLUG-IN HYBRID vehicles)171
Driving and parking
Z
Page 175 of 398
Indicator
lamp
Lights up
orangeA charging break for the high-
voltage battery is taking
place.
The indicator lamp goes out
after approximately
90 seconds.
Lights up
greenThe high-voltage battery is
fully charged.
The indicator lamp goes out
after approximately
90 seconds.
iIf the indicator lamp is off, lock or unlock the
vehicle. The indicator lamp then displays the
current status of the charging process again.
Connecting the charging cable
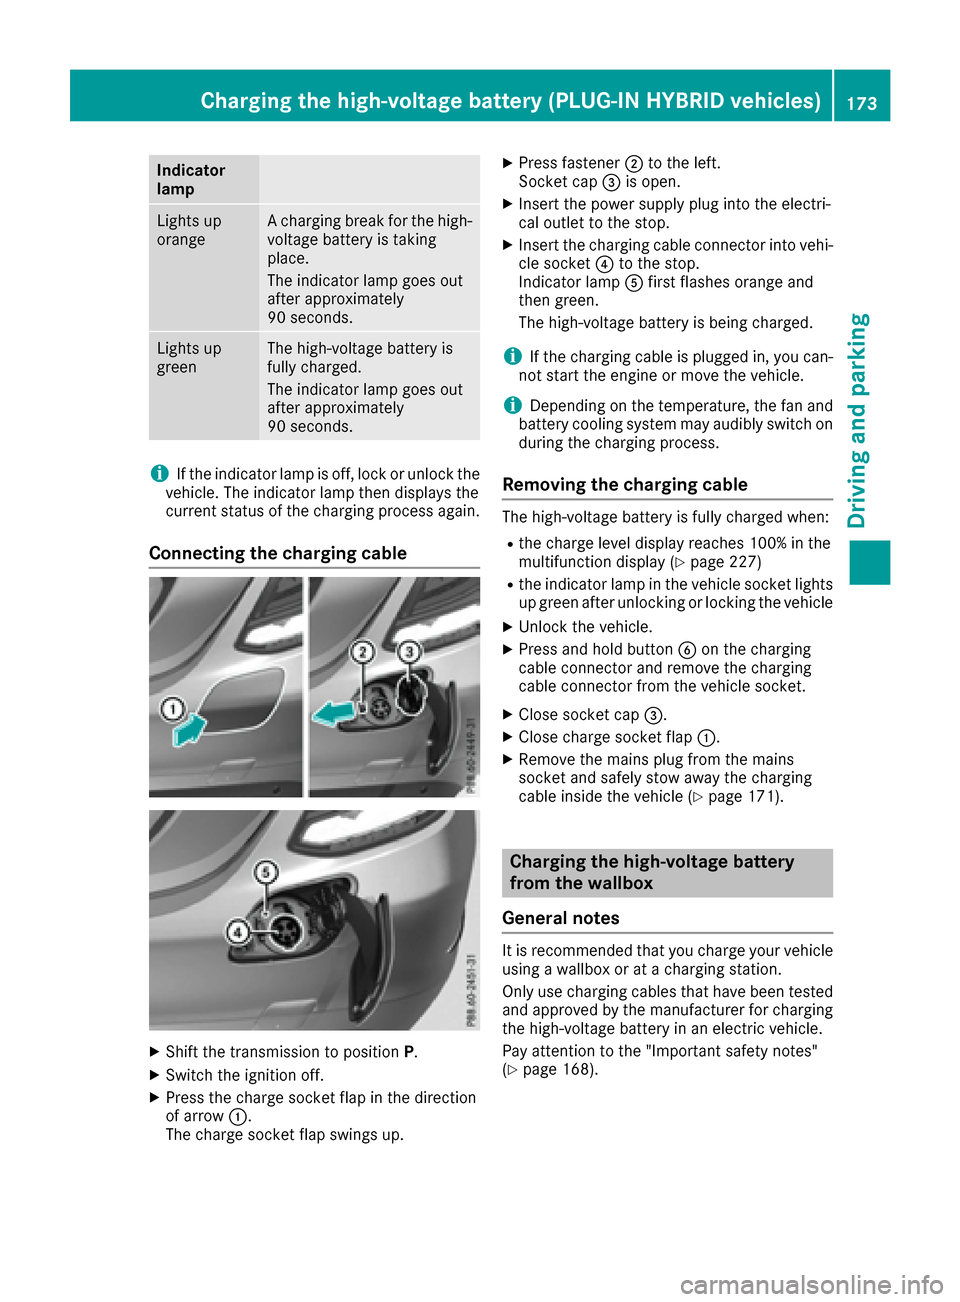
XShift the transmission to position P.
XSwitch the ignition off.
XPress the charge socket flap in the direction
of arrow:.
The charge socket flap swings up.
XPress fastener ;to the left.
Socket cap =is open.
XInsert the power supply plug into the electri-
cal outlet to the stop.
XInsert the charging cable connector into vehi-
cle socket ?to the stop.
Indicator lamp Afirst flashes orange and
then green.
The high-voltage battery is being charged.
iIf the charging cable is plugged in, you can-
not start the engine or move the vehicle.
iDepending on the temperature, the fan and
battery cooling system may audibly switch on
during the charging process.
Removing the charging cable
The high-voltage battery is fully charged when:
Rthe charge level display reaches 100% in the
multifunction display (Ypage 227)
Rthe indicator lamp in the vehicle socket lights up green after unlocking or locking the vehicle
XUnlock the vehicle.
XPress and hold button Bon the charging
cable connector and remove the charging
cable connector from the vehicle socket.
XClose socket cap =.
XClose charge socket flap :.
XRemove the mains plug from the mains
socket and safely stow away the charging
cable inside the vehicle (
Ypage 171).
Charging the high-voltage battery
from the wallbox
General notes
It is recommended that you charge your vehicle
using a wallbox or at a charging station.
Only use charging cables that have been tested
and approved by the manufacturer for charging
the high-voltage battery in an electric vehicle.
Pay attention to the "Important safety notes"
(
Ypage 168).
Charging the high-voltage battery (PLUG-IN HYBRID vehicles)173
Driving and parking
Z
Page 176 of 398
Connecting the charging cable
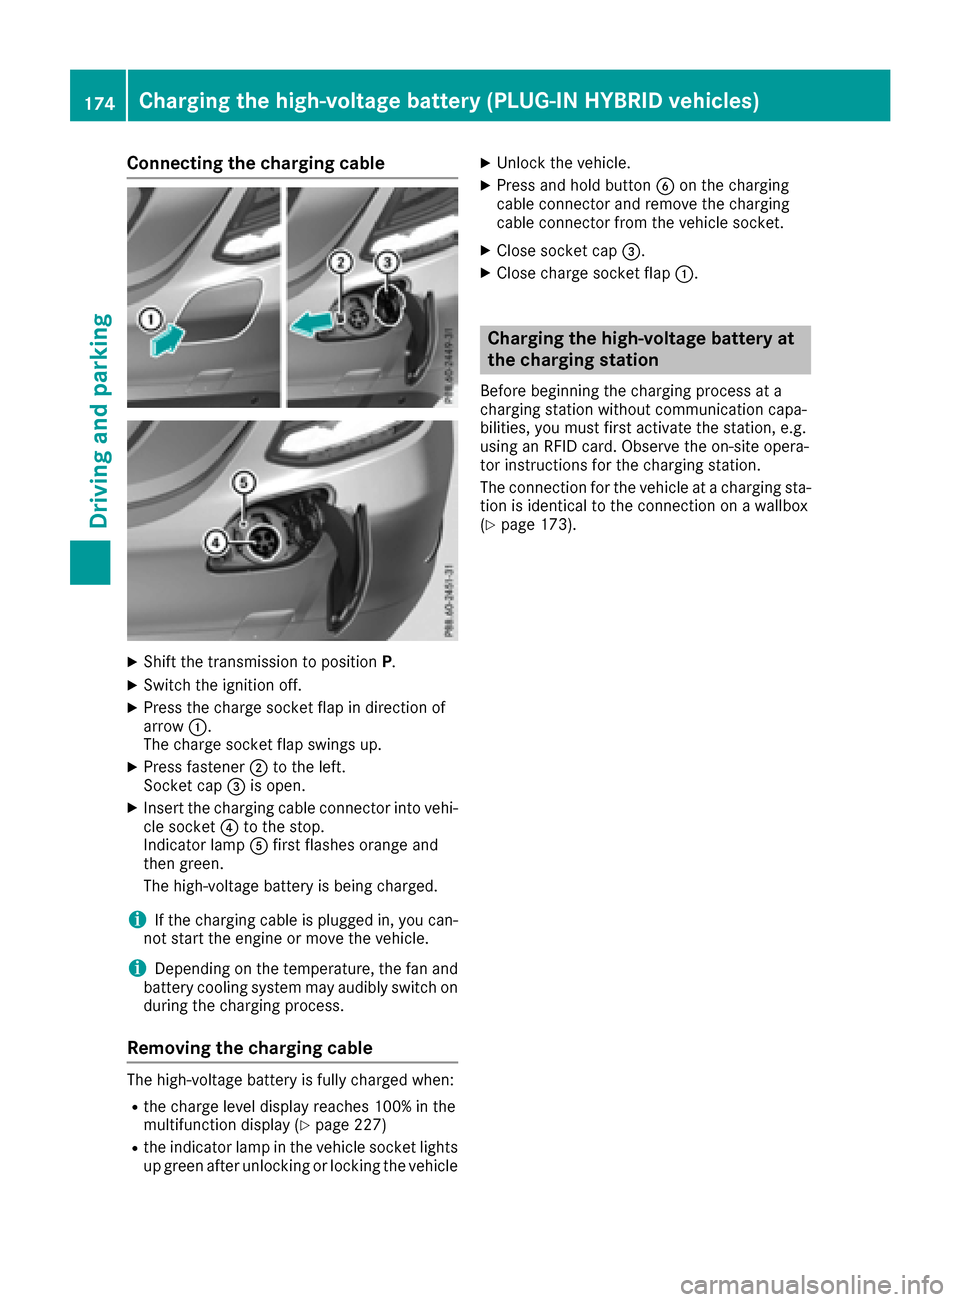
XShift the transmission to positionP.
XSwitch the ignition off.
XPress the charge socket flap in direction of
arrow:.
The charge socket flap swings up.
XPress fastener ;to the left.
Socket cap =is open.
XInsert the charging cable connector into vehi-
cle socket ?to the stop.
Indicator lamp Afirst flashes orange and
then green.
The high-voltage battery is being charged.
iIf the charging cable is plugged in, you can-
not start the engine or move the vehicle.
iDepending on the temperature, the fan and
battery cooling system may audibly switch on
during the charging process.
Removing the charging cable
The high-voltage battery is fully charged when:
Rthe charge level display reaches 100% in the
multifunction display (Ypage 227)
Rthe indicator lamp in the vehicle socket lights up green after unlocking or locking the vehicle
XUnlock the vehicle.
XPress and hold button Bon the charging
cable connector and remove the charging
cable connector from the vehicle socket.
XClose socket cap =.
XClose charge socket flap :.
Charging the high-voltage battery at
the charging station
Before beginning the charging process at a
charging station without communication capa-
bilities, you must first activate the station, e.g.
using an RFID card. Observe the on-site opera-
tor instructions for the charging station.
The connection for the vehicle at a charging sta-
tion is identical to the connection on a wallbox
(
Ypage 173).
174Charging the high-voltage battery (PLUG-IN HYBRID vehicles)
Driving and parking
Page 180 of 398
XDepress the brake pedal and keep it
depressed.
XShift to neutralN.
XRelease the brake pedal.
XRelease the electric parking brake.
XSwitch off the ignition and leave the SmartKey
in the ignition lock.
The engine can be switched off in an emergency
while the vehicle is in motion by pressing and
holding the Start/Stop button for three sec-
onds. This function operates independently of
the ECO start/stop automatic engine switch-off
function.
Electric parking brake
General notes
GWARNING
If you leave children unsupervised in the vehi-
cle, they could set it in motion by, for example:
Rrelease the parking brake.
Rshift the automatic transmission out of the
parking position P.
Rstart the engine.
In addition, they may operate vehicle equip-
ment and become trapped. There is a risk of
an accident and injury.
When leaving the vehicle, always take the
SmartKey with you and lock the vehicle. Never
leave children unsupervised in the vehicle.
The function of the electric parking brake is
dependent on the on-board voltage. If the on-
board voltage is low or there is a malfunction in
the system, it may not be possible to apply the
released parking brake.
XIf this is the case, only park the vehicle on
level ground and secure it to prevent it rolling
away.
XShift the automatic transmission to position
P .
It may not be possible to release an applied
parking brake if the on-board voltage is low or
there is a malfunction in the system. Contact a
qualified specialist workshop.
The electric parking brake performs a function
test at regular intervals while the engine is switched off. The sounds that
can b
e heard while
this is occurring are normal.
Applying or releasing manually
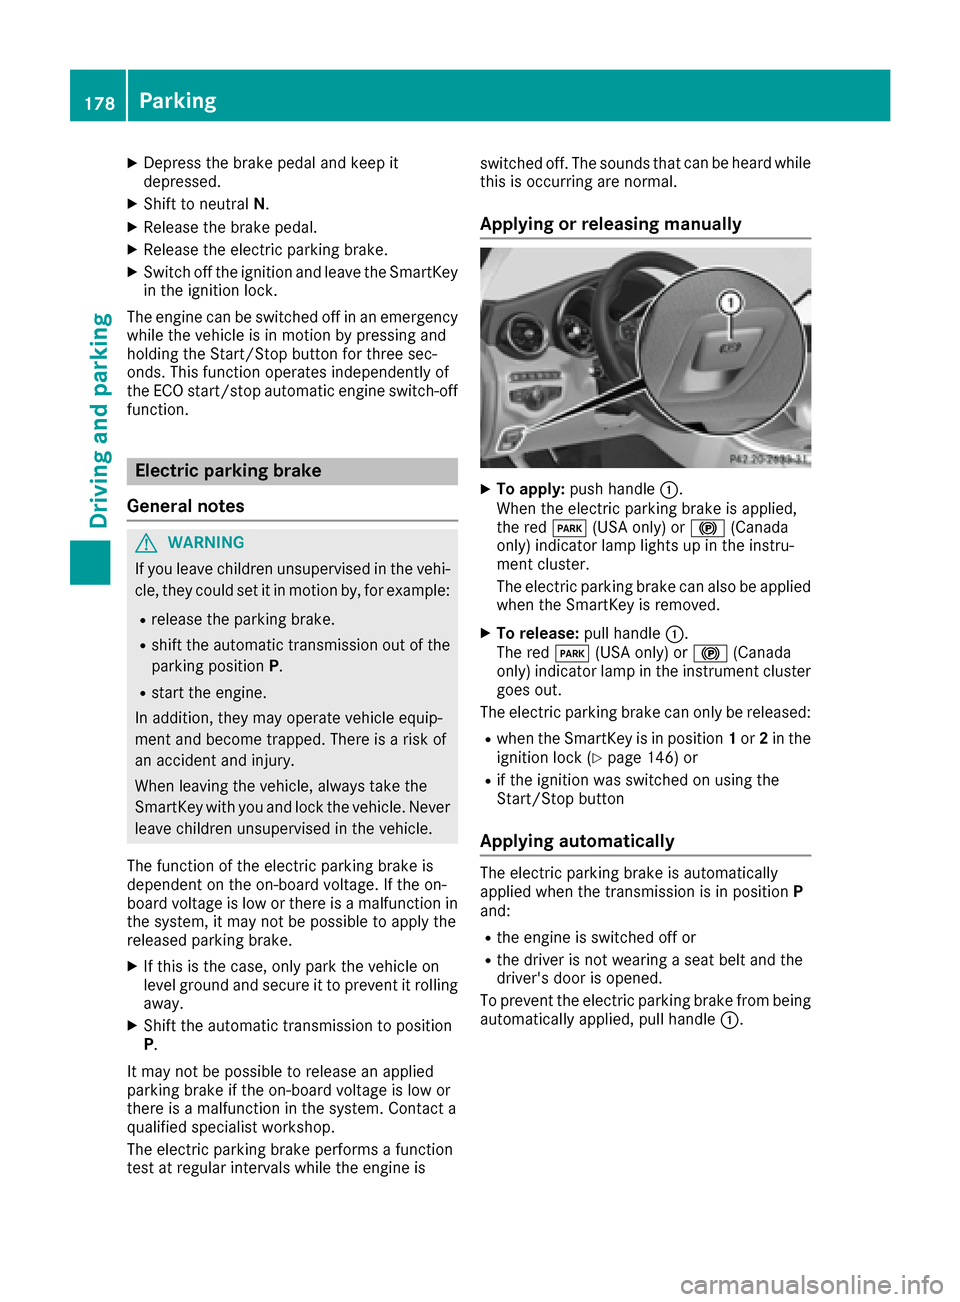
XTo apply: push handle :.
When the electric parking brake is applied,
the red F(USA only) or !(Canada
only) indicator lamp lights up in the instru-
ment cluster.
The electric parking brake can also be applied
when the SmartKey is removed.
XTo release: pull handle:.
The red F(USA only) or !(Canada
only) indicator lamp in the instrument cluster
goes out.
The electric parking brake can only be released:
Rwhen the SmartKey is in position 1or 2in the
ignition lock (Ypage 146) or
Rif the ignition was switched on using the
Start/Stop button
Applying automatically
The electric parking brake is automatically
applied when the transmission is in position P
and:
Rthe engine is switched off or
Rthe driver is not wearing a seat belt and the
driver's door is opened.
To prevent the electric parking brake from being
automatically applied, pull handle :.
178Parking
Driving and parking
Page 184 of 398
In addition to driving style, the actual consump-
tion is affected by other factors, such as:
Rload
Rtire pressure
Rcold start
Rchoice of route
Relectrical consumers switched on
These factors are not included in the ECO dis-
play.
An economical driving style specially requires
driving at moderate engine speeds.
Achieving a higher value in the categories
"Acceleration" and "Constant":
Robserve the gearshift recommendations.
Rdrive in drive program E.
On long journeys at a constant speed, e.g. on the
highway, only the outer area for "constant" will
change.
The ECO display summarizes the driving style
from the start of the journey to its completion.
Therefore, there are more marked changes in
the outer areas at the start of a journey. On lon-
ger journeys, there are fewer changes. For more
marked changes, perform a manual rest
(
Ypage 241).
For further information on the ECO display, see
(
Ypage 240).
Braking
Important safety notes
GWARNING
If you shift down on a slippery road surface in an attempt to increase the engine's braking
effect, the drive wheels could lose their grip.
There is an increased danger of skidding and
accidents.
Do not shift down for additional engine brak-
ing on a slippery road surface.
Downhill gradients
!On long and steep gradients, you must
reduce the load on the brakes by shifting early
to a lower gear. This allows you to take
advantage of the engine braking effect and
helps avoid overheating and excessive wear
of the brakes. When you take advantage of the engine brak-
ing effect, a drive wheel may not turn for some
time, e.g. on a slippery road surface. This
could cause damage to the drive train. This
type of damage is not covered by the
Mercedes-Benz warranty.
Heavy and light loads
GWARNING
If you rest your foot on the brake pedal while
driving, the braking system can overheat. This increases the stopping distance and can even
cause the braking system to fail. There is a
risk of an accident.
Never use the brake pedal as a footrest. Never
depress the brake pedal and the accelerator
pedal at the same time.
!Depressing the brake pedal constantly
results in excessive and premature wear to
the brake pads.
If the brakes have been subjected to a heavy
load, do not stop the vehicle immediately. Drive
on for a short while. This allows the airflow to
cool the brakes more quickly.
Wet roads
If you have driven for a long time in heavy rain
without braking, there may be a delayed reac-
tion from the brakes when braking for the first
time. This may also occur after the vehicle has
been washed or driven through deep water.
You have to depress the brake pedal more
firmly. Maintain a greater distance from the
vehicle in front.
After driving on a wet road or having the vehicle
washed, brake firmly while paying attention to
the traffic conditions. This will warm up the
brake discs, thereby drying them more quickly
and protecting them against corrosion.
Limited braking performance on salt-
treated roads
If you drive on salted roads, a layer of salt resi-
due may form on the brake discs and brake
pads. This can result in a significantly longer
braking distance.
182Driving tips
Driving and parking
Page 185 of 398
RIn order to prevent any salt build-up, apply the
brakes occasionally while paying attention to
the traffic conditions.
RCarefully depress the brake pedal and the
beginning and end of a journey.
RMaintain a greater distance to the vehicle
ahead.
Servicing the brakes
!The brake fluid level may be too low, if:
Rif the red brake warning lamp lights up in
the instrument cluster and
Ryou hear a warning tone while the engine is
running
Observe additional warning messages in the
multifunction display.
The brake fluid level may be too low due to
brake pad wear or leaking brake lines.
Have the brake system checked immediately. Consult a qualified specialist workshop to
arrange this.
!A function or performance test should only
be carried out on a 2-axle dynamometer. If
you wish to operate the vehicle on such a
dynamometer, please consult a qualified spe- cialist workshop in advance. You could oth-
erwise damage the drive train or the brake
system.
!The ESP®system operates automatically.
The engine and the ignition must therefore be
switched off (the SmartKey must be in posi-
tion 0or 1in the ignition lock or the Start/
Stop button must be in position 0or 1) if the
electric parking brake is tested on a brake
dynamometer.
Braking triggered automatically by ESP
®may
cause severe damage to the brake system.
All checks and maintenance work on the brake
system must be carried out at a qualified spe-
cialist workshop.
Have brake pads installed and brake fluid
replaced at a qualified specialist workshop.
If the brake system has only been subject to
moderate loads, you should test the functional-
ity of your brakes at regular intervals.
Information on BAS (Brake Assist) (
Ypage 68)
and BAS PLUS (Brake Assist PLUS) (Ypage 69). For safety reasons, Mercedes-Benz recom-
mends only installing the following brake disks
and brake pads/linings:
Rbrake disks that have been approved by
Mercedes-Benz
Rbrake pads/linings that have been approved
by Mercedes-Benz or that are of an equivalent
standard of quality
Other brake disks or brake pads/linings can
compromise the safety of your vehicle.
Always replace all brake disks and brake pads/ linings on an axle at the same time. Always
install new brake pa
ds/linings when replacing
brake disks.
The vehicle is equipped with lightweight brake
disks to which the wheel assembly with rim and
threaded connection is matched.
The use of brake disks other than those
approved by Mercedes-Benz can change the
track width and is subject to approval, if appli-
cable.
Shock-type loads when handling the brake
disks, such as when changing wheels, can lead
to a reduction in comfort when driving with light-
weight brake disks. Avoid shock-type loads on
the lightweight brake disks, particularly on the
brake plate.
Mercedes-Benz recommends that you only use
brake fluid that has been specially approved for
your vehicle by Mercedes-Benz, or which corre-
sponds to an equivalent quality standard. Brake
fluid which has not been approved for
Mercedes-Benz vehicles or which is not of an
equivalent quality could affect your vehicle's
operating safety.
High-performance and ceramic brakes
(Mercedes AMG vehicles)
The AMG brake systems are designed for heavy
loads. This may lead to noise when braking. This
will depend on:
RSpeed
RBraking force
REnvironmental conditions, such as tempera-
ture and humidity
The wear of individual components of the brake
system, such as the brake pads/linings or brake
discs, depends on the individual driving style
and operating conditions.
For this reason, it is impossible to state a mile-
age that will be valid under all circumstances. An
Driving tips183
Driving and parking
Z
Page 194 of 398
multifunction display for approximately five sec-
onds.
iThe last speed stored remains stored until
you switch off the engine.
iDISTRONIC PLUS is not deactivated if you
depress the accelerator pedal.
DISTRONIC PLUS is automatically deactivated
if:
Ryou engage the electric parking brake or if the vehicle is automatically secured with the elec-
tric parking brake
RESP®intervenes or you deactivate ESP®
Rthe transmission is in the P,Ror Nposition
Ryou pull the cruise control lever towards you
in order to pull away and the front-passenger
door or one of the rear doors is open
Rthe vehicle is skidding
Ryou activate Active Parking Assist
If DISTRONIC PLUS is deactivated, you will hear a warning tone. You will see the DISTRONIC
PLUS Offmessage in the multifunction display
for approximately five seconds.
Tips for driving with DISTRONIC PLUS
General notes
Pay particular attention in the following traffic
situations:
RCornering, entering and exiting a bend: the
ability of DISTRONIC PLUS to detect vehicles
when cornering is limited. Your vehicle may
brake unexpectedly or late.
RDriving on a different line: DISTRONIC PLUS
may not detect vehicles which are not driving in the middle of their lane. The distance to the
vehicle in front will be too short.
ROther vehicles changing lane: DISTRONIC
PLUS has not detected the vehicle cutting in
yet. The distance to this vehicle will be too
short.
RNarrow vehicles: DISTRONIC PLUS does not
detect the vehicle in front on the edge of the
road because of its narrow width. The dis-
tance to the vehicle in front will be too short.
RObstacles and stationary vehicles:
DISTRONIC PLUS does not brake for obsta-
cles or stationary vehicles. If, for example, the
detected vehicle turns a corner and reveals an obstacle or stationary vehicle, DISTRONIC
PLUS will not brake for these.
RCrossing vehicles: DISTRONIC PLUS may mis-
takenly detect vehicles that are crossing your
lane. Activating DISTRONIC PLUS at traffic
lights with crossing traffic, for example, could
cause your vehicle to pull away unintention-
ally.
In such situations, brake if necessary.
DISTRONIC PLUS is then deactivated.
DISTRONIC PLUS with Steering Assist
and Stop&Go Pilot
General notes
DISTRONIC PLUS with Steering Assist and
Stop&Go Pilot aids you in keeping the vehicle in
the center of the driving lane by means of mod-
erate steering interventions at speeds of
0 - 125 mph (0 - 200 km/h).
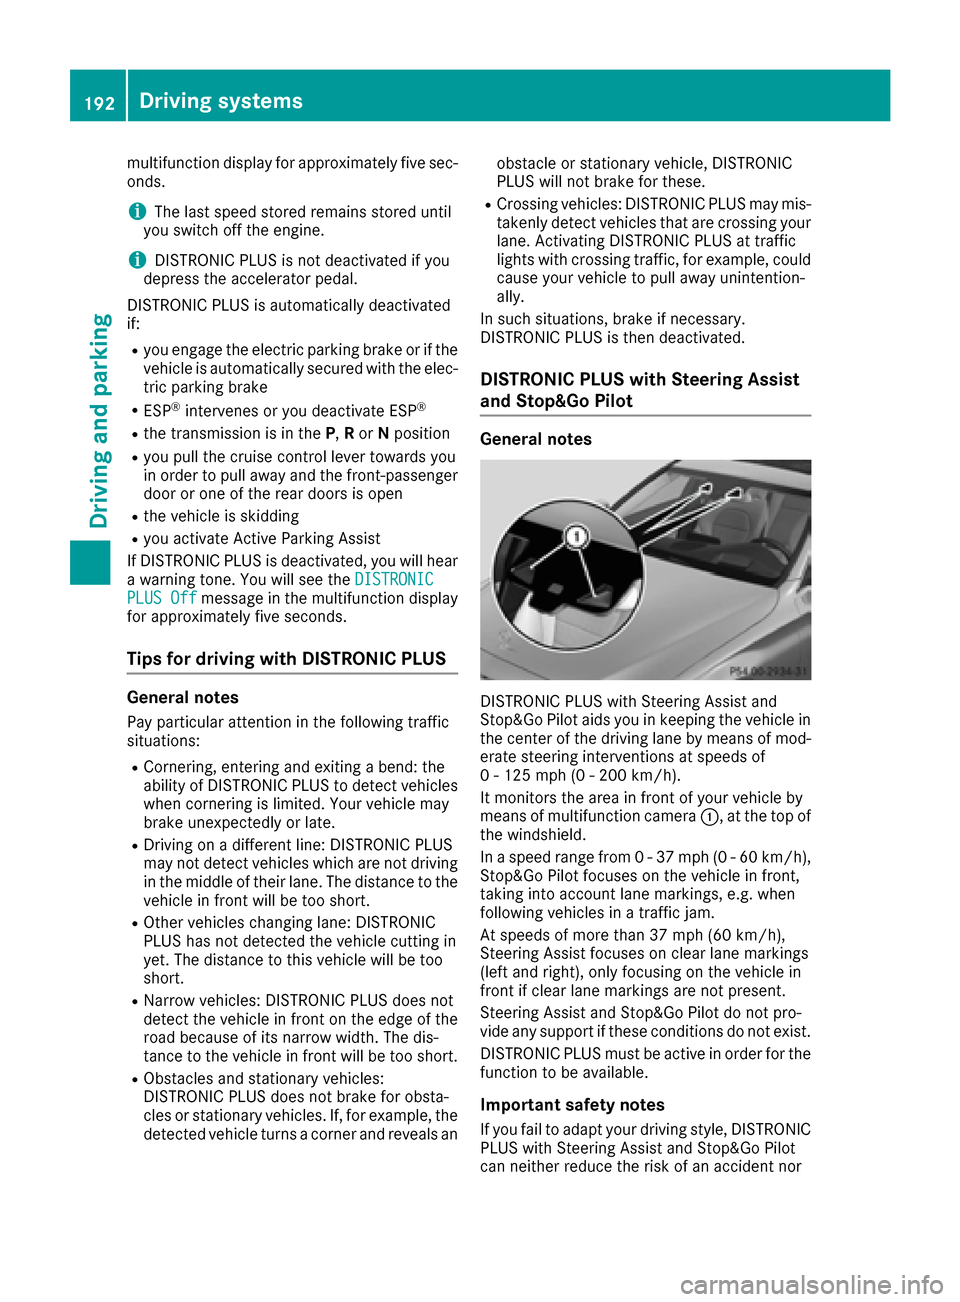
It monitors the area in front of your vehicle by
means of multifunction camera :, at the top of
the windshield.
In a speed range from 0 - 37 mph (0 - 60 km/h),
Stop&Go Pilot focuses on the vehicle in front,
taking into account lane markings, e.g. when
following vehicles in a traffic jam.
At speeds of more than 37 mph (60 km/h),
Steering Assist focuses on clear lane markings
(left and right), only focusing on the vehicle in
front if clear lane markings are not present.
Steering Assist and Stop&Go Pilot do not pro-
vide any support if these conditions do not exist.
DISTRONIC PLUS must be active in order for the
function to be available.
Important safety notes
If you fail to adapt your driving style, DISTRONIC
PLUS with Steering Assist and Stop&Go Pilot
can neither reduce the risk of an accident nor
192Driving systems
Driving and parking
Page 195 of 398
override the laws of physics. It cannot take
account of road, weather and traffic conditions.
DISTRONIC PLUS with Steering Assist and
Stop&Go Pilot is only an aid. You are responsible
for the distance to the vehicle in front, for vehi-
cle speed, for braking in good time and for stay-
ing in your lane.
DISTRONIC PLUS with Steering Assist and
Stop&Go Pilot does not detect road and traffic
conditions. If you are following a vehicle which is
driving towards the edge of the road, your vehi-
cle could come into contact with the curb or
other road boundaries. Be particularly aware of
other road users, e.g. cyclists, that are directly
next to your vehicle.
Obstacles such as traffic pylons on the lane or
projecting out into the lane are not detected.
An inappropriate steering intervention, e.g. after
intentionally driving over a lane marking, can becorrected at any time if you steer slightly in the
opposite direction.
DISTRONIC PLUS with Steering Assist and
Stop&Go Pilot cannot continuously keep your
vehicle in lane. In some cases, the steering
intervention is not sufficient to bring the vehicle
back to the lane. In such cases, you must steer
the vehicle yourself to ensure that it does not
leave the lane.
The system may be impaired or may not function
if:
Rthere is poor visibility, e.g. due to insufficient
illumination of the road, or due to snow, rain,
fog or spray
Rthere is glare, e.g. from oncoming traffic, the
sun or reflections (e.g. when the road surface
is wet)
Rthe windshield is dirty, fogged up, damaged or
covered, for instance by a sticker, in the vicin-
ity of the camera
Rthere are no, several or unclear lane markings
for a lane, e.g. in areas with road construction
work
Rthe lane markings are worn away, dark or cov-
ered up, e.g. by dirt or snow
Rthe distance to the vehicle in front is too small
and the lane markings thus cannot be detec-
ted
Rthe lane markings change quickly, e.g. lanes
branch off, cross one another or merge
Rthe road is narrow and winding
Rthere are strong shadows cast on the road The syst
em is switched to passive and no longer
assists you by performing steering interventions
if:
Ryou actively change lane
Ryou switch on the turn signal
Rtake your hands off the steering wheel or do
not steer for a prolonged period of time
iSteering Assist and Stop&Go Pilot are acti-
vated again automatically after a lane change
is completed.
Steering Assist and Stop&Go Pilot do not pro-
vide any support:
Ron very sharp corners
Rwhen a loss of tire pressure or a defective tire
has been detected and displayed
Pay attention also to the important safety notes for DISTRONIC PLUS (
Ypage 187).
The steering interventions are carried out with a
limited steering moment. The system requires
the driver to keep his hands on the steering
wheel and to steer himself.
If you do not steer yourself or if you take your
hands off the steering wheel for a prolonged
period of time, the system will first alert you with
a visual warning. A steering wheel symbol
appears in the multifunction display. If you have
still not started to steer and have not taken hold
of the steering wheel after five seconds at the
latest, a warning tone also sounds to remind you
to take control of the vehicle. Steering Assist
and Stop&Go Pilot are switched to passive.
DISTRONIC PLUS remains active.
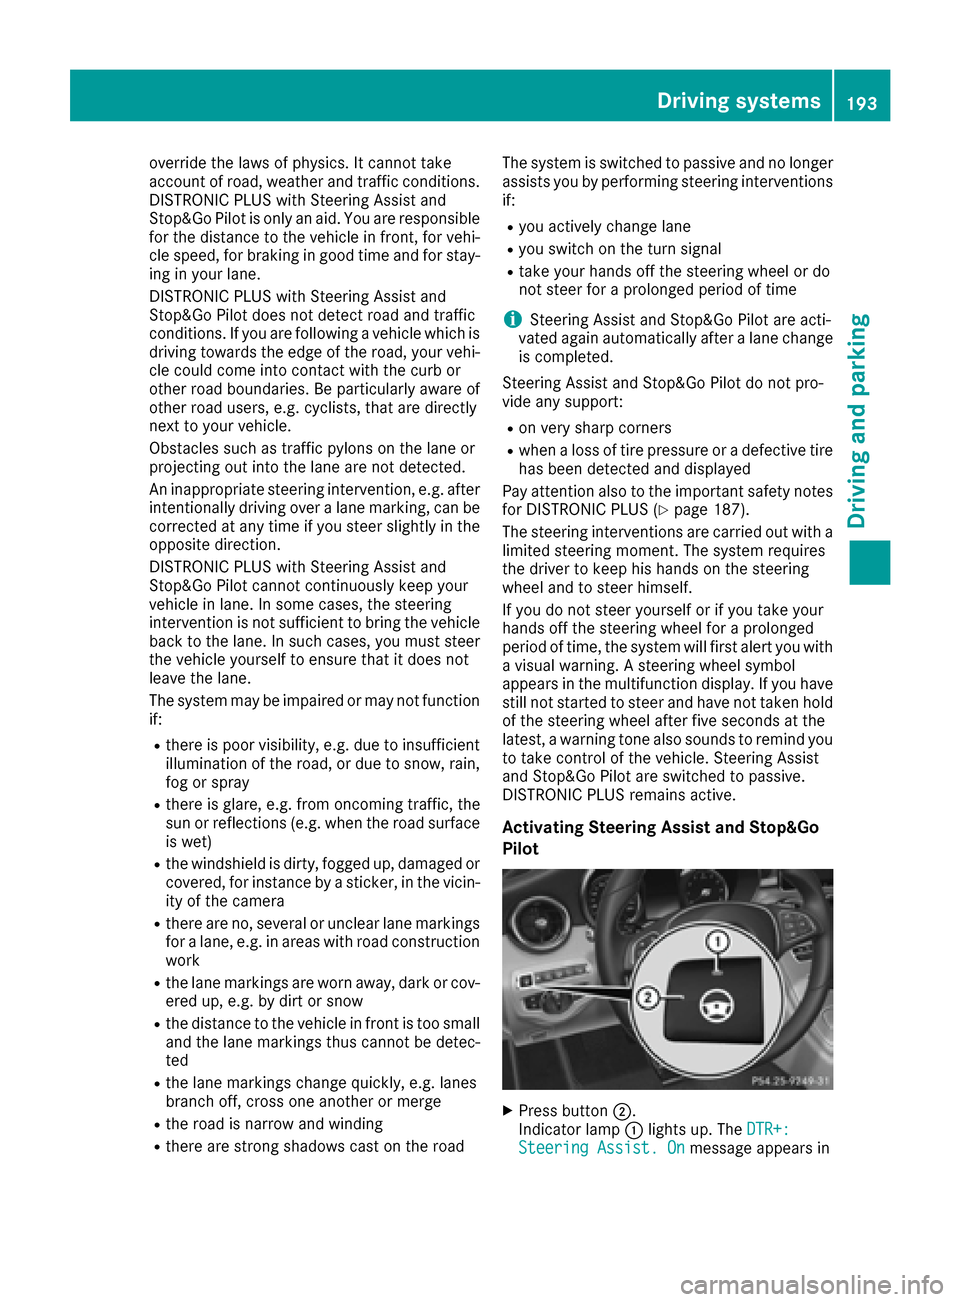
Activating Steering Assist and Stop&Go
Pilot
XPress button ;.
Indicator lamp :lights up. The DTR+:
Steering Assist. Onmessage appears in
Driving systems193
Driving and parking
Z
Page 200 of 398
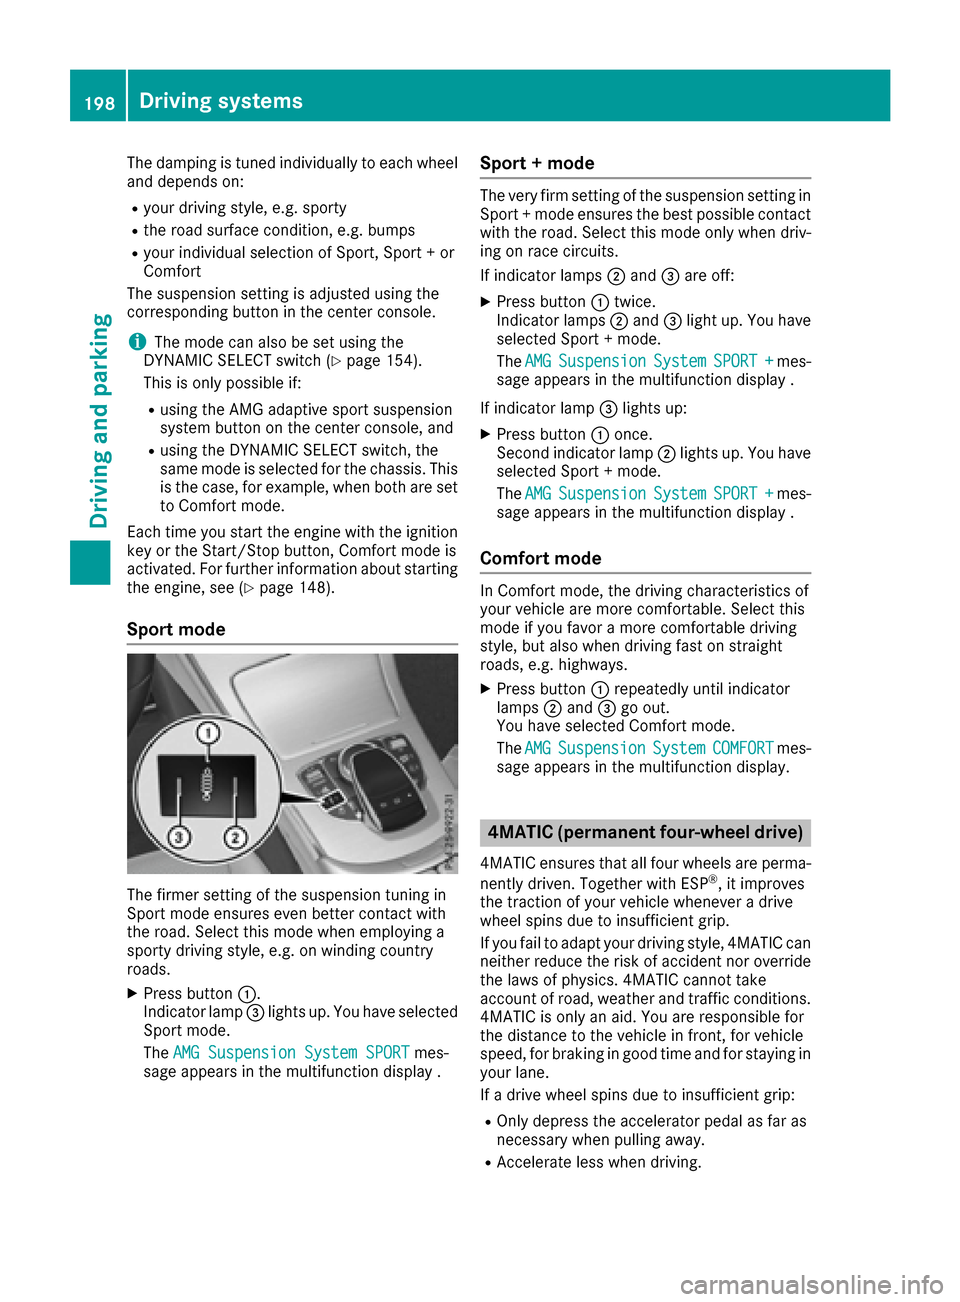
The damping is tuned individually to each wheel
and depends on:
Ryour driving style, e.g. sporty
Rthe road surface condition, e.g. bumps
Ryour individual selection of Sport, Sport + or
Comfort
The suspension setting is adjusted using the
corresponding button in the center console.
iThe mode can also be set using the
DYNAMIC SELECT switch (Ypage 154).
This is only possible if:
Rusing the AMG adaptive sport suspension
system button on the center console, and
Rusing the DYNAMIC SELECT switch, the
same mode is selected for the chassis. This
is the case, for example, when both are set
to Comfort mode.
Each time you start the engine with the ignition
key or the Start/Stop button, Comfort mode is
activated. For further information about starting
the engine, see (
Ypage 148).
Sport mode
The firmer setting of the suspension tuning in
Sport mode ensures even better contact with
the road. Select this mode when employing a
sporty driving style, e.g. on winding country
roads.
XPress button :.
Indicator lamp =lights up. You have selected
Sport mode.
The AMG Suspension System SPORT
mes-
sage appears in the multifunction display .
Sport + mode
The very firm setting of the suspension setting in
Sport + mode ensures the best possible contact
with the road. Select this mode only when driv-
ing on race circuits.
If indicator lamps ;and =are off:
XPress button :twice.
Indicator lamps ;and =light up. You have
selected Sport + mode.
The AMG
SuspensionSystemSPORT +mes-
sage appears in the multifunction display .
If indicator lamp =lights up:
XPress button :once.
Second indicator lamp ;lights up. You have
selected Sport + mode.
The AMG
SuspensionSystemSPORT +mes-
sage appears in the multifunction display .
Comfort mode
In Comfort mode, the driving characteristics of
your vehicle are more comfortable. Select this
mode if you favor a more comfortable driving
style, but also when driving fast on straight
roads, e.g. highways.
XPress button :repeatedly until indicator
lamps ;and =go out.
You have selected Comfort mode.
The AMG
SuspensionSystemCOMFORTmes-
sage appears in the multifunction display.
4MATIC (permanent four-wheel drive)
4MATIC ensures that all four wheels are perma-
nently driven. Together with ESP®, it improves
the traction of your vehicle whenever a drive
wheel spins due to insufficient grip.
If you fail to adapt your driving style, 4MATIC can
neither reduce the risk of accident nor override the laws of physics. 4MATIC cannot take
account of road, weather and traffic conditions.
4MATIC is only an aid. You are responsible for
the distance to the vehicle in front, for vehicle
speed, for braking in good time and for staying in
your lane.
If a drive wheel spins due to insufficient grip:
ROnly depress the accelerator pedal as far as
necessary when pulling away.
RAccelerate less when driving.
198Driving systems
Driving and parking
Page 203 of 398
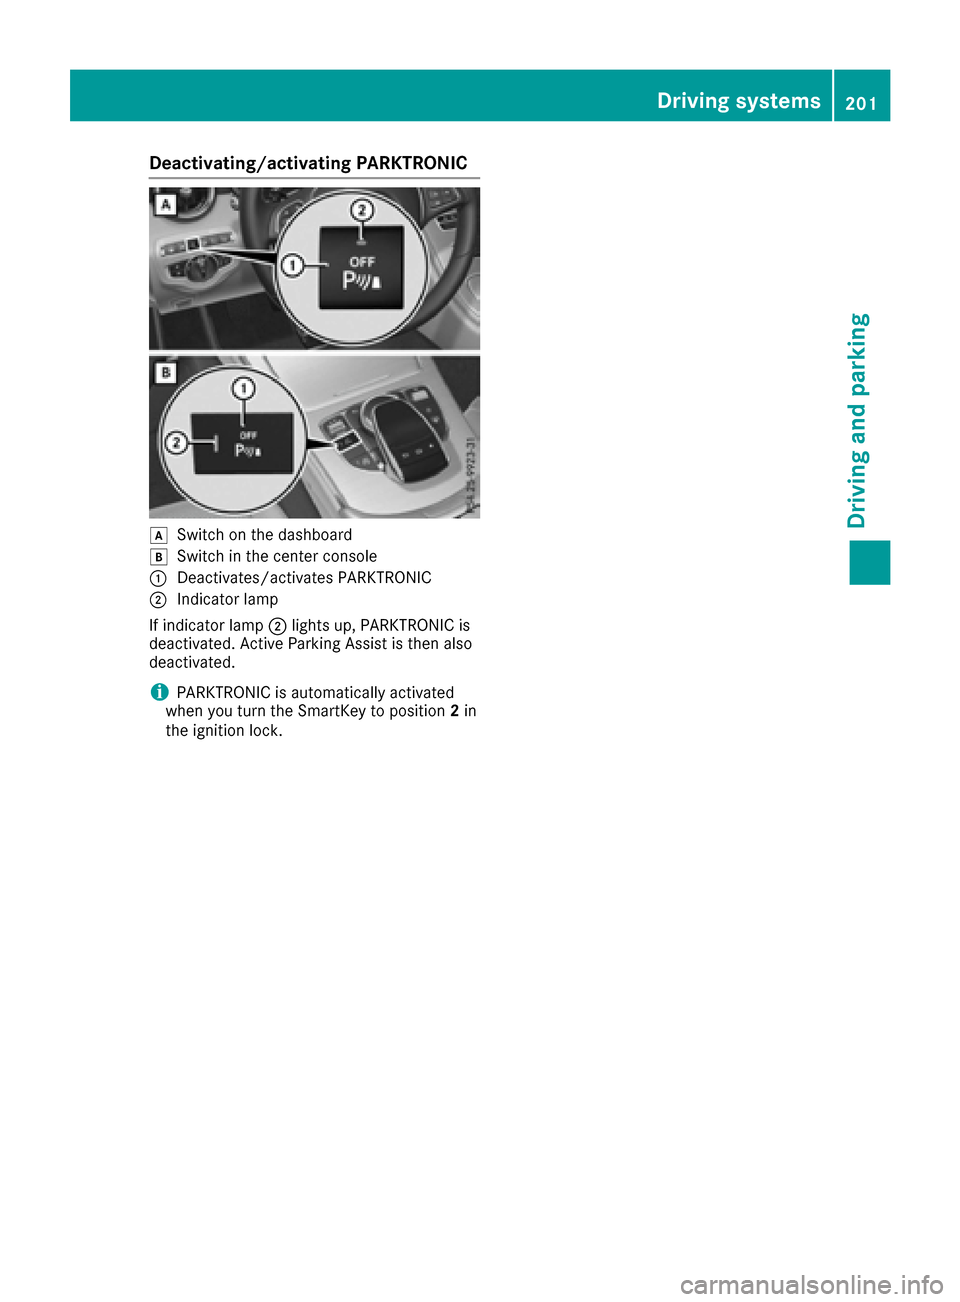
Deactivating/activating PARKTRONIC
dSwitchon th edashboar d
eSwitchin th ecenter console
:Deactivates/activates PARKTRONIC
;Indicator lamp
If indicator lamp ;lights up, PARKTRONIC is
deactivated. Active Parking Assis tis then also
deactivated.
iPARKTRONIC is automatically activated
when you turn th eSmartKey to position 2in
th eignition lock.
Driving systems20 1
Driving an d parking
Z