Doors MERCEDES-BENZ C-Class SEDAN 2016 W205 Owner's Manual
[x] Cancel search | Manufacturer: MERCEDES-BENZ, Model Year: 2016, Model line: C-Class SEDAN, Model: MERCEDES-BENZ C-Class SEDAN 2016 W205Pages: 398, PDF Size: 9.57 MB
Page 8 of 398
Steering wheel ............................... 340
Trim pieces .................................... 340
Washing by hand ........................... 336
Wheels ........................................... 338
Windows ........................................ 338
Wiper blades .................................. 338
Wooden trim .................................. 340
Cargo tie down rings ......................... 313
CD
see also Digital Operator's Man-
ual .................................................. 298
CD player (on-board computer) ........ 244
Center console
Lower section ............................ 40, 41
Upper section .................................. 39
Central locking
Locking/unlocking (SmartKey) ........ 81
Changing bulbs
High-beam headlamps ................... 124
Low-beam headlamps .................... 123
Opening and closing the side trim
panels ............................................ 124
Reversing lamps ............................ 124
Turn signals (front) ......................... 124
Turn signals (rear) .......................... 124
Changing the media source ............. 243
Charge-air pressure (on-board
computer, Mercedes-AMG vehi-
cles) .................................................... 252
Charging
see Charging the high-voltage bat-
tery (important safety notes)
Charging cable
Connecting .................................... 173
Controls ......................................... 171
Important safety notes .................. 171
Indicator lamp ................................ 172
Removing ....................................... 173
Storing ........................................... 171
Warming up ................................... 170
Charging the high-voltage battery
(important safety notes) ................... 168
Child
Restraint system .............................. 63
Child seat
Forward-facing restraint system ...... 66 LATCH-type (ISOFIX) child seat
anchors ............................................ 64
On the front-passenger seat ............ 65
Rearward-facing restraint system .... 65
Top Tether ....................................... 64
Child-proof locks
Important safety notes .................... 66
Rear doors ....................................... 67
Children
Special seat belt retractor ............... 62
Cigarette lighter ................................ 319
Cle
aning
Mirror turn signal ........................... 339
Climate control
3-zone automatic control panel ..... 131
Control panel for automatic cli-
mate control (1 zone) .................... 130
Control panel for dual-zone auto-
matic climate control ..................... 130
Controlling automatically ............... 133
Cooling with air dehumidification .. 133
Cooling with air dehumidification
(multimedia system) ...................... 303
Defrosting the windows ................. 136
Defrosting the windshield .............. 135
ECO start/stop function (3-zone
automatic climate control) ............. 132
General notes ................................ 129
Immediate pre-entry climate con-
trol ................................................. 143
Indicator lamp ................................ 133
Ionization ....................................... 140
Ionization (multimedia system) ...... 303
Notes on using the automatic cli-
mate control .................................. 132
Overview ........................................ 302
Overview of systems ...................... 129
Perfume atomizer .......................... 138
Perfume atomizer (multimedia
system) .......................................... 303
Pre-entry climate control (via key)
(multimedia system) ...................... 303
Pre-entry climate control at
departure time ............................... 142
Pre-entry climate control at
departure time (multimedia sys-
tem) ............................................... 303
Pre-entry climate control via key ... 141
6Index
Page 10 of 398
Switching on/off (on-board com-
puter) ............................................. 250
Declarations of conformity ................. 31
Diagnostics connection ...................... 31
Digital Operator's Manual
Help ................................................. 25
Introduction ..................................... 25
Digital speedometer ......................... 241
DIRECT SELECT lever
Automatic transmission ................. 156
Display
see Display messages
see Warning and indicator lamps
Display message
Hybrid drive system ....................... 272
Display messages
ASSYST PLUS ................................ 333
Calling up (on-board computer) ..... 255
Driving systems ............................. 274
Engine ............................................ 268
General notes ................................ 255
Hiding (on-board computer) ........... 255
Introduction ................................... 255
Lights ............................................. 267
Safety systems .............................. 256
SmartKey ....................................... 285
Tires ............................................... 280
Vehicle ........................................... 282
Distance recorder ............................. 239
Distance warning (warning lamp) .... 295
Distance warning function
Function/notes ................................ 71
DISTRONIC PLUS
Activating ....................................... 188
Activation conditions ..................... 188
Cruise control lever ....................... 188
Deactivating ................................... 191
Display message ............................ 277
Displays in the instrument cluster .. 191
Driving tips .................................... 192
Driving with DISTRONIC PLUS ....... 189
Function/notes ............................. 186
Important safety notes .................. 187
Setting a speed .............................. 190
Setting the specified minimum
distance ......................................... 190
Stopping ........................................ 189 with Steering Assist and Stop&Go
Pilot ............................................... 192
Doors
Automatic locking (switch) ............... 89
Central locking/unlocking
(SmartKey) ....................................... 81
Control panel ................................... 43
Display message ............................ 284
Emergency locking ........................... 89
Emergency unlocking ....................... 89
Important safety notes .................... 87
Opening (from inside) ...................... 88
Drinki ng an
d driving
......................... 180
Drive program
Automatic transmission ................. 159
SETUP (on-board computer) .......... 253
Drive programs
Display (DIRECT SELECT lever) ...... 157
Driver's door
see Doors
Driving abroad
Mercedes-Benz Service ................. 335
Driving Assistance PLUS package ... 219
Driving on flooded roads .................. 184
Driving safety systems
ABS (Anti-lock Braking System) ....... 68
ADAPTIVE BRAKE ............................. 76
Adaptive Brake Assist ...................... 72
BAS (Brake Assist System) .............. 68
BAS PLUS with Cross-Traffic
Assist ............................................... 69
COLLISION PREVENTION ASSIST
PLUS ................................................ 70
Distance warning function ............... 71
EBD (electronic brake force distri-
bution) ............................................. 76
ESP
®(Electronic Stability Pro-
gram) ............................................... 73
Important safety information ........... 68
Overview .......................................... 67
PRE-SAFE
®Brake ............................. 77
Recuperative Brake System ............. 45
STEER CONTROL ............................. 78
Driving system
RACE START (Mercedes-AMG
vehicles) ........................................ 195
8Index
Page 15 of 398
Lane Tracking package.....................216
Lap time (RACETIMER) ......................253
LATCH-type (ISOFIX) child seat
anchors ................................................ 64
License plate lamp (display mes-
sage) ................................................... 267
Light function, active
Display message ............................ 267
Light sensor (display message) ....... 267
Lights
Adaptive Highbeam Assist ............. 120
Automatic headlamp mode ............ 118
Cornering light function ................. 120
Fogged up headlamps .................... 121
General notes ................................ 118
Hazard warning lamps ................... 120
High beam flasher .......................... 119
High-beam headlamps ................... 119
Light switch ................................... 118
Low-beam headlamps .................... 119
Parking lamps ................................ 119
Rear fog lamp ................................ 119
Setting exterior lighting ................. 118
Standing lamps .............................. 119
Switching the daytime running
lamps on/off (on-board com-
puter) ............................................. 250
Turn signals ................................... 119
see Interior lighting
Loading guidelines ............................ 308
Locking
see Central locking
Locking (doors)
Automatic ........................................ 89
Emergency locking ........................... 89
From inside (central locking but-
ton) ..................................................8 8
Locking centrally
see Central locking
Low-beam headlamps
Changing bulbs .............................. 123
Display message ............................ 267
Switching on/off .......................... .119
Lumbar support
Adjusting the 4-way lumbar sup-
port ....... ......................................... 108M
M+S tires
............................................ 362
Malfunction message
see Display messages
Matte finish (cleaning instruc-
tions) ..................................................3 37
Maximum charge current
Setting (charging cable) ................. 172
Setting (on-board computer) .......... 248
mbrace
Call priority ....................................3 23
Display message ............................ 261
Downloading destinations
(COMAND) ..................................... 323
Downloading routes ....................... 326
Emergency call .............................. 320
General notes ................................ 320
Geo fencing ................................... 326
Locating a stolen vehicle ...............3 25
MB info call button ........................ 322
Remote fault diagnosis .................. 325
Remote vehicle locking .................. 324
Roadside Assistance button .......... 321
Search & Send ............................... 323
Self-test ......................................... 320
Speed alert ....................................3 26
System .......................................... 320
Triggering the vehicle alarm ........... 326
Vehicle remote unlocking .............. 324
Mechanical key
Function/notes ................................ 83
General notes .................................. 83
Inserting .......................................... 83
Locking vehicle ................................ 89
Removing ......................................... 83
Unlocking the driver's door .............. 89
Memory card (audio) ......................... 244
Memory function
Seats, steering wheel, exterior
mirrors ...........................................1 16
Mercedes-Benz Intelligent Drive
360°camera .................................. 210
Active Blind Spot Assist ................. 219
Active Lane Keeping Assist ............ 222
Active Parking Assist ..................... 202
ATTENTION ASSIST ........................ 214
Blind Spot Assist ............................ 216
Index13
Page 29 of 398
Protection of the environment
General notes
HEnvironmental note
Daimler's declared policy is one of compre-
hensive environmental protection.
The objectives are for the natural resources
that form the basis of our existence on this
planet to be used sparingly and in a manner
that takes the requirements of both nature
and humanity into account.
You too can help to protect the environment
by operating your vehicle in an environmen-
tally responsible manner.
Fuel consumption and the rate of engine,
transmission, brake and tire wear are affected by these factors:
Roperating conditions of your vehicle
Ryour personal driving style
You can influence both factors. You should
bear the following in mind:
Operating conditions:
Ravoid short trips as these increase fuel con-
sumption.
Ralways make sure that the tire pressures
are correct.
Rdo not carry any unnecessary weight.
Rremove roof racks once you no longer need
them.
Ra regularly serviced vehicle will contribute
to environmental protection. You should
therefore adhere to the service intervals.
Ralways have service work carried out at a
qualified specialist workshop.
Personal driving style:
Rdo not depress the accelerator pedal when
starting the engine.
Rdo not warm up the engine when the vehicle
is stationary.
Rdrive carefully and maintain a safe distance
from the vehicle in front.
Ravoid frequent, sudden acceleration and
braking.
Rchange gear in good time and use each gear
only up to Ôof its maximum engine speed.
Rswitch off the engine in stationary traffic.
Rkeep an eye on the vehicle's fuel consump-
tion.
HEnvironmental note
Have a defective high-voltage battery dis-
posed of in an environmentally-responsible
manner. Contact a qualified specialist work-
shop which has the necessary specialist
knowledge and tools to carry out the work
required. Mercedes-Benz recommends that
you use an authorized Mercedes-Benz Center
for this purpose.
Environmental concerns and recom-
mendations
Wherever the operating instructions require you
to dispose of materials, first try to regenerate or
re-use them. Observe the relevant environmen-
tal rules and regulations when disposing of
materials. In this way you will help to protect the
environment.
Genuine Mercedes-Benz parts
HEnvironmental note
Daimler AG also supplies reconditioned major
assemblies and parts which are of the same
quality as new parts. They are covered by the
same Limited Warranty entitlements as new
parts.
!Air bags and Emergency Tensioning Devi-
ces, as well as control units and sensors for
these restraint systems, may be installed in
the following areas of your vehicle:
Rdoors
Rdoor pillars
Rdoor sills
Rseats
Rcockpit
Rinstrument cluster
Rcenter console
Genuine Mercedes-Benz parts27
Introduction
Z
Page 53 of 398
XPress the release button in the belt buckle,
hold the belt tongue firmly and guide the belt
back.
Seat belt adjustment
The seat-belt adjustment is an integral part of
the PRE-SAFE®convenience function. This func-
tion adjusts the driver's and front-passenger
seat belt to the upper body of the occupants.
The belt strap is tightened slightly when:
Rthe belt tongue is engaged in the buckle and
Rthe ignition is switched on
The seat-belt adjustment will apply a certain
retraction force if any slack is detected between
the vehicle occupant and the seat belt. Do not
hold on to the seat belt tightly while it is adjust-
ing.
You can switch the seat-belt adjustment on and
off using the multimedia system. Information on
activating and deactivating the seat-belt adjust-
ment function can be found in the Digital Oper-
ator's Manual or in the separate operating
instructions for the multimedia system.
Belt warning for the driver and front
passenger
The 7 seat belt warning lamp in the instru-
ment cluster is a reminder that all vehicle occu- pants must wear their seat belts. It may light up
continuously or flash. In addition, there may be
a warning tone.
Regardless of whether the driver's seat belt has
already been fastened, the 7seat belt warn-
ing lamp lights up for six seconds each time the
engine is started. If the front doors are closed
and the driver or front-passenger seat belt has
not been fastened, the 7seat belt warning
lamp lights up again after the six seconds. As
soon as the driver's and front-passenger seat
belts are fastened or a front door is opened
again, the 7seat belt warning lamp goes out.
If the driver's seat belt is not fastened after the
engine is started, an additional warning tone will sound. The warning tone switches off after six
seconds or once the driver's seat belt is fas-
tened.
If the vehicle speed exceeds 15 mph (25 km/ h)
an d the driver's or front-passenger seat belt is
not fastened, a warning tone sounds again. The
warning tone sounds with increasing intensity
for a maximum of 60 seconds or until the driver or front passenger have fastened their seat
belts.
If the driver or front passenger unfasten their
seat belt while the vehicle is in motion, the belt
warning automatically reactivates.
iFor more information on the
7seat belt
warning lamp, see "Warning and indicator
lamps in the instrument cluster, seat belts"
(
Ypage 287).
Air bags
Introduction
The air bag installation point is identified by the
label AIR BAG.
An air bag supplements a correctly fastened
seat belt. However, it is not intended as a sub-
stitute for the seat belt. Air bags provide addi-
tional protection in the event of an accident.
Not all air bags are deployed in an accident. The
various air bag systems work independently of
each other (
Ypage 58).
There is, however, no system available today
that can completely rule out injury or death.
It is also not possible to rule out a risk of injury
caused by an air bag due to the high speed at
which the air bag must be deployed.
Important safety notes
GWARNING
If you do not sit in the correct seat position,
the air bag cannot protect as intended and
could even cause additional injury when
deployed. This poses an increased risk of
injury or even fatal injury.
To avoid hazardous situations, always make
sure that all of the vehicle's occupants:
Rhave fastened their seat belts correctly,
including pregnant women
Rare sitting correctly and maintain the great-
est possible distance to the air bags
Rfollow the following instructions
Always make sure that there are no objects
between the air bag and the vehicle's occu-
pants.
Occupant safety51
Safety
Z
Page 54 of 398
RAdjust the seats properly before beginning
your journey. Always make sure that the seat
is in an almost upright position. The center of
the head restraint must support the head at
about eye level.
RMove the driver's and front-passenger seats
as far back as possible. The driver's seat posi-
tion must allow the vehicle to be driven safely.
ROnly hold the steering wheel on the outside.
This allows the air bag to be fully deployed.
RAlways lean against the backrest while driv-
ing. Do not lean forwards or lean against the
door or side window. You may otherwise be in
the deployment area of the air bags.
RAlways keep your feet in the footwell in front
of the seat. Do not put your feet on the dash-
board, for example. Your feet may otherwise
be in the deployment area of the air bag.
RFor this reason, always secure persons less
than 5 ft (1.50 m)tall in suitable restraint sys-
tems. Up to this height, the seat belt cannot
be worn correctly.
If a child is traveling in your vehicle, also
observe the following notes:
RAlways secure children under twelve years of age and less than 5 ft (1.50m)tall in suitable
child restraint systems.
RChild restraint systems should be installed on
the rear seats.
ROnly secure a child in a rearward-facing child
restraint system on the front-passenger seat
when the front-passenger front air bag is
deactivated. If the PASSENGER AIR BAG OFF
indicator lamp is permanently lit, the front-
passenger front air bag is deactivated
(
Ypage 47).
RAlways observe the instructions and safety
notes on the "Occupant Classification System
(OCS)" (
Ypage 54) and on "Children in the
vehicle" (Ypage 62) in addition to the child
restraint system manufacturer's installation
and operating instructions.
Objects in the vehicle interior may prevent
an air bag from functioning correctly. Before
starting your journey and to avoid risks resulting from the speed of the air bag as it deploys, make
sure that:
Rthere are no people, animals or objects
between the vehicle occupants and an air
bag.
Rthere are no objects between the seat, door
and B-pillar.
Rno hard objects, e.g. coat hangers, hang on
the grab handles or coat hooks.
Rno accessories, such as cup holders, are
attache d to the vehicle within the deployment
area of an air bag, e.g. to doors, side windows,
rear side trim or side walls.
Rno heavy, sharp-edged or fragile objects are in
the pockets of your clothing. Store such
objects in a suitable place.
GWARNING
If you modify the air bag cover or affix objects
such as stickers to it, the air bag can no longer
function correctly. There is an increased risk
of injury.
Never modify an air bag cover or affix objects
to it.
GWARNING
Sensors to control the air bags are located in
the doors. Modifications or work not per-
formed correctly to the doors or door panel-
ing, as well as damaged doors, can lead to the
function of the sensors being impaired. The air
bags might therefore not function properly
anymore. Consequently, the air bags cannot
protect vehicle occupants as they are
designed to do. There is an increased risk of
injury.
Never modify the doors or parts of the doors.
Always have work on the doors or door pan-
eling carried out at a qualified specialist work-
shop.
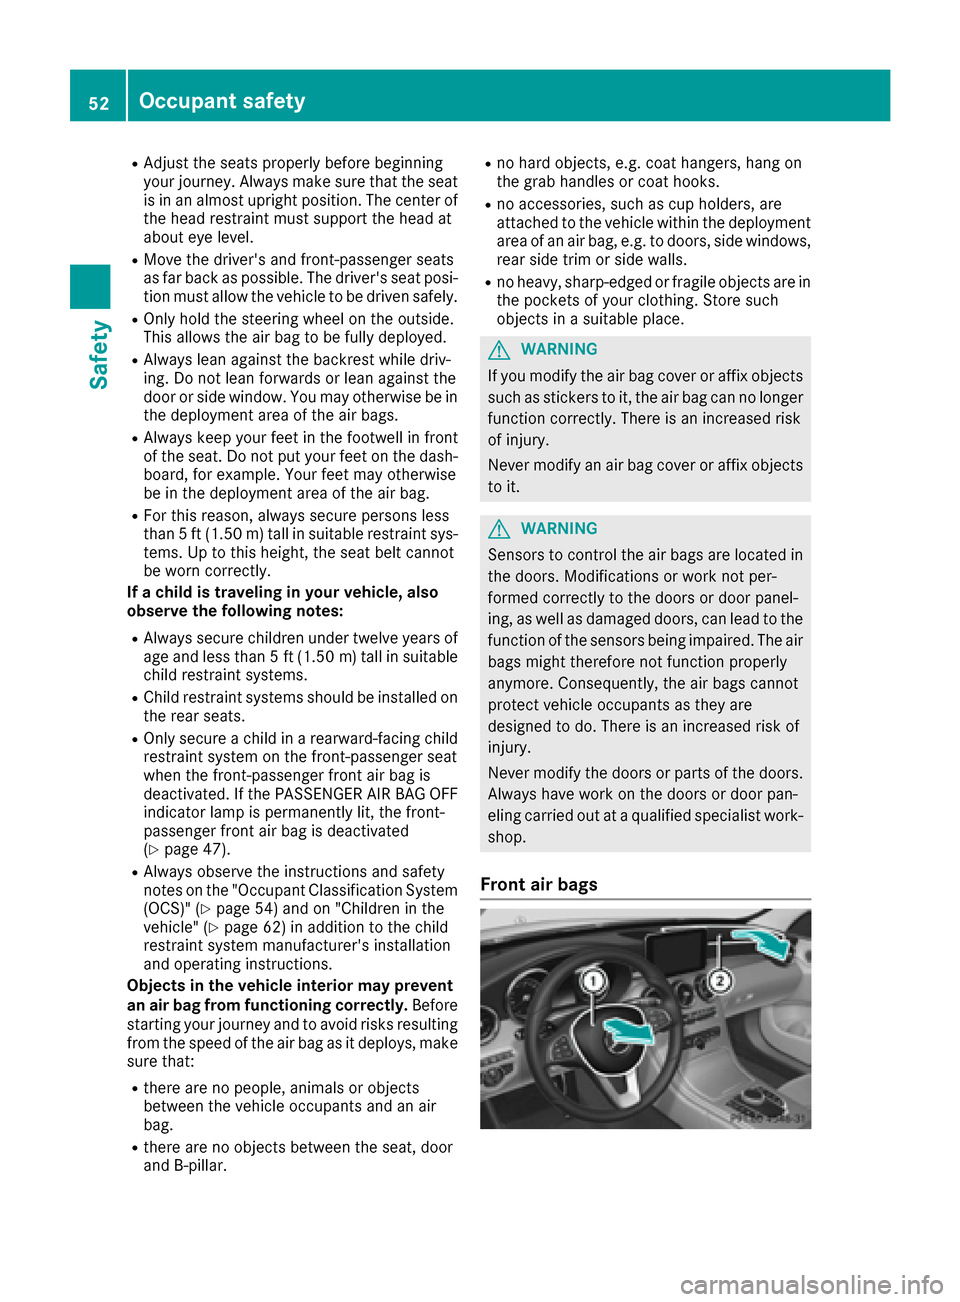
Front air bags
52Occupant safety
Safety
Page 63 of 398
PRE-SAFE®takes the following measures
depending on the hazardous situation detected:
Rthe front seat belts are pre-tensioned.
Rif the vehicle skids, the side windows and the
sliding sunroof are closed.
Rvehicles with the memory function for the
front-passenger seat: the front-passenger
seat is adjusted if it is in an unfavorable posi-
tion.
If the hazardous situation passes without result-
ing in an accident, PRE-SAFE
®slackens the belt
pre-tensioning. All settings made by PRE-SAFE®
can then be reversed.
If the seat belt pre-tensioning is not reduced:
XMove the seat backrest or seat back slightly
when the vehicle is stationary.
The seat belt pre-tensioning is reduced and
the locking mechanism is released.
The seat-belt adjustment is an integral part of
the PRE-SAFE
®convenience function. You will
find information on the convenience function
under "Belt adjustment" (
Ypage 51).
PRE-SAFE®PLUS (anticipatory occu-
pant protection system PLUS)
Introduction
PRE-SAFE®PLUS is only available in vehicles
with the Driving Assistance package.
Using the radar sensor system, PRE-SAFE
®
PLUS is able to detect that a head-on or rear-end
collision is imminent. In certain hazardous sit-
uations, PRE-SAFE
®PLUS takes pre-emptive
measures to protect the vehicle occupants.
Important safety notes
The intervention of PRE-SAFE®PLUS cannot
prevent an imminent collision.
The driver is not warned about the intervention
of PRE-SAFE
®PLUS.
PRE-SAFE®PLUS does not intervene if the vehi-
cle is backing up.
When driving, or when parking or exiting a park-
ing space with assistance from Active Parking
Assist, PRE-SAFE
®PLUS will not apply the
brakes.
Function
PRE-SAFE®PLUS intervenes in certain situa-
tions if the radar sensor system detects an
imminent head-on or rear-end collision.
PRE-SAFE
®PLUS takes the following measures
depending on the hazardous situation detected:
Rif the radar sensor system detects that a
head-on collision is imminent, the seat belts
are pre-tensioned.
Rif the radar sensor system detects that a rear-
end collision is imminent:
-the brake pressure is increased if the driver
applies the brakes when the vehicle is sta- tionary.
-the seat belts are pre-tensioned.
The PRE-SAFE®PLUS braking application is can-
celed:
Rif the accelerator pedal is depressed when a
gear is engaged
Rif the risk of a collision passes or is no longer
detected
Rif DISTRONIC PLUS indicates an intention to
pull away
If the hazardous situation passes without result-
ing in an accident, the original settings are
restored.
Automatic measures after an acci-
dent
Immediately after an accident, the following
measures are implemented, depending on the
type and severity of the impact:
Rthe hazard warning lamps are activated
Rthe emergency lighting is activated
Rthe vehicle doors are unlocked
Rthe front side windows are lowered
Rvehicles with a memory function: the electri-
cally adjustable steering wheel is raised
Rthe engine is switched off and the fuel supply
is cut off
Rvehicles with mbrace: automatic emergency
call
Rvehicles with the hybrid drive system: the
hybrid system and the high-voltage electrical
system are deactivated
Occupant safety61
Safety
Z
Page 68 of 398
Always observe the child restraint system man-
ufacturer's installation and operating instruc-
tions.
Forward-facing child restraint system
If it is absolutely necessary to install a forward-
facing child restraint system on the front-
passenger seat, always move the front-
passenger seat as far back as possible. Fully
retract the seat cushion length. The entire base
of the child restraint system must always rest on
the seat cushion of the front-passenger seat.
The backrest of the child restraint system must
lie as flat as possible against the backrest of thefront-passenger seat. The child restraint system
must not touch the roof or be subjected to a load
by the head restraint. Adjust the angle of the
seat backrest and the head restraint position
accordingly. Always make sure that the shoul-
der belt strap is correctly routed from the vehi-
cle belt outlet to the shoulder belt guide on the
child restraint system. The shoulder belt strap
must be routed forwards and downwards from
the vehicle belt outlet. If necessary, adjust the
vehicle belt outlet and the front-passenger seat
accordingly.
Always observe the child restraint system man-
ufacturer's installation and operating instruc-
tions.
Child-proof locks
Important safety notes
GWARNING
If children are traveling in the vehicle, they
could:
Ropen doors, thus endangering other people
or road users
Rexit the vehicle and be caught by oncoming
traffic
Roperate vehicle equipment and become
trapped
There is a risk of an accident and injury.
Always activate the child-proof locks and
override feature if children are traveling in the vehicle. When leaving the vehicle, always take
the key with you and lock the vehicle. Never
leave children unattended in the vehicle. Override feature for:
Rthe rear doors (Ypage 67)
Rthe rear side windows (Ypage 67)
GWARNING
If you leave children unsupervised in the vehi-
cle, they could set it in motion by, for example:
Rrelease the parking brake.
Rshift the automatic transmission out of the
parking position P.
Rstart the engine.
In addition, they may operate vehicle equip-
ment and become trapped. There is a risk of
an accident and injury.
When leaving the vehicle, always take the
SmartKey with you and lock the vehicle. Never
leave children unsupervised in the vehicle.
GWARNING
If persons, particularly children are subjected to prolonged exposure to extreme heat or
cold, there is a risk of injury, possibly even
fatal. Never leave children unattended in the
vehicle.
GWARNING
If the child restraint system is subjected to
direct sunlight, parts may get very hot. Chil-
dren may burn themselves on these parts,
particularly on the metal parts of the child
restraint system. There is a risk of injury.
If you leave the vehicle, taking the child with
you, always ensure that the child restraint
system is not exposed to direct sunlight. Pro- tect it with a blanket, for example. If the child
restraint system has been exposed to direct
sunlight, let it cool down before securing the
child in it. Never leave children unattended in
the vehicle.
66Children in the vehicle
Safety
Page 69 of 398
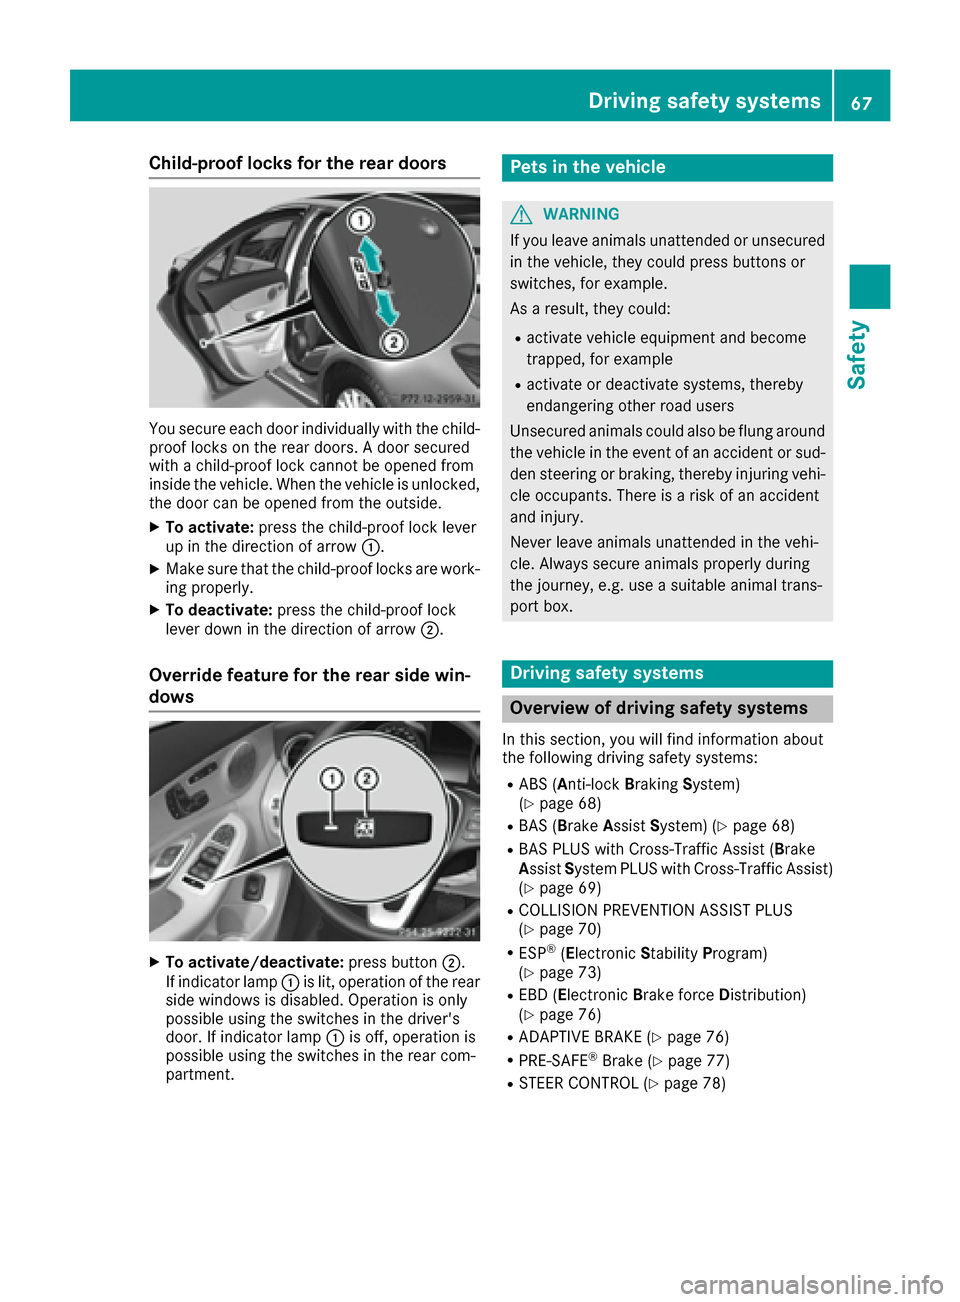
Child-proof locks for the rear doors
You secure each door individually with the child-
proof locks on the rear doors. A door secured
with a child-proof lock cannot be opened from
inside the vehicle. When the vehicle is unlocked,
the door can be opened from the outside.
XTo activate:press the child-proof lock lever
up in the direction of arrow :.
XMake sure that the child-proof locks are work-
ing properly.
XTo deactivate:press the child-proof lock
lever down in the direction of arrow ;.
Override feature for the rear side win-
dows
XTo activate/deactivate:press button;.
If indicator lamp :is lit, operation of the rear
side windows is disabled. Operation is only
possible using the switches in the driver's
door. If indicator lamp :is off, operation is
possible using the switches in the rear com-
partment.
Pets in the vehicle
GWARNING
If you leave animals unattended or unsecured
in the vehicle, they could press buttons or
switches, for example.
As a result, they could:
Ractivate vehicle equipment and become
trapped, for example
Ractivate or deactivate systems, thereby
endangering other road users
Unsecured animals could also be flung around
the vehicle in the event of an accident or sud-
den steering or braking, thereby injuring vehi-
cle occupants. There is a risk of an accident
and injury.
Never leave animals unattended in the vehi-
cle. Always secure animals properly during
the journey, e.g. use a suitable animal trans-
port box.
Driving safety systems
Overview of driving safety systems
In this section, you will find information about
the following driving safety systems:
RABS (Anti-lock Braking System)
(Ypage 68)
RBAS (B rakeAssist System) (Ypage 68)
RBAS PLUS with Cross-Traffic Assist ( Brake
Assist System PLUS with Cross-Traffic Assist)
(
Ypage 69)
RCOLLISION PREVENTION ASSIST PLUS
(Ypage 70)
RESP®( Electronic StabilityProgram)
(Ypage 73)
REBD (Electronic Brake force Distribution)
(Ypage 76)
RADAPTIVE BRAKE (Ypage 76)
RPRE-SAFE®Brake (Ypage 77)
RSTEER CONTROL (Ypage 78)
Driving safety systems67
Safety
Z
Page 83 of 398
SmartKey
Important safety notes
GWARNING
If children are left unsupervised in the vehicle,
they could:
Ropen the doors, thus endangering other
people or road users.
Rget out and disrupt traffic.
Roperate the vehicle's equipment.
Additionally, children could set the vehicle in
motion if, for example, they:
Rrelease the parking brake.
Rshifting the automatic transmission out of
park position P
RStart the engine.
There is a risk of an accident and injury.
When leaving the vehicle, always take the
SmartKey with you and lock the vehicle. Never
leave children or animals unattended in the
vehicle. Always keep the SmartKey out of
reach of children.
GWARNING
If you attach heavy or large objects to the
SmartKey, the SmartKey could be uninten-
tionally turned in the ignition lock. This could
cause the engine to be switched off. There is a risk of an accident.
Do not attach any heavy or large objects to the
SmartKey. Remove any bulky key rings before
inserting the SmartKey into the ignition lock.
!Keep the SmartKey away from strong mag-
netic fields. Otherwise, the remote control
function could be affected.
Strong magnetic fields can occur in the vicin-
ity of powerful electrical installations.
Do not keep the SmartKey:
Rwith electronic devices, e.g. a mobile phone
or another SmartKey.
Rwith metallic objects, e.g. coins or metal foil.
Rinside metallic objects, e.g. a metal case.
This can affect the functionality of the Smart- Key. Vehicles with KEYLESS-GO start function:
do
not keep the SmartKey on the parcel shelf or in
the trunk. Otherwise, the SmartKey may not be
detected, e.g. when starting the engine using
the Start/Stop button.
A check which periodically establishes a radio
connection between the vehicle and the Smart-
Key determines whether a valid SmartKey is in
the vehicle. This occurs, for example:
Rwhen starting the engine
Rwhile driving
Rwhen the external door handles are touched
Rduring convenience closing
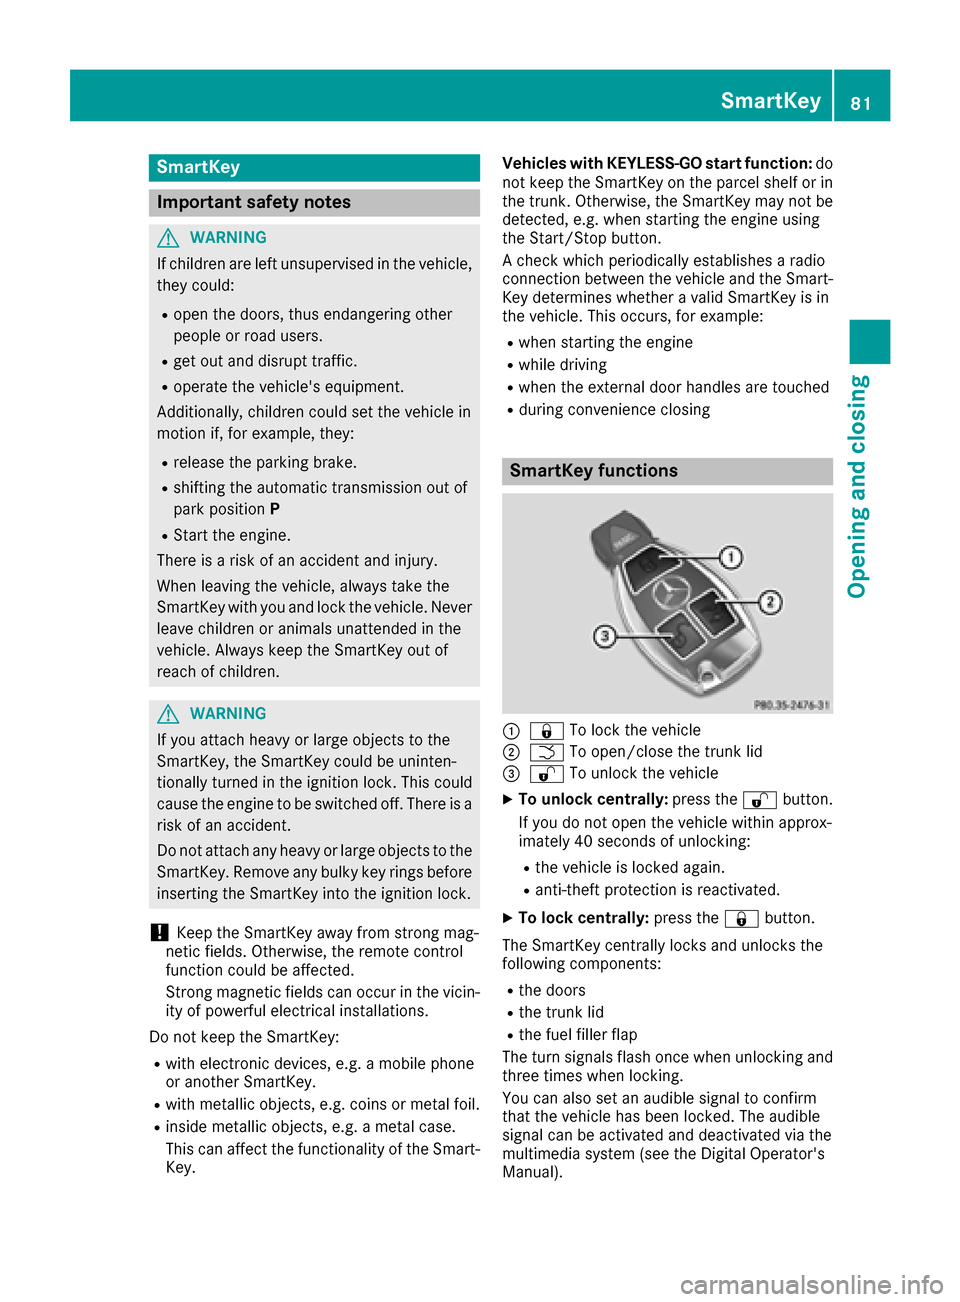
SmartKey functions
:& To lock the vehicle
;FTo open/close the trunk lid
=%To unlock the vehicle
XTo unlock centrally: press the%button.
If you do not open the vehicle within approx-
imately 40 seconds of unlocking:
Rthe vehicle is locked again.
Ranti-theft protection is reactivated.
XTo lock centrally: press the&button.
The SmartKey centrally locks and unlocks the
following components:
Rthe doors
Rthe trunk lid
Rthe fuel filler flap
The turn signals flash once when unlocking and
three times when locking.
You can also set an audible signal to confirm
that the vehicle has been locked. The audible
signal can be activated and deactivated via the
multimedia system (see the Digital Operator's
Manual).
SmartKey81
Opening and closing
Z