car play MERCEDES-BENZ C-CLASS SEDAN 2018 COMAND Manual
[x] Cancel search | Manufacturer: MERCEDES-BENZ, Model Year: 2018, Model line: C-CLASS SEDAN, Model: MERCEDES-BENZ C-CLASS SEDAN 2018Pages: 174, PDF Size: 4.1 MB
Page 146 of 174
Selecting Internet update of metadata
XIn media mode, slide6the controller.
The media menu bar is shown.
XTo select Options: turn and press the con-
troller.
XSelect Updating Metadata Via Internetin the selection list.
A connection with the Gracenote®server is
established. The missing data is loaded,
saved and displayed in the main display field.
If there is no data found or there is no Internet
connection, a corresponding error message
will appear.
Switching the Gracenote®data display
on/off
XActivate CD mode (Ypage 138).
XTo select Gracenote Media Database: turn
and press the controller.
XTo switch the display off: select None.
In the CD mode menu, Track 1is shown, for
example, instead of the Gracenote®data.
XTo switch on the display: press the controller.
Media search
General notes
The multimedia system plays back files from the following data media:
RDisc (audio CD or DVD)
RMemory card
RMedia Register
RUSB storage device
RApple®devices (folder, year and photos are
not available)
The categories are displayed according to the
data available.
Starting the media search
XIn the media mode menu, slide 6the con-
troller.
The media menu bar is shown.
XTo select Search: turn and press the control-
ler.
The category list appears.
Category list
XIn the media mode menu, slide 6the con-
troller.
The media menu bar is shown.
XTo select Search: turn and press the control-
ler.
The category list is shown.
Depending on the connected media sources and
files, the following categories are listed:
RCurrent Tracklist
RFolder
RSelect By Cover
RKeyword Search
RPlaylists
RArtists
RAlbums
RTrack
RGenres
RYear
RComposers
RVideos
RPhotos
RPodcasts
RAudiobooks
iThe categories are available as soon as the
entire media content has been read and ana-
lyzed.
If the same device is reconnected with
unchanged media content, these categories
are available more quickly.
When connecting Apple
®devices, the cate-
gories “Folder”, “Year” and “Photos” are not
available.
Searching a track using the current
track list
XSelect Current Tracklistfrom the cate-
gory list (Ypage 144).
The selection list appears.
XSelect the required track.
Searching for a track via a folder
Playable files can be searched for in the active
data medium's directories.
144Media search
Media
Page 148 of 174
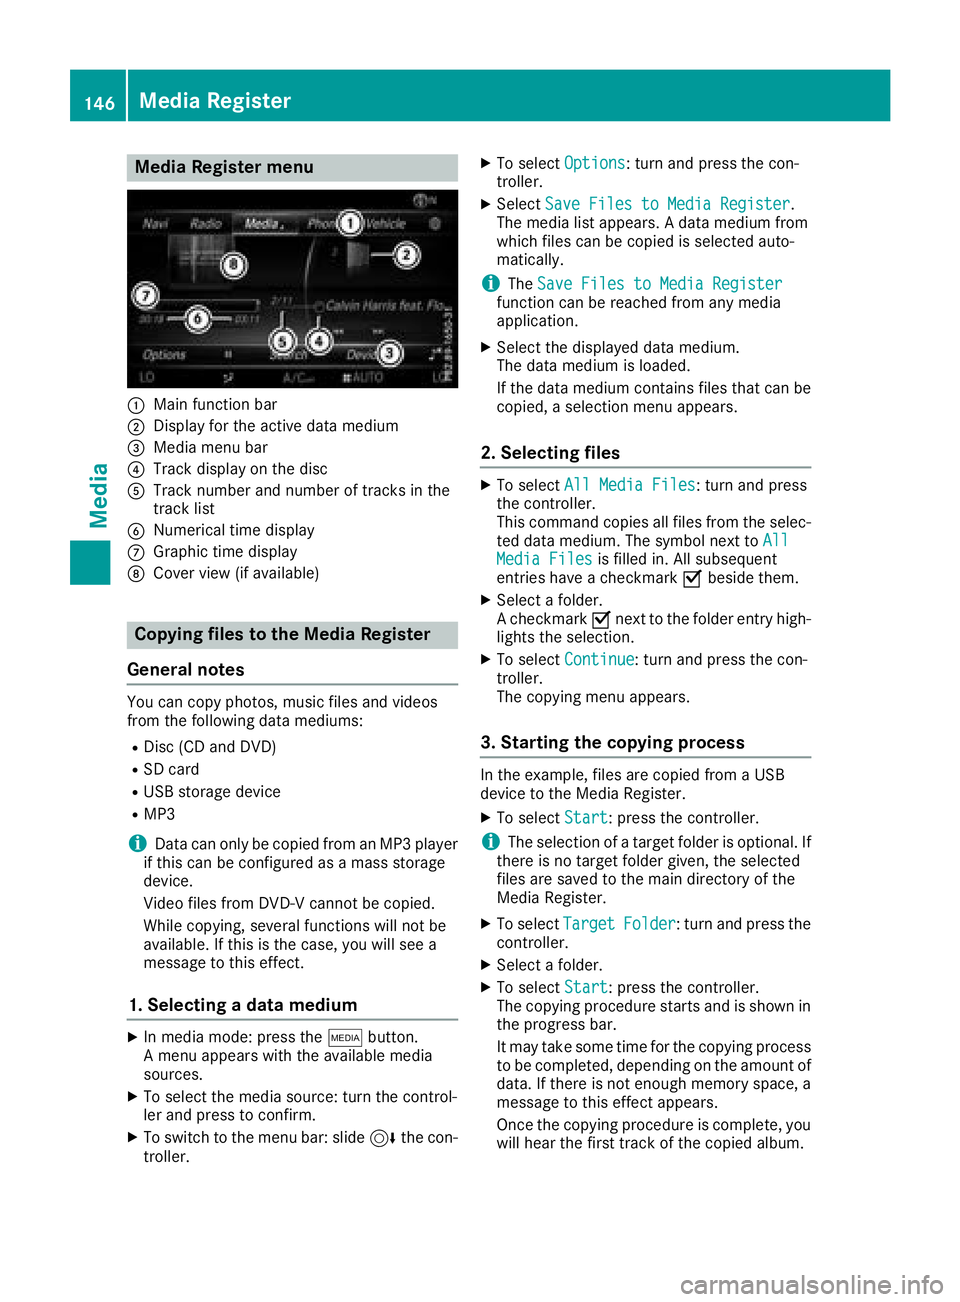
Media Register menu
:Main function bar
;Display for the active data medium
=Media menu bar
?Track display on the disc
ATrack number and number of tracks in the
track list
BNumerical time display
CGraphic time display
DCover view (if available)
Copying files to the Media Register
General notes
You can copy photos, music files and videos
from the following data mediums:
RDisc (CD and DVD)
RSD card
RUSB storage device
RMP3
iData can only be copied from an MP3 player
if this can be configured as a mass storage
device.
Video files from DVD-V cannot be copied.
While copying, several functions will not be
available. If this is the case, you will see a
message to this effect.
1. Selecting a data medium
XIn media mode: press the Õbutton.
A menu appears with the available media
sources.
XTo select the media source: turn the control-
ler and press to confirm.
XTo switch to the menu bar: slide 6the con-
troller.
XTo select Options: turn and press the con-
troller.
XSelect Save Files to Media Register.
The media list appears. A data medium from
which files can be copied is selected auto-
matically.
iThe Save Files to Media Registerfunction can be reached from any media
application.
XSelect the displayed data medium.
The data medium is loaded.
If the data medium contains files that can be
copied, a selection menu appears.
2. Selecting files
XTo select All Media Files: turn and press
the controller.
This command copies all files from the selec-
ted data medium. The symbol next to All
Media Filesis filled in. All subsequent
entries have a checkmark Obeside them.
XSelect a folder.
A checkmark Onext to the folder entry high-
lights the selection.
XTo select Continue: turn and press the con-
troller.
The copying menu appears.
3. Starting the copying process
In the example, files are copied from a USB
device to the Media Register.
XTo select Start: press the controller.
iThe selection of a target folder is optional. If
there is no target folder given, the selected
files are saved to the main directory of the
Media Register.
XTo select TargetFolder: turn and press the
controller.
XSelect a folder.
XTo select Start: press the controller.
The copying procedure starts and is shown in
the progress bar.
It may take some time for the copying process
to be completed, depending on the amount of
data. If there is not enough memory space, a
message to this effect appears.
Once the copying procedure is complete, you
will hear the first track of the copied album.
146Media Register
Media
Page 156 of 174
RPlaylists
RArtists
RAlbums
RTrack
RGenres
RYear
RComposers
RVideos
RPhotos
RPodcasts
RAudiobooks
iThe functions are available as soon as the
entire media content has been read and ana-
lyzed.
If the same device is reconnected with
unchanged media content, these functions
are available more quickly.
The audio books and podcasts categories are
only available for Apple
®devices.
When connecting Apple®devices, the cate-
gories “Folder”, “Year” and “Photos” are not
available.
Searching for a track
XIn media mode, slide 6the controller.
The media menu bar is shown.
XTo select Search: turn and press the control-
ler.
The category list appears.
XTo select a category, e.g. Current Track‐list: turn and press the controller.
A selection list appears.
XSelect the required track.
Using the keyword search
XTo select Keyword Searchin the category
list: turn and press the controller.
XEnter and confirm the characters of the
desired search using the controller
(
Ypage 145).
Search results are sorted according to the
available categories, displayed and can then
be selected.
Selecting the playback option
XIn media mode, slide 6the controller.
The media menu bar is shown.
XTo select Options: turn and press the con-
troller.
XTo select the desired playback option: turn
and press the controller.
Additional information on playback options
(
Ypage 142).
Selecting video settings
Video files from Apple®devices cannot be
played.
If playable video files are found, they will be
played by the multimedia system.
XTo activate full-screen mode: press the con-
troller in the Media Interface menu.
XTo show the video menu: slide 6the con-
troller in full-screen mode.
The Media Interface menu bar appears.
XTo select Options: turn and press the con-
troller.
XSelect Video Settings.
XChange the settings (Ypage 156).
Video DVD mode
Important safety notes
GWARNING
The CD/DVD drive is a class 1 laser product.
If you open the housing of the CD/DVD drive,
there is a risk of exposure to invisible laser
radiation. This laser radiation could damage
your retina. There is a risk of injury.
Never open the housing. Always have main-
tenance and repair work carried out at a quali- fied specialist workshop.
GWARNING
If you handle a disc while driving, you may be
distracted from the traffic situation. You could
also lose control of the vehicle. There is a risk of an accident.
154Video DVD mode
Media
Page 160 of 174
FStops playback
GPauses playback
Using the DVD functions
XIn full-screen mode, press the controller
The DVD functions menu is shown.
It is possible to navigate in the DVD's control
menu when the arrows in the upper menu bar
are activated.
XTo select theXZ¬Yarrow to navigate in the
menu: turn the controller.
The active arrow is highlighted.
XTo select a menu entry: press the controller.
The next menu entry in the direction of the
arrow is highlighted.
XTo call up a highlighted menu entry: turn the
controller until ¬is highlighted.
XPress the controller.
The selected DVD scene is played.
XTo hide DVD functions: select &using the
controller.
XPress the controller.
The DVD functions menu is hidden.
Continuing/stopping playback
Interrupting playback
XShow the DVD functions (Ypage 157).
XTo select Éfrom the DVD functions menu:
turn and press the controller.
The Ë display changes to Ì. Playback
is stopped.
Continuing playback
XSelect Ì.
Playback continues from the point where it
was interrupted.
Stopping playback
XWhile playback is interrupted select É
again.
Restarting playback
XSelect Ì.
Playback restarts from the beginning.
Pausing/continuing playback
Pausing playback
XShow the DVD functions (Ypage 157).
XSelect Ë: turn and press the controller.
The Ë display changes to Ì.
Continuing playback
XSelect Ì.
Selecting a scene/chapter
If the film is divided into scenes and chapters,
you can select these directly while the film is
running or you can skip progressively through
them. This is not possible at certain points for
some DVDs (e.g. during the opening credits).
It may also be possible to select the scene and
chapter from the functions stored on the DVD.
XTo skip forward or back: in the video menu,
turn the controller.
The next or previous scene in the film is skip-
ped to.
iThe DVD functions can also be used to make
selections (Ypage 157).
Picture viewer
General notes
If there are pictures on the active data medium,
you can view them on the multimedia system.
The following data media and picture formats
are supported:
RData media: Media Register, CD, DVD, USB
devices, SD cards
RPicture formats: jpeg, jpg, bmp, png
The maximum image resolution is
20 megapixels.
It is not possible to view a picture from the driv-
er's side while the vehicle is in motion.
Displaying pictures
XIn media mode, slide 6the controller.
XTo select Search: turn and press the control-
ler.
The category list appears.
158Picture viewer
Media