display MERCEDES-BENZ C-CLASS SEDAN 2018 Repair Manual
[x] Cancel search | Manufacturer: MERCEDES-BENZ, Model Year: 2018, Model line: C-CLASS SEDAN, Model: MERCEDES-BENZ C-CLASS SEDAN 2018Pages: 370, PDF Size: 6.25 MB
Page 168 of 370
The ECO display consists of three sections, with
an inner and outer area. The sections corre-
spond to the following three categories:
:Acceleration(evaluation of all accel-
eration processes):
Rthe outer area fills up and the inner area lights up green: moderate
acceleration, especially at higher
speeds
Rthe outer area empties and the
inner area is gray: sporty acceler-
ation
;Coasting (evaluation of all decelera-
tion processes):
Rthe outer area fills up and the inner area lights up green: anticipatory
driving, keeping your distance and
early release of the accelerator.
The vehicle can coast without use
of the brakes.
Rthe outer area empties and the
inner area is gray: frequent heavy
braking
=Constant (continuous evaluation
over the entire journey):
Rthe outer area fills up and the inner area lights up green: constant
speed and avoidance of unneces-
sary acceleration and deceleration
Rthe outer area empties and the
inner area is gray: fluctuations in
speed
The three inner areas display the current driving
style and light up green as a result of a particu-
larly economical driving style. Depending on thedriving situation, up to two areas may light up
simultaneously.
At the beginning of the journey, the three outer
areas are empty and fill up as a result of eco-
nomical driving. A higher level indicates a more
economical driving style. If the three outer areas
are completely filled at the same time, the driver
has adopted the most economical driving style
for the selected settings and prevailing condi-
tions. The ECO display border lights up.
The ECO display does not indicate the actual fuel consumption. The additionally achieved range
displayed under Bonus fr. Start
does not
indicate a fixed consumption reduction. In addition to driving style, the actual consump-
tion is affected by other factors, such as:
Rload
RTire pressure
RCold start
RChoice of route
RActive electrical consumers
These factors are not included in the ECO dis-
play.
An economical driving style specially requires
driving at moderate engine speeds.
Achieving a higher value in the categories
"Acceleration" and "Constant":
Robserve the gearshift recommendations
Rdrive using drive program E
On long journeys at a constant speed, e.g. on the
highway, only the outer area for "constant" will
change.
The ECO display summarizes the driving style
from the start of the journey to its completion.
Therefore, there are more marked changes in
the outer areas at the start of a journey. On lon- ger journeys, there are fewer changes. For more
marked changes, perform a manual rest
(
Ypage 216).
For further information on the ECO display, see
(
Ypage 215).
Braking
Important safety notes
GWARNING
If you shift down on a slippery road surface in an attempt to increase the engine's braking
effect, the drive wheels could lose their grip.
There is an increased danger of skidding and
accidents.
Do not shift down for additional engine brak-
ing on a slippery road surface.
Downhill gradients
!On long and steep gradients, you must
reduce the load on the brakes by shifting to a
lower gear in good time. This allows you to
take advantage of the engine's braking effect.
This helps you to avoid overheating the
brakes and wearing them out excessively.
166Driving tips
Driving and parking
Page 169 of 370
When you take advantage of engine braking, a
drive wheel may not turn for some time, e.g.
on a slippery road surface. This could cause
damage to the drive train. This type of damage is not covered by the Mercedes-Benz war-
ranty.
Heavy and light loads
GWARNING
If you rest your foot on the brake pedal while
driving, the braking system can overheat. This increases the stopping distance and can even
cause the braking system to fail. There is a
risk of an accident.
Never use the brake pedal as a footrest. Never
depress the brake pedal and the accelerator
pedal at the same time.
!Depressing the brake pedal constantly
results in excessive and premature wear to
the brake pads.
If the brakes have been subjected to a heavy
load, do not stop the vehicle immediately. Drive
on for a short while. This allows the airflow to
cool the brakes more quickly.
Wet roads
If you have driven for a long time in heavy rain
without braking, there may be a delayed reac-
tion from the brakes when braking for the first
time. This may also occur after the vehicle has
been washed or driven through deep water.
You have to depress the brake pedal more
firmly. Maintain a greater distance from the
vehicle in front.
After driving on a wet road or having the vehicle
washed, brake firmly while paying attention to
the traffic conditions. This will warm up the
brake discs, thereby drying them more quickly
and protecting them against corrosion.
Limited braking performance on salt-
treated roads
If you drive on salted roads, a layer of salt resi-
due may form on the brake discs and brake
pads. This can result in a significantly longer
braking distance.
RIn order to prevent any salt build-up, apply the
brakes occasionally while paying attention to
the traffic conditions.
RCarefully depress the brake pedal and the
beginning and end of a journey.
RMaintain a greater distance to the vehicle
ahead.
Servicing the brakes
!The brake fluid level may be too low, if:
Rif the red brake warning lamp lights up in
the instrument cluster and
Ryou hear a warning tone while the engine is
running
Observe additional warning messages in the
multifunction display.
The brake fluid level may be too low due to
brake pad wear or leaking brake lines.
Have the brake system checked immediately.
Consult a qualified specialist workshop to
arrange this.
!Vehicles with 4MATIC: function or per-
formance tests may only be carried out on a 2-
axle dynamometer. If you wish to operate the
vehicle on such a dynamometer, please con-
sult a qualified specialist workshop in
advance. You could otherwise damage the
drive train or the brake system.
!Vehicles with 4MATIC: the ESP®system
operates automatically. If the electric parking
brake is tested on a brake dynamometer, the
engine and ignition must be switched off: turn
the SmartKey in the ignition lock to position
u or1 or press the Start/Stop button
repeatedly in accordance with the given
SmartKey positions.
Braking triggered automatically by ESP
®may
cause severe damage to the brake system.
All checks and maintenance work on the brake
system must be carried out at a qualified spe-
cialist workshop.
Have brake pads installed and brake fluid
replaced at a qualified specialist workshop.
If the brake system has only been subject to
moderate loads, you should test the functional-
ity of your brakes at regular intervals.
Information on BAS (Brake Assist System)
(
Ypage 66) and Active Brake Assist with cross-
traffic function (Ypage 73).
Driving tips167
Driving and parking
Z
Page 170 of 370
For safety reasons, Mercedes-Benz recom-
mends only installing the following brake disks
and brake pads/linings:
Rbrake disks that have been approved by
Mercedes-Benz
Rbrake pads/linings that have been approved
by Mercedes-Benz or that are of an equivalent
standard of quality
Other brake disks or brake pads/linings can
compromise the safety of your vehicle.
Always replace all brake disks and brake pads/
linings on an axle at the same time. Always
install new brake pads/linings when replacing
brake disks.
The vehicle is equipped with lightweight brake
disks to which the wheel assembly with rim and
threaded connection is matched.
The use of brake disks other than those
approved by Mercedes-Benz can change the
track width and is subject to approval, if appli-
cable.
Shock-type loads when handling the brake
discs, such as when changing wheels, can lead
to a reduction in comfort when driving with light-
weight brake discs. Avoid shock-type loads on
the lightweight brake disks, particularly on the
brake plate.
Mercedes-Benz recommends that you only use
brake fluid that has been specially approved for
your vehicle by Mercedes-Benz, or which corre-
sponds to an equivalent quality standard. Brake
fluid which has not been approved for
Mercedes-Benz vehicles or which is not of an
equivalent quality could affect your vehicle's
operating safety.
High-performance and ceramic brakes
(Mercedes-AMG vehicles)
The AMG brake systems are designed for heavy
loads. This may lead to noise when braking. This
will depend on:
RSpeed
RBraking force
REnvironmental conditions, such as tempera-
ture and humidity
The wear of individual components of the brake
system, such as the brake pads/linings or brake
discs, depends on the individual driving style
and operating conditions.
For this reason, it is impossible to state a mile-
age that will be valid under all circumstances. An aggressive driving style will lead to high wear.
You can obtain more information on this from a
qualified specialist workshop.
New and replaced brake pads and discs only
reach their optimum braking effect after several
hundred kilometers of driving. Compensate for
this by applying greater force to the brake pedal.
Keep this in mind, and adapt your driving and
braking accordingly during this break-in period.
Excessive heavy braking results in correspond-
ingly high brake wear. If the brake pads/linings
have reached their wear limit, the multifunction
display shows a corresponding message. Espe-
cially for high performance driving, it is impor-
tant to maintain and have the brake system
checked regularly.
Driving on wet roads
Hydroplaning
If water has accumulated to a certain depth on
the road surface, there is a danger of hydro-
planing occurring, even if:
Ryou drive at low speeds
Rthe tires have adequate tread depth
For this reason, in the event of heavy rain or in
conditions in which hydroplaning may occur,
you must drive in the following manner:
Rlower your speed
Ravoid ruts
Ravoid sudden steering movements
Rbrake carefully
Driving on flooded roads
!Bear in mind that vehicles traveling in front
or in the opposite direction create waves. This
may cause the maximum permissible water
depth to be exceeded.
Failure to observe these notes may result in
damage to the engine, electrical systems and
transmission.
If you have to drive on stretches of road on which
water has collected, please bear in mind that:
Rin the case of standing water, the water level may be no higher than the lower edge of the
vehicle body
Ryou should drive no faster than walking pace
168Driving tips
Driving and parking
Page 172 of 370
speed, for braking in good time and for staying in
lane.
Do not use cruise control:
Rin road and traffic conditions which do not
allow you to maintain a constant speed, e.g. in
heavy traffic or on winding roads
Ron slippery road surfaces. Braking or accel-
erating could cause the drive wheels to lose
traction and the vehicle could then skid
Rwhen there is poor visibility, e.g. due to fog,
heavy rain or snow
If there is a change of drivers, advise the new
driver of the speed stored.
iThe speed indicated in the speedometer
may differ slightly from the speed stored.
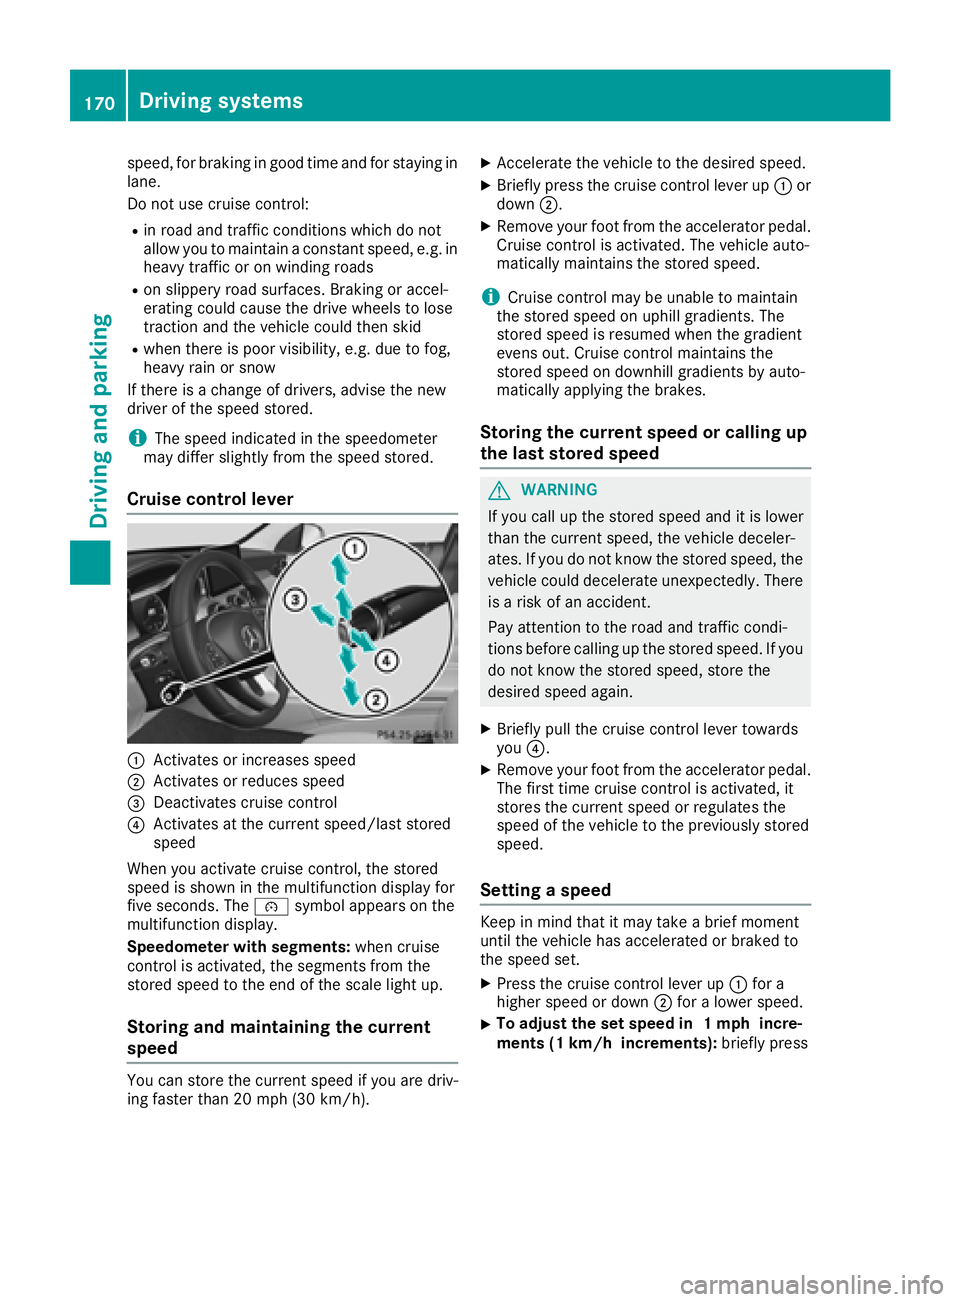
Cruise control lever
:Activates or increases speed
;Activates or reduces speed
=Deactivates cruise control
?Activates at the current speed/last stored
speed
When you activate cruise control, the stored
speed is shown in the multifunction display for
five seconds. The ésymbol appears on the
multifunction display.
Speedometer with segments: when cruise
control is activated, the segments from the
stored speed to the end of the scale light up.
Storing and maintaining the current
speed
You can store the current speed if you are driv-
ing faster than 20 mph (30 km/h).
XAccelerate the vehicle to the desired speed.
XBriefly press the cruise control lever up :or
down ;.
XRemove your foot from the accelerator pedal.
Cruise control is activated. The vehicle auto-
matically maintains the stored speed.
iCruise control may be unable to maintain
the stored speed on uphill gradients. The
stored speed is resumed when the gradient
evens out. Cruise control maintains the
stored speed on downhill gradients by auto-
matically applying the brakes.
Storing the current speed or calling up
the last stored speed
GWARNING
If you call up the stored speed and it is lower
than the current speed, the vehicle deceler-
ates. If you do not know the stored speed, the vehicle could decelerate unexpectedly. There
is a risk of an accident.
Pay attention to the road and traffic condi-
tions before calling up the stored speed. If you
do not know the stored speed, store the
desired speed again.
XBriefly pull the cruise control lever towards
you ?.
XRemove your foot from the accelerator pedal.
The first time cruise control is activated, it
stores the current speed or regulates the
speed of the vehicle to the previously stored
speed.
Setting a speed
Keep in mind that it may take a brief moment
until the vehicle has accelerated or braked to
the speed set.
XPress the cruise control lever up :for a
higher speed or down ;for a lower speed.
XTo adjust the set speed in 1 mph incre-
ments (1 km/h increments): briefly press
170Driving systems
Driving and parking
Page 173 of 370
the cruise control lever up:or down ;to
the pressure point.
Every time the cruise control lever is pressed
up : or down ;the last speed stored is
increased or reduced.
XTo adjust the set speed in 5 mph incre-
ments (10 km/h increments): briefly press
the cruise control lever up :or down ;
beyond the pressure point.
Every time the cruise control lever is pressed
up : or down ;the last speed stored is
increased or reduced.
iCruise control is not deactivated if you
depress the accelerator pedal. If you acceler-
ate to overtake, cruise control adjusts the
vehicle's speed to the last speed stored after
you have finished overtaking.
Deactivating cruise control
There are several ways to deactivate cruise con-
trol:
XBriefly press the cruise control lever forward
=.
or
XBrake.
Cruise control is automatically deactivated if:
Ryou engage the electric parking brake
Ryou are driving at less than 20 mph (30 km/h)
RESP®intervenes or you deactivate ESP®
Ryou shift the transmission to position i
while driving
If cruise control is deactivated, a warning tone
sounds. You will see the Cruise Control Off
message in the multifunction display for approx-
imately five seconds. The message on the mul-
tifunction display disappears and the segments
on the speedometer go out.
iWhen you switch off the engine, the last
speed stored is cleared.
Distance Pilot DISTRONIC
General notes
Distance Pilot DISTRONIC regulates the speed
and automatically helps you maintain the dis-
tance to the vehicle detected in front. Vehicles
are detected with the aid of the radar sensor
system. Distance Pilot DISTRONIC brakes auto-
matically so that the set speed is not exceeded. Change into a lower gear in good time on long
and steep downhill gradients. This is especially
important if the vehicle is laden. By doing so, you
will make use of the braking effect of the engine.
This relieves the load on the brake system and
prevents the brakes from overheating and wear-
ing too quickly.
If Distance Pilot DISTRONIC detects that there is a risk of a collision, you will be warned visually
and acoustically. Without your intervention, Dis-
tance Pilot DISTRONIC cannot prevent a colli-
sion. An intermittent warning tone will then
sound and the distance warning lamp will light
up in the instrument cluster. Brake immediately in order to increase the distance to the vehicle in
front or take evasive action provided it is safe to
do so.
Distance Pilot DISTRONIC operates in the range
between 0 mph (0 km/h) and 120 mph
(200 km/h).
Do not use Distance Pilot DISTRONIC whi
le driv-
ing on roads with steep gradients.
Since Distance Pilot DISTRONIC transmits radar
waves, it can resemble the radar detectors of
the responsible authorities. You can refer to the
relevant chapter in the Operator's Manual if
questions are asked about this.
iUSA only: This device has been approved by
the FCC as a "Vehicular Radar System". The
radar sensor is intended for use in an auto-
motive radar system only. Removal, tamper-
ing, or altering of the device will void any war-
ranties, and is not permitted by the FCC. Do
not tamper with, alter, or use in any non-
approved way.
Any unauthorized modification to this device
could void the user's authority to operate the equipment.
iCanada only: This device complies with
RSS-210 of Industry Canada. Operation is
subject to the following two conditions:
1. This device may not cause interference,
and
2. This device must accept any interference
received, including interference that may
cause undesired operation of the device.
Removal, tampering, or altering of the device
will void any warranties, and is not permitted.
Do not tamper with, alter, or use in any no
n-
approved way.
Driving system s171
Driving an d parking
Z
Page 175 of 370
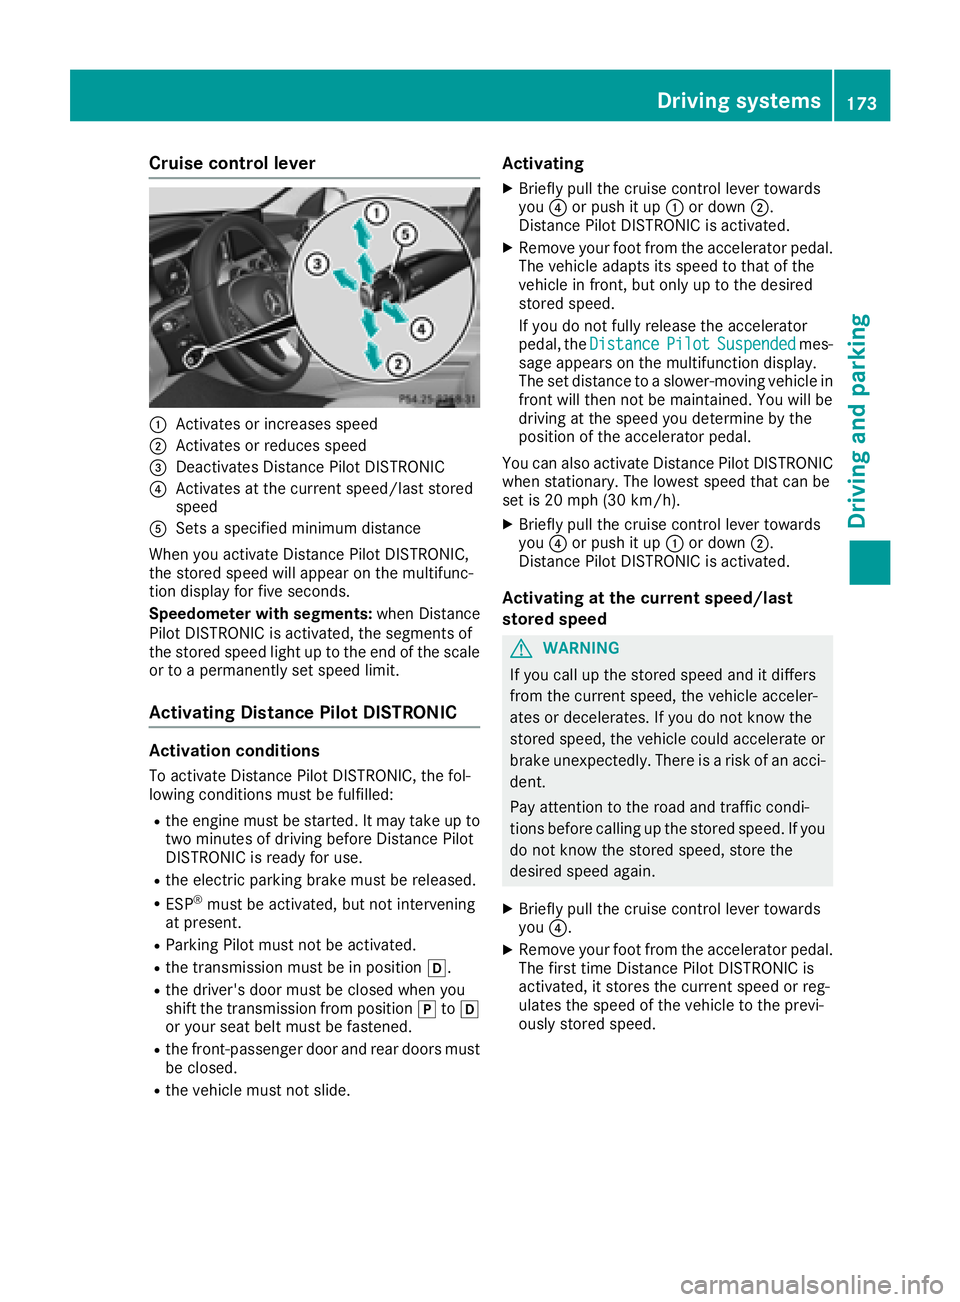
Cruise control lever
:Activates or increases speed
;Activates or reduces speed
=Deactivates Distance Pilot DISTRONIC
?Activates at the current speed/last stored
speed
ASets a specified minimum distance
When you activate Distance Pilot DISTRONIC,
the stored speed will appear on the multifunc-
tion display for five seconds.
Speedometer with segments: when Distance
Pilot DISTRONIC is activated, the segments of
the stored speed light up to the end of the scale
or to a permanently set speed limit.
Activating Distance Pilot DISTRONIC
Activation conditions
To activate Distance Pilot DISTRONIC, the fol-
lowing conditions must be fulfilled:
Rthe engine must be started. It may take up to
two minutes of driving before Distance Pilot
DISTRONIC is ready for use.
Rthe electric parking brake must be released.
RESP®must be activated, but not intervening
at present.
RParking Pilot must not be activated.
Rthe transmission must be in position h.
Rthe driver's door must be closed when you
shift the transmission from positionjtoh
or your seat belt must be fastened.
Rthe front-passenger door and rear doors must
be closed.
Rthe vehicle must not slide.
Activating
XBriefly pull the cruise control lever towards
you ?or push it up :or down ;.
Distance Pilot DISTRONIC is activated.
XRemove your foot from the accelerator pedal.
The vehicle adapts its speed to that of the
vehicle in front, but only up to the desired
stored speed.
If you do not fully release the accelerator
pedal, the Distance
PilotSuspendedmes-
sage appears on the multifunction display.
The set distance to a slower-moving vehicle in
front will then not be maintained. You will be
driving at the speed you determine by the
position of the accelerator pedal.
You can also activate Distance Pilot DISTRONIC
when stationary. The lowest speed that can be
set is 20 mph (30 km/h).
XBriefly pull the cruise control lever towards
you ?or push it up :or down ;.
Distance Pilot DISTRONIC is activated.
Activating at the current speed/last
stored speed
GWARNING
If you call up the stored speed and it differs
from the current speed, the vehicle acceler-
ates or decelerates. If you do not know the
stored speed, the vehicle could accelerate or brake unexpectedly. There is a risk of an acci-
dent.
Pay attention to the road and traffic condi-
tions before calling up the stored speed. If you
do not know the stored speed, store the
desired speed again.
XBriefly pull the cruise control lever towards
you ?.
XRemove your foot from the accelerator pedal.
The first time Distance Pilot DISTRONIC is
activated, it stores the current speed or reg-
ulates the speed of the vehicle to the previ-
ously stored speed.
Driving systems173
Driving and parking
Z
Page 177 of 370
When Distance Pilot DISTRONIC is activated,
the transmission shifts automatically to position
jif:
Rthe driver's seat belt is not fastened and the
driver's door is open.
Rthe engine is switched off, unless it is auto-
matically switched off by the ECO start/stop
function.
The electric parking brake secures the vehicle
automatically if Distance Pilot DISTRONIC is
activated when the vehicle is stationary and:
Ra system malfunction occurs.
Rthe power supply is insufficient.
If a malfunction occurs, the transmission may
also be shifted to position jautomatically.
Setting a speed
XPush cruise control lever up :for a higher
speed or down ;for a lower speed.
XTo adjust the set speed in 1 mph incre-
ments (1 km/h increments): briefly push
the cruise control lever up :or down ;to
the pressure point.
Every time the cruise control lever is pressed up : or down ;the last speed stored is
increased or reduced.
XTo adjust the set speed in 5 mph incre-
ments (10 km/h increments): briefly push
the cruise control lever up :or down ;
beyond the pressure point.
Every time the cruise control lever is pressed
up : or down ;, the last speed stored is
increased or reduced.
iIf you accelerate to overtake, Distance Pilot
DISTRONIC adjusts the vehicle's speed to the
last speed stored after you have finished over-
taking.
Setting a specified minimum distance
You can set the specified minimum distance for
Distance Pilot DISTRONIC by varying the time
span between one and two seconds. With this
function you can set the minimum distance that
Distance Pilot DISTRONIC maintains to the vehi-
cle in front, depending on vehicle speed. You
can see this distance in the multifunction dis-
play (
Ypage 176).
Make sure that you maintain the minimum dis-
tance to the vehicle in front as required by law. Adjust the distance to the vehicle in front if nec-
essary.
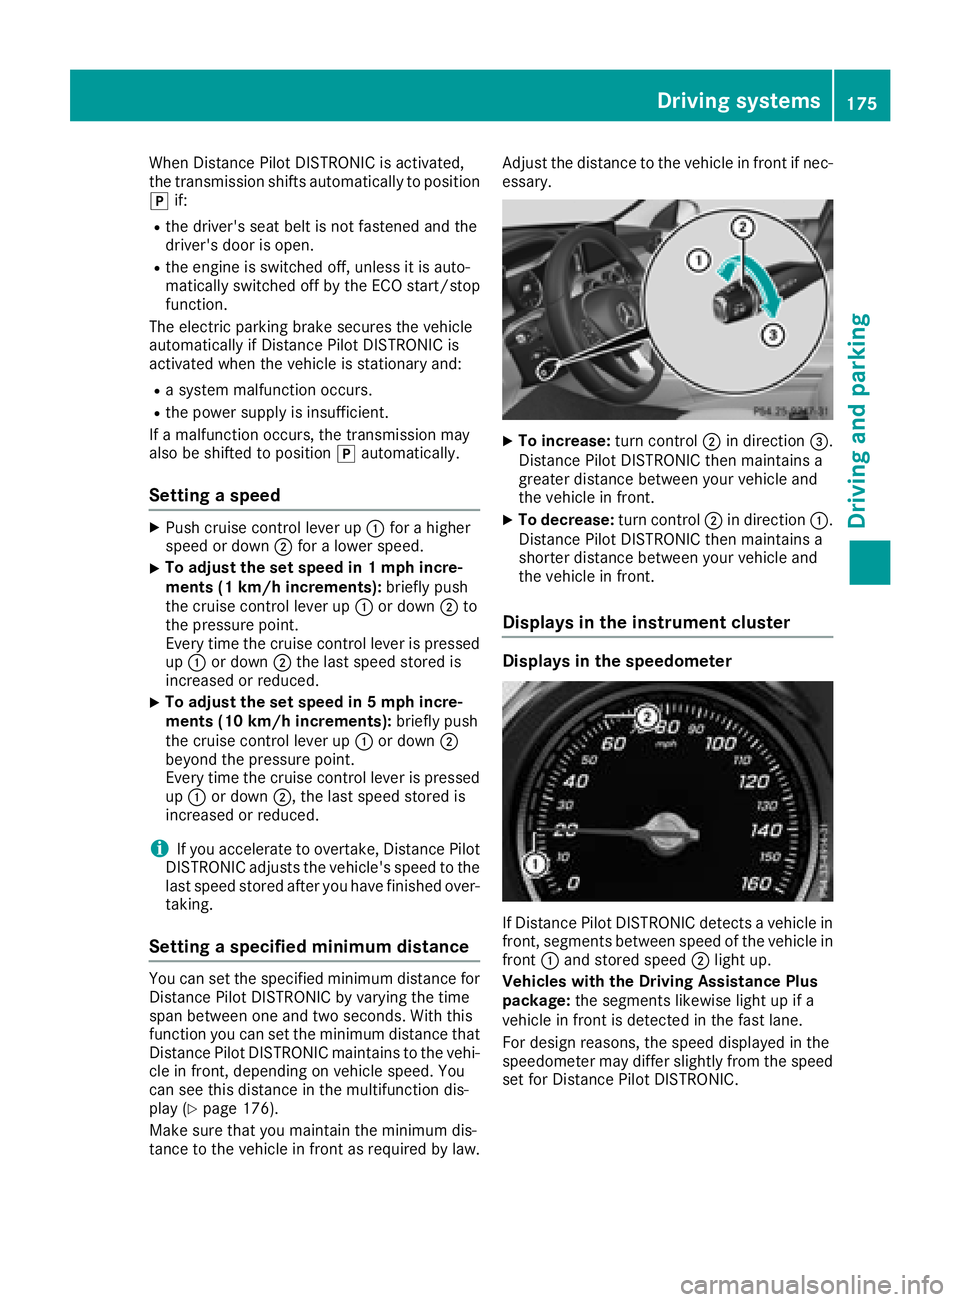
XTo increase:
turn control;in direction =.
Distance Pilot DISTRONIC then maintains a
greater distance between your vehicle and
the vehicle in front.
XTo decrease: turn control;in direction :.
Distance Pilot DISTRONIC then maintains a
shorter distance between your vehicle and
the vehicle in front.
Displays in the instrument cluster
Displays in the speedometer
If Distance Pilot DISTRONIC detects a vehicle in
front, segments between speed of the vehicle in
front :and stored speed ;light up.
Vehicles with the Driving Assistance Plus
package: the segments likewise light up if a
vehicle in front is detected in the fast lane.
For design reasons, the speed displayed in the
speedometer may differ slightly from the speed
set for Distance Pilot DISTRONIC.
Driving systems175
Driving and parking
Z
Page 178 of 370
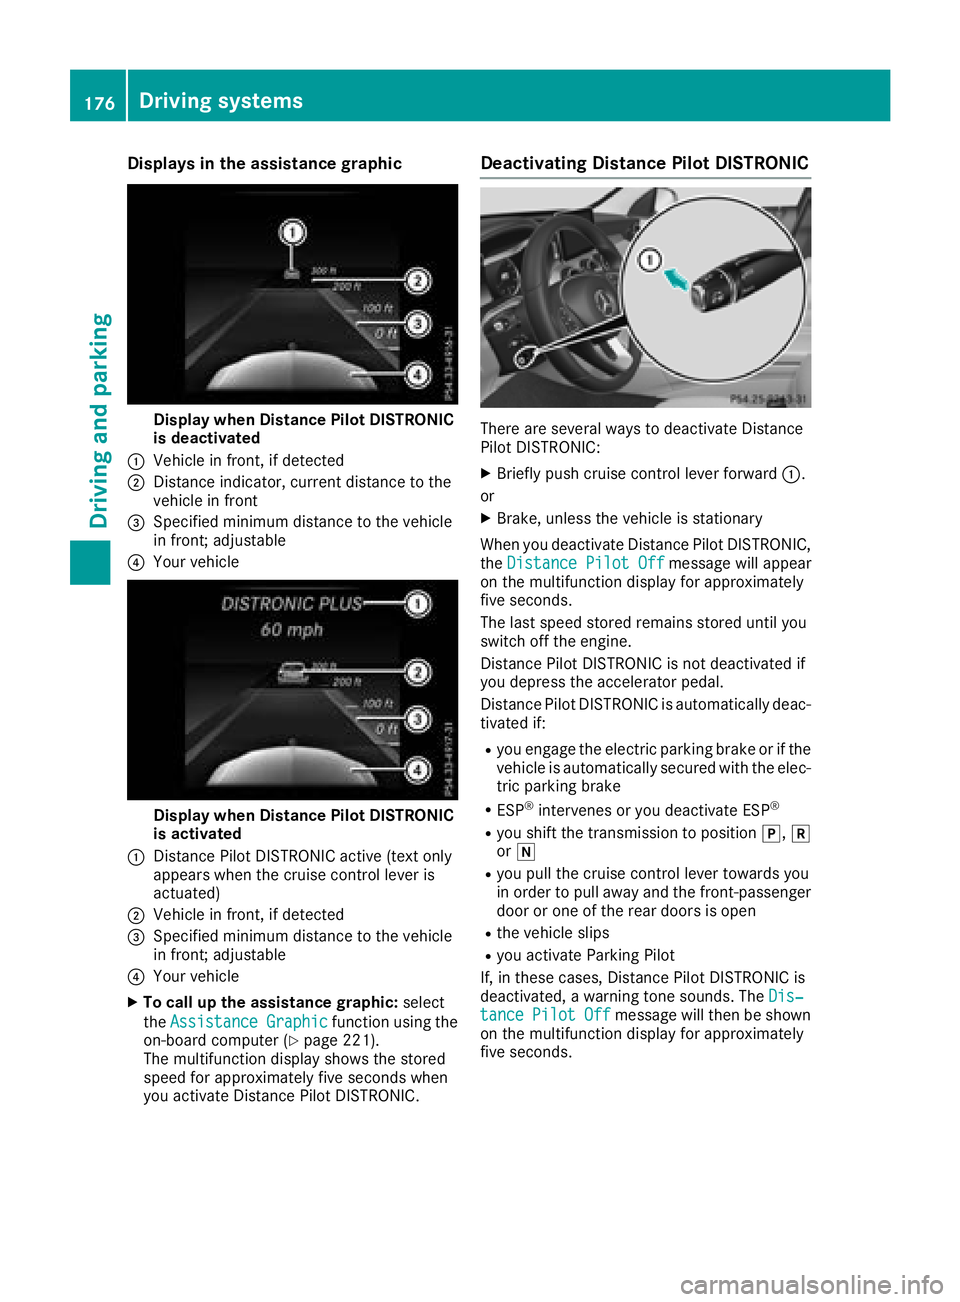
Displaysin th eassistanc egraphic
Display when Distanc ePilo tDISTRONIC
is deactivated
:Vehicl ein front, if detecte d
;Distanceindicator, curren tdistanc eto th e
vehicl ein fron t
=Specified minimum distanc eto th evehicl e
in front; adjustable
?Your vehicl e
Display when Distanc ePilo tDISTRONIC
is activated
:Distanc ePilo tDISTRONIC active (tex tonly
appears when th ecruise control lever is
actuated)
;Vehicl ein front, if detecte d
=Specified minimum distanc eto th evehicl e
in front; adjustable
?Your vehicl e
XTo call up th eassistanc egraphic: select
th eAssistanc eGraphi c
function usin gth e
on-boar dcomputer (Ypage 221).
The multifunction display shows th estore d
speed fo rapproximately fiv eseconds when
you activat eDistanc ePilo tDISTRONIC.
Deactivating Distanc ePilot DISTRONIC
There are severa lways to deactivat eDistanc e
Pilo tDISTRONIC:
XBriefly push cruise control lever forwar d:.
or
XBrake ,unless th evehicl eis stationary
Whe nyou deactivat eDistanc ePilo tDISTRONIC,
th eDistance Pilot Off
message will appear
on th emultifunction display fo rapproximately
fiv eseconds.
The last speed store dremain sstore duntil you
switch of fth eengine.
Distanc ePilo tDISTRONIC is no tdeactivated if
you depress th eaccelerato rpedal.
Distanc ePilo tDISTRONIC is automatically deac -
tivated if:
Ryou engage th eelectric parkin gbrak eor if th e
vehicl eis automatically secured wit hth eelec -
tric parkin gbrak e
RESP®intervenes or you deactivat eES P®
Ryou shift th etransmissio nto position j,k
or i
Ryou pull th ecruise control lever toward syou
in order to pull away and th efront-passenger
doo ror on eof th erea rdoors is ope n
Rthevehicl eslip s
Ryou activat eParking Pilo t
If ,in these cases, Distanc ePilo tDISTRONIC is
deactivated, awarnin gtone sounds. The Dis‐
tancePilotOffmessage will then be shown
on th emultifunction display fo rapproximately
fiv eseconds.
176Driving systems
Driving an d parking
Page 180 of 370
with the curb or other road boundaries. Be par-
ticularly aware of other road users, e.g. cyclists,
that are directly next to your vehicle.
Obstacles such as traffic markers on a con-
struction site that are on the lane or projecting
out into the lane are not detected.
An inappropriate steering intervention, e.g. afterintentionally driving over a lane marking, can be
corrected at any time if you steer slightly in theopposite direction.
DISTRONIC PLUS with Steering Pilot cannot
continuously keep your vehicle in lane. In some
cases, steering intervention is not sufficient to
bring the vehicle back to the lane. In such cases,
you must steer the vehicle yourself to ensure
that it does not leave the lane.
The system may be impaired or may not function
if:
Rthere is poor visibility, e.g. due to insufficient
illumination of the road, or due to snow, rain,
fog or spray
Rthere is glare, e.g. from oncoming traffic, the
sun or reflection from other vehicles (e.g. if
the road surface is wet)
Rthe windshield is dirty, fogged up, damaged or
covered, for instance by a sticker, in the vicin-
ity of the camera
Rthere are no or several unclear lane markings
for one lane, e.g. roadworks
Rthe lane markings are worn away, dark or cov-
ered up, e.g. by dirt or snow
Rthe distance to the vehicle in front is too short
and thus the lane markings cannot be detec-
ted
Rthe lane markings change quickly, e.g. lanes
branch off, cross one another or merge
Rthe road is narrow and winding
Rthere are highly variable shade conditions on the roadway
The system is switched to passive and no longer
assists you by performing steering interventions
if:
Ryou actively change lane
Ryou switch on the turn signal
Ryou take your hands off the steering wheel or
do not steer for a prolonged period of time
After you have finished changing lanes, Steering
Pilot is automatically active once more. Steering Pilot cannot provide assistance:
Ron very sharp corners
Rwhen a loss of tire pressure or a defective tire
has been detected and displayed
Pay attention also to the important safety notes
on Distance Pilot DISTRONIC (
Ypage 172).
The steering interventions are carried out with a
limited steering moment. The system requires
the driver to keep his hands on the steering
wheel and to steer himself.
If you do not steer yourself or if you take your
hands off the steering wheel for a prolonged
period of time, the system will first alert you with
a visual warning. A steering wheel symbol
appears in the multifunction display. If you have still not started to steer and have not taken hold
of the steering wheel, a warning tone also
sounds to remind you to take control of the
vehicle after five seconds at the latest. Steering
Pilot is then switched to passive. Distan ce Pilot
D
ISTRONIC remains active.
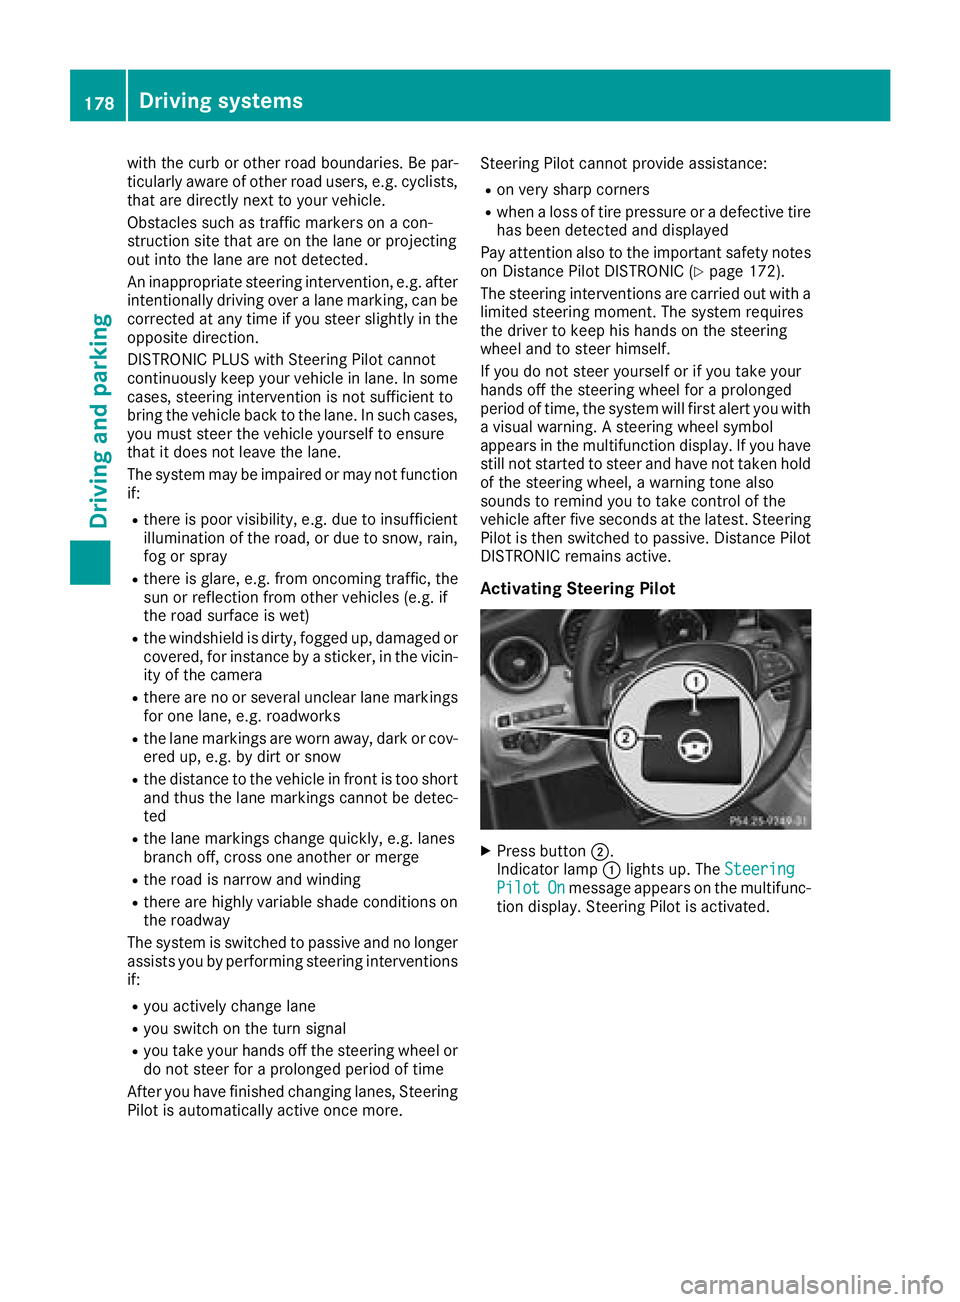
Activating Steering Pilot
XPress button ;.
Indicator lamp :lights up. The Steering
PilotOnmessage appears on the multifunc-
tion display. Steering Pilot is activated.
178Driving systems
Driving and parking
Page 181 of 370
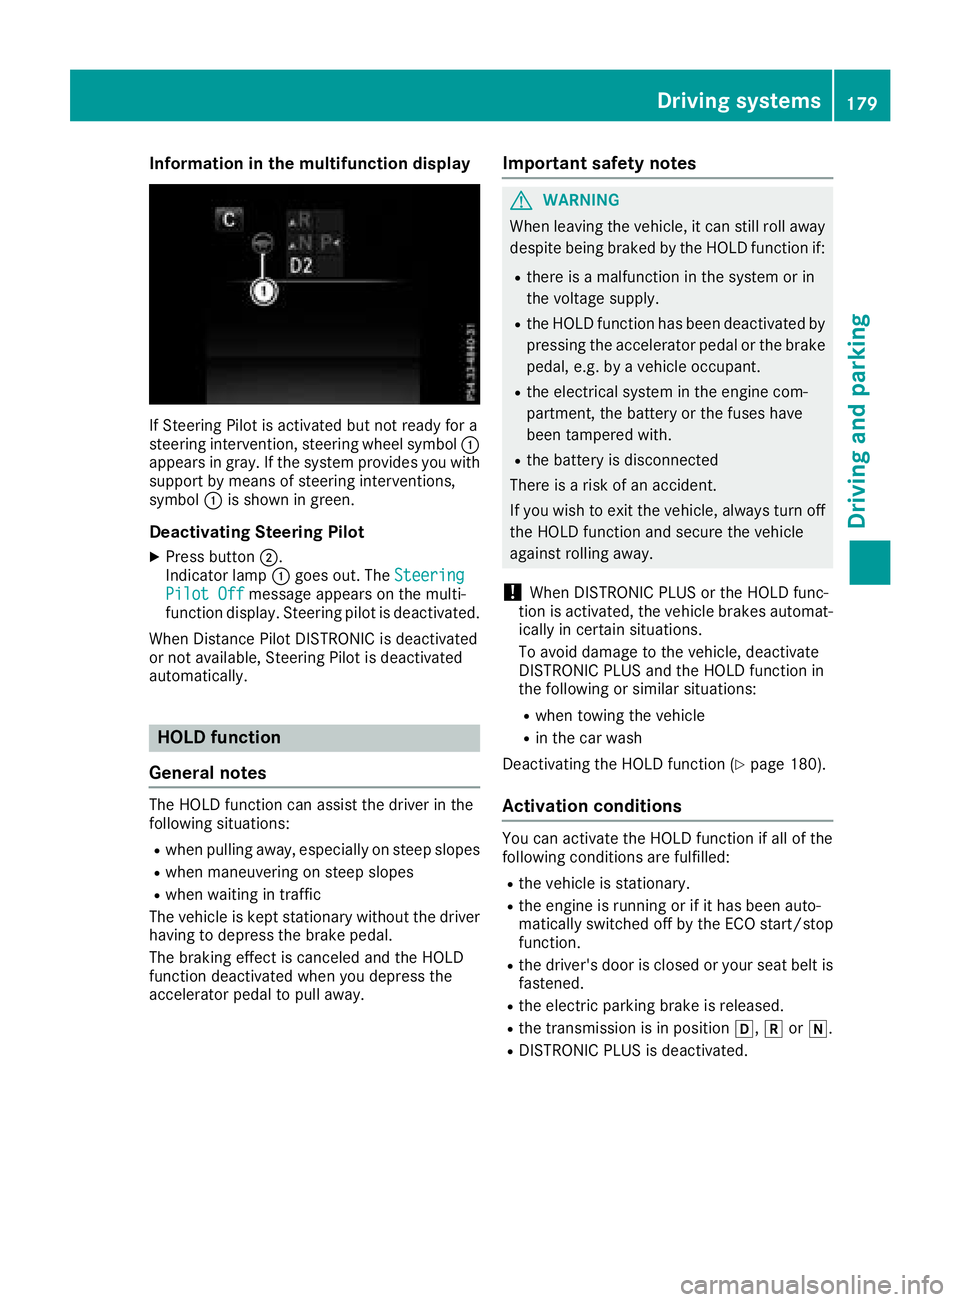
Information in the multifunction display
If Steering Pilot isactivated but not ready for a
steering intervention, steering wheel symbol :
appears ingray. Ifthe system provide s youwith
support bymeans of steering interventions,
symbol :isshown in green.
Deactivating Steering Pilot
XPress button ;.
Indic ator lamp :goes out. The Steering
Pilot Offmessage appears on the mult i-
function display.Steering pilot is deactivate d.
When Distance Pilot DI STRONIC isdeactivated
or not available, Steering Pilot isdeactivated
automatically.
HOLD function
General notes
The HOLD function can assist the driverinthe
fol lowin g situations:
Rwhen pulling away, especial lyon steep slopes
Rwhen maneuvering on steep slopes
Rwhen waitingintraff ic
The veh icle iskept stationary without the driver
having to depress the brake pedal.
The braking effect iscanceled and the HOLD
function deactivated when you depress the
accelerator pedal to pullaway.
Important safety notes
GWARNING
When leaving the vehicle, it can still roll away despite being braked bythe HOLD function if:
Rthere isa malfunction inthe system or in
the voltage supply.
Rthe HOLD function has been deactivated by
pressing the accelerator pedal or the brake
pedal, e.g. by a vehicle occupant.
Rthe electrical system inthe engine com-
partment, the battery or the fuses have
been tampered with.
Rthe battery is disconnected
There isa risk of an accident.
If you wish to exit the vehicle, always turn off
the HOLD function and secure the vehicle
against rolling away.
!When DISTRONIC PLUS or the HOLD func-
tion isactivated, the vehicle brakes automat-
ically incertain situations.
To avoid damage to the vehicle, deactivate
DI ST RONIC PLUS and the HOLD function in
the fol lowing or similar situations:
Rwhen to wing the vehicle
Rinthe car wash
Deactivating the HOLD function (
Ypage 180).
Activation conditions
You can activate the HOLD function ifall of the
fol lowin g conditions are fulfilled:
Rthe vehicle isstationary.
Rthe engine is running or if ithas been auto-
matical ly switched off by the ECO start/stop
function.
Rthe driver's door isclosed or your seat belt is
fastened.
Rthe electr icparking brake isreleased.
Rthe transmission isin position h,kori.
RDIST RONIC PLUS is deactivate d.
Driving systems179
Driving and parking
Z