MERCEDES-BENZ C230 KOMPRESSOR COUPE 2002 CL203 Owner's Manual
Manufacturer: MERCEDES-BENZ, Model Year: 2002, Model line: C230 KOMPRESSOR COUPE, Model: MERCEDES-BENZ C230 KOMPRESSOR COUPE 2002 CL203Pages: 399
Page 321 of 399
318 Engine compartment
Te ch n i c a l
data Instruments
and controlsOperation DrivingInstrument
cluster displayPractical hintsCar care Index
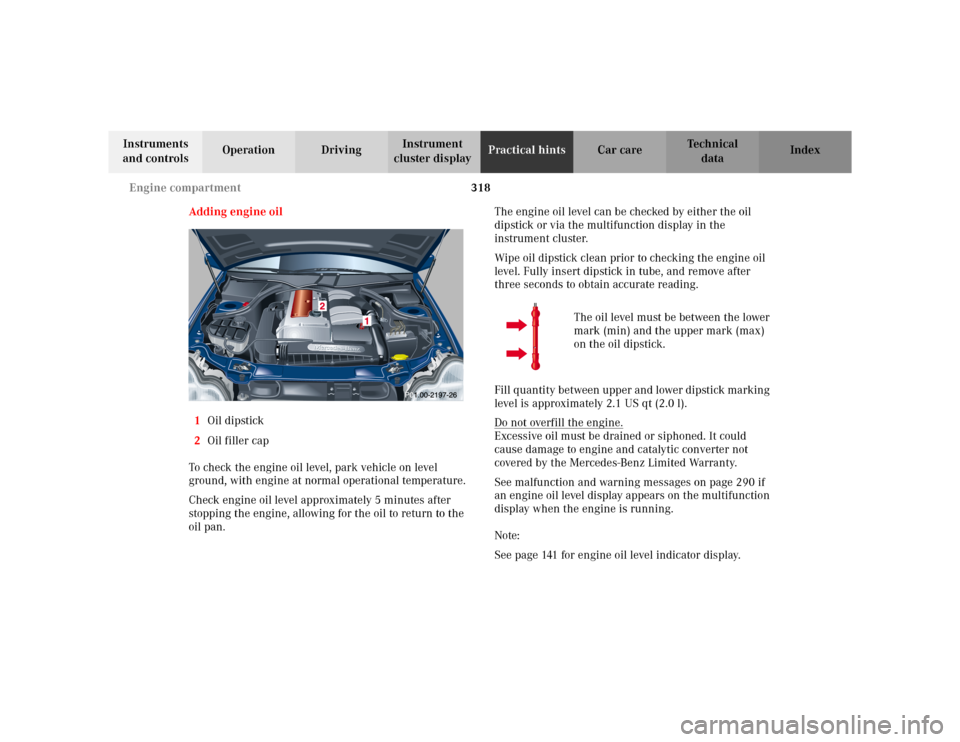
Adding engine oil
1Oil dipstick
2Oil filler cap
To check the engine oil level, park vehicle on level
ground, with engine at normal operational temperature.
Check engine oil level approximately 5 minutes after
stopping the engine, allowing for the oil to return to the
oil pan.The engine oil level can be checked by either the oil
dipstick or via the multifunction display in the
instrument cluster.
Wipe oil dipstick clean prior to checking the engine oil
level. Fully insert dipstick in tube, and remove after
three seconds to obtain accurate reading.
The oil level must be between the lower
mark (min) and the upper mark (max)
on the oil dipstick.
Fill quantity between upper and lower dipstick marking
level is approximately 2.1 US qt (2.0 l).
Do not overfill the engine.
Excessive oil must be drained or siphoned. It could
cause damage to engine and catalytic converter not
covered by the Mercedes-Benz Limited Warranty.
See malfunction and warning messages on page 290 if
an engine oil level display appears on the multifunction
display when the engine is running.
Note:
See page 141 for engine oil level indicator display.
Page 322 of 399
319 Engine compartment
Te ch n i c a l
data Instruments
and controlsOperation DrivingInstrument
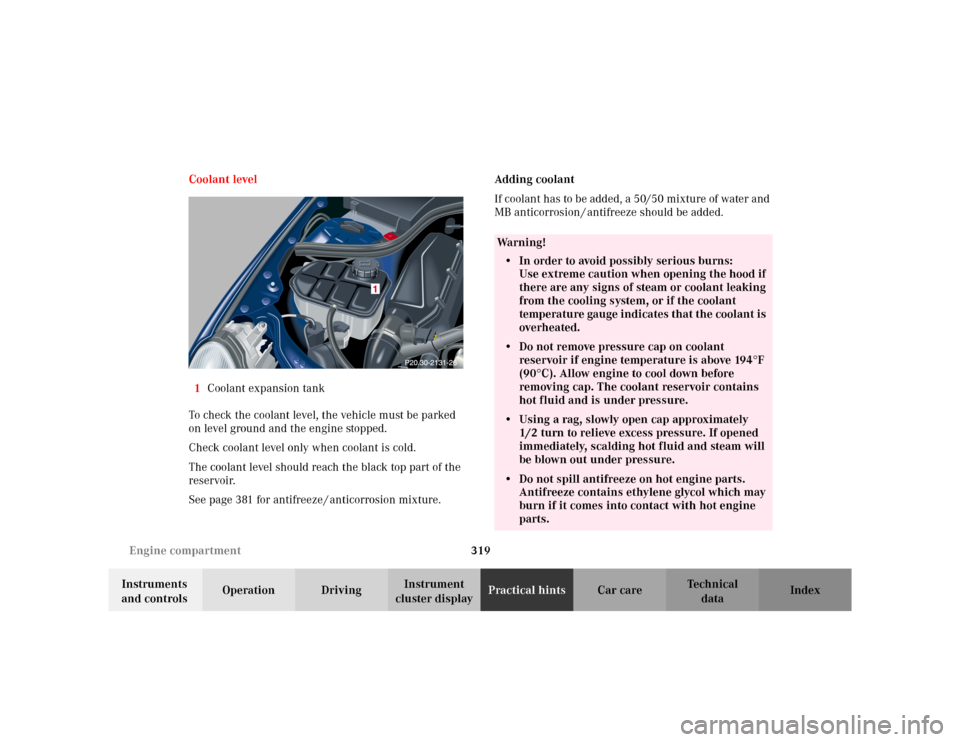
cluster displayPractical hintsCar care Index Coolant level
1Coolant expansion tank
To check the coolant level, the vehicle must be parked
on level ground and the engine stopped.
Check coolant level only when coolant is cold.
The coolant level should reach the black top part of the
reservoir.
See page 381 for antifreeze / anticorrosion mixture.Adding coolant
If coolant has to be added, a 50/50 mixture of water and
MB anticorrosion / antifreeze should be added.
Wa r n i n g !
• In order to avoid possibly serious burns:
Use extreme caution when opening the hood if
there are any signs of steam or coolant leaking
from the cooling system, or if the coolant
temperature gauge indicates that the coolant is
overheated.• Do not remove pressure cap on coolant
reservoir if engine temperature is above 194
°F
(90
°C). Allow engine to cool down before
removing cap. The coolant reservoir contains
hot fluid and is under pressure.
• Using a rag, slowly open cap approximately
1/2 turn to relieve excess pressure. If opened
immediately, scalding hot fluid and steam will
be blown out under pressure.• Do not spill antifreeze on hot engine parts.
Antifreeze contains ethylene glycol which may
burn if it comes into contact with hot engine
parts.
Page 323 of 399
320 Engine compartment
Te ch n i c a l
data Instruments
and controlsOperation DrivingInstrument
cluster displayPractical hintsCar care Index
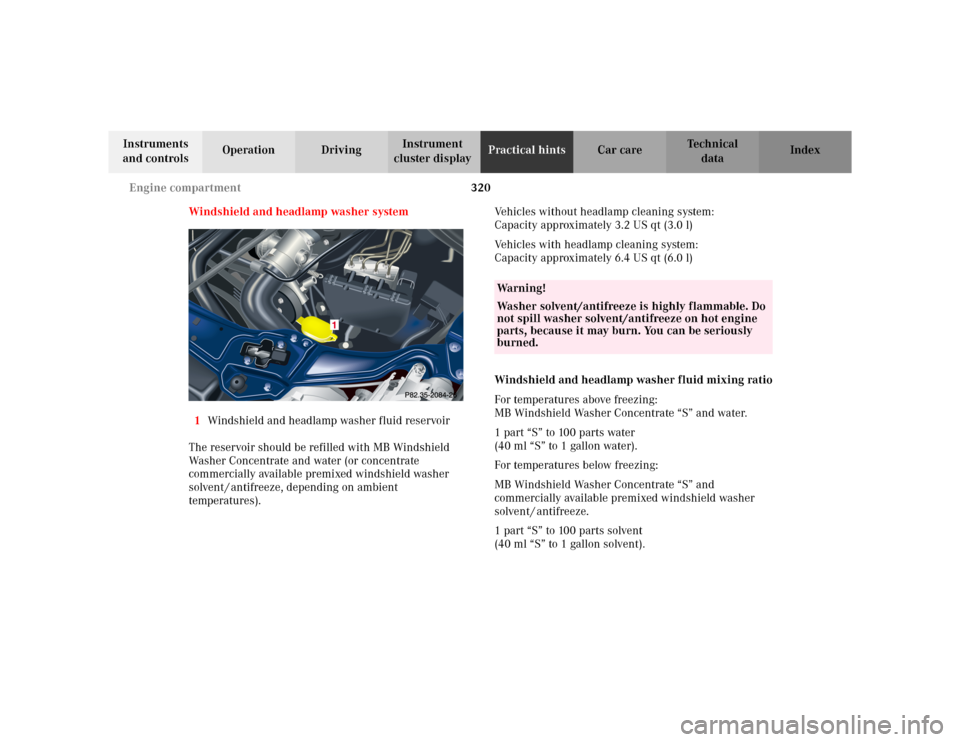
Windshield and headlamp washer system
1Windshield and headlamp washer fluid reservoir
The reservoir should be refilled with MB Windshield
Washer Concentrate and water (or concentrate
commercially available premixed windshield washer
solvent / antifreeze, depending on ambient
temperatures).Vehicles without headlamp cleaning system:
Capacity approximately 3.2 US qt (3.0 l)
Vehicles with headlamp cleaning system:
Capacity approximately 6.4 US qt (6.0 l)
Windshield and headlamp washer fluid mixing ratio
For temperatures above freezing:
MB Windshield Washer Concentrate “S” and water.
1 part “S” to 100 parts water
(40 ml “S” to 1 gallon water).
For temperatures below freezing:
MB Windshield Washer Concentrate “S” and
commercially available premixed windshield washer
solvent / antifreeze.
1 part “S” to 100 parts solvent
(40 ml “S” to 1 gallon solvent).
Wa r n i n g !
Washer solvent/antifreeze is highly flammable. Do
not spill washer solvent/antifreeze on hot engine
parts, because it may burn. You can be seriously
burned.
Page 324 of 399
321 Spare wheel
Te ch n i c a l
data Instruments
and controlsOperation DrivingInstrument
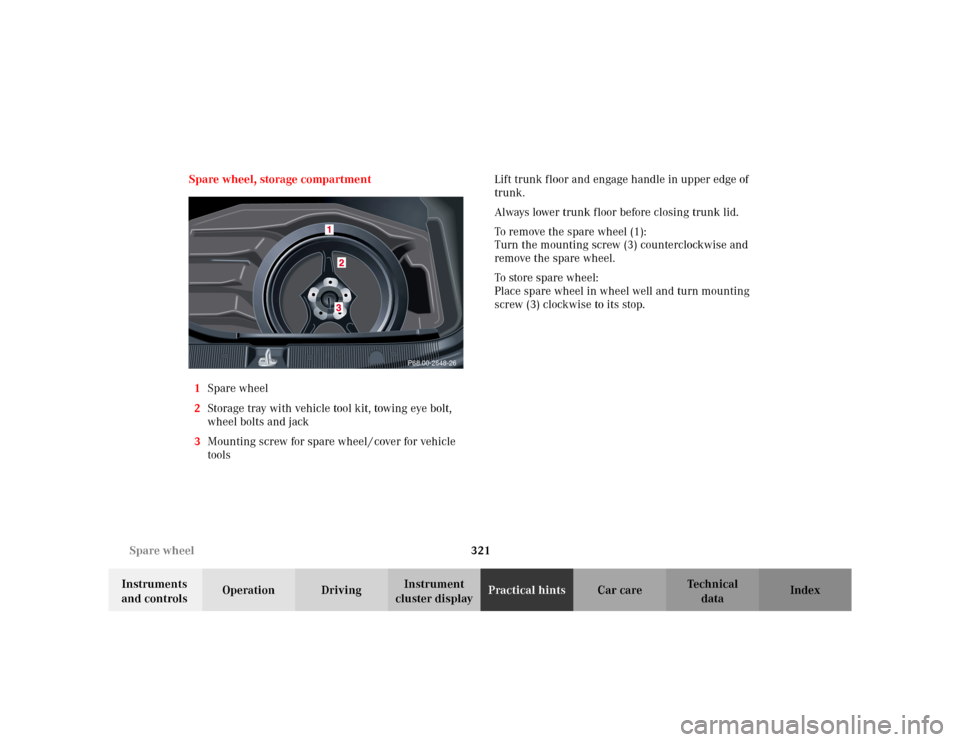
cluster displayPractical hintsCar care Index Spare wheel, storage compartment
1Spare wheel
2Storage tray with vehicle tool kit, towing eye bolt,
wheel bolts and jack
3Mounting screw for spare wheel / cover for vehicle
toolsLift trunk floor and engage handle in upper edge of
trunk.
Always lower trunk floor before closing trunk lid.
To remove the spare wheel (1):
Turn the mounting screw (3) counterclockwise and
remove the spare wheel.
To store spare wheel:
Place spare wheel in wheel well and turn mounting
screw (3) clockwise to its stop.
P68.00-2648-26
Page 325 of 399
322 Spare wheel
Te ch n i c a l
data Instruments
and controlsOperation DrivingInstrument
cluster displayPractical hintsCar care Index
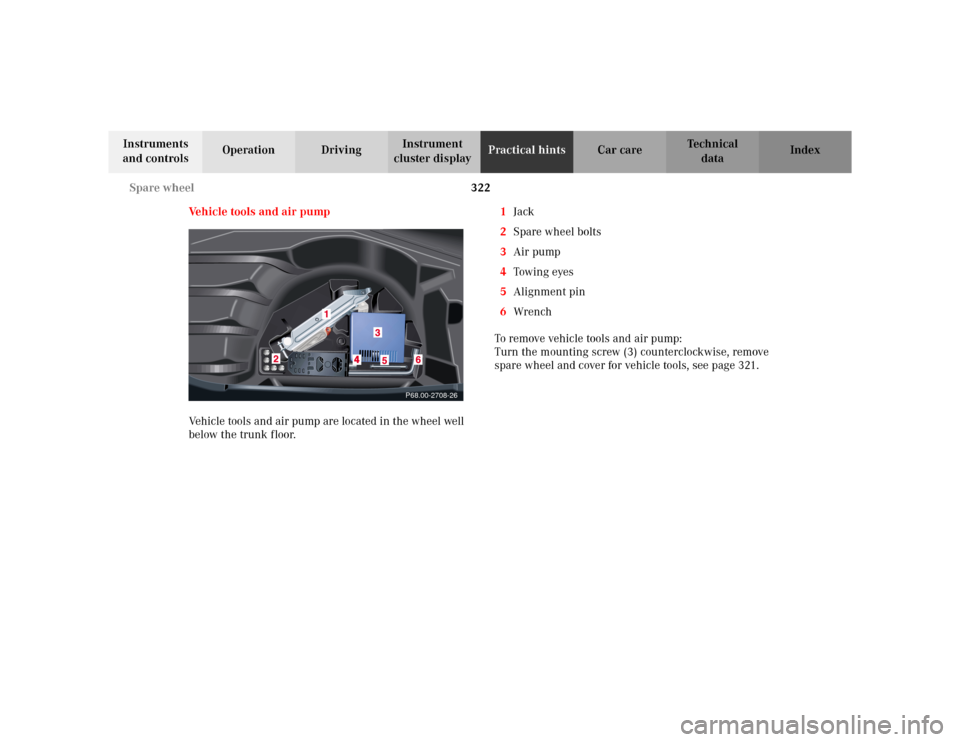
Vehicle tools and air pump
Vehicle tools and air pump are located in the wheel well
below the trunk floor.1Jack
2Spare wheel bolts
3Air pump
4Towin g eyes
5Alignment pin
6Wrench
To remove vehicle tools and air pump:
Turn the mounting screw (3) counterclockwise, remove
spare wheel and cover for vehicle tools, see page 321.
P68.00-2708-26
Page 326 of 399
323 Jack
Te ch n i c a l
data Instruments
and controlsOperation DrivingInstrument
cluster displayPractical hintsCar care Index Ve h i c l e j a c k
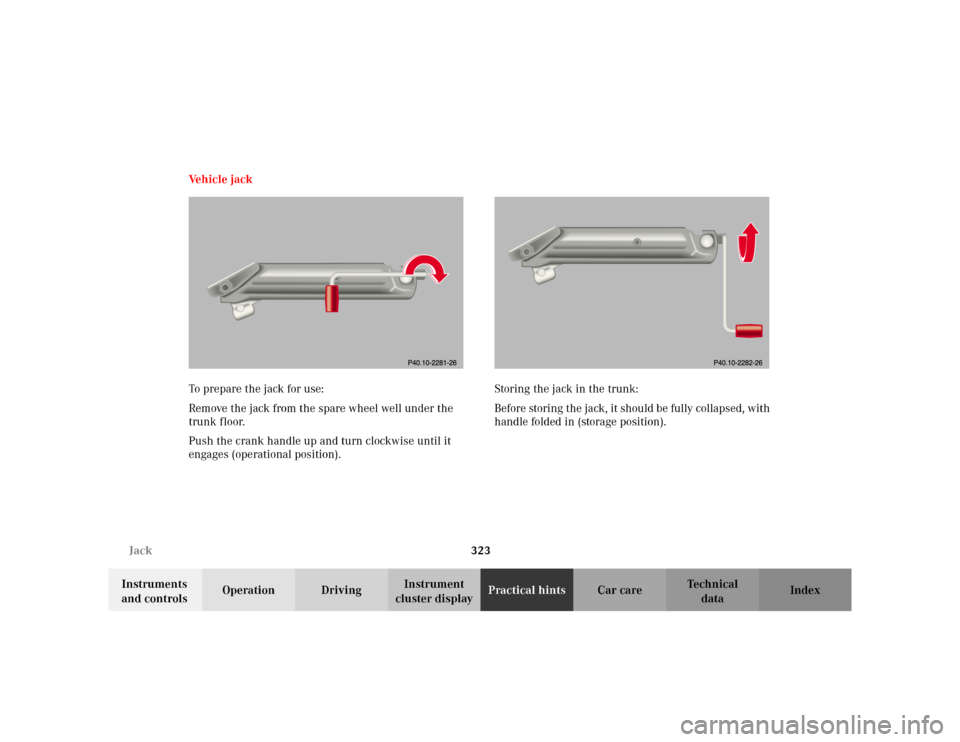
To prepare the jack for use:
Remove the jack from the spare wheel well under the
trunk floor.
Push the crank handle up and turn clockwise until it
engages (operational position).Storing the jack in the trunk:
Before storing the jack, it should be fully collapsed, with
handle folded in (storage position).
Page 327 of 399
324 Tires, Wheels
Te ch n i c a l
data Instruments
and controlsOperation DrivingInstrument
cluster displayPractical hintsCar care Index
Wheels
Replace rims or tires with the same designation,
manufacturer and type as shown on the original part.
See your authorized Mercedes-Benz Center for further
information.
See your authorized Mercedes-Benz Center for
information on tested and recommended rims and tires
for summer and winter operation. They can also offer
advice concerning tire service and purchase.
Tire replacement
Front and rear tires should be replaced in sets. Rims
and tires must be of the correct size and type. For
dimensions, see “Technical Data”.
We recommend that you break in new tires for
approximately 60 miles (100 km) at moderate speed.
Wa r n i n g !
The jack is designed exclusively for jacking up the
vehicle at the jack take-up brackets built into either
side of the vehicle. To help avoid personal injury,
use the jack only to lift the vehicle during a wheel
change. Never get beneath the vehicle while it is
supported by the jack. Keep hands and feet away
from the area under the lifted vehicle. Always
firmly set parking brake and block wheels before
raising vehicle with jack.Do not disengage parking brake while the vehicle is
raised. Be certain that the jack is always vertical
when in use, especially on hills. Always try to use
the jack on level surface. Be sure that the jack arm
is fully seated in the jack take-up bracket. Always
lower the vehicle onto sufficient capacity
jackstands before working under the vehicle.
Page 328 of 399
325 Tires, Wheels
Te ch n i c a l
data Instruments
and controlsOperation DrivingInstrument
cluster displayPractical hintsCar care Index It is imperative that the wheel mounting bolts be
fastened to a tightening torque of 80 ft.lb. (110 Nm)
whenever wheels are mounted.
For rim and tire specifications, refer to “Technical Data”.Rotating wheels
The wheels can be rotated according to the degree of
tire wear while retaining the same direction of travel.
Rotating, however, should be carried out as
recommended by the tire manufacturer, before the
characteristic tire wear pattern (shoulder wear on front
wheels and tread center wear on rear wheels) becomes
visible, as otherwise the driving properties deteriorate.
Notes:
Thoroughly clean the inner side of the wheels any time
you rotate the wheels or wash the vehicle underside.
The use of retread tires is not recommended. Retread
tires may adversely affect the handling characteristics
and safety of the vehicle.
Dented or bent rims can cause tire pressure loss and
damage to the tire beads. For this reason, check rims for
damage at regular intervals. The rim flanges must be
checked for wear before a tire is mounted. Remove
burrs, if any.
Check and ensure proper tire inflation pressure after
rotating the wheels. For tire inflation pressure see
inside of fuel filler flap and also page 278.
Wa r n i n g !
Worn, old tires can cause accidents. If the tire tread
is badly worn, or if the tires have sustained
damage, replace them.When replacing rims, use only genuine
Mercedes-Benz wheel bolts specified for the
particular rim type. Failure to do so can result in
the bolts loosening and possibly an accident.
Page 329 of 399
326 Tires, Wheels
Te ch n i c a l
data Instruments
and controlsOperation DrivingInstrument
cluster displayPractical hintsCar care Index
Spare wheel
Important!
The spare wheel rim size is 4
1/2 Bx15H2 with
inflatable, collapsible tire, size 165 -15 89 P.
You should inflate the spare tire using the supplied air
pump.
In the case of a flat tire, you may temporarily use the
spare wheel, while observing the following restrictions:
•Do not exceed vehicle speed of 50 mph (80 km / h).
•Drive to the nearest tire repair facility to have the
flat tire repaired or replaced as appropriate.
•Do not operate vehicle with more than one
collapsible spare wheel / tire mounted.
For additional information, refer to page 374.
Wa r n i n g !The dimensions of the spare wheel are different
from those of the road wheels. As a result, the
vehicle handling characteristics change when
driving with a mounted spare wheel.The spare wheel should only be used temporarily,
and replaced with a regular road wheel as quick as
possible.
Page 330 of 399
327 Tires, Wheels
Te ch n i c a l
data Instruments
and controlsOperation DrivingInstrument
cluster displayPractical hintsCar care Index Changing wheelsMove vehicle to a level area which is a safe distance
from the roadway.
1. Set parking brake and turn on hazard warning
flasher.
2. Move selector lever to position “P” and turn off
engine (manual transmission to 1st or reverse gear).
3. Prevent vehicle from rolling away by blocking
wheels with wheel chocks (not supplied with
vehicle) or sizable wood block or stone. When
changing a wheel on a hill, place chocks on the
downhill side blocking both wheels of the other
axle. On an level road, place one chock in front of
and one behind the wheel that is diagonally
opposite to the wheel being changed.
Wa r n i n g !
The jack is designed exclusively for jacking up the
vehicle at the jack take-up brackets built into either
side of the vehicle. To help avoid personal injury,
use the jack only to lift the vehicle during a wheel
change. Never get beneath the vehicle while it is
supported by the jack. Keep hands and feet away
from the area under the lifted vehicle. Always
firmly set parking brake and block wheels before
raising vehicle with jack.
Do not disengage parking brake while the vehicle is
raised. Be certain that the jack is always vertical
when in use, especially on hills. Always try to use
the jack on level surface. Be sure that the jack arm
is fully seated in the jack take-up bracket. Always
lower the vehicle onto sufficient capacity
jackstands before working under the vehicle.