Exterior lamp switch MERCEDES-BENZ C300 4MATIC 2010 W204 User Guide
[x] Cancel search | Manufacturer: MERCEDES-BENZ, Model Year: 2010, Model line: C300 4MATIC, Model: MERCEDES-BENZ C300 4MATIC 2010 W204Pages: 364, PDF Size: 8.23 MB
Page 92 of 364
Recalling positions from memoryXPress and hold desired memory position
button 1, 2 or 3 until the seat has moved
to the stored position completely. On the
driver’s side, also wait for the steering
wheel and exterior rear view mirrors to
move to the stored position.
iReleasing the memory position button
stops movement to the stored positions
immediately.
Lighting
Notes
iIf you drive in countries with left-hand
driving, you must have the headlamps
modified for symmetrical low beams.
Relevant information can be obtained at
any authorized Mercedes-Benz Center.
iVehicles equipped with active Bi-Xenon
headlamps:
The active Bi-Xenon headlamps increase
usable illumination over conventional
headlamps because they follow the
curvature of the road ahead. The beams of
the active Bi-Xenon headlamps shift to
either side according to the vehicle’s
steering angle and speed.
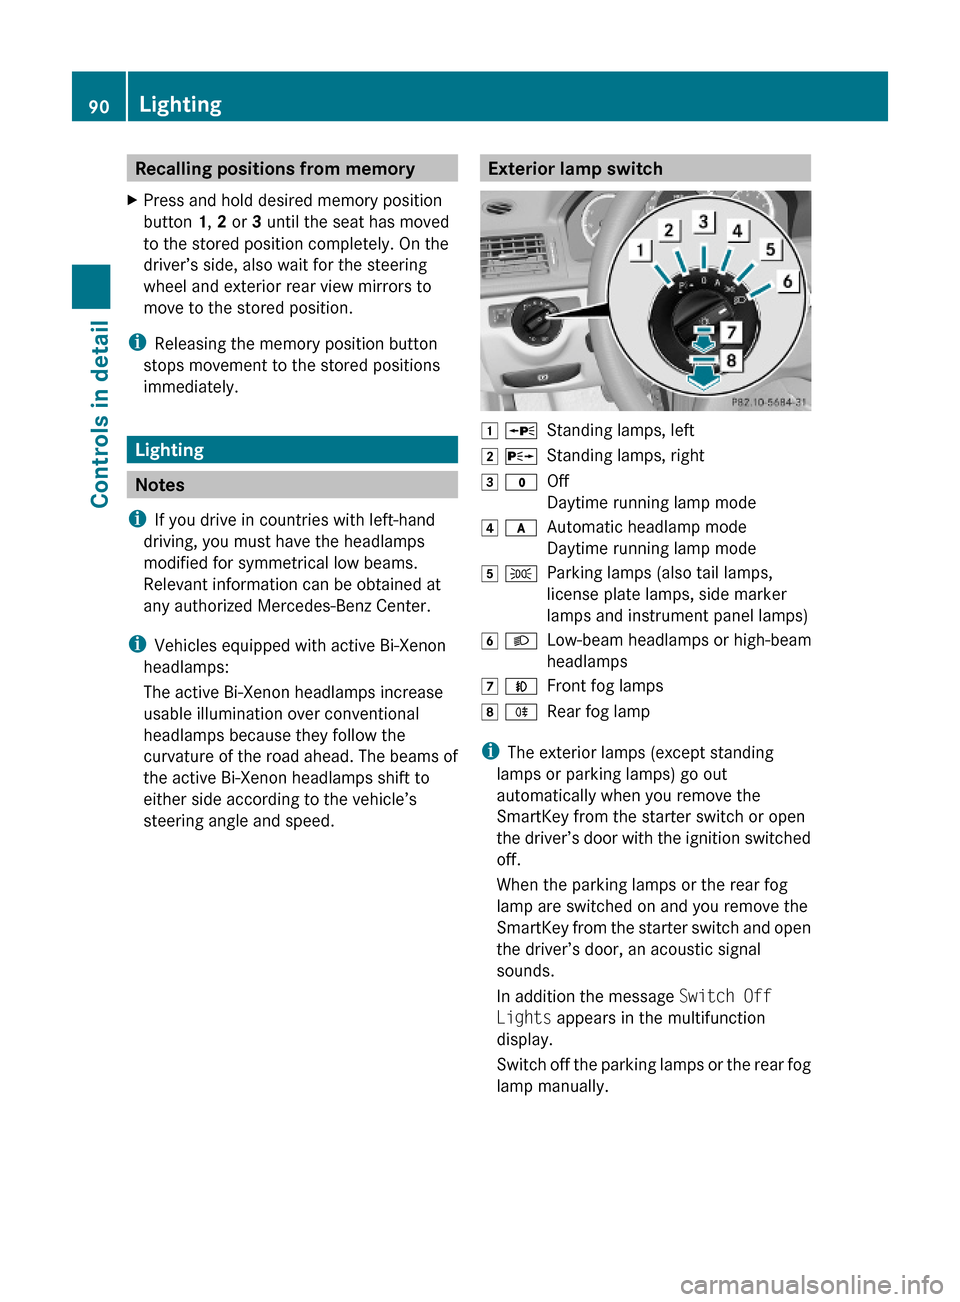
Exterior lamp switch1 WStanding lamps, left2 XStanding lamps, right3 $Off
Daytime running lamp mode
4 cAutomatic headlamp mode
Daytime running lamp mode
5 TParking lamps (also tail lamps,
license plate lamps, side marker
lamps and instrument panel lamps)
6 LLow-beam headlamps or high-beam
headlamps
7 NFront fog lamps8 RRear fog lamp
iThe exterior lamps (except standing
lamps or parking lamps) go out
automatically when you remove the
SmartKey from the starter switch or open
the driver’s door with the ignition switched
off.
When the parking lamps or the rear fog
lamp are switched on and you remove the
SmartKey from the starter switch and open
the driver’s door, an acoustic signal
sounds.
In addition the message Switch Off
Lights appears in the multifunction
display.
Switch off the parking lamps or the rear fog
lamp manually.
90LightingControls in detail
204_AKB; 5; 23, en-USd2ureepe,Version: 2.11.8.12009-07-16T17:54:06+02:00 - Seite 90
Page 93 of 364
! Failure to switch off the parking lamps
when leaving the vehicle may result in a
discharged battery.
Low-beam headlamps
The low-beam headlamps can be switched on
and off with the exterior lamp switch.
XSwitch on the ignition.XSwitching on: Turn the exterior lamp
switch to position L.
The following lamps come on:
R Low-beam headlamps
R Tail lamps
R Parking lamps
R License plate lamps
R Side marker lamps
R Instrument panel lamps
R Green indicator lamp L in the
instrument clusterXSwitching off: Turn the exterior lamp
switch to position $.
Automatic headlamp mode
The following lamps come on and go out
automatically depending on the brightness of
the ambient light:
R Low-beam headlamps
R Tail lamps
R Parking lamps
R License plate lamps
R Side marker lamps
GWarning!
If the exterior lamp switch is set to c, the
headlamps will not automatically come on
under foggy conditions.
To minimize risk to you and to others, activate
headlamps by turning exterior lamp switch to
L when driving or when traffic and/or
ambient lighting conditions require you to do
so.
In low ambient lighting conditions, only switch
from position c to L with the vehicle
at a standstill in a safe location. Switching
from c to L will briefly switch off the
headlamps. Doing so while driving in low
ambient lighting conditions may result in an
accident.
The automatic headlamp feature is only an aid
to the driver. The driver is responsible for the
operation of the vehicle’s lights at all times.XSwitching on: Turn the exterior lamp
switch to position c.
The following lamps come on and go out
depending on the brightness of the ambient
light with the SmartKey in starter switch
position 1 or the KEYLESS-GO start/stop
button pressed once:
R Tail lamps
R Parking lamps
R License plate lamps
R Side marker lamps
When the engine is running, the low-beam
headlamps will also come on and turn off
automatically.
Canada only: High-beam headlamps are only
available in low ambient lighting conditions.
Daytime running lamp mode
In Canada, the daytime running lamp mode is
mandatory and therefore in a constant mode.
In the USA, the daytime running lamp mode
is deactivated by default.
XActivate the daytime running lamp mode
using the control system, see “Switching
daytime running lamp mode on or off (USA
only)” ( Y page 133).XTurn the exterior lamp switch to position
$ or c .
When the engine is running, the low-beam
headlamps come on.Lighting91Controls in detail204_AKB; 5; 23, en-USd2ureepe,Version: 2.11.8.12009-07-16T17:54:06+02:00 - Seite 91Z
Page 94 of 364
In low ambient lighting conditions, the
following lamps will come on additionally:
R Tail lamps
R Parking lamps
R License plate lamps
R Side marker lamps
With the daytime running lamp mode
activated and the engine running, you cannot
switch off the low-beam headlamps manually.
Canada only
You can only switch on the high-beam
headlamps in low ambient lighting conditions.
The high-beam flasher is available at all times.
When the engine is running, and you
R shift from a driving position to park
position P with the vehicle at a standstill
(vehicles with automatic transmission) or
the parking brake is engaged, the low-beam
headlamps will go out with a delay of
3 minutes
R turn the exterior lamp switch to position
T , the low-beam headlamps, the tail
and parking lamps, the license plate lamps
and the side marker lamps come on
R turn the exterior lamp switch to position
L , the manual headlamp mode has
priority over the daytime running lamp
mode
The corresponding exterior lamps come on
( Y page 90).
USA only
You can only switch on the high-beam
headlamps in low ambient lighting conditions.
The high-beam flasher is available at all times.
When the engine is running, and you turn the
exterior lamp switch to position T or
L , the manual headlamp mode has
priority over the daytime running lamp mode.
The corresponding exterior lamps come on
( Y page 90).
Fog lamps
Fog lamps cannot be switched on with the
exterior lamp switch in position c.
GWarning!
In low ambient lighting or foggy conditions,
only switch from position c to L with
the vehicle at a standstill in a safe location.
Switching from c to L will briefly
switch off the headlamps. Doing so while
driving in low ambient lighting conditions may
result in an accident.
Fog lamps will operate with the parking lamps
and/or the low-beam headlamps on. Fog
lamps should only be used in conjunction with
low-beam headlamps. Consult your State or
Province Motor Vehicle Regulations
regarding permissible lamp operation.
XSwitch on the ignition.XTurn the exterior lamp switch to position
T or L (Y page 90).XSwitching on front fog lamps: Pull out the
exterior lamp switch to first stop.
The green indicator lamp N in the
instrument cluster comes on.XSwitching on rear fog lamp: Pull out the
exterior lamp switch to second stop.
The rear fog lamp, the front fog lamps, the
green N and the yellow indicator lamp
R in the instrument cluster come on.XSwitching off front fog lamps/rear fog
lamp: Push in the exterior lamp switch to
its stop.
Locator lighting
The locator lighting is described in the
“Control system” section, see “Switching
locator lighting on or off” ( Y page 134).
92LightingControls in detail
204_AKB; 5; 23, en-USd2ureepe,Version: 2.11.8.12009-07-16T17:54:06+02:00 - Seite 92
Page 95 of 364
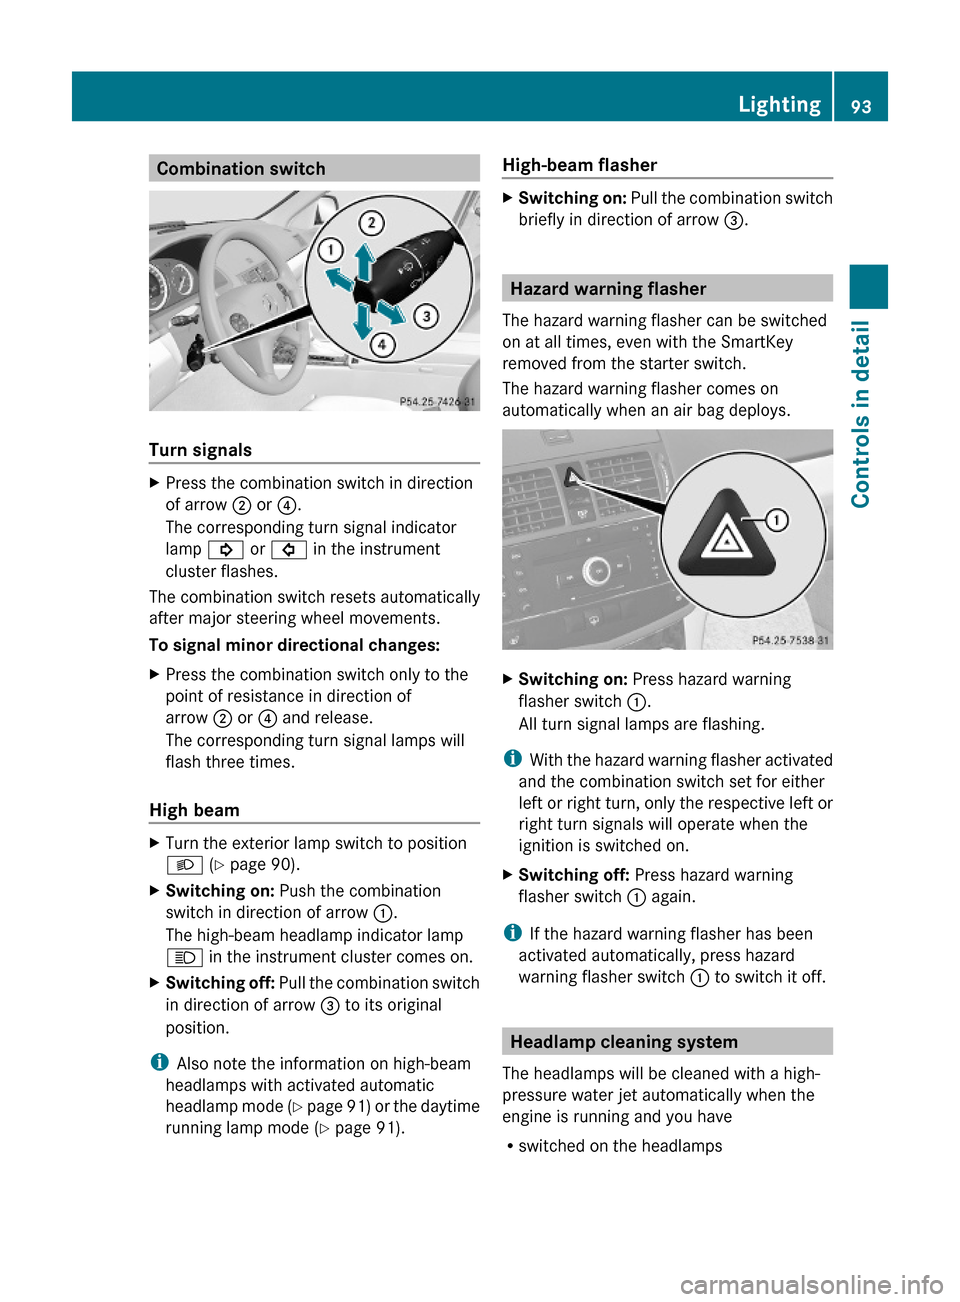
Combination switch
Turn signals
XPress the combination switch in direction
of arrow ; or ?.
The corresponding turn signal indicator
lamp ! or # in the instrument
cluster flashes.
The combination switch resets automatically
after major steering wheel movements.
To signal minor directional changes:
XPress the combination switch only to the
point of resistance in direction of
arrow ; or ? and release.
The corresponding turn signal lamps will
flash three times.
High beam
XTurn the exterior lamp switch to position
L (Y page 90).
XSwitching on: Push the combination
switch in direction of arrow :.
The high-beam headlamp indicator lamp
K in the instrument cluster comes on.
XSwitching off: Pull the combination switch
in direction of arrow = to its original
position.
iAlso note the information on high-beam
headlamps with activated automatic
headlamp mode (Y page 91) or the daytime
running lamp mode (Y page 91).
High-beam flasher XSwitching on: Pull the combination switch
briefly in direction of arrow =.
Hazard warning flasher
The hazard warning flasher can be switched
on at all times, even with the SmartKey
removed from the starter switch.
The hazard warning flasher comes on
automatically when an air bag deploys.
XSwitching on: Press hazard warning
flasher switch :.
All turn signal lamps are flashing.
iWith the hazard warning flasher activated
and the combination switch set for either
left or right turn, only the respective left or
right turn signals will operate when the
ignition is switched on.
XSwitching off: Press hazard warning
flasher switch : again.
iIf the hazard warning flasher has been
activated automatically, press hazard
warning flasher switch : to switch it off.
Headlamp cleaning system
The headlamps will be cleaned with a high-
pressure water jet automatically when the
engine is running and you have
Rswitched on the headlamps
Lighting93Controls in detail204_AKB; 5; 23, en-USd2ureepe,Version: 2.11.8.12009-07-16T17:54:06+02:00 - Seite 93Z
Page 96 of 364
and
R the windshield wipers have wiped the
windshield with washer fluid for the first
time
The headlamps are cleaned every tenth time
the windshield is washed with washer fluid.
The counter resets when you switch off the
ignition.
For information on filling up the washer
reservoir, see “Washer system and headlamp
cleaning system” ( Y page 228).
Corner-illuminating front fog lamps
The corner-illuminating front fog lamps
improve illumination of the area in the
direction into which you are turning.
The corner-illuminating front fog lamps will
only operate
R in low ambient lighting conditions
R at vehicle speeds below 25 mph
(40 km/h)
R with the front fog lamps switched off
R when the engine is running
Switching on
XTurn the exterior lamp switch to position
L or c .
or
XActivate the daytime running lamp mode
( Y page 91).XSwitch on the left or right turn signal,
depending on whether you are turning left
or right.
The respective front fog lamp comes on. If
you have switched on the turn signal for
one side but turn the steering wheel in the
other direction, the corner-illuminatingfront fog lamp on the side of the turn signal
comes on.
or
XTurn the steering wheel in the desired
direction.
Driving forward: The front fog lamp on the
side of your steering direction comes on.
Driving in reverse: The front fog lamp
opposite to your steering direction comes
on.
The corner-illuminating front fog lamps will
come on automatically depending on the
steering angle, even if you did not switch on
either turn signal. If the corner-illuminating
front fog lamps came on automatically, they
will also go out automatically depending on
the steering angle and vehicle speed.
The corner-illuminating front fog lamps
temporarily come on on both sides of the
vehicle if you turn the steering wheel in one
direction and then again in the other direction
shortly thereafter.
The corner-illuminating front fog lamp
remains lit for a short time only. It then goes
out automatically.
Switching off
XSwitch off the left or right turn signal.
or
XSteer straight ahead.
i There may be a brief delay before the
corner-illuminating front fog lamps go out.
94LightingControls in detail
204_AKB; 5; 23, en-USd2ureepe,Version: 2.11.8.12009-07-16T17:54:06+02:00 - Seite 94
Page 119 of 364
Rmalfunction/warning messages
Rfailure of any systems
Driving characteristics may be impaired.
If you must continue to drive, do so with added
caution. Contact an authorized Mercedes-
Benz Center as soon as possible.
The language setting for the multifunction
display can be changed with the audio system
(Y page 148) or with the COMAND system.
Vehicles with COMAND system: Refer to
separate operating instructions.
Activating the instrument cluster
The instrument cluster is activated when you
Ropen the driver’s door
Rswitch on the ignition
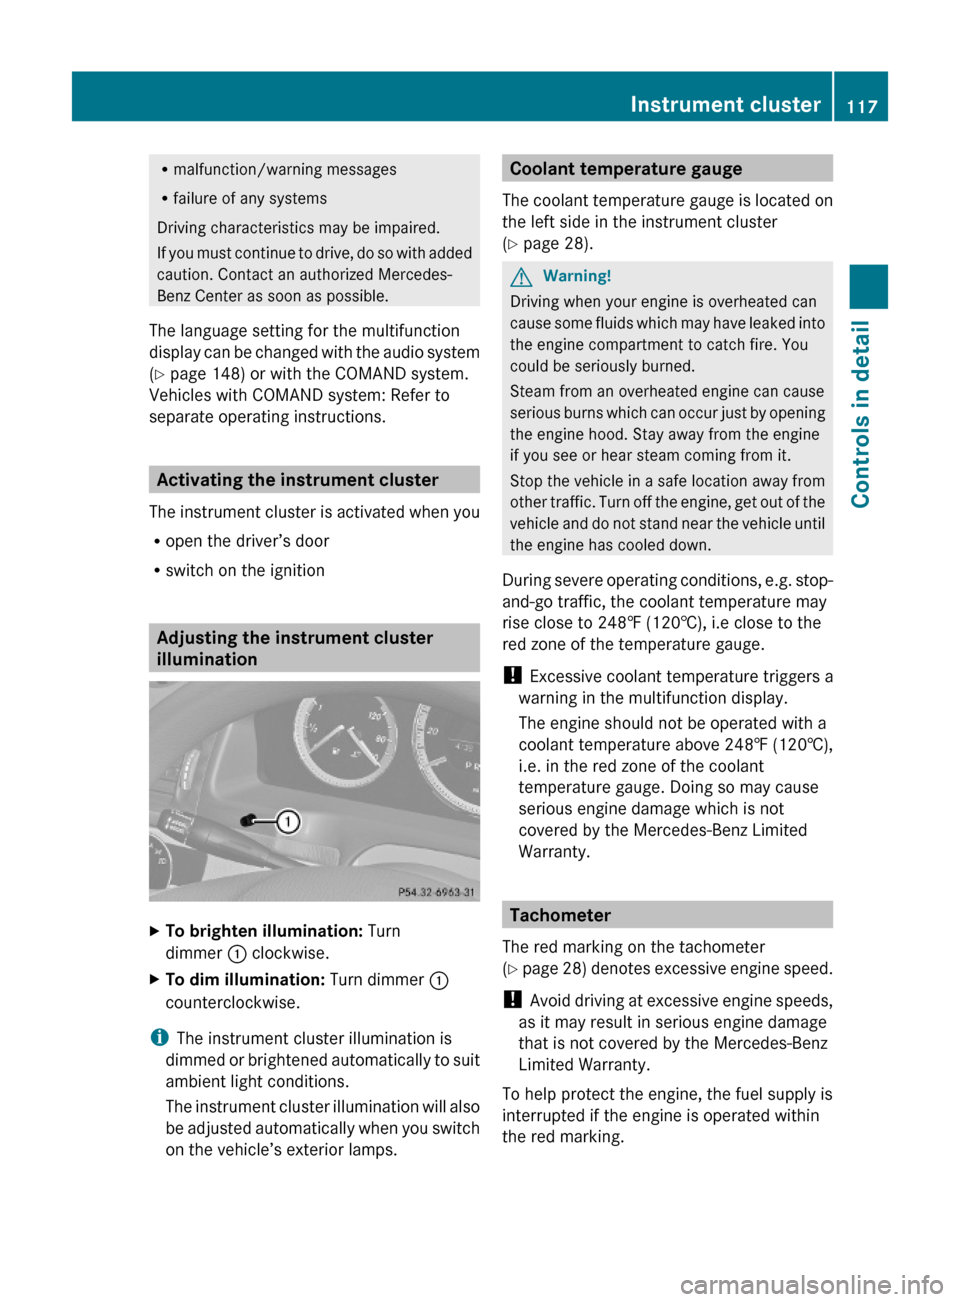
Adjusting the instrument cluster
illumination
XTo brighten illumination: Turn
dimmer : clockwise.
XTo dim illumination: Turn dimmer :
counterclockwise.
iThe instrument cluster illumination is
dimmed or brightened automatically to suit
ambient light conditions.
The instrument cluster illumination will also
be adjusted automatically when you switch
on the vehicle’s exterior lamps.
Coolant temperature gauge
The coolant temperature gauge is located on
the left side in the instrument cluster
(Y page 28).
GWarning!
Driving when your engine is overheated can
cause some fluids which may have leaked into
the engine compartment to catch fire. You
could be seriously burned.
Steam from an overheated engine can cause
serious burns which can occur just by opening
the engine hood. Stay away from the engine
if you see or hear steam coming from it.
Stop the vehicle in a safe location away from
other traffic. Turn off the engine, get out of the
vehicle and do not stand near the vehicle until
the engine has cooled down.
During severe operating conditions, e.g. stop-
and-go traffic, the coolant temperature may
rise close to 248‡ (120†), i.e close to the
red zone of the temperature gauge.
! Excessive coolant temperature triggers a
warning in the multifunction display.
The engine should not be operated with a
coolant temperature above 248‡ (120†),
i.e. in the red zone of the coolant
temperature gauge. Doing so may cause
serious engine damage which is not
covered by the Mercedes-Benz Limited
Warranty.
Tachometer
The red marking on the tachometer
(Y page 28) denotes excessive engine speed.
! Avoid driving at excessive engine speeds,
as it may result in serious engine damage
that is not covered by the Mercedes-Benz
Limited Warranty.
To help protect the engine, the fuel supply is
interrupted if the engine is operated within
the red marking.
Instrument cluster117Controls in detail204_AKB; 5; 23, en-USd2ureepe,Version: 2.11.8.12009-07-16T17:54:06+02:00 - Seite 117Z
Page 133 of 364
XPress button : or 9 to select a
submenu.
Scroll down with button :, scroll up with
button 9.
With the selection marker on the desired
submenu, use the button a to access the
individual functions within that submenu.
Once within the submenu, you can use button
9 to move to the next function or
button : to move to the previous function
within that submenu.
The following lists show what settings can be
changed within the various menus. Detailed
instructions on making individual settings can
be found on the following pages.
Instrument cluster submenu
RSelecting speedometer display mode
(Y page 131)
RShowing or hiding additional
speedometer13 (Y page 132)
RPermanent display14 (speed display or
outside temperature) (Y page 132)
Time/Date submenu
RSetting the time (Y page 132)
RSetting the date (Y page 133)
Lights submenu
RSwitching daytime running lamp mode on
or off (USA only) (Y page 133)
RSwitching locator lighting on or off
(Y page 134)
RSwitching interior lighting delayed shut-off
on or off (Y page 135)
Vehicle submenu
RSwitching automatic central locking on or
off (Y page 135)
Convenience submenu
RActivating easy-entry/exit feature
(Y page 136)
RSwitching fold-in function for exterior rear
view mirrors on or off (Canada only)
(Y page 136)
Instrument cluster submenu
Access the Instr. Cluster submenu via
the Settings menu. Use the Instr.
Cluster submenu to change the instrument
cluster display settings.
The following functions are available:
RSelecting speedometer display mode
(Y page 131)
RShowing or hiding additional
speedometer15 (Y page 132)
RPermanent display16 (speed display or
outside temperature) (Y page 132)
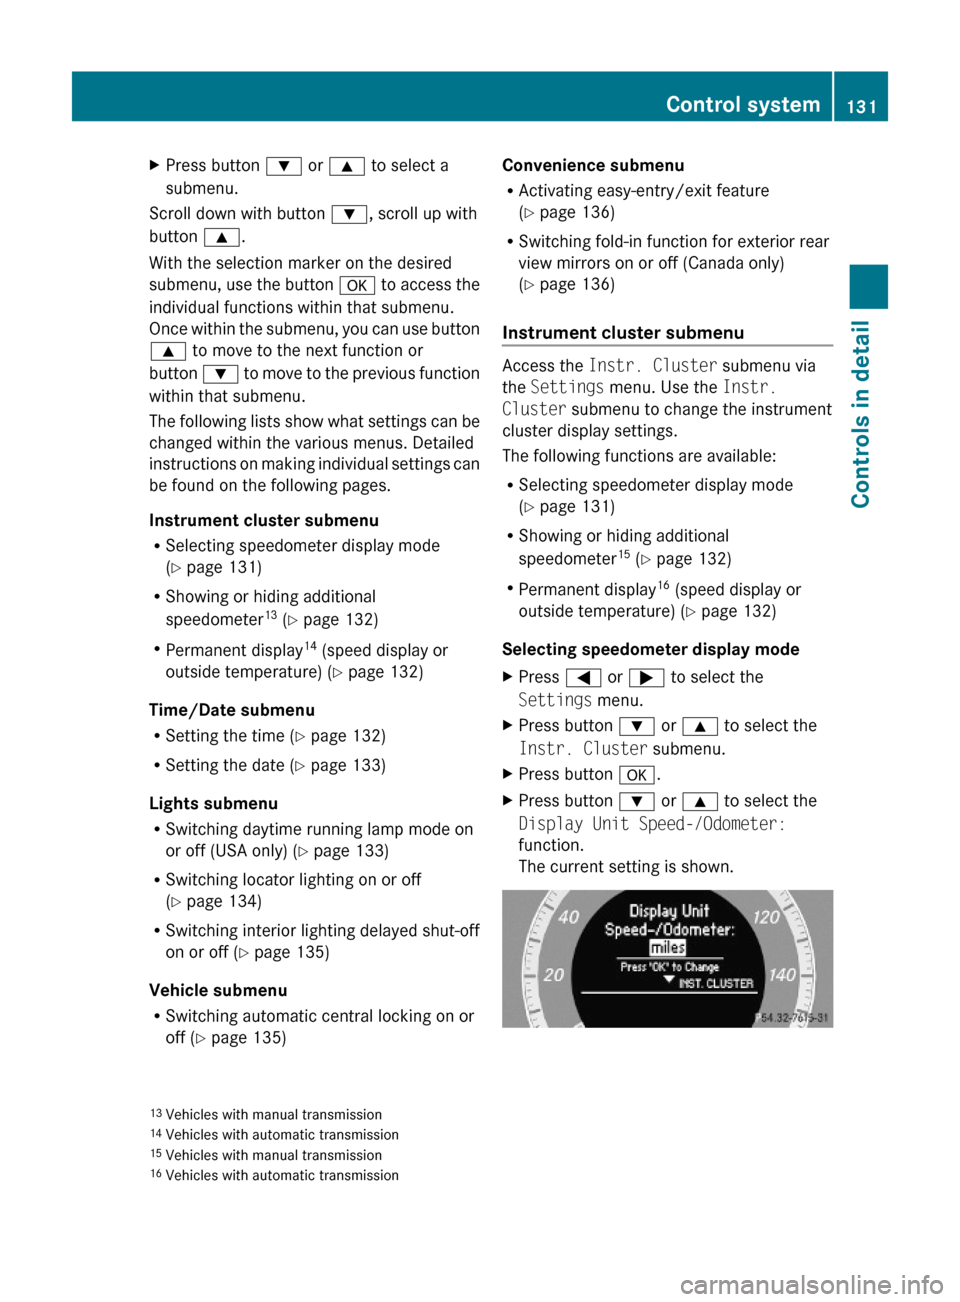
Selecting speedometer display mode
XPress = or ; to select the
Settings menu.
XPress button : or 9 to select the
Instr. Cluster submenu.
XPress button a.XPress button : or 9 to select the
Display Unit Speed-/Odometer:
function.
The current setting is shown.
13Vehicles with manual transmission14Vehicles with automatic transmission15Vehicles with manual transmission16Vehicles with automatic transmission
Control system131Controls in detail204_AKB; 5; 23, en-USd2ureepe,Version: 2.11.8.12009-07-16T17:54:06+02:00 - Seite 131Z
Page 136 of 364
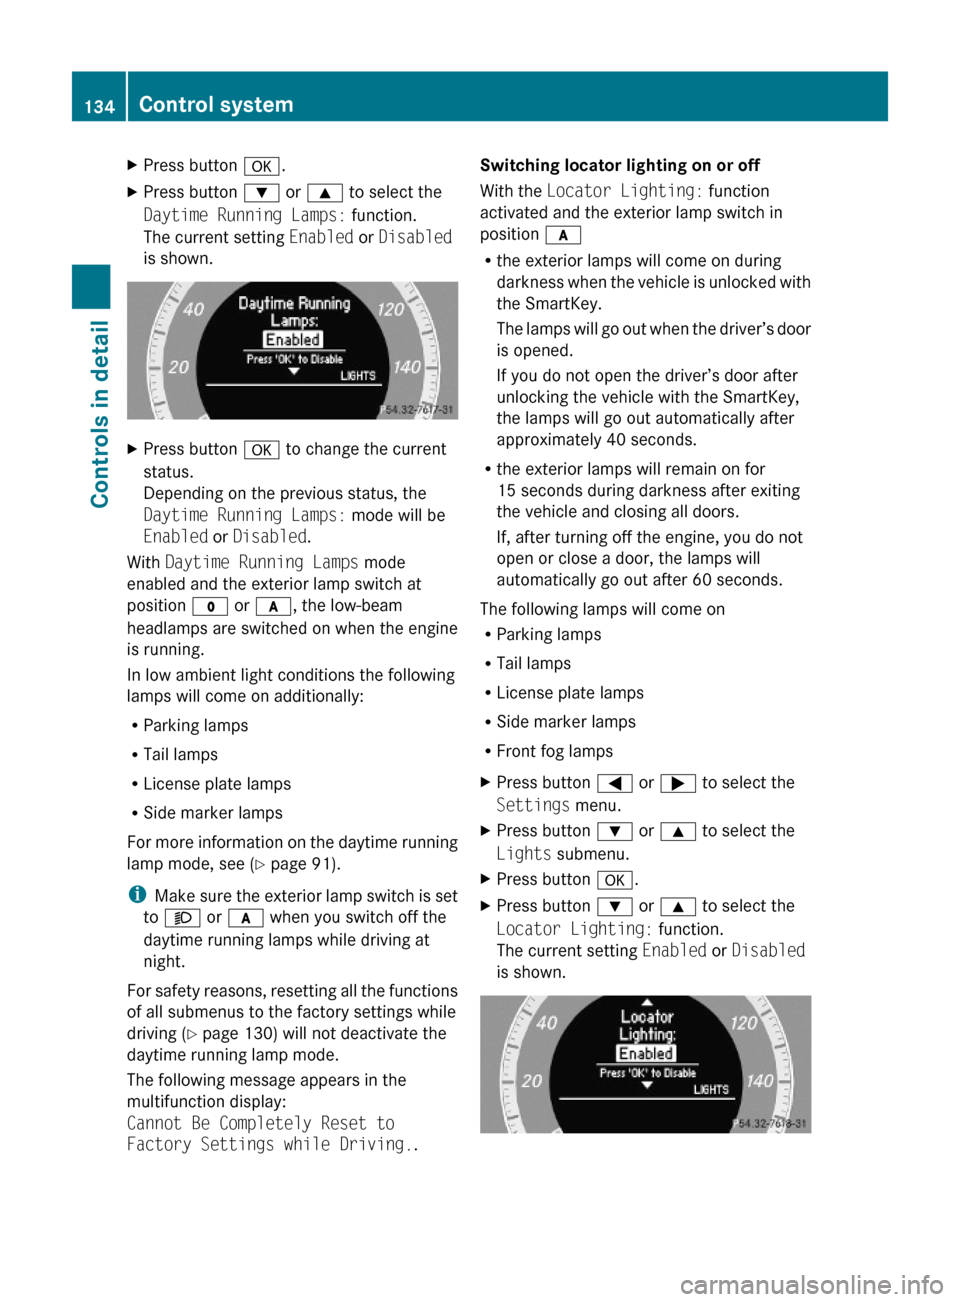
XPress button a.XPress button : or 9 to select the
Daytime Running Lamps: function.
The current setting Enabled or Disabled
is shown.
XPress button a to change the current
status.
Depending on the previous status, the
Daytime Running Lamps: mode will be
Enabled or Disabled.
With Daytime Running Lamps mode
enabled and the exterior lamp switch at
position $ or c, the low-beam
headlamps are switched on when the engine
is running.
In low ambient light conditions the following
lamps will come on additionally:
RParking lamps
RTail lamps
RLicense plate lamps
RSide marker lamps
For more information on the daytime running
lamp mode, see (Y page 91).
iMake sure the exterior lamp switch is set
to M or c when you switch off the
daytime running lamps while driving at
night.
For safety reasons, resetting all the functions
of all submenus to the factory settings while
driving (Y page 130) will not deactivate the
daytime running lamp mode.
The following message appears in the
multifunction display:
Cannot Be Completely Reset to
Factory Settings while Driving..
Switching locator lighting on or off
With the Locator Lighting: function
activated and the exterior lamp switch in
position c
Rthe exterior lamps will come on during
darkness when the vehicle is unlocked with
the SmartKey.
The lamps will go out when the driver’s door
is opened.
If you do not open the driver’s door after
unlocking the vehicle with the SmartKey,
the lamps will go out automatically after
approximately 40 seconds.
Rthe exterior lamps will remain on for
15 seconds during darkness after exiting
the vehicle and closing all doors.
If, after turning off the engine, you do not
open or close a door, the lamps will
automatically go out after 60 seconds.
The following lamps will come on
RParking lamps
RTail lamps
RLicense plate lamps
RSide marker lamps
RFront fog lamps
XPress button = or ; to select the
Settings menu.
XPress button : or 9 to select the
Lights submenu.
XPress button a.XPress button : or 9 to select the
Locator Lighting: function.
The current setting Enabled or Disabled
is shown.
134Control systemControls in detail
204_AKB; 5; 23, en-USd2ureepe,Version: 2.11.8.12009-07-16T17:54:06+02:00 - Seite 134
Page 137 of 364
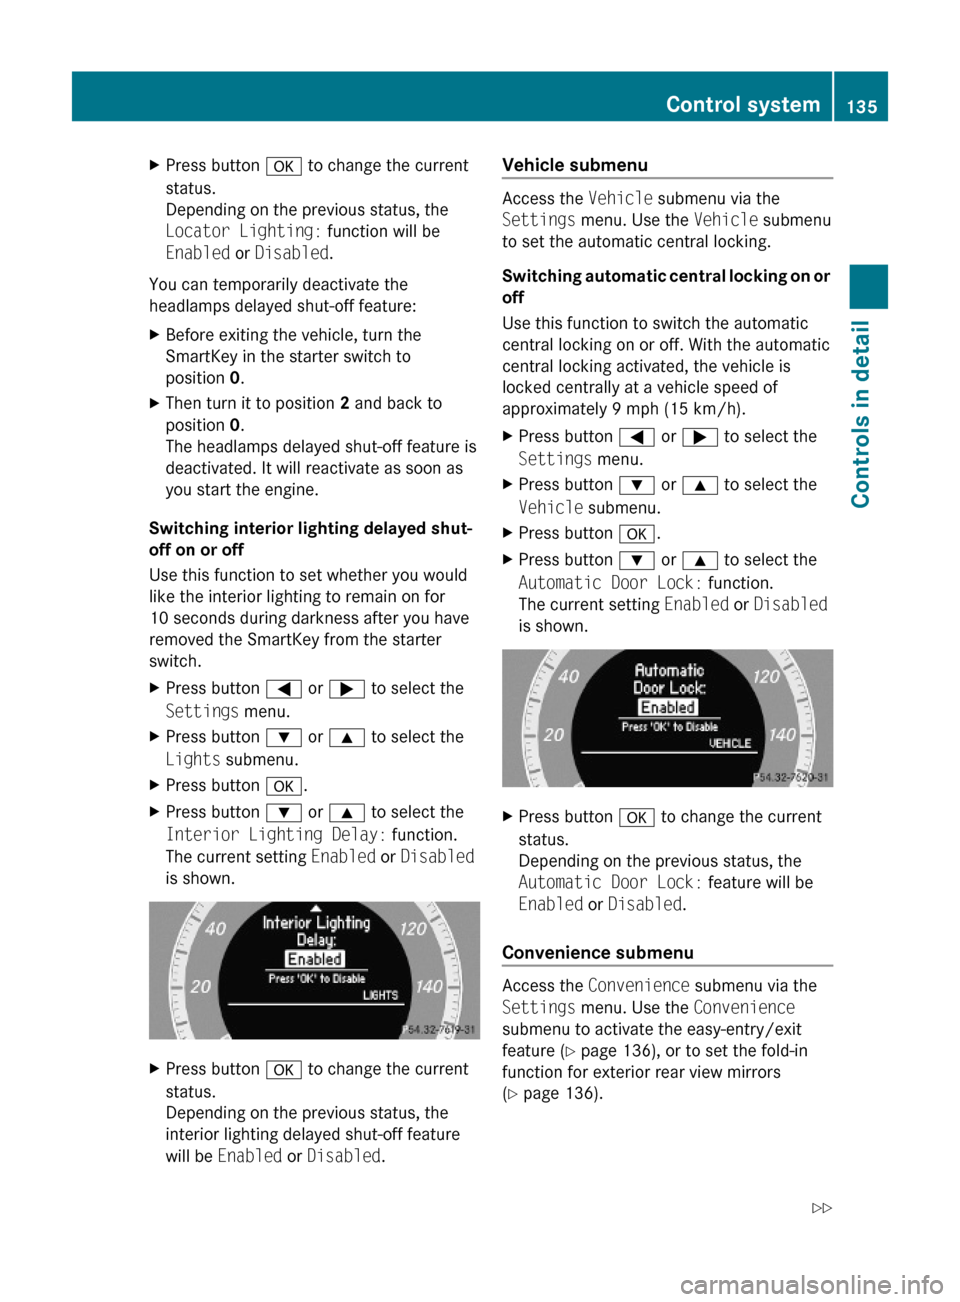
XPress button a to change the current
status.
Depending on the previous status, the
Locator Lighting: function will be
Enabled or Disabled.
You can temporarily deactivate the
headlamps delayed shut-off feature:
XBefore exiting the vehicle, turn the
SmartKey in the starter switch to
position 0.
XThen turn it to position 2 and back to
position 0.
The headlamps delayed shut-off feature is
deactivated. It will reactivate as soon as
you start the engine.
Switching interior lighting delayed shut-
off on or off
Use this function to set whether you would
like the interior lighting to remain on for
10 seconds during darkness after you have
removed the SmartKey from the starter
switch.
XPress button = or ; to select the
Settings menu.
XPress button : or 9 to select the
Lights submenu.
XPress button a.XPress button : or 9 to select the
Interior Lighting Delay: function.
The current setting Enabled or Disabled
is shown.
XPress button a to change the current
status.
Depending on the previous status, the
interior lighting delayed shut-off feature
will be Enabled or Disabled.
Vehicle submenu
Access the Vehicle submenu via the
Settings menu. Use the Vehicle submenu
to set the automatic central locking.
Switching automatic central locking on or
off
Use this function to switch the automatic
central locking on or off. With the automatic
central locking activated, the vehicle is
locked centrally at a vehicle speed of
approximately 9 mph (15 km/h).
XPress button = or ; to select the
Settings menu.
XPress button : or 9 to select the
Vehicle submenu.
XPress button a.XPress button : or 9 to select the
Automatic Door Lock: function.
The current setting Enabled or Disabled
is shown.
XPress button a to change the current
status.
Depending on the previous status, the
Automatic Door Lock: feature will be
Enabled or Disabled.
Convenience submenu
Access the Convenience submenu via the
Settings menu. Use the Convenience
submenu to activate the easy-entry/exit
feature (Y page 136), or to set the fold-in
function for exterior rear view mirrors
(Y page 136).
Control system135Controls in detail204_AKB; 5; 23, en-USd2ureepe,Version: 2.11.8.12009-07-16T17:54:06+02:00 - Seite 135Z
Page 296 of 364
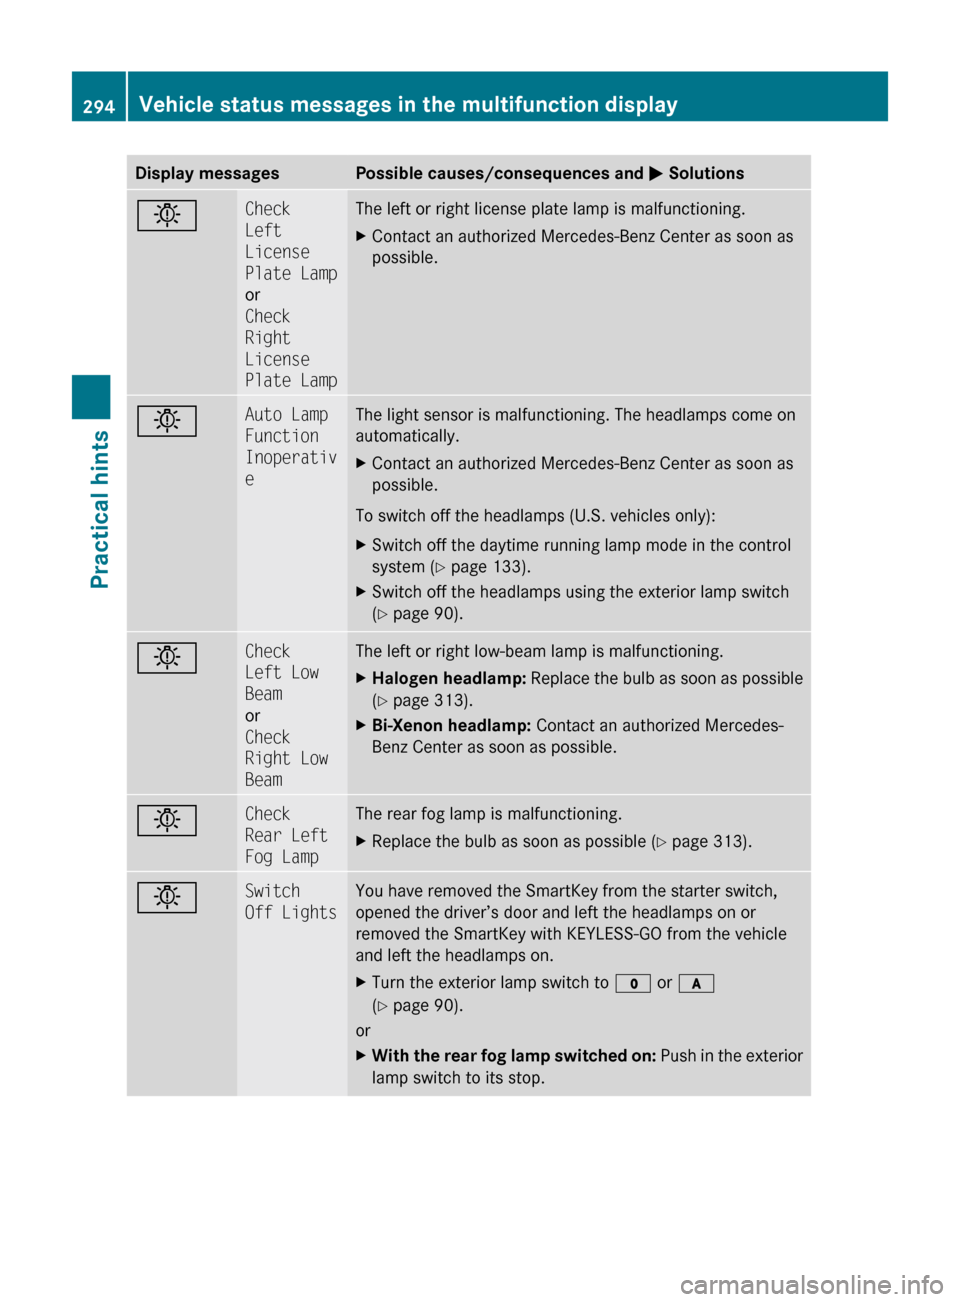
Display messagesPossible causes/consequences and M SolutionsbCheck
Left
License
Plate Lamp
or
Check
Right
License
Plate LampThe left or right license plate lamp is malfunctioning.XContact an authorized Mercedes-Benz Center as soon as
possible.bAuto Lamp
Function
Inoperativ
eThe light sensor is malfunctioning. The headlamps come on
automatically.XContact an authorized Mercedes-Benz Center as soon as
possible.
To switch off the headlamps (U.S. vehicles only):
XSwitch off the daytime running lamp mode in the control
system ( Y page 133).XSwitch off the headlamps using the exterior lamp switch
( Y page 90).bCheck
Left Low
Beam
or
Check
Right Low
BeamThe left or right low-beam lamp is malfunctioning.XHalogen headlamp: Replace the bulb as soon as possible
( Y page 313).XBi-Xenon headlamp: Contact an authorized Mercedes-
Benz Center as soon as possible.bCheck
Rear Left
Fog LampThe rear fog lamp is malfunctioning.XReplace the bulb as soon as possible ( Y page 313).bSwitch
Off LightsYou have removed the SmartKey from the starter switch,
opened the driver’s door and left the headlamps on or
removed the SmartKey with KEYLESS-GO from the vehicle
and left the headlamps on.XTurn the exterior lamp switch to $ or c
( Y page 90).
or
XWith the rear fog lamp switched on: Push in the exterior
lamp switch to its stop.294Vehicle status messages in the multifunction displayPractical hints
204_AKB; 5; 23, en-USd2ureepe,Version: 2.11.8.12009-07-16T17:54:06+02:00 - Seite 294