light MERCEDES-BENZ CL-Class 2001 C215 Comand Manual
[x] Cancel search | Manufacturer: MERCEDES-BENZ, Model Year: 2001, Model line: CL-Class, Model: MERCEDES-BENZ CL-Class 2001 C215Pages: 243, PDF Size: 2.33 MB
Page 134 of 243

132 Telephone
Introduction AudioTelephone
Navigation
Index Info Services and
system settings
SMS function
This function can be used for receiving, reading and
deleting short text messages
1.
Activating the SMS function
Use the rotary/pushbutton to highlight the “
”
symbol in the main telephone menu and press to
confirm. Other menu fields will be displayed.
1
If available from your carrier.
1The
symbol will appear when a new SMS
message has arrived.
Note:
When an SMS message arrives the “RM” symbol
(roaming mode) may be faded out and the
symbol displayed.
2Activates the SMS list, page 133
Note:
If necessary, SMS messages must be read in by the
COMAND unit. The following message will appear:
“SMS loading...”. The loading process can take up
to 30 seconds.
P82.85-6085-261
2
Page 135 of 243

Telephone
Introduction
AudioTelephone
Navigation
Index Info Services and
system settings Telephone133 Reading SMS messages received
Use the rotary/pushbutton
to highlight the “Reading
SMS” menu field and press to confirm.
The list of SMS messages received (up to 10 messages)
will be displayed. The messages are sorted according to
the time received.3Current SMS message marked,
telephone number or name (if it is in the phone
book) will be displayed, date and time will be
highlighted in brown
Use the corresponding arrow symbols to page forwards
and backwards through the list of messages.
P82.85-6086-26
3
Page 136 of 243

134 Telephone
Introduction AudioTelephone
Navigation
Index Info Services and
system settings
Use the rotary/pushbutton
to highlight the desired
SMS message and press to confirm.
The SMS message will be displayed.Press the rotary/pushbutton
to page through the
list:
4Pages through the list backwards when the
symbol is marked
5Pages through the list forwards when the symbol
is marked
6Deletes an SMS message, page 135
P82.85-6087-2645
6
Page 137 of 243

Telephone
Introduction
AudioTelephone
Navigation
Index Info Services and
system settings Telephone135 Deleting an SMS message
Use the rotary/pushbutton
to highlight the “Delete”
menu field and press to confirm.7SMS message currently displayed is deleted
If there was only one SMS message:
The main telephone menu will be activated.
If there are other SMS messages:
The next SMS message will be displayed.
After the oldest SMS message has been deleted the
current SMS message will be marked in the list
displayed.
8SMS message is not deleted,
the list with the SMS messages received (page 133)
will be activated, the SMS message previously
marked remains marked
P82.85-6088-26
8
7
Page 140 of 243

138 Telephone
Introduction AudioTelephone
Navigation
Index Info Services and
system settings
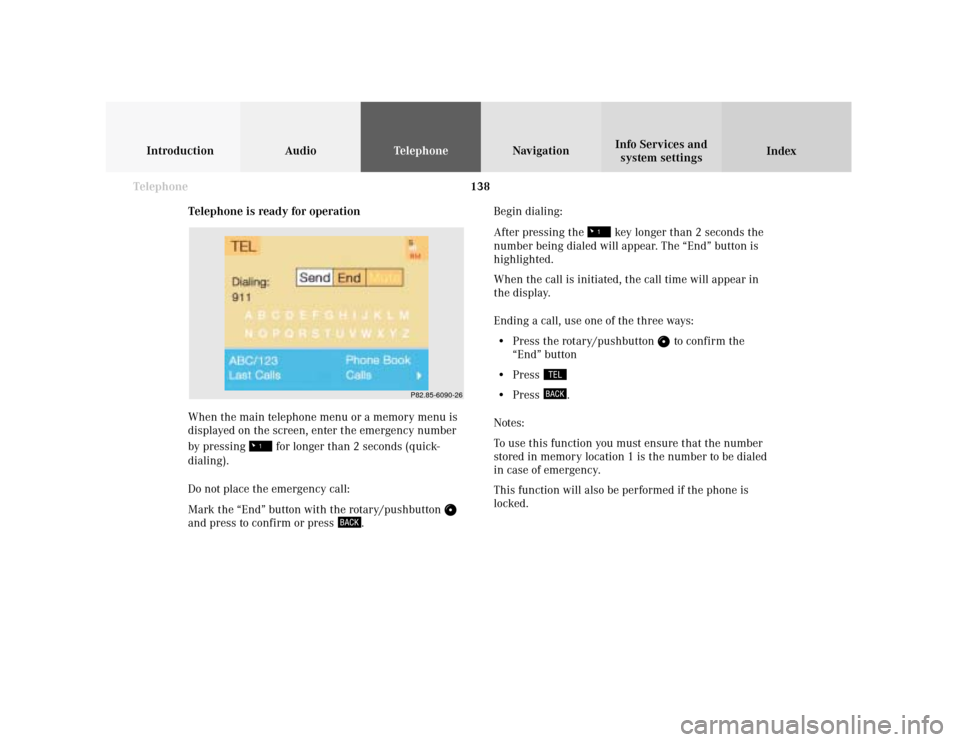
Telephone is ready for operation
When the main telephone menu or a memory menu is
displayed on the screen, enter the emergency number
by pressing
for longer than 2 seconds (quick-
dialing).
Do not place the emergency call:
Mark the “End” button with the rotary/pushbutton
and press to confirm or press
.Begin dialing:
After pressing the
key longer than 2 seconds the
number being dialed will appear. The “End” button is
highlighted.
When the call is initiated, the call time will appear in
the display.
Ending a call, use one of the three ways:
• Press the rotary/pushbutton
to confirm the
“End” button
• Press
• Press
.
Notes:
To use this function you must ensure that the number
stored in memory location 1 is the number to be dialed
in case of emergency.
This function will also be performed if the phone is
locked.
P82.85-6090-26
Page 141 of 243

Telephone
Introduction
AudioTelephone
Navigation
Index Info Services and
system settings Telephone139 Service numbers
Calling a service number
Use the rotary/pushbutton
to highlight the menu
field “Service No.” in the main telephone menu and
confirm by pressing.
The “Service No.” menu is activated.
1Personal service number
2Number for roadside assistanceUse the rotary/pushbutton
to highlight the service
you require in the menu and confirm by pressing.
The main telephone menu is activated.
The dialing process starts:
Confirm the
“Send”
button by pressing the
rotary/
pushbutton
. One of the messages “Personal Service
No.” or “Roadside Assistance” appears. The
“End”
button is highlighted.After the call has been initiated the length of the call is
displayed.
Ending a call, use one of the three ways:
• Press the rotary/pushbutton
to confirm the
“End” button
• Press
• Press
.
P82.85-60912621
Page 143 of 243

Telephone
Introduction
AudioTelephone
Navigation
Index Info Services and
system settings Telephone141 Changing the number for roadside assistance
Use the rotary/pushbutton
to highlight the menu
field “Change 2” in the “Service No.” menu and confirm
by pressing.
The country list “Change Service No. 2” is activated.Select the new country ser vice number by highlighting
the country abbreviation you want with the rotary/
pushbutton
and confirm by pressing.
The new service number is now stored in the menu
“Service No.”.
Return to the main telephone menu by pressing
.
P82.85-2588-26
Page 147 of 243

145
Introduction
Audio
Telephone
Navigation
Index Info Services and
system settings Destination input
Before you use the navigation system
The route calculated by COMAND is a recommendation
on how to best reach your selected destination.
Warning!
During route guidance, you will not receive any
information on traffic lights, stop or yield signs,
no parking or no stopping zones, one-way streets,
narrow bridges and similar traffic regulation data.
Please always strictly observe traffic regulations
while driving. Traffic regulations always have
priority over any route recommendations given.
Study manual and select route before driving, – do
not watch display screen or operate buttons while
the vehicle is in motion – let voice instructions
guide you. – Stop at a safe location before using
buttons or making corrections. Drive carefully and
always obey traffic laws and road signs even if
they contradict system instructions.
For safety’s sake you should only enter destina-
tions when the vehicle is stationary. When the
vehicle is in motion, a passenger should enter the
destination.
Notes
Warning!
The CD reader contains a Class 1 laser product.
There is a danger of invisible laser radiation if the
cover is opened or damaged.
Do not remove the cover. The CD reader does not
contain any parts which can be serviced by the
user. For safety reasons, have any service work
which may be necessary performed only by
qualified personnel.
The data stored on the original navigation CD is used
for route calculation. Using other navigation CDs might
lead to malfunctions.
Because of changes in local traffic patterns and/or
incomplete data, errors in calculation may occur.
The recommended trip may deviate in this case from
the available traffic pattern, because the data material
stored on the CD represent the local conditions at the
time the CD was produced.
Page 150 of 243

148
Index Info Services and
system settings IntroductionAudio TelephoneNavigation
Destination input
1Selecting a detour during route guidance, page 196
2Switching the navigation system on, after which
either the main destination input menu, the symbol
display or the map will appear
3Repeats the current (last) voice instruction
4Selecting a destination via the map, page 161
5During map display:
Press
once – the scale bar appears,
page 164 and 191
Press again – selects a more detailed map
scale
If a list is displayed: Removes the window for
Number 6 below
6During map display:
Press once – the scale bar appears,
page 164 and 191
Press again – selects a less detailed map scale
If a list is displayed:
Press once – a long entry will display in full in
a window, page 166
Press again – removes the window7Raising
or lowering
the volume of the
voice output during route instruction
8Return to the previous menu
9Turn: Highlight a menu field, list entry or symbol
Altering the map scale, page 164 and 191
Press: Confirm an entry/selection, start a function
or activate a submenu
Activate the map scale bar, page 164 and 191
10Switching the COMAND system on and off, page 13
11Press
briefly:
The current route instruction is muted, page 185
Press longer than 2 seconds:
The voice output is switched off for the duration
of the current route guidance, page 185
12Color screen with map display
13CD slot for navigation CD
Note:
Do not insert radio CD’s in this slot.
14Ejects navigation CD
Navigation
Page 156 of 243

154
Index Info Services and
system settings IntroductionAudio TelephoneNavigation
Destination input
Select city/suburb
Press the rotary/pushbutton
to confirm the “City/
Suburb...” menu field. An entry menu will appear.
5Input line, selected characters are shown inverted;
the last city selected is also shown here
6Character set
7Delete symbol, delete the last or all characters
8Zoom, enlarges the currently selected character
9Move the insertion point one position to the right
10Activate the city listSelecting a new destination:
Selections are made from the city list, call up via the
menu field (10). First enter in the input line (5) the re-
quired destination or adopt the destination last selected.
Entering the destination via the input menu:
Turn the rotary/pushbutton
to select the desired let-
ter from the character set (6), it will appear magnified (8).
Press the rotary/pushbutton to confirm your selection,
the letter selected will appear highlighted in the input
line (5). The new entry will be completed with additional
letters to form one of the city/suburb names available on
the list.
Move the insertion point one position to the right:
Use the rotary/pushbutton to highlight the symbol (9)
and confirm by pressing.
Correcting the entry:
To delete the last character entered, use the rotary/
pushbutton
to highlight the delete symbol (7) and
press to confirm.
To delete all of the characters entered, highlight the
delete symbol (7) and press the rotary/pushbutton
for longer than 2 seconds.
P82.85-2596-26
10
8
7
6
5
9