clock MERCEDES-BENZ CL-Class 2002 C215 Comand Manual
[x] Cancel search | Manufacturer: MERCEDES-BENZ, Model Year: 2002, Model line: CL-Class, Model: MERCEDES-BENZ CL-Class 2002 C215Pages: 251
Page 11 of 251
Introduction
AudioIntroduction
Telephone Navigation Index AudioInfo Services and
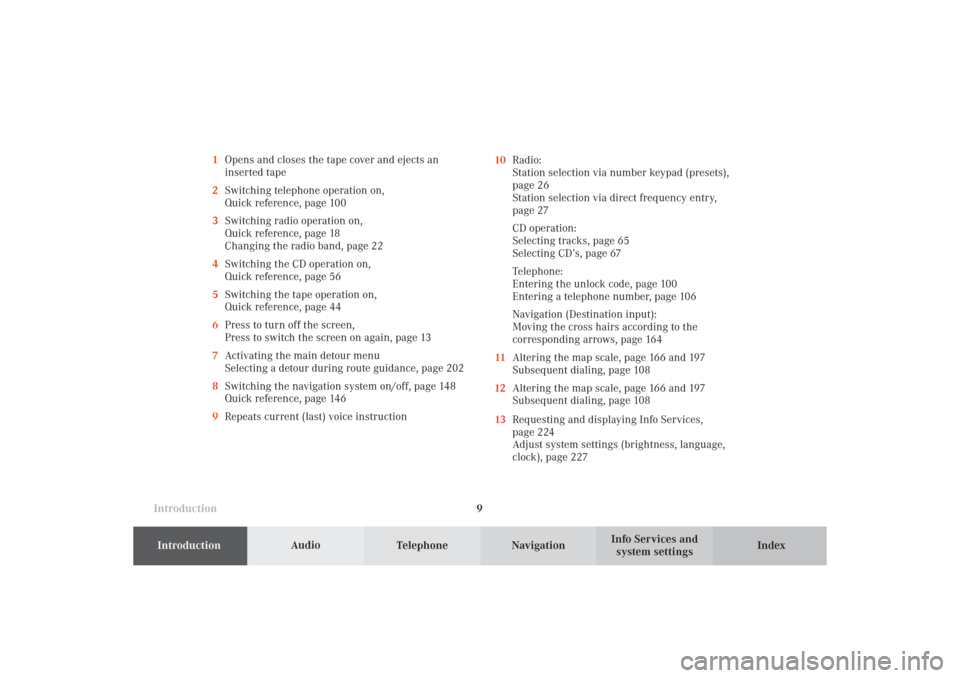
system settings 9 1Opens and closes the tape cover and ejects an
inserted tape
2Switching telephone operation on,
Quick reference, page 100
3Switching radio operation on,
Quick reference, page 18
Changing the radio band, page 22
4Switching the CD operation on,
Quick reference, page 56
5Switching the tape operation on,
Quick reference, page 44
6Press to turn off the screen,
Press to switch the screen on again, page 13
7Activating the main detour menu
Selecting a detour during route guidance, page 202
8Switching the navigation system on/off, page 148
Quick reference, page 146
9Repeats current (last) voice instruction10Radio:
Station selection via number keypad (presets),
page 26
Station selection via direct frequency entry,
page 27
CD operation:
Selecting tracks, page 65
Selecting CD’s, page 67
Telephone:
Entering the unlock code, page 100
Entering a telephone number, page 106
Navigation (Destination input):
Moving the cross hairs according to the
corresponding arrows, page 164
11Altering the map scale, page 166 and 197
Subsequent dialing, page 108
12Altering the map scale, page 166 and 197
Subsequent dialing, page 108
13Requesting and displaying Info Services,
page 224
Adjust system settings (brightness, language,
clock), page 227
03-EINF-25-US.pm509.07.2004, 13:58 Uhr 9
Page 21 of 251
Introduction
AudioTelephone
Navigation
Index Info Services and
system settings Radio operation
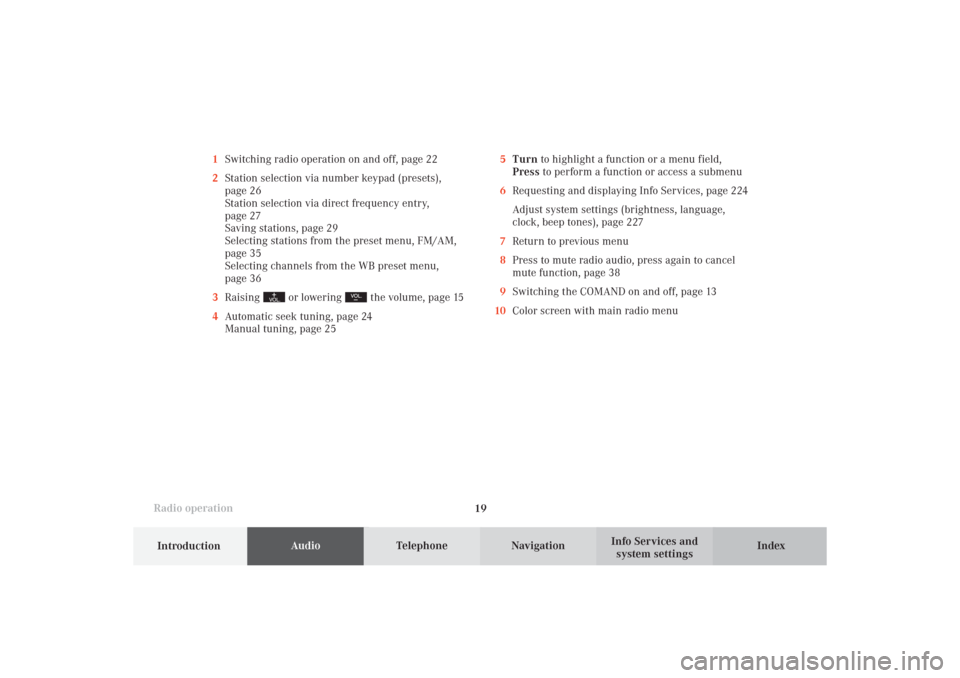
195Turn to highlight a function or a menu field,
Press to perform a function or access a submenu
6Requesting and displaying Info Services, page 224
Adjust system settings (brightness, language,
clock, beep tones), page 227
7Return to previous menu
8Press to mute radio audio, press again to cancel
mute function, page 38
9Switching the COMAND on and off, page 13
10Color screen with main radio menu 1Switching radio operation on and off, page 22
2Station selection via number keypad (presets),
page 26
Station selection via direct frequency entry,
page 27
Saving stations, page 29
Selecting stations from the preset menu, FM/AM,
page 35
Selecting channels from the WB preset menu,
page 36
3Raising
or lowering
the volume, page 15
4Automatic seek tuning, page 24
Manual tuning, page 25
04-RADIO-25-US.pm509.07.2004, 14:00 Uhr 19
Page 43 of 251
41
AudioTelephone
Navigation
Index
IntroductionInfo Services and
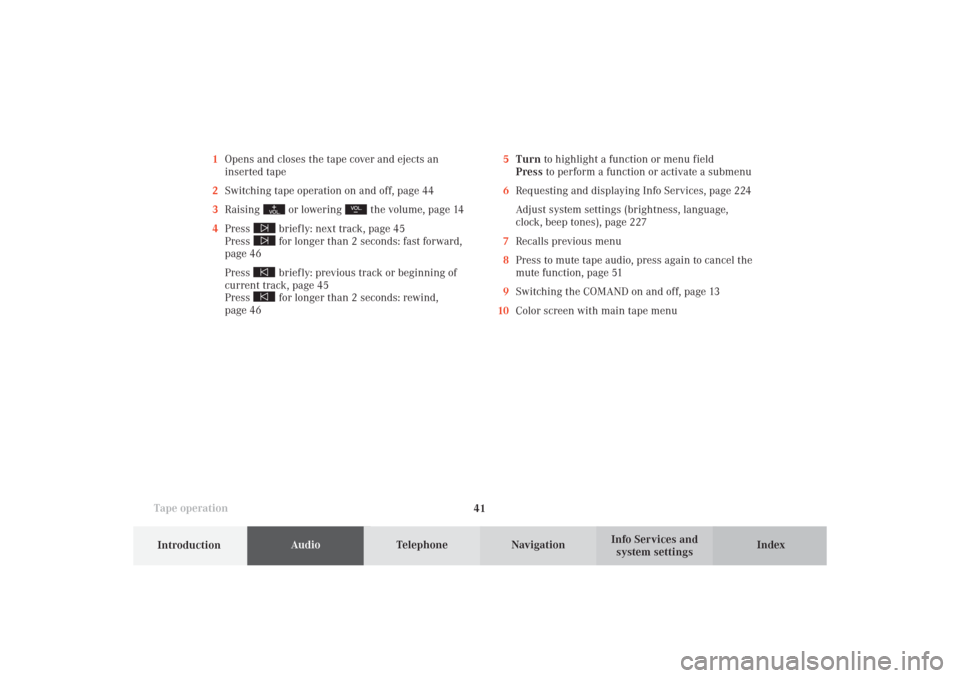
system settings Tape operation1Opens and closes the tape cover and ejects an
inserted tape
2Switching tape operation on and off, page 44
3Raising
or lowering
the volume, page 14
4Press
briefly: next track, page 45
Press for longer than 2 seconds: fast forward,
page 46
Press briefly: previous track or beginning of
current track, page 45
Press for longer than 2 seconds: rewind,
page 465Turn to highlight a function or menu field
Press to perform a function or activate a submenu
6Requesting and displaying Info Services, page 224
Adjust system settings (brightness, language,
clock, beep tones), page 227
7Recalls previous menu
8Press to mute tape audio, press again to cancel the
mute function, page 51
9Switching the COMAND on and off, page 13
10Color screen with main tape menu
05-TAPE-25-US.pm509.07.2004, 14:04 Uhr 41
Page 59 of 251
57
Introduction
AudioTelephone
Navigation
Index Info Services and
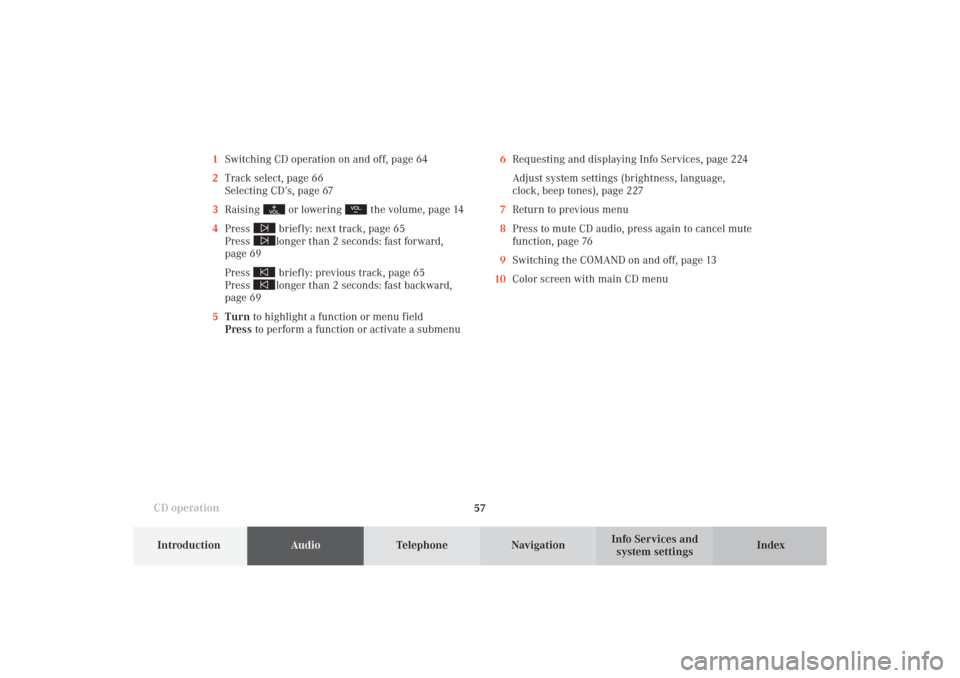
system settings CD operation6Requesting and displaying Info Services, page 224
Adjust system settings (brightness, language,
clock, beep tones), page 227
7Return to previous menu
8Press to mute CD audio, press again to cancel mute
function, page 76
9Switching the COMAND on and off, page 13
10Color screen with main CD menu 1Switching CD operation on and off, page 64
2Track select, page 66
Selecting CD’s, page 67
3Raising
or lowering
the volume, page 14
4Press
briefly: next track, page 65
Press longer than 2 seconds: fast forward,
page 69
Press briefly: previous track, page 65
Press longer than 2 seconds: fast backward,
page 69
5Turn to highlight a function or menu field
Press to perform a function or activate a submenu
06-CD-US.pm509.07.2004, 14:07 Uhr 57
Page 229 of 251
System settings227Introduction
Audio Telephone
Navigation
Index Info Services and
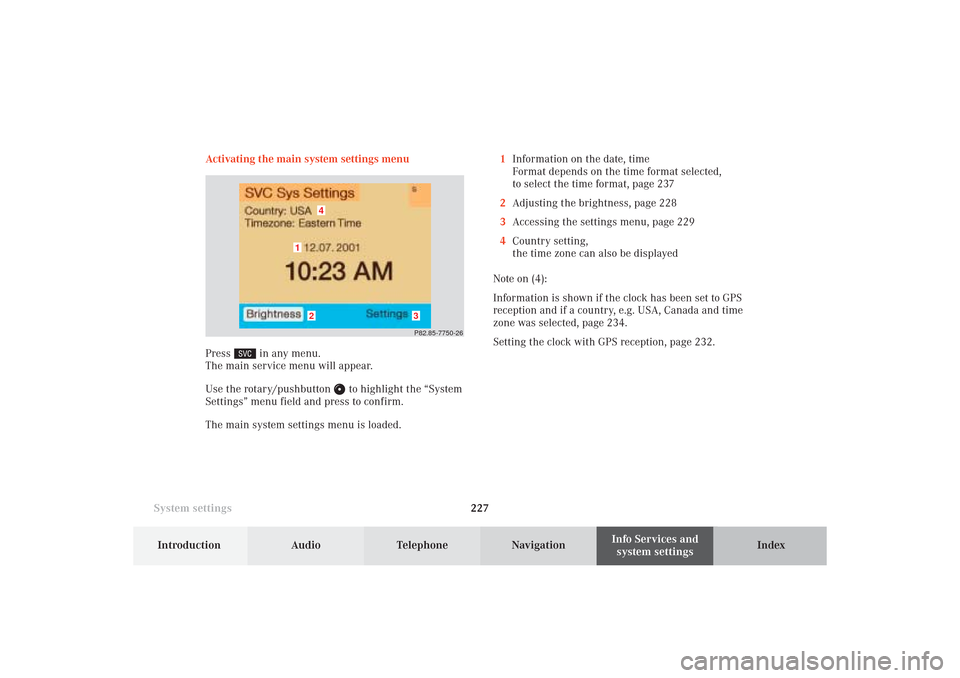
system settings Activating the main system settings menu
Press
in any menu.
The main service menu will appear.
Use the rotary/pushbutton
to highlight the “System
Settings” menu field and press to confirm.
The main system settings menu is loaded.1Information on the date, time
Format depends on the time format selected,
to select the time format, page 237
2Adjusting the brightness, page 228
3Accessing the settings menu, page 229
4Country setting,
the time zone can also be displayed
Note on (4):
Information is shown if the clock has been set to GPS
reception and if a country, e.g. USA, Canada and time
zone was selected, page 234.
Setting the clock with GPS reception, page 232.
P82.85-7750-26
4
3
2
1
12-System-25-US.pm517.10.2001, 11:06 Uhr 227
Page 233 of 251
System settings231Introduction
Audio Telephone
Navigation
Index Info Services and
system settings Set the date and time
COMAND is equipped with an integrated clock. Press
to display the current time. The clock is used e.g.
for indicating the estimated time of arrival at the
destination, page 181.
There are several ways to set the time:
• With GPS reception, page 232
Set the time in 30 minute steps, page 233
Set the time by selecting a country and the time
zone, page 234
• Without GPS reception, page 232
Set the date and time manually, page 236
Note:
The clock must always be reset if the COMAND
system was disconnected or if the vehicle battery
was discharged. List of languages:
• “Adopt from Instrument Cluster” – the system will
use the same language as is set in instrument
cluster
• “Deutsch”
• “English (metric)” – distance measured in km,
speed in km/h
• “English (imperial)” – distance measured in yards,
miles, speed in mph
• “Español“
• “Français“
• “Italiano“
• “Nederlands“
12-System-25-US.pm517.10.2001, 11:06 Uhr 231
Page 234 of 251
232 System settings
Audio Telephone Navigation
Index Info Services and
system settings Introduction
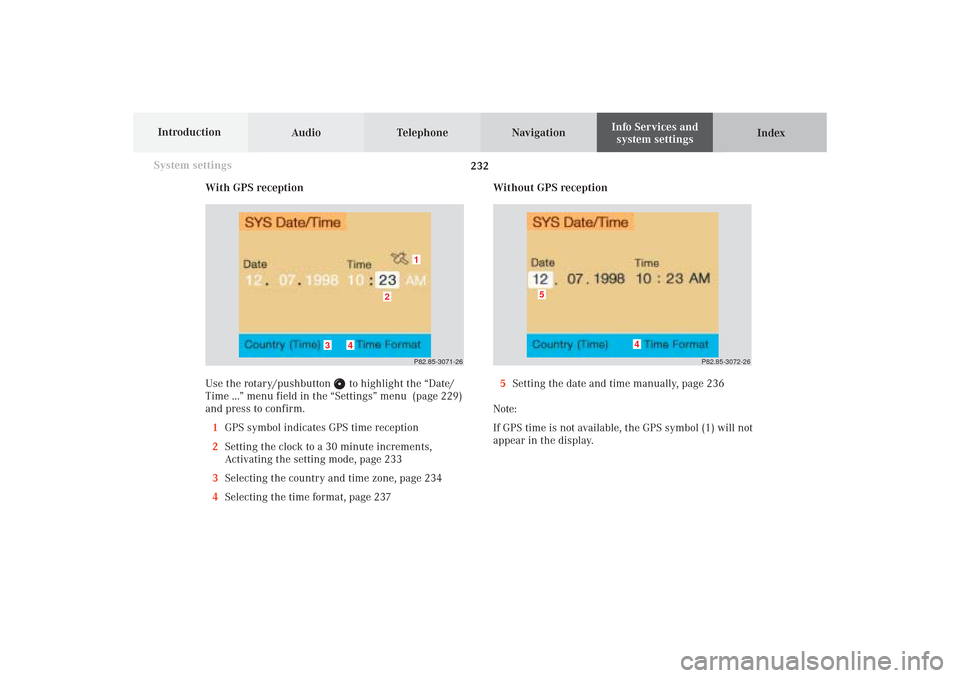
With GPS reception
Use the rotary/pushbutton
to highlight the “Date/
Time ...” menu field in the “Settings” menu (page 229)
and press to confirm.
1GPS symbol indicates GPS time reception
2Setting the clock to a 30 minute increments,
Activating the setting mode, page 233
3Selecting the country and time zone, page 234
4Selecting the time format, page 237Without GPS reception
5Setting the date and time manually, page 236
Note:
If GPS time is not available, the GPS symbol (1) will not
appear in the display.
P82.85-3071-26
2
1
3
4
P82.85-3072-26
4
5
12-System-25-US.pm517.10.2001, 11:06 Uhr 232
Page 235 of 251
System settings233Introduction
Audio Telephone
Navigation
Index Info Services and
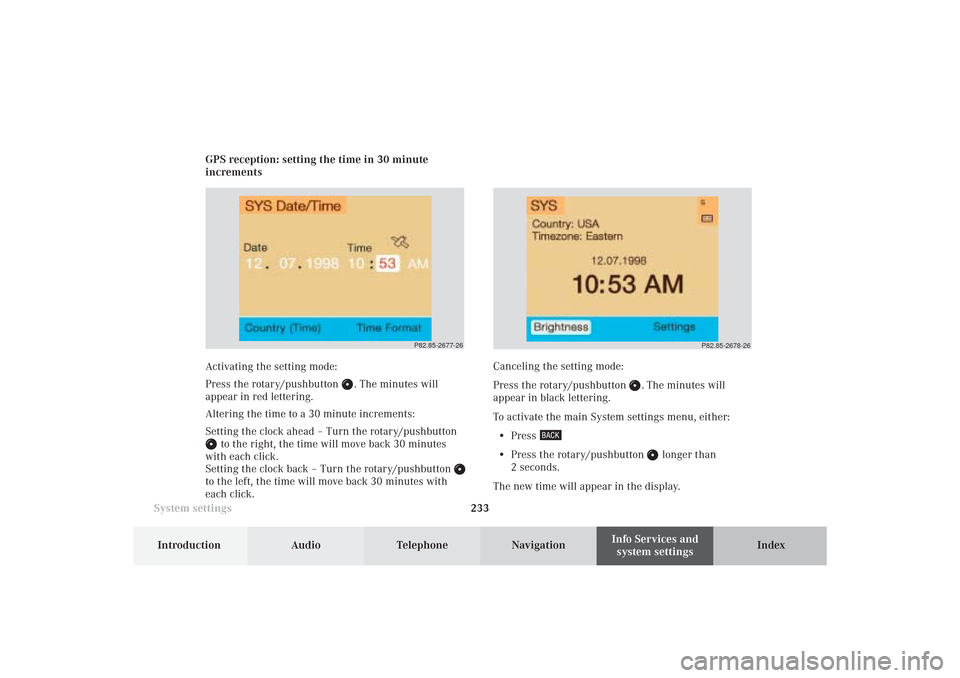
system settings GPS reception: setting the time in 30 minute
increments
Activating the setting mode:
Press the rotary/pushbutton
. The minutes will
appear in red lettering.
Altering the time to a 30 minute increments:
Setting the clock ahead – Turn the rotary/pushbutton
to the right, the time will move back 30 minutes
with each click.
Setting the clock back – Turn the rotary/pushbutton
to the left, the time will move back 30 minutes with
each click.Canceling the setting mode:
Press the rotary/pushbutton
. The minutes will
appear in black lettering.
To activate the main System settings menu, either:
• Press
• Press the rotary/pushbutton
longer than
2 seconds.
The new time will appear in the display.
P82.85-2677-26
P82.85-2678-26
12-System-25-US.pm517.10.2001, 11:06 Uhr 233
Page 238 of 251
236 System settings
Audio Telephone Navigation
Index Info Services and
system settings Introduction
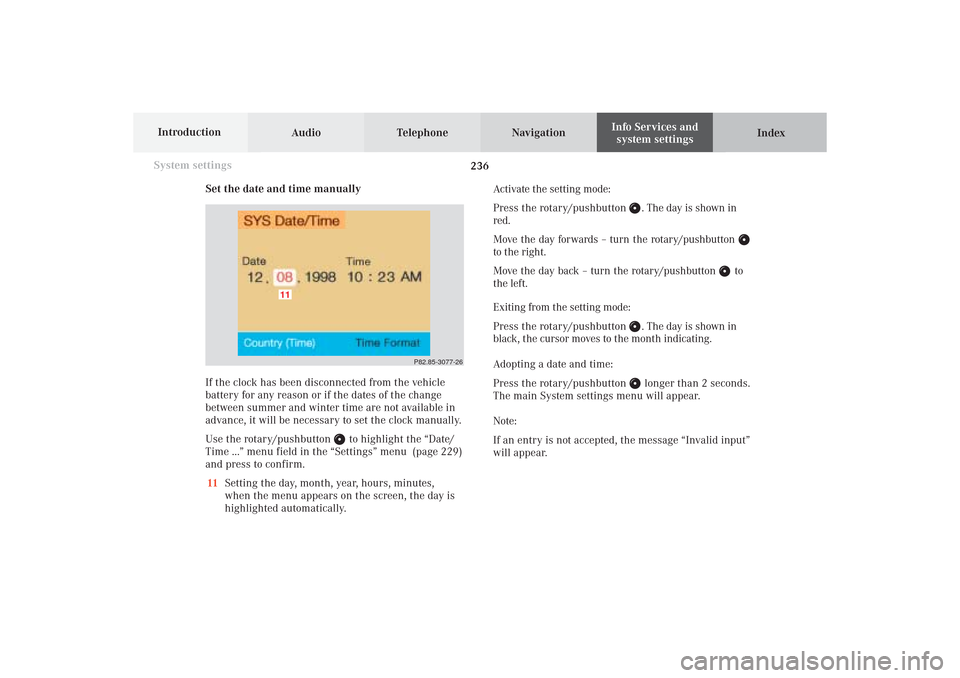
Set the date and time manually
If the clock has been disconnected from the vehicle
battery for any reason or if the dates of the change
between summer and winter time are not available in
advance, it will be necessary to set the clock manually.
Use the rotary/pushbutton
to highlight the “Date/
Time ...” menu field in the “Settings” menu (page 229)
and press to confirm.
11Setting the day, month, year, hours, minutes,
when the menu appears on the screen, the day is
highlighted automatically.Activate the setting mode:
Press the rotary/pushbutton
. The day is shown in
red.
Move the day forwards – turn the rotary/pushbutton
to the right.
Move the day back – turn the rotary/pushbutton
to
the left.
Exiting from the setting mode:
Press the rotary/pushbutton
. The day is shown in
black, the cursor moves to the month indicating.
Adopting a date and time:
Press the rotary/pushbutton longer than 2 seconds.
The main System settings menu will appear.
Note:
If an entry is not accepted, the message “Invalid input”
will appear.
P82.85-3077-26
11
12-System-25-US.pm517.10.2001, 11:06 Uhr 236