ESP MERCEDES-BENZ CL CLASS 2010 Owners Manual
[x] Cancel search | Manufacturer: MERCEDES-BENZ, Model Year: 2010, Model line: CL CLASS, Model: MERCEDES-BENZ CL CLASS 2010Pages: 500, PDF Size: 9.32 MB
Page 446 of 500

Display messages
Possible causes/consequences and
X Solutions# The battery is no longer charging.
Possible causes:
R
alternator malfunctioning
R broken poly-V-belt
R a malfunction in the electronic system
X Stop immediately in a safe location or as soon as it is safe
to do so and check the poly-V-belt.
X If it is broken: Do not continue to drive. Otherwise the
engine will overheat due to an inoperative water pump
which may result in damage to the engine. Contact an
authorized Mercedes-Benz Center.
X If it is intact: Drive to the nearest authorized Mercedes-
Benz Center immediately. Adjust driving to be consistent
with reduced braking responsiveness. 4 Check
Engine
Oil at
Next
Refueling CL 550 4MATIC and CL 63 AMG only:
The engine oil level has dropped to approximately the
minimum level.
X
Check the engine oil level ( Y page 369) and add engine oil
as required (Y page 371).
X If you must add engine oil frequently, have the engine
checked for possible leaks. 4 Check
Engine
Oil Level
(Add 1
quart)
(USA only)
Check
Engine
Oil Level
(Add 1
Liter)
(Canada
only) CL 600 and CL 65 AMG only:
The engine oil level is too low.
X
Add engine oil ( Y page 371) and check the engine oil level
(
Y page 369).
X If you must add engine oil frequently, have the engine
checked for possible leaks. If the message
Check Engine
Oil at Next
Refueling (CL 550 4MATIC and CL 63 AMG
only) or Check Engine Oil Level (Add 1
quart) (Canada: 1 Liter) (CL 600 and CL
65 AMG) appears while the engine is running
and at operating temperature, the engine oil level has dropped to approximately the
minimum level.
The message will be stored in the vehicle
status message memory after you have
cleared it from the multifunction display.444
Vehicle status messages in the multifunction display
Practical hints
216_AKB; 3; 90, en-US
d2ureepe,
Version: 2.11.8.1 2009-05-15T11:47:50+02:00 - Seite 444
Page 447 of 500
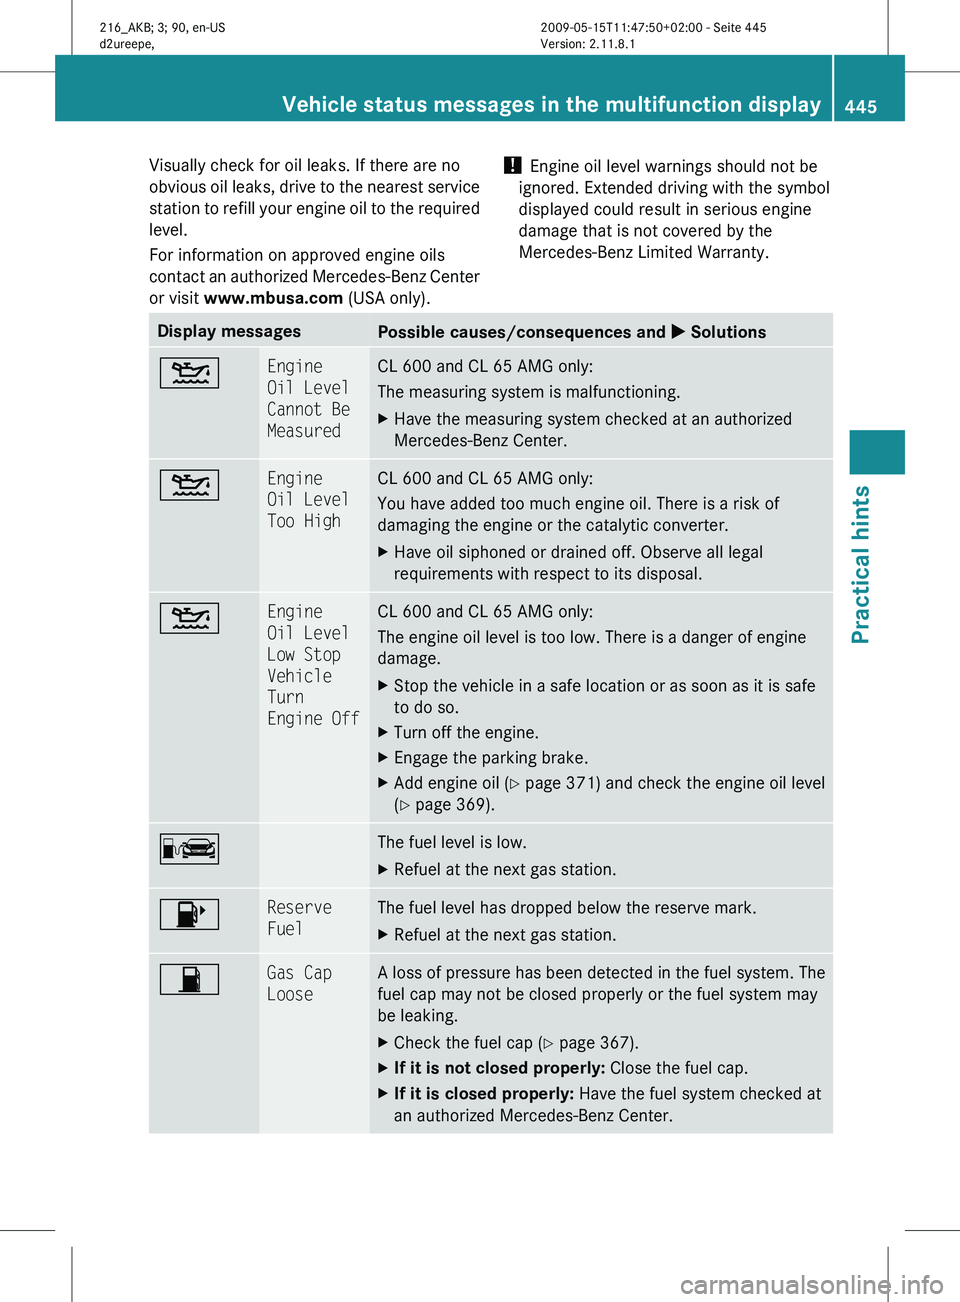
Visually check for oil leaks. If there are no
obvious
oil
leaks, drive to the nearest service
station to refill your engine oil to the required
level.
For information on approved engine oils
contact an authorized Mercedes-Benz Center
or visit www.mbusa.com (USA only). !
Engine oil level warnings should not be
ignored. Extended driving with the symbol
displayed could result in serious engine
damage that is not covered by the
Mercedes-Benz Limited Warranty. Display messages
Possible causes/consequences and
X Solutions4 Engine
Oil Level
Cannot Be
Measured CL 600 and CL 65 AMG only:
The measuring system is malfunctioning.
X
Have the measuring system checked at an authorized
Mercedes-Benz Center. 4 Engine
Oil Level
Too High CL 600 and CL 65 AMG only:
You have added too much engine oil. There is a risk of
damaging the engine or the catalytic converter.
X
Have oil siphoned or drained off. Observe all legal
requirements with respect to its disposal. 4 Engine
Oil Level
Low Stop
Vehicle
Turn
Engine Off CL 600 and CL 65 AMG only:
The engine oil level is too low. There is a danger of engine
damage.
X
Stop the vehicle in a safe location or as soon as it is safe
to do so.
X Turn off the engine.
X Engage the parking brake.
X Add engine oil ( Y page 371) and check the engine oil level
(
Y page 369). C The fuel level is low.
X
Refuel at the next gas station. 8 Reserve
Fuel The fuel level has dropped below the reserve mark.
X
Refuel at the next gas station. 7 Gas Cap
Loose A loss of pressure has been detected in the fuel system. The
fuel cap may not be closed properly or the fuel system may
be leaking.
X
Check the fuel cap ( Y page 367).
X If it is not closed properly: Close the fuel cap.
X If it is closed properly: Have the fuel system checked at
an authorized Mercedes-Benz Center. Vehicle status messages in the multifunction display
445
Practical hints
216_AKB; 3; 90, en-US
d2ureepe,Version: 2.11.8.1 2009-05-15T11:47:50+02:00 - Seite 445 Z
Page 452 of 500
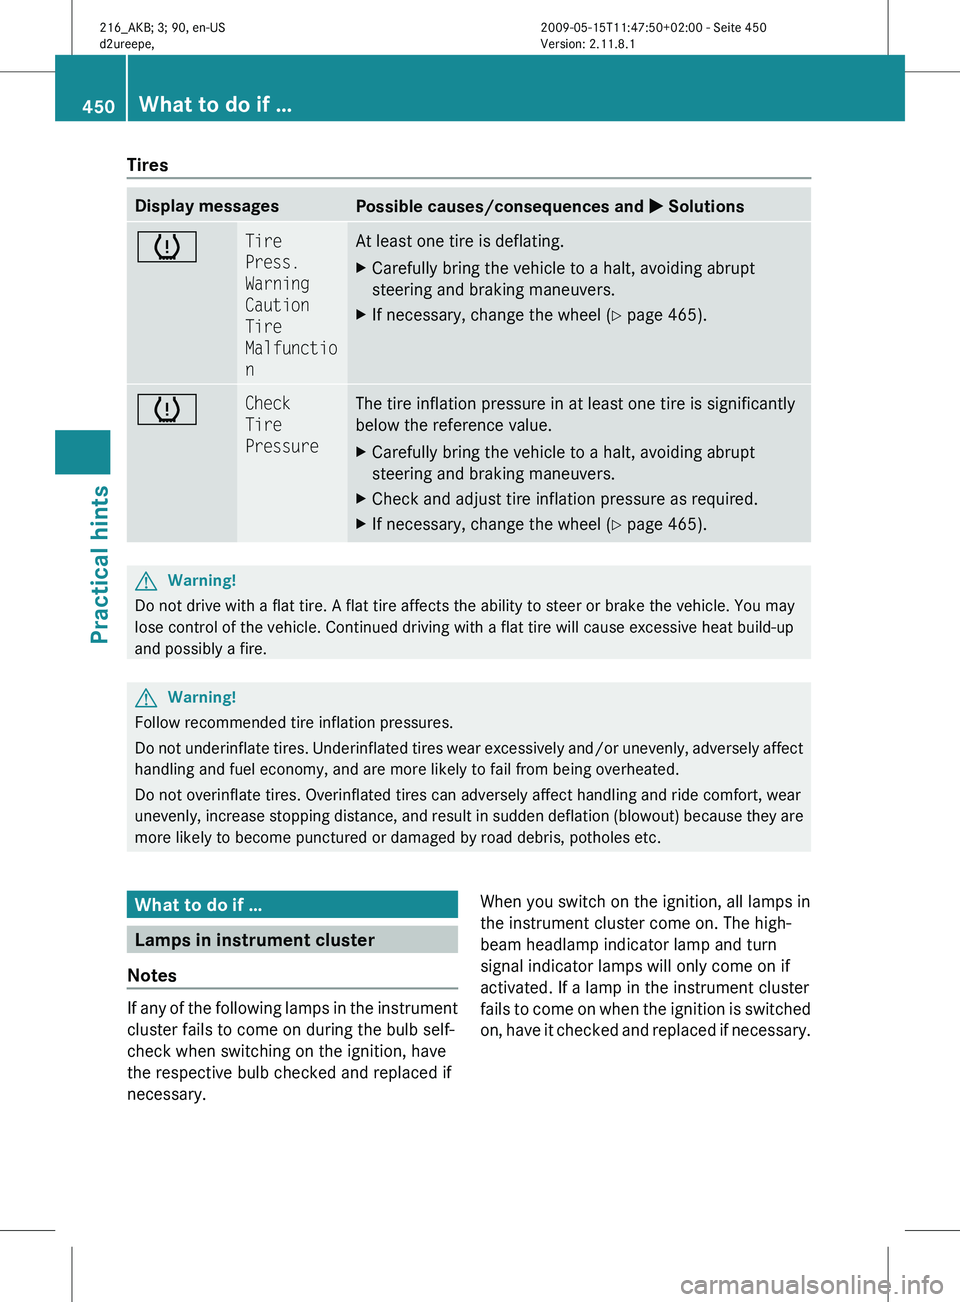
Tires
Display messages
Possible causes/consequences and
X Solutionsh Tire
Press.
Warning
Caution
Tire
Malfunctio
n At least one tire is deflating.
X
Carefully bring the vehicle to a halt, avoiding abrupt
steering and braking maneuvers.
X If necessary, change the wheel (Y page 465). h Check
Tire
Pressure The tire inflation pressure in at least one tire is significantly
below the reference value.
X
Carefully bring the vehicle to a halt, avoiding abrupt
steering and braking maneuvers.
X Check and adjust tire inflation pressure as required.
X If necessary, change the wheel (Y page 465). G
Warning!
Do not drive with a flat tire. A flat tire affects the ability to steer or brake the vehicle. You may
lose control of the vehicle. Continued driving with a flat tire will cause excessive heat build-up
and possibly a fire. G
Warning!
Follow recommended tire inflation pressures.
Do not
underinflate tires. Underinflated tires wear excessively and/or unevenly, adversely affect
handling and fuel economy, and are more likely to fail from being overheated.
Do not overinflate tires. Overinflated tires can adversely affect handling and ride comfort, wear
unevenly, increase stopping distance, and result in sudden deflation (blowout) because they are
more likely to become punctured or damaged by road debris, potholes etc. What to do if …
Lamps in instrument cluster
Notes If any of the following lamps in the instrument
cluster fails to come on during the bulb self-
check when switching on the ignition, have
the respective bulb checked and replaced if
necessary.
When you switch on the ignition, all lamps in
the instrument cluster come on. The high-
beam headlamp indicator lamp and turn
signal indicator lamps will only come on if
activated. If a lamp in the instrument cluster
fails
to
come on when the ignition is switched
on, have it checked and replaced if necessary. 450
What to do if …
Practical hints
216_AKB; 3; 90, en-US
d2ureepe,
Version: 2.11.8.1 2009-05-15T11:47:50+02:00 - Seite 450
Page 453 of 500
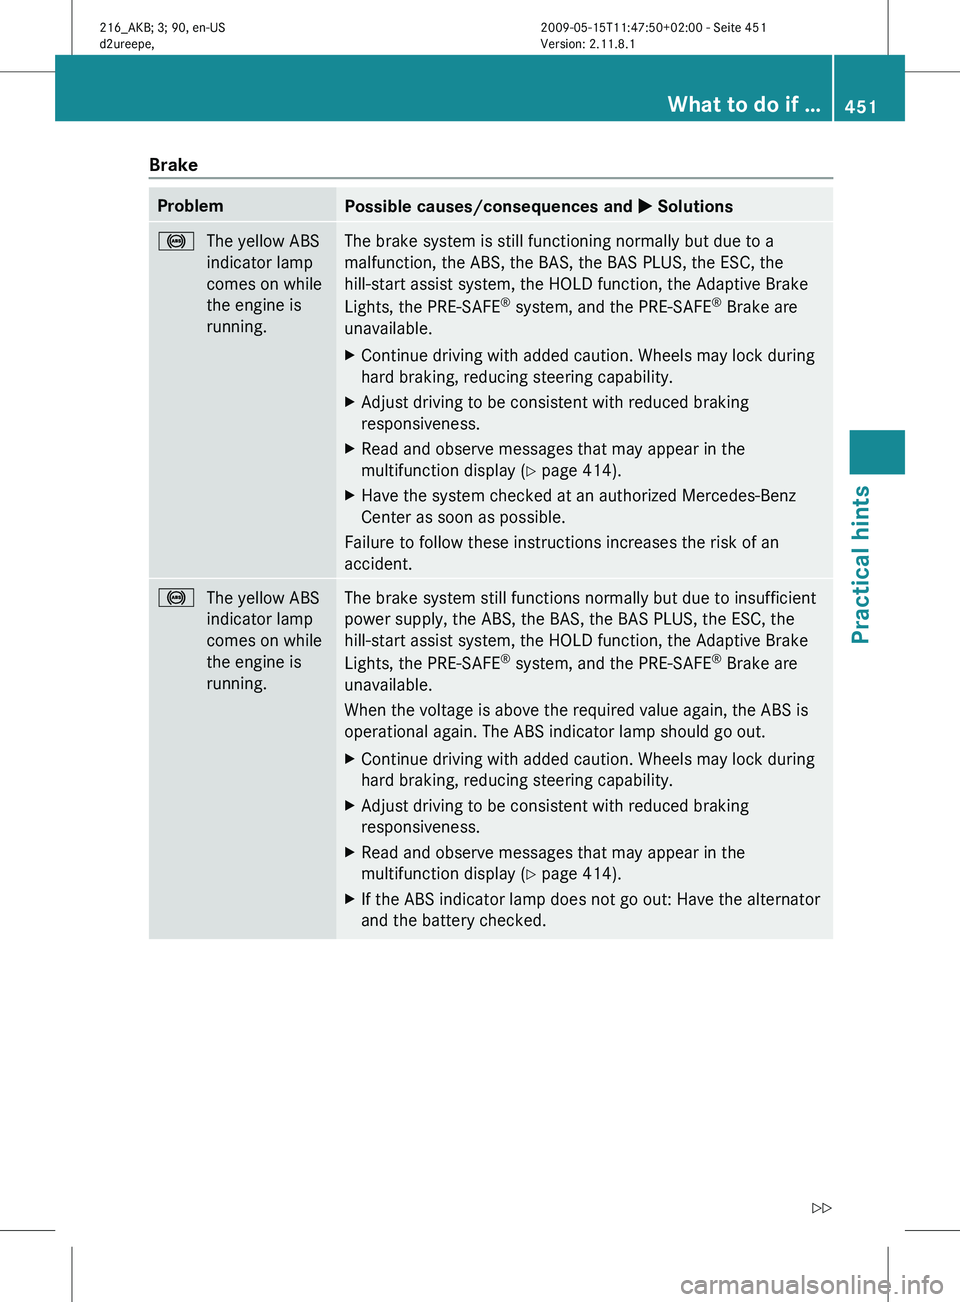
Brake
Problem
Possible causes/consequences and
X Solutions!
The yellow ABS
indicator lamp
comes on while
the engine is
running. The brake system is still functioning normally but due to a
malfunction, the ABS, the BAS, the BAS PLUS, the ESC, the
hill-start assist system, the HOLD function, the Adaptive Brake
Lights, the PRE-SAFE
®
system, and the PRE-SAFE ®
Brake are
unavailable.
X Continue driving with added caution. Wheels may lock during
hard braking, reducing steering capability.
X Adjust driving to be consistent with reduced braking
responsiveness.
X Read and observe messages that may appear in the
multifunction display (Y
page 414).
X Have the system checked at an authorized Mercedes-Benz
Center as soon as possible.
Failure to follow these instructions increases the risk of an
accident. !
The yellow ABS
indicator lamp
comes on while
the engine is
running. The brake system still functions normally but due to insufficient
power supply, the ABS, the BAS, the BAS PLUS, the ESC, the
hill-start assist system, the HOLD function, the Adaptive Brake
Lights, the PRE-SAFE
®
system, and the PRE-SAFE ®
Brake are
unavailable.
When the voltage is above the required value again, the ABS is
operational again. The ABS indicator lamp should go out.
X Continue driving with added caution. Wheels may lock during
hard braking, reducing steering capability.
X Adjust driving to be consistent with reduced braking
responsiveness.
X Read and observe messages that may appear in the
multifunction display (Y
page 414).
X If the ABS indicator lamp does not go out: Have the alternator
and the battery checked. What to do if …
451
Practical hints
216_AKB; 3; 90, en-US
d2ureepe, Version: 2.11.8.1 2009-05-15T11:47:50+02:00 - Seite 451 Z
Page 454 of 500
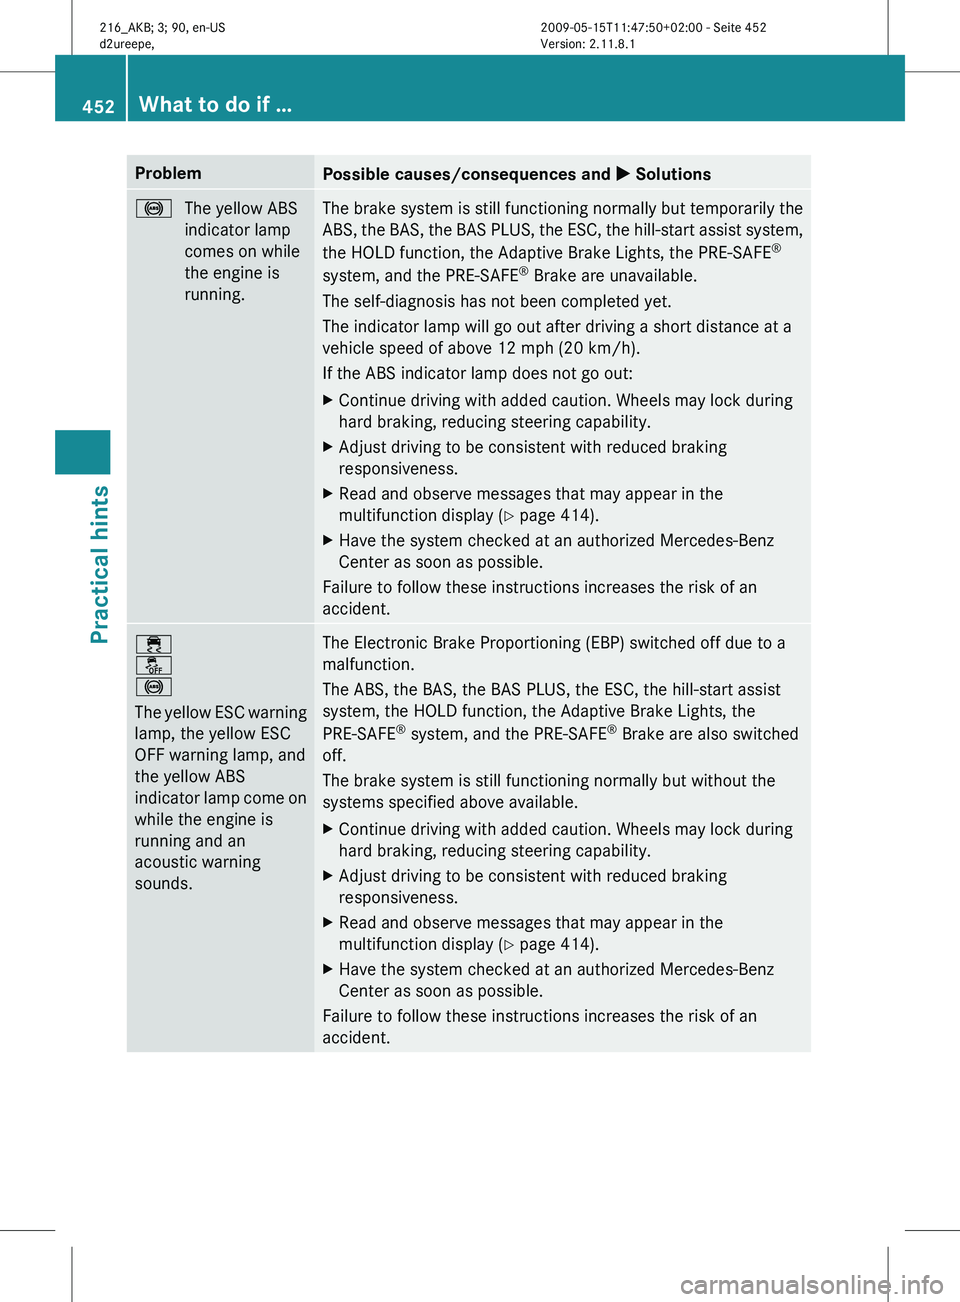
Problem
Possible causes/consequences and
X Solutions!
The yellow ABS
indicator lamp
comes on while
the engine is
running. The brake system is still functioning normally but temporarily the
ABS,
the
BAS, the BAS PLUS, the ESC, the hill-start assist system,
the HOLD function, the Adaptive Brake Lights, the PRE-SAFE ®
system, and the PRE-SAFE ®
Brake are unavailable.
The self-diagnosis has not been completed yet.
The indicator lamp will go out after driving a short distance at a
vehicle speed of above 12 mph (20 km/h).
If the ABS indicator lamp does not go out:
X Continue driving with added caution. Wheels may lock during
hard braking, reducing steering capability.
X Adjust driving to be consistent with reduced braking
responsiveness.
X Read and observe messages that may appear in the
multifunction display (Y
page 414).
X Have the system checked at an authorized Mercedes-Benz
Center as soon as possible.
Failure to follow these instructions increases the risk of an
accident. ÷
å
!
The
yellow
ESC warning
lamp, the yellow ESC
OFF warning lamp, and
the yellow ABS
indicator lamp come on
while the engine is
running and an
acoustic warning
sounds. The Electronic Brake Proportioning (EBP) switched off due to a
malfunction.
The ABS, the BAS, the BAS PLUS, the ESC, the hill-start assist
system, the HOLD function, the Adaptive Brake Lights, the
PRE-SAFE
®
system, and the PRE-SAFE ®
Brake are also switched
off.
The brake system is still functioning normally but without the
systems specified above available.
X Continue driving with added caution. Wheels may lock during
hard braking, reducing steering capability.
X Adjust driving to be consistent with reduced braking
responsiveness.
X Read and observe messages that may appear in the
multifunction display (Y
page 414).
X Have the system checked at an authorized Mercedes-Benz
Center as soon as possible.
Failure to follow these instructions increases the risk of an
accident. 452
What to do if …
Practical hints
216_AKB; 3; 90, en-US
d2ureepe,
Version: 2.11.8.1 2009-05-15T11:47:50+02:00 - Seite 452
Page 460 of 500
Tires
Problem
Possible causes/consequences and
X Solutionsh
USA only:
Combination
low tire
pressure
telltale/TPMS
malfunction
telltale for the
Advanced TPMS
illuminates
continuously.
Canada only:
Low tire
pressure telltale
for the
Advanced TPMS
illuminates
continuously. The Advanced TPMS detects a loss of pressure in at least one tire.
X
Carefully bring the vehicle to a halt, avoiding abrupt steering and
braking maneuvers. Observe the traffic situation around you.
X Read and observe messages in the multifunction display
(Y page 414).
If the tire inflation pressure in the respective tire(s) has (have) been
corrected, the combination low tire pressure/TPMS malfunction
telltale goes out after a few minutes of driving. h
USA only:
Combination
low tire
pressure
telltale/TPMS
malfunction
telltale for the
Advanced TPMS
flashes 60
seconds and
then stays
illuminated. There is a malfunction in the Advanced TPMS.
X
Read and observe messages in the multifunction display
(Y page 414).
X Have the Advanced TPMS checked at an authorized Mercedes-
Benz Center.
After the malfunction has been remedied, the combination low tire
pressure/TPMS malfunction
telltale goes out after a few minutes
of driving. G
Warning!
Each tire, including the spare (if provided),
should be checked at least once a month
when cold and inflated to the inflation
pressure recommended by the vehicle
manufacturer on the Tire and Loading
Information placard on the driver’s door B-
pillar or
the tire inflation pressure label on the
inside of the fuel filler flap. If your vehicle has
tires of a different size than the size indicated
on the Tire and Loading Information placard
or the tire inflation pressure label, you should determine the proper tire inflation pressure
for those tires.
As an added safety feature, your vehicle has
been equipped
with a tire pressure monitoring
system (TPMS) that illuminates a low tire
pressure telltale when one or more of your
tires are significantly underinflated.
Accordingly, when the low tire pressure
telltale illuminates, you should stop and check
your tires as soon as possible, and inflate
them to the proper pressure. Driving on a
significantly underinflated tire causes the tire
to overheat and can lead to tire failure. 458
What to do if …
Practical hints
216_AKB; 3; 90, en-US
d2ureepe,
Version: 2.11.8.1 2009-05-15T11:47:50+02:00 - Seite 458
Page 461 of 500
Underinflation also reduces fuel efficiency
and
tire
tread life, and may affect the vehicle’s
handling and stopping ability. Please note that
the TPMS is not a substitute for proper tire
maintenance, and it is the driver’s
responsibility to maintain correct tire
pressure, even if underinflation has not
reached the level to trigger illumination of the
TPMS low tire pressure telltale.
USA only:
Your vehicle has also been equipped with a
TPMS malfunction indicator to indicate when
the system is not operating properly. The
TPMS malfunction indicator is combined with
the low tire pressure telltale. When the
system detects a malfunction, the telltale will
flash for approximately 1 minute and then remain continuously illuminated. This
sequence will continue upon subsequent
vehicle start-ups as long as the malfunction
exists. When the malfunction indicator is
illuminated, the system may not be able to
detect
or
signal low tire pressure as intended.
TPMS malfunctions may occur for a variety of
reasons, including the installation of
incompatible replacement or alternate tires
or wheels on the vehicle that prevent the
TPMS from functioning properly. Always
check the TPMS malfunction telltale after
replacing one or more tires or wheels on your
vehicle to ensure that the replacement or
alternate tires and wheels allow the TPMS to
continue to function properly. Lamp in center console
Problem
Possible causes/consequences and
X Solutions42
The front passenger
front air bag off
indicator lamp
illuminates and
remains illuminated
with the weight of a
typical adult or
someone larger than a
small individual on the
front passenger seat.
The system is malfunctioning.
X
Have the system checked as soon as possible at an authorized
Mercedes-Benz Center.
X Read and observe messages in the multifunction display and
follow corrective steps (Y page 414). G
Warning!
If the 42 indicator lamp
illuminates and remains illuminated with the
weight of a typical adult or someone larger than a small individual on the front passenger
seat,
do
not have any passenger use the front
passenger seat until the system has been
repaired. What to do if …
459
Practical hints
216_AKB; 3; 90, en-US
d2ureepe, Version: 2.11.8.1 2009-05-15T11:47:50+02:00 - Seite 459 Z
Page 464 of 500
G
Warning!
Batteries contain poisonous and corrosive
substances. Therefore, keep the batteries out
of reach of children.
If a battery is swallowed, seek medical help
immediately. G
Warning!
SmartKey batteries contain perchlorate
material, which may require special handling
and regard for the environment. Check with
your local government’s disposal guidelines.
California residents, see www.dtsc.ca.gov/
HazardousWaste/Perchlorate/
index.cfm.
Batteries contain materials that can harm the
environment if disposed of improperly.
Recycling of batteries is the preferred method
of disposal. Many states (USA only) or
provinces (Canada only) require sellers of
batteries to accept old batteries for recycling.
When inserting the batteries, make sure they
are clean and free of lint.
When replacing batteries, always replace
both batteries.
i The required replacement batteries are
available at any authorized Mercedes-Benz
Center.
Replacement batteries: Lithium, type
CR 2025 or equivalent.
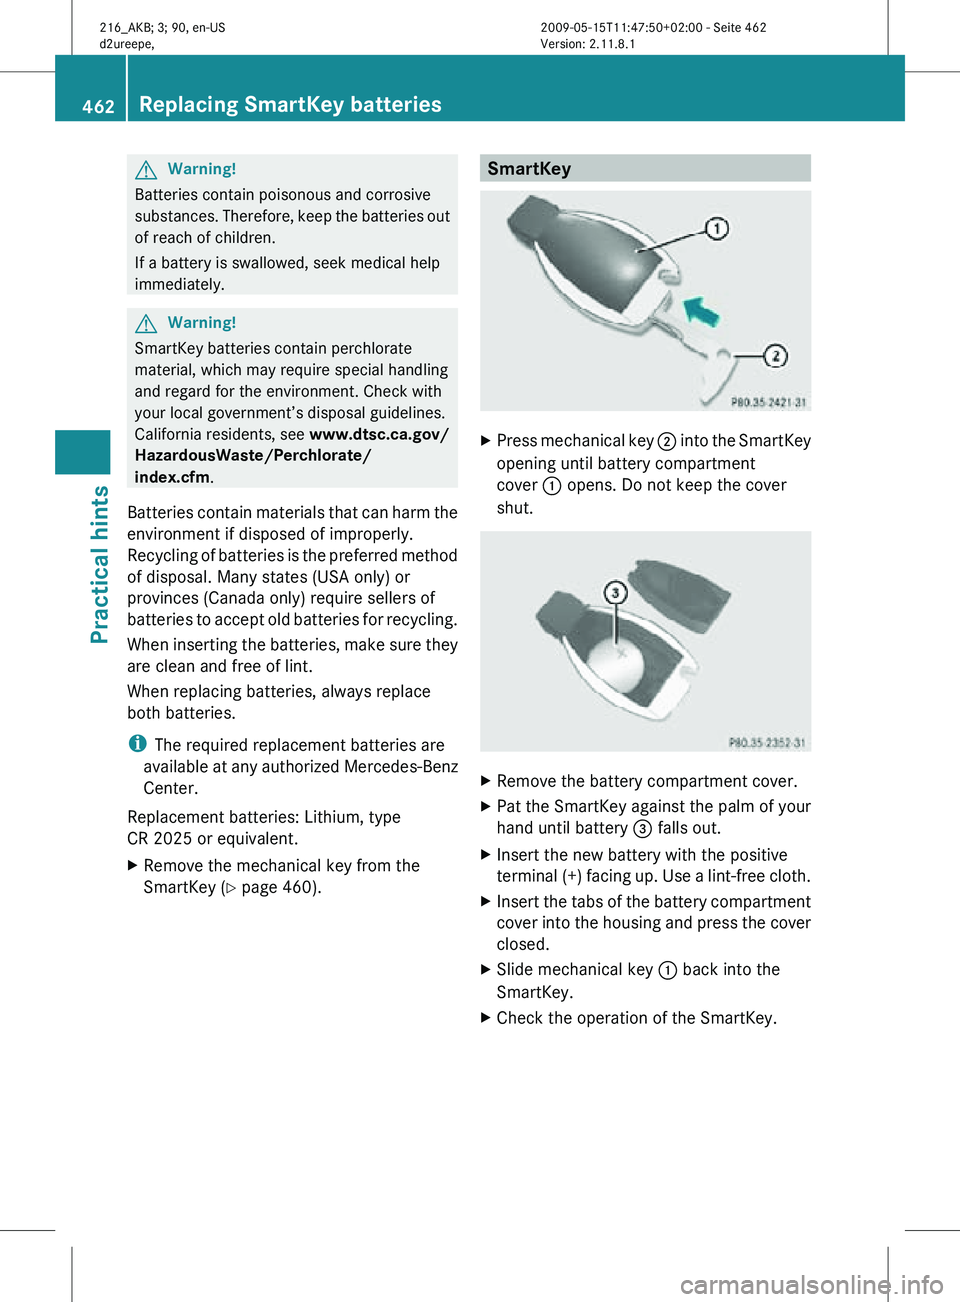
X Remove the mechanical key from the
SmartKey (Y page 460). SmartKey
X
Press mechanical key ; into the SmartKey
opening until battery compartment
cover : opens. Do not keep the cover
shut. X
Remove the battery compartment cover.
X Pat the SmartKey against the palm of your
hand until battery = falls out.
X Insert the new battery with the positive
terminal (+) facing up. Use a lint-free cloth.
X Insert the tabs of the battery compartment
cover into the housing and press the cover
closed.
X Slide mechanical key : back into the
SmartKey.
X Check the operation of the SmartKey. 462
Replacing SmartKey batteriesPractical hints
216_AKB; 3; 90, en-US
d2ureepe,
Version: 2.11.8.1 2009-05-15T11:47:50+02:00 - Seite 462
Page 466 of 500
Replacing bulbs for rear lamps
Tail lamp unit The tail lamps are equipped with HiP bulbs
and LEDs. Have them replaced at an
authorized Mercedes-Benz Center.
Replacing wiper blades
Safety notes
G
Warning!
For safety reasons, switch off the wipers and
remove the SmartKey from the starter switch
(vehicles with KEYLESS-GO: Make sure the
vehicle’s on-board electronics have status 0)
before replacing a wiper blade. Otherwise, the
wiper motor could suddenly turn on and cause
injury. G
Warning!
Wiper blades are components that are subject
to wear and tear. Replace the wiper blades
twice a year, preferably in the spring and fall.
Otherwise the windshield will not be wiped
properly. As a result, you may not be able to
observe surrounding traffic conditions and
could cause an accident.
! To avoid damage to the hood, the wiper
arms should only be folded forward when
in the vertical position.
! Never open the hood when a wiper arm is
folded forward.
Hold on to the wiper when folding a wiper
arm back. If released, the force of the
impact from the tensioning spring could
crack the windshield.
Do not allow a wiper arm to contact the
windshield glass without a wiper blade
inserted.
Mercedes-Benz recommends that you have
this work carried out at an authorized
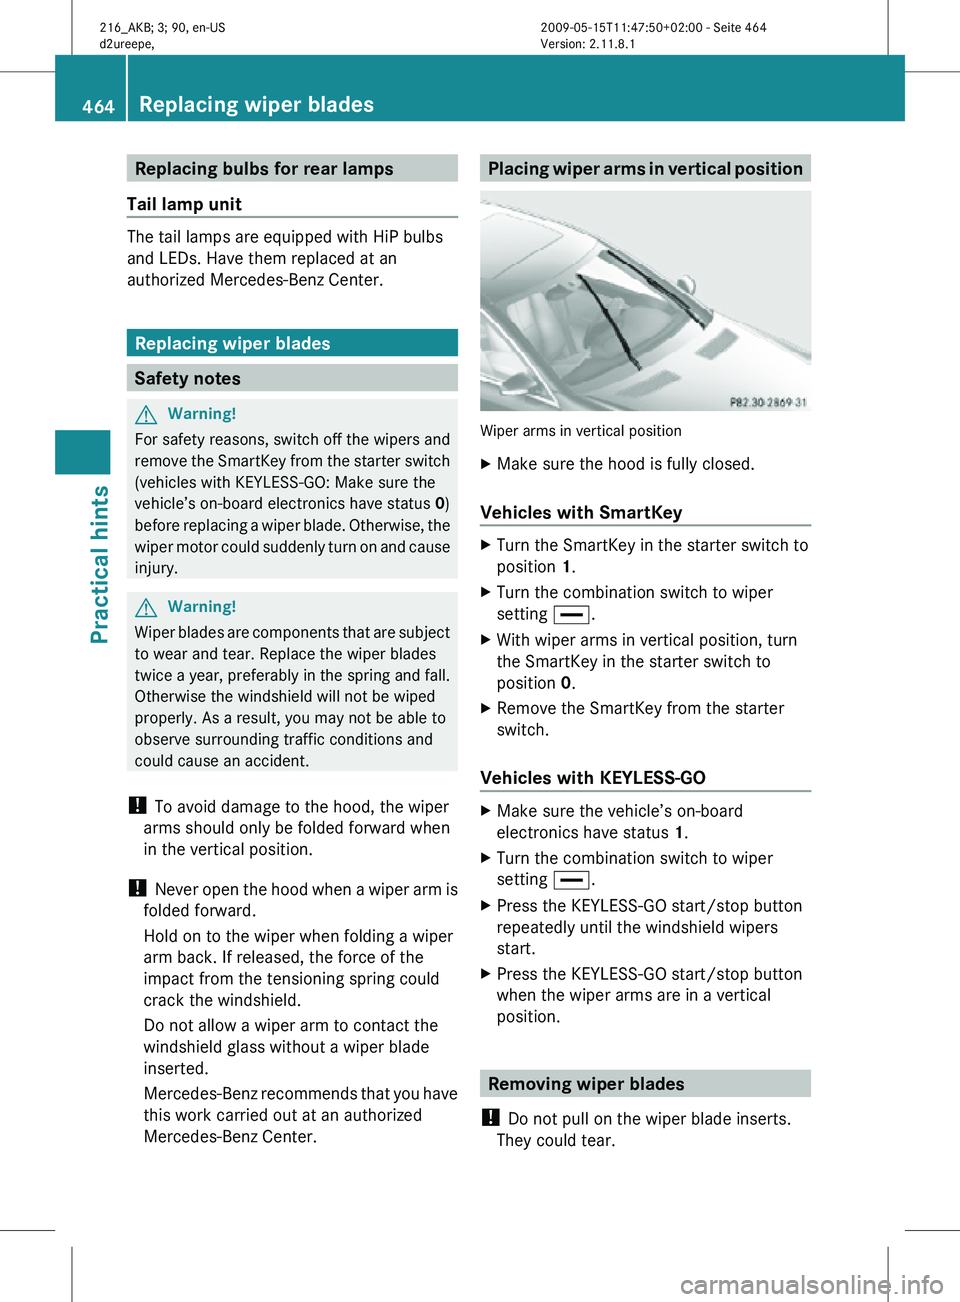
Mercedes-Benz Center. Placing wiper arms in vertical position
Wiper arms in vertical position
X
Make sure the hood is fully closed.
Vehicles with SmartKey X
Turn the SmartKey in the starter switch to
position 1.
X Turn the combination switch to wiper
setting °.
X With wiper arms in vertical position, turn
the SmartKey in the starter switch to
position 0.
X Remove the SmartKey from the starter
switch.
Vehicles with KEYLESS-GO X
Make sure the vehicle’s on-board
electronics have status 1.
X Turn the combination switch to wiper
setting °.
X Press the KEYLESS-GO start/stop button
repeatedly until the windshield wipers
start.
X Press the KEYLESS-GO start/stop button
when the wiper arms are in a vertical
position. Removing wiper blades
! Do not pull on the wiper blade inserts.
They could tear. 464
Replacing wiper bladesPractical hints
216_AKB; 3; 90, en-US
d2ureepe,
Version: 2.11.8.1 2009-05-15T11:47:50+02:00 - Seite 464
Page 468 of 500
Mounting the spare wheel
Introduction X
Prepare the vehicle as described
(Y page 465).
X Take the following out of the vehicle:
R
spare wheel
R jack
R vehicle tool kit
R wheel bolts for spare wheel
For information on where to find the
respective items, see “Where will I find ...?”
(Y page 412) and ( Y page 413).
i Vehicles without spare wheel are not
factory-equipped with
the tools required for
a wheel change such as a jack or a wheel
wrench. Some tools required for a wheel
change are specific to your vehicle.
Contact an authorized Mercedes-Benz
Center to obtain the tools approved for
your vehicle. This section describes the
wheel change using the tools approved and
recommended for your vehicle.
Lifting the vehicle G
Warning!
When jacking up the vehicle, only use the jack
which has been specifically approved by
Mercedes-Benz for your vehicle.
The jack
is designed exclusively for jacking up
the vehicle at the jack take-up brackets built
into both sides of the vehicle. Make sure the
jack arm is fully seated in the jack take-up
bracket. The jack must always be vertical
when in use, especially on inclines or
declines.
The jack is intended only for lifting the vehicle
briefly for wheel changes. It is not suited for
performing maintenance work under the
vehicle. To help avoid personal injury, use the
jack only to lift the vehicle during a wheel
change. Never get beneath the vehicle while it is
supported by the jack. Keep hands and feet
away from the area under the lifted vehicle.
Always lower the vehicle onto sufficient
capacity
jackstands
before working under the
vehicle.
Always make sure the electronic parking
brake is engaged. In addition, block the
wheels with wheel chocks or other sizeable
objects before raising the vehicle with the
jack. Do not disengage the electronic parking
brake while the vehicle is raised.
Make sure that the ground on which the
vehicle is standing and where you place the
jack is solid, level and not slippery. If
necessary, use a large underlay. On slippery
surfaces, such as tiled floors, you should use
a non-slip underlay, for example a rubber mat.
Do not use wooden blocks or similar objects
to support the jack. Otherwise the jack may
not be able to achieve its load-bearing
capacity if it is not at its full height.
Never start the engine when the vehicle is
raised.
Also observe the notes on the jack.
X Prevent the vehicle from rolling away by
blocking wheels
with wheel chocks or other
sizeable objects.
When your vehicle is equipped with a wheel
chock, it is included with the vehicle tool kit
(Y page 412). For information on setting up
the collapsible wheel chock, see
(Y page 412).
When changing a wheel on a level surface:
X Place a wheel chock or other sizeable
object in
front of and another wheel chock
or other sizeable object behind the wheel
that is diagonally opposite to the wheel
being changed. 466
Flat tire
Practical hints
216_AKB; 3; 90, en-US
d2ureepe,
Version: 2.11.8.1 2009-05-15T11:47:50+02:00 - Seite 466