ESP MERCEDES-BENZ CL CLASS 2010 Owners Manual
[x] Cancel search | Manufacturer: MERCEDES-BENZ, Model Year: 2010, Model line: CL CLASS, Model: MERCEDES-BENZ CL CLASS 2010Pages: 500, PDF Size: 9.32 MB
Page 321 of 500
message disappears when the vehicle is
raised. Indicator lamp
; is then lit.
When the
vehicle is in raised level, pressing
vehicle level control switch : will return
the vehicle to normal level.
The vehicle is lowered to the normal level
automatically when
R the vehicle speed is above 75 mph
(120 km/h)
R the vehicle speed stays between 50 mph
(80 km/h) and 75 mph (120 km/h) for
approximately 3 minutes.
Indicator lamp
; in
vehicle level control switch : goes out.
If you do not drive in this speed range, the
selected vehicle level setting remains stored
in memory even if the SmartKey is removed
from the starter switch.
Selecting normal level
X Start the engine.
When indicator lamp ; is on:
X Briefly press vehicle level control
switch :.
Indicator lamp ; goes out. The vehicle
adjusts from raised level to normal level. ABC
The ABC system is an active, computer-
controlled system that adjusts the
suspension hydraulically at all four wheels in
response to various driving situations. It
selects the optimum suspension tuning and
ride height for your vehicle automatically.
Vehicle level control Your vehicle adjusts its ride height
automatically to increase vehicle safety and
to reduce fuel consumption.
The vehicle chassis ride height is raised or
lowered according to the selected level
setting and to the vehicle speed. With increasing speed, the ride height is reduced
by up to approximately 0.4 in
(10 mm). With
decreasing speed, the ride height is again
raised to the selected vehicle level.
These height adjustments are so small that
you may not notice any change. G
Warning!
When you turn off the engine, the entire
vehicle is
lowered. You should therefore make
sure that no one is near the wheel housing or
under the vehicle when you turn off the
engine. Otherwise, parts of the individuals
body could be trapped.
! When you turn off the engine, the entire
vehicle is lowered. When parking, position
your vehicle in such a way that it will not
scrape against a curb, for example, when it
is lowered. Your vehicle could otherwise be
damaged.
i CL 63 AMG and CL 65 AMG only:
When you turn off the engine, the entire
vehicle is lowered by 0.2 in (5 mm).
Setting the vehicle level G
Warning!
To help avoid personal injury, keep hands and
feet away from wheel housing area, and stay
away from under the vehicle when lowering
the vehicle chassis. Driving systems
319
Controls in detail
216_AKB; 3; 90, en-US
d2ureepe, Version: 2.11.8.1 2009-05-15T11:47:50+02:00 - Seite 319 Z
Page 324 of 500

in the front bumper and four sensors in the
rear bumper.
Example illustration, sensors in the front bumper
To function properly, sensors
: must be free
of dirt, ice, snow and slush. Clean
sensors : regularly. Be careful not to
scratch or damage sensors :, see “Cleaning
the driving systems sensors” (Y page 406). G
Warning!
The Parktronic is a supplemental system. It is
not intended to, nor does it replace, the need
for extreme care. The responsibility during
parking and other critical maneuvers always
remains with the driver. G
Warning!
Make sure no persons or animals are in or
near the area in which you are parking/
maneuvering. Otherwise, they could be
injured.
! Special attention must be paid to objects
with smooth surfaces or low silhouettes
(e.g. trailer couplings, painted posts,
elevated crossbars or road curbs). Such
objects may not be detected by the system
and can damage the vehicle.
During parking maneuvers, pay special
attention to objects located above or below
the height of the sensors (e.g. street curbs,
painted posts, or trailer hitches etc.). The
Parktronic system will not detect such
objects at close range and damage to your
vehicle or the object may result. !
Ultrasonic signals from outside sources
(e.g. truck air brakes, car wash, or
jackhammers) may impair the operation of
the Parktronic system.
Range of the sensors Front sensors
Center approx. 40 in (100 cm)
Corners approx. 24 in (60 cm)
Rear sensors
Center approx. 48 in (120 cm)
Corners approx. 32 in (80 cm)
Minimum distance
Center approx. 8 in (20 cm)
Corners approx. 6 in (15 cm)
If the Parktronic system detects an obstacle
in this range, all the distance warning
segments illuminate and you hear a warning322
Driving systemsControls in detail
216_AKB; 3; 90, en-US
d2ureepe,
Version: 2.11.8.1 2009-05-15T11:47:50+02:00 - Seite 322
Page 326 of 500

X
Switching off: Press Parktronic
switch :.
Indicator lamp ; comes on.
X Switching on: Press Parktronic switch :
again.
Parktronic system malfunction There is a malfunction in the Parktronic
system, if only the red distance segments
illuminate and an acoustic warning sounds.
The Parktronic system will switch off
automatically after 20 seconds and indicator
lamp
; in Parktronic switch : comes on.
X Have the Parktronic system checked at an
authorized Mercedes-Benz Center as soon
as possible.
If only the red distance segments illuminate
and no acoustic warning sounds, the
Parktronic system sensors are dirty (e.g. dirt,
ice, snow and slush). Another cause could be
interference from other radio or ultrasonic
signals (e.g. truck air brakes, car wash, or
jackhammers). The Parktronic system will
switch off automatically after 20 seconds and
indicator lamp ; in Parktronic switch :
comes on.
X Switch off the ignition.
X Clean the Parktronic system sensors
(Y page 406).
X Switch on the ignition.
or
X Check the Parktronic system operation at
another location to rule out interference
from outside radio or ultrasonic signals. Park Assist
G
Warning!
The Park Assist is a supplemental system. It
is not intended to, nor does it replace, the
need for extreme care. The responsibility
during parking and other critical maneuvers
always remains with the driver. G
Warning!
Make sure no persons or animals are in the
area in which you are maneuvering. You could
otherwise injure them.
! Special attention must be paid to objects
with smooth surfaces or low silhouettes
(e.g. trailer couplings, painted posts,
elevated crossbars or road curbs). Such
objects may not be detected by the system
and can damage the vehicle.
i USA only:
This device has been approved by the FCC
as a “Vehicular Radar System”. The radar
sensor is intended for use in an automotive
radar system only. Removal, tampering, or
altering of the device will void any
warranties, and is not permitted by the
FCC. Do not tamper with, alter, or use in
any non-approved way.
Any unauthorized modification to this
device could void the user’s authority to
operate the equipment.
i Canada only:
This device complies with RSS-210 of
Industry Canada. Operation is subject to
the following two conditions:
1. This device may not cause interference, and
2. this device must accept any interference received, including
interference that may cause undesired
operation of the device.
Removal, tampering, or altering of the
device will void any warranties, and is not 324
Driving systemsControls in detail
216_AKB; 3; 90, en-US
d2ureepe,
Version: 2.11.8.1 2009-05-15T11:47:50+02:00 - Seite 324
Page 327 of 500

permitted. Do not tamper with, alter, or use
in any non-approved way.
Any unauthorized modification to this
device could void the user’s authority to
operate the equipment.
When traveling in Canada in a vehicle not
registered in Canada, you must switch off the
radar sensor system ( Y page 216). Canadian
law does not permit the use of the radar
sensor system for vehicles from outside of
Canada. When you switch off the radar sensor
system, the following functions are
deactivated:
R Park Assist
R BAS PLUS (Y page 57)
R PRE-SAFE ®
Brake (Y page 62)
R DISTRONIC PLUS (Y page 304)
R Advanced Parking Guidance ( Y page 327)
R Blind Spot Assist (Y page 335)
! The operational function of the Park
Assist can be affected by dirty sensors,
especially at times of snow and ice.
Make sure that the area on the bumpers
around the sensors is free of dirt, ice and/
or slush, otherwise the Park Assist may not
function properly.
For cleaning the driving systems sensors, see
(Y page 406).
! High-frequency sources such as toll
stations, speed measuring systems, etc.
can cause the Park Assist to malfunction.
You can switch off the Park Assist using the
Park Assist button or switch off the radar
sensors with the instrument cluster control
system to prevent possible malfunction.
The Park Assist is an electronic parking aid
with radar sensors that helps you while
parking. It visually and audibly indicates the
relative distance between the vehicle and an
obstacle.
The Park Assist is automatically activated
when the engine is running and the automatic transmission is in drive position D, reverse
gear
R or neutral position N.
The Park Assist deactivates at speeds over
approximately 10 mph (16 km/h). At lower
speeds the Park Assist turns on again.
The Park Assist is also switched off when you
set the automatic transmission into park
position P or switch off the engine.
While the automatic transmission is in neutral
position N, the Park Assist is switched off if
you secure the vehicle in place with the
electronic parking brake.
The Park Assist monitors the surroundings of
your vehicle with four sensors in the front
bumper and two sensors in the rear bumper.
Range of the sensors The sensors of the Park Assist are integrated
in the front and rear bumpers. Make sure that
the bumpers are clear of dirt, ice and slush in
the area of the sensors, as otherwise, the
Park Assist may not function properly, see
(Y page 406). Driving systems
325Controls in detail
216_AKB; 3; 90, en-US
d2ureepe, Version: 2.11.8.1 2009-05-15T11:47:50+02:00 - Seite 325 Z
Page 329 of 500

Once the second red distance segment
illuminates, you will hear a continuous
warning tone. You have reached the minimum
distance. The signal is canceled when the
automatic transmission is in park position P
or neutral position N with the electronic
parking brake engaged.
Rear area:
As soon as the first red distance segment
illuminates, you will hear an intermittent
warning tone for approximately 2 seconds.
Once the second red distance segment
illuminates, you will hear a continuous
warning tone. You have reached the minimum
distance. The signal is canceled when the
automatic transmission is in drive position
D,
park position P, or neutral position N with the
electronic parking brake engaged.
i During strong rainfall, the warning
indicators and warning tones may be
triggered, for example, by water splashing
into the area of the sensors.
Collision warning The Park Assist can detect obstacles from a
considerable distance. If you drive in reverse
towards an obstacle, you will hear a warning
tone. You must then brake in order to avoid a
collision. The warning tone for a collision will
not sound when the vehicle is at a standstill
very close to the obstacle. In this case, you
will hear a corresponding tone for the warning
indicator in the rear area.
i
During strong rainfall, the collision
warning may be triggered, for example, by
water splashing into the area of the
sensors.
Switching Park Assist on/off The Park Assist can be switched off manually.
i
When the indicator lamp is on, the Park
Assist is switched off. X
Switching off: Press Park Assist
button :.
Indicator lamp ; comes on.
X Switching on: Press Park Assist
button : again.
Indicator lamp ; goes out.
The Park Assist is automatically switched on
when the ignition and radar sensors
(Y page 216) are switched on. Advanced Parking Guidance
The Advanced Parking Guidance is an
electronic parking aid equipped with radar
sensors. The radar sensors scan the area on
both sides of vehicle. When a suitable parking
space is found, it is indicated by a parking
space symbol in the multifunction display.
You will receive steering instructions for
parking in that space. G
Warning!
The Advanced Parking Guidance is only an aid
and may display parking spaces that are not
suitable for parking such as
R no-parking zones
R parking space with unsuitable road/ground
surface
R driveways
R entrances/exits
The Advanced Parking Guidance only shows a
representation of the parking space in the
multifunction display as parking space is first Driving systems
327Controls in detail
216_AKB; 3; 90, en-US
d2ureepe, Version: 2.11.8.1 2009-05-15T11:47:50+02:00 - Seite 327 Z
Page 330 of 500

initially measured when driving past.
Subsequent
changes
to the parking space are
not taken into account, e.g. if the position of
the vehicle parked in front of or behind the
space changes or objects in the parking space
are moved. Moving objects are not shown,
e.g. pedestrians or vehicles driving past. The
Advanced Parking Guidance does not relieve
you of the responsibility to pay attention. If
you only rely on the Advanced Parking
Guidance, you may cause an accident and
injure yourself and others.
You are always responsible for safety and
must continue to pay attention to your
immediate surroundings when parking and
maneuvering. G
Warning!
Make sure no persons or animals are in the
area in
which you are maneuvering. You could
otherwise injure them.
! Special attention must be paid to objects
with smooth surfaces or low silhouettes
(e.g. trailer couplings, painted posts,
elevated crossbars or road curbs). Such
objects may not be detected by the system
and can damage the vehicle.
! The operation and functionality of the
Advanced Parking Guidance can be
affected or impaired by dirty sensors,
especially at times of snow and ice.
Make sure that the area on the bumpers
around the sensors is free of dirt, ice and/
or slush, otherwise Advanced Parking
Guidance may not function properly.
i USA only:
This device has been approved by the FCC
as a “Vehicular Radar System”. The radar
sensor is intended for use in an automotive
radar system only. Removal, tampering, or
altering of the device will void any
warranties, and is not permitted by the
FCC. Do not tamper with, alter, or use in
any non-approved way. Any unauthorized modification to this
device could void the user’s authority to
operate the equipment.
i Canada only:
This device complies with RSS-210 of
Industry Canada. Operation is subject to
the following two conditions:
1. This device
may not cause interference,
and
2. this device must accept any interference received, including
interference that may cause undesired
operation of the device.
Removal, tampering, or altering of the
device will void any warranties, and is not
permitted. Do not tamper with, alter, or use
in any non-approved way.
Any unauthorized modification to this
device could void the user’s authority to
operate the equipment.
When traveling in Canada in a vehicle not
registered in Canada, you must switch off the
radar sensor system ( Y page 216). Canadian
law does not permit the use of the radar
sensor system for vehicles from outside of
Canada. When you switch off the radar sensor
system, the following functions are
deactivated:
R Advanced Parking Guidance
R BAS PLUS (Y page 57)
R PRE-SAFE ®
Brake (Y page 62)
R DISTRONIC PLUS (Y page 304)
R Park Assist ( Y page 324)
R Blind Spot Assist (Y page 335)
Use the Advanced Parking Guidance for
parking spaces that are
R parallel to the direction of travel
R located on straight streets, i.e. not in
curves
R on the same level as the street, i.e. not on
sidewalks, for example. 328
Driving systems
Controls in detail
216_AKB; 3; 90, en-US
d2ureepe,
Version: 2.11.8.1 2009-05-15T11:47:50+02:00 - Seite 328
Page 332 of 500
Parking
The following describes the parallel parking
process on the passenger side. Parallel
parking on the driver’s side is performed
reversed left to right.
If the Advanced Parking Guidance detects an
obstacle behind the vehicle during the
parking procedure, you will hear an audible
warning. Stop the vehicle immediately. The
parking space and the lane flash in the
multifunction display. Only continue driving/
parking after you have made sure that this is
possible to do in a safe manner. If the
Advanced Parking Guidance no longer
detects any obstacles, the display in the
multifunction display stops blinking. You may
continue the parking procedure.
G
Warning!
The Advanced Parking Guidance is only an aid
and may not detect all obstacles. At corners
or near smooth surfaces, the Advanced
Parking Guidance may not detect an object
correctly. The Advanced Parking Guidance
does not relieve you of the responsibility to
pay attention. You are always responsible for
safety and must continue to pay attention to
your immediate surroundings when parking
and maneuvering. Otherwise, you could
endanger yourself and others.
X Bring the vehicle to a standstill as long as
the desired parking space is displayed by
the blue parking space symbol in the
multifunction display.
X Shift the automatic transmission into
reverse gear R.
The message Check Surroundings
Press ’OK’ to Confirm appears in the
multifunction display.
X Press a on the multifunction steering
wheel to confirm.
The display in the multifunction display
changes to the Advanced Parking
Guidance. X
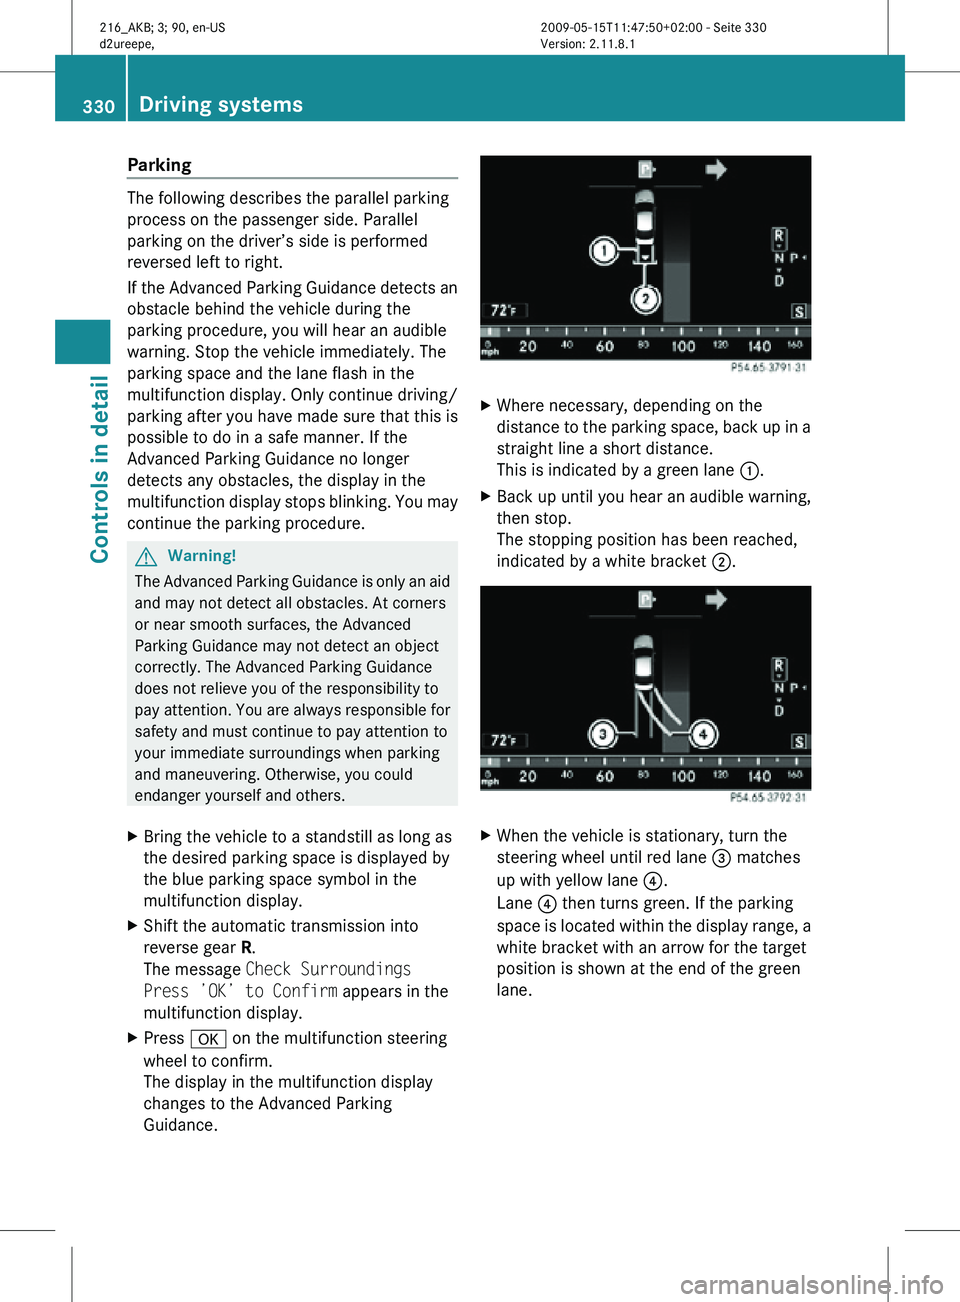
Where necessary, depending on the
distance to the parking space, back up in a
straight line a short distance.
This is indicated by a green lane :.
X Back up until you hear an audible warning,
then stop.
The stopping position has been reached,
indicated by a white bracket ;. X
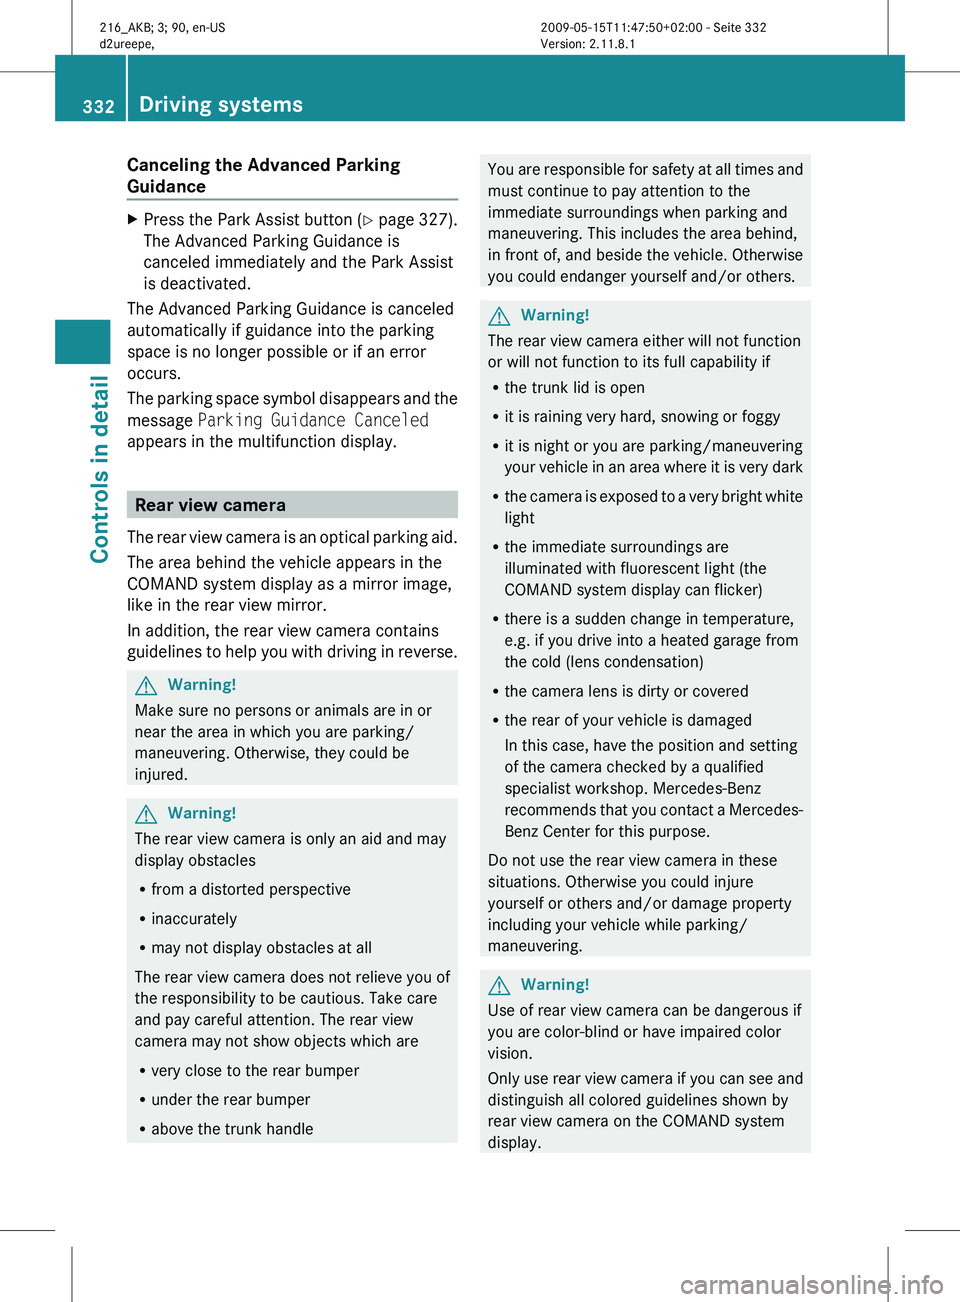
When the vehicle is stationary, turn the
steering wheel until red lane = matches
up with yellow lane ?.
Lane ? then turns green. If the parking
space is located within the display range, a
white bracket with an arrow for the target
position is shown at the end of the green
lane. 330
Driving systemsControls in detail
216_AKB; 3; 90, en-US
d2ureepe,
Version: 2.11.8.1 2009-05-15T11:47:50+02:00 - Seite 330
Page 334 of 500
Canceling the Advanced Parking
Guidance
X
Press the Park Assist button (Y page 327).
The Advanced Parking Guidance is
canceled immediately and the Park Assist
is deactivated.
The Advanced Parking Guidance is canceled
automatically if guidance into the parking
space is no longer possible or if an error
occurs.
The parking
space symbol disappears and the
message Parking Guidance Canceled
appears in the multifunction display. Rear view camera
The rear
view camera is an optical parking aid.
The area behind the vehicle appears in the
COMAND system display as a mirror image,
like in the rear view mirror.
In addition, the rear view camera contains
guidelines to help you with driving in reverse. G
Warning!
Make sure no persons or animals are in or
near the area in which you are parking/
maneuvering. Otherwise, they could be
injured. G
Warning!
The rear view camera is only an aid and may
display obstacles
R from a distorted perspective
R inaccurately
R may not display obstacles at all
The rear view camera does not relieve you of
the responsibility to be cautious. Take care
and pay careful attention. The rear view
camera may not show objects which are
R very close to the rear bumper
R under the rear bumper
R above the trunk handle You are responsible for safety at all times and
must continue to pay attention to the
immediate surroundings when parking and
maneuvering. This includes the area behind,
in front of, and beside the vehicle. Otherwise
you could endanger yourself and/or others.
G
Warning!
The rear view camera either will not function
or will not function to its full capability if
R the trunk lid is open
R it is raining very hard, snowing or foggy
R it is night or you are parking/maneuvering
your vehicle
in an area where it is very dark
R the camera is exposed to a very bright white
light
R the immediate surroundings are
illuminated with fluorescent light (the
COMAND system display can flicker)
R there is a sudden change in temperature,
e.g. if you drive into a heated garage from
the cold (lens condensation)
R the camera lens is dirty or covered
R the rear of your vehicle is damaged
In this case, have the position and setting
of the camera checked by a qualified
specialist workshop. Mercedes-Benz
recommends that you contact a Mercedes-
Benz Center for this purpose.
Do not use the rear view camera in these
situations. Otherwise you could injure
yourself or others and/or damage property
including your vehicle while parking/
maneuvering. G
Warning!
Use of rear view camera can be dangerous if
you are color-blind or have impaired color
vision.
Only use
rear view camera if you can see and
distinguish all colored guidelines shown by
rear view camera on the COMAND system
display. 332
Driving systems
Controls in detail
216_AKB; 3; 90, en-US
d2ureepe,
Version: 2.11.8.1 2009-05-15T11:47:50+02:00 - Seite 332
Page 335 of 500
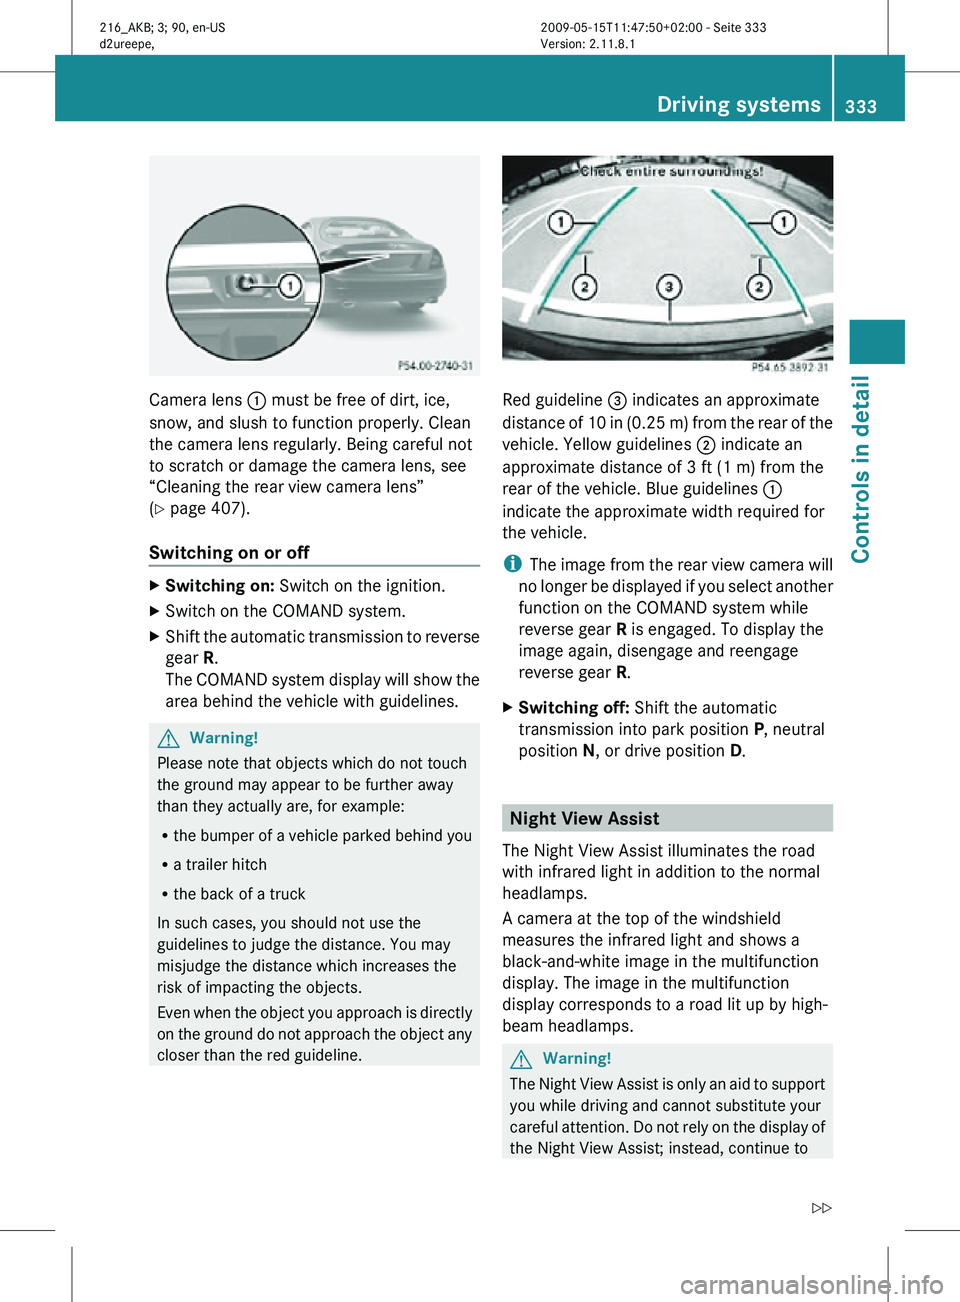
Camera lens
: must be free of dirt, ice,
snow, and slush to function properly. Clean
the camera lens regularly. Being careful not
to scratch or damage the camera lens, see
“Cleaning the rear view camera lens”
(Y page 407).
Switching on or off X
Switching on: Switch on the ignition.
X Switch on the COMAND system.
X Shift the automatic transmission to reverse
gear R.
The COMAND system display will show the
area behind the vehicle with guidelines. G
Warning!
Please note that objects which do not touch
the ground may appear to be further away
than they actually are, for example:
R the bumper of a vehicle parked behind you
R a trailer hitch
R the back of a truck
In such cases, you should not use the
guidelines to judge the distance. You may
misjudge the distance which increases the
risk of impacting the objects.
Even when the object you approach is directly
on the ground do not approach the object any
closer than the red guideline. Red guideline
= indicates an approximate
distance of 10 in (0.25 m) from the rear of the
vehicle. Yellow guidelines ; indicate an
approximate distance of 3 ft (1 m) from the
rear of the vehicle. Blue guidelines :
indicate the approximate width required for
the vehicle.
i The image from the rear view camera will
no longer be displayed if you select another
function on the COMAND system while
reverse gear R is engaged. To display the
image again, disengage and reengage
reverse gear R.
X Switching off: Shift the automatic
transmission into park position P, neutral
position N, or drive position D. Night View Assist
The Night View Assist illuminates the road
with infrared light in addition to the normal
headlamps.
A camera at the top of the windshield
measures the infrared light and shows a
black-and-white image in the multifunction
display. The image in the multifunction
display corresponds to a road lit up by high-
beam headlamps. G
Warning!
The Night View Assist is only an aid to support
you while driving and cannot substitute your
careful attention. Do not rely on the display of
the Night View Assist; instead, continue to Driving systems
333Controls in detail
216_AKB; 3; 90, en-US
d2ureepe, Version: 2.11.8.1 2009-05-15T11:47:50+02:00 - Seite 333 Z
Page 336 of 500
look through the windshield. You are always
responsible for safety and must drive in
accordance with traffic conditions.
Otherwise, you could endanger yourself and
others.
The system may be impaired or unavailable
when
R
visibility is poor, e.g. due to snow, rain, fog,
or heavy spray
R the camera area of the windshield is dirty,
fogged up or covered by a sticker for
example
R driving through curves or on inclines or
declines G
Warning!
The Night View Assist cannot record objects
immediately in front of or next to the vehicle.
When maneuvering, continue to look through
the windshield. Make sure no persons or
animals are in the area in which you are
maneuvering. You could otherwise injure
them.
The Night View Assist image in the
multifunction display is not impaired by the
headlamps of approaching vehicles.
As a result, you can better follow the course
of the road and detect obstacles earlier on.
i Infrared light is invisible to the human eye
and thus does not blind. The Night View
Assist can remain switched on
permanently even with oncoming traffic
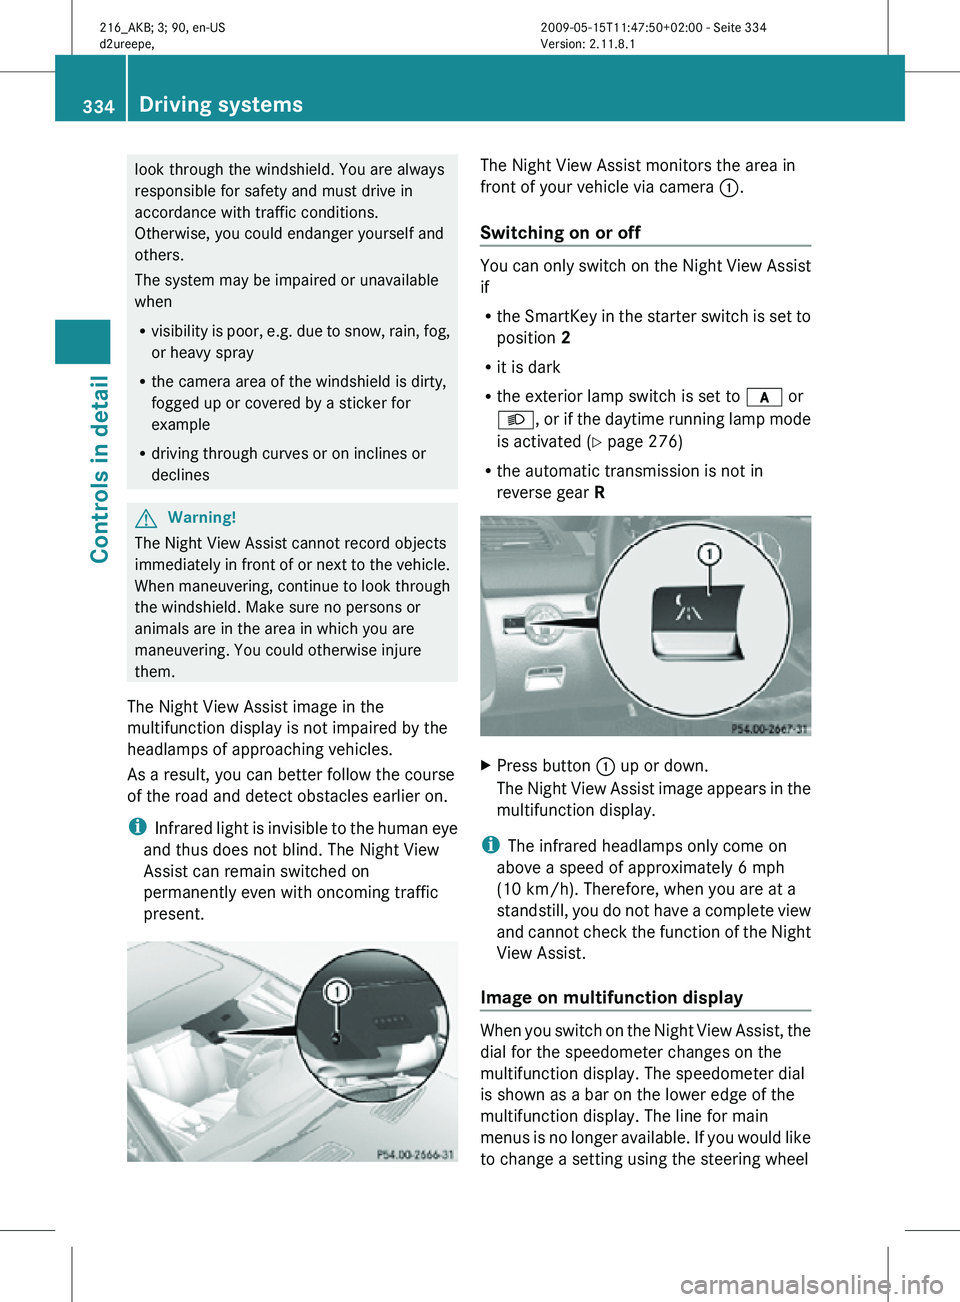
present. The Night View Assist monitors the area in
front of your vehicle via camera
:.
Switching on or off You can only switch on the Night View Assist
if
R
the SmartKey in the starter switch is set to
position 2
R it is dark
R the exterior lamp switch is set to c or
L, or if the daytime running lamp mode
is activated ( Y page 276)
R the automatic transmission is not in
reverse gear R X
Press button : up or down.
The Night View Assist image appears in the
multifunction display.
i The infrared headlamps only come on
above a speed of approximately 6 mph
(10 km/h). Therefore, when you are at a
standstill, you do not have a complete view
and cannot check the function of the Night
View Assist.
Image on multifunction display When you switch on the Night View Assist, the
dial for the speedometer changes on the
multifunction display. The speedometer dial
is shown as a bar on the lower edge of the
multifunction display. The line for main
menus is no longer available. If you would like
to change a setting using the steering wheel334
Driving systemsControls in detail
216_AKB; 3; 90, en-US
d2ureepe,
Version: 2.11.8.1 2009-05-15T11:47:50+02:00 - Seite 334