headlamp MERCEDES-BENZ CL-Class 2011 C216 User Guide
[x] Cancel search | Manufacturer: MERCEDES-BENZ, Model Year: 2011, Model line: CL-Class, Model: MERCEDES-BENZ CL-Class 2011 C216Pages: 480, PDF Size: 19.76 MB
Page 251 of 480
The cornering light function improves the
illumination of the road over a wide angle in
the direction you are turning, enabling better
visibility in tight bends, for example. It can
only be activated when the low-beam
headlamps are switched on.
Active:
Rif you are driving at speeds below 25
(40 km/h) and switch on the turn signals
or turn the steering wheel.
Rif you are driving at speeds between
25 mph (40 km/h) and
45 mph (70 km/h) and turn the steering
wheel.
Not active: if you are driving at speeds above
25 mph (40 km/h) or switch off the turn
signals or turn the steering wheel to the
straight-ahead position.
The cornering light function may remain lit for
a short time, but is automatically switched off
after no more than three minutes.
Headlamps fogged up on the inside
The headlamps may fog up on the inside if
there is high atmospheric humidity.
XDrive with the headlamps switched on.
The headlamps clear up after a short
distance.
If the moisture does not disappear, the
headlamp casing is not sealed correctly and
moisture has been able to enter.
XHave the headlamps checked at a qualified
specialist workshop.Interior lighting
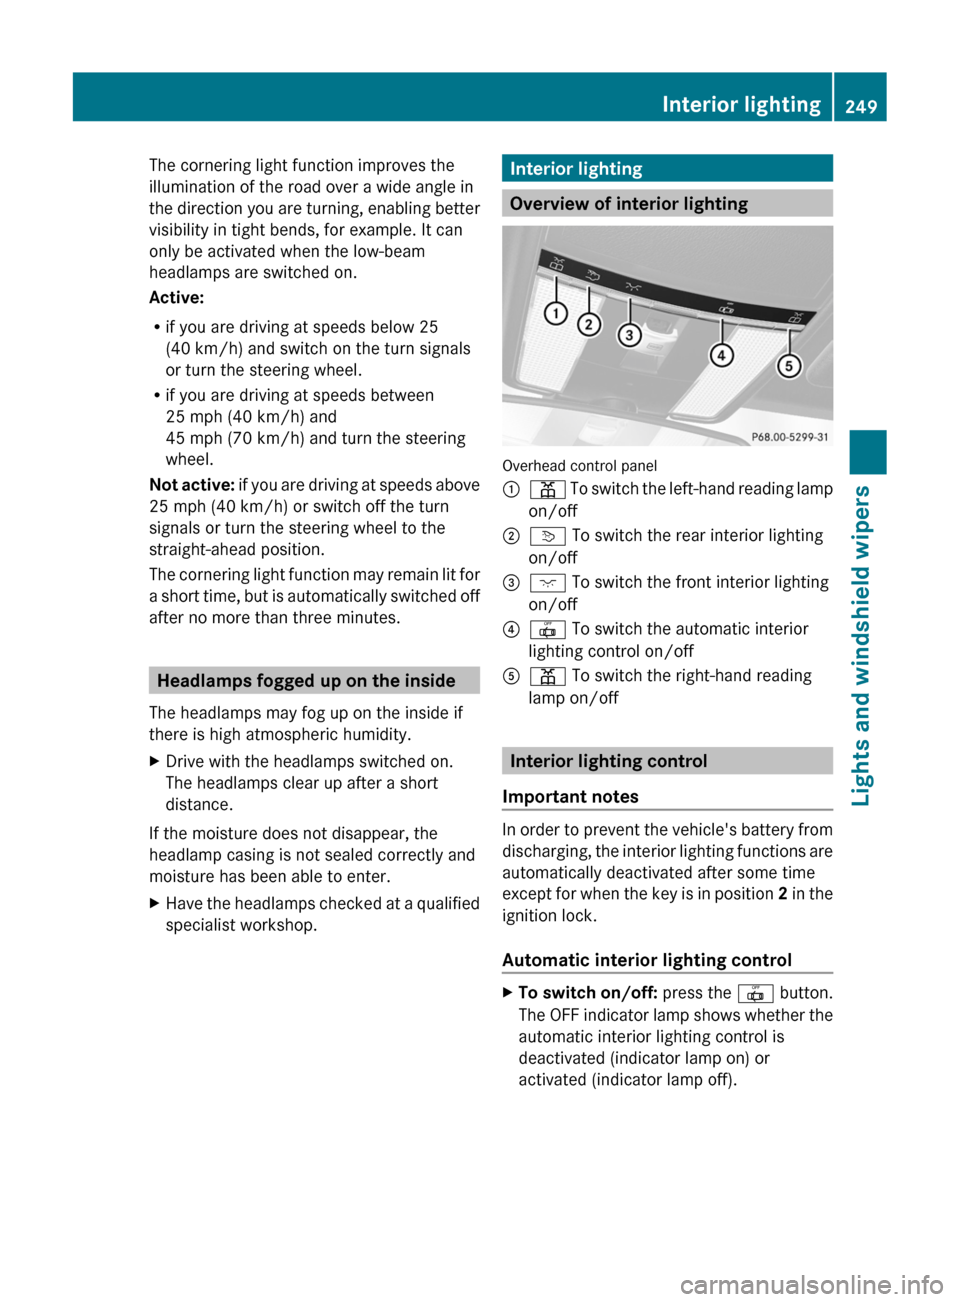
Overview of interior lighting
Overhead control panel
:p To switch the left-hand reading lamp
on/off
;v To switch the rear interior lighting
on/off
=c To switch the front interior lighting
on/off
?| To switch the automatic interior
lighting control on/off
Ap To switch the right-hand reading
lamp on/off
Interior lighting control
Important notes
In order to prevent the vehicle's battery from
discharging, the interior lighting functions are
automatically deactivated after some time
except for when the key is in position 2 in the
ignition lock.
Automatic interior lighting control
XTo switch on/off: press the | button.
The OFF indicator lamp shows whether the
automatic interior lighting control is
deactivated (indicator lamp on) or
activated (indicator lamp off).
Interior lighting249Lights and windshield wipersZ
Page 252 of 480
The interior lighting automatically switches
on if you:
R unlock the vehicle
R open a door
R remove the key from the ignition lock
The interior light is activated for a short while
when the key is removed from the ignition
lock. You can activate this delayed switch-off
using COMAND ( Y page 232).
Manual interior lighting controlXTo switch the front interior lighting on/
off: press the c button.XTo switch the rear interior lighting on/
off: press the u button.XTo switch the reading lamps on/off:
press the p button.
Changing bulbs
Important safety notes
Xenon bulbs
If your vehicle is equipped with Xenon bulbs,
you can recognize this by the following: the
cone of light from the Xenon bulbs moves
from the top to the bottom and back again
when you start the engine. For this to be
observed, the lights must be switched on
before starting the engine.
GWarning
Xenon bulbs carry a high voltage. You could
get an electric shock and be seriously or even
fatally injured if you touch the electric
contacts on Xenon bulbs. Therefore, never
remove the cover from Xenon bulbs.
Do not change Xenon bulbs yourself, but have
them replaced at a qualified specialist
workshop which has the necessary specialist
knowledge and tools to carry out the work
required.
Mercedes-Benz recommends that you use an
authorized Mercedes-Benz Center for this
purpose. In particular, work relevant to safety
or on safety-related systems must be carried
out at a qualified specialist workshop.
Bulbs and lamps are an important aspect of
vehicle safety. You must therefore make sure
that these function correctly at all times.
Have the headlamp setting checked regularly.
Other bulbsGWarning!
Bulbs and lamps can be very hot. You should
therefore allow them to cool down before you
change them. Otherwise, you could be burned
if you touch them.
Keep bulbs out of the reach of children.
Otherwise, they could damage the bulbs, for
example, and injure themselves.
Never use a bulb which has been dropped.
Such a bulb may break or even explode and
injure you.
Halogen bulbs are pressurized and can
explode when you change them, particularly
if they are very hot. You should therefore wear
eye protection and gloves when you are
changing them.
There are bulbs other than the Xenon bulbs
that you cannot replace. Replace only the
bulbs listed (Y page 251). Have the bulbs that
you cannot replace yourself changed at a
qualified specialist workshop.
Mercedes-Benz recommends that you use an
authorized Mercedes-Benz Center for this
purpose. In particular, work relevant to safety
or on safety-related systems must be carried
out at a qualified specialist workshop.
If you require assistance changing bulbs,
consult a qualified specialist workshop.
Do not touch the glass tube of new bulbs with
your bare hands. Even minor contamination
can burn into the glass surface and reduce
the service life of the bulbs. Always use a lint-
free cloth or only touch the base of the bulb
when installing.
Only use bulbs of the correct type.
250Changing bulbsLights and windshield wipers
Page 253 of 480
If the new bulb still does not light up, consult
a qualified specialist workshop.
Bulbs and lamps are an important aspect of
vehicle safety. You must therefore make sure
that these function correctly at all times.
Have the headlamp setting checked regularly.
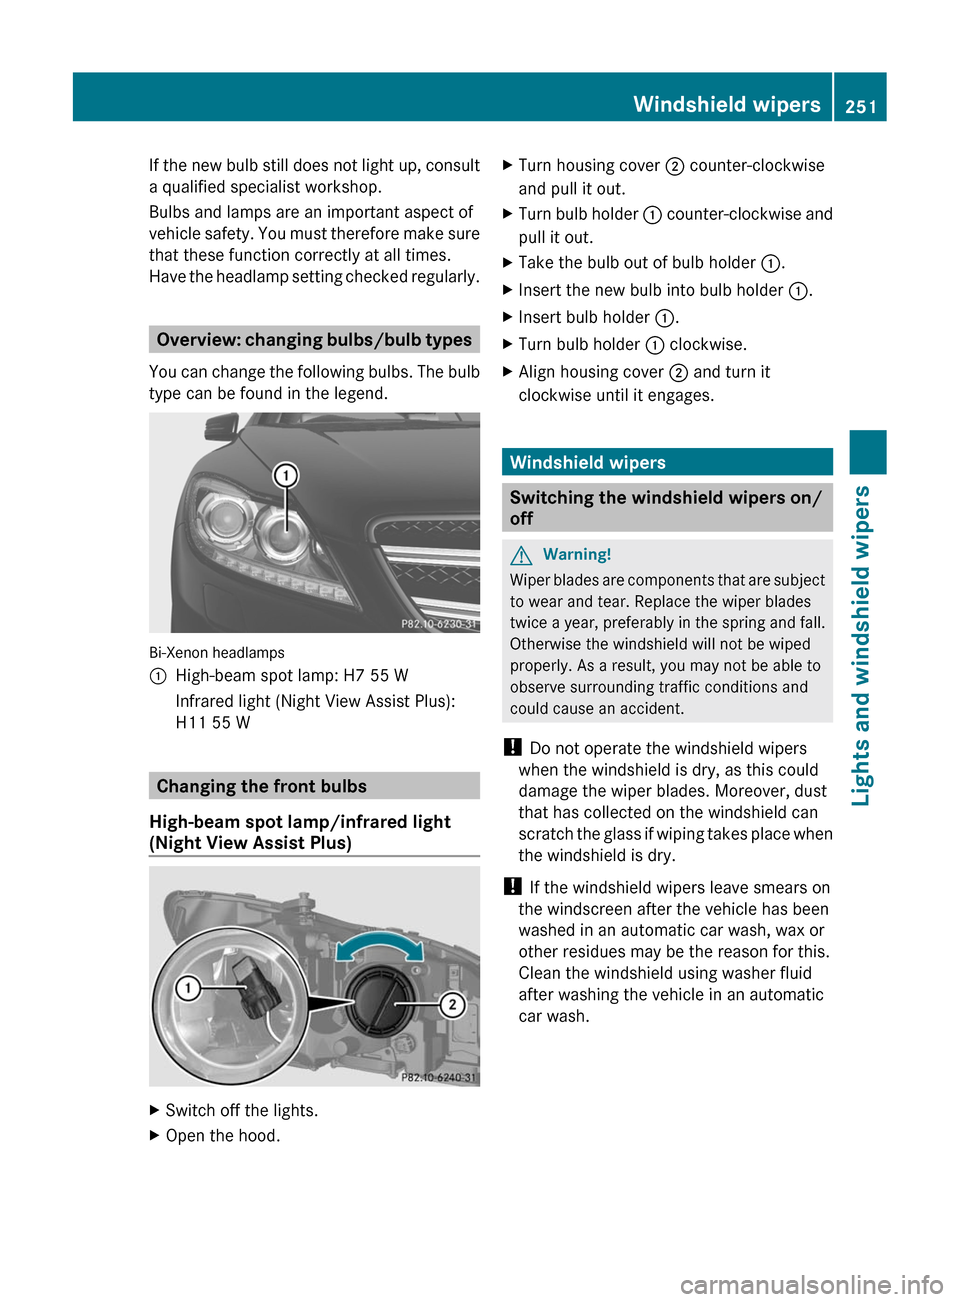
Overview: changing bulbs/bulb types
You can change the following bulbs. The bulb
type can be found in the legend.
Bi-Xenon headlamps
:High-beam spot lamp: H7 55 WInfrared light (Night View Assist Plus):
H11 55 W
Changing the front bulbs
High-beam spot lamp/infrared light
(Night View Assist Plus)
XSwitch off the lights.XOpen the hood.XTurn housing cover ; counter-clockwise
and pull it out.
XTurn bulb holder : counter-clockwise and
pull it out.
XTake the bulb out of bulb holder :.XInsert the new bulb into bulb holder :.XInsert bulb holder :.XTurn bulb holder : clockwise.XAlign housing cover ; and turn it
clockwise until it engages.
Windshield wipers
Switching the windshield wipers on/
off
GWarning!
Wiper blades are components that are subject
to wear and tear. Replace the wiper blades
twice a year, preferably in the spring and fall.
Otherwise the windshield will not be wiped
properly. As a result, you may not be able to
observe surrounding traffic conditions and
could cause an accident.
! Do not operate the windshield wipers
when the windshield is dry, as this could
damage the wiper blades. Moreover, dust
that has collected on the windshield can
scratch the glass if wiping takes place when
the windshield is dry.
! If the windshield wipers leave smears on
the windscreen after the vehicle has been
washed in an automatic car wash, wax or
other residues may be the reason for this.
Clean the windshield using washer fluid
after washing the vehicle in an automatic
car wash.
Windshield wipers251Lights and windshield wipersZ
Page 269 of 480
gear when the engine is idling normally and
when your right foot is firmly on the brake
pedal.
! Warm up the engine quickly. Do not use
the engine's full performance until it has
reached operating temperature.
Only shift the automatic transmission to
the desired drive position when the vehicle
is stationary.
Where possible, avoid spinning the drive
wheels when pulling away on slippery
roads. You could otherwise damage the
drive train.
! CL 63 AMG: at low engine oil
temperatures below 68 ‡ (+20 †), the
maximum engine speed is restricted in
order to protect the engine. To protect the
engine and maintain smooth engine
operation, avoid driving at full throttle when
the engine is cold.
SmartKey positions
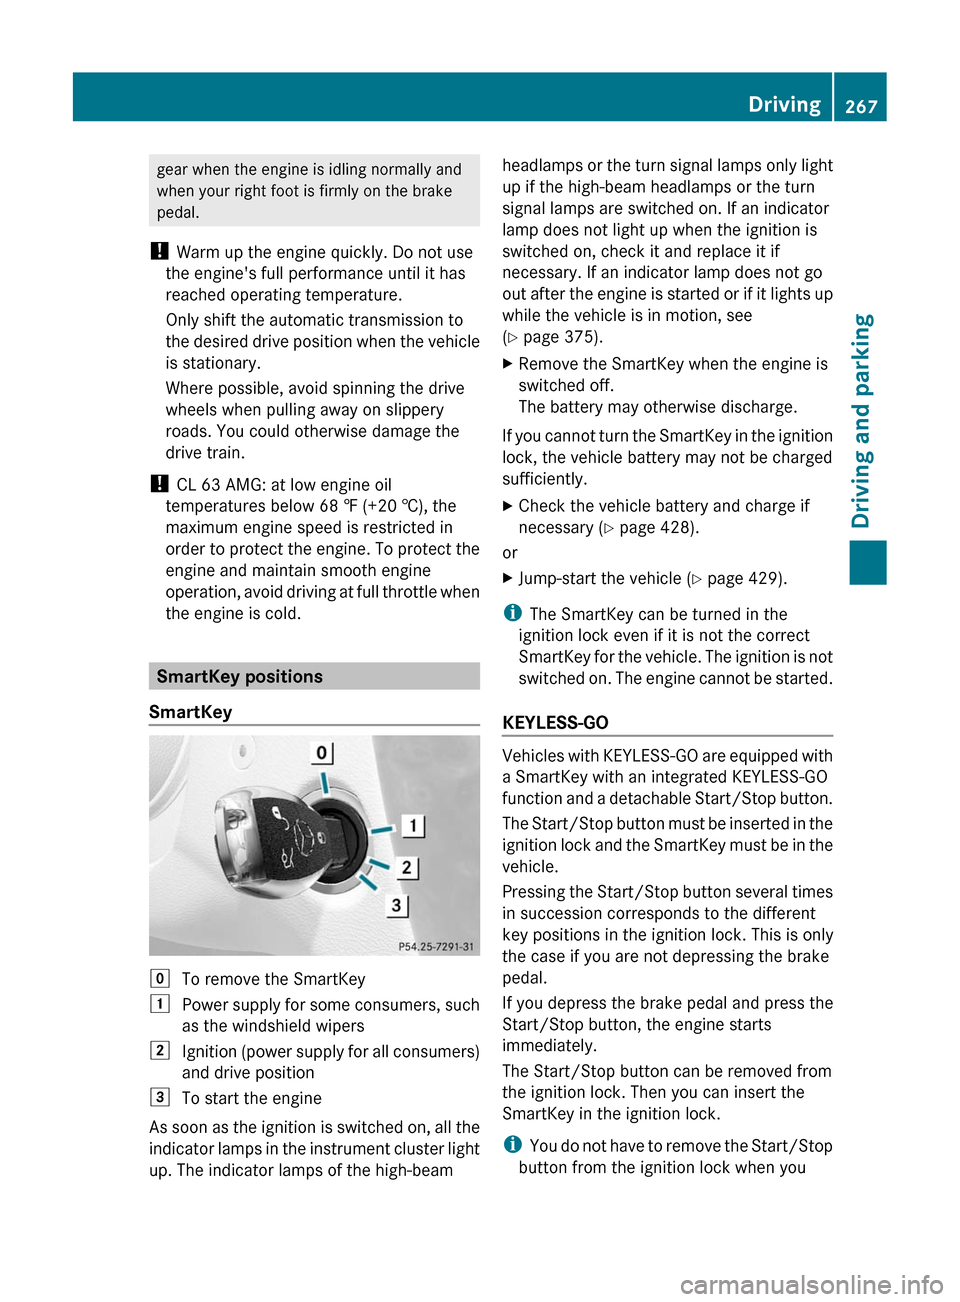
SmartKey
gTo remove the SmartKey1Power supply for some consumers, such
as the windshield wipers2Ignition (power supply for all consumers)
and drive position3To start the engine
As soon as the ignition is switched on, all the
indicator lamps in the instrument cluster light
up. The indicator lamps of the high-beam
headlamps or the turn signal lamps only light
up if the high-beam headlamps or the turn
signal lamps are switched on. If an indicator
lamp does not light up when the ignition is
switched on, check it and replace it if
necessary. If an indicator lamp does not go
out after the engine is started or if it lights up
while the vehicle is in motion, see
( Y page 375).XRemove the SmartKey when the engine is
switched off.
The battery may otherwise discharge.
If you cannot turn the SmartKey in the ignition
lock, the vehicle battery may not be charged
sufficiently.
XCheck the vehicle battery and charge if
necessary ( Y page 428).
or
XJump-start the vehicle ( Y page 429).
i
The SmartKey can be turned in the
ignition lock even if it is not the correct
SmartKey for the vehicle. The ignition is not
switched on. The engine cannot be started.
KEYLESS-GO
Vehicles with KEYLESS-GO are equipped with
a SmartKey with an integrated KEYLESS-GO
function and a detachable Start/Stop button.
The Start/Stop button must be inserted in the
ignition lock and the SmartKey must be in the
vehicle.
Pressing the Start/Stop button several times
in succession corresponds to the different
key positions in the ignition lock. This is only
the case if you are not depressing the brake
pedal.
If you depress the brake pedal and press the
Start/Stop button, the engine starts
immediately.
The Start/Stop button can be removed from
the ignition lock. Then you can insert the
SmartKey in the ignition lock.
i You do not have to remove the Start/Stop
button from the ignition lock when you
Driving267Driving and parkingZ
Page 270 of 480
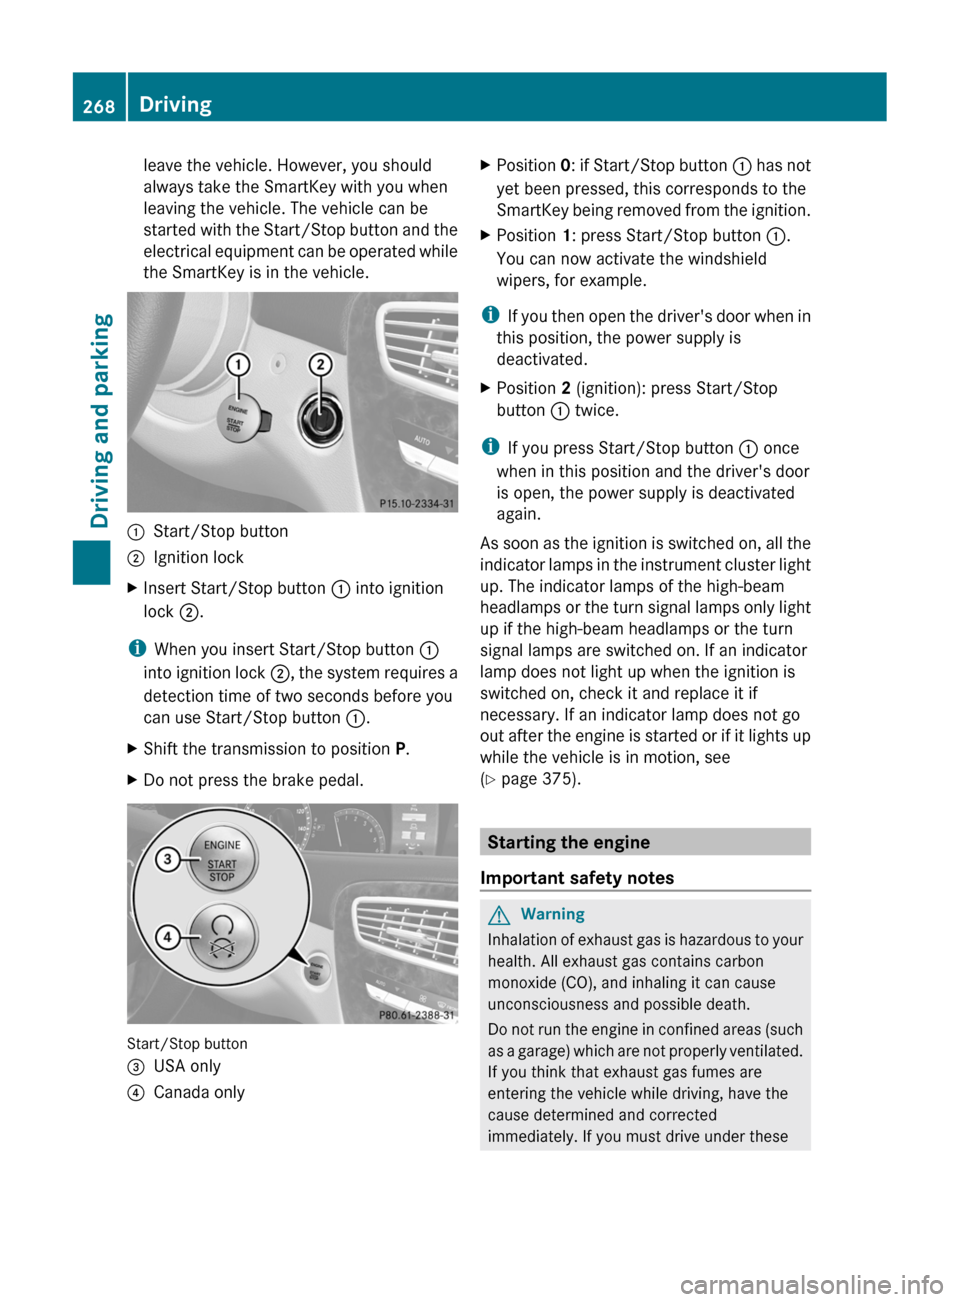
leave the vehicle. However, you should
always take the SmartKey with you when
leaving the vehicle. The vehicle can be
started with the Start/Stop button and the
electrical equipment can be operated while
the SmartKey is in the vehicle.:Start/Stop button;Ignition lockXInsert Start/Stop button : into ignition
lock ;.
i
When you insert Start/Stop button :
into ignition lock ;, the system requires a
detection time of two seconds before you
can use Start/Stop button :.
XShift the transmission to position P.XDo not press the brake pedal.
Start/Stop button
=USA only?Canada onlyXPosition 0: if Start/Stop button : has not
yet been pressed, this corresponds to the
SmartKey being removed from the ignition.XPosition 1: press Start/Stop button :.
You can now activate the windshield
wipers, for example.
i If you then open the driver's door when in
this position, the power supply is
deactivated.
XPosition 2 (ignition): press Start/Stop
button : twice.
i
If you press Start/Stop button : once
when in this position and the driver's door
is open, the power supply is deactivated
again.
As soon as the ignition is switched on, all the
indicator lamps in the instrument cluster light
up. The indicator lamps of the high-beam
headlamps or the turn signal lamps only light
up if the high-beam headlamps or the turn
signal lamps are switched on. If an indicator
lamp does not light up when the ignition is
switched on, check it and replace it if
necessary. If an indicator lamp does not go
out after the engine is started or if it lights up
while the vehicle is in motion, see
( Y page 375).
Starting the engine
Important safety notes
GWarning
Inhalation of exhaust gas is hazardous to your
health. All exhaust gas contains carbon
monoxide (CO), and inhaling it can cause
unconsciousness and possible death.
Do not run the engine in confined areas (such
as a garage) which are not properly ventilated.
If you think that exhaust gas fumes are
entering the vehicle while driving, have the
cause determined and corrected
immediately. If you must drive under these
268DrivingDriving and parking
Page 318 of 480
recognize dangers too late which could result
in an accident and serious injury to you and/
or others.
ATTENTION ASSIST assesses your level of
fatigue or lapses in concentration by taking
the following criteria into account:
Ryour personal driving style, e.g. steering
characteristics
Rdriving conditions, e.g. time, driving time
The functionality of ATTENTION ASSIST is
restricted and warnings may be delayed or
not occur at all:
Rif the road condition is poor, e.g. if the
surface is uneven or if there are potholes
Rif there is a strong side wind
Rif you have adopted a sporty driving style
with high cornering speeds or high rates of
acceleration
Rif you are predominantly driving slower
than 50 mph (80 km/h) or faster than
112 mph (180 km/h)
Rif you are currently operating or making a
call using COMAND
Rif the time has been set incorrectly
Rin active driving situations, such as when
you change lanes or change your speed
Warning and display messages in the
multifunction display
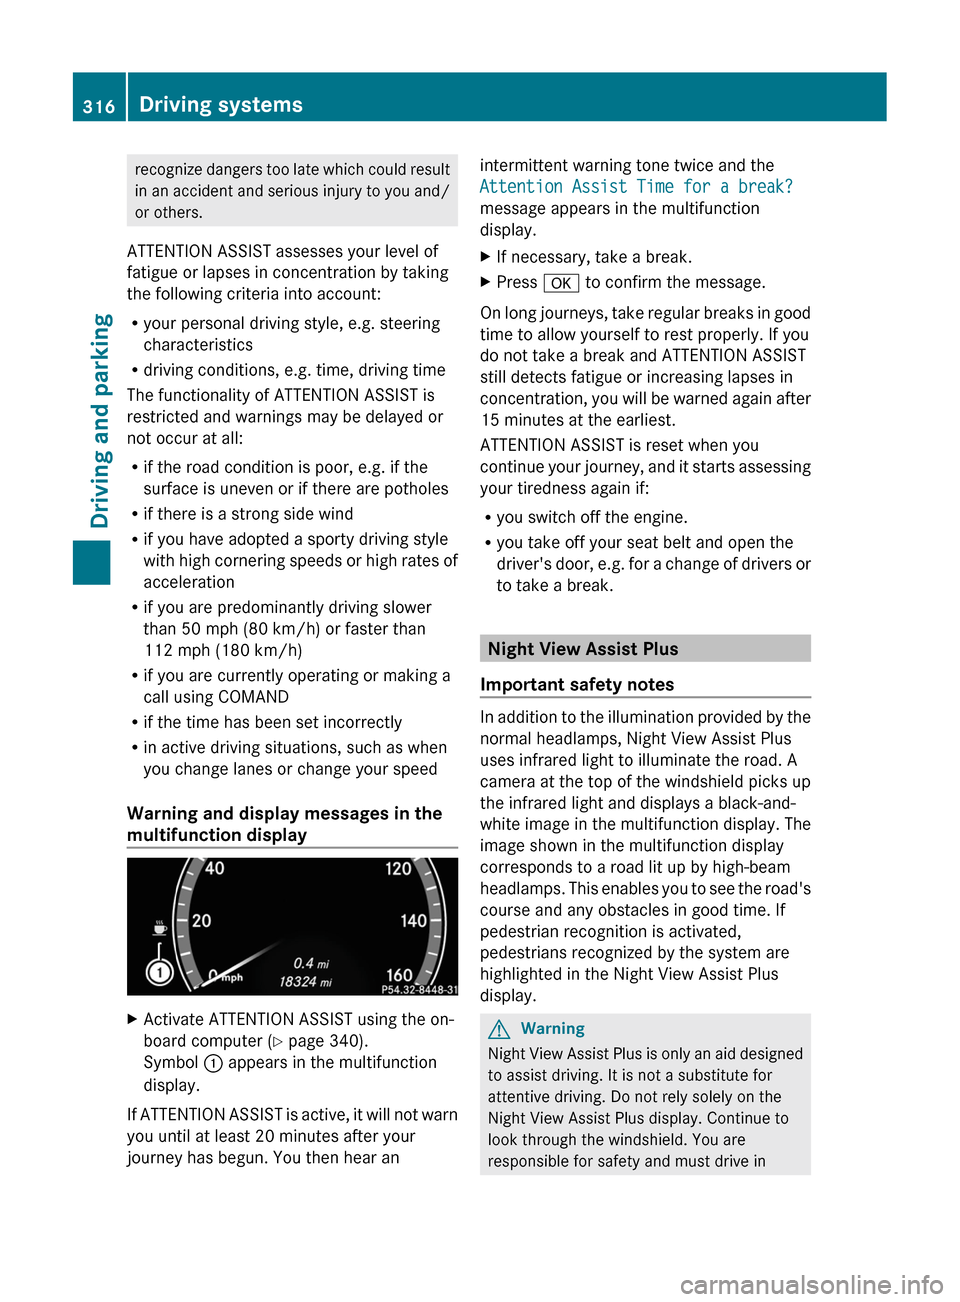
XActivate ATTENTION ASSIST using the on-
board computer (Y page 340).
Symbol : appears in the multifunction
display.
If ATTENTION ASSIST is active, it will not warn
you until at least 20 minutes after your
journey has begun. You then hear an
intermittent warning tone twice and the
Attention Assist Time for a break?
message appears in the multifunction
display.
XIf necessary, take a break.XPress a to confirm the message.
On long journeys, take regular breaks in good
time to allow yourself to rest properly. If you
do not take a break and ATTENTION ASSIST
still detects fatigue or increasing lapses in
concentration, you will be warned again after
15 minutes at the earliest.
ATTENTION ASSIST is reset when you
continue your journey, and it starts assessing
your tiredness again if:
Ryou switch off the engine.
Ryou take off your seat belt and open the
driver's door, e.g. for a change of drivers or
to take a break.
Night View Assist Plus
Important safety notes
In addition to the illumination provided by the
normal headlamps, Night View Assist Plus
uses infrared light to illuminate the road. A
camera at the top of the windshield picks up
the infrared light and displays a black-and-
white image in the multifunction display. The
image shown in the multifunction display
corresponds to a road lit up by high-beam
headlamps. This enables you to see the road's
course and any obstacles in good time. If
pedestrian recognition is activated,
pedestrians recognized by the system are
highlighted in the Night View Assist Plus
display.
GWarning
Night View Assist Plus is only an aid designed
to assist driving. It is not a substitute for
attentive driving. Do not rely solely on the
Night View Assist Plus display. Continue to
look through the windshield. You are
responsible for safety and must drive in
316Driving systemsDriving and parking
Page 319 of 480
accordance with traffic conditions. You could
otherwise put yourself and others in danger.
The system may be impaired or unavailable if:
Rthere is poor visibility, e.g. due to snow,
rain, fog or heavy spray.
Rthe windshield is dirty, fogged up or
covered, for instance by a sticker, in the
vicinity of the camera.
Ryou are driving on bends, uphill gradients
or downhill gradients.
Light from the headlamps of oncoming
vehicles does not affect the Night View Assist
Plus display in the multifunction display. This
is also the case if you cannot switch on the
high-beam headlamps because of oncoming
traffic.
GWarning!
The Night View Assist Plus cannot record
objects immediately in front of or next to the
vehicle. When maneuvering, continue to look
through the windshield. Make sure no
persons or animals are in the area in which
you are maneuvering. You could otherwise
injure them.
iInfrared light is not visible to the human
eye and therefore does not glare. Night
View Assist Plus can therefore remain
switched on even if there is oncoming
traffic.
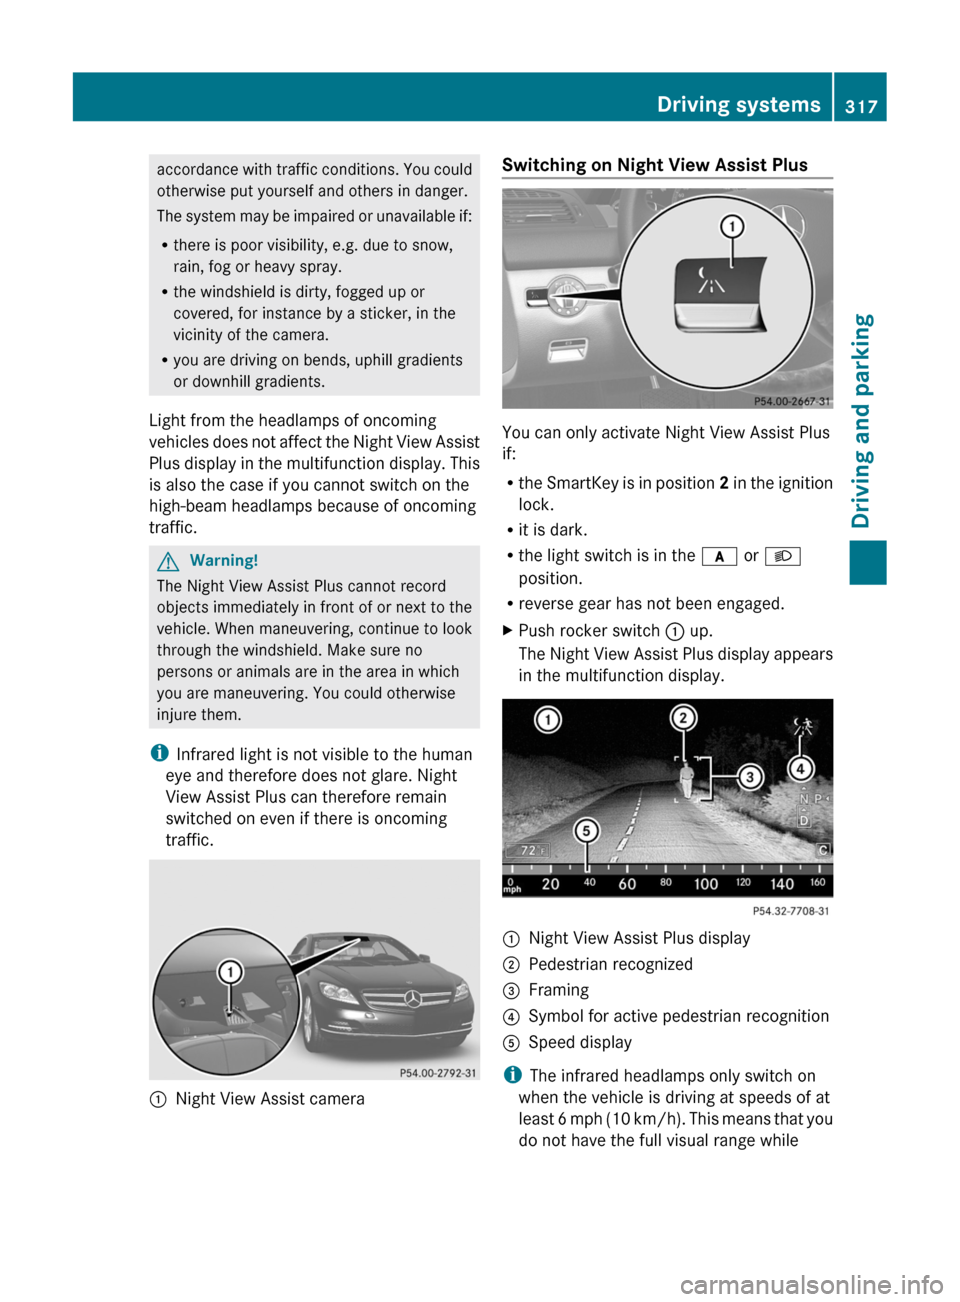
:Night View Assist cameraSwitching on Night View Assist Plus
You can only activate Night View Assist Plus
if:
Rthe SmartKey is in position 2 in the ignition
lock.
Rit is dark.
Rthe light switch is in the c or L
position.
Rreverse gear has not been engaged.
XPush rocker switch : up.
The Night View Assist Plus display appears
in the multifunction display.
:Night View Assist Plus display;Pedestrian recognized=Framing?Symbol for active pedestrian recognitionASpeed display
iThe infrared headlamps only switch on
when the vehicle is driving at speeds of at
least 6 mph (10 km/h). This means that you
do not have the full visual range while
Driving systems317Driving and parkingZ
Page 358 of 480
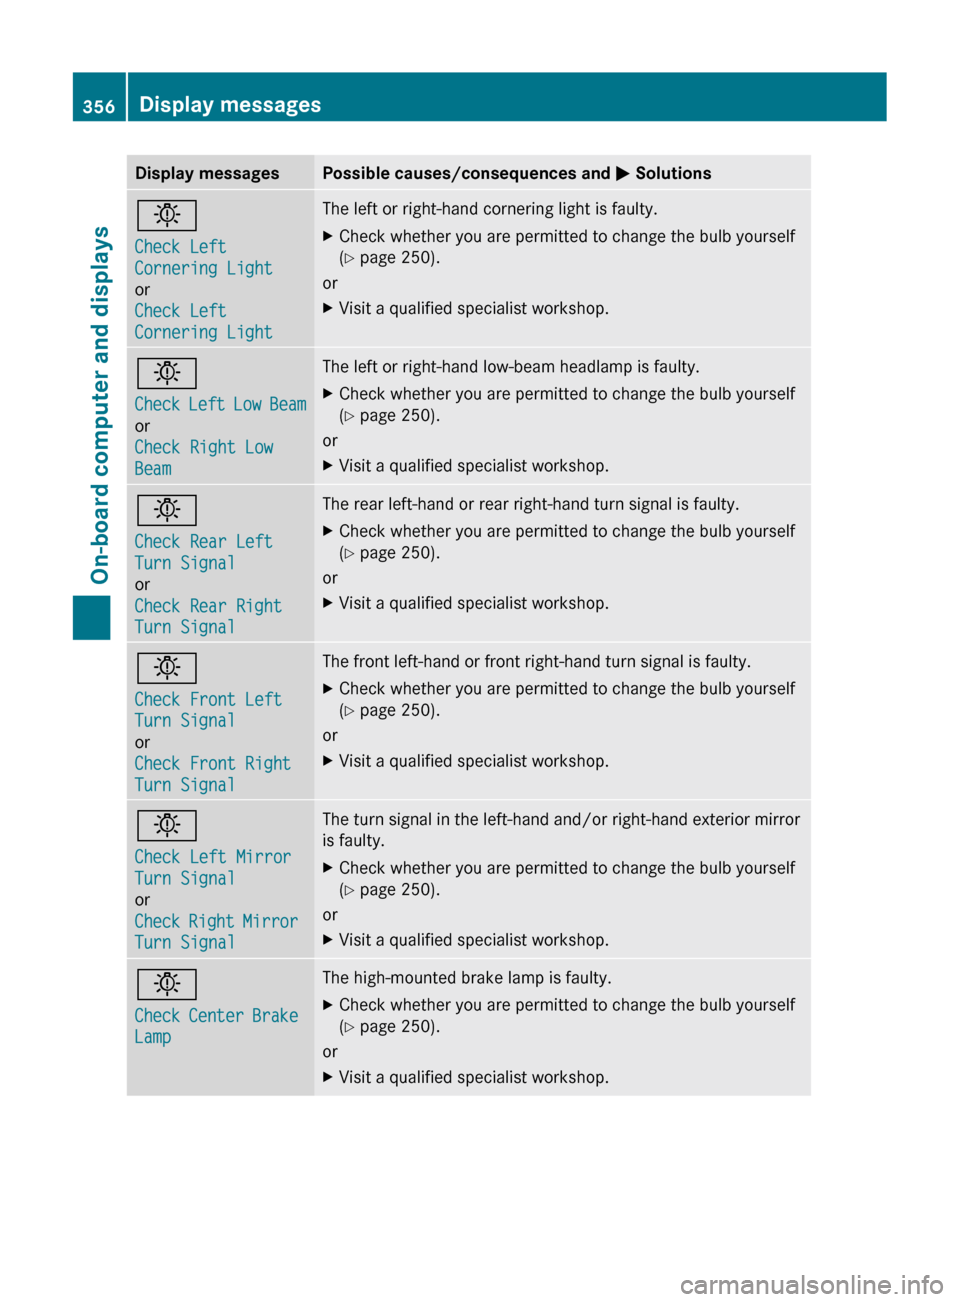
Display messagesPossible causes/consequences and M Solutionsb
Check Left
Cornering Light
or
Check Left
Cornering LightThe left or right-hand cornering light is faulty.XCheck whether you are permitted to change the bulb yourself
( Y page 250).
or
XVisit a qualified specialist workshop.b
Check Left Low Beam
or
Check Right Low
BeamThe left or right-hand low-beam headlamp is faulty.XCheck whether you are permitted to change the bulb yourself
( Y page 250).
or
XVisit a qualified specialist workshop.b
Check Rear Left
Turn Signal
or
Check Rear Right
Turn SignalThe rear left-hand or rear right-hand turn signal is faulty.XCheck whether you are permitted to change the bulb yourself
( Y page 250).
or
XVisit a qualified specialist workshop.b
Check Front Left
Turn Signal
or
Check Front Right
Turn SignalThe front left-hand or front right-hand turn signal is faulty.XCheck whether you are permitted to change the bulb yourself
( Y page 250).
or
XVisit a qualified specialist workshop.b
Check Left Mirror
Turn Signal
or
Check Right Mirror
Turn SignalThe turn signal in the left-hand and/or right-hand exterior mirror
is faulty.XCheck whether you are permitted to change the bulb yourself
( Y page 250).
or
XVisit a qualified specialist workshop.b
Check Center Brake
LampThe high-mounted brake lamp is faulty.XCheck whether you are permitted to change the bulb yourself
( Y page 250).
or
XVisit a qualified specialist workshop.356Display messagesOn-board computer and displays
Page 360 of 480
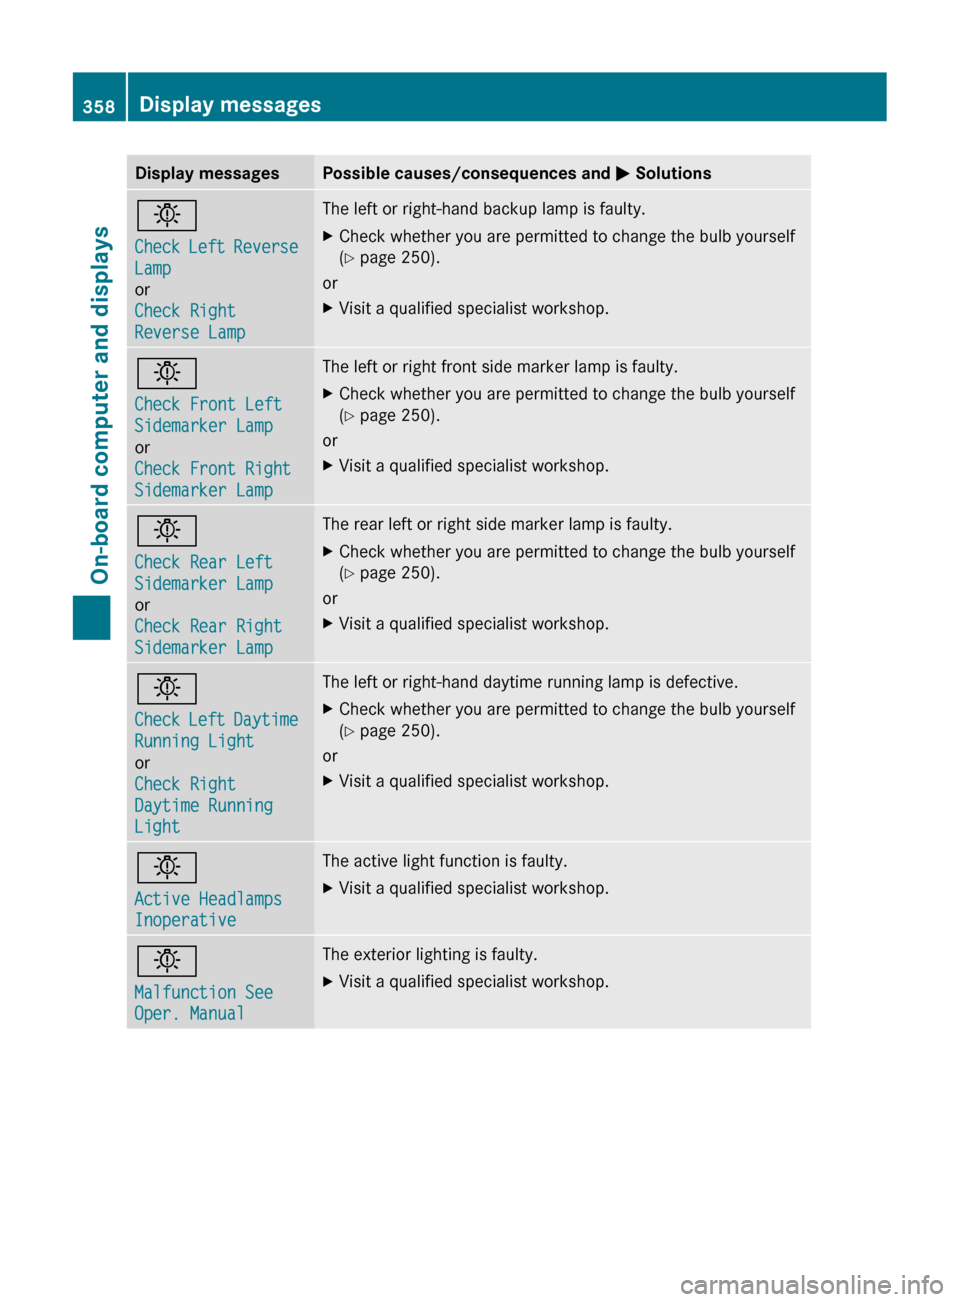
Display messagesPossible causes/consequences and M Solutionsb
Check Left Reverse
Lamp
or
Check Right
Reverse LampThe left or right-hand backup lamp is faulty.XCheck whether you are permitted to change the bulb yourself
( Y page 250).
or
XVisit a qualified specialist workshop.b
Check Front Left
Sidemarker Lamp
or
Check Front Right
Sidemarker LampThe left or right front side marker lamp is faulty.XCheck whether you are permitted to change the bulb yourself
( Y page 250).
or
XVisit a qualified specialist workshop.b
Check Rear Left
Sidemarker Lamp
or
Check Rear Right
Sidemarker LampThe rear left or right side marker lamp is faulty.XCheck whether you are permitted to change the bulb yourself
( Y page 250).
or
XVisit a qualified specialist workshop.b
Check Left Daytime
Running Light
or
Check Right
Daytime Running
LightThe left or right-hand daytime running lamp is defective.XCheck whether you are permitted to change the bulb yourself
( Y page 250).
or
XVisit a qualified specialist workshop.b
Active Headlamps
InoperativeThe active light function is faulty.XVisit a qualified specialist workshop.b
Malfunction See
Oper. ManualThe exterior lighting is faulty.XVisit a qualified specialist workshop.358Display messagesOn-board computer and displays
Page 410 of 480
coolant reservoir contains hot fluid and is
under pressure.
Rusing a rag, slowly turn the cap
approximately 1/2 turn to relieve excess
pressure. If opened immediately, scalding
hot fluid and steam will be blown out under
pressure.
Rdo not spill antifreeze on hot engine parts.
Antifreeze contains ethylene glycol which
may burn if it comes into contact with hot
engine parts.
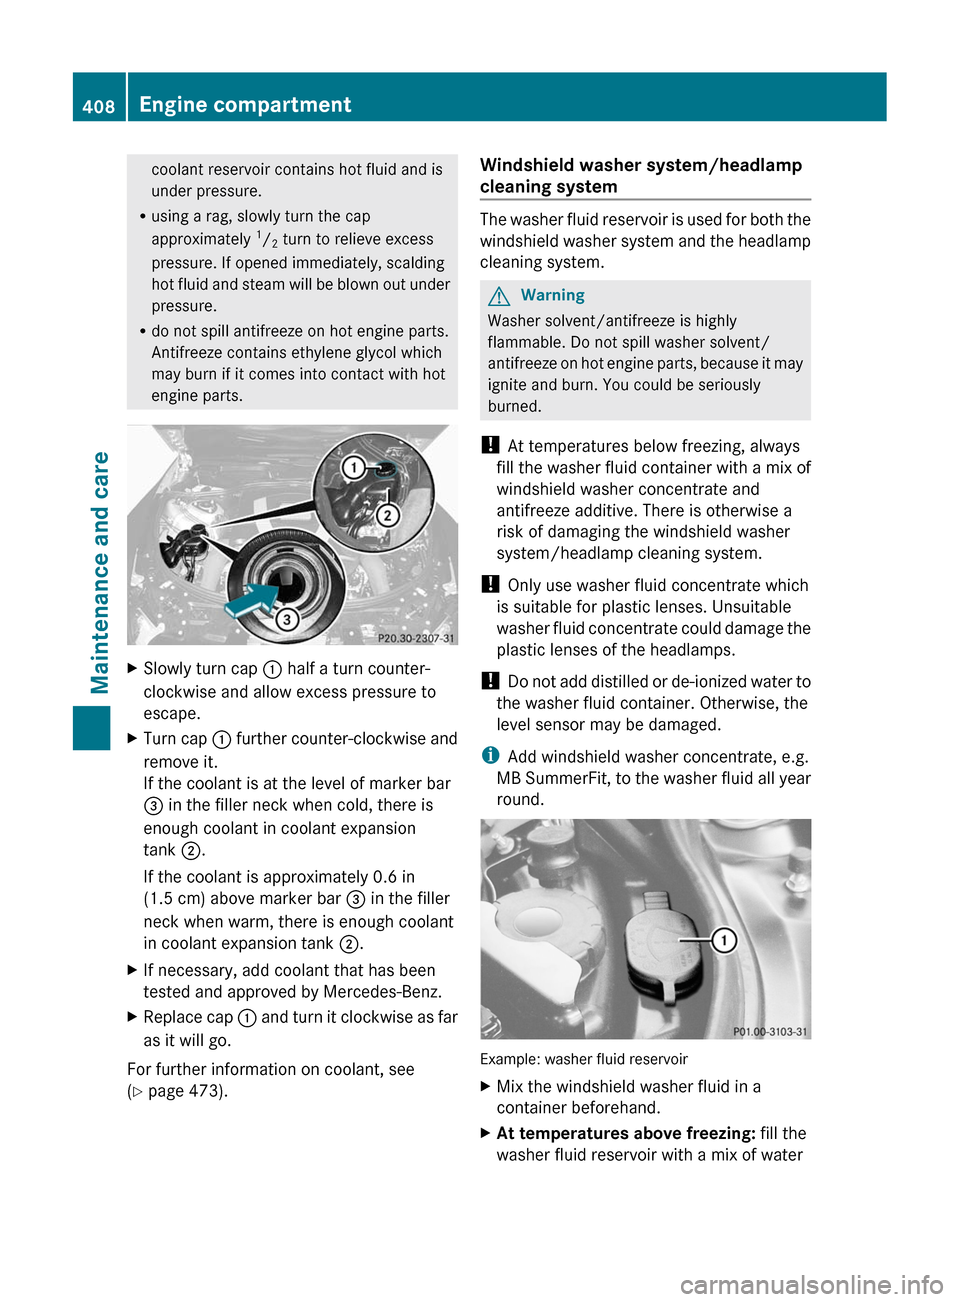
XSlowly turn cap : half a turn counter-
clockwise and allow excess pressure to
escape.
XTurn cap : further counter-clockwise and
remove it.
If the coolant is at the level of marker bar
= in the filler neck when cold, there is
enough coolant in coolant expansion
tank ;.
If the coolant is approximately 0.6 in
(1.5 cm) above marker bar = in the filler
neck when warm, there is enough coolant
in coolant expansion tank ;.
XIf necessary, add coolant that has been
tested and approved by Mercedes-Benz.
XReplace cap : and turn it clockwise as far
as it will go.
For further information on coolant, see
(Y page 473).
Windshield washer system/headlamp
cleaning system
The washer fluid reservoir is used for both the
windshield washer system and the headlamp
cleaning system.
GWarning
Washer solvent/antifreeze is highly
flammable. Do not spill washer solvent/
antifreeze on hot engine parts, because it may
ignite and burn. You could be seriously
burned.
! At temperatures below freezing, always
fill the washer fluid container with a mix of
windshield washer concentrate and
antifreeze additive. There is otherwise a
risk of damaging the windshield washer
system/headlamp cleaning system.
! Only use washer fluid concentrate which
is suitable for plastic lenses. Unsuitable
washer fluid concentrate could damage the
plastic lenses of the headlamps.
! Do not add distilled or de-ionized water to
the washer fluid container. Otherwise, the
level sensor may be damaged.
iAdd windshield washer concentrate, e.g.
MB SummerFit, to the washer fluid all year
round.
Example: washer fluid reservoir
XMix the windshield washer fluid in a
container beforehand.
XAt temperatures above freezing: fill the
washer fluid reservoir with a mix of water
408Engine compartmentMaintenance and care