instrument cluster MERCEDES-BENZ CL-Class 2011 C216 User Guide
[x] Cancel search | Manufacturer: MERCEDES-BENZ, Model Year: 2011, Model line: CL-Class, Model: MERCEDES-BENZ CL-Class 2011 C216Pages: 480, PDF Size: 19.76 MB
Page 63 of 480
2. This device must withstand any
interference received, including
interference that may cause undesired
operation of the device.
Any unauthorized modification to this
device could void the user's authority to
operate the equipment.
Driving safety systems
Driving safety systems overview
In this section, you will find information about
the following driving safety systems:
R ABS ( Anti-lock Braking System)
R BAS ( Brake Assist System)
R BAS PLUS ( Brake Assist System Plus*)
R Adaptive brake lamps
R ESP ®
(E lectronic Stability Program)
R EBD ( Electronic Brake force Distribution)
R ADAPTIVE BRAKE
R PRE-SAFE ®
Brake (vehicles with
DISTRONIC PLUS)
Important safety notes
GWarning
The following factors increase the risk of
accidents:
R Excessive speed, especially in turns
R Wet and slippery road surfaces
R Following another vehicle too closely
The driving safety systems described in this
section cannot reduce these risks or prevent
the natural laws of physics from acting on the
vehicle. They cannot increase braking or
steering efficiency beyond that afforded by
the condition of the vehicle brakes and tires
or the traction afforded.
Only a safe, attentive, and skillful driver can
prevent accidents.
The capabilities of a vehicle equipped with the
driving safety systems described in this
section must never be exploited in a reckless
or dangerous manner which could jeopardize
the user's safety or the safety of others.
Always adjust your driving style to the
prevailing road and weather conditions and
keep a safe distance to other road users and
objects on the street.
If a driving system malfunctions, other driving
safety systems may also switch off. Observe
indicator and warning lamps that may come
on as well as messages in the multifunction
display that may appear.
i In wintry driving conditions, always use
winter tires (M+S tires) and if necessary,
snow chains. Only in this way will the
driving safety systems described in this
section work as effectively as possible.
ABS (Anti-lock Braking System)
Important safety notes
GWarning
Observe "Important safety notes"
( Y page 61).
GWarning
Do not pump the brake pedal. Use firm, steady
brake pedal pressure instead. Pumping the
brake pedal defeats the purpose of the ABS
and significantly reduces braking
effectiveness.
ABS regulates brake pressure in such a way
that the wheels do not lock when you brake.
This allows you to continue steering the
vehicle when braking.
ABS works from a speed of about
5 mph (8 km/h) upwards, regardless of road-
surface conditions. ABS works on slippery
surfaces, even when you only brake gently.
The ! warning lamp in the instrument
cluster lights up when the ignition is switched
on. It goes out when the engine is running.
Driving safety systems61SafetyZ
Page 66 of 480
If ESP®
intervenes, the ÷ warning lamp
flashes in the instrument cluster.GWarning
Under no circumstances should you
deactivate ESP ®
when the ÷ ESP®
warning lamp in the instrument cluster
flashes. Proceed as follows:
R when driving off, apply as little throttle as
possible.
R while driving, ease up on the accelerator
pedal.
R adapt your speed to suit the prevailing road
and weather conditions.
failure to observe these guidelines could
cause the vehicle to skid. ESP ®
cannot
prevent accidents resulting from excessive
speed.
! Vehicles without 4MATIC: switch the
ignition off when:
R the electric parking brake is being tested
using a brake dynamometer.
R the vehicle is being towed with the front/
rear axle raised.
Application of the brakes by ESP ®
may
otherwise destroy the brake system.
! Vehicles with 4MATIC: switch off the
ignition when the electric parking brake is
being tested on a brake dynamometer.
Application of the brakes by ESP ®
may
otherwise destroy the brake system.
i Only use wheels with the recommended
tire sizes. Only then will ESP ®
function
properly.
ETS/4ETS (Electronic Traction System)
GWarning
Observe "Important safety notes"
( Y page 61).
Traction control is part of ESP ®
.
Traction control brakes the drive wheels
individually if they spin. This enables you to
pull away and accelerate on slippery surfaces,
for example if the road surface is slippery on
one side. On vehicles with 4MATIC, more
drive torque is also transferred to the wheel
or wheels with traction.
Traction control remains active if you
deactivate ESP ®
.
Activating/deactivating ESP ®GWarning!
The ESP should not be switched off during
normal driving other than in the
circumstances described below. Disabling
the system will reduce vehicle stability in
driving maneuvers.
Do not switch off the ESP when a spare wheel
is mounted.
GWarning
CL 63 AMG: ESP ®
should not be deactivated
during normal driving.
Deactivating the system results in the
following:
R no restriction to the engine torque
R loss of system-supported traction control
"ESP OFF" is designed for driving on closed
tracks when the vehicle's own oversteering
and understeering characteristics are desired
and requires an extremely qualified and
experienced driver who is able to handle
these critical driving situations.
You could lose control of your vehicle and
cause an accident.
Beware of these limits if you deactivate
ESP ®
.
Do not deactivate ESP ®
when the emergency
or spare wheel is mounted.
ESP ®
is activated automatically when the
engine is running.
64Driving safety systemsSafety
Page 67 of 480
It may be best to deactivate ESP®
in the
following situations:
R when using snow chains
R in deep snow
R on sand or gravelGWarning!
Switch on the ESP immediately if the
aforementioned circumstances do not apply
anymore. Otherwise the ESP will not stabilize
the vehicle when it is starting to skid or a
wheel is spinning.
When you deactivate ESP ®
:
R ESP ®
no longer improves driving stability.
R the engine's torque is no longer limited and
the drive wheels can spin. The spinning of
the wheels results in a cutting action, which
provides better grip.
R traction control is still activated.
R ESP ®
still provides support when you
brake.
If ESP ®
is deactivated and one or more wheels
start to spin, the ÷ warning lamp in the
instrument cluster flashes. In such situations,
ESP ®
will not stabilize the vehicle.
XTo deactivate: (Y page 339).
The å warning lamp in the instrument
cluster lights up.GWarning
When the å ESP®
OFF warning lamp is lit,
ESP ®
is deactivated.
If the ÷ ESP®
warning lamp and the
å ESP®
OFF warning lamp remain lit,
ESP ®
is not available due to a malfunction.
When ESP ®
is deactivated or not operational,
vehicle stability in standard driving
maneuvers is reduced.
Adapt your speed and driving to the prevailing
road conditions and to the non-operating
status of the ESP ®
.
! Avoid spinning a drive wheel for an
extended period with ESP ®
switched off.
This could cause serious damage to the
drive train.XTo activate: (Y page 339).
The å warning lamp in the instrument
cluster goes out.
EBD (Electronic Brake force
Distribution)
GWarning
Observe "Important safety notes"
( Y page 61).
EBD monitors and controls the brake
pressure on the rear wheels to improve
driving stability while braking.
GWarning
If the EBD malfunctions, the brake system will
still function with full brake boost. However,
the rear wheels could lock up during
emergency braking situations, for example.
You could lose control of the vehicle and
cause an accident.
Adapt your driving style to the changed
driving characteristics.
Adaptive Brake
ADAPTIVE BRAKE enhances braking safety
and offers increased braking comfort. In
addition to the braking function, ADAPTIVE
BRAKE also has the HOLD function
( Y page 303) and hill start assist
( Y page 270). For further information, see
Driving tips ( Y page 288).
PRE-SAFE ®
Brake (vehicles with
DISTRONIC PLUS)
PRE-SAFE ®
Brake can help you to minimize
the risk of a frontal collision with a vehicle
Driving safety systems65SafetyZ
Page 68 of 480
ahead or to reduce the effects of such a
collision.
At speeds above approximately 20 mph
(30 km/h) , this function warns you when you
are rapidly approaching the vehicle in front.
An intermittent warning tone sounds and the
· distance warning lamp lights up in the
instrument cluster.
Due to the nature of the system, particularly
complicated driving conditions may cause the
system to display an unnecessary warning.
At speeds of above approximately 20 mph
(30 km/h) , if the driver and passengers have
fastened their seat belts, PRE-SAFE ®
Brake
can:
R brake the vehicle automatically at speeds
ranging up to approximately 112 mph
(180 km/h)
R trigger preventative occupant protection
measures (PRE-SAFE ®
) ( Y page 51)GWarning!
An intermittent warning sounds and the
distance warning lamp · in the instrument
cluster is illuminated if the PRE-SAFE ®
Brake
calculates that the distance to the vehicle
ahead and your vehicle's current speed
indicate that the PRE-SAFE ®
Brake will not be
capable of slowing the vehicle sufficiently to
maintain the preset following distance, which
creates a danger of a collision.
Immediately brake your vehicle to increase
the distance between your vehicle and the
vehicle driving in front of you. The warning
sound is intended as a final caution that you
have not interceded with your own braking
inputs to avoid a potentially dangerous
situation. Do not wait for the operation of the
warning signal to intercede with your own
braking, as that will result in potentially
dangerous emergency braking which will not
always result in an impact being avoided.
Tailgating increases the risk of an accident.
GWarning!
The PRE-SAFE ®
Brake is a convenience
system designed to assist the driver during
vehicle operation. The responsibility for the
vehicle speed and the distance to the vehicle
ahead, including most importantly brake
operation to assure safe stopping distance,
always remains with the driver.
Always pay attention to traffic conditions
even while the PRE-SAFE ®
Brake is switched
on. Otherwise, you may not be able to
recognize dangerous situations until it is too
late and could cause an accident resulting in
personal or fatal injury to you or others.
i USA only: this device has been approved
by the FCC as a "Vehicular Radar System".
The radar sensor system is intended for use
in an automotive radar system only.
Removal, tampering, or altering of the
device will void any warranties, and is not
permitted by the FCC. Do not tamper with
the device in any way.
Any unauthorized modification to this
device could void the user's authority to
operate the equipment.
i Canada only: this device complies with
RSS-210 from Industry Canada. Operation
is subject to the following two conditions:
1. This device may not cause interference,
and
2. This device must withstand any
interference received, including
interference that may cause undesired
operation.
Removal, tampering, or altering of the
device will void any warranties, and is not
permitted. Do not tamper with the device
in any way.
Any unauthorized modification to this
device could void the user's authority to
operate the equipment.
With the help of the radar sensor system,
PRE-SAFE ®
Brake can detect obstacles that
are in front of your vehicle for an extended
66Driving safety systemsSafety
Page 69 of 480
period of time. If you approach an obstacle
and PRE-SAFE ®
Brake detects a risk of a
collision, the system will initially alert you
both visually and acoustically. If you yourself
do not brake or steer, the vehicle will
automatically brake slightly. In the event of
an increased risk of a collision, PRE-SAFE ®
is
activated ( Y page 51).GWarning!
The PRE-SAFE ®
Brake will only respond with
brake assistance if it has clearly detected an
object. Detection can be impeded by:
R dirty or covered sensors
R snowfall or heavy rain
R disturbance from other radar sources
R strong radar reflection such as in parking
garages
The PRE-SAFE ®
Brake uses radar signals that
are not reflected well by narrow objects and
absorptive materials. For this reason the PRE-
SAFE ®
Brake will not react to persons,
animals, and approaching traffic or cross-
traffic.
The PRE-SAFE ®
Brake may not detect narrow
vehicles driving in front of you, such as
motorcycles and vehicles driving offset from
your vehicle center.
In order to maintain the appropriate distance
to the vehicle in front and thus prevent a
collision, you must apply the brakes yourself.
At speeds up to approximately 40 mph
( 70 km/h), PRE-SAFE ®
Brake can also detect
stationary obstacles, for example stopped or
parked vehicles.
GWarning!
If you do not receive visual or acoustic
warning signals, the PRE-SAFE ®
Brake may
R not have recognized the collision risk
R have been deactivated
R be malfunctioning
Apply the brakes yourself to avoid a collision.
XTo activate/deactivate: activate or
deactivate PRE-SAFE ®
Brake in the on-
board computer ( Y page 340).
After activation, the Ä symbol is
displayed on the left in the instrument
cluster.
For PRE-SAFE ®
Brake to assist you when
driving, the radar sensor system must be
switched on and operational.
PRE-SAFE ®
Brake does not always detect
complex traffic situations properly. You can
terminate the braking action of PRE-SAFE ®
Brake in a non-critical driving situation at any
time if:
R an acoustic and visual warning occurs
R the vehicle brakes gently
To end this, you can either depress the
accelerator pedal further, activate kickdown
or release the brake pedal.
The braking action of PRE-SAFE ®
Brake is
ended automatically if:
R you maneuver to avoid the obstacle
R you drive slower than approximately 9 mph
(15 km/h)
R there is no longer an obstacle detected in
front of your vehicle
R there is no longer any danger of a collision
i While DISTRONIC PLUS is activated, PRE-
SAFE ®
Brake remains passive.
Following a collision or collision-related
damage to the front end of the vehicle, have
the configuration and operation of the radar
sensors checked. Choose a qualified
specialist workshop for this that has the
necessary specialist knowledge and tools for
the work required. Mercedes-Benz
recommends that you use an authorized
Mercedes-Benz Center for this purpose.
Driving safety systems67SafetyZ
Page 94 of 480
Vehicle equipment
i This manual describes all the standard
and optional equipment of your vehicle
which was available at the time of
purchase. Country-specific differences are
possible. Bear in mind that your vehicle
may not feature all functions described
here. This also refers to safety-related
systems and functions.
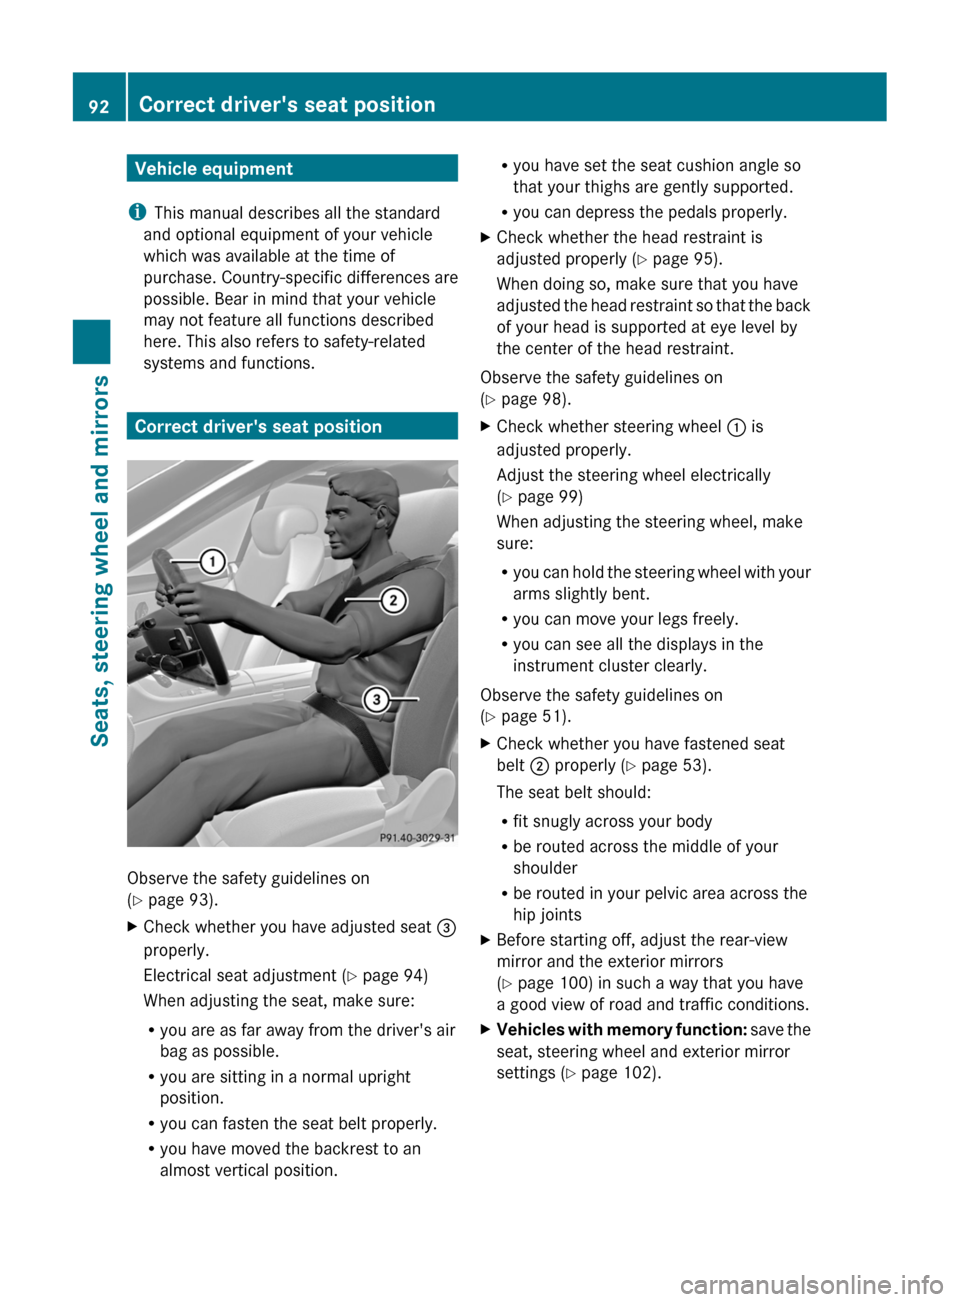
Correct driver's seat position
Observe the safety guidelines on
( Y page 93).
XCheck whether you have adjusted seat =
properly.
Electrical seat adjustment ( Y page 94)
When adjusting the seat, make sure:
R you are as far away from the driver's air
bag as possible.
R you are sitting in a normal upright
position.
R you can fasten the seat belt properly.
R you have moved the backrest to an
almost vertical position.R you have set the seat cushion angle so
that your thighs are gently supported.
R you can depress the pedals properly.XCheck whether the head restraint is
adjusted properly ( Y page 95).
When doing so, make sure that you have
adjusted the head restraint so that the back
of your head is supported at eye level by
the center of the head restraint.
Observe the safety guidelines on
( Y page 98).
XCheck whether steering wheel : is
adjusted properly.
Adjust the steering wheel electrically
( Y page 99)
When adjusting the steering wheel, make
sure:
R you can hold the steering wheel with your
arms slightly bent.
R you can move your legs freely.
R you can see all the displays in the
instrument cluster clearly.
Observe the safety guidelines on
( Y page 51).
XCheck whether you have fastened seat
belt ; properly ( Y page 53).
The seat belt should:
R fit snugly across your body
R be routed across the middle of your
shoulder
R be routed in your pelvic area across the
hip jointsXBefore starting off, adjust the rear-view
mirror and the exterior mirrors
( Y page 100) in such a way that you have
a good view of road and traffic conditions.XVehicles with memory function: save the
seat, steering wheel and exterior mirror
settings ( Y page 102).92Correct driver's seat positionSeats, steering wheel and mirrors
Page 116 of 480

removed, the settings on the front-passenger
side are saved for approximately 30 minutes
longer. After this period, reactivation on the
front-passenger side means that the settings
from the driver's side will be used.
Swiveling the COMAND display and
setting the brightness
! Do not place any objects in front of or
behind the COMAND display and/or do not
secure any objects to the COMAND
display. Movement could otherwise be
prevented when folding the display in/out.
You can swivel the COMAND display5. The
buttons are located beside the COMAND
display.
Swiveling
:To swivel the display to the left;To swivel the display to the rightSetting the brightness:Brightness of the instrument cluster
lighting
;Brightness of the COMAND display
Brighter or dimmer:
XTurn control : or ; clockwise or counter-
clockwise.
iIf Night View Assist Plus is activated, only
the brightness of the multifunction display
is adjusted with control :.
Display design
When the default settings are selected, the
display automatically switches between day
design and night design.
You can change these settings using
COMAND (Y page 128).
Cleaning instructions
! Do not touch the COMAND display. The
display has a very sensitive high-gloss
surface; there is a risk of scratching. If you
have to clean the screen, however, use a
mild cleaning agent and a soft, lint-free
cloth.
When cleaning, the display must be switched
off and cooled down. Clean the display
screen, when necessary, with a commercially
available microfiber cloth and cleaning agent
for TFT/LCD displays. Then, dry the surface
with a dry microfiber cloth.
5Not with SPLITVIEW.114At a glanceCOMAND
Page 169 of 480
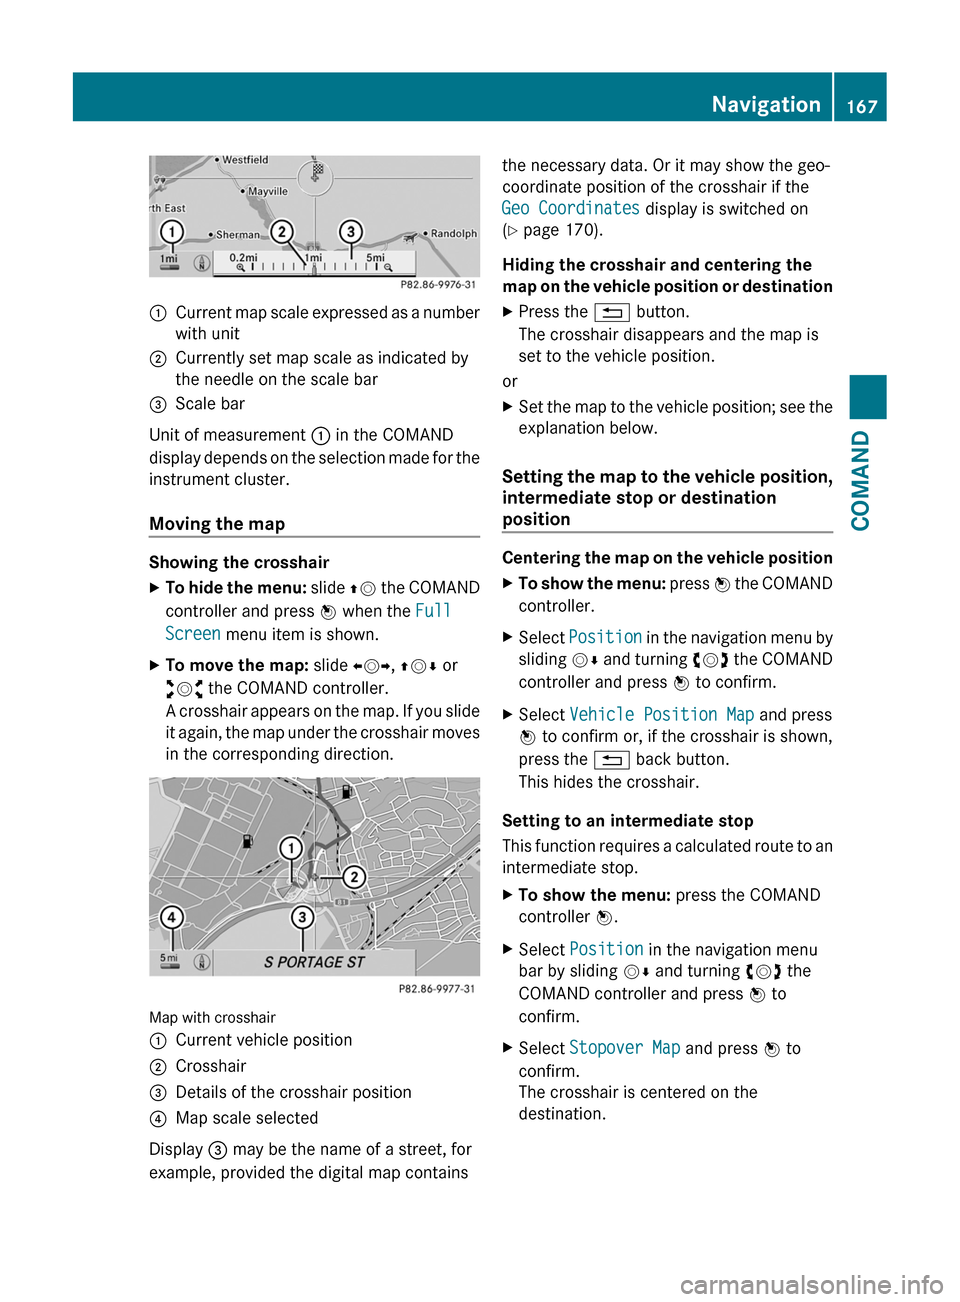
:Current map scale expressed as a number
with unit
;Currently set map scale as indicated by
the needle on the scale bar
=Scale bar
Unit of measurement : in the COMAND
display depends on the selection made for the
instrument cluster.
Moving the map
Showing the crosshair
XTo hide the menu: slide ZV the COMAND
controller and press W when the Full
Screen menu item is shown.
XTo move the map: slide XVY, ZVÆ or
aVb the COMAND controller.
A crosshair appears on the map. If you slide
it again, the map under the crosshair moves
in the corresponding direction.
Map with crosshair
:Current vehicle position;Crosshair=Details of the crosshair position?Map scale selected
Display = may be the name of a street, for
example, provided the digital map contains
the necessary data. Or it may show the geo-
coordinate position of the crosshair if the
Geo Coordinates display is switched on
(Y page 170).
Hiding the crosshair and centering the
map on the vehicle position or destination
XPress the % button.
The crosshair disappears and the map is
set to the vehicle position.
or
XSet the map to the vehicle position; see the
explanation below.
Setting the map to the vehicle position,
intermediate stop or destination
position
Centering the map on the vehicle position
XTo show the menu: press W the COMAND
controller.
XSelect Position in the navigation menu by
sliding VÆ and turning cVd the COMAND
controller and press W to confirm.
XSelect Vehicle Position Map and press
W to confirm or, if the crosshair is shown,
press the % back button.
This hides the crosshair.
Setting to an intermediate stop
This function requires a calculated route to an
intermediate stop.
XTo show the menu: press the COMAND
controller W.
XSelect Position in the navigation menu
bar by sliding VÆ and turning cVd the
COMAND controller and press W to
confirm.
XSelect Stopover Map and press W to
confirm.
The crosshair is centered on the
destination.
Navigation167COMANDZ
Page 249 of 480
XPress the combination switch beyond the
pressure point in the direction of
arrow :.
The K indicator lamp in the instrument
cluster lights up.
XTo switch off the high-beam
headlamps: move the combination switch
back to its normal position.
The K indicator lamp in the instrument
cluster goes out.
Adaptive Highbeam Assist
GWarning!
The Adaptive Highbeam Assist is only an aid
intended to support you while driving. The
driver is and remains responsible for proper
vehicle lighting in accordance with the
prevailing light, sight and traffic conditions.
The system may be impaired or unavailable
when
Rvisibility is poor, e.g. due to snow, rain, fog,
or heavy spray
Rthe optical sensor area of the windshield is
dirty, fogged up, or covered by a sticker for
example
The system cannot recognize the following
road users:
RRoad users without a lighting system of
their own, e.g. pedestrians
RRoad users with dim lighting of their own,
e.g. cyclists
RRoad users whose lighting is obstructed,
e.g. road users behind a guardrail
RIn some seldom cases, even road users with
a lighting system of their own may be
recognized too late or not at all.
The automatic high-beam headlamps will then
not be deactivated or it will be activated in
spite of preceding or oncoming road users.
This could endanger you and/or others and
cause an accident. Always pay close attention
to the traffic situation and switch off the high
beam manually if necessary.
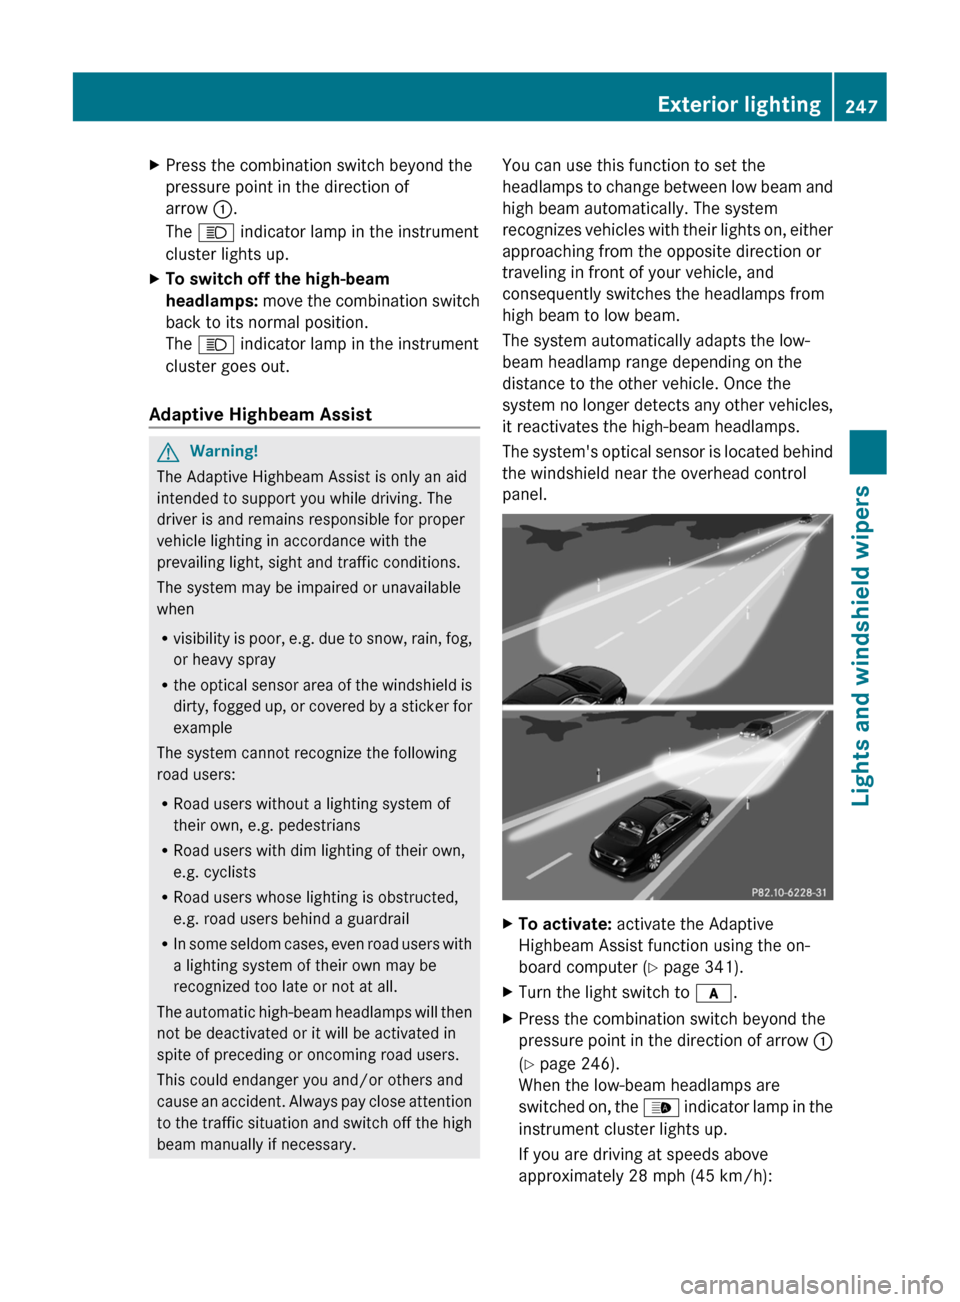
You can use this function to set the
headlamps to change between low beam and
high beam automatically. The system
recognizes vehicles with their lights on, either
approaching from the opposite direction or
traveling in front of your vehicle, and
consequently switches the headlamps from
high beam to low beam.
The system automatically adapts the low-
beam headlamp range depending on the
distance to the other vehicle. Once the
system no longer detects any other vehicles,
it reactivates the high-beam headlamps.
The system's optical sensor is located behind
the windshield near the overhead control
panel.
XTo activate: activate the Adaptive
Highbeam Assist function using the on-
board computer (Y page 341).
XTurn the light switch to c.XPress the combination switch beyond the
pressure point in the direction of arrow :
(Y page 246).
When the low-beam headlamps are
switched on, the _ indicator lamp in the
instrument cluster lights up.
If you are driving at speeds above
approximately 28 mph (45 km/h):
Exterior lighting247Lights and windshield wipersZ
Page 250 of 480
the headlamp range is set automatically
depending on the distance between the
vehicle and other road users.
If you are driving at speeds above
approximately 35 mph (55 km/h) and no
other road users are detected:
the high-beam headlamps are switched on
automatically. The K indicator lamp in
the instrument cluster also lights up.
If you are driving at speeds below
approximately 30 mph (45 km/h) or other
road users are detected or the roads are
illuminated sufficiently:
the high-beam headlamps are switched off
automatically. The K indicator lamp in
the instrument cluster goes out. The _
indicator lamp in the instrument cluster
stays on.
XTo deactivate: move the combination
switch back to its normal position.
The _ indicator lamp in the instrument
cluster goes out.
High-beam flasher
XTo switch on: turn the key in the ignition
lock to position 1 or 2 or start the engine.
XPull the combination switch briefly in the
direction of arrow =.
Hazard warning lamps
The hazard warning lamps automatically
switch on if:
Ran air bag is deployed.
Rthe vehicle decelerates rapidly from a
speed of more than 45 mph (70 km/h) and
comes to a standstill.
XTo switch on the hazard warning lamps:
press button :.
All turn signals flash. If you now switch on
a turn signal using the combination switch,
only the turn signal lamp on the
corresponding side of the vehicle will flash.
XTo switch off the hazard warning
lamps: press button :.
The hazard warning lamp switches off
automatically after full brake application if the
vehicle then reaches a speed of above 6 mph
(10 km/h).
iThe hazard warning lamps still operate if
the ignition is switched off.
Headlamp cleaning system
The headlamps are cleaned automatically if
the "Wipe with washer fluid" function is
operated ten times while the lights are on and
the engine is running (Y page 251). When you
switch off the ignition, the automatic
headlamp cleaning system is reset and
counting is resumed from 0.
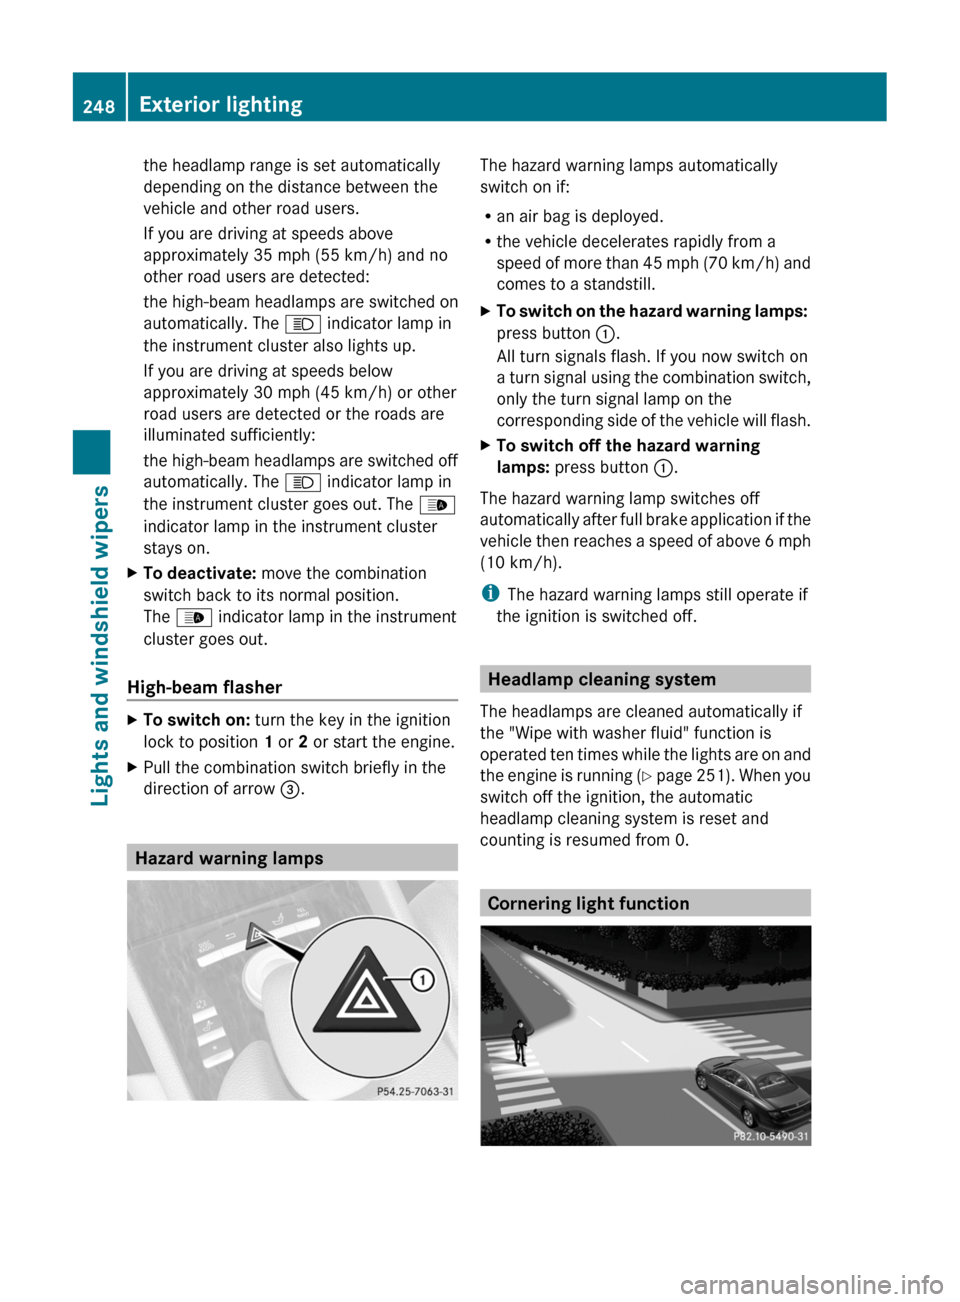
Cornering light function
248Exterior lightingLights and windshield wipers