navigation system MERCEDES-BENZ CL-Class 2011 C216 Owner's Guide
[x] Cancel search | Manufacturer: MERCEDES-BENZ, Model Year: 2011, Model line: CL-Class, Model: MERCEDES-BENZ CL-Class 2011 C216Pages: 480, PDF Size: 19.76 MB
Page 147 of 480
iFurther information on "Last
destinations" memory can be found on
(Y page 165).
Entering a destination using the map
Calling up the map
XTo switch on navigation mode: press the
S function button once or twice.
XTo show the menu: press the COMAND
controller W.
XSelect Destination in the navigation
system menu bar by turning cVd the
COMAND controller and press W to
confirm.
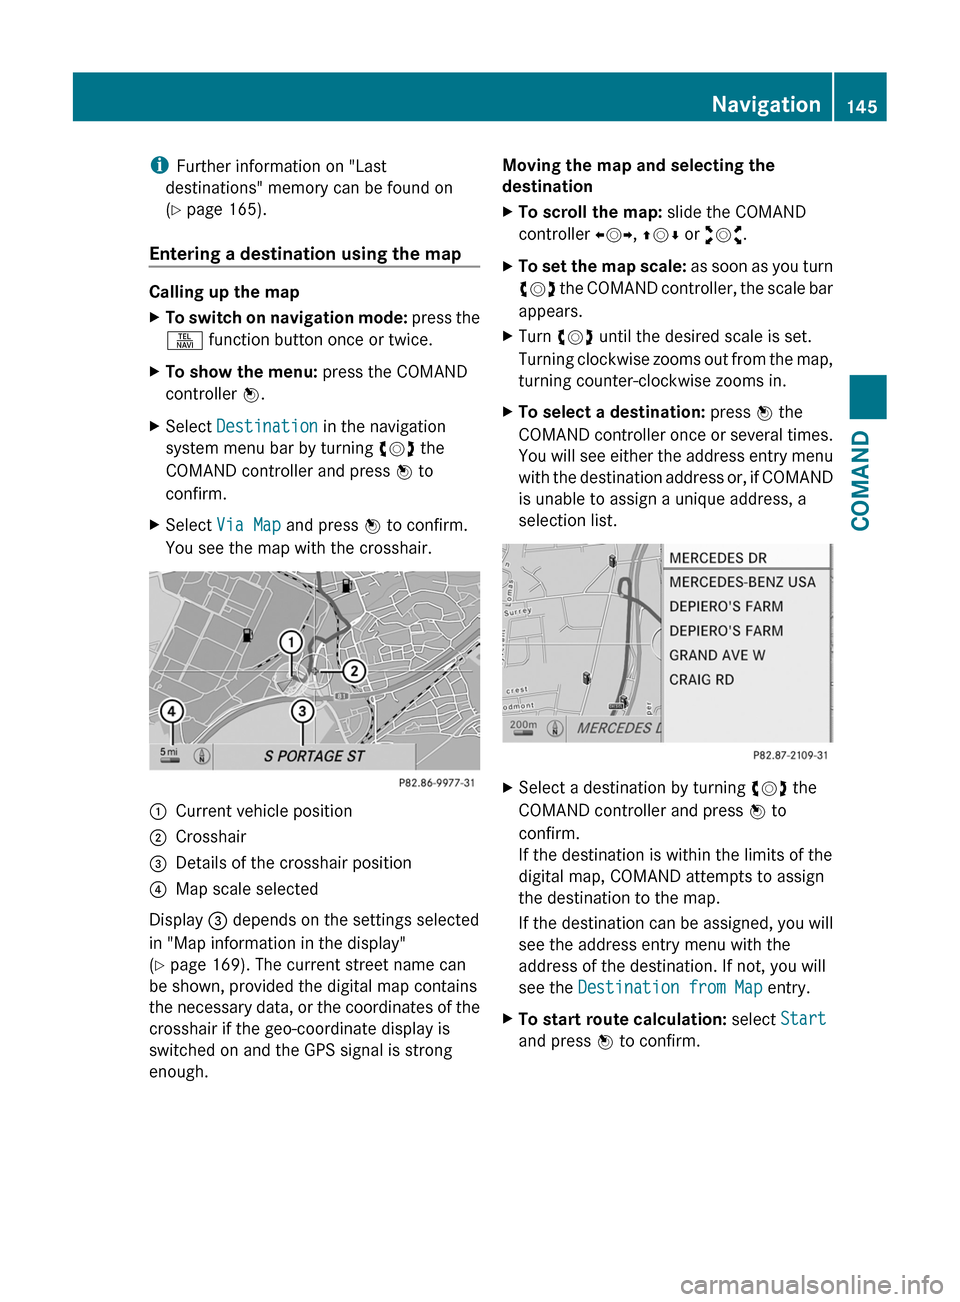
XSelect Via Map and press W to confirm.
You see the map with the crosshair.
:Current vehicle position;Crosshair=Details of the crosshair position?Map scale selected
Display = depends on the settings selected
in "Map information in the display"
(Y page 169). The current street name can
be shown, provided the digital map contains
the necessary data, or the coordinates of the
crosshair if the geo-coordinate display is
switched on and the GPS signal is strong
enough.
Moving the map and selecting the
destination
XTo scroll the map: slide the COMAND
controller XVY, ZVÆ or aVb.
XTo set the map scale: as soon as you turn
cVd the COMAND controller, the scale bar
appears.
XTurn cVd until the desired scale is set.
Turning clockwise zooms out from the map,
turning counter-clockwise zooms in.
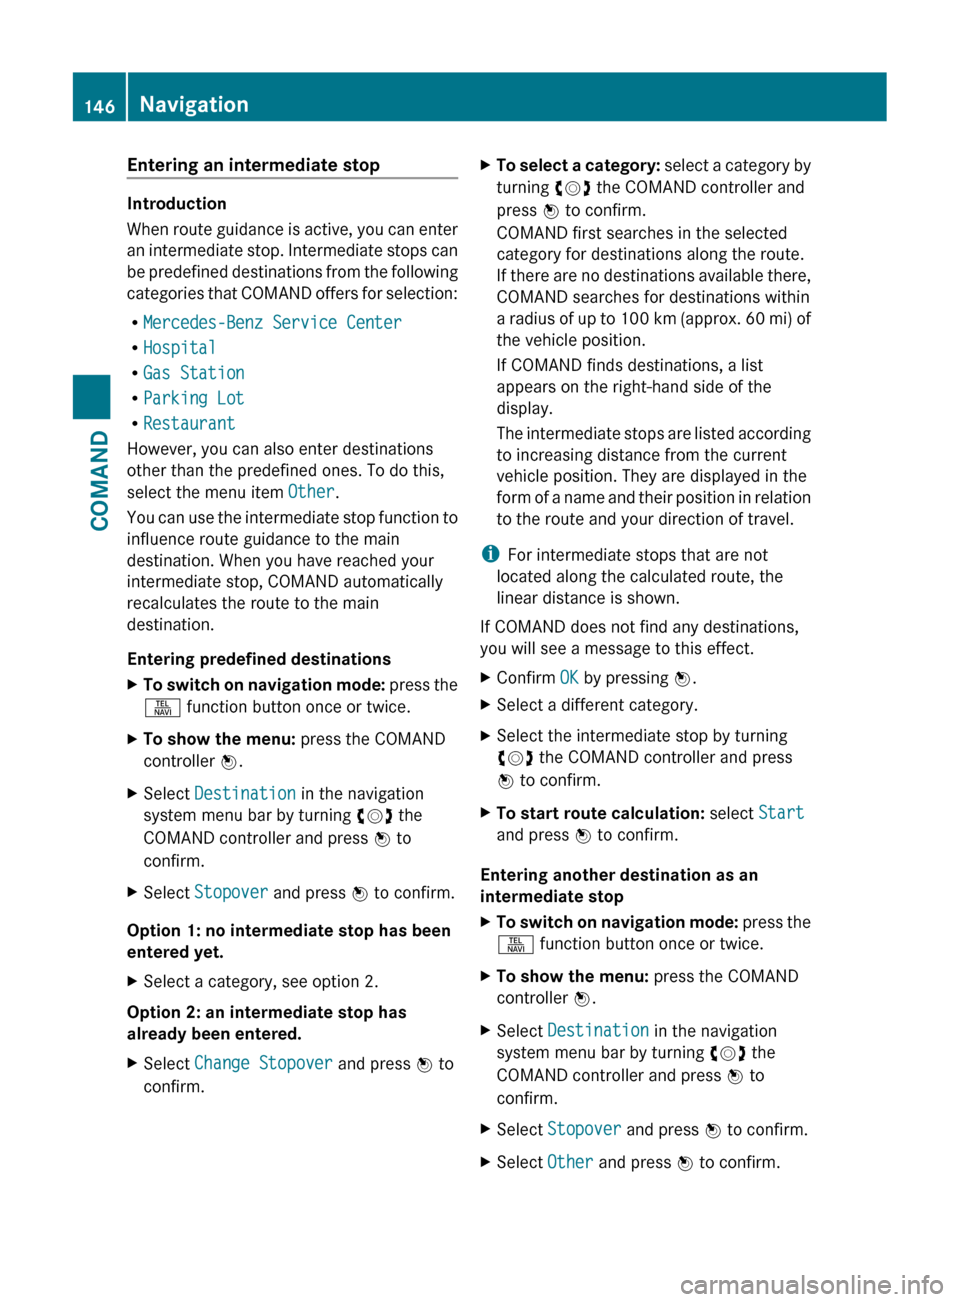
XTo select a destination: press W the
COMAND controller once or several times.
You will see either the address entry menu
with the destination address or, if COMAND
is unable to assign a unique address, a
selection list.
XSelect a destination by turning cVd the
COMAND controller and press W to
confirm.
If the destination is within the limits of the
digital map, COMAND attempts to assign
the destination to the map.
If the destination can be assigned, you will
see the address entry menu with the
address of the destination. If not, you will
see the Destination from Map entry.
XTo start route calculation: select Start
and press W to confirm.
Navigation145COMANDZ
Page 148 of 480
Entering an intermediate stop
Introduction
When route guidance is active, you can enter
an intermediate stop. Intermediate stops can
be predefined destinations from the following
categories that COMAND offers for selection:
R Mercedes-Benz Service Center
R Hospital
R Gas Station
R Parking Lot
R Restaurant
However, you can also enter destinations
other than the predefined ones. To do this,
select the menu item Other.
You can use the intermediate stop function to
influence route guidance to the main
destination. When you have reached your
intermediate stop, COMAND automatically
recalculates the route to the main
destination.
Entering predefined destinations
XTo switch on navigation mode: press the
S function button once or twice.XTo show the menu: press the COMAND
controller W.XSelect Destination in the navigation
system menu bar by turning cVd the
COMAND controller and press W to
confirm.XSelect Stopover and press W to confirm.
Option 1: no intermediate stop has been
entered yet.
XSelect a category, see option 2.
Option 2: an intermediate stop has
already been entered.
XSelect Change Stopover and press W to
confirm.XTo select a category: select a category by
turning cVd the COMAND controller and
press W to confirm.
COMAND first searches in the selected
category for destinations along the route.
If there are no destinations available there,
COMAND searches for destinations within
a radius of up to 100 km (approx. 60 mi) of
the vehicle position.
If COMAND finds destinations, a list
appears on the right-hand side of the
display.
The intermediate stops are listed according
to increasing distance from the current
vehicle position. They are displayed in the
form of a name and their position in relation
to the route and your direction of travel.
i For intermediate stops that are not
located along the calculated route, the
linear distance is shown.
If COMAND does not find any destinations,
you will see a message to this effect.
XConfirm OK by pressing W.XSelect a different category.XSelect the intermediate stop by turning
cVd the COMAND controller and press
W to confirm.XTo start route calculation: select Start
and press W to confirm.
Entering another destination as an
intermediate stop
XTo switch on navigation mode: press the
S function button once or twice.XTo show the menu: press the COMAND
controller W.XSelect Destination in the navigation
system menu bar by turning cVd the
COMAND controller and press W to
confirm.XSelect Stopover and press W to confirm.XSelect Other and press W to confirm.146NavigationCOMAND
Page 149 of 480
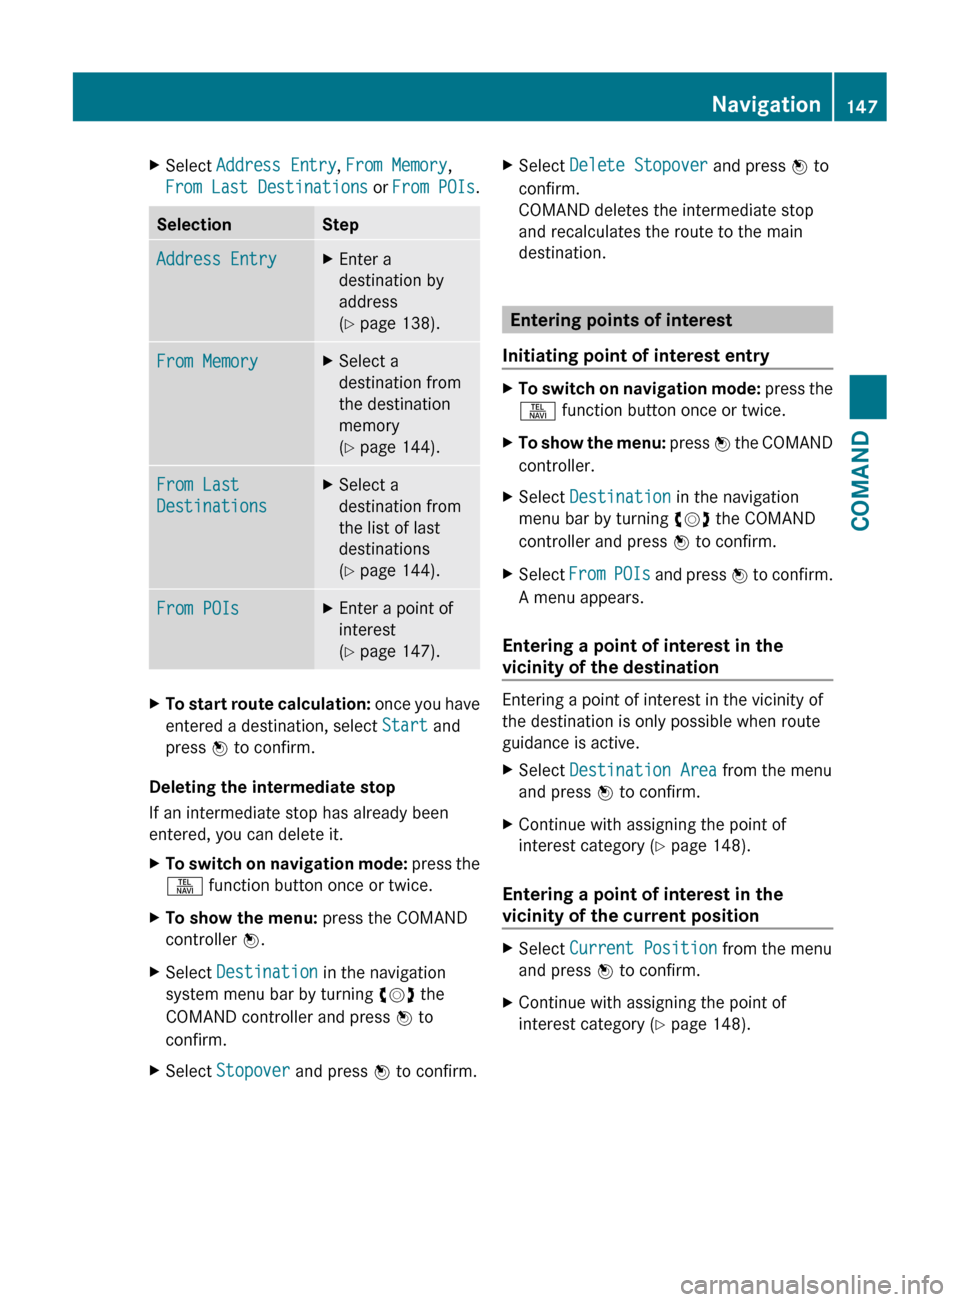
XSelect Address Entry , From Memory ,
From Last Destinations or From POIs .SelectionStepAddress EntryXEnter a
destination by
address
( Y page 138).From MemoryXSelect a
destination from
the destination
memory
( Y page 144).From Last
DestinationsXSelect a
destination from
the list of last
destinations
( Y page 144).From POIsXEnter a point of
interest
( Y page 147).XTo start route calculation: once you have
entered a destination, select Start and
press W to confirm.
Deleting the intermediate stop
If an intermediate stop has already been
entered, you can delete it.
XTo switch on navigation mode: press the
S function button once or twice.XTo show the menu: press the COMAND
controller W.XSelect Destination in the navigation
system menu bar by turning cVd the
COMAND controller and press W to
confirm.XSelect Stopover and press W to confirm.XSelect Delete Stopover and press W to
confirm.
COMAND deletes the intermediate stop
and recalculates the route to the main
destination.
Entering points of interest
Initiating point of interest entry
XTo switch on navigation mode: press the
S function button once or twice.XTo show the menu: press W the COMAND
controller.XSelect Destination in the navigation
menu bar by turning cVd the COMAND
controller and press W to confirm.XSelect From POIs and press W to confirm.
A menu appears.
Entering a point of interest in the
vicinity of the destination
Entering a point of interest in the vicinity of
the destination is only possible when route
guidance is active.
XSelect Destination Area from the menu
and press W to confirm.XContinue with assigning the point of
interest category ( Y page 148).
Entering a point of interest in the
vicinity of the current position
XSelect Current Position from the menu
and press W to confirm.XContinue with assigning the point of
interest category ( Y page 148).Navigation147COMANDZ
Page 153 of 480
Selecting points of interest using the
map
You can select points of interest that are
available in the selected (visible) map section.
XTo switch on navigation mode: press the
S function button once or twice.XTo show the menu: press W the COMAND
controller.XSelect Destination in the navigation
menu bar by turning cVd the COMAND
controller and press W to confirm.XSelect Via Map by turning cVd the
COMAND controller and press W to
confirm.
If points of interest are available:
Depending on the map scale selected,
point of interest icons appear on the map.
The scale at which the icons are displayed
on the map varies according to the icon.
You can select the icons that COMAND will
display ( Y page 168).
If there are points of interest, you will see
a message to this effect.
i You also see this message if you have
selected the menu item No Symbols under
"Map display" ( Y page 168).
Route guidance
General information
GWarning
COMAND calculates the route to the
destination without taking into account the
following, for example:
R Traffic lights
R Stop and right-of-way signs
R Lane merging
R Parking or stopping prohibited areas
R Other road and traffic rules and regulations
R Narrow bridges
COMAND may give incorrect navigation
commands if the data in the digital map does
not correspond with the actual road/ traffic
situation. For example, if the traffic routing
has been changed or the direction of a one-
way road has been reversed.
For this reason, you must always observe
applicable road and traffic rules and
regulations during your journey. Road and
traffic rules and regulations always have
priority over the navigation commands
generated by the system.
Route guidance begins once a route has been
calculated ( Y page 141).
COMAND guides you to your destination by
means of navigation commands in the form
of audible navigation announcements and
route guidance displays.
The route guidance displays can only be seen
if the display is switched to navigation mode.
If you do not follow the navigation
announcements or if you leave the calculated
route, COMAND automatically calculates a
new route to the destination.
If the digital map contains the corresponding
information, the following applies:
R when selecting a route, COMAND tries to
avoid roads that only have limited access,
e.g. roads closed to through traffic and non-
residents.
R roads that have time restrictions (e.g.
closed on Sundays and public holidays) are
avoided for route guidance.
Changing direction
Introduction
Changes of direction have three phases:
R Preparation phase
R Announcement phase
R Change-of-direction phase
Navigation151COMANDZ
Page 160 of 480
XTo show the menu: press the COMAND
controller W.
XSelect Position in the navigation menu
bar by turning cVd the COMAND
controller and press W to confirm.
XSelect Where am I? and press W to
confirm.
Off-road and off-map
Important safety notes
GWarning
The COMAND navigation system may direct
you to off-road routes that your vehicle may
not be capable of traversing through without
damaging your tires, wheels or vehicle. It is
the driver’s sole responsibility to determine
the suitability of the route. Off-road routes
may be of varying conditions and their
appropriateness for use may be affected by
various factors such as time of day, time of
year and immediate weather conditions that
cannot be judged or taken into consideration
by the COMAND system.
Route guidance to a destination that is on
a non-digitized road
COMAND can guide you to destinations
which are within the area covered by the
digital map, but which are not themselves
recorded on the map.
These destinations are known as off-road
destinations, which you can enter using the
map, for example. In these cases, COMAND
guides you for as long as possible with
navigation announcements and displays on
roads known to the system.
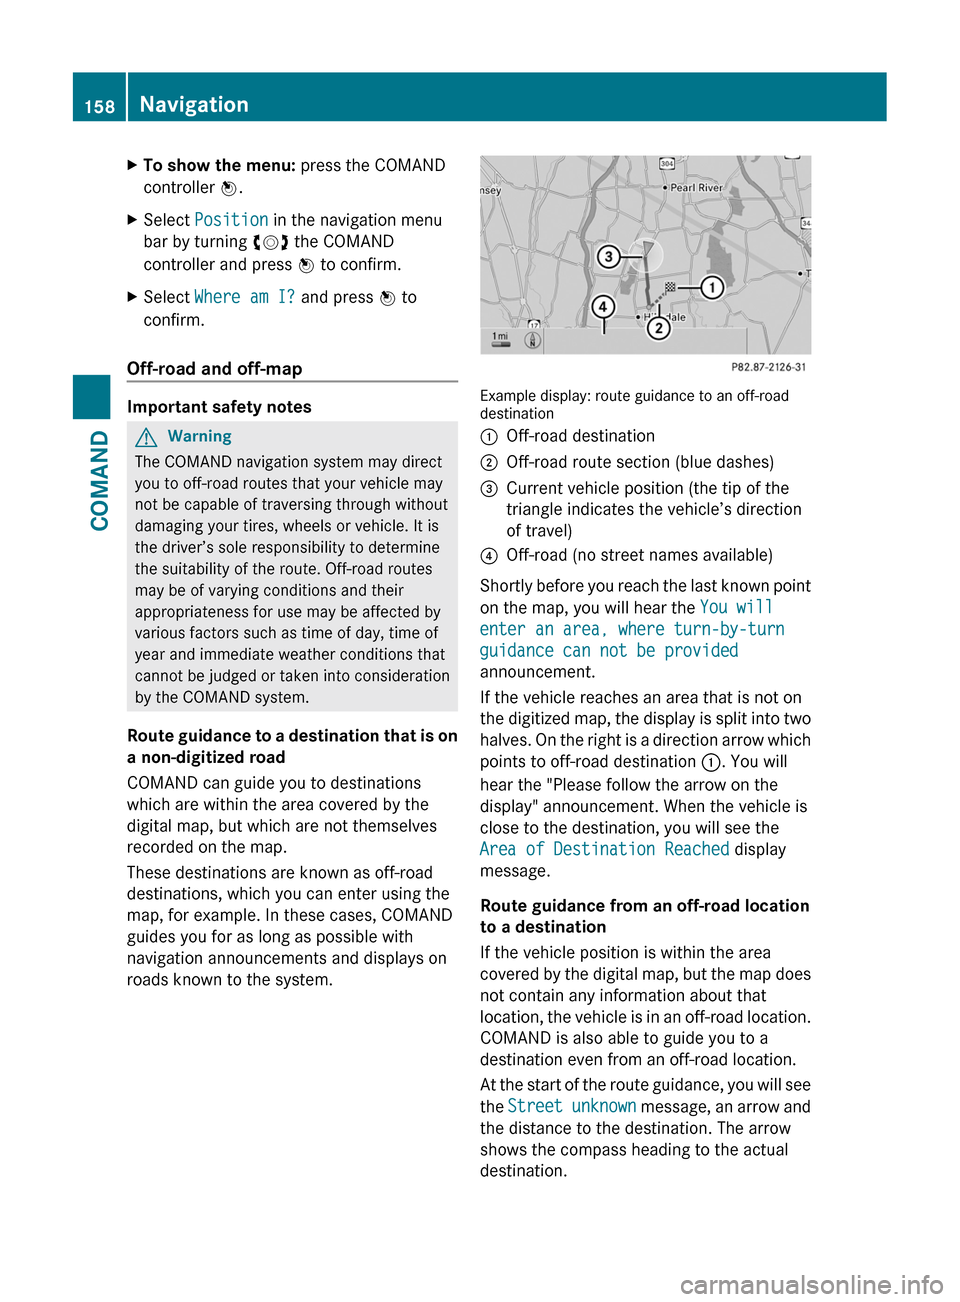
Example display: route guidance to an off-roaddestination
:Off-road destination;Off-road route section (blue dashes)=Current vehicle position (the tip of the
triangle indicates the vehicle’s direction
of travel)
?Off-road (no street names available)
Shortly before you reach the last known point
on the map, you will hear the You will
enter an area, where turn-by-turn
guidance can not be provided
announcement.
If the vehicle reaches an area that is not on
the digitized map, the display is split into two
halves. On the right is a direction arrow which
points to off-road destination :. You will
hear the "Please follow the arrow on the
display" announcement. When the vehicle is
close to the destination, you will see the
Area of Destination Reached display
message.
Route guidance from an off-road location
to a destination
If the vehicle position is within the area
covered by the digital map, but the map does
not contain any information about that
location, the vehicle is in an off-road location.
COMAND is also able to guide you to a
destination even from an off-road location.
At the start of the route guidance, you will see
the Street unknown message, an arrow and
the distance to the destination. The arrow
shows the compass heading to the actual
destination.
158NavigationCOMAND
Page 161 of 480
The continuous blue route on the map starts
from the nearest road known to the system.
As soon as the vehicle is back on a road
known to the system, route guidance
continues in the usual way.
Route guidance from an off-map location
to a destination
If the vehicle position is outside the area
covered by the digital map, then the vehicle
is in an off-map location. COMAND is also
able to guide you to a destination even from
an off-map location.
At the start of the route guidance, you will see
the Street unknown message, an arrow and
the distance to the destination. The arrow
shows the compass heading to the road left
last.
The route is highlighted in blue from the
nearest road known to the system.
As soon as the vehicle is back on a road
known to the system, route guidance
continues in the usual way.
Off-road during route guidance
Due to road construction work, for example,
there may be differences between the data
on the digital map and the actual course of
the road.
In such cases, the system will temporarily be
unable to locate the vehicle position on the
digital map and thus considers the vehicle to
be in an off-road position.
In the display, you will see the Street
unknown message, an arrow and the distance
to the destination. The arrow shows the
compass heading to the actual destination.
As soon as the system can assign the vehicle
position to the map again, route guidance
continues in the usual way.Traffic reports
Conditions
i The SatRadio reception described below
requires optionally available SatRadio
equipment as well as a subscription to
SIRIUS XM SatRadio Traffic Message
Service. Further details on SatRadio are
available in the "SatRadio" chapter
( Y page 200).
COMAND can receive traffic reports via
SatRadio and incorporate them in the
navigation system. Traffic reports and map
icons can then be shown in the COMAND
display.
Real-time traffic reports on the map
COMAND can show certain traffic incidents
on the map. The incidents are shown on the
map at a scale from 1/16 mi to 20 mi.
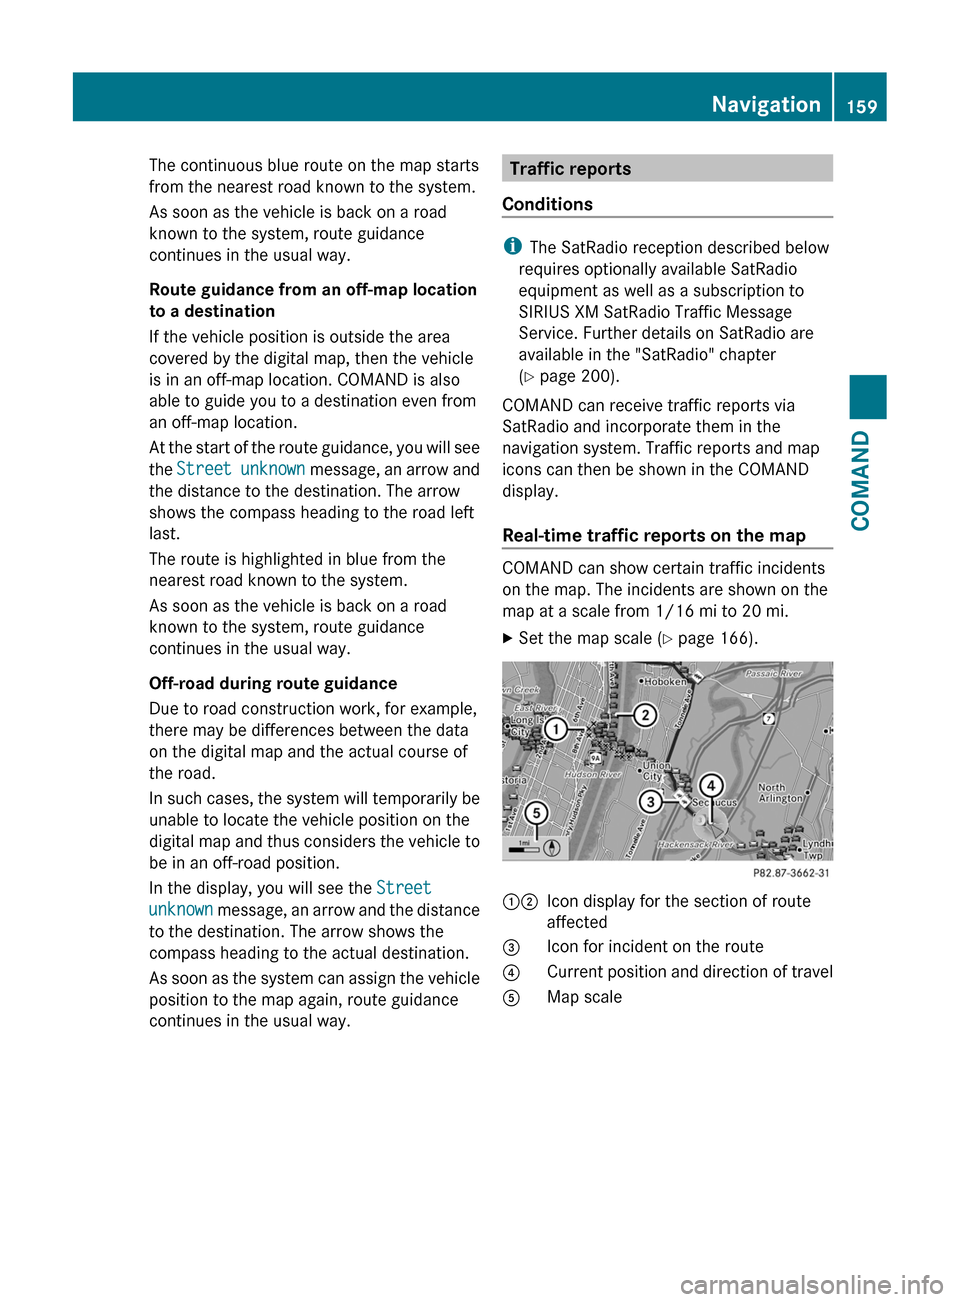
XSet the map scale ( Y page 166).12Icon display for the section of route
affected3Icon for incident on the route4Current position and direction of travel5Map scaleNavigation159COMANDZ
Page 163 of 480
Displaying real-time traffic reportsXIf necessary, switch to navigation mode
and show the menu (Y page 137).
XSelect Traffic in the navigation system
menu bar by turning cVd the COMAND
controller and press W to confirm.
If you see the No traffic messages.
message:
This means that:
Rno traffic reports have been received yet.
Rno traffic reports are available.
XTo cancel the search: select Cancel.XTo close the message window: select
OK.
If there are any traffic reports, a list is shown.
The content of the list varies depending on
whether route guidance is active or not.
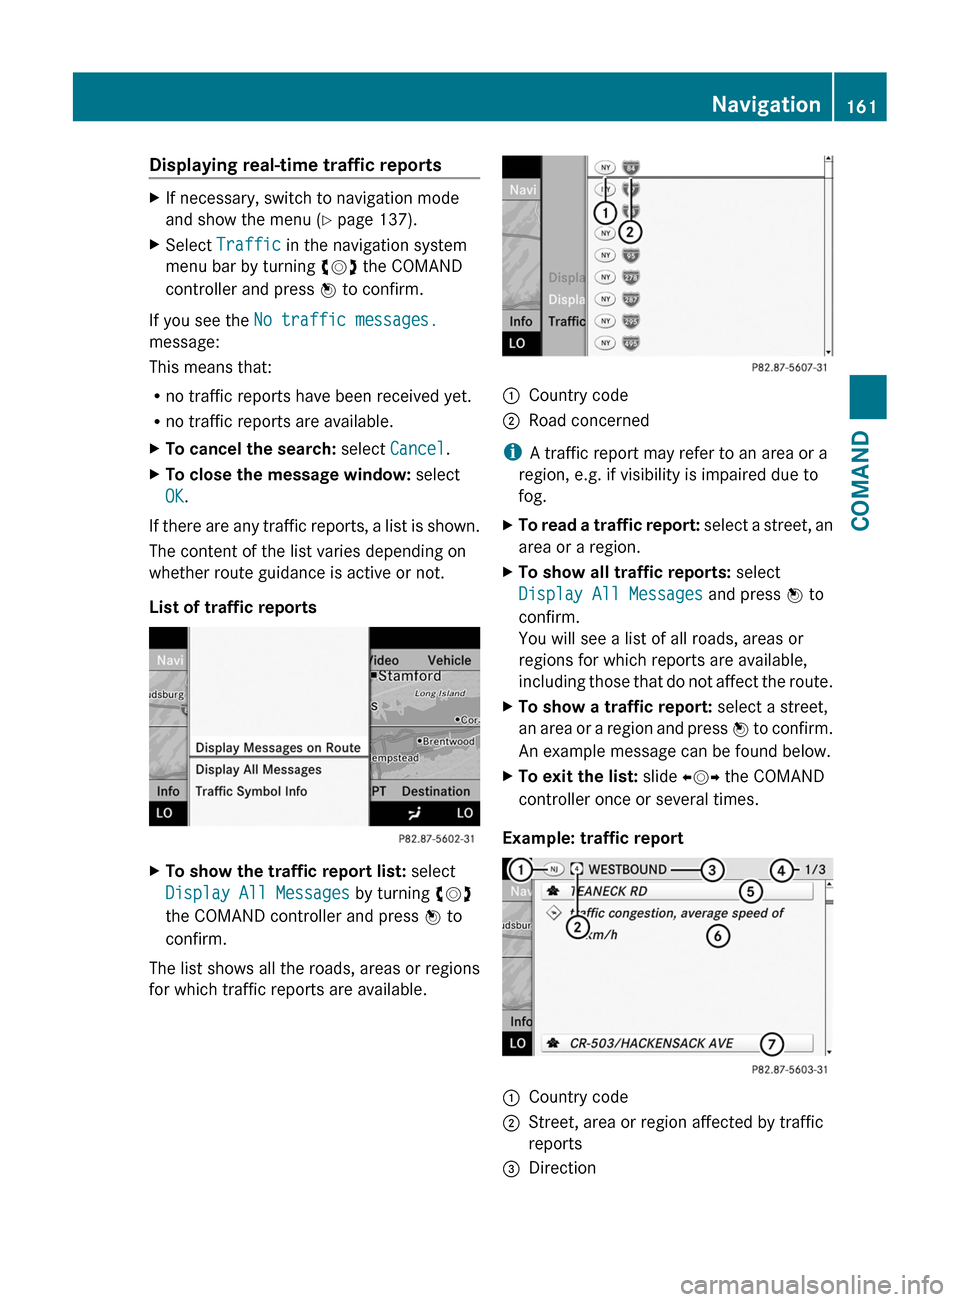
List of traffic reports
XTo show the traffic report list: select
Display All Messages by turning cVd
the COMAND controller and press W to
confirm.
The list shows all the roads, areas or regions
for which traffic reports are available.
1Country code2Road concerned
iA traffic report may refer to an area or a
region, e.g. if visibility is impaired due to
fog.
XTo read a traffic report: select a street, an
area or a region.
XTo show all traffic reports: select
Display All Messages and press W to
confirm.
You will see a list of all roads, areas or
regions for which reports are available,
including those that do not affect the route.
XTo show a traffic report: select a street,
an area or a region and press W to confirm.
An example message can be found below.
XTo exit the list: slide XVY the COMAND
controller once or several times.
Example: traffic report
1Country code2Street, area or region affected by traffic
reports
3DirectionNavigation161COMANDZ
Page 164 of 480
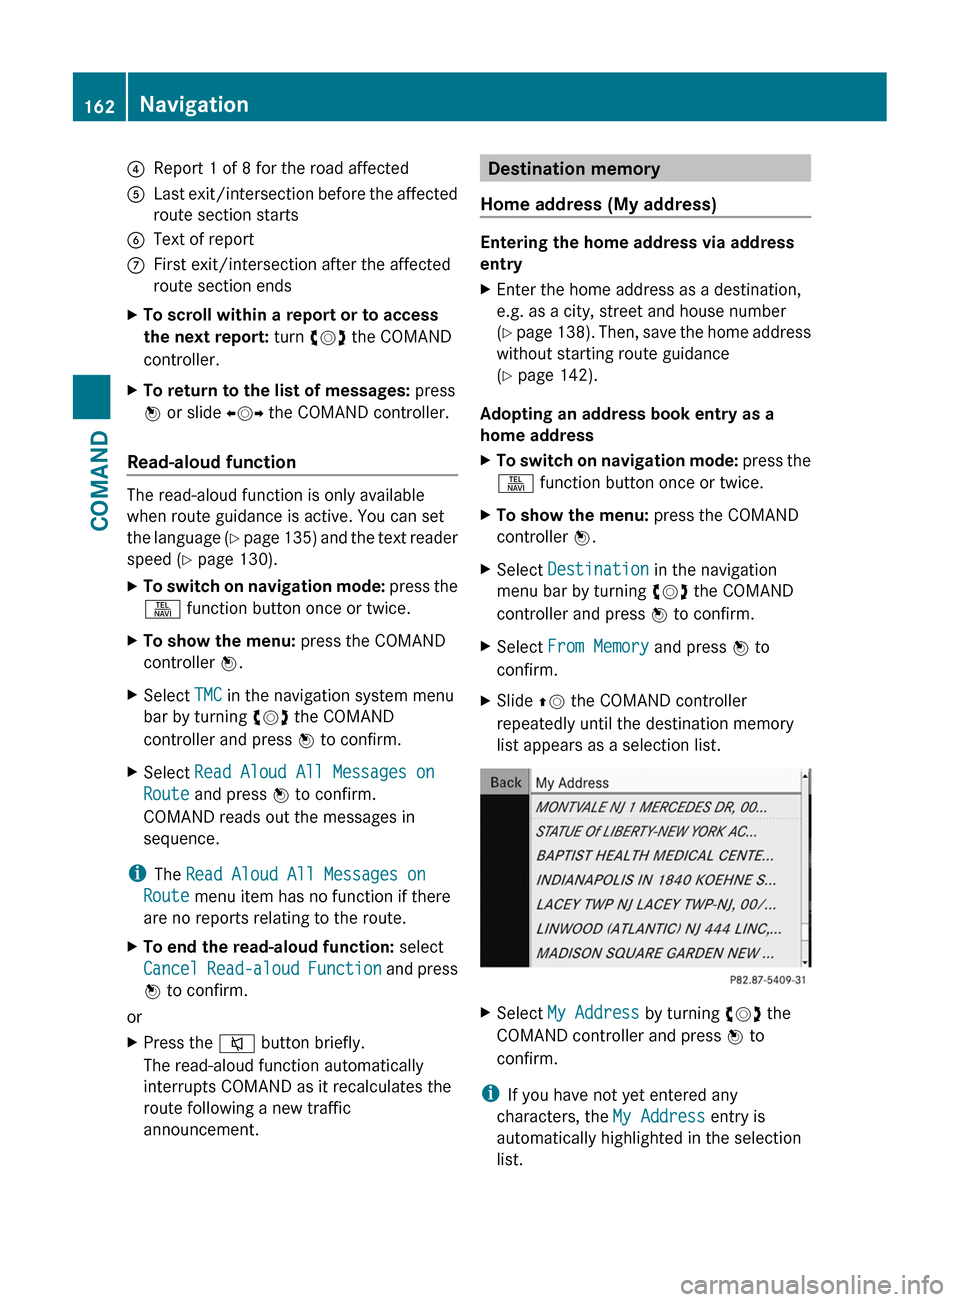
4Report 1 of 8 for the road affected5Last exit/intersection before the affected
route section starts
6Text of reportCFirst exit/intersection after the affected
route section ends
XTo scroll within a report or to access
the next report: turn cVd the COMAND
controller.
XTo return to the list of messages: press
W or slide XVY the COMAND controller.
Read-aloud function
The read-aloud function is only available
when route guidance is active. You can set
the language (Y page 135) and the text reader
speed (Y page 130).
XTo switch on navigation mode: press the
S function button once or twice.
XTo show the menu: press the COMAND
controller W.
XSelect TMC in the navigation system menu
bar by turning cVd the COMAND
controller and press W to confirm.
XSelect Read Aloud All Messages on
Route and press W to confirm.
COMAND reads out the messages in
sequence.
iThe Read Aloud All Messages on
Route menu item has no function if there
are no reports relating to the route.
XTo end the read-aloud function: select
Cancel Read-aloud Function and press
W to confirm.
or
XPress the 8 button briefly.
The read-aloud function automatically
interrupts COMAND as it recalculates the
route following a new traffic
announcement.
Destination memory
Home address (My address)
Entering the home address via address
entry
XEnter the home address as a destination,
e.g. as a city, street and house number
(Y page 138). Then, save the home address
without starting route guidance
(Y page 142).
Adopting an address book entry as a
home address
XTo switch on navigation mode: press the
S function button once or twice.
XTo show the menu: press the COMAND
controller W.
XSelect Destination in the navigation
menu bar by turning cVd the COMAND
controller and press W to confirm.
XSelect From Memory and press W to
confirm.
XSlide ZV the COMAND controller
repeatedly until the destination memory
list appears as a selection list.
XSelect My Address by turning cVd the
COMAND controller and press W to
confirm.
iIf you have not yet entered any
characters, the My Address entry is
automatically highlighted in the selection
list.
162NavigationCOMAND
Page 168 of 480
Storing the crosshair position in the list
of previous destinations
Route guidance not active
A crosshair appears on the map if you have
moved the map manually. You can store the
crosshair position as a destination in the list
of previous destinations.
XTo show the menu: press the COMAND
controller W.XSelect Position in the navigation menu
bar by turning cVd the COMAND
controller and press W to confirm.XSelect Save Crosshair Position and
press W to confirm.
Route guidance is active
XTo show the menu: press the COMAND
controller W.XSelect Position in the navigation menu
bar by turning cVd the COMAND
controller and press W to confirm.XSelect Destination Map and press W to
confirm.
You will see the map with a crosshair at the
destination.XTo show the menu: press the COMAND
controller W.XSelect Position in the navigation menu
bar by turning cVd the COMAND
controller and press W to confirm.XSelect Save Crosshair Position and
press W to confirm.
COMAND stores the crosshair position as
a destination in the list of previous
destinations.
Deleting one of the previous
destinations
XTo switch on navigation mode: press the
S function button once or twice.XTo show the menu: press the COMAND
controller W.XSelect Destination in the navigation
menu bar by turning cVd the COMAND
controller and press W to confirm.XSelect From Last Destinations and
press W to confirm.
The list of previous destinations appears.XSelect the desired destination and press
W to confirm.
The destination address appears.XSelect Delete and press W to confirm.
A prompt appears, asking whether the
entry should be deleted.XSelect Yes or No and press W to confirm.
If you select Yes, the entry is deleted.
If you select No, the process will be
canceled.
Map usage and settings
Note
Company logos displayed on the map are
trademarks of the respective companies and
used solely for the purpose of indicating the
location of these companies. The use of such
logos for the map does not indicate approval,
support or advertisement of the navigation
system by the respective companies.
Adjusting the map scale
XTo hide the menu: slide ZV the COMAND
controller and press W when the Full
Screen menu item is shown.XTo call up the scale bar: as soon as you
turn cVd the COMAND controller, scale
bar = appears.XTurn cVd until the desired scale is
selected.166NavigationCOMAND
Page 172 of 480
Road display
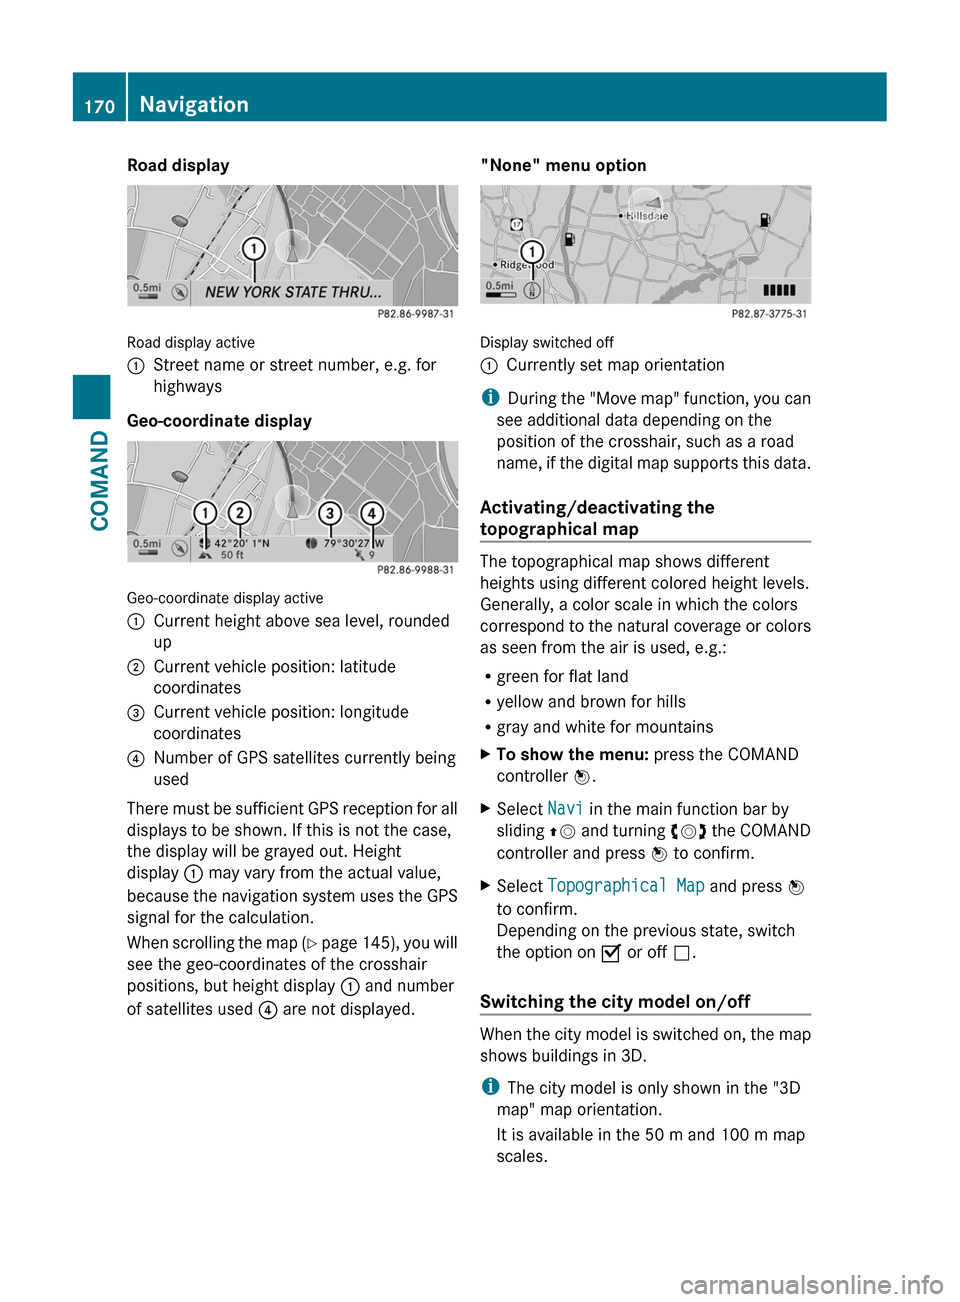
Road display active
:Street name or street number, e.g. for
highways
Geo-coordinate display
Geo-coordinate display active
:Current height above sea level, rounded
up
;Current vehicle position: latitude
coordinates
=Current vehicle position: longitude
coordinates
?Number of GPS satellites currently being
used
There must be sufficient GPS reception for all
displays to be shown. If this is not the case,
the display will be grayed out. Height
display : may vary from the actual value,
because the navigation system uses the GPS
signal for the calculation.
When scrolling the map (Y page 145), you will
see the geo-coordinates of the crosshair
positions, but height display : and number
of satellites used ? are not displayed.
"None" menu option
Display switched off
:Currently set map orientation
iDuring the "Move map" function, you can
see additional data depending on the
position of the crosshair, such as a road
name, if the digital map supports this data.
Activating/deactivating the
topographical map
The topographical map shows different
heights using different colored height levels.
Generally, a color scale in which the colors
correspond to the natural coverage or colors
as seen from the air is used, e.g.:
Rgreen for flat land
Ryellow and brown for hills
Rgray and white for mountains
XTo show the menu: press the COMAND
controller W.
XSelect Navi in the main function bar by
sliding ZV and turning cVd the COMAND
controller and press W to confirm.
XSelect Topographical Map and press W
to confirm.
Depending on the previous state, switch
the option on O or off ª.
Switching the city model on/off
When the city model is switched on, the map
shows buildings in 3D.
iThe city model is only shown in the "3D
map" map orientation.
It is available in the 50 m and 100 m map
scales.
170NavigationCOMAND