interior lights MERCEDES-BENZ CL-Class 2011 C216 Owner's Manual
[x] Cancel search | Manufacturer: MERCEDES-BENZ, Model Year: 2011, Model line: CL-Class, Model: MERCEDES-BENZ CL-Class 2011 C216Pages: 480, PDF Size: 19.76 MB
Page 42 of 480
Vehicle equipment
i This manual describes all the standard
and optional equipment of your vehicle
which was available at the time of
purchase. Country-specific differences are
possible. Bear in mind that your vehicle
may not feature all functions described
here. This also refers to safety-related
systems and functions.
Occupant safety
Overview of occupant safety
In this section you will learn the most
important facts about the restraint system
components of the vehicle.
The restraint systems are:
R Seat belts
R Child restraint systems
R LATCH-type (ISOFIX) child seat anchors
Additional protection is provided by:
R SRS (Supplemental Restraint System)
R NECK-PRO head restraints
R PRE-SAFE ®
R Air bag system components with:
- PASSENGER air bag OFF indicator lamp
- USA only: front passenger seat with
Occupant Classification System (OCS)
- Canada only: front passenger seat with
BabySmart™ air bag deactivation system
The different air bag systems work
independently of each other. The protective
functions of the systems work in conjunction
with each other. Not all air bags are deployed
in an accident.
GWarning
Modifications to or work improperly
conducted on restraint system components
or their wiring, as well as tampering with
interconnected electronic systems, can lead
to the restraint systems no longer functioning
as intended.
Air bags or Emergency Tensioning Devices
(ETDs), for example, could deploy
inadvertently or fail to deploy in accidents
although the deceleration threshold for air
bag deployment is exceeded. Therefore,
never modify the restraint systems. Do not
tamper with electronic components or their
software.
i See "Children in the vehicle"
( Y page 56) for more information on
infants and children traveling with you in
the vehicle and restraints for infants and
children.
SRS (Supplemental Restraint System)
Introduction
SRS reduces the risk of occupants coming
into contact with the vehicle's interior in the
event of an accident. It can also reduce the
effect of the forces to which occupants are
subjected during an accident.
SRS consists of:
R the 6 SRS warning lamp
R air bags
R air bag control unit (with crash sensors)
R belt tensioners
R belt force limiters
SRS warning lamps
SRS functions are checked regularly when
you switch on the ignition and when the
engine is running. Therefore, malfunctions
can be detected in good time.
The 6 SRS warning lamp in the instrument
cluster lights up when the ignition is switched
on. It goes out no later than a few seconds
after the engine is started.
The SRS components are in operational
readiness when the 6 SRS warning lamp
goes out while the engine is running.
40Occupant safetySafety
Page 102 of 480
motion. All steering wheel adjustment must
be completed before setting the vehicle in
motion. Driving off with the steering wheel
still adjusting could cause the driver to lose
control of the vehicle.
! Do not activate the EASY-ENTRY/EXIT
feature, if the seat backrest is reclined too
far backwards. This can damage the front
or rear seats. You must first move the
backrest to a vertical position.
Position of the steering wheel and the
driver's seat when the EASY-ENTRY/
EXIT feature is active
The steering wheel tilts upwards and the
driver's seat moves backwards when you:
R remove the SmartKey from the ignition lock
R open the driver's door when the SmartKey
is in the ignition lock or KEYLESS-GO is in
position 1
i The steering wheel only moves upwards if
it has not already reached the upper end
stop. The driver's seat only moves
backwards if it is not already in the
rearmost position.
Position of the steering wheel and the
driver's seat for driving
If you insert the SmartKey into the ignition
lock with the driver's door closed, depending
on the setting, the position of the steering
wheel and the driver's seat will be changed to
the previously set position.
The last position of the steering wheel or seat
is stored when:
R the ignition is switched off or
R the setting is stored with the memory
function.
Crash-responsive EASY-EXIT feature
If the crash-responsive EASY-EXIT feature is
triggered in an accident, the steering column
will move upwards when the driver's door is
opened. This occurs irrespective of the
position of the SmartKey in the ignition lock.
This makes it easier to exit the vehicle and
rescue the occupants.
The crash-responsive EASY-EXIT feature is
only operational if the EASY-EXIT/ENTRY
feature is activated in the on-board computer.
Mirrors
Exterior mirrors
Adjusting the exterior mirrors
GWarning
Exercise care when using the passenger-side
exterior rear view mirror. The mirror surface
is convex (outwardly curved surface for a
wider field of view). Objects in mirror are
closer than they appear. Check your interior
rear view mirror and glance over your
shoulder before changing lanes.
The exterior mirrors are automatically heated
if the rear window heating is switched on and
the outside temperature is low.
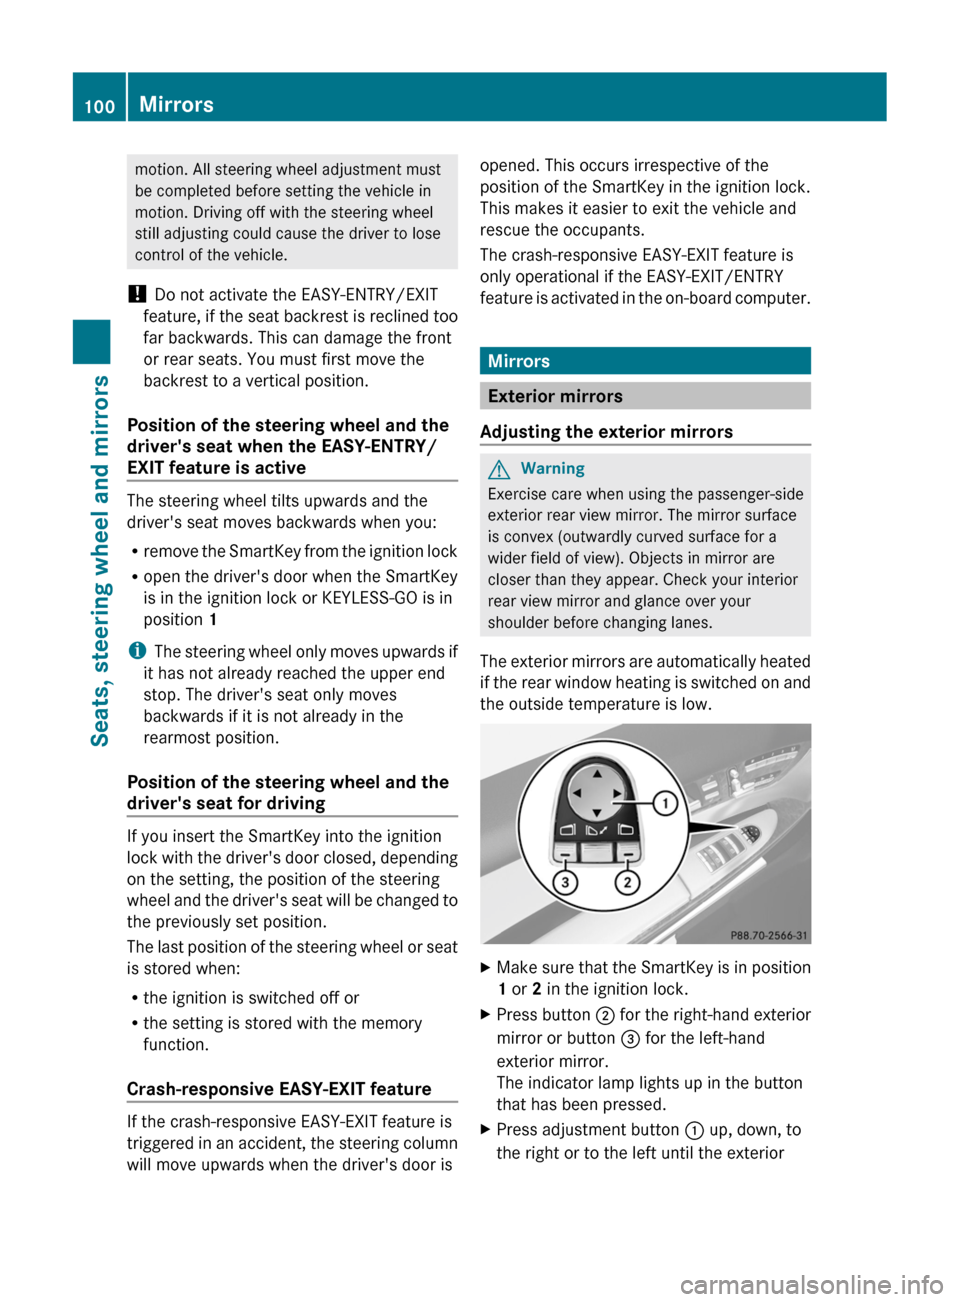
XMake sure that the SmartKey is in position
1 or 2 in the ignition lock.XPress button ; for the right-hand exterior
mirror or button = for the left-hand
exterior mirror.
The indicator lamp lights up in the button
that has been pressed.XPress adjustment button : up, down, to
the right or to the left until the exterior100MirrorsSeats, steering wheel and mirrors
Page 234 of 480
COMAND controller and press W to
confirm.
The main area is active.
XSelect the Easy-entry/exit feature
menu by sliding XVY or turning cVd the
COMAND controller.
The EASY-ENTRY/EXIT feature menu
appears. The current setting is indicated by
a # dot.
XSelect Setting by sliding ZVÆ or turning
cVd the COMAND controller.
The selected setting is indicated by a #
dot.
Setting the interior/exterior lighting
delayed switch-off time
Interior lighting: you can set whether and for
how long you wish the interior lighting to
remain on in the dark after you have removed
the key from the ignition lock.
Exterior light: you can set whether and for
how long you want the exterior lighting to
remain on in the dark after the doors have
been closed. The exterior lighting
automatically switches off after the switch-off
delay has elapsed.
You may select from the following settings:
R0 seconds: delayed switch-off is
deactivated.
R15, 30, 45, 60 seconds: delayed switch-off
is activated.
iYou can reactivate this function by
opening a door within one minute. If none
of the doors are opened after the key is
removed from the ignition lock or if a door
is not closed after it has been opened, the
exterior lights switch off after 60 seconds.
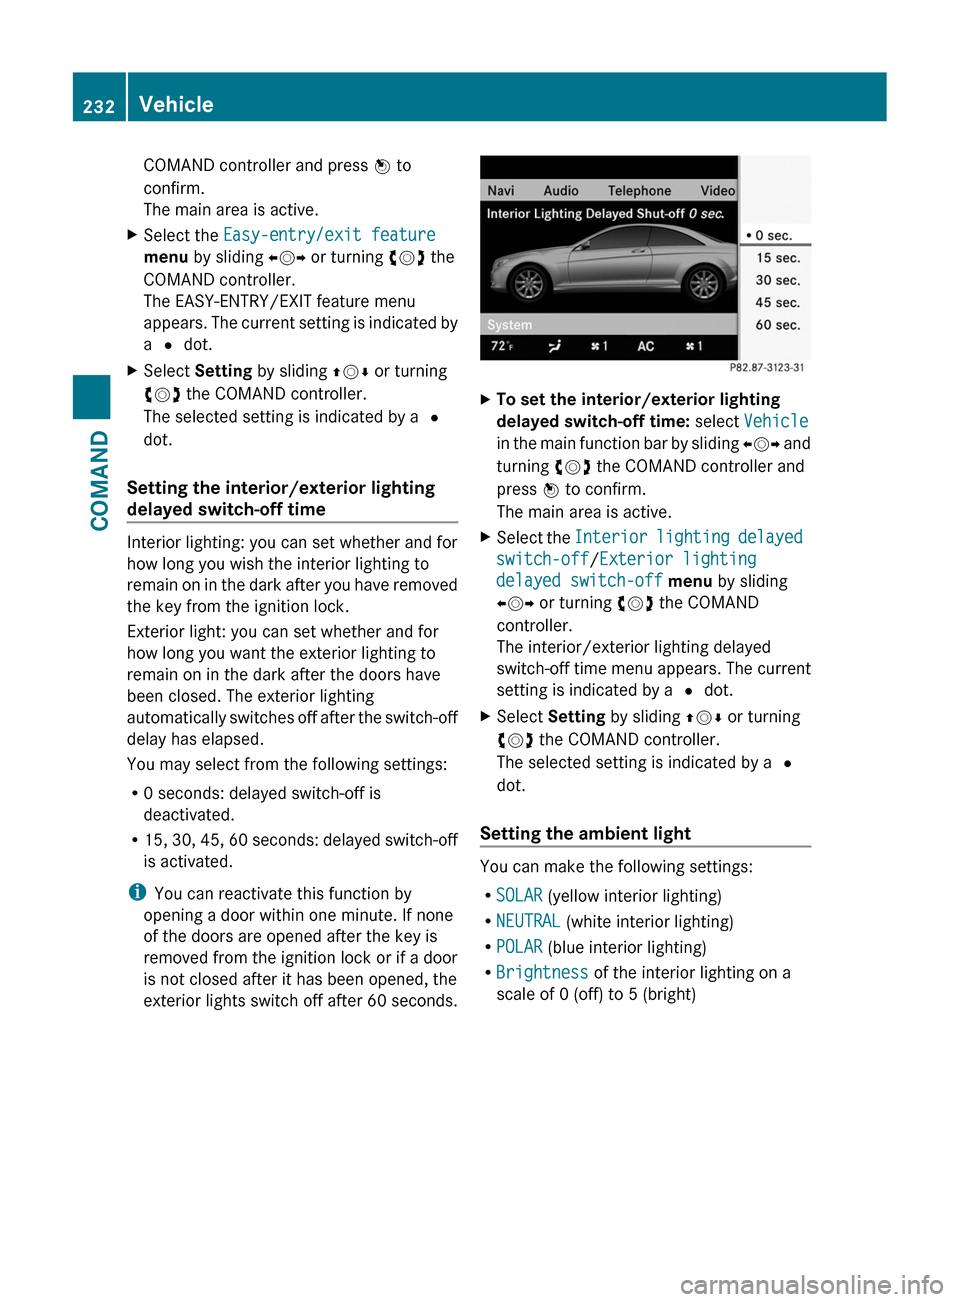
XTo set the interior/exterior lighting
delayed switch-off time: select Vehicle
in the main function bar by sliding XVY and
turning cVd the COMAND controller and
press W to confirm.
The main area is active.
XSelect the Interior lighting delayed
switch-off/Exterior lighting
delayed switch-off menu by sliding
XVY or turning cVd the COMAND
controller.
The interior/exterior lighting delayed
switch-off time menu appears. The current
setting is indicated by a # dot.
XSelect Setting by sliding ZVÆ or turning
cVd the COMAND controller.
The selected setting is indicated by a #
dot.
Setting the ambient light
You can make the following settings:
RSOLAR (yellow interior lighting)
RNEUTRAL (white interior lighting)
RPOLAR (blue interior lighting)
RBrightness of the interior lighting on a
scale of 0 (off) to 5 (bright)
232VehicleCOMAND
Page 245 of 480
Vehicle equipment ............................244
Exterior lighting ................................ 244
Interior lighting ................................. 249
Changing bulbs ................................. 250
Windshield wipers ............................251243Lights and windshield wipers
Page 251 of 480
The cornering light function improves the
illumination of the road over a wide angle in
the direction you are turning, enabling better
visibility in tight bends, for example. It can
only be activated when the low-beam
headlamps are switched on.
Active:
Rif you are driving at speeds below 25
(40 km/h) and switch on the turn signals
or turn the steering wheel.
Rif you are driving at speeds between
25 mph (40 km/h) and
45 mph (70 km/h) and turn the steering
wheel.
Not active: if you are driving at speeds above
25 mph (40 km/h) or switch off the turn
signals or turn the steering wheel to the
straight-ahead position.
The cornering light function may remain lit for
a short time, but is automatically switched off
after no more than three minutes.
Headlamps fogged up on the inside
The headlamps may fog up on the inside if
there is high atmospheric humidity.
XDrive with the headlamps switched on.
The headlamps clear up after a short
distance.
If the moisture does not disappear, the
headlamp casing is not sealed correctly and
moisture has been able to enter.
XHave the headlamps checked at a qualified
specialist workshop.Interior lighting
Overview of interior lighting
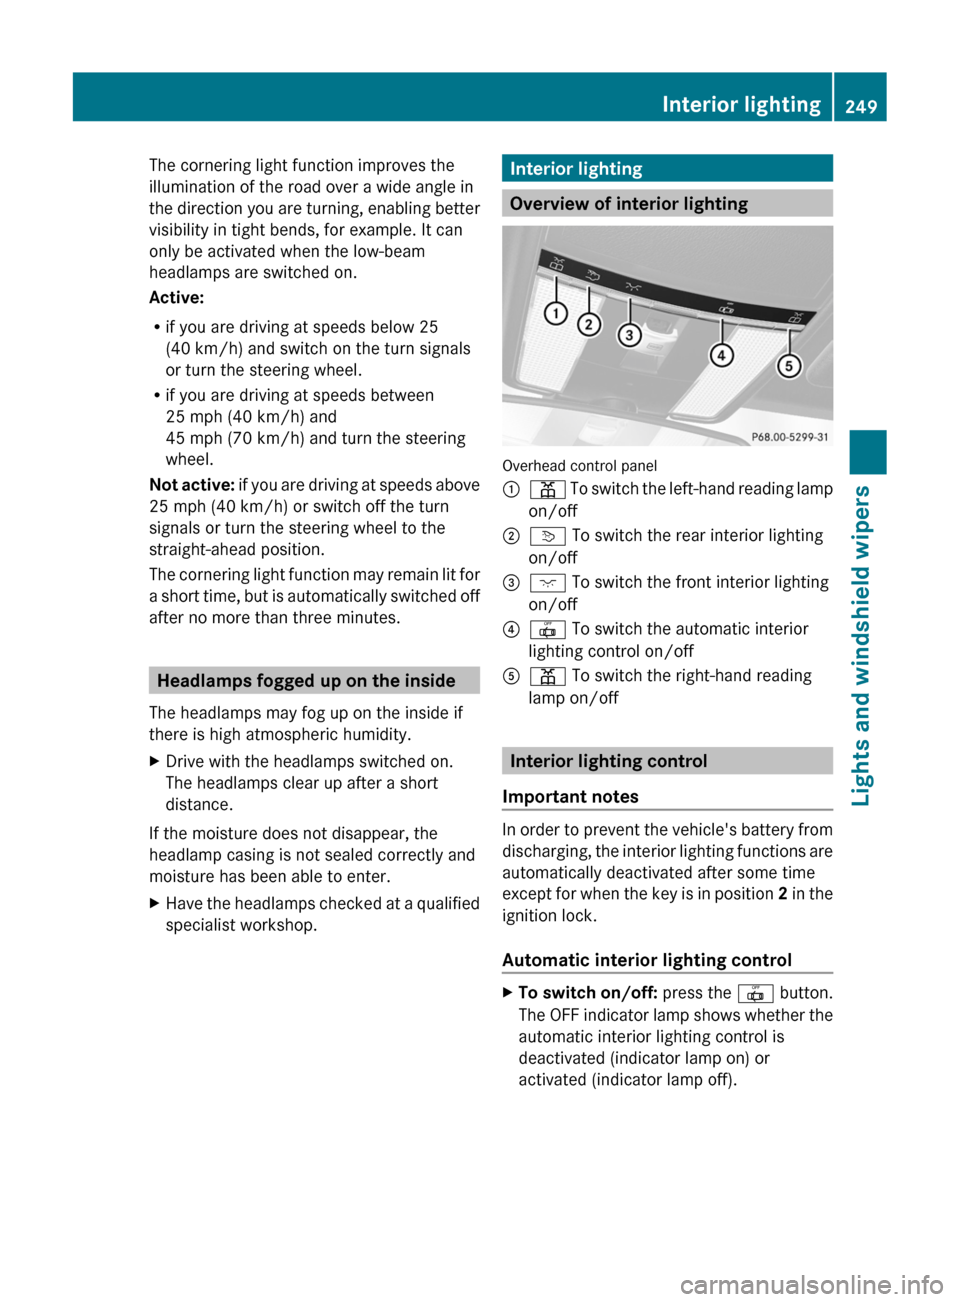
Overhead control panel
:p To switch the left-hand reading lamp
on/off
;v To switch the rear interior lighting
on/off
=c To switch the front interior lighting
on/off
?| To switch the automatic interior
lighting control on/off
Ap To switch the right-hand reading
lamp on/off
Interior lighting control
Important notes
In order to prevent the vehicle's battery from
discharging, the interior lighting functions are
automatically deactivated after some time
except for when the key is in position 2 in the
ignition lock.
Automatic interior lighting control
XTo switch on/off: press the | button.
The OFF indicator lamp shows whether the
automatic interior lighting control is
deactivated (indicator lamp on) or
activated (indicator lamp off).
Interior lighting249Lights and windshield wipersZ
Page 252 of 480
The interior lighting automatically switches
on if you:
R unlock the vehicle
R open a door
R remove the key from the ignition lock
The interior light is activated for a short while
when the key is removed from the ignition
lock. You can activate this delayed switch-off
using COMAND ( Y page 232).
Manual interior lighting controlXTo switch the front interior lighting on/
off: press the c button.XTo switch the rear interior lighting on/
off: press the u button.XTo switch the reading lamps on/off:
press the p button.
Changing bulbs
Important safety notes
Xenon bulbs
If your vehicle is equipped with Xenon bulbs,
you can recognize this by the following: the
cone of light from the Xenon bulbs moves
from the top to the bottom and back again
when you start the engine. For this to be
observed, the lights must be switched on
before starting the engine.
GWarning
Xenon bulbs carry a high voltage. You could
get an electric shock and be seriously or even
fatally injured if you touch the electric
contacts on Xenon bulbs. Therefore, never
remove the cover from Xenon bulbs.
Do not change Xenon bulbs yourself, but have
them replaced at a qualified specialist
workshop which has the necessary specialist
knowledge and tools to carry out the work
required.
Mercedes-Benz recommends that you use an
authorized Mercedes-Benz Center for this
purpose. In particular, work relevant to safety
or on safety-related systems must be carried
out at a qualified specialist workshop.
Bulbs and lamps are an important aspect of
vehicle safety. You must therefore make sure
that these function correctly at all times.
Have the headlamp setting checked regularly.
Other bulbsGWarning!
Bulbs and lamps can be very hot. You should
therefore allow them to cool down before you
change them. Otherwise, you could be burned
if you touch them.
Keep bulbs out of the reach of children.
Otherwise, they could damage the bulbs, for
example, and injure themselves.
Never use a bulb which has been dropped.
Such a bulb may break or even explode and
injure you.
Halogen bulbs are pressurized and can
explode when you change them, particularly
if they are very hot. You should therefore wear
eye protection and gloves when you are
changing them.
There are bulbs other than the Xenon bulbs
that you cannot replace. Replace only the
bulbs listed (Y page 251). Have the bulbs that
you cannot replace yourself changed at a
qualified specialist workshop.
Mercedes-Benz recommends that you use an
authorized Mercedes-Benz Center for this
purpose. In particular, work relevant to safety
or on safety-related systems must be carried
out at a qualified specialist workshop.
If you require assistance changing bulbs,
consult a qualified specialist workshop.
Do not touch the glass tube of new bulbs with
your bare hands. Even minor contamination
can burn into the glass surface and reduce
the service life of the bulbs. Always use a lint-
free cloth or only touch the base of the bulb
when installing.
Only use bulbs of the correct type.
250Changing bulbsLights and windshield wipers
Page 259 of 480
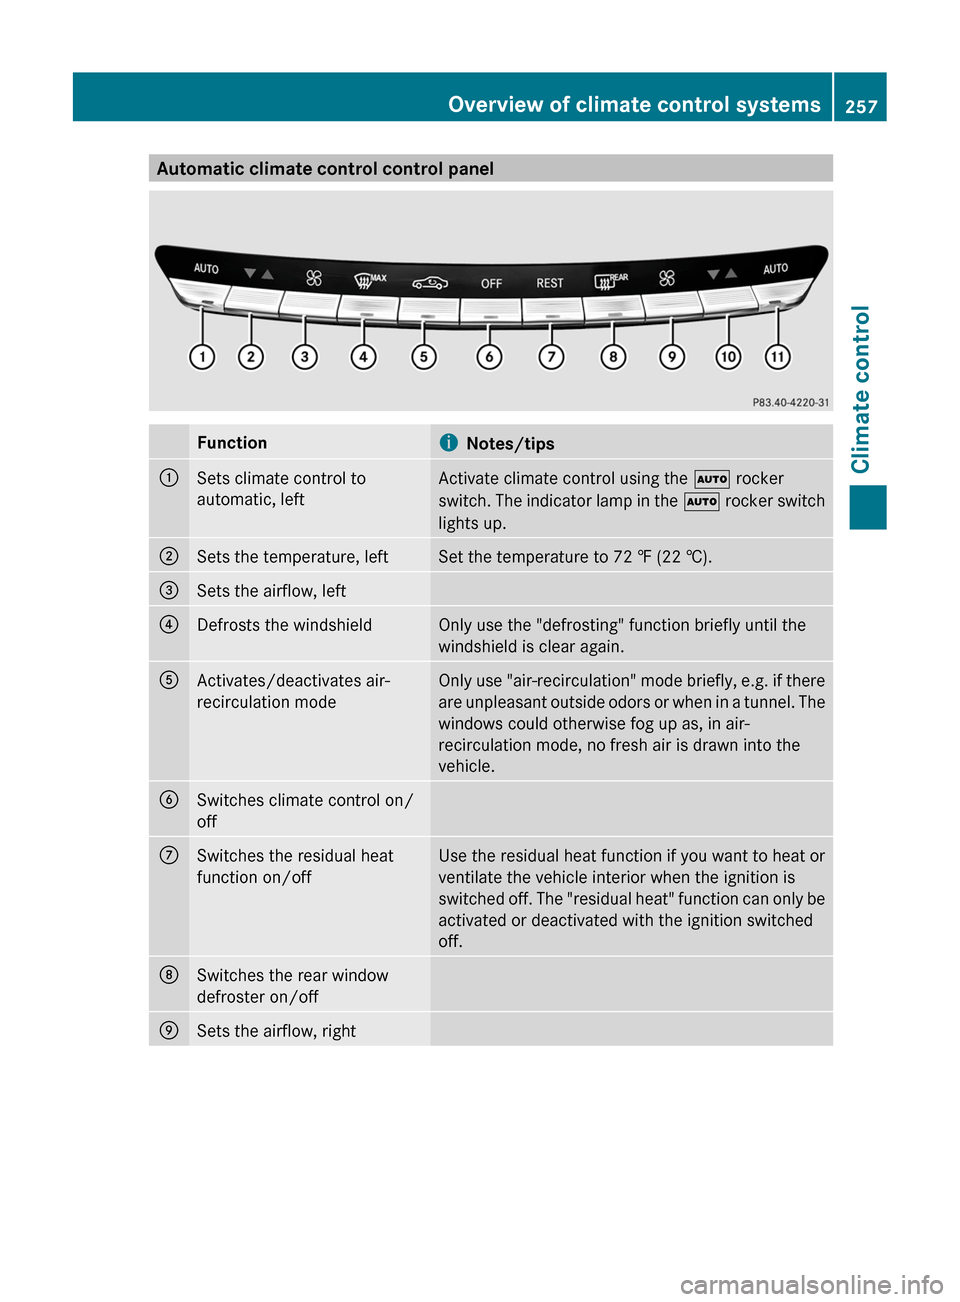
Automatic climate control control panelFunctioniNotes/tips:Sets climate control to
automatic, leftActivate climate control using the à rocker
switch. The indicator lamp in the à rocker switch
lights up.;Sets the temperature, leftSet the temperature to 72 ‡ (22 †).=Sets the airflow, left?Defrosts the windshieldOnly use the "defrosting" function briefly until the
windshield is clear again.AActivates/deactivates air-
recirculation modeOnly use "air-recirculation" mode briefly, e.g. if there
are unpleasant outside odors or when in a tunnel. The
windows could otherwise fog up as, in air-
recirculation mode, no fresh air is drawn into the
vehicle.BSwitches climate control on/
offCSwitches the residual heat
function on/offUse the residual heat function if you want to heat or
ventilate the vehicle interior when the ignition is
switched off. The "residual heat" function can only be
activated or deactivated with the ignition switched
off.DSwitches the rear window
defroster on/offESets the airflow, rightOverview of climate control systems257Climate controlZ
Page 262 of 480
Setting the airflow
You can select different airflow settings for
the driver's and front-passenger sides.XTurn the key to position 2 in the ignition
lock.XTo increase/reduce: press the K
rocker switch up or down.
You can also use COMAND to set the airflow
( Y page 235).
Defrosting the windshield
You can use this function to defrost the
windshield or to defrost the inside of the
windshield and the side windows.
i You should only select the defrosting
function until the windshield is clear again.
XTurn the SmartKey to position 2 in the
ignition lock.XTo switch on: press the ¬ rocker
switch up or down.
The indicator lamp in the ¬ rocker
switch lights up.
The climate control system switches to the
following functions:
R cooling with air dehumidification on
R high airflow 16
R high temperature 16
R air distribution to the windshield and
front side windows
R air-recirculation mode offXTo switch off: press the ¬ rocker
switch up or down.
The indicator lamp in the ¬ rocker
switch goes out. The previously selected
settings come into effect again. The cooling
with air dehumidification function remains
on. Air-recirculation mode remains
deactivated.
or
XPress the w rocker switch up or down.orXPress the K rocker switch up or down.
Maximum cooling MAX COOL
The MAX COOL function is only available in
vehicles for the USA.
MAX COOL is only operational when the
engine is running.
The MAX COOL function is activated
automatically:
R if climate control is set to automatic
( Ã ) on both sides
R if additional cooling is used
The display shows MAX COOL.
This is the quickest way to cool the vehicle
interior when the sliding sunroof and the side
windows are closed.
Defrosting the windows
Windows fogged up on the inside
XActivate the "cooling with air
dehumidification" function via COMAND
( Y page 236).XActivate automatic mode Ã.XIf the windows continue to fog up, activate
the defrosting function ( Y page 260).
i
You should only select this setting until
the windshield is clear again.
Windows fogged up on the outside
XActivate the windshield wipers.XActivate automatic climate control.
i You should only select this setting until
the windshield is clear again.
16 Depending on the outside temperature.260Operating the control systemsClimate control
Page 263 of 480
Rear window defroster
Activating/deactivatingGWarning
Any accumulation of snow and ice should be
removed from the rear window before driving.
Visibility could otherwise be impaired,
endangering you and others.
The rear window heating has a high current
draw. You should therefore switch it off as
soon as the window is clear as it only switches
off automatically after several minutes.
If the battery voltage is too low, the rear
window heating may switch off.
XTurn the SmartKey to position 2 in the
ignition lock.XPress the ¤ rocker switch up or down.
The indicator lamp in the ¤ rocker
switch lights up or goes out.
Problems with the rear window heating
The rear window heating has deactivated
itself prematurely or cannot be activated.
XSwitch off any consumers that are not
required, e.g. reading lamps or interior
lighting.
When the battery is sufficiently charged,
the rear window heating is activated again
automatically.
Activating/deactivating air-
recirculation mode
You can deactivate the flow of fresh air if
unpleasant odors are entering the vehicle
from outside. The air already inside the
vehicle will then be recirculated.
GWarning
Fogged windows impair visibility,
endangering you and others. If the windows
begin to fog on the inside, switching off the
air recirculation mode immediately should
clear interior window fogging. If interior
window fogging persists, make sure the air
conditioning is activated, or press the ¬
button.XTurn the SmartKey to position 2 in the
ignition lock.XTo activate: press the g rocker switch
up or down.
The indicator lamp in the g rocker
switch lights up.
i Air-recirculation mode is activated
automatically at high outside
temperatures. The indicator lamp in the
g rocker switch is not lit when
automatic air-recirculation mode is
activated.
Outside air is added after about 30
minutes.
X To deactivate: press the g rocker
switch up or down.
The indicator lamp in the g rocker
switch goes out.
i Air-recirculation mode switches off
automatically:
R after approximately five minutes if
outside temperatures are under about
41 ‡ (5 †)
R after approximately five minutes if
cooling with air dehumidification is
deactivated
R after approximately 30 minutes if outside
temperatures are over about
41 ‡ (5 †)
Switching the residual heat on/off
It is possible to make use of the residual heat
of the engine to continue heating the
stationary vehicle for up to 30 minutes after
the engine has been switched off. The heating
time depends on the temperature that has
been set.
i The blower will run at a low speed
regardless of the airflow setting.
Operating the control systems261Climate controlZ
Page 264 of 480
iIf you activate the "residual heat" function
at high temperatures, only the ventilation
will be activated. The blower runs at
medium speed.
XTurn the key to position 0 in the ignition
lock or remove it.
XTo switch on: press the Ì rocker
switch up or down.
The indicator lamp in the Ì rocker
switch lights up.
XTo switch off: press the Ì rocker
switch up or down.
The indicator lamp in the Ì rocker
switch goes out.
iResidual heat is deactivated
automatically:
Rafter about 30 minutes
Rwhen the ignition is switched on
Rif the battery voltage drops
Rif the coolant temperature is too low
Setting the air vents
Important safety notes
GWarning
When operating the climate control, the air
that enters the passenger compartment
through the air vents can be very hot or very
cold (depending on the set temperature). This
could cause burns or frostbite to unprotected
skin in the immediate area of the air vents.
Always keep sufficient distance between
unprotected parts of the body and the air
vents. If necessary, use the air distribution
adjustment to direct the air to air vents in the
vehicle interior that are not in the immediate
area of unprotected skin.
In order to ensure the direct flow of fresh air
through the air vents into the vehicle interior,
please observe the following notes:
Rkeep the air inlet grille on the hood free of
blockages, such as ice, snow or leaves
Rnever cover the vents or air inlet and outlet
grilles in the vehicle interior.
iFor virtually draft-free ventilation, adjust
the sliders of the air vents to the center
position.
Setting the center air vents
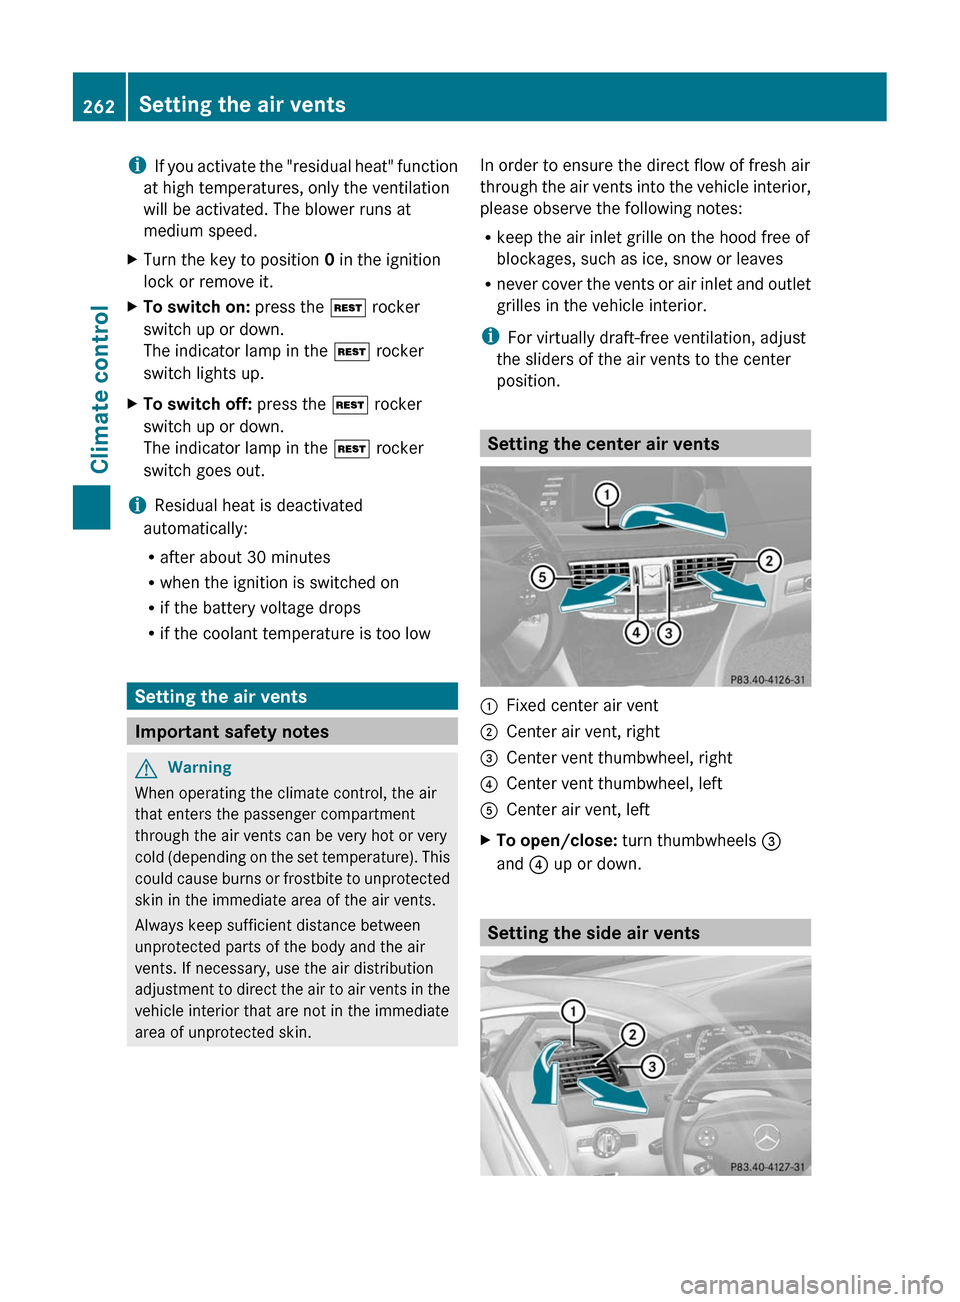
:Fixed center air vent;Center air vent, right=Center vent thumbwheel, right?Center vent thumbwheel, leftACenter air vent, leftXTo open/close: turn thumbwheels =
and ? up or down.
Setting the side air vents
262Setting the air ventsClimate control