Key MERCEDES-BENZ CL-Class 2012 C216 Owner's Manual
[x] Cancel search | Manufacturer: MERCEDES-BENZ, Model Year: 2012, Model line: CL-Class, Model: MERCEDES-BENZ CL-Class 2012 C216Pages: 488, PDF Size: 21.88 MB
Page 290 of 488

more firmly. Maintain a safe distance from
vehicles in front.
After driving on a wet road or having the
vehicle washed, brake firmly while paying
attention to the traffic conditions. This will
warm up the brake discs, thereby drying them
more quickly and protecting them against
corrosion.
Limited braking performance on salt
treated roadsGWARNING
The layer of salt on the brake discs and the
brake pads/linings may cause a delay in the
braking effect, resulting in a significantly
longer braking distance, which could lead to
an accident.
To avoid this danger, you should:
R occasionally brake carefully, without
putting other road users at risk, when you
are driving on salted roads. This helps to
remove any salt that may have started to
build up on the brake discs and the brake
pads/linings.
R maintain a greater distance to the vehicle
ahead and drive with particular care.
R carefully apply the brakes at the end of a
trip and immediately after commencing a
new trip, so that salt residues are removed
from the brake discs.
Servicing the brakes
! If the red brake warning lamp lights up in
the instrument cluster and you hear a
warning tone while the engine is running,
the brake fluid level may be too low.
Observe additional warning messages in
the multifunction display.
The brake fluid level may be too low due to
brake pad wear or leaking brake lines.
Have the brake system checked
immediately. This work should be carried
out at an authorized Mercedes-Benz
Center.
All checks and maintenance work on the
brake system must be carried out at a
qualified specialist workshop. This work
should be carried out at an authorized
Mercedes-Benz Center.
Have the brake pads replaced and the brake
fluid renewed at a qualified specialist
workshop, e.g. an authorized Mercedes-Benz
Center.GWARNING
If brake pads or brake fluid other than those
recommended are used, the braking
properties of the vehicle can be degraded to
an extent that safe braking is substantially
impaired. This could result in an accident.
! Vehicles with 4MATIC: function or
performance tests may only be carried out
on a 2-axle dynamometer. If you are
planning to have the vehicle tested on such
a dynamometer, contact an authorized
Mercedes-Benz Center to obtain further
information first. Otherwise, you could
damage the drive train or the brake system.
! Vehicles with 4MATIC: as the ESP®
system operates automatically, the engine
and the ignition must be switched off
(SmartKey in position 0 or 1 in the ignition
lock or Start/Stop button in position 0 or
1 ) when the electric parking brake is being
tested on a brake dynamometer.
Braking maneuvers triggered automatically
by ESP ®
may seriously damage the brake
system.
! Vehicles with 4MATIC: as the ESP®
system operates automatically, the engine
and the ignition system must be switched
off (SmartKey in position 0 or 1 in the
ignition lock or Start/Stop button in
position 0 or 1) when:
R testing the electric parking brake on a
brake dynamometer.
R you intend to have the vehicle towed with
one of the axles raised.
288Driving tipsDriving and parking
Page 305 of 488
Deactivating the HOLD function
The HOLD function is deactivated
automatically if:
R you accelerate and the transmission is in
position D or R.
R you shift the transmission to position P.
R you apply the brakes again with a certain
amount of pressure until HOLD disappears
from the instrument cluster.
R you secure the vehicle using the electric
parking brake.
R you activate DISTRONIC PLUS.
i After a time, the electric parking brake
secures the vehicle and relieves the service
brake.
GWARNING
Never get out of the vehicle when the HOLD
function is activated.
The HOLD function must never be operated
or deactivated by a passenger or from outside
the vehicle.
The HOLD function does not replace the
electric parking brake and must not be used
for parking.
The braking effect of the HOLD function is
canceled and the vehicle could roll away if:
R the HOLD function is deactivated by
depressing the accelerator pedal or the
brake pedal.
R there is a malfunction in the system or an
interruption in the power supply, e.g.
battery failure.
R the electrical system in the engine
compartment, the battery or the fuses are
tampered with.
R the battery is disconnected.
AIRMATIC
Vehicle level
Important safety notes
Your vehicle regulates its height
automatically. All-round self-leveling ensures
the best possible suspension and constant
ground clearance, even with a laden vehicle.
When you drive fast, the vehicle is lowered
automatically to improve driving safety and to
reduce fuel consumption.
The following vehicle levels are possible:
R normal
R raised: the vehicle is raised by about 1.20 in
(30 mm) when compared with the normal
level
R lowered: the vehicle is lowered by about
0.40 in (10 mm) when compared with the
normal level
The "Normal" and "Raised" vehicle levels can
be set manually.
The "Lowered” vehicle level is set
automatically at speeds over 60 mph
(100 km/h).
Setting the vehicle level
Select the "Normal" setting for normal road
surfaces and "Raised" for driving with snow
chains or on particularly poor road surfaces.
Your selection remains stored even if you
remove the SmartKey from the ignition lock.
GWARNING
To help avoid personal injury, keep hands and
feet away from wheel housing area, and stay
away from under the vehicle when lowering
the vehicle chassis.
Driving systems303Driving and parkingZ
Page 306 of 488
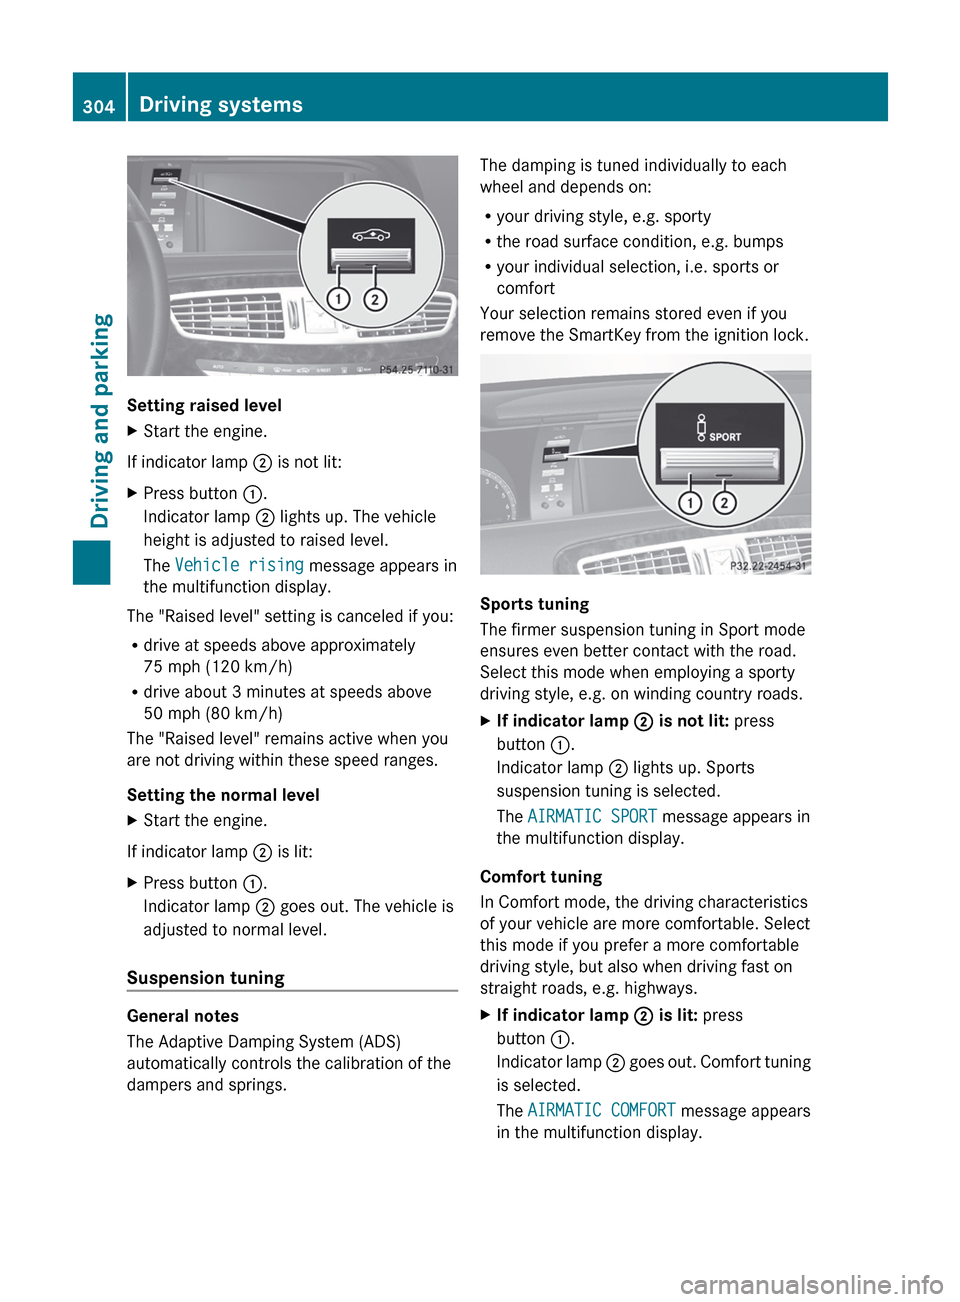
Setting raised level
XStart the engine.
If indicator lamp ; is not lit:
XPress button :.
Indicator lamp ; lights up. The vehicle
height is adjusted to raised level.
The Vehicle rising message appears in
the multifunction display.
The "Raised level" setting is canceled if you:
R drive at speeds above approximately
75 mph (120 km/h)
R drive about 3 minutes at speeds above
50 mph (80 km/h)
The "Raised level" remains active when you
are not driving within these speed ranges.
Setting the normal level
XStart the engine.
If indicator lamp ; is lit:
XPress button :.
Indicator lamp ; goes out. The vehicle is
adjusted to normal level.
Suspension tuning
General notes
The Adaptive Damping System (ADS)
automatically controls the calibration of the
dampers and springs.
The damping is tuned individually to each
wheel and depends on:
R your driving style, e.g. sporty
R the road surface condition, e.g. bumps
R your individual selection, i.e. sports or
comfort
Your selection remains stored even if you
remove the SmartKey from the ignition lock.
Sports tuning
The firmer suspension tuning in Sport mode
ensures even better contact with the road.
Select this mode when employing a sporty
driving style, e.g. on winding country roads.
XIf indicator lamp ; is not lit: press
button :.
Indicator lamp ; lights up. Sports
suspension tuning is selected.
The AIRMATIC SPORT message appears in
the multifunction display.
Comfort tuning
In Comfort mode, the driving characteristics
of your vehicle are more comfortable. Select
this mode if you prefer a more comfortable
driving style, but also when driving fast on
straight roads, e.g. highways.
XIf indicator lamp ; is lit: press
button :.
Indicator lamp ; goes out. Comfort tuning
is selected.
The AIRMATIC COMFORT message appears
in the multifunction display.304Driving systemsDriving and parking
Page 307 of 488
Active Body Control (ABC)
Vehicle level
Your vehicle automatically adjusts its ride
height to improve driving safety and reduce
fuel consumption.
Depending on the vehicle height that has
been set, the vehicle automatically adjusts its
height dependent on the current speed. As
speed increases, the vehicle is lowered by up
to 0.4 in (10 mm). As the speed is reduced,
the vehicle is raised up to the set vehicle
height.
GWARNING
The vehicle is lowered when the engine is
switched off. Therefore, make sure that
nobody is in the vicinity of the wheel housing
or under the vehicle when you switch off the
engine. Otherwise, limbs could become
trapped.
! The vehicle is lowered when the engine is
switched off. Make sure when parking that
you position your vehicle so that it does not
make contact with the curb as the vehicle
is lowered. Your vehicle could otherwise be
damaged.
i For AMG vehicles: when the engine is
switched off, the vehicle is lowered by
approx. 0.2 in (5 mm).
Setting the vehicle level
Select the "Normal" setting for normal road
surfaces and "Raised" for driving with snow
chains or on particularly poor road surfaces.
GWARNING
To help avoid personal injury, keep hands and
feet away from wheel housing area, and stay
away from under the vehicle when lowering
the vehicle chassis.
Your selection remains stored even if you
remove the SmartKey from the ignition lock.
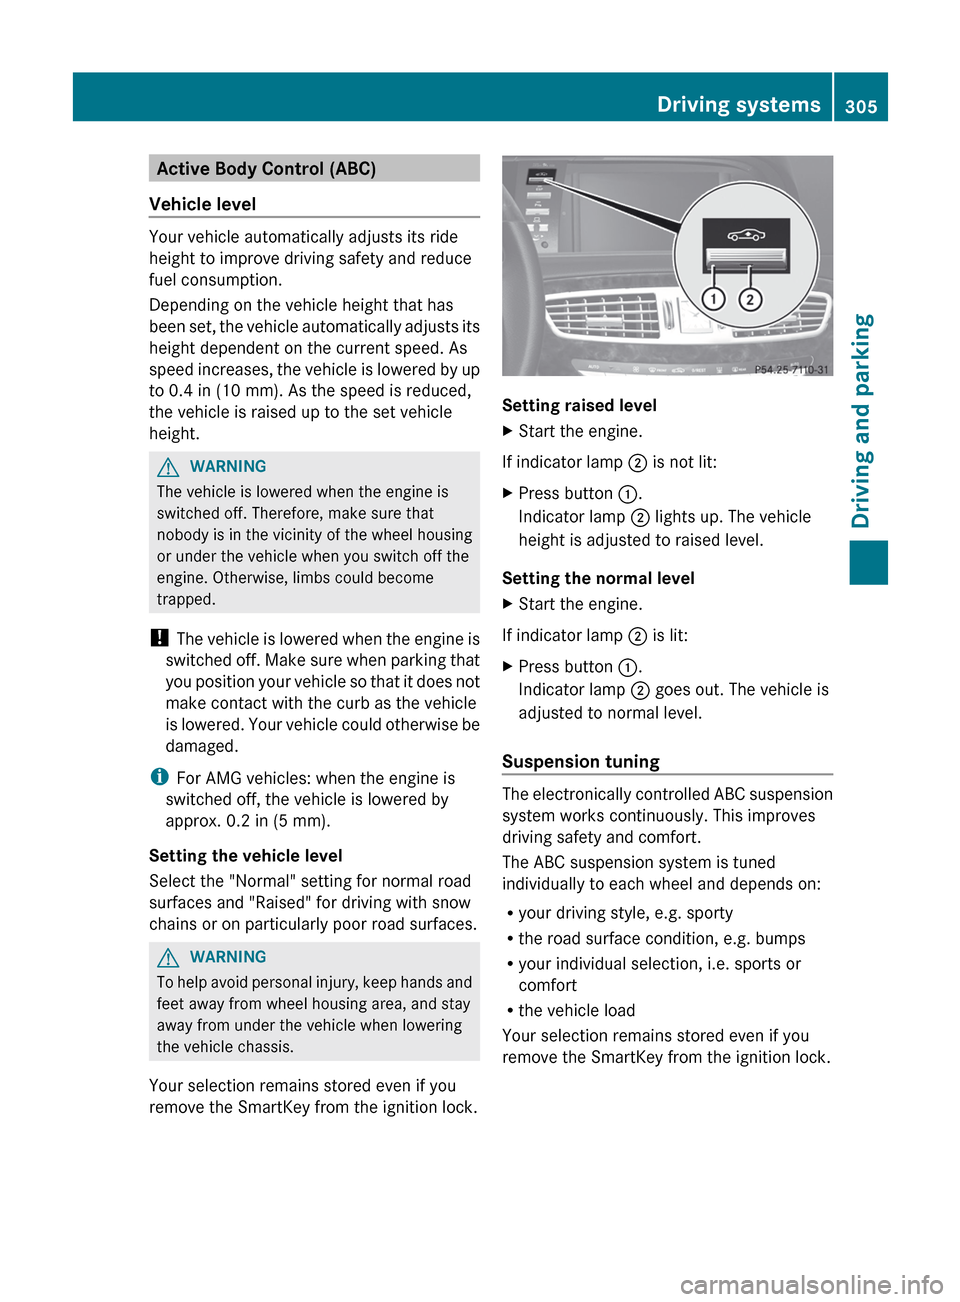
Setting raised level
XStart the engine.
If indicator lamp ; is not lit:
XPress button :.
Indicator lamp ; lights up. The vehicle
height is adjusted to raised level.
Setting the normal level
XStart the engine.
If indicator lamp ; is lit:
XPress button :.
Indicator lamp ; goes out. The vehicle is
adjusted to normal level.
Suspension tuning
The electronically controlled ABC suspension
system works continuously. This improves
driving safety and comfort.
The ABC suspension system is tuned
individually to each wheel and depends on:
R your driving style, e.g. sporty
R the road surface condition, e.g. bumps
R your individual selection, i.e. sports or
comfort
R the vehicle load
Your selection remains stored even if you
remove the SmartKey from the ignition lock.
Driving systems305Driving and parkingZ
Page 311 of 488

If indicator lamp ; lights up, PARKTRONIC is
deactivated.
i PARKTRONIC is automatically activated
when you turn the SmartKey to position 2
in the ignition lock.Driving systems309Driving and parkingZ
Page 317 of 488
Rthe trunk lid is open
R it is raining or snowing strongly or if it is
foggy
R it is night or if you are parking/
maneuvering your vehicle in a very dark
area
R a very bright white light is affecting the
camera
R the immediate vicinity is illuminated with
fluorescent light (the display of the
COMAND system can flicker)
R temperature changes abruptly, for example
if you drive out of the cold into a heated
garage (condensation on the lens)
R the camera lens is dirty or covered
R the rear of your vehicle is damaged
In this case, have the position and the
setting of the camera checked at a
specialist workshop. Mercedes-Benz
recommends that you consult a Mercedes-
Benz Center for this purpose.
Do not use the rear view camera in these
situations. You could otherwise injure
yourself and other people and/or cause
damage - including damage to your vehicle -
while parking/maneuvering.
Activating the rear view cameraXMake sure that the SmartKey is in position
2 in the ignition lock.XEngage reverse gear.
The area behind the vehicle is shown in the
COMAND display with guide lines.
Guide lines in the COMAND display
GWARNING
Use of rear view camera can be dangerous if
you are color-blind or have impaired color
vision.
Only use rear view camera if you can see and
distinguish all colored guidelines shown by
rear view camera on the COMAND system
display.
GWARNING
Please note that objects that do not touch the
ground may appear to be further away than
they actually are, for example:
R the bumper of a vehicle parked behind you
R the trailer drawbar
R the ball coupling of a trailer tow hitch
R the rear end of a truck
R a slanted post
In such cases, you should not use the guide
lines to judge the distance. You may misjudge
the distance, which increases the risk of
impacting the objects.
Even if the object you approach is directly on
the ground, do not approach the object any
closer than the red guide line.
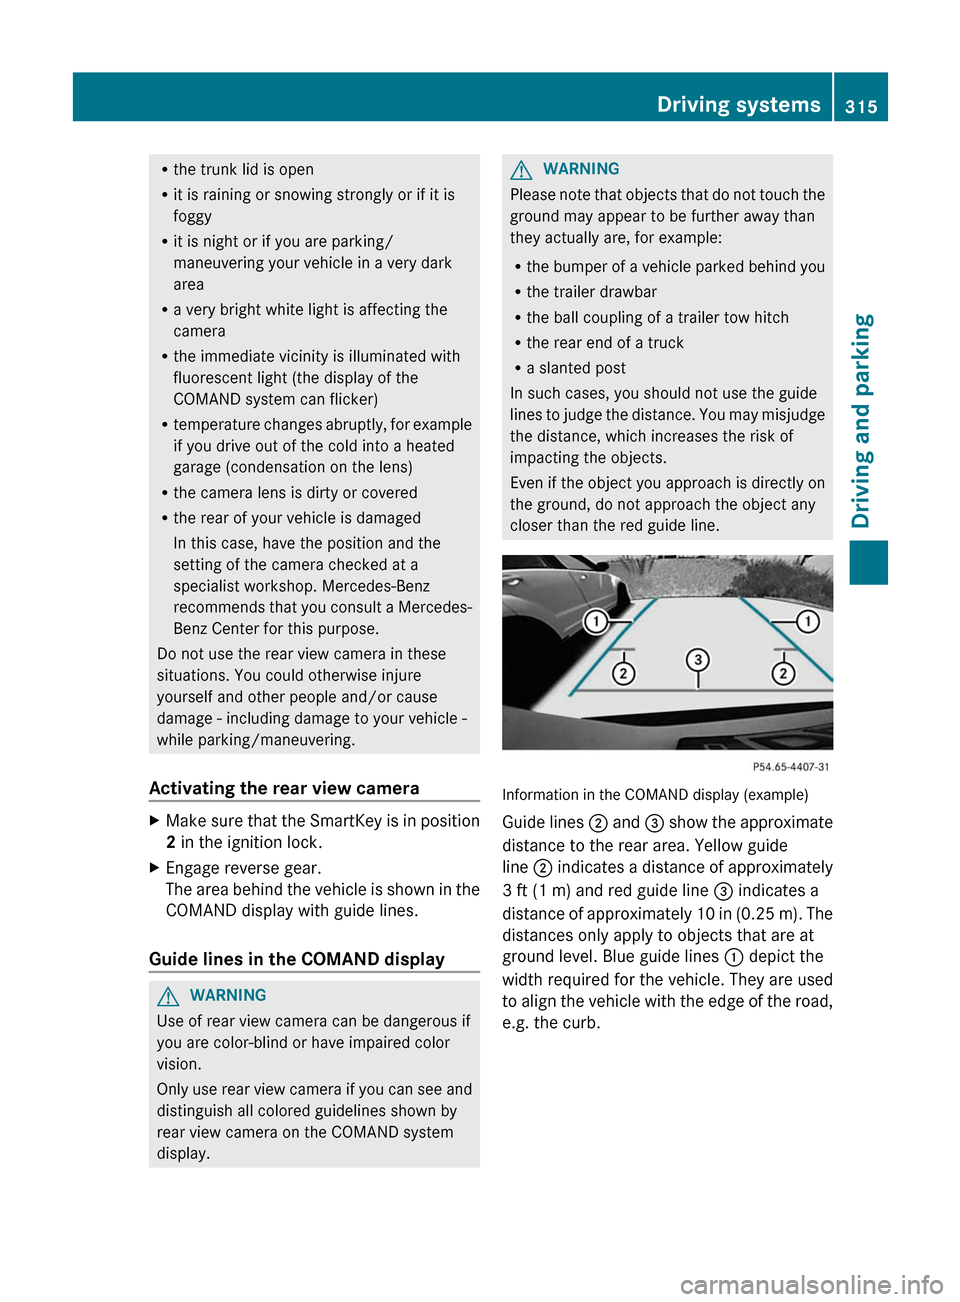
Information in the COMAND display (example)
Guide lines ; and = show the approximate
distance to the rear area. Yellow guide
line ; indicates a distance of approximately
3 ft (1 m) and red guide line = indicates a
distance of approximately 10 in (0.25 m). The
distances only apply to objects that are at
ground level. Blue guide lines : depict the
width required for the vehicle. They are used
to align the vehicle with the edge of the road,
e.g. the curb.
Driving systems315Driving and parkingZ
Page 320 of 488
iAnimals are not recognized by pedestrian
recognition.
Night View Assist Plus is able to recognize
pedestrians by typical characteristics, e.g. a
silhouette in the shape of a person.
Pedestrian recognition is then switched on
automatically if:
R Night View Assist Plus is activated.
R you are driving faster than 6 mph
(10 km/h).
R the surroundings are dark, e.g. when
driving outside built-up areas without
street lighting.
If pedestrian recognition is enabled, the
active pedestrian recognition symbol
( Y page 319) appears in the multifunction
display. If a pedestrian is now recognized,
they are framed and thereby highlighted. If
the pedestrian recognition system has
brought a pedestrian to your attention, look
through the windshield to evaluate the
situation. The actual distance to objects and
pedestrians cannot be gauged accurately by
looking at a screen.
It may be the case that objects are highlighted
as well as pedestrians.
Spotlight function
Pedestrian recognition with spotlight
function is activated automatically if:
R Night View Assist Plus with spotlight
function is activated.
R you are driving faster than 28 mph
(45 km/h).
R the surroundings are dark, e.g. when
driving outside built-up areas without
street lighting.
Only one pedestrian or one object can be
illuminated with the spotlight at any one time.
The spotlight function will not function if:
R pedestrians or objects cannot be
recognized due to fast cornering.
R pedestrians or objects are on the driver's
side of the vehicle.If you switch to symmetrical low beam
( Y page 244), pedestrians or objects on the
front-passenger side of the vehicle will not
be recognized instead.
It may be the case that pedestrians and other
objects are inadvertently illuminated.
Activating/deactivating Night View
Assist Plus with spotlight function
You can only activate Night View Assist Plus
with spotlight function if:
R the SmartKey is in position 2 in the ignition
lock.
R it is dark.
R the "Adaptive Highbeam Assist" function is
activated via the on-board computer
( Y page 344).
R the light switch is in position c.
R the combination switch is pushed forward
beyond the point of resistance.
R reverse gear has not been engaged.
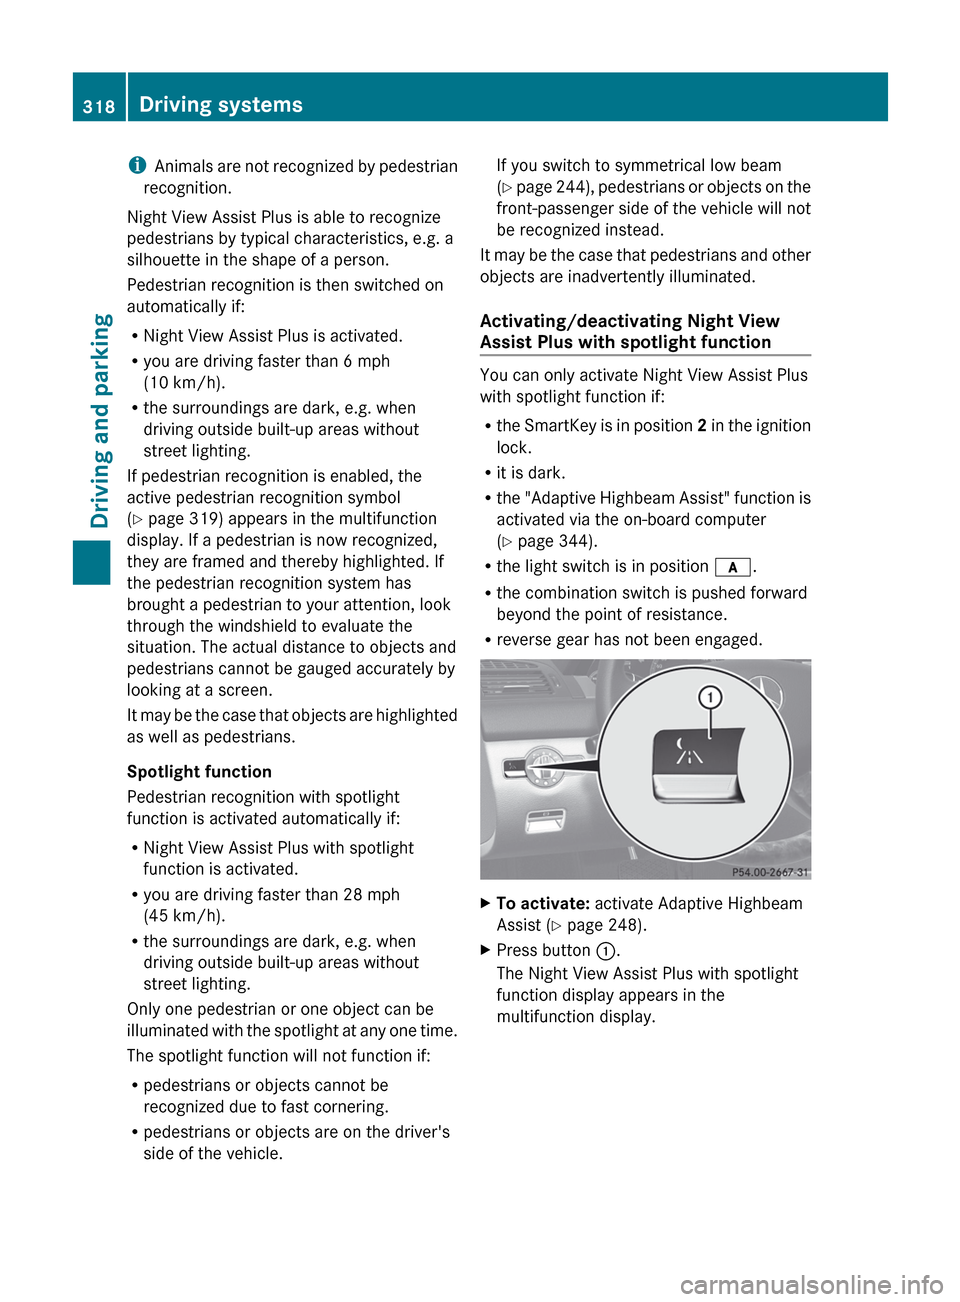
XTo activate: activate Adaptive Highbeam
Assist ( Y page 248).XPress button :.
The Night View Assist Plus with spotlight
function display appears in the
multifunction display.318Driving systemsDriving and parking
Page 322 of 488
You can only activate Night View Assist Plus
without spotlight function if:
R the SmartKey is in position 2 in the ignition
lock.
R it is dark.
R the light switch is in the c or L
position.
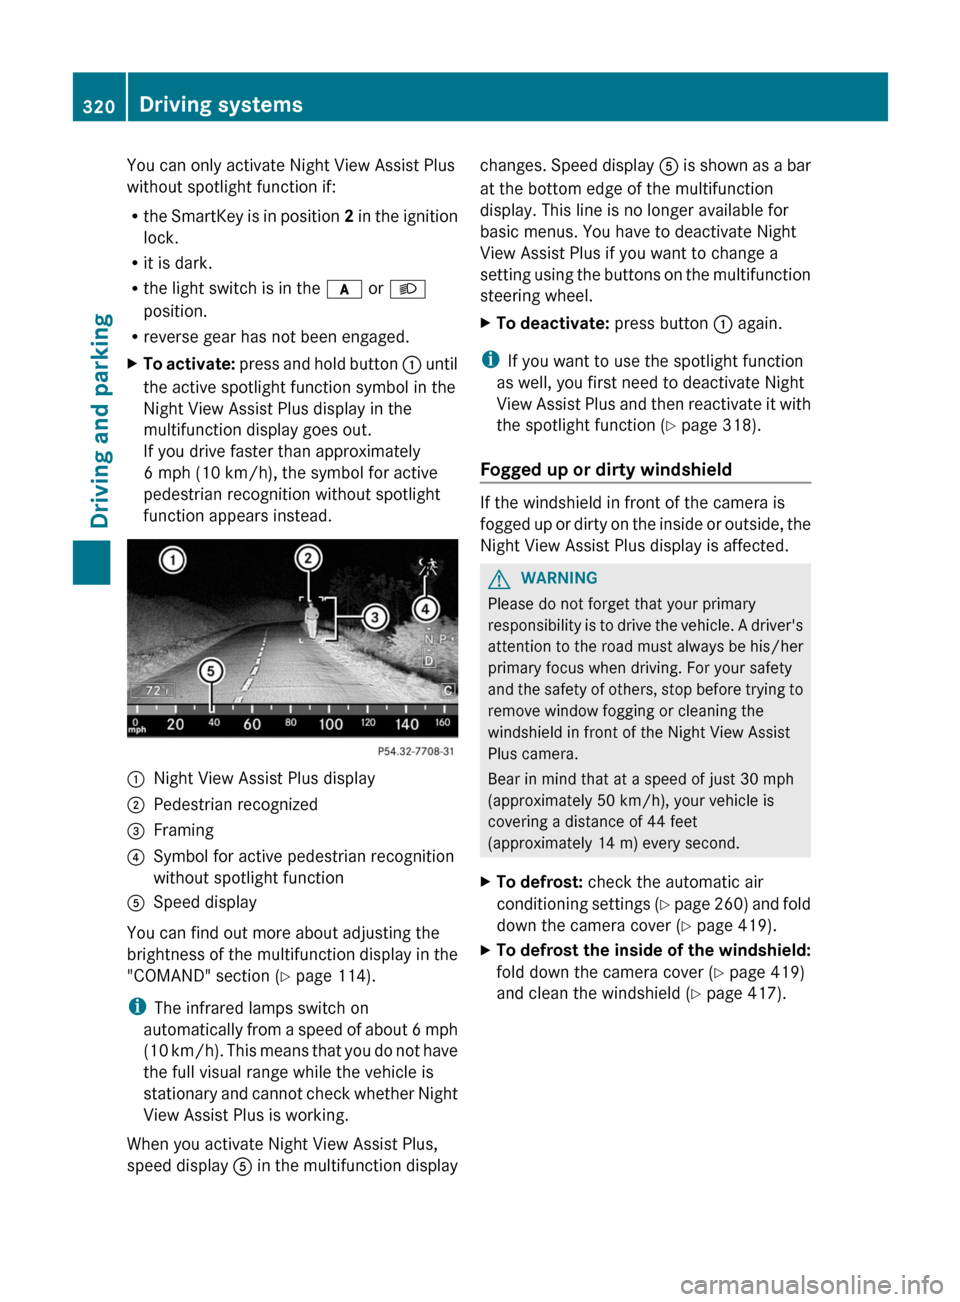
R reverse gear has not been engaged.XTo activate: press and hold button : until
the active spotlight function symbol in the
Night View Assist Plus display in the
multifunction display goes out.
If you drive faster than approximately
6 mph (10 km/h), the symbol for active
pedestrian recognition without spotlight
function appears instead.:Night View Assist Plus display;Pedestrian recognized=Framing?Symbol for active pedestrian recognition
without spotlight functionASpeed display
You can find out more about adjusting the
brightness of the multifunction display in the
"COMAND" section ( Y page 114).
i The infrared lamps switch on
automatically from a speed of about 6 mph
( 10 km/h). This means that you do not have
the full visual range while the vehicle is
stationary and cannot check whether Night
View Assist Plus is working.
When you activate Night View Assist Plus,
speed display A in the multifunction display
changes. Speed display A is shown as a bar
at the bottom edge of the multifunction
display. This line is no longer available for
basic menus. You have to deactivate Night
View Assist Plus if you want to change a
setting using the buttons on the multifunction
steering wheel.XTo deactivate: press button : again.
i
If you want to use the spotlight function
as well, you first need to deactivate Night
View Assist Plus and then reactivate it with
the spotlight function ( Y page 318).
Fogged up or dirty windshield
If the windshield in front of the camera is
fogged up or dirty on the inside or outside, the
Night View Assist Plus display is affected.
GWARNING
Please do not forget that your primary
responsibility is to drive the vehicle. A driver's
attention to the road must always be his/her
primary focus when driving. For your safety
and the safety of others, stop before trying to
remove window fogging or cleaning the
windshield in front of the Night View Assist
Plus camera.
Bear in mind that at a speed of just 30 mph
(approximately 50 km/h), your vehicle is
covering a distance of 44 feet
(approximately 14 m) every second.
XTo defrost: check the automatic air
conditioning settings (Y page 260) and fold
down the camera cover ( Y page 419).XTo defrost the inside of the windshield:
fold down the camera cover ( Y page 419)
and clean the windshield ( Y page 417).320Driving systemsDriving and parking
Page 326 of 488

exterior mirror and the following is shown in
the multifunction display, for example:GWARNING
Active Blind Spot Assist is only an aid
designed to assist driving. It is not a substitute
for attentive driving. In some cases, the
course-correcting brake application is not
sufficient to avoid a collision. In such a case,
you must steer, brake or accelerate.
In very rare cases, the system may
erroneously detect a danger of collision in the
area of crash barriers or similar lane borders
and apply the brakes. Active Blind Spot Assist
does not detect all traffic situations and road
users. Always make sure that there is
sufficient distance on the side for other traffic
or obstacles. An inappropriate brake
application may be interrupted at any time if
you steer slightly in the opposite direction or
accelerate.
You are responsible for driving at appropriate
speeds, braking in good time, and steering
correctly. Always adapt your driving style to
suit the prevailing road and weather
conditions. Always pay attention to traffic
conditions and your surroundings. Otherwise,
you may fail to recognize dangers in time,
cause an accident and injure yourself and
others.
There will be either no or only a weak course-
correcting brake application if:
R there are vehicles or obstacles, e.g. crash
barriers, located on both sides of your
vehicle.
R a vehicle approaches you too closely at the
side.
R you have adopted a sporty driving style with
high cornering speeds.
R you clearly brake or accelerate.
R a driving safety system intervenes, e.g.
ESP ®
or PRE-SAFE ®
Brake.
R ESP ®
is switched off.
R a loss of tire pressure or a defective tire is
detected.
Switching on Active Blind Spot AssistXMake sure that the radar sensor system
( Y page 344) and Active Blind Spot Assist
( Y page 343) are activated in the on-board
computer.XTurn the SmartKey to position 2 in the
ignition lock.
Warning lamps : light up red in the
exterior mirrors for approximately 1.5
seconds and then turn yellow.
Active Lane Keeping Assist
Important safety notes
Active Lane Keeping Assist monitors the area
in front of your vehicle by means of a camera
at the top of the windshield. Active Lane
Keeping Assist detects lane markings on the
road and warns you before you leave your
lane unintentionally. If you do not react to the
warning, a lane-correcting application of the
brakes can bring the vehicle back into the
original lane.
:Active Lane Keeping Assist camera
If you have selected the Display Unit
Speed-/Odometer (Y page 344) function in
the on-board computer and select km as the
unit of measurement, Active Lane Keeping
324Driving systemsDriving and parking
Page 333 of 488
! If the coolant temperature is too high a
display message is shown.
If the coolant temperature rises above
248 ‡(120 †), do not drive any further as
this could damage the engine.
Tachometer
The red band in the tachometer indicates the
engine's overrevving range.
! Do not drive in the overrevving range, as
this could damage the engine.
The fuel supply is interrupted to protect the
engine when the red band is reached.
Outside temperature display
The outside temperature display is in the
multifunction display ( Y page 332).
GWARNING
The outside temperature indicator is not
designed to serve as an ice-warning device
and is therefore unsuitable for that purpose.
Indicated temperatures just above the
freezing point do not guarantee that the road
surface is free of ice. The road may still be icy,
especially in wooded areas or on bridges.
Changes in the outside temperature are
displayed after a short delay.
Operating the on-board computer
The on-board computer is activated as soon
as you turn the SmartKey to position 2 in the
ignition lock.
You can control the multifunction display and
the settings in the on-board computer using
the buttons on the multifunction steering
wheel.
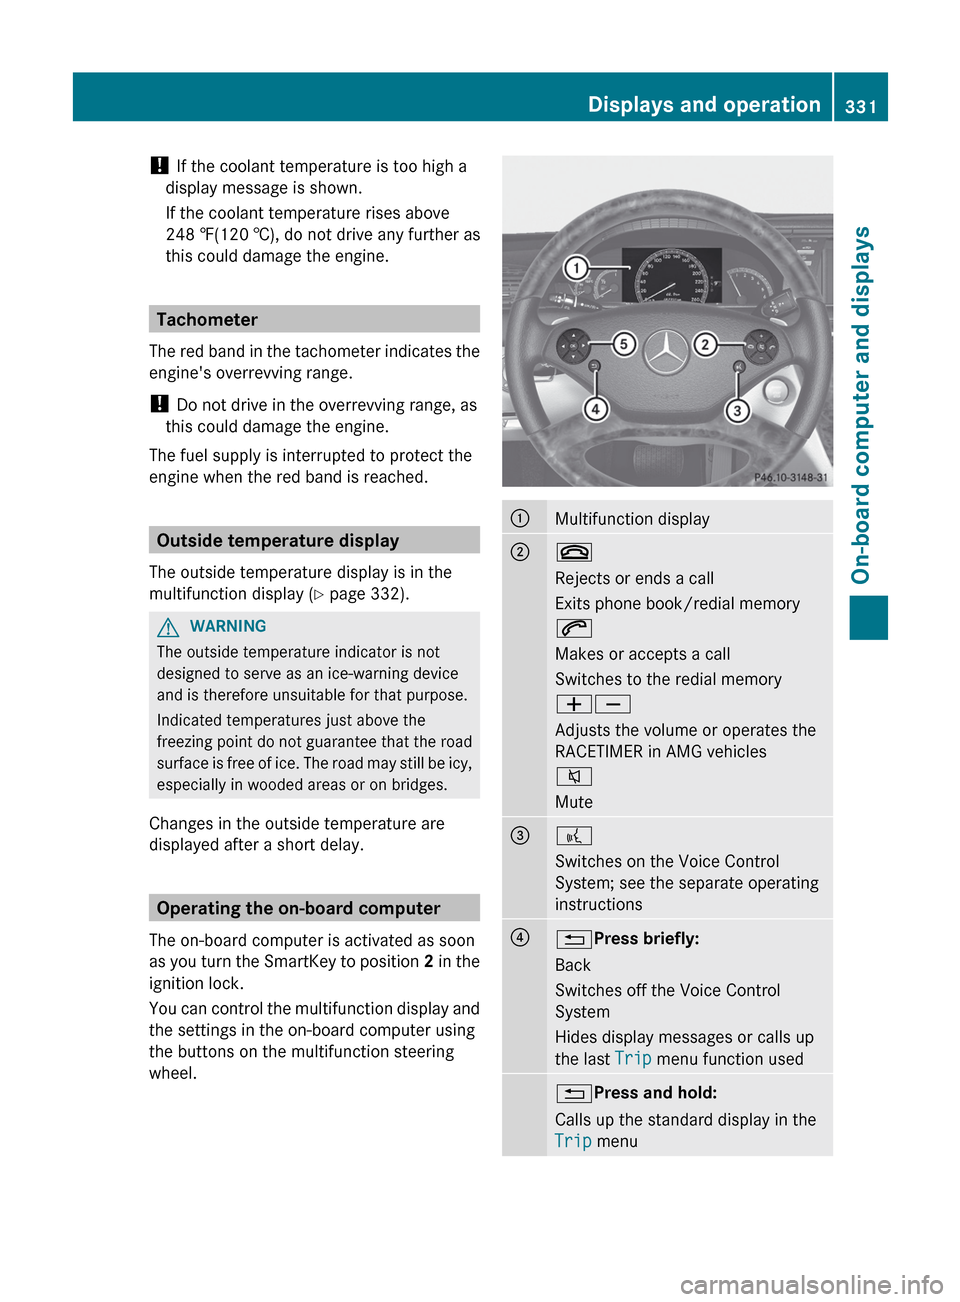
:Multifunction display;~
Rejects or ends a call
Exits phone book/redial memory
6
Makes or accepts a call
Switches to the redial memory
WX
Adjusts the volume or operates the
RACETIMER in AMG vehicles
8
Mute=?
Switches on the Voice Control
System; see the separate operating
instructions?% Press briefly:
Back
Switches off the Voice Control
System
Hides display messages or calls up
the last Trip menu function used% Press and hold:
Calls up the standard display in the
Trip menuDisplays and operation331On-board computer and displaysZ