ECO mode MERCEDES-BENZ CL-Class 2012 C216 User Guide
[x] Cancel search | Manufacturer: MERCEDES-BENZ, Model Year: 2012, Model line: CL-Class, Model: MERCEDES-BENZ CL-Class 2012 C216Pages: 488, PDF Size: 21.88 MB
Page 114 of 488

NaviAudioTelephoneVideoVehicleModeFM/AM radioVideo DVDECOMap orientationSat radioAUXMulticontour
seat/lumbar
settingsPoint of interest
symbols on the mapDiscVideo offRear window
blindTraffic symbols on the
mapMemory cardEASY-ENTRY/
EXIT systemText information on
mapMUSIC
REGISTERExterior
lighting
delayed
switch-offO Topographical
mapMedia
InterfaceInterior
lighting
delayed
switch-offO City viewUSBAmbient
lightingO Freeway
informationAUXO Automatic
mirror fold-in
functionO Volume reductionAudio offO Locator
lightingSIRIUS serviceO Automatic
lockingMap versionO Interior
motion sensorO Tow-away
alarmO Trunk lid
opening height
restrictionSPLITVIEW
SPLITVIEW allows you to simultaneously use
different COMAND functions on the front-
passenger side and on the driver's side.
Depending on the viewing angle of the display
(from the driver's seat or from the front-
passenger seat), you will see two different
displays.112At a glanceCOMAND
Page 120 of 488
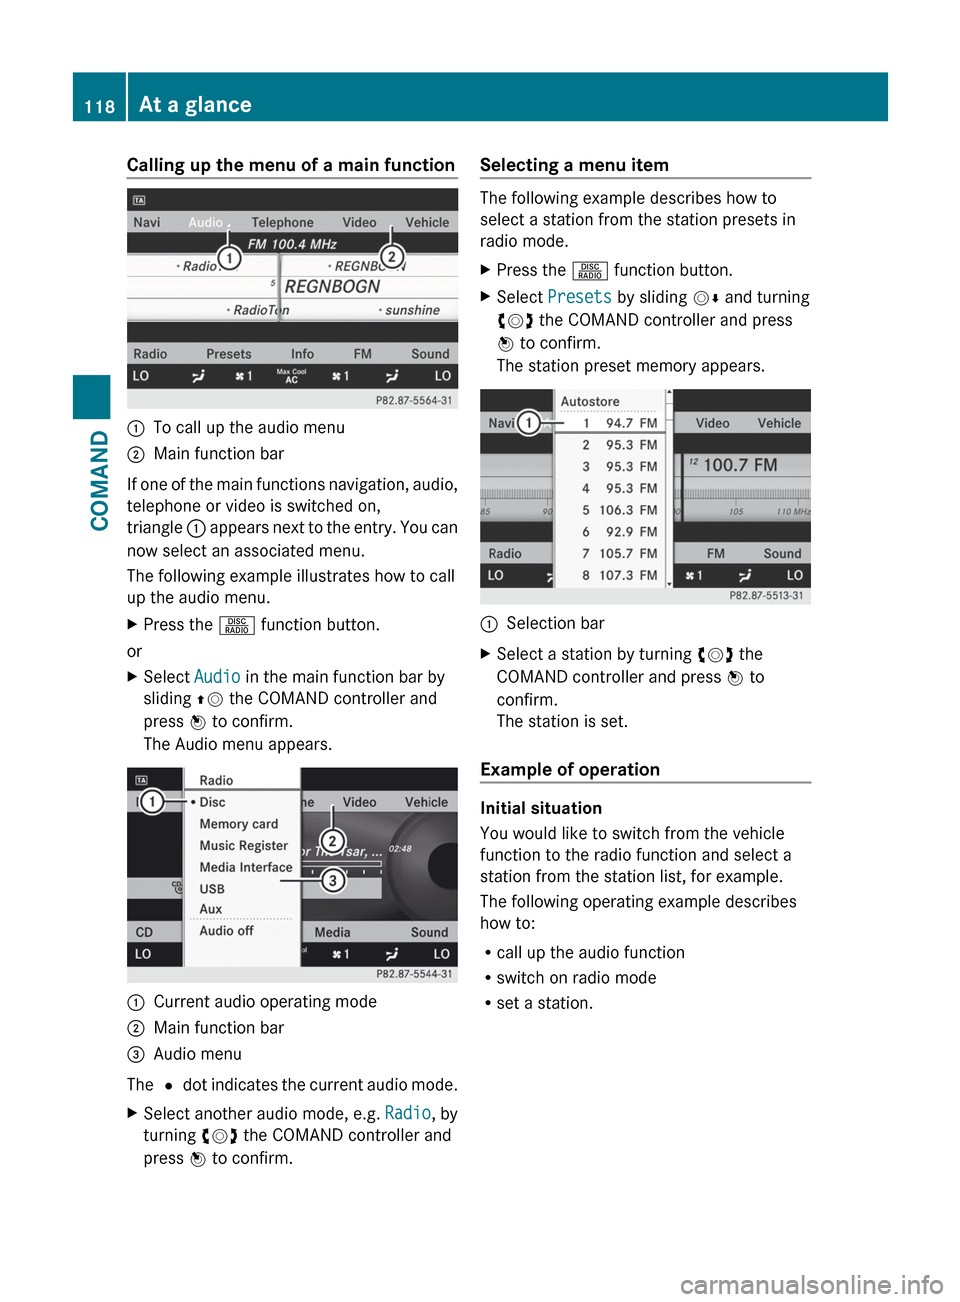
Calling up the menu of a main function:To call up the audio menu;Main function bar
If one of the main functions navigation, audio,
telephone or video is switched on,
triangle : appears next to the entry. You can
now select an associated menu.
The following example illustrates how to call
up the audio menu.
XPress the R function button.
or
XSelect Audio in the main function bar by
sliding ZV the COMAND controller and
press W to confirm.
The Audio menu appears.:Current audio operating mode;Main function bar=Audio menu
The # dot indicates the current audio mode.
XSelect another audio mode, e.g. Radio, by
turning cVd the COMAND controller and
press W to confirm.Selecting a menu item
The following example describes how to
select a station from the station presets in
radio mode.
XPress the R function button.XSelect Presets by sliding VÆ and turning
cVd the COMAND controller and press
W to confirm.
The station preset memory appears.:Selection barXSelect a station by turning cVd the
COMAND controller and press W to
confirm.
The station is set.
Example of operation
Initial situation
You would like to switch from the vehicle
function to the radio function and select a
station from the station list, for example.
The following operating example describes
how to:
R call up the audio function
R switch on radio mode
R set a station.
118At a glanceCOMAND
Page 126 of 488
Mute
Switching audio and video sources on/off
XPress the 8 button on the multifunction
steering wheel.
The sound from the respective audio or
video source is switched on or muted.
i When the sound is off, the system
displays the , symbol in the status line.
When you change the audio or video
source, or adjust the volume, sound
automatically switches on again.
i Even if the sound is switched off, you will
still hear traffic and navigation system
announcements.
Switching off Traffic program and
navigation announcements completely
XTraffic program: press the 8 button
until the . message disappears from the
status bar of the display.
A confirmation tone sounds.XNavigation announcements: during an
announcement, press the 8 button on
the multifunction steering wheel.
Switching Traffic program and navigation
announcements on again
XTraffic program: press and hold down the
8 button until the . display appears
in the status bar.
A confirmation tone sounds.XNavigation messages: select the y
symbol in the navigation menu bar and
press W to confirm.
i
The navigation announcements are
activated again if you switch COMAND off
and on again or start a new route guidance.
Adjusting the volume
Adjusting the volume for the audio or
video source
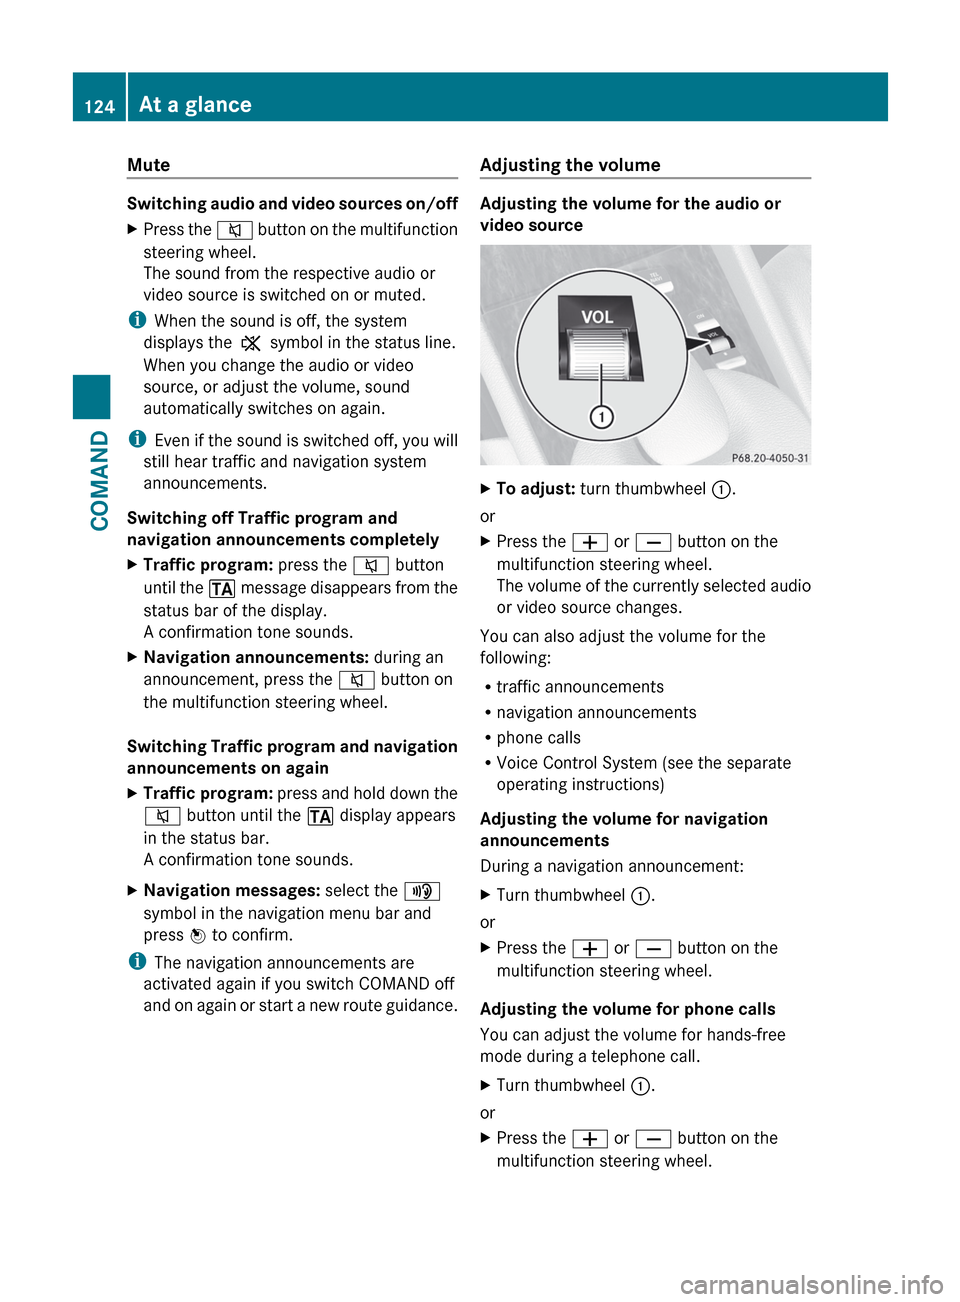
XTo adjust: turn thumbwheel :.
or
XPress the W or X button on the
multifunction steering wheel.
The volume of the currently selected audio
or video source changes.
You can also adjust the volume for the
following:
R traffic announcements
R navigation announcements
R phone calls
R Voice Control System (see the separate
operating instructions)
Adjusting the volume for navigation
announcements
During a navigation announcement:
XTurn thumbwheel :.
or
XPress the W or X button on the
multifunction steering wheel.
Adjusting the volume for phone calls
You can adjust the volume for hands-free
mode during a telephone call.
XTurn thumbwheel :.
or
XPress the W or X button on the
multifunction steering wheel.124At a glanceCOMAND
Page 128 of 488
Surround sound
General information
If your vehicle is equipped with the harman/
kardon ®
Logic 7 ®
surround sound system,
you can set the optimum surround sound for
every passenger.
The harman/kardon ®
Logic 7 ®
surround
sound system is available for the following
operating modes:
R radio (FM only)
R satellite radio
R audio CD
R audio DVD (MLP, dts, PCM and Dolby
Digital audio formats)
R MP3 (including SD memory card)
R Media Interface
R video DVD (PCM, dts and Dolby Digital
audio formats)
R AUX
Because some DVDs contain both stereo and
multichannel audio formats, it may be
necessary to set the audio format
( Y page 211).
i The Logic7 ®
ON function enables
playback of, e.g. stereo recordings with a
surround sound experience for every
passenger. It enables optimum playback of
music and films on CD, audio DVD or video
DVD with multichannel audio formats, such
as MLP, dts or Dolby Digital. This results in
sound characteristics like those intended
by the sound engineer when the original
was recorded.
i If you select LOGIC7®
OFF , the sound
system plays the tracks as stored on the
medium. Due to the design of the
passenger compartment, an optimum
audio experience cannot be guaranteed for
all passengers.
i Discs which support the audio formats
mentioned have the following logos:
Dolby Digital
dts
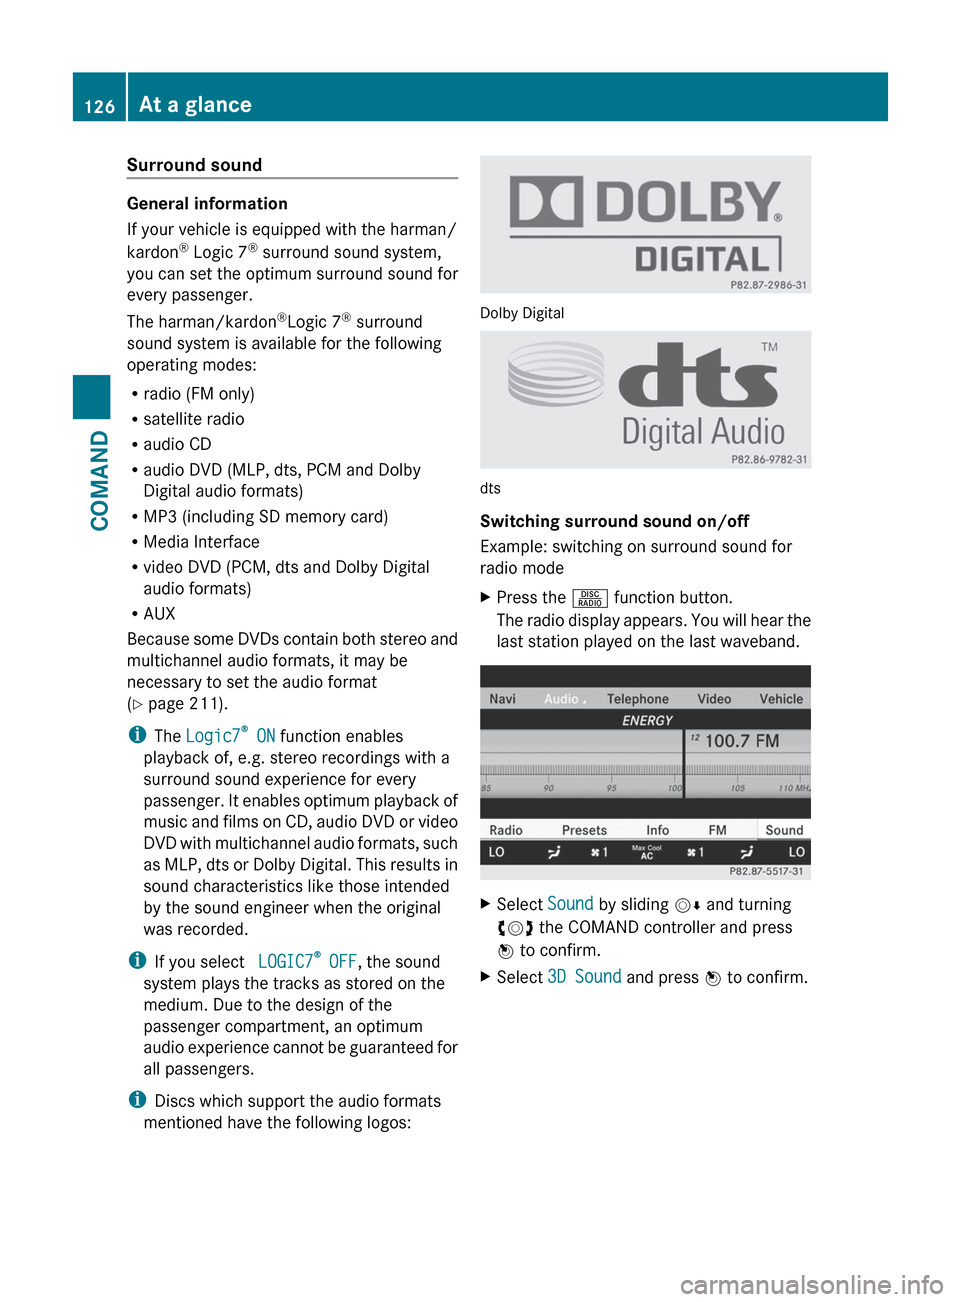
Switching surround sound on/off
Example: switching on surround sound for
radio mode
XPress the R function button.
The radio display appears. You will hear the
last station played on the last waveband.XSelect Sound by sliding VÆ and turning
cVd the COMAND controller and press
W to confirm.XSelect 3D Sound and press W to confirm.126At a glanceCOMAND
Page 129 of 488
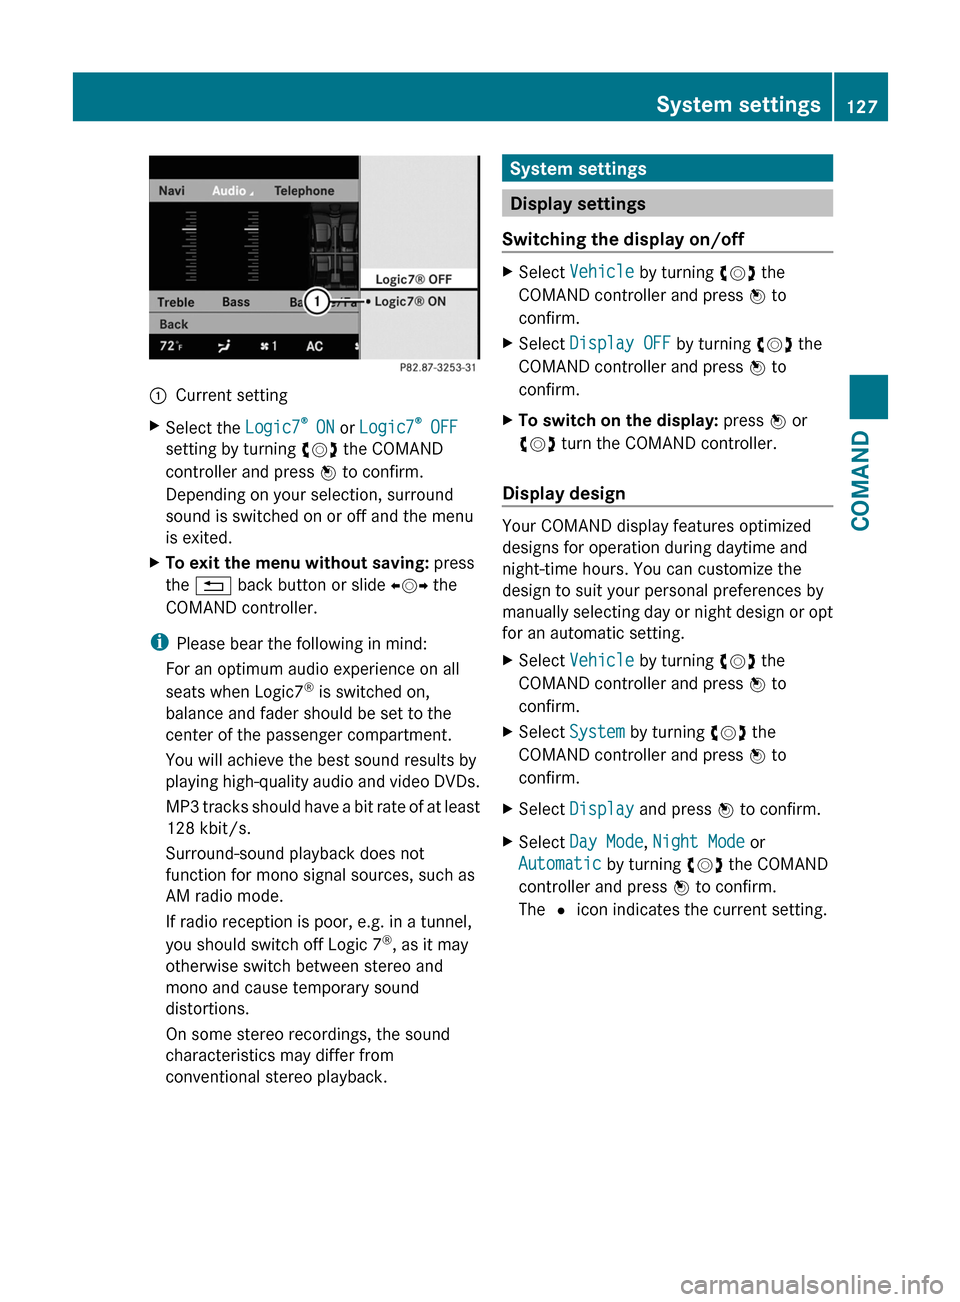
:Current settingXSelect the Logic7®
ON or Logic7 ®
OFF
setting by turning cVd the COMAND
controller and press W to confirm.
Depending on your selection, surround
sound is switched on or off and the menu
is exited.XTo exit the menu without saving: press
the % back button or slide XVY the
COMAND controller.
i Please bear the following in mind:
For an optimum audio experience on all
seats when Logic7 ®
is switched on,
balance and fader should be set to the
center of the passenger compartment.
You will achieve the best sound results by
playing high-quality audio and video DVDs.
MP3 tracks should have a bit rate of at least
128 kbit/s.
Surround-sound playback does not
function for mono signal sources, such as
AM radio mode.
If radio reception is poor, e.g. in a tunnel,
you should switch off Logic 7 ®
, as it may
otherwise switch between stereo and
mono and cause temporary sound
distortions.
On some stereo recordings, the sound
characteristics may differ from
conventional stereo playback.
System settings
Display settings
Switching the display on/off
XSelect Vehicle by turning cVd the
COMAND controller and press W to
confirm.XSelect Display OFF by turning cVd the
COMAND controller and press W to
confirm.XTo switch on the display: press W or
cVd turn the COMAND controller.
Display design
Your COMAND display features optimized
designs for operation during daytime and
night-time hours. You can customize the
design to suit your personal preferences by
manually selecting day or night design or opt
for an automatic setting.
XSelect Vehicle by turning cVd the
COMAND controller and press W to
confirm.XSelect System by turning cVd the
COMAND controller and press W to
confirm.XSelect Display and press W to confirm.XSelect Day Mode , Night Mode or
Automatic by turning cVd the COMAND
controller and press W to confirm.
The # icon indicates the current setting.System settings127COMANDZ
Page 138 of 488
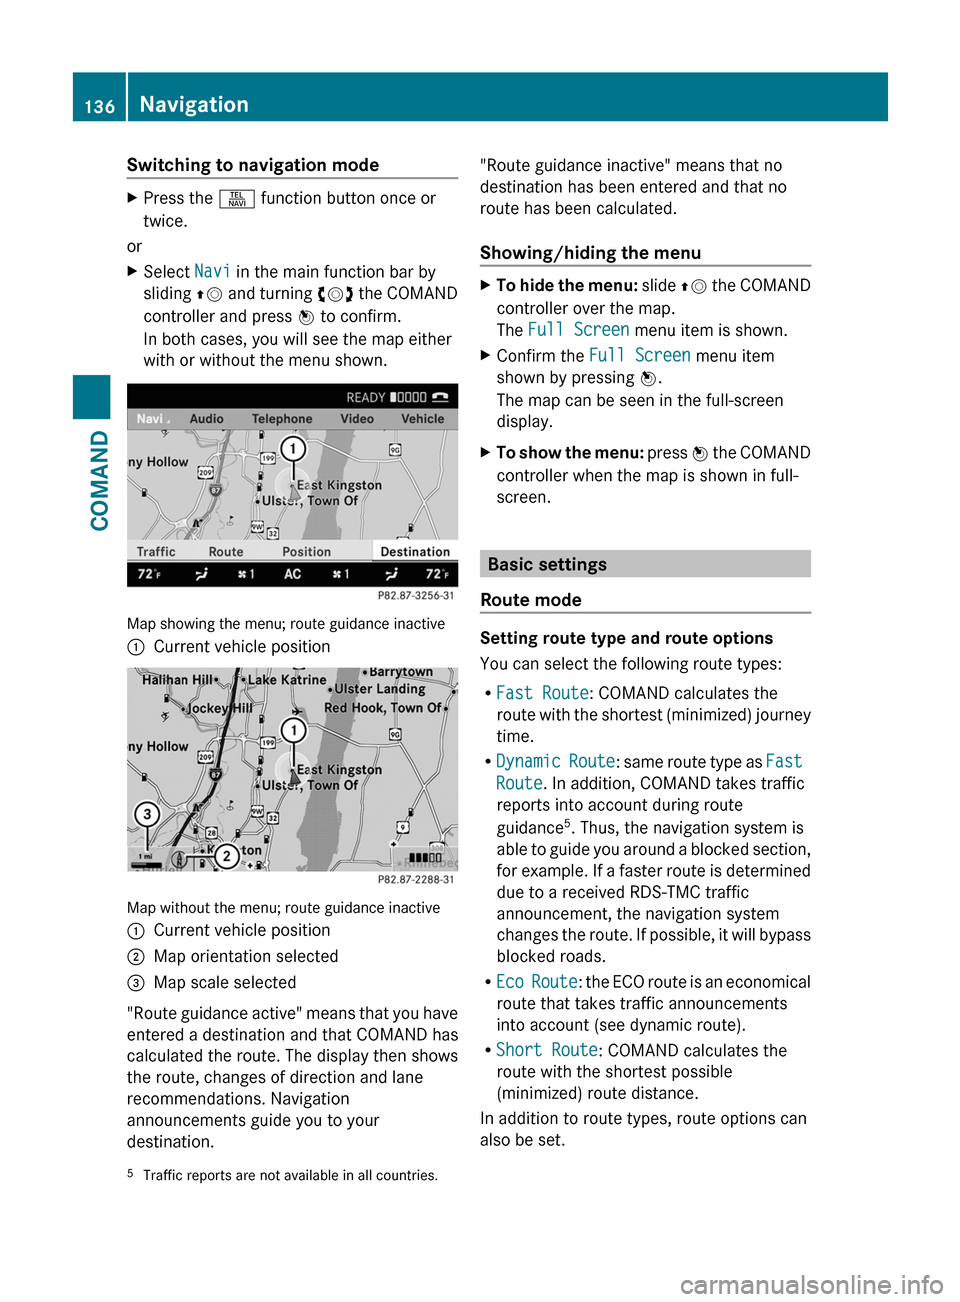
Switching to navigation modeXPress the S function button once or
twice.
or
XSelect Navi in the main function bar by
sliding ZV and turning cVd the COMAND
controller and press W to confirm.
In both cases, you will see the map either
with or without the menu shown.
Map showing the menu; route guidance inactive
:Current vehicle position
Map without the menu; route guidance inactive
:Current vehicle position;Map orientation selected=Map scale selected
" Route guidance active" means that you have
entered a destination and that COMAND has
calculated the route. The display then shows
the route, changes of direction and lane
recommendations. Navigation
announcements guide you to your
destination.
"Route guidance inactive" means that no
destination has been entered and that no
route has been calculated.
Showing/hiding the menuXTo hide the menu: slide ZV the COMAND
controller over the map.
The Full Screen menu item is shown.XConfirm the Full Screen menu item
shown by pressing W.
The map can be seen in the full-screen
display.XTo show the menu: press W the COMAND
controller when the map is shown in full-
screen.
Basic settings
Route mode
Setting route type and route options
You can select the following route types:
R Fast Route : COMAND calculates the
route with the shortest (minimized) journey
time.
R Dynamic Route : same route type as Fast
Route . In addition, COMAND takes traffic
reports into account during route
guidance 5
. Thus, the navigation system is
able to guide you around a blocked section,
for example. If a faster route is determined
due to a received RDS-TMC traffic
announcement, the navigation system
changes the route. If possible, it will bypass
blocked roads.
R Eco Route : the ECO route is an economical
route that takes traffic announcements
into account (see dynamic route).
R Short Route : COMAND calculates the
route with the shortest possible
(minimized) route distance.
In addition to route types, route options can
also be set.
5 Traffic reports are not available in all countries.136NavigationCOMAND
Page 144 of 488
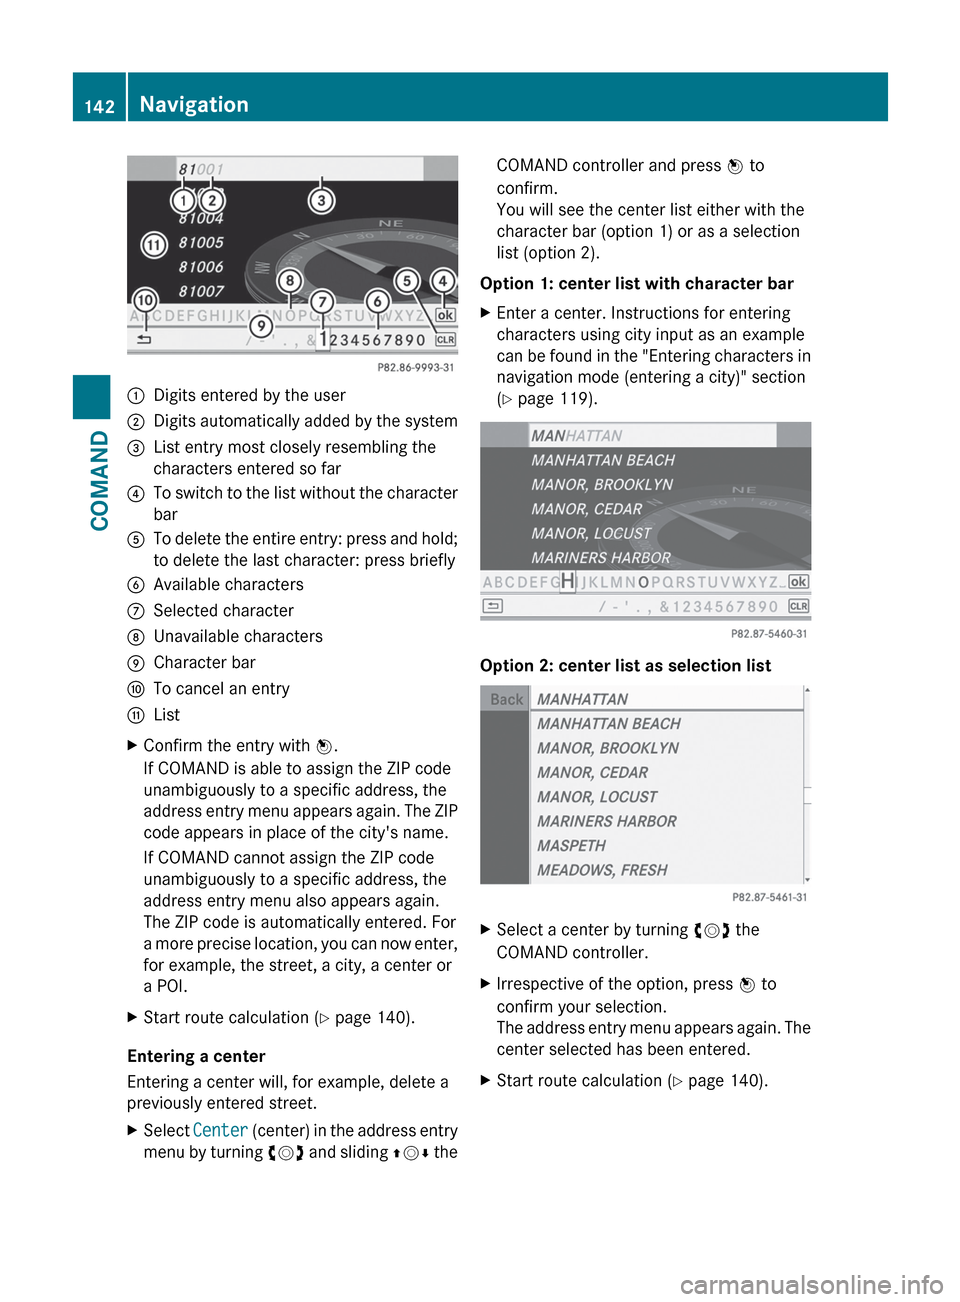
:Digits entered by the user;Digits automatically added by the system=List entry most closely resembling the
characters entered so far?To switch to the list without the character
barATo delete the entire entry: press and hold;
to delete the last character: press brieflyBAvailable charactersCSelected characterDUnavailable charactersECharacter barFTo cancel an entryGListXConfirm the entry with W.
If COMAND is able to assign the ZIP code
unambiguously to a specific address, the
address entry menu appears again. The ZIP
code appears in place of the city's name.
If COMAND cannot assign the ZIP code
unambiguously to a specific address, the
address entry menu also appears again.
The ZIP code is automatically entered. For
a more precise location, you can now enter,
for example, the street, a city, a center or
a POI.XStart route calculation ( Y page 140).
Entering a center
Entering a center will, for example, delete a
previously entered street.
XSelect Center (center) in the address entry
menu by turning cVd and sliding ZVÆ theCOMAND controller and press W to
confirm.
You will see the center list either with the
character bar (option 1) or as a selection
list (option 2).
Option 1: center list with character bar
XEnter a center. Instructions for entering
characters using city input as an example
can be found in the "Entering characters in
navigation mode (entering a city)" section
( Y page 119).
Option 2: center list as selection list
XSelect a center by turning cVd the
COMAND controller.XIrrespective of the option, press W to
confirm your selection.
The address entry menu appears again. The
center selected has been entered.XStart route calculation ( Y page 140).142NavigationCOMAND
Page 155 of 488
Display and description of lane recommendations
The colors used in the lane recommendation display vary depending on whether day or night
design is switched on.LaneDay designNight designRecommended lane C
In this lane, you will be able to complete the
next two changes of direction without
changing lanes.Dark blueLight bluePossible lane B
In this lane, you will only be able to complete
the next change of direction without
changing lanes.Light blueDark blueLane not recommended D
In this lane, you will not be able to complete
the next change of direction without
changing lane.GrayGrayDisplay in the multifunction display
The lane recommendations are also shown in
the multifunction display. You will find further
information in the "On-board computer"
section ( Y page 335).
Using car pool lanes
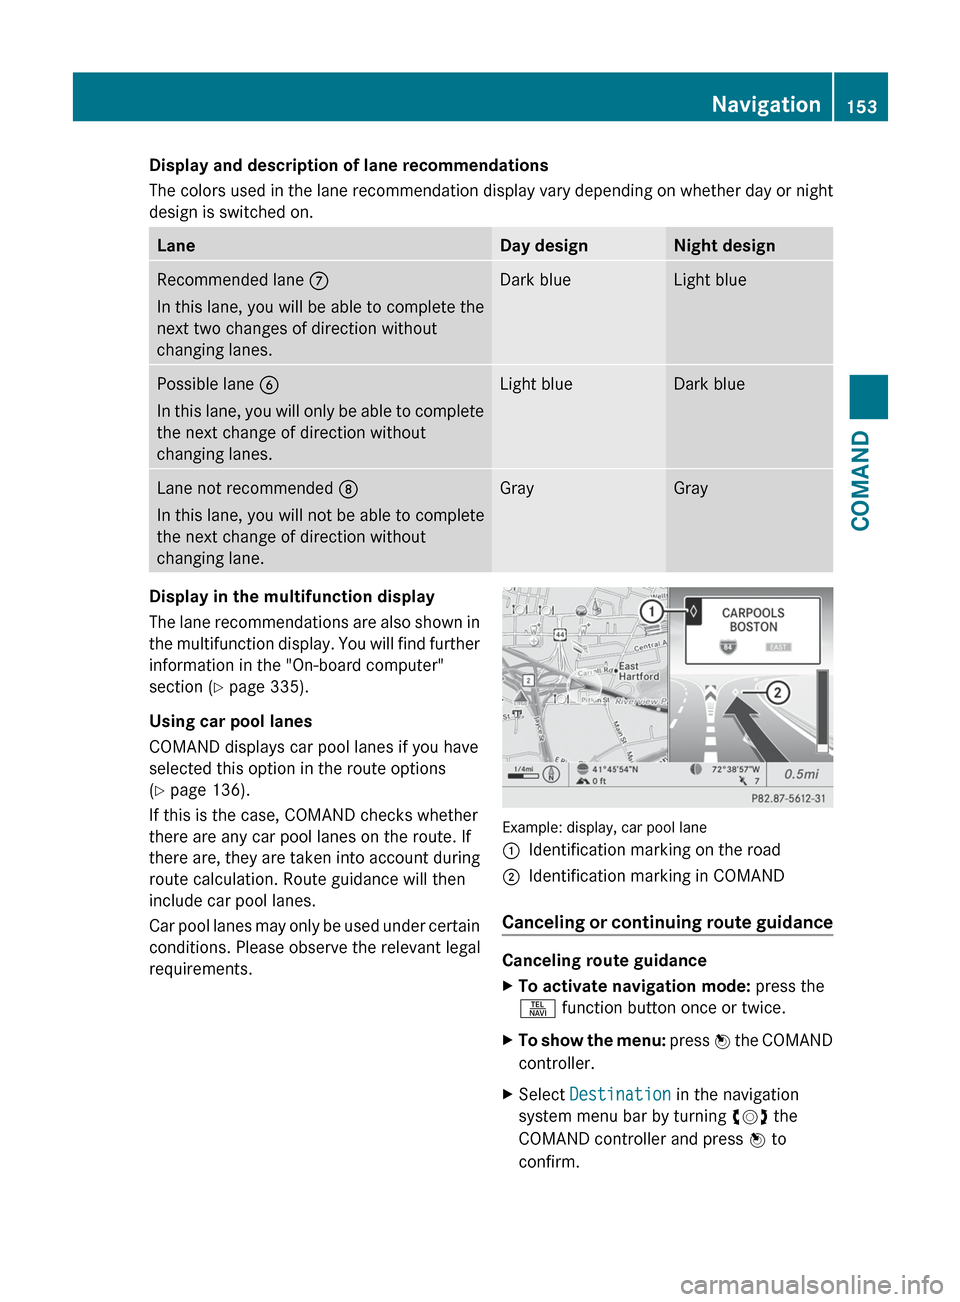
COMAND displays car pool lanes if you have
selected this option in the route options
( Y page 136).
If this is the case, COMAND checks whether
there are any car pool lanes on the route. If
there are, they are taken into account during
route calculation. Route guidance will then
include car pool lanes.
Car pool lanes may only be used under certain
conditions. Please observe the relevant legal
requirements.
Example: display, car pool lane
:Identification marking on the road;Identification marking in COMAND
Canceling or continuing route guidance
Canceling route guidance
XTo activate navigation mode: press the
S function button once or twice.XTo show the menu: press W the COMAND
controller.XSelect Destination in the navigation
system menu bar by turning cVd the
COMAND controller and press W to
confirm.Navigation153COMANDZ
Page 157 of 488
Avoiding a section of the route blocked
by a traffic jam
This function blocks a section of the route
ahead of you. You can set the length of the
blocked route section. If possible, COMAND
calculates a detour around the blocked
section of the route.
XTo activate navigation mode: press the
S function button once or twice.XTo show the menu: press W the COMAND
controller.XSelect Route in the navigation system
menu bar by turning cVd the COMAND
controller and press W to confirm.XSelect Detour and press W to confirm.XTo block a section of the route: select
More or Less repeatedly and confirm using
W until the desired section has been
selected.
i The total length of the section that can be
blocked is defined by the digital map. The
menu items are available accordingly.
XTo start route calculation: select Start
and press W to confirm.XTo delete the blocked section: select
Delete while the message is shown and
press W to confirm.
COMAND calculates the route without the
block.
Selecting an alternative route
With the "Alternative route" function, routes
other than the original one can be calculated.
XTo activate navigation mode: press the
S function button once or twice.XTo show the menu: press W the COMAND
controller.XSelect Route in the navigation system
menu bar by turning cVd the COMAND
controller and press W to confirm.XSelect Alternative Route and press W
to confirm.
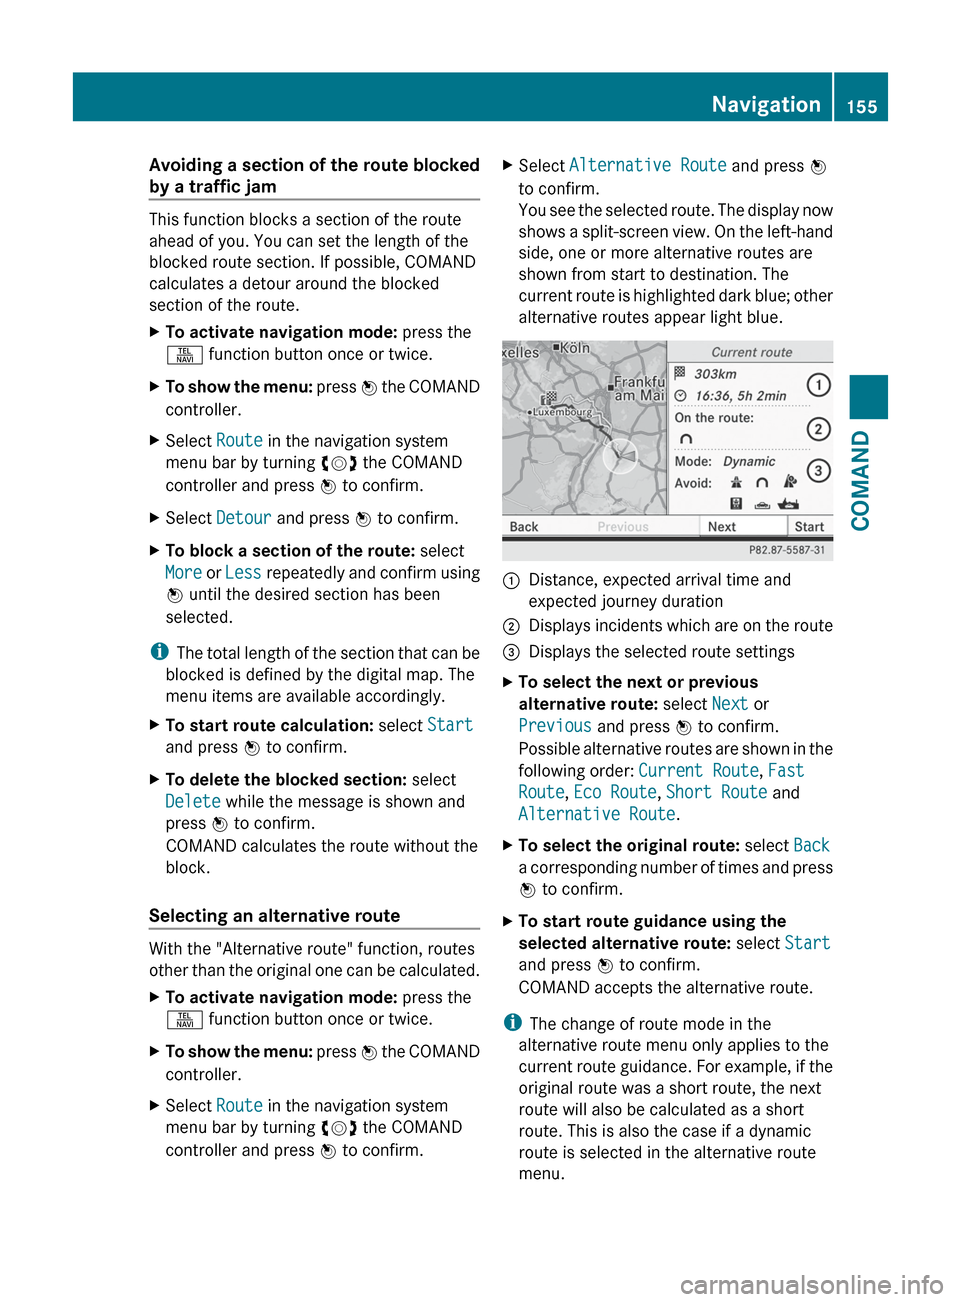
You see the selected route. The display now
shows a split-screen view. On the left-hand
side, one or more alternative routes are
shown from start to destination. The
current route is highlighted dark blue; other
alternative routes appear light blue.:Distance, expected arrival time and
expected journey duration;Displays incidents which are on the route=Displays the selected route settingsXTo select the next or previous
alternative route: select Next or
Previous and press W to confirm.
Possible alternative routes are shown in the
following order: Current Route, Fast
Route , Eco Route , Short Route and
Alternative Route .XTo select the original route: select Back
a corresponding number of times and press
W to confirm.XTo start route guidance using the
selected alternative route: select Start
and press W to confirm.
COMAND accepts the alternative route.
i The change of route mode in the
alternative route menu only applies to the
current route guidance. For example, if the
original route was a short route, the next
route will also be calculated as a short
route. This is also the case if a dynamic
route is selected in the alternative route
menu.
Navigation155COMANDZ
Page 163 of 488
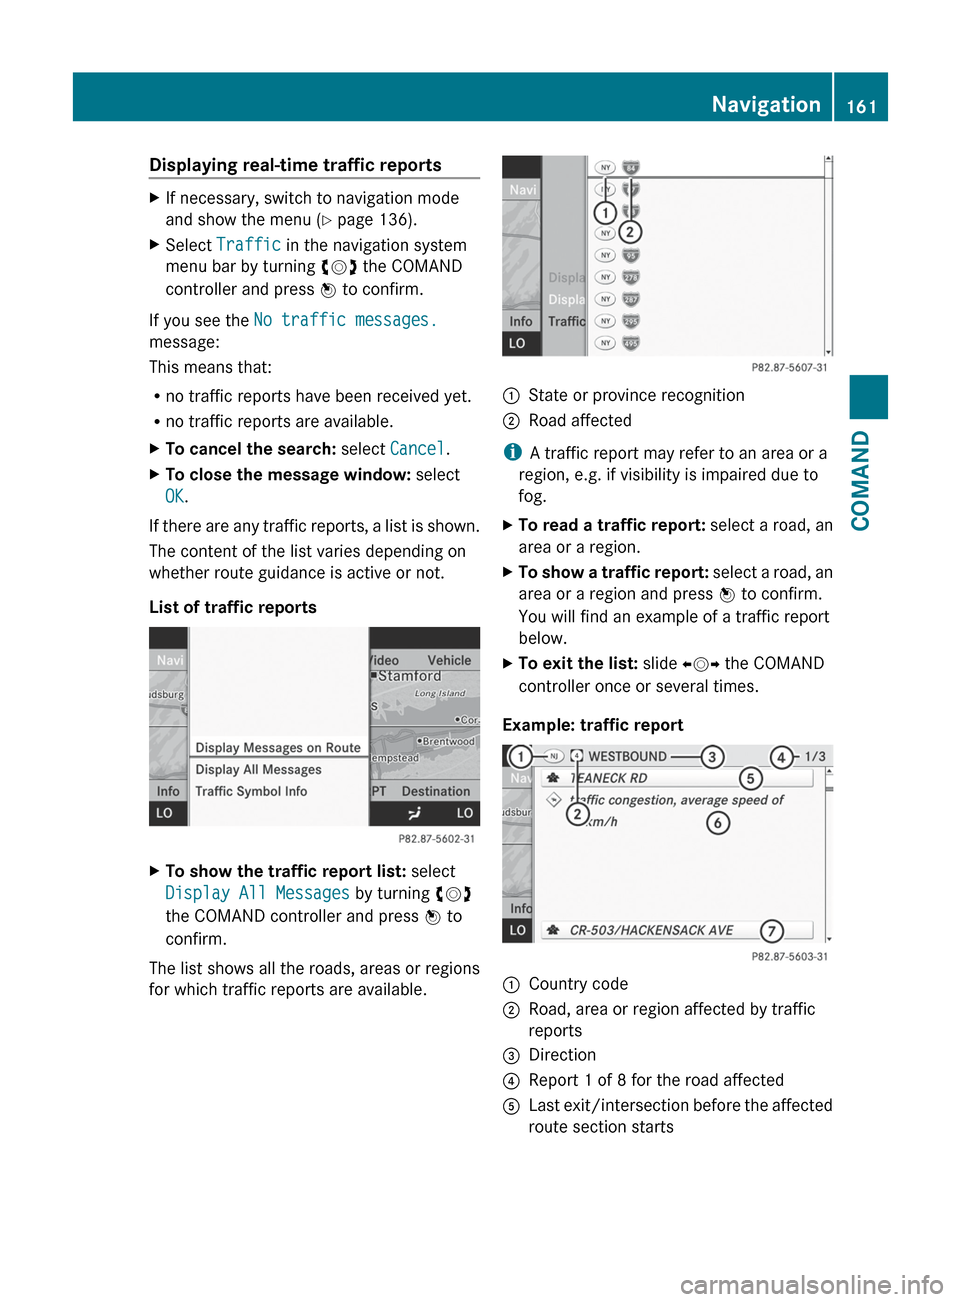
Displaying real-time traffic reportsXIf necessary, switch to navigation mode
and show the menu ( Y page 136).XSelect Traffic in the navigation system
menu bar by turning cVd the COMAND
controller and press W to confirm.
If you see the No traffic messages.
message:
This means that:
R no traffic reports have been received yet.
R no traffic reports are available.
XTo cancel the search: select Cancel .XTo close the message window: select
OK .
If there are any traffic reports, a list is shown.
The content of the list varies depending on
whether route guidance is active or not.
List of traffic reports
XTo show the traffic report list: select
Display All Messages by turning cVd
the COMAND controller and press W to
confirm.
The list shows all the roads, areas or regions
for which traffic reports are available.
1State or province recognition2Road affected
i A traffic report may refer to an area or a
region, e.g. if visibility is impaired due to
fog.
XTo read a traffic report: select a road, an
area or a region.XTo show a traffic report: select a road, an
area or a region and press W to confirm.
You will find an example of a traffic report
below.XTo exit the list: slide XVY the COMAND
controller once or several times.
Example: traffic report
1Country code2Road, area or region affected by traffic
reports3Direction4Report 1 of 8 for the road affected5Last exit/intersection before the affected
route section startsNavigation161COMANDZ