MERCEDES-BENZ CL-Class 2014 C217 Owner's Manual
Manufacturer: MERCEDES-BENZ, Model Year: 2014, Model line: CL-Class, Model: MERCEDES-BENZ CL-Class 2014 C217Pages: 494, PDF Size: 13.55 MB
Page 231 of 494
Changing the picture format
X
Press Wthe COMAND controller to show
the menu.
X Select Video by sliding
VÆand turning
cVd the COMAND controller and press
W to confirm.
X Select Video DVD and press
Wto confirm.
X Select DVD-V and press
Wto confirm.
The DVD- Vmenu appears. The ädot in
front of a menu item indicates the current
setting.
X Select Auto ,
16:9 optimized ,
4:3 or
Widescreen and press
Wto confirm.
X Select a setting by turning cVdthe
COMAND controller and press Wto
confirm. Video DVD mode
Safety notes G
WARNING
COMAND is classified as a Class 1laser
product .You must not open the casing. If you
open the casing, or if the casing is faulty or
damaged, there is a risk of exposure to
invisible laser radiation. This may damage
your eyes, or those of others.
COMAND does not contain any parts that can
be serviced by the user. For safety reasons,
all maintenance work must be carried out by
qualified aftersales technicians. G
WARNING
Only when the vehicle is stationary should
you:
R load a disc
R eject a disc
There is a risk of being distracted from the
road and traffic conditions if this is done while
the vehicle is in motion. Notes about discs There may be playback problems when
playing copied discs. There are a large variety
of discs, DVD authoring software, writing
software and writers available. This variety
means that there is no guarantee that the
system will be able to play discs that you have
copied yourself.
! Do not affix stickers or labels to the discs,
as they could peel off and damage
COMAND. Stickers can cause the disc to
bend, which can result in read errors and
disc recognition problems.
! COMAND is designed to accommodate
discs which comply with the EN 60908
standard. You can therefore only use discs
with a maximum thickness of 1.3 mm.
If you insert thicker discs, e.g. those that
contain data on both sides (DVD on one
side and audio data on the other), they
cannot be ejected and can damage
COMAND.
Use round discs with a diameter of 12 cm.
Do not use discs with a diameter of 8 cm,
even with an adapter.
DVD playback conditions If video DVDsdon
ot conform to the NTSC or
PAL TV standards, they may create picture,
sound or other problems during playback.
COMAND can play back video DVDs
produced according to the following
standards:
R region code 1orregion code 0(no region
code)
i If you insert a video DVD with a different
regio ncode, you will see a message to this
effect.
R PAL or NTSC standard
You will generally find the relevant details
either on the DVD itself or on the DVD case.
i COMAND is set to region code 1 at the
factory. This setting can be changed at an Video
229COMAND Z
Page 232 of 494
authorized Mercedes-Ben
zCenter. This will
allow you to play video DVDs with a
differen tregion code, provided that they
are produced in accordance with the PAL
or NTSC standard. The region code can be
changed up to five times.
Function restrictions Depending on the DVD, it is possible that
certain functions or actions will be
temporarily blocked or may not function at all.
As soon as you try to activate these functions
or actions, you will see the Ksymbol in the
display.
Inserting and removing DVDs X
Proceed as described in the "Inserting and
ejecting CDs and DVDs" section
(Y page 209).
Activating video DVD mode Option 1
X
Insert a video DVD.
COMAND loads the medium inserted and
starts to play it.
Option 2
X Select Video in the main function bar by
sliding ZVand turning cVdthe COMAND
controller and press Wto confirm.
Video DVD mode is switched on.
Hiding/showing the navigation menu X
To show: turncVd or slide ZVÆthe
COMAND controller.
i This function is not available while the
DVD's own menu (Y page 232) is being
displayed.
X To hide: slideZVÆ the COMAND
controller.
or
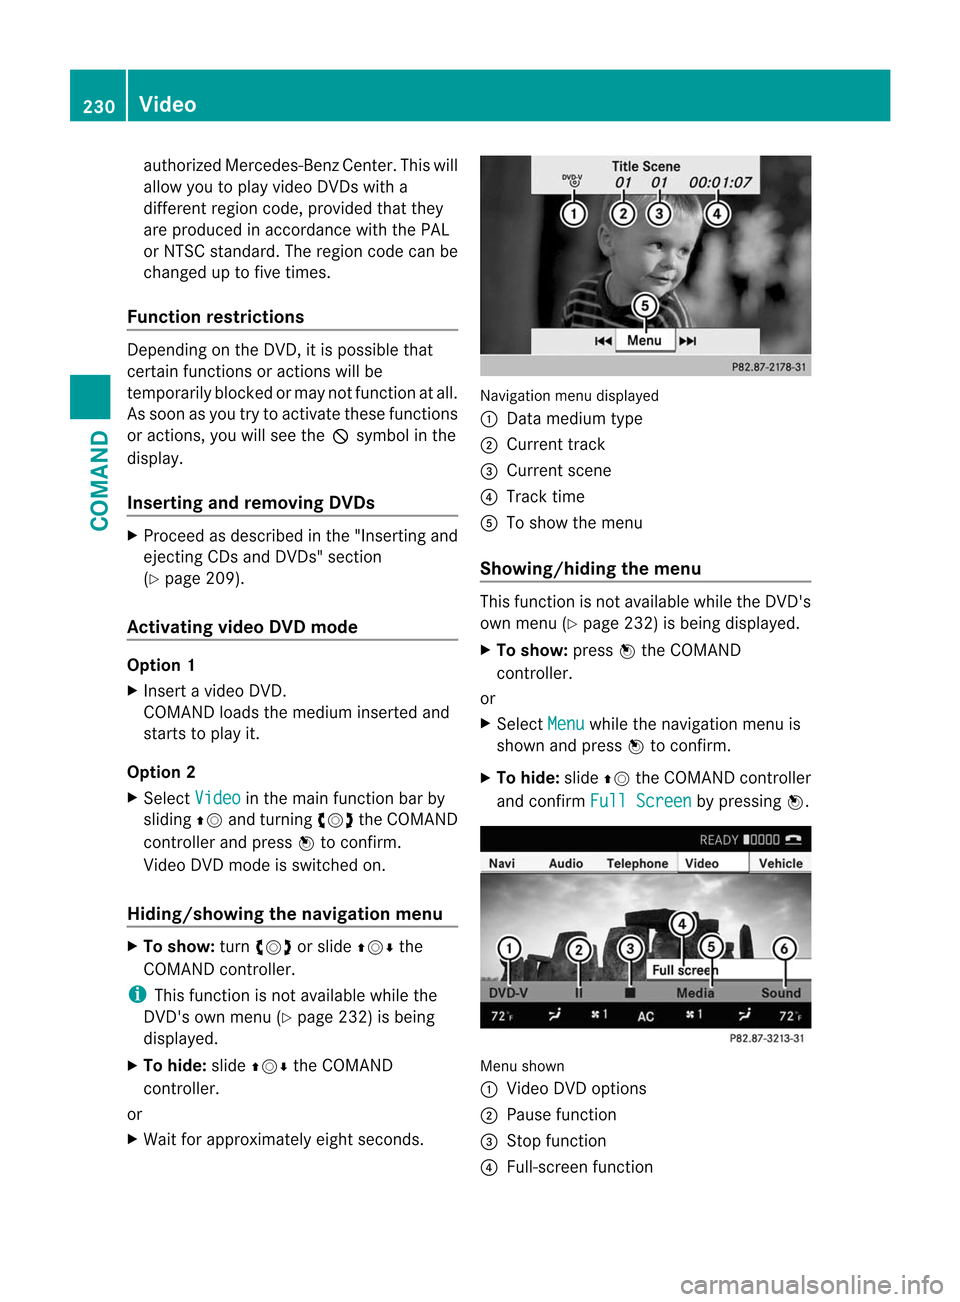
X Wait for approximately eight seconds. Navigation menu displayed
:
Data medium type
; Current track
= Current scene
? Track time
A To show the menu
Showing/hiding the menu This function is not available while the DVD's
own menu (Y
page 232) is being displayed.
X To show: pressWthe COMAND
controller.
or
X Select Menu while the navigation menu is
shown and press Wto confirm.
X To hide: slideZVthe COMAND controller
and confirm Full Screen by pressing
W. Menu shown
:
Video DVD options
; Pause function
= Stop function
? Full-screen function 230
VideoCOMAND
Page 233 of 494
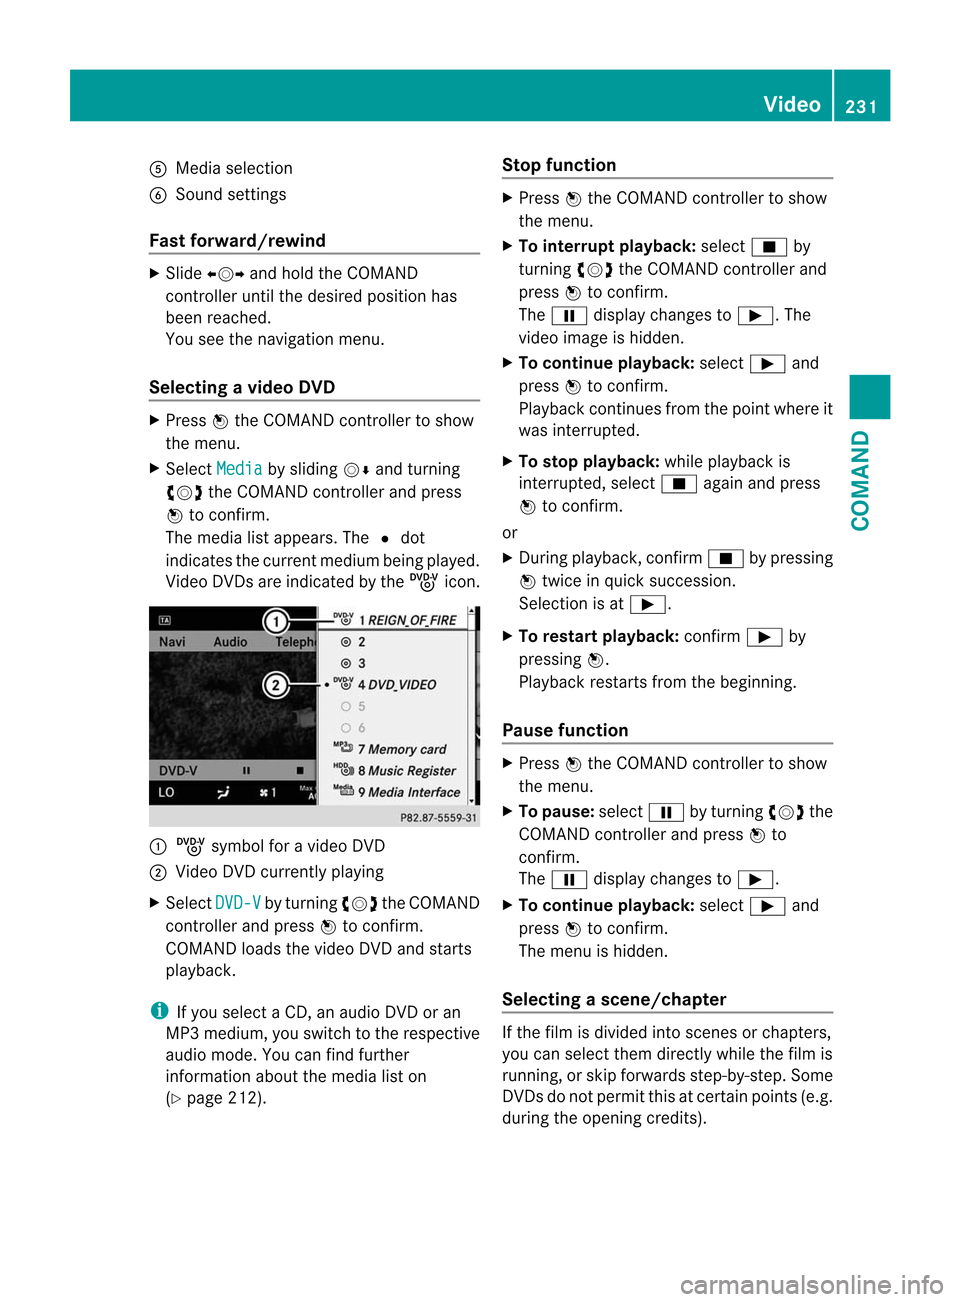
A
Media selection
B Sound settings
Fast forward/rewind X
Slide XVY and hold the COMAND
controller until the desired position has
been reached.
You see the navigation menu.
Selecting avideo DVD X
Press Wthe COMAND controller to show
the menu.
X Select Media by sliding
VÆand turning
cVd the COMAND controller and press
W to confirm.
The media list appears. The #dot
indicates the current medium being played.
Video DVDs are indicated by the ýicon. :
ý symbol for a video DVD
; Video DVD currently playing
X Select DVD-V by turning
cVdthe COMAND
controller and press Wto confirm.
COMAN Dloads the video DVD and starts
playback.
i If you select a CD, an audio DVD or an
MP3 medium, you switch to the respective
audio mode. You can find further
information about the media list on
(Y page 212). Stop function X
Press Wthe COMAND controller to show
the menu.
X To interrupt playback: selectÉby
turning cVdthe COMAND controller and
press Wto confirm.
The Ë display changes to Ì.The
video image is hidden.
X To continue playback: selectÌand
press Wto confirm.
Playback continues from the point where it
was interrupted.
X To stop playback: while playback is
interrupted, select Éagain and press
W to confirm.
or
X During playback, confirm Éby pressing
W twice in quick succession.
Selection is at Ì.
X To restart playback: confirmÌby
pressing W.
Playback restarts from the beginning.
Pause function X
Press Wthe COMAND controller to show
the menu.
X To pause: selectËby turning cVdthe
COMAND controller and press Wto
confirm.
The Ë display changes to Ì.
X To continue playback: selectÌand
press Wto confirm.
The menu is hidden.
Selecting ascene/chapter If the film is divided into scenes or chapters,
you can select them directly while the film is
running, or skip forwards step-by-step. Some
DVDs do no
tpermit this at certain points (e.g.
during the opening credits). Video
231COMAND Z
Page 234 of 494
It may also be possible to select the scene/
chapter from within the menu stored on the
DVD.
X
To skip forwards or back: turncVd or
slide XVY the COMAND controller.
The control menu (Y page 230) appears for
approximately eight seconds.
X On the multifunction steering wheel:
switch on video DVD mode in COMAND
(Y page 230).
X Use the =or; button to select the
Audio menu.
X Press 9or: to select a scene/
chapter.
If you press and hold 9or: for an
extended period, rapid scroll begins.
Selecting afilm/title This function is only available if the DVD is
divided into several films/tracks. If the DVD
contains several films, these can be selected
directly.
Afilm can be selected either when
the DV Dis being played back or when it is
stopped.
The film can also be selected from the menu
on the DVD itself.
X Press Wthe COMAND controller to show
the menu.
X Select DVD-V by turning
cVdthe COMAND
controller and press Wto confirm.
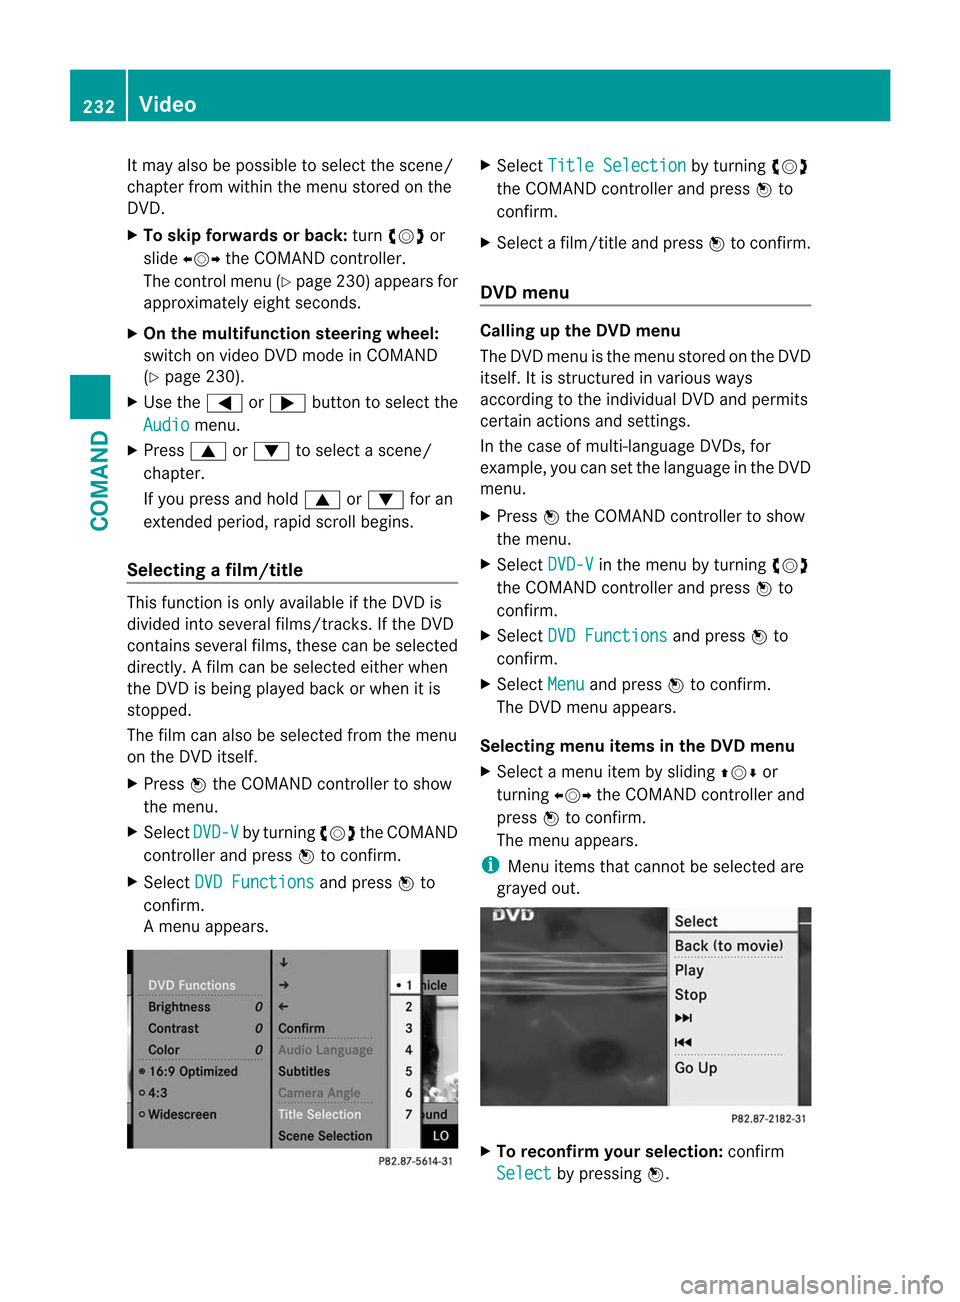
X Select DVD Functions and press
Wto
confirm.
Am enu appears. X
Select Title Selection by turning
cVd
the COMAND controller and press Wto
confirm.
X Select a film/title and press Wto confirm.
DVD menu Calling up the DVD menu
The DVD menu is the menu stored on the DVD
itself. It is structured in various ways
according to the individual DVD and permits
certain actions and settings.
In the case of multi-language DVDs, for
example, you can set the language in the DVD
menu.
X Press Wthe COMAND controller to show
the menu.
X Select DVD-V in the menu by turning
cVd
the COMAND controller and press Wto
confirm.
X Select DVD Functions and press
Wto
confirm.
X Select Menu and press
Wto confirm.
The DVD menu appears.
Selecting menu items in the DVD menu
X Select a menu item by sliding ZVÆor
turning XVYthe COMAND controller and
press Wto confirm.
The menu appears.
i Menu items that cannot be selected are
grayed out. X
To reconfirm your selection: confirm
Select by pressing
W.232
VideoCOMAND
Page 235 of 494
COMAND executes the action.
Make a selection from th
efurther options,
if necessary.
COMAND then switches back to the DVD
menu.
i Depending on the DVD, it is possible that
the Back (to the movie) ,
Play ,
Stop ,
C, DorGo up menu item may not
be operative or operative only at certain
points of the DVD. To indicate this, the
K symbol is shown in the display.
Stopping a film or skipping to the
beginning or end of ascene
X Select any men uitem from the DVD menu.
The menu appears.
X To stop the film: select theStop menu
ite ma nd press Wto confirm.
X To skip to the end of a scene: select the
D menu ite mand press Wto confirm.
X To ski pto the beginning of ascene:
selec tthe C menu item and press Wto
confirm.
Moving up one level in the DVD menu
X Press the %back button.
or
X Select the corresponding menu item in the
DVD menu and press Wthe COMAND
controller to confirm.
or
X Select any menu item in the DVD menu and
press Wthe COMAND controller to
confirm.
X Select Go up and press
Wto confirm.
Back to the film
X Press the %back button repeatedly
until you see the movie.
or
X Select the corresponding menu item from
the DVD menu.
X Select the Back (to the movie) menu
item in the menu and press Wto confirm. Setting the language and audio format This function is not available on all DVDs. If it
is available, you can set the DVD menu
language, the audio language or the audio
format. The number of settings is determined
by the DVD content. It is possible that the
settings may also be accessed in the DVD
menu (Y
page 232).
X Press Wthe COMAND controller to show
the menu.
X Select DVD-V in the menu by turning
cVd
the COMAND controller and press Wto
confirm.
X Select DVD Functions and press
Wto
confirm.
X Select Audio Language and press
Wto
confirm.
In both cases, a menu appears after a few
seconds. The #dot in front of an entry
indicates the currently selected language.
X Select a setting by turning cVdthe
COMAND controller and press Wto
confirm.
X To exit the menu: slideXVY the COMAND
controller.
Subtitles and camera angle These functions are not available on all DVDs.
The number of subtitle languages and camera
angles available depends on the content of
the DVD.Iti
s possible that the settings may
also be accessed in the DVD menu
(Y page 232).
X Press Wthe COMAND controller to show
the menu.
X Select DVD-V in the menu by turning
cVd
the COMAND controller and press Wto
confirm. Video
233COMAND Z
Page 236 of 494
X
Select DVD Functions and press
Wto
confirm.
X Select Subtitles or
Camera angle and
press Wto confirm.
In both cases, a menu appears .The # dot
in front of an entry indicates the current
setting.
X Select a setting by turning cVdthe
COMAND controller and press Wto
confirm.
X To exit the menu: slideXVY the COMAND
controller.
Interactive content DVDs can contain interactive content (e.g. a
video game). In a video game, for example,
you may be able to influence events by
selecting and triggering actions. The type and
number of actions depend on the DVD.
X
Select an action by sliding ZVÆorXVY the
COMAND controller and press Wto
execute it.
A menu appears and the first entry,
Select , is highlighted.
X Press Wthe COMAND controller. AUX video mode
AUX jacks An external video source (video AUX) can be
connected to COMAND via the media
interface( Ypage 222 )using the AUX jacks in
the glove box.
i In vehicles with a rear view camera, the
video AUX jack cannot be used for external
video sources. Switching to video AUX mode X
Select Video in the main function bar by
sliding ZVand turning cVdthe COMAND
controller and press Wto confirm.
If video AUX mode was the last mode
selected, it will now be active.
If another video source is switched on, you
can now switch to video AUX mode in the
video menu.
X Select Video and press
Wto confirm.
X Select AUX and press
Wto confirm.
The video AUX menu appears. You will hear
and see the content of the external video
source if it is connected and switched to
playback.
For details on how to operate the external
video source, see the respective device's
operating instructions.
Showing/hiding the menu X
To show: pressWthe COMAND
controller.
X To hide: slideZVthe COMAND controller
and confirm Full screen by pressing
W.
Volume and sound settings You will find details on volume (Y
page 127)
and sound (Y page 128) settings in the "At a
glance" section. G
WARNING
External video sources may have different
volumes, which can mean that system
messages such as traffic announcements and
navigation system announcements are much
louder. If necessary, please deactivate the
system messages or adjust their volume
manually.
i In some cases, the volume of the AUX
device may be quieter or louder, or the
usual maximum possible volume cannot be
reached. On some devices, it is possible to
adjust the volume separately.Int his case,
start at a medium volume and increase it 234
VideoCOMAND
Page 237 of 494
gradually. This enables you to determine
whether the system is able to play the
music at high volume without distorting it. Vehicle
Vehicle functions
General information In this menu, you can set the following vehicle
functions:
R
ECO
R multicontour seat settings
R rear window blind
R EASY-ENTRY/EXIT feature
R exterior lighting delayed switch-off
R interior lighting delayed switch-off
R ambient lighting
R automatic folding mirror function
R locator lighting
R automatic locking feature
R trunk lid opening height restriction
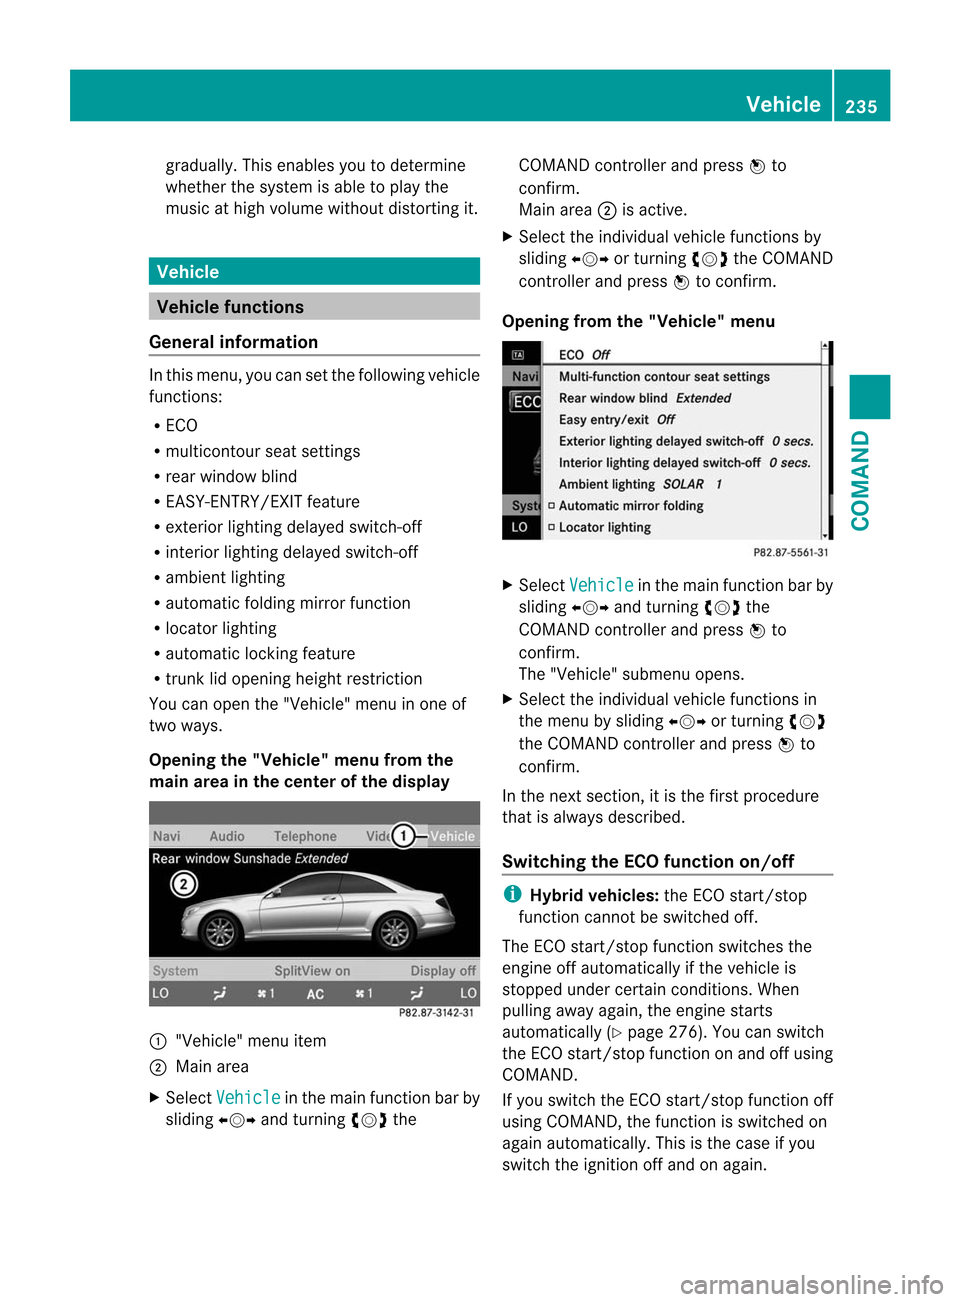
You can open the "Vehicle" menu in one of
two ways.
Opening the "Vehicle" menu from the
main area in the center of the display :
"Vehicle" menu item
; Main area
X Select Vehicle in the main function bar by
sliding XVYand turning cVdthe COMAND controller and press
Wto
confirm.
Main area ;is active.
X Select the individual vehicle functions by
sliding XVYor turning cVdthe COMAND
controller and press Wto confirm.
Opening from the "Vehicle" menu X
Select Vehicle in the main function bar by
sliding XVYand turning cVdthe
COMAND controller and press Wto
confirm.
The "Vehicle" submenu opens.
X Select the individual vehicle functions in
the menu by sliding XVYor turning cVd
the COMAND controller and press Wto
confirm.
In the next section, it is the first procedure
that is always described.
Switching the ECO function on/off i
Hybrid vehicles: the ECO start/stop
function cannot be switched off.
The ECO start/stop function switches the
engine off automatically if the vehicle is
stopped under certain conditions. When
pulling away again, the engine starts
automatically (Y page 276). You can switch
the ECO start/stop function on and off using
COMAND.
If you switch the ECO start/stop function off
using COMAND, the function is switched on
again automatically. This is the case if you
switch the ignition off and on again. Vehicle
235COMAND Z
Page 238 of 494
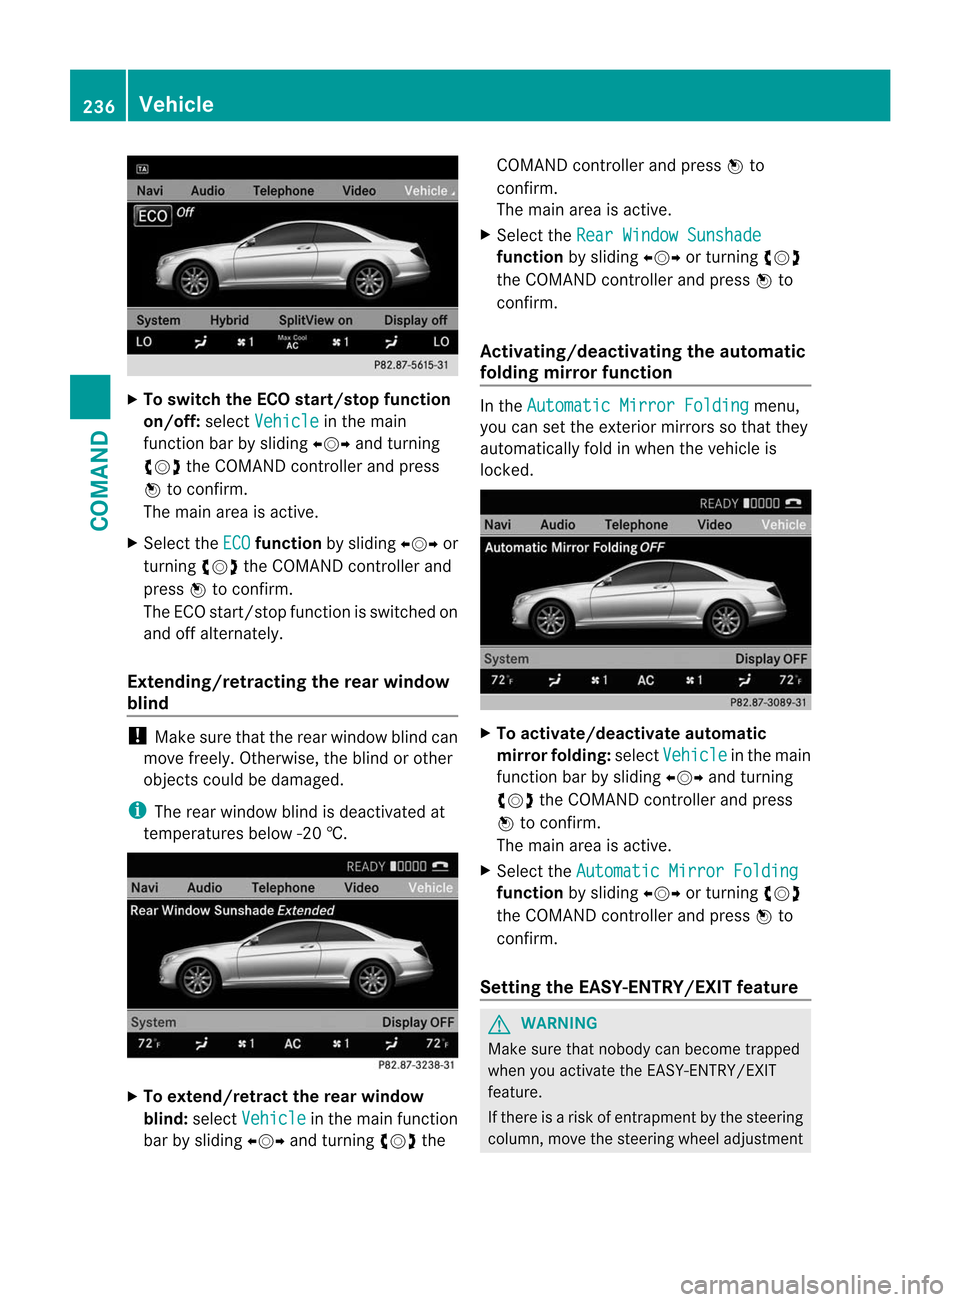
X
To switch the ECO start/stop function
on/off: selectVehicle in the main
functio nbar by sliding XVYand turning
cVd the COMAND controller and press
W to confirm.
The main area is active.
X Select the ECO function
by sliding XVYor
turning cVdthe COMAND controller and
press Wto confirm.
The ECO start/stop function is switched on
and off alternately.
Extending/retracting the rea rwindow
blind !
Make sure that the rear window blind can
move freely. Otherwise, the blind or other
objects could be damaged.
i The rear window blind is deactivated at
temperatures below -2 0†.X
To extend/retract the rear window
blind: selectVehicle in the main function
ba rb y sliding XVYand turning cVdthe COMAND controller and press
Wto
confirm.
The main area is active.
X Selec tthe Rear Window Sunshade function
by sliding XVYor turning cVd
the COMAND controller and press Wto
confirm.
Activating/deactivating the automatic
folding mirror function In the
Automatic Mirror Folding menu,
you can set the exterior mirrors so that they
automatically fold in when the vehicle is
locked. X
To activate/deactivate automatic
mirror folding: selectVehicle in the main
function bar by sliding XVYand turning
cVd the COMAND controller and press
W to confirm.
The main area is active.
X Select the Automatic Mirror Folding function
by sliding XVYor turning cVd
the COMAND controller and press Wto
confirm.
Setting the EASY-ENTRY/EXIT feature G
WARNING
Make sure that nobody can become trapped
when you activate the EASY-ENTRY/EXIT
feature.
If there is a risk of entrapmentb y the steering
column, move the steering wheel adjustment 236
VehicleCOMAND
Page 239 of 494
lever or press the position button of the
memory function.
If there is a risk of entrapmen tby the seat, you
can also cancel the adjustmen tprocedure by
moving the switch for seat adjustment. The
steering colum nand driver's sea tstop moving
immediately.
Never leave children unsupervised in the
vehicle. They could open the driver's door and
thereby unintentionally activate the EASY-
ENTRY/EXIT feature and become trapped.
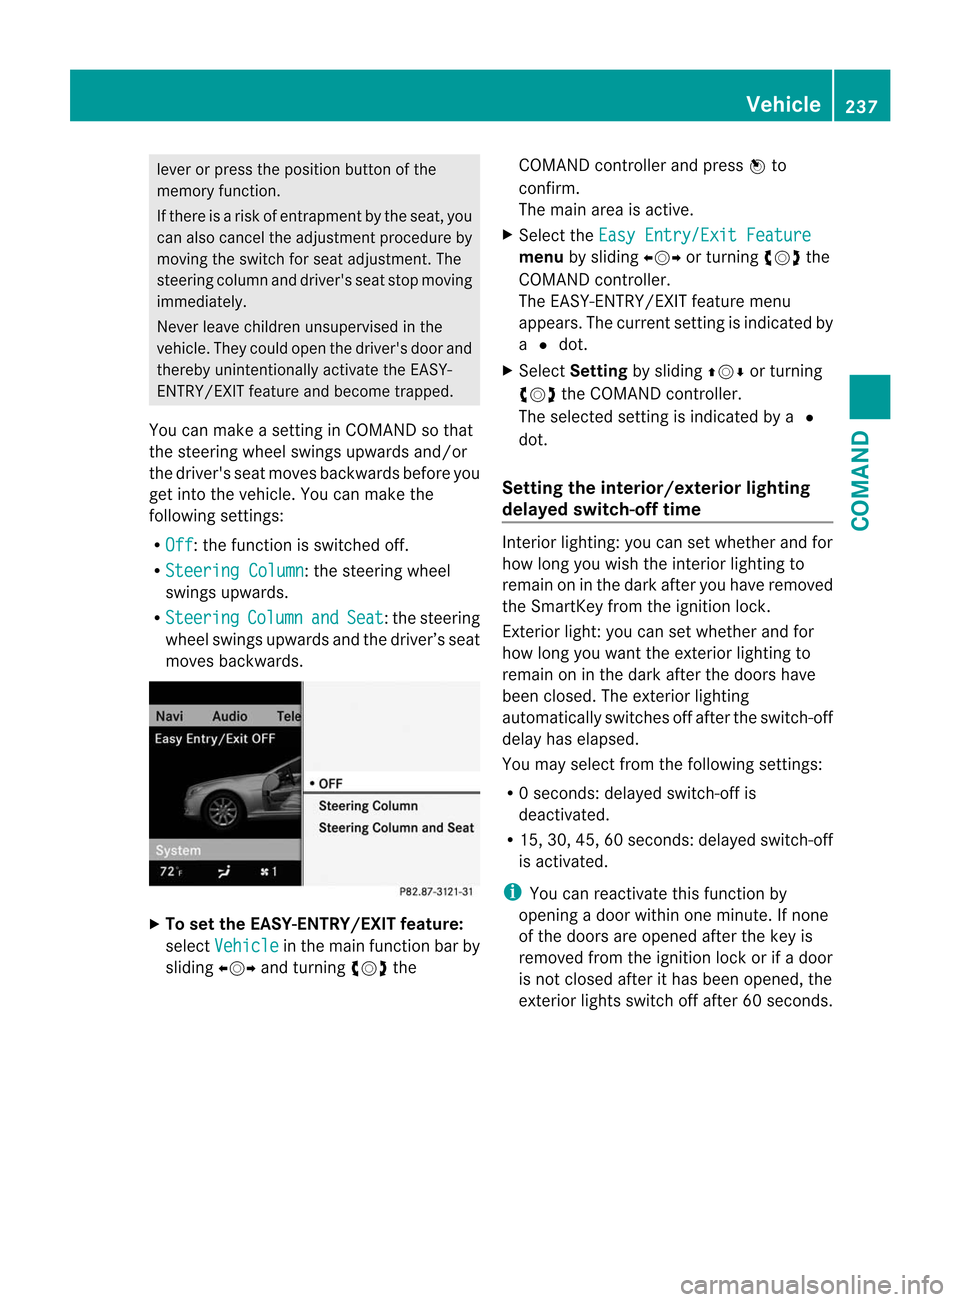
You can make a setting in COMAND so that
the steering wheel swings upwards and/or
the driver's seat moves backwards before you
get into the vehicle. You can make the
following settings:
R Off : the function is switched off.
R Steering Column :t
he steering wheel
swings upwards.
R Steering Column and Seat :t
he steering
wheel swings upwards and the driver’s seat
moves backwards. X
To set the EASY-ENTRY/EXIT feature:
select Vehicle in the main function bar by
sliding XVYand turning cVdthe COMAND controller and press
Wto
confirm.
The main area is active.
X Select the Easy Entry/Exit Feature menu
by sliding XVYor turning cVdthe
COMAND controller.
The EASY-ENTRY/EXIT feature menu
appears. The current setting is indicated by
a # dot.
X Select Setting by sliding ZVÆor turning
cVd the COMAND controller.
The selected setting is indicated by a #
dot.
Setting the interior/exterior lighting
delayed switch-off time Interior lighting: you can set whether and for
how long you wish the interior lighting to
remain on in the dark after you have removed
the SmartKey from the ignition lock.
Exterior light: you can set whether and for
how long you want the exterior lighting to
remain on in the dark after the doors have
been closed. The exterior lighting
automatically switches off after the switch-off
delay has elapsed.
You may select from the following settings:
R
0s econds: delayed switch-off is
deactivated.
R 15, 30, 45, 60 seconds: delayed switch-off
is activated.
i You can reactivate this function by
opening a door within one minute. If none
of the doors are opened after the key is
removed from the ignition lock or if a door
is not closed after it has been opened, the
exterior lights switch off after 60 seconds. Vehicle
237COMAND Z
Page 240 of 494
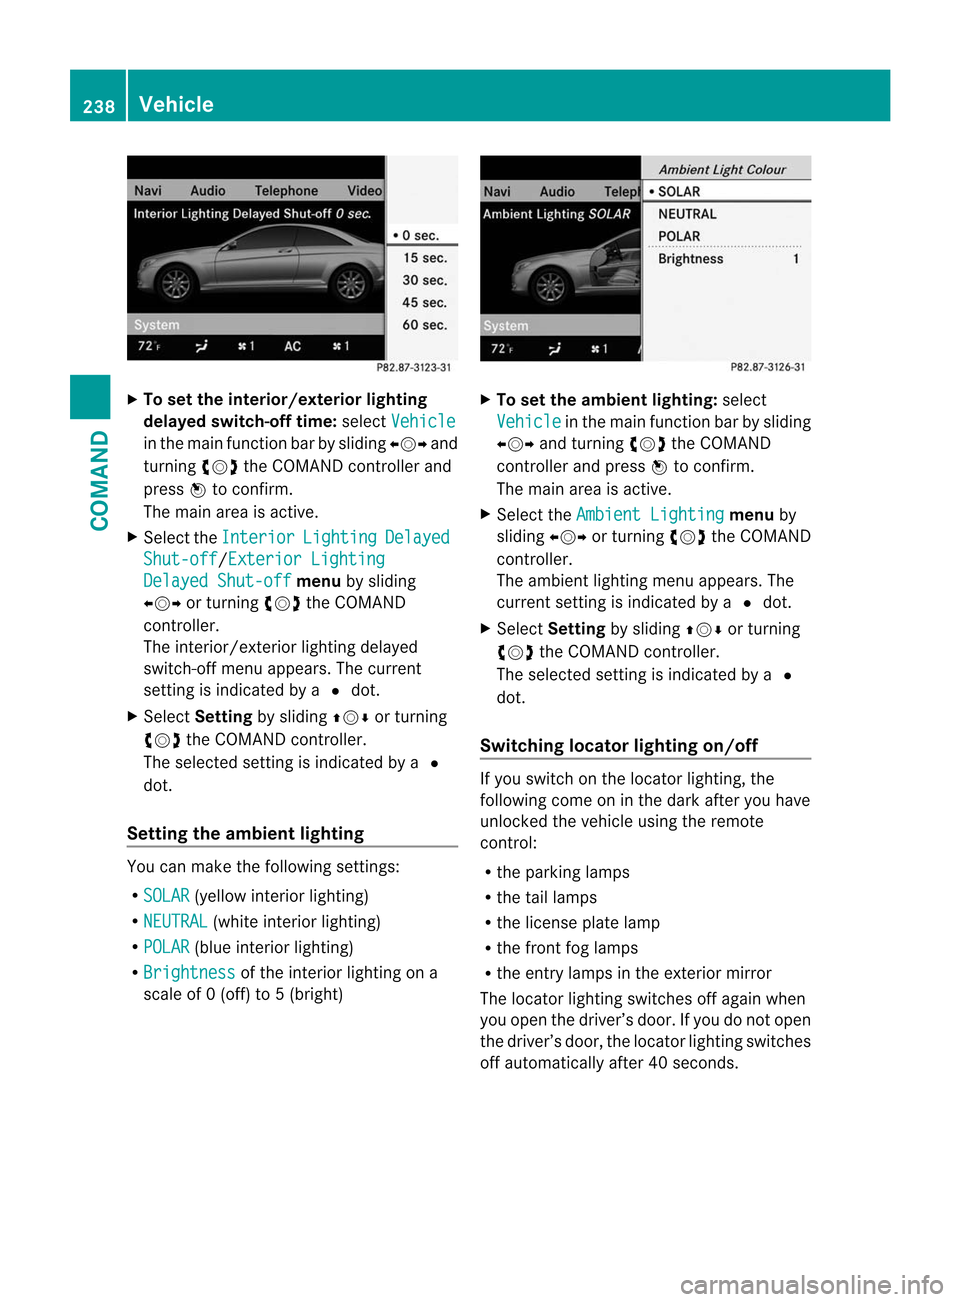
X
To se tthe interior/exterio rlighting
delayed switch-off time: selectVehicle in the main function bar by sliding
XVYand
turning cVdthe COMAND controller and
press Wto confirm.
The main area is active.
X Selec tthe Interior Lighting Delayed
Shut-off /Exterior Lighting
Delayed Shut-off menu
by sliding
XVY or turning cVdthe COMAND
controller.
The interior/exterior lighting delayed
switch-off menu appears. The current
setting is indicated by a #dot.
X Select Setting by sliding ZVÆor turning
cVd the COMAND controller.
The selected setting is indicated by a #
dot.
Setting the ambient lighting You can make the following settings:
R
SOLAR (yellow interior lighting)
R NEUTRAL (white interior lighting)
R POLAR (blue interior lighting)
R Brightness of the interior lighting on a
scale of 0 (off) to 5 (bright) X
To set the ambient lighting: select
Vehicle in the main function bar by sliding
XVY and turning cVdthe COMAND
controller and press Wto confirm.
The main area is active.
X Select the Ambient Lighting menu
by
sliding XVYor turning cVdthe COMAND
controller.
The ambient lighting menu appears. The
current setting is indicated by a #dot.
X Select Setting by sliding ZVÆor turning
cVd the COMAND controller.
The selected setting is indicated by a #
dot.
Switching locator lighting on/off If you switch on the locator lighting, the
following come on in the dark after you have
unlocked the vehicle using the remote
control:
R
the parking lamps
R the tail lamps
R the license plate lamp
R the front fog lamps
R the entry lamps in the exterior mirror
The locator lighting switches off again when
you open the driver’s door. If you do not open
the driver’s door, the locator lighting switches
off automatically after 40 seconds. 238
VehicleCOMAND