clock MERCEDES-BENZ CL-Class 2014 C217 Owner's Manual
[x] Cancel search | Manufacturer: MERCEDES-BENZ, Model Year: 2014, Model line: CL-Class, Model: MERCEDES-BENZ CL-Class 2014 C217Pages: 494, PDF Size: 13.55 MB
Page 85 of 494
Powerc
losing feature
The power closing feature pulls the doors and
trunk lid into their locks automatically even if
they are only partly closed. G
WARNING
To prevent possible personal injury, always
keep hands and fingers away from the door or
trunk opening when closing a door or the
trunk lid. Be especially careful when small
children are around.
If danger threatens, pull the inside or outside
door handle, or pull the trunk lid handle.
To prevent personal injury, never activate the
closing assist mechanism by tampering with
the door or trunk lid latch. G
WARNING
Only drive with the doors closed. Otherwise,
one or more of the doors could open while the
vehicle is in motion, putting you and/or
others at risk. G
WARNING
Make sure the trunk lid is closed when the
engine is running and while driving. Among
other dangers, deadly carbo nmonoxide (CO)
gases may enter the vehicle interior resulting
in unconsciousness and death.
X Power closing feature (doors): push the
door past the first detent position of the
lock.
The power closing feature will pull the door
fully closed.
X Power closing feature (trunk lid): lightly
push the trunk lid closed.
The power closing feature will pull the trunk
lid fully closed. Unlocking the driver's door
(mechanical key)
If the vehicle can no longer be unlocked
centrally with the SmartKey or KEYLESS-GO: X
Take the mechanical key out of the key
(Y page 77).
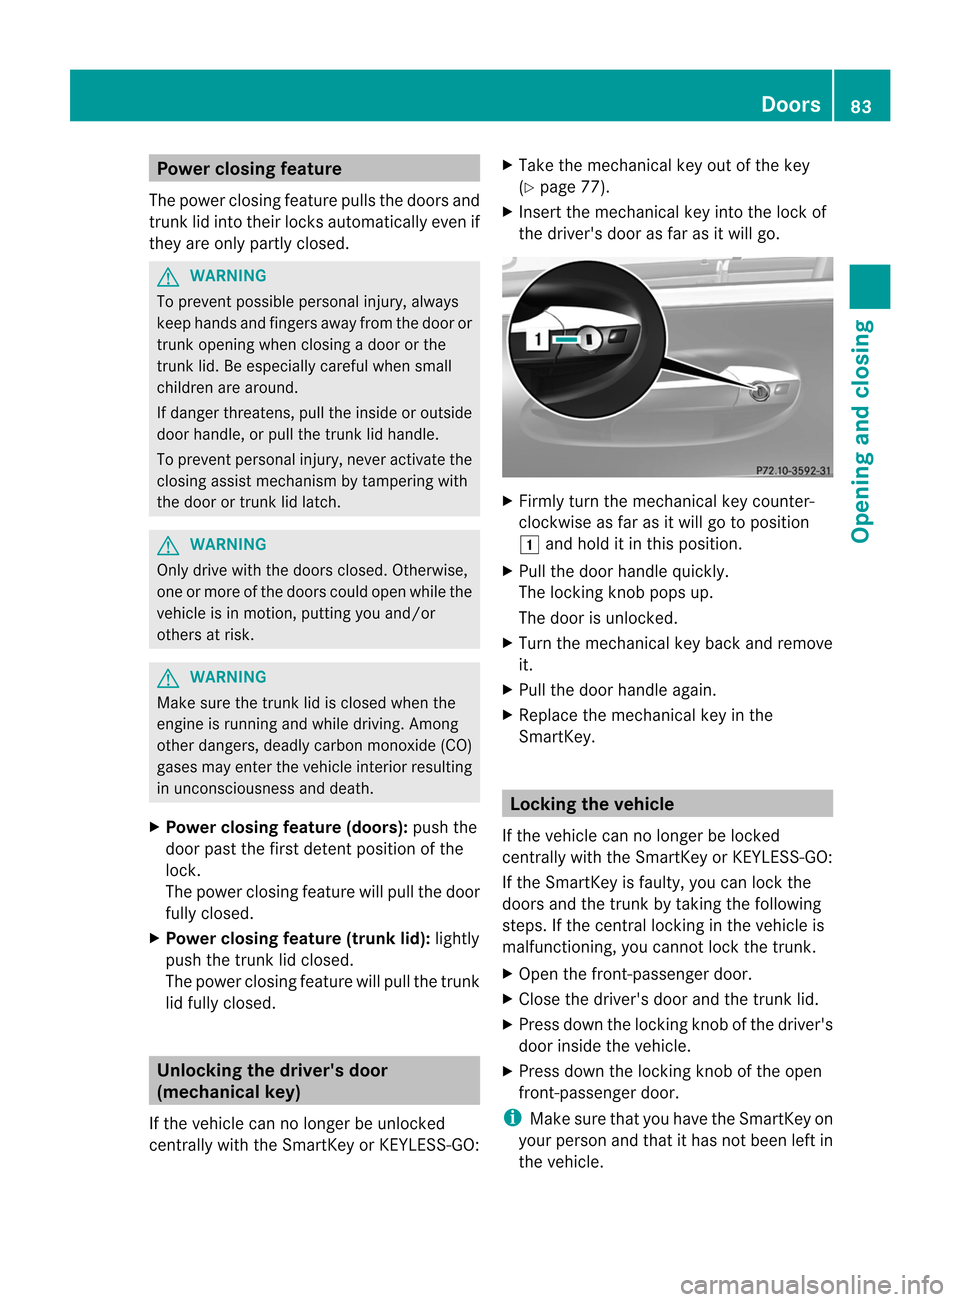
X Insert the mechanical key into the lock of
the driver's door as far as it will go. X
Firmly turn the mechanical key counter-
clockwise as far as it will go to position
1 and hold it in this position.
X Pull the door handle quickly.
The locking knob pops up.
The door is unlocked.
X Turn the mechanical key back and remove
it.
X Pull the door handle again.
X Replace the mechanical key in the
SmartKey. Locking the vehicle
If the vehicle can no longer be locked
centrally with the SmartKey or KEYLESS-GO:
If the SmartKey is faulty, you can lock the
doors and the trunk by taking the following
steps. If the central locking in the vehicle is
malfunctioning, you cannot lock the trunk.
X Open the front-passenger door.
X Close the driver's door and the trunk lid.
X Press down the locking knob of the driver's
door inside the vehicle.
X Press down the locking knob of the open
front-passenger door.
i Make sure that you have the SmartKey on
your person and that it has not been left in
the vehicle. Doors
83Opening and closing Z
Page 89 of 494

X
Insert the mechanical key into the trunk lid
lock as far as the stop.
X Turn the mechanical key clockwise from
position 1to position 2.
X Remove the mechanical key.
X Replace the mechanical key in the
SmartKey. Unlocking the trunk (mechanical key)
! The trunk lid swings upwards when
opened. Therefore, make sure that there is
sufficient clearance above the trunk lid.
If the trunk can no longer be unlocked with
the SmartKey or KEYLESS-GO:
X Take the mechanical key out of the
SmartKey (Y page 77). X
Insert the mechanical key into trunk lid
lock :as far as the stop.
X Turn the mechanical key counter-clockwise
as far as possible.
The trunk is unlocked. X
Turn the mechanical key back and remove
it.
X Replace the mechanical key in the
SmartKey. Trunk emergency release
You can open the trunk lid from inside the
vehicle with the emergency release button. X
Briefly press emergency release
button :.
The trunk lid unlocks and opens.
The trunk lid can be unlocked and opened
with the trunk lid emergency release when
the vehicle is stationary or while driving.
Trunk lid emergency release light:
R The button flashes for 30 minutes after the
trunk lid is opened.
R The button flashes for 60 minutes after the
trunk lid is closed.
The trunk lid emergency release does not
open the trunk lid if the battery is
disconnected or discharged. Trunk
87Opening and closing Z
Page 115 of 494
The COMAND controller can be:
R
pressed briefly or pressed and held W
R turned clockwise or counter-clockwise
cVd
R slid left or right XVY
R slid forwards or back ZVÆ
R slid diagonally aVb
In the instructions, operating sequences are
described as follows:
X Press the Rbutton.
Audio mode is activated.
X Select Audio by sliding
VÆand turning
cVd the COMAND controller and press
W to confirm.
The audio menu appears.
Back button :
Back button
X To exit the menu: press back button:
briefly.
COMAND changes to the next higher menu
level in the curren toperating mode.
i You can also exit a menu by sliding XVY
or ZVÆ the COMAND controller.
X To switch to the basic display: press and
hold back button :.
COMAND changes to the basic display of
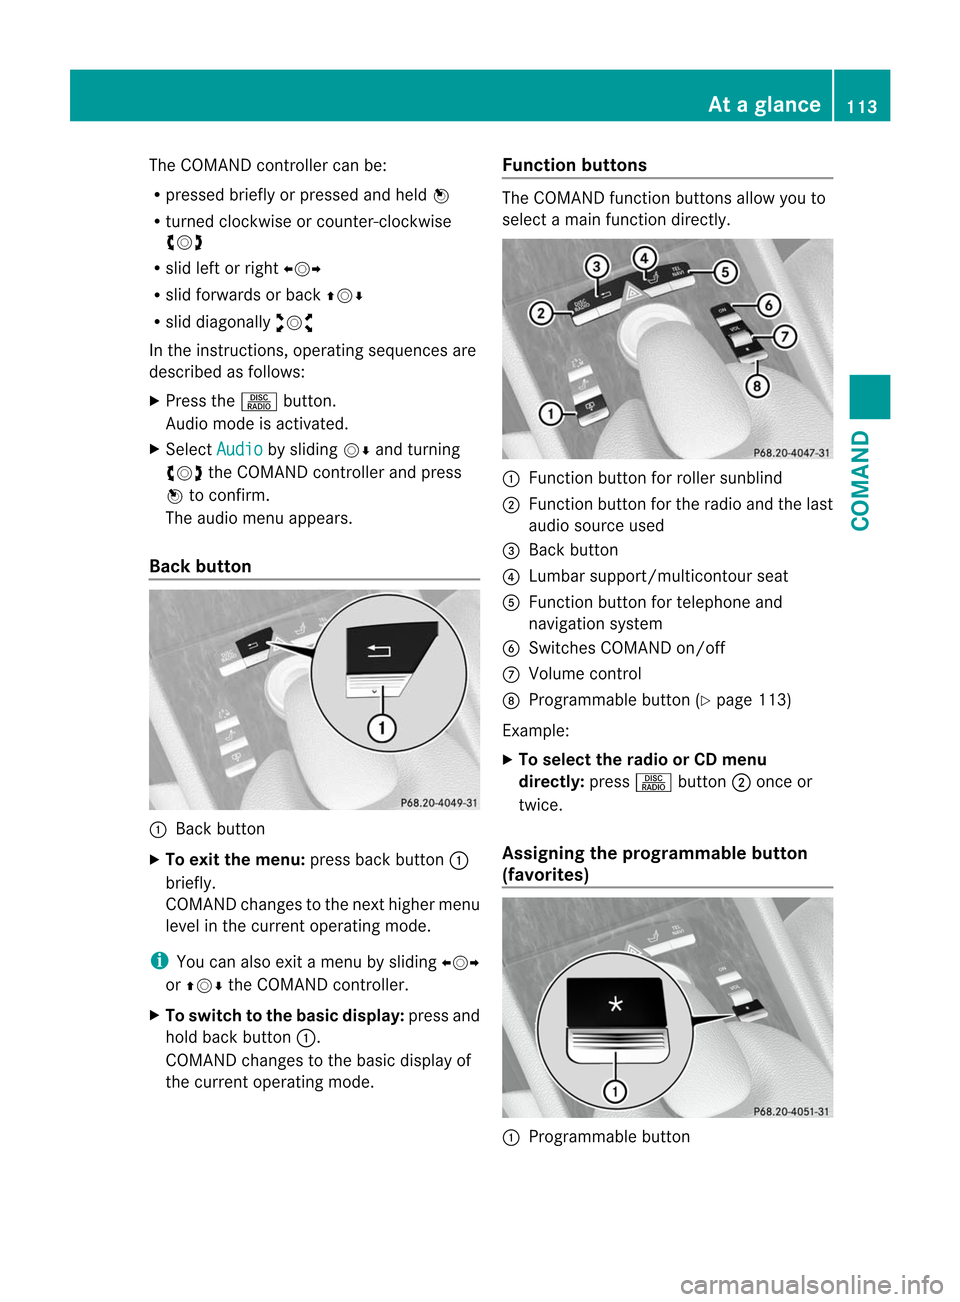
the curren toperating mode. Function buttons The COMAND function buttons allow you to
select a main function directly.
:
Function button for roller sunblind
; Function button for the radio and the last
audio source used
= Back button
? Lumbar support/multicontour seat
A Function button for telephone and
navigation system
B Switches COMAND on/off
C Volume control
D Programmable button (Y page 113)
Example:
X To select the radio or CD menu
directly: pressRbutton ;once or
twice.
Assigning the programmable button
(favorites) :
Programmable button At
ag lance
113COMAND Z
Page 120 of 494
switch SPLITVIEW on and off
(Y
page 119).
The SPLITVIEW screen remains on for
approximately 30 minutes after the SmartKey
has been turned to position 0in the ignition
lock. After this time or after the SmartKey has
been removed, the settings on the front-
passenger side are saved for approximately
30 minutes longer. After this period,
reactivation on the front-passenger side
means that the settings from the driver's side
will be used.
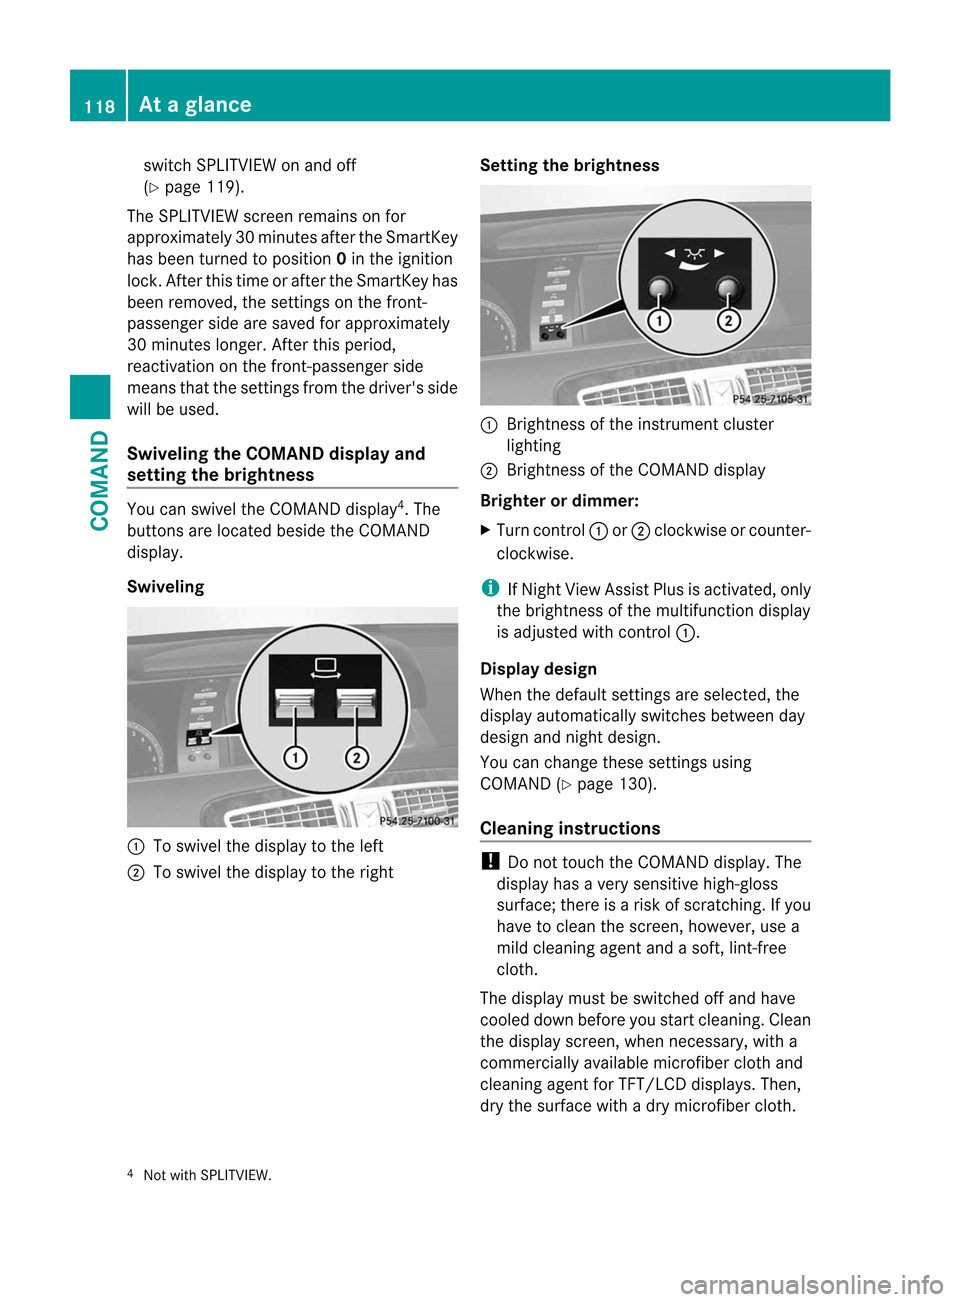
Swiveling the COMAND display and
setting the brightness You can swivel the COMAND display
4
.T he
buttons are located beside the COMAND
display.
Swiveling :
To swivel the display to the left
; To swivel the display to the right Setting the brightness :
Brightness of the instrument cluster
lighting
; Brightness of the COMAND display
Brighter or dimmer:
X Turn control :or; clockwise or counter-
clockwise.
i If Night View Assist Plus is activated, only
the brightness of the multifunction display
is adjusted with control :.
Display design
When the default settings are selected, the
display automatically switches between day
design and night design.
You can change these settings using
COMAND (Y page 130).
Cleaning instructions !
Do not touch the COMAND display. The
display has a very sensitive high-gloss
surface; there is a risk of scratching. If you
have to clean the screen, however, use a
mild cleaning agent and a soft, lint-free
cloth.
The display must be switched off and have
cooled down before you start cleaning. Clean
the display screen, when necessary, with a
commercially available microfiber cloth and
cleaning agent for TFT/LCD displays. Then,
dry the surface with a dry microfiber cloth.
4 Not with SPLITVIEW. 118
At
ag lanceCOMAND
Page 150 of 494
switched on and the GPS signal is strong
enough.
Moving the map and selecting the
destination
X
To scroll the map: slideXVY, ZVÆor
aVb the COMAND controller.
X To set the map scale: as soon as you turn
cVd the COMAND controller, the scale bar
appears.
X Turn cVd until the desired scale is set.
Turning clockwise zooms out from the map;
turning counter-clockwise zooms in.
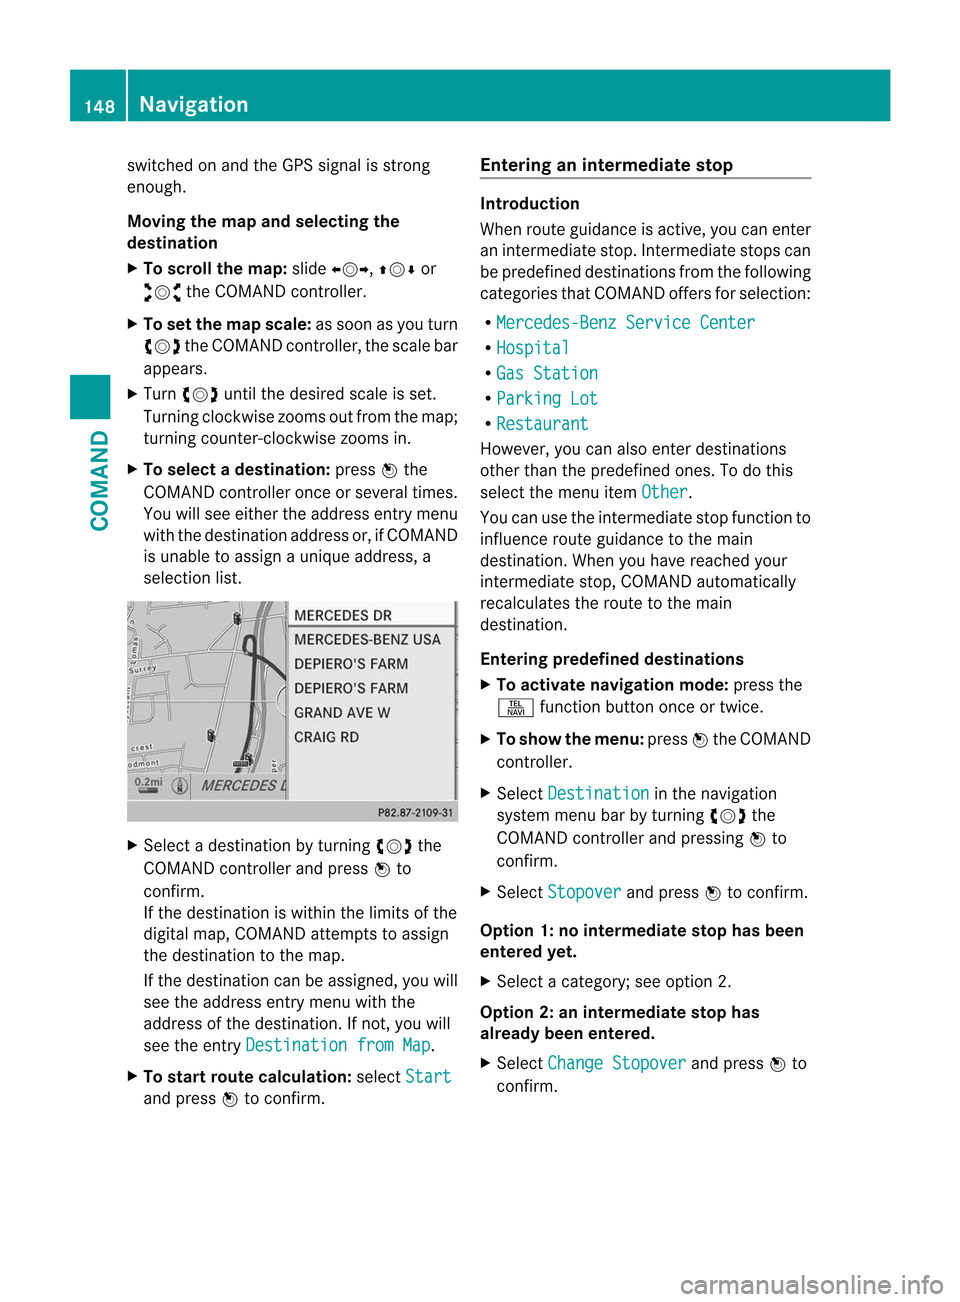
X To selectad estination:pressWthe
COMAND controller once or several times.
You will see either the address entry menu
with the destination address or, if COMAND
is unable to assign a unique address, a
selectio nlist. X
Selec tadestination by turning cVdthe
COMAND controller and press Wto
confirm.
If the destination is within the limits of the
digital map, COMAND attempts to assign
the destination to the map.
If the destination can be assigned, you will
see the address entry menu with the
address of the destination. If not, you will
see the entry Destination from Map .
X To start route calculation: selectStart and press
Wto confirm. Entering an intermediate stop Introduction
When route guidance is active, you can enter
an intermediate stop. Intermediate stops can
be predefined destinations from the following
categories that COMAND offers for selection:
R Mercedes-Benz Service Center R
Hospital R
Gas Station R
Parking Lot R
Restaurant However, you can also enter destinations
other than the predefined ones. To do this
select the menu item
Other .
You can use the intermediate stop function to
influence route guidance to the main
destination. When you have reached your
intermediate stop, COMAND automatically
recalculates the route to the main
destination.
Entering predefined destinations
X To activate navigation mode: press the
S function button once or twice.
X To show the menu: pressWthe COMAND
controller.
X Select Destination in the navigation
system menu bar by turning cVdthe
COMAND controller and pressing Wto
confirm.
X Select Stopover and press
Wto confirm.
Option 1: no intermediate stop has been
entered yet.
X Select a category; see option 2.
Option 2: an intermediate stop has
already been entered.
X Select Change Stopover and press
Wto
confirm. 148
NavigationCOMAND
Page 207 of 494
Displaying program information
X
Select Audio in the main function bar by
sliding ZVand turning cVdthe COMAND
controller and press Wto confirm.
X Select Audio by sliding
ZVthe COMAND
controller and pressing Wto confirm.
The audio menu appears.
X Select HD Radio by sliding
ZVthe
COMAN Dcontroller and press Wto
confirm.
X Select Info in the HD Radio display by
sliding ZVthe COMAND controller and
press Wto confirm.
Information on the currently selected
station is displayed. The contents and
purpose of the information depend on the
HD Radio station. Satellite radio
Important notes This section provides detailed information on
the following topics:
R selecting a channel and program category
R memory functions
R sound settings
i The satellite radio mode described below
requires optionally available satellite radio
equipment and registration with a satellite
radio provider.
i Note that the categories and channels
shown in the illustrations depend on the
program content offered by the provider.
The program contents may vary. The
illustrations and descriptions in these
operating instructions may therefore differ
from the channels and categories offered
by the provider.
Satellite radio mode may be temporarily
unavailable or interrupted for a variety of
reasons. These reasons include
environmental or topographical conditions
as well as other issues beyond the control of Mercedes-Benz USA, LLC. Operation
may also be impaired in certain locations
(e.g. tunnels, multi-storey car parks or
within as well as close to buildings).
i SIRIUS XM Radio offers more than 130
digital-quality radio channels providing
100% commercial-free music, sport, news
and entertainment.
SIRIUS XM Radio employs a fleet of high-
performance satellites to broadcast around
the clock throughout the USA and Canada.
The satellite radio program is available for
a monthly fee. Details are available from
the SIRIUS XM Service Center and at
http://www.sirius.com (USA) or
http://www.siriuscanada.com
(Canada).
Registering satellite radio X
Select Audio in the main function bar by
sliding ZVand turning cVdthe COMAND
controller and press Wto confirm.
X Select Sat. Radio and press
Wto
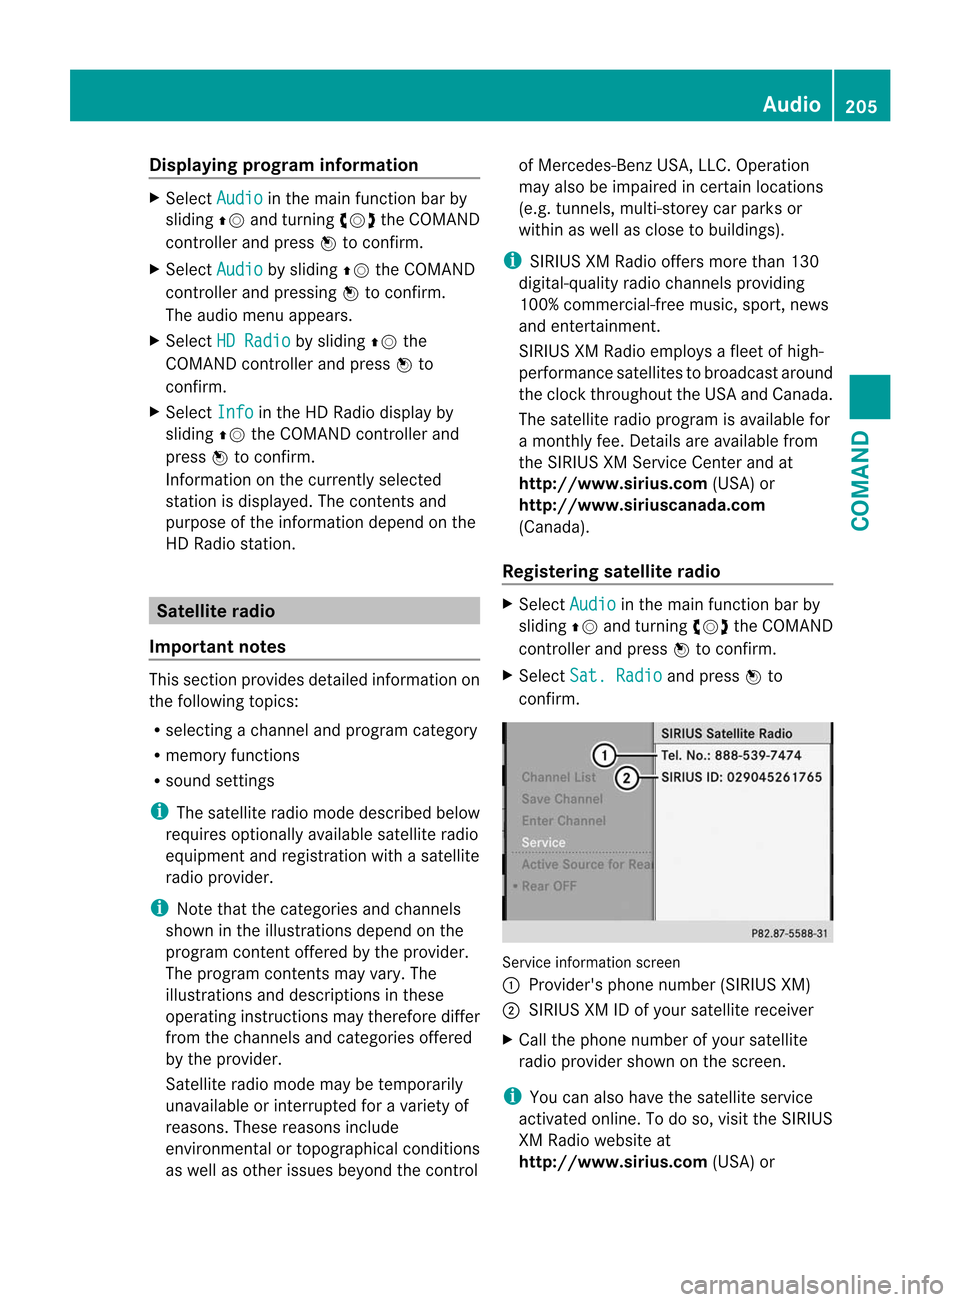
confirm. Service information screen
1
Provider's phone number (SIRIUS XM)
2 SIRIUS XM ID of your satellite receiver
X Call the phone number of your satellite
radio provider shown on the screen.
i You can also have the satellite service
activated online. To do so, visit the SIRIUS
XM Radio website at
http://www.sirius.com (USA) or Audio
205COMAND Z
Page 259 of 494
Keep bulbs out of the reach of children.
Otherwise, they could, for example, damage
the bulbs and injure themselves.
Never use a bulb which has been dropped.
Such a bulb may explode and injure you.
Halogen bulbs are pressurized and could
explode when you change them, especially if
they are very hot. You should therefore wear
eye protection and gloves when you are
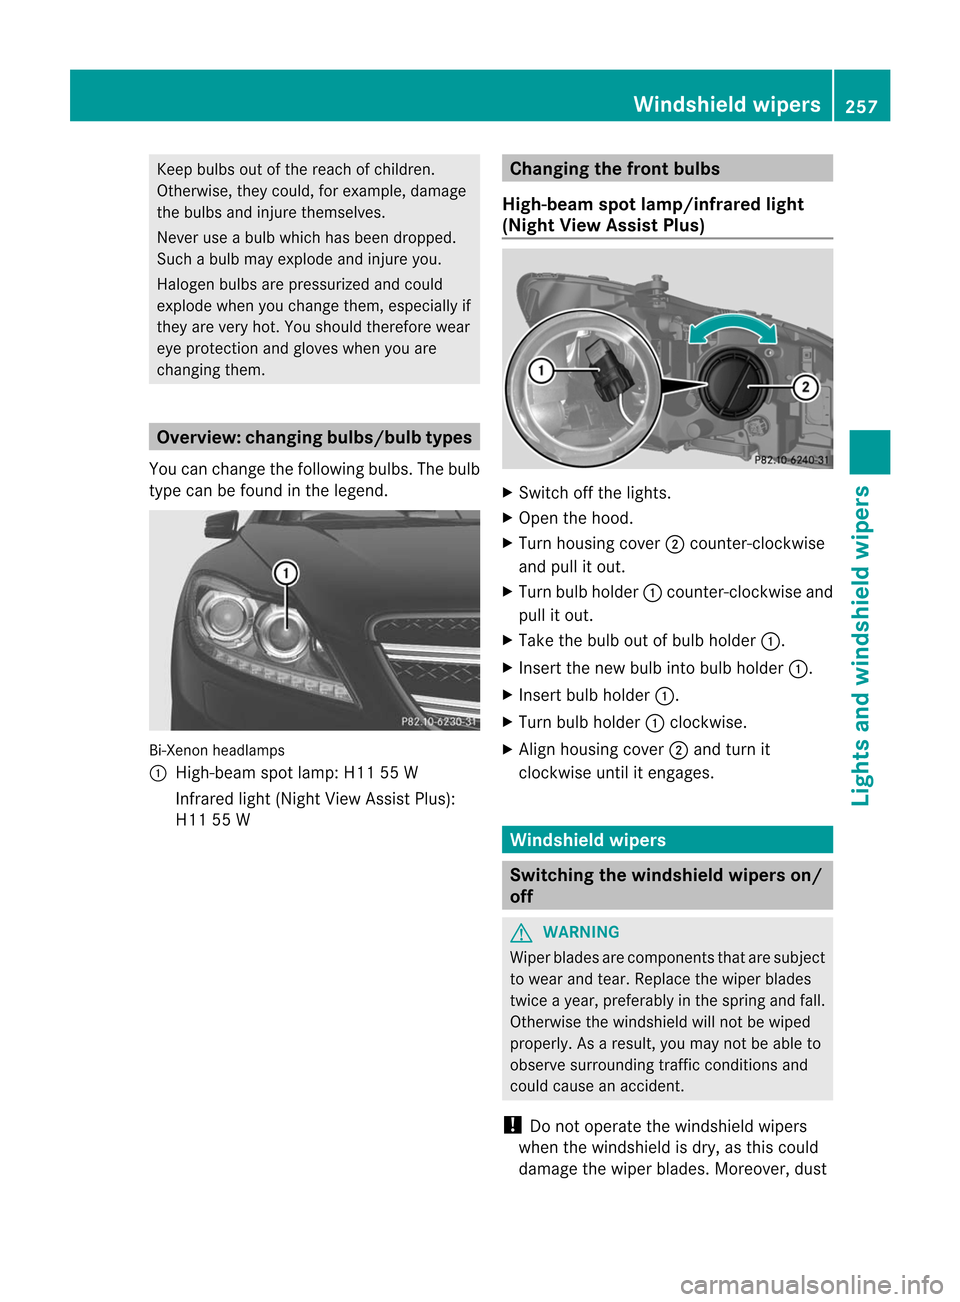
changing them. Overview: changing bulbs/bulb types
You can change the following bulbs. The bulb
type can be found in the legend. Bi-Xenon headlamps
:
High-beam spot lamp: H11 55 W
Infrared light( Night View Assist Plus):
H11 55 W Changing the front bulbs
High-beam spot lamp/infrared light
(Night View Assist Plus) X
Switch off the lights.
X Open the hood.
X Turn housing cover ;counter-clockwise
and pull it out.
X Turn bulb holder :counter-clockwise and
pull it out.
X Take the bulb out of bulb holder :.
X Insert the new bulb into bulb holder :.
X Insert bulb holder :.
X Turn bulb holder :clockwise.
X Align housing cover ;and turn it
clockwise until it engages. Windshiel
dwipers Switching the windshield wipers on/
off
G
WARNING
Wiper blades are components that are subject
to wear and tear .Replace the wiper blades
twice a year, preferably in the spring and fall.
Otherwise the windshield will not be wiped
properly. As a result, you may not be able to
observe surrounding traffic conditions and
could cause an accident.
! Do not operate the windshield wipers
when the windshield is dry, as this could
damage the wiper blades. Moreover, dust Windshield wipers
257Lights and windshield wipers Z
Page 271 of 494
X
To switc hthe ventilation on/off: push
rocker switch down ;or up :. Setting the glove box air vent
When automatic climate control is activated,
the glove box can be ventilated, for instance
to cool its contents. The level of airflow
depends on the airflow and aird istribution
settings.
! Close the air ven twhen heating the
vehicle.
At high outside temperatures, open the air
vent and activate the "cooling with air
dehumidification" function. Otherwise,
temperature-sensitive items stored in the
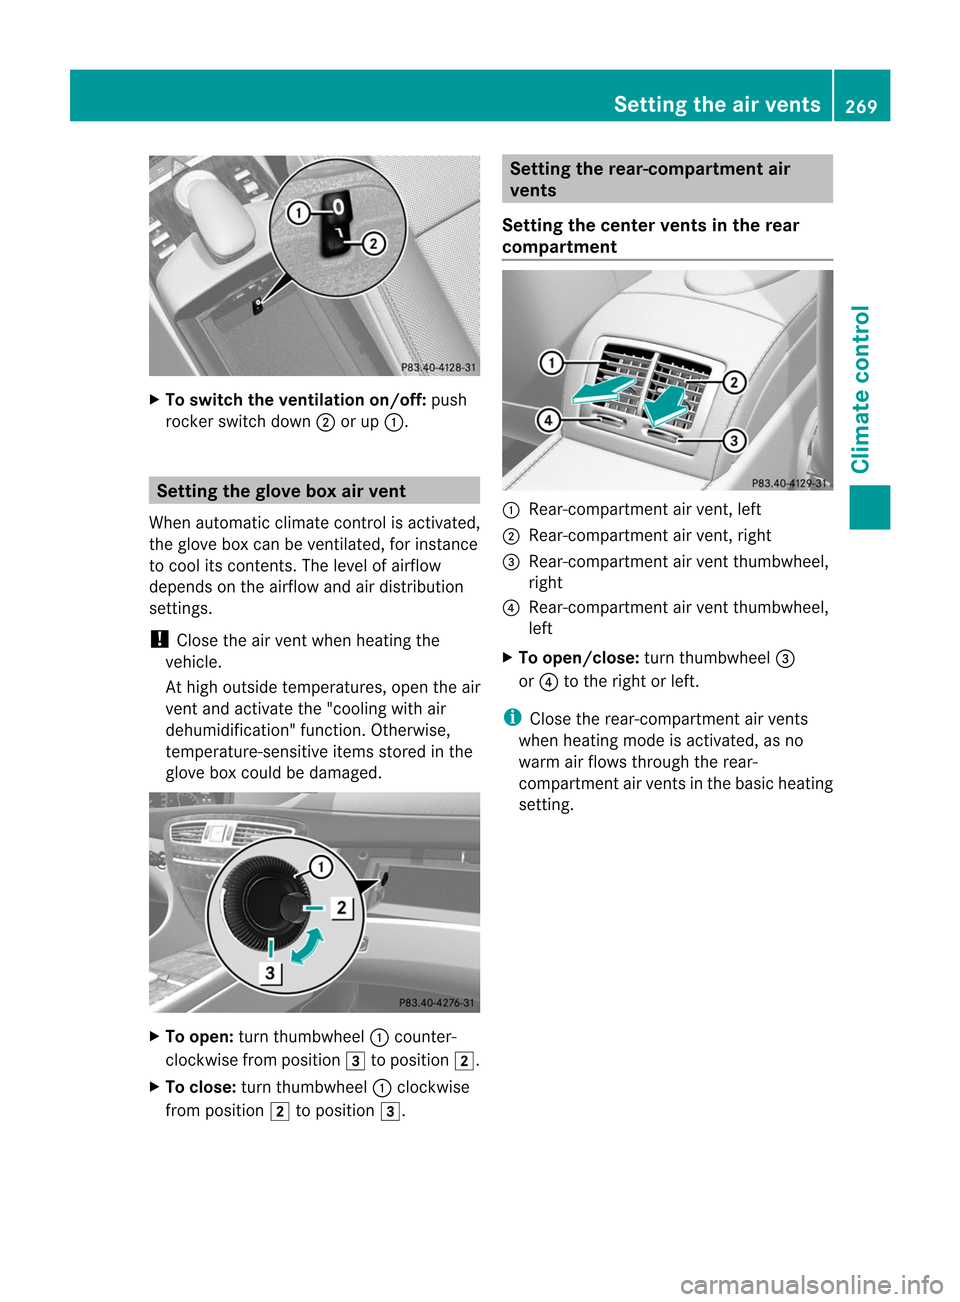
glove box could be damaged. X
To open: turn thumbwheel :counter-
clockwise from position 3to position 2.
X To close: turn thumbwheel :clockwise
from position 2to position 3. Setting the rear-compartment air
vents
Setting the center vents in the rear
compartment :
Rear-compartment air vent, left
; Rear-compartment air vent, right
= Rear-compartment air vent thumbwheel,
right
? Rear-compartment air vent thumbwheel,
left
X To open/close: turn thumbwheel =
or ? to the right or left.
i Close the rear-compartment air vents
when heating mode is activated, as no
warm air flows through the rear-
compartmenta ir vents in the basic heating
setting. Setting the air vents
269Climate control Z
Page 289 of 494
!
Do not use diesel to refuel vehicles with a
gasoline engine. Even small amounts of the
wrong fuel result in damage to the fuel
system and engine.
! Do not switch on the ignition if you
accidentally refuel with the wrong fuel.
Otherwise, the fuel will enter the fuel lines.
Notify a qualified specialist workshop and
have the fuel tank and fuel lines drained
completely.
! Overfilling the fuel tank could damage the
fuel system.
! Take care not to spill any fuel on painted
surfaces. You could otherwise damage the
paintwork.
! Use a filter when refueling from a fuel can.
Otherwise, the fuel lines and/or injection
system could be blocked by particles from
the fuel can.
Further information on fuel and on fuel grades
can be found in the "Fuel" section
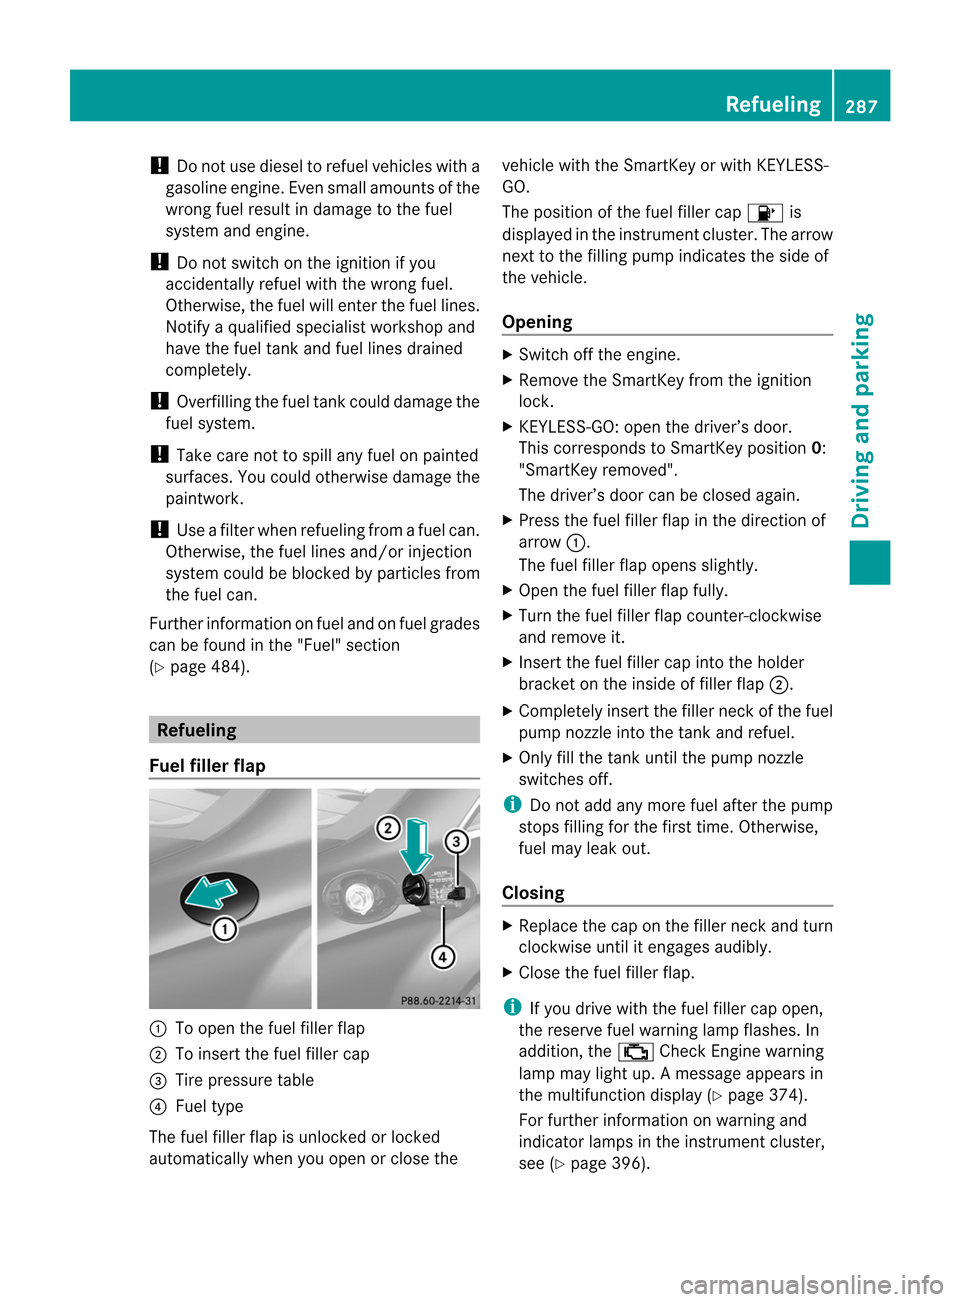
(Y page 484). Refueling
Fuel fillerf lap :
To open the fuel filler flap
; To inser tthe fuel filler cap
= Tire pressure table
? Fuel type
The fuel filler flap is unlocked or locked
automatically when you open or close the vehicle with the SmartKey or with KEYLESS-
GO.
The position of the fuel filler cap
8is
displayed in the instrumentc luster.The arrow
next to the filling pump indicates the side of
the vehicle.
Opening X
Switch off the engine.
X Remove the SmartKey from the ignition
lock.
X KEYLESS-GO: open the driver’s door.
This corresponds to SmartKey position 0:
"SmartKey removed".
The driver’s door can be closed again.
X Press the fuel filler flap in the direction of
arrow :.
The fuel filler flap opens slightly.
X Open the fuel filler flap fully.
X Turn the fuel filler flap counter-clockwise
and remove it.
X Insert the fuel filler cap into the holder
bracket on the inside of filler flap ;.
X Completely insert the filler neck of the fuel
pump nozzle into the tank and refuel.
X Only fill the tank until the pump nozzle
switches off.
i Do not add any more fuel after the pump
stops filling for the first time. Otherwise,
fuel may leak out.
Closing X
Replace the cap on the filler neck and turn
clockwise until it engages audibly.
X Close the fuel filler flap.
i If you drive with the fuel filler cap open,
the reserve fuel warning lamp flashes. In
addition, the ;Check Engine warning
lamp may light up. Amessage appears in
the multifunction display (Y page 374).
For further information on warning and
indicator lamps in the instrument cluster,
see (Y page 396). Refueling
287Driving and parking Z
Page 426 of 494
service system. You can obtain a list of the
engine oils and oil filters tested and
approved in accordance with the
Mercedes-Benz Specifications for Service
Products at any Mercedes-Benz Service
center.
Damage to the engine or exhaust system is
caused by the following:
R
using engine oils and oil filters that have
not been specifically approved for the
service system
R replacing engine oil and oil filters after
the interval for replacement specified by
the service system has been exceeded
R using engine oil additives.
! Do not add too much oil. adding too much
engine oil can result in damage to the
engine or to the catalytic converter. Have
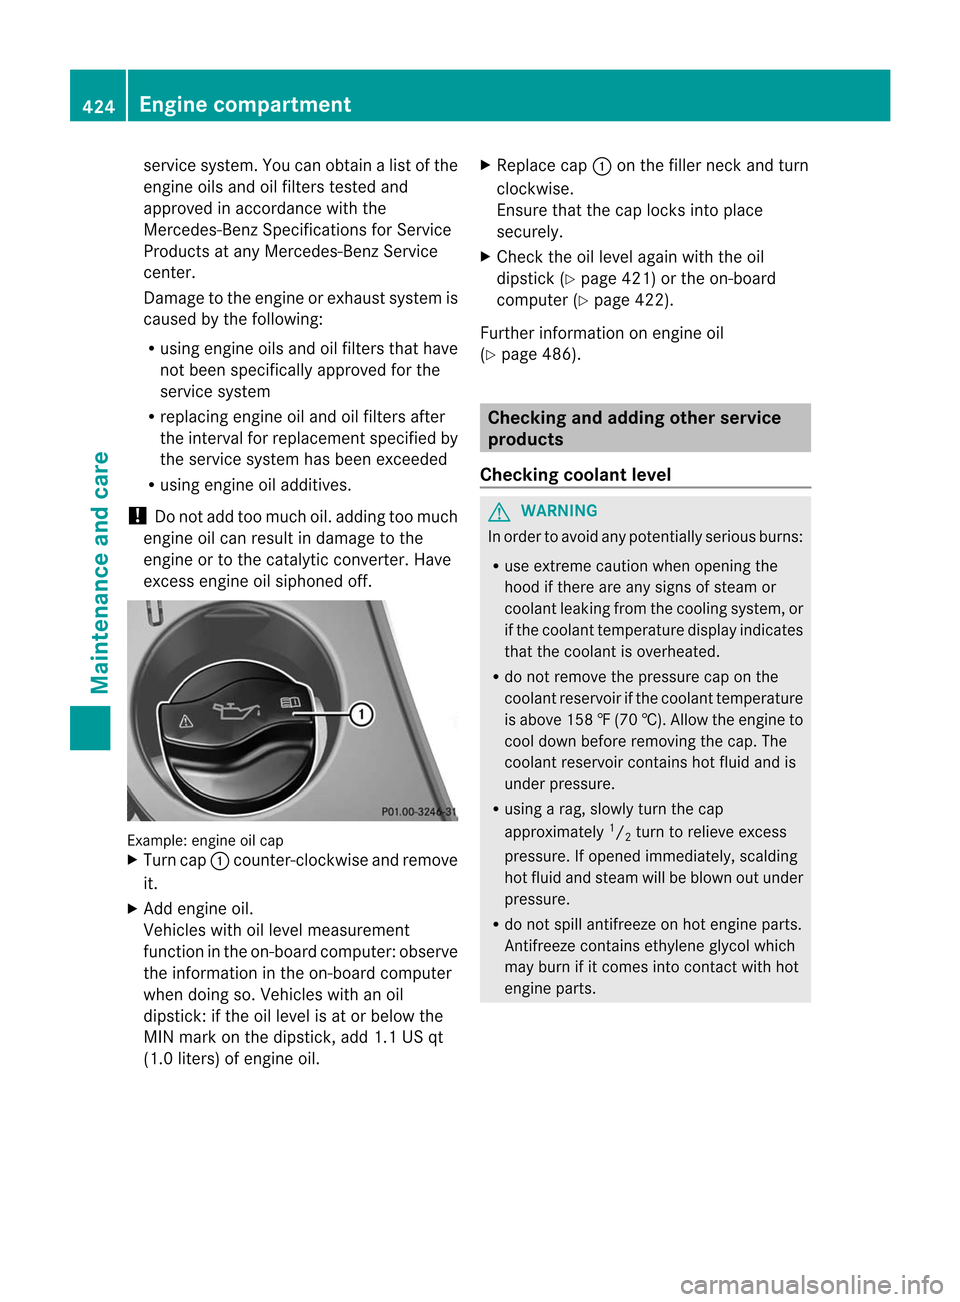
excess engine oil siphoned off. Example: engine oil cap
X
Turn cap :counter-clockwise and remove
it.
X Add engine oil.
Vehicles with oil level measurement
function in the on-board computer: observe
the information in the on-board computer
when doing so. Vehicles with an oil
dipstick: if the oil level is at or below the
MIN mark on the dipstick, add 1.1 US qt
(1.0 liters) of engine oil. X
Replace cap :on the filler neck and turn
clockwise.
Ensure that the cap locks into place
securely.
X Check the oil level againw ith the oil
dipstick (Y page 421) or the on-board
computer (Y page 422).
Further information on engine oil
(Y page 486). Checking and adding other service
products
Checking coolant level G
WARNING
In order to avoid any potentially serious burns:
R use extreme caution when opening the
hood if there are any signs of steam or
coolan tleaking from the cooling system, or
if the coolant temperature display indicates
that the coolant is overheated.
R do not remove the pressure cap on the
coolant reservoir if the coolant temperature
is above 158 ‡(70 †). Allow the engine to
cool dow nbefore removing the cap. The
coolant reservoir contains hot fluid and is
under pressure.
R using a rag, slowly turn the cap
approximately 1
/ 2 turn to relieve excess
pressure. If opened immediately, scalding
hot fluid and steam will be blown out under
pressure.
R do not spill antifreeze on hot engine parts.
Antifreeze contains ethylene glycol which
may burn if it comes into contact with hot
engine parts. 424
Engine compartmentMaintenance and care