language MERCEDES-BENZ CL-Class 2014 C217 Owner's Manual
[x] Cancel search | Manufacturer: MERCEDES-BENZ, Model Year: 2014, Model line: CL-Class, Model: MERCEDES-BENZ CL-Class 2014 C217Pages: 494, PDF Size: 13.55 MB
Page 21 of 494
Route guidance (on-board
computer)
.......................................... 341
Route information see Dynami croute guidance/TMC S
Safety Children in the vehicle .....................59
Child restraint systems ....................59
Occupant Classification System
(OCS) ............................................... 50
Overview of occupant safety
systems ........................................... 44
Safety notes
Audio CD/DVD and MP3 mode .....209
Operating safety ............................ 110
Video DVD mode ........................... 229
Safety systems
see Driving safety systems
SatRadio ............................................. 205
Displaying information ...................208
Registering .................................... 205
Selecting acategor y...................... 206
Screen
see Display
SD memory card
Loading .......................................... 210
Seat belts
Automatic comfort-fit feature ..........59
Belt force limiters ............................ 59
Cleaning ......................................... 433
Correct usage .................................. 56
Emergency Tensioning Devices ....... .59
Fastening ......................................... 57
Important safety guidelines .............55
Releasing ......................................... 58
Safety guidelines ............................. 45
Specia lseat belt retractor ...............61
Warning lamp ................................. 389
Warning lamp (function) ................... 58
Seats
Active multicontour seat ....... .101, 245
Adjusting (electrically). ....................98
Adjusting lumba rsuppor t.............. 101
Adjusting the head restraint ............99
Cleaning the cover .........................433
Correct driver's seat position ........... 96 Folding the backrests forward/
back ............................................... 100
Important safety notes ....................97
Multicontour sea t.......................... 101
Seat backres tdisplay message .....387
Seat heating problem ....................102
Seat ventilation problem ................102
Selecting (COMAND) .....................244
Storing settings (memory function) 106
Switching sea theating on/off .......101
Switching seat ventilation on/off ..102
Selecting stations (radio)
Using statio npresets ..................... 200
Using statio nsearch ...................... 200
Sending DTMF tones .........................191
Sensors (cleaning instructions) .......431
Service Center see Qualified specialist workshop
Service interval display
Displaying service messages .........426
Hiding service messages ...............426
Notes ............................................. 426
Service messages ..........................426
Service menu (on-board computer) .349
Service products Brake fluid ..................................... 487
Coolant (engine) ............................ 487
Engine oil ....................................... 486
Fuel ................................................ 484
Important safety notes ..................484
Refrigerant (air-conditioning
system) .......................................... 489
Washer fluid .................................. .488
Setting astation (radio)
Via manual frequency entry ...........201
Settings
Display ........................................... 130
Menu overview .............................. 115
On-board computer .......................349
Picture (COMAND) .........................228
Sound settings ............................... 128
System settings ............................. 130
Setting the language
COMAND ....................................... 137
Setting the night design ...................130
Setting the text reader speed ..........132
Setting the vehicle level ...................310 Index
19
Page 23 of 494
Storing stations
Manually. ....................................... 201
Storing stations (radio)
Automatically ................................. 201
Stowage areas ................................... 400
Stowage compartments Armrest (under) ............................. 401
Cuph olders ................................... 403
Eyeglasses compartment ...............401
Glove box ...................................... .400
Important safety information .........400
Parce lnet ...................................... 402
Rea r............................................... 401
Rear seat backrest ......................... 402
Rea rseats (between) .....................402
Stowage well beneath the trunk
floor .................................................... 403
Summer opening see Convenience opening feature
Summer tires ..................................... 456
Sun visor ............................................ 404
Supplemental Restraint System see SRS (Supplemental Restraint
System)
Surround sound
see 3D sound (Harman Kardon ®
surround sound system)
Surround sound (harman/
kardon ®
surround sound system)
Notes ............................................. 129
Switching on/off ........................... 129
Suspension tuning
Active Body Control .......................311
AIRMATIC ...................................... 309
Switching air-recirculation mode
on/off ................................................. 267
Switching between picture
formats (TV, video) ............................229
Switching between summer time
and standard time .............................132
Switching off the alarm (ATA) ............70
Switching the hands-free
microphone on/off ............................ 189
Switching wavebands (radio) ...........200
Syste msettings
Bluetooth ®
..................................... 134
Date ............................................... 131Language
....................................... 137
Programmable button (COMAND) ..113
Text reader spee d.......................... 132
Time ............................................... 131
Time zone ...................................... 132
Voice Control System ....................132 T
TA (Traffic Announcements) see Traffi cannouncements
Tachometer ........................................ 337
Tail lamps Display message ............................ 368
Tank
see Fuel tank
Tank content
Fuel gauge ....................................... 35
Technical data
Capacities ...................................... 484
Notes ............................................. 482
Tires/wheels ................................. 477
Vehicle data ................................... 490
TELEAID
Automatic retrieval of vehicle data
(service due date ).......................... 413
Call priority .................................... 411
Display message ............................ 361
Downloading destinations
(COMAND) ..................................... 411
Emergency call .............................. 408
Important safety notes ..................407
Locating astolen vehicl e............... 414
MB info call button ........................410
Remote vehicle locking ..................413
Roadside Assistance button ..........409
Search &Send ............................... 412
Self-test ......................................... 408
System .......................................... 407
Vehicle remote unlocking ..............413
Telephone
Accepting/ending acall................ 187
Accepting acall............................. 346
Adjusting the volume for calls .......127
Basi cmenu (Bluetooth ®
interface) 186
Calling (outgoing call) ....................188
Calling voicemai l............................ 189
Conference connection .................. 189 Index
21
Page 26 of 494
Locking separately
...........................86
Opening automatically from insid e..86
Trunk lid
Display message ............................ 386
Power closing feature ......................83
Trunk lid opening height restriction 239
Turn signals Display message ............................ 367
Switching on/off ........................... 252
TV
Automatic picture shutoff ..............228
Picture settings .............................. 228
Type identification plate
see Vehicle identification plate U
Unlocking Emergency unlocking .......................83
From inside the vehicle (central
unlocking button) ............................. 82
USB
see Medi aInterface V
Vanity mirror (in the sun visor) ........ 404
Vehicle Correct us e...................................... 29
Data acquisition ............................... 30
Display message ............................ 385
Emergency locking ........................... 83
Emergency unlocking .......................83
Equipment ....................................... 26
Individua lsettings .......................... 349
Limited Warranty ............................. 30
Loading .......................................... 464
Lowering ........................................ 441
Maintenance .................................... 27
Parking for a long period ................ 291
Pulling away ................................... 275
Raising ........................................... 438
Reporting problems .........................30
Towing away .................................. 446
Transporting .................................. 448
Vehicle data ................................... 490
Vehicle battery
see Battery (vehicle) Vehicle data
....................................... 490
Vehicle dimensions ...........................490
Vehicle identification number see VIN
Vehicle identification plate ..............482
Vehicle level Active Body Control (ABC) .............310
AIRMATIC ...................................... 309
Display message ............................ 377
Vehicle level (display message) .......376
Vehicle tool kit .................................. 436
Video see Video DVD
Video AUX
Setting the picture .........................228
Video DVD
Automatic picture shutoff ..............228
DVD menu ..................................... 232
Fast forward/rewind ..................... .231
Function restrictions ......................230
Interactive content ........................234
Notes on discs ............................... 229
Operation ....................................... 229
Pause function ............................... 231
Playing conditions .......................... 229
Safety notes .................................. 229
Selecting ........................................ 231
Selecting a film/title ..................... .232
Selecting a scene/chapter ............231
Setting the audio forma t................ 233
Setting the language ......................233
Setting the picture .........................228
Showing/hiding the control menu .230
Showing/hiding the menu .............230
Stop function ................................. 231
Subtitles ........................................ 233
Switching to ................................... 230
VIN ...................................................... 482
Voice Control System Settings ......................................... 132
Volume, adjusting
COMAND ....................................... 127
Navigation messages .....................12724
Index
Page 127 of 494
i
You will find further information in the
"Destination entry" section (Y page 140).
Entering characters in the address and
the phone book Introduction
The following section describes how to enter
characters in the phone book/address book
when creating a new entry.
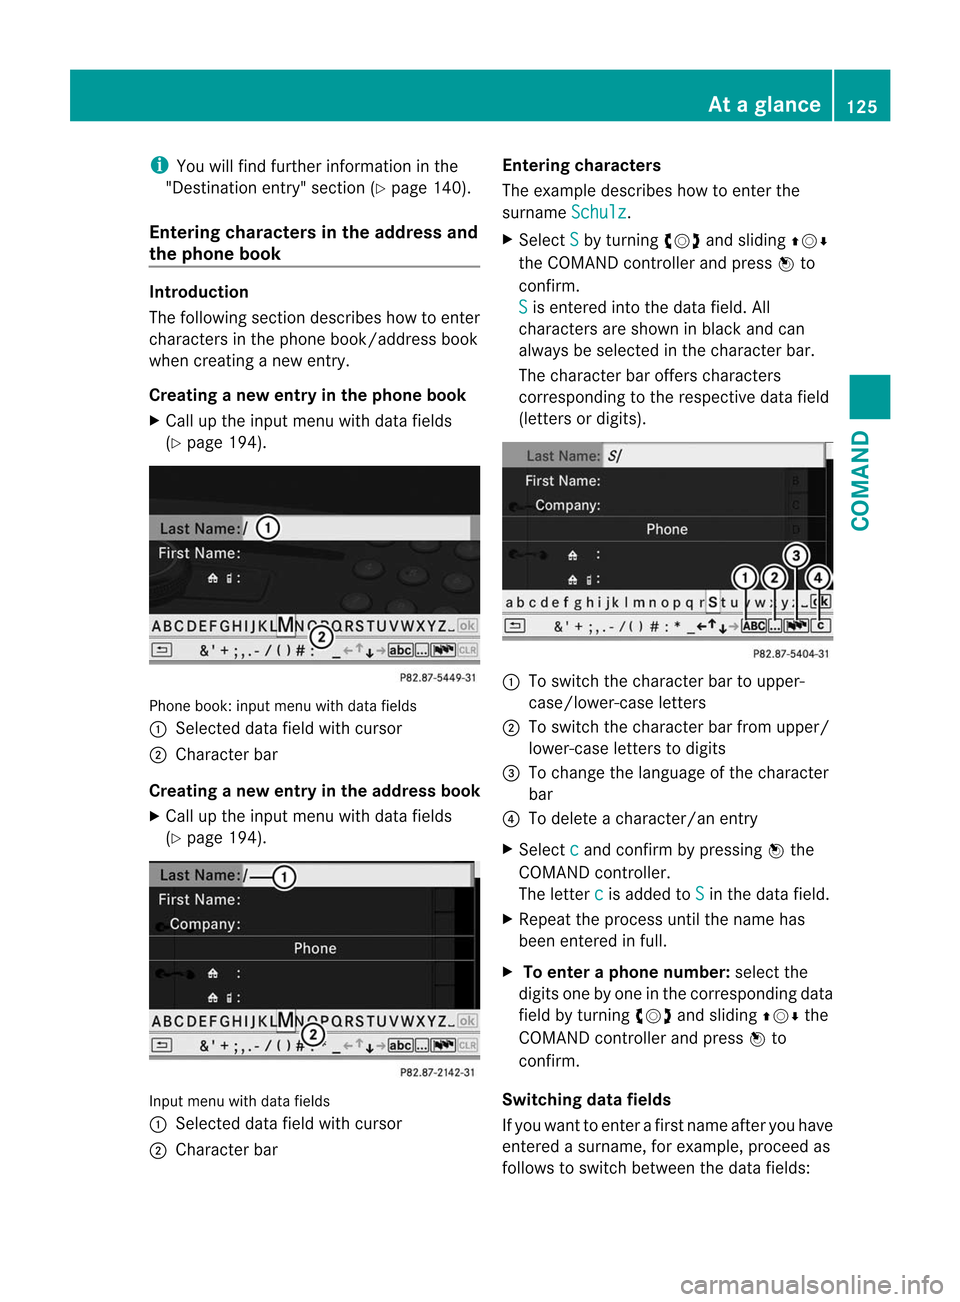
Creating anew entr yin the phone book
X Call up the input menu with data fields
(Y page 194). Phone book: input menu with data fields
:
Selected data field with cursor
; Character bar
Creating a new entry in the address book
X Call up the input menu with data fields
(Y page 194). Input menu with data fields
:
Selected data field with cursor
; Character bar Entering characters
The example describes how to enter the
surname
Schulz .
X Select S by turning
cVdand sliding ZVÆ
the COMAND controller and press Wto
confirm.
S is entered into the data field. All
characters are shown in black and can
always be selected in the character bar.
The character bar offers characters
corresponding to the respective data field
(letters or digits). :
To switch the character bar to upper-
case/lower-case letters
; To switch the character bar from upper/
lower-case letters to digits
= To change the language of the character
bar
? To delete a character/an entry
X Select c and confirm by pressing
Wthe
COMAND controller.
The letter c is added to
S in the data field.
X Repeat the process until the name has
been entered in full.
X To enter a phone number: select the
digits one by one in the corresponding data
field by turning cVdand sliding ZVÆthe
COMAND controller and press Wto
confirm.
Switching dataf ields
If you want to enter a first name afte ryou have
entered a surname, for example, proceed as
follows to switch between the data fields: At
ag lance
125COMAND Z
Page 128 of 494
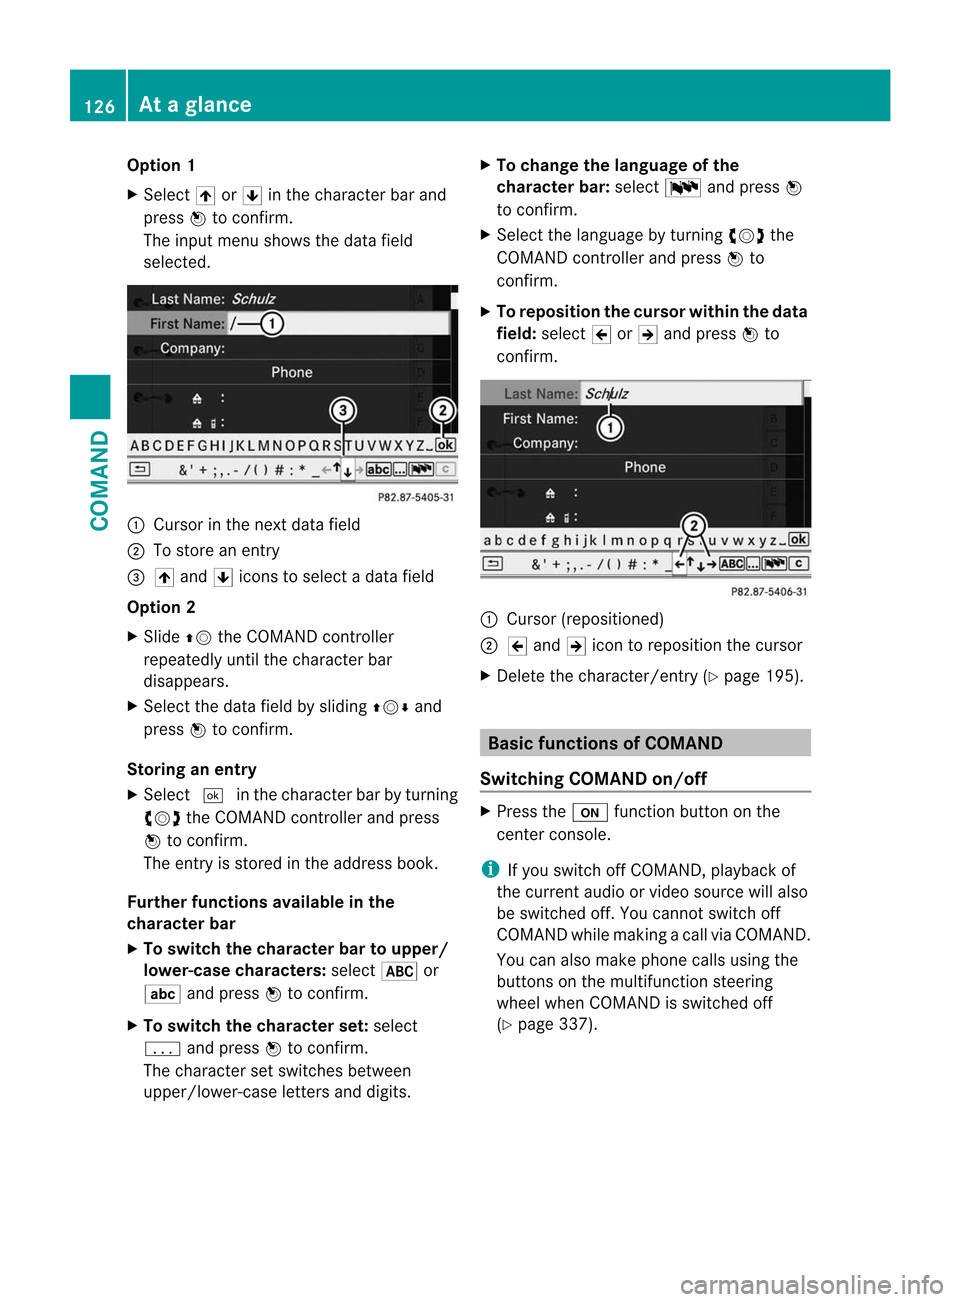
Option 1
X
Select 4or5 in the character bar and
press Wto confirm.
The input menu shows the data field
selected. :
Cursor in the nextd ata field
; To store an entry
= 4 and 5icons to selec tadata field
Option 2
X Slide ZVthe COMAND controller
repeatedly until the character bar
disappears.
X Select the data field by sliding ZVÆand
press Wto confirm.
Storing an entry
X Select ¬in the character bar by turning
cVd the COMAND controller and press
W to confirm.
The entry is stored in the address book.
Further functions available in the
character bar
X To switch the character bar to upper/
lower-case characters: select*or
E and press Wto confirm.
X To switch the character set: select
p and press Wto confirm.
The character set switches between
upper/lower-case letters and digits. X
To change the language of the
character bar: selectBand press W
to confirm.
X Select the language by turning cVdthe
COMAND controller and press Wto
confirm.
X To reposition the cursor within the data
field: select 2or3 and press Wto
confirm. :
Cursor (repositioned)
; 2 and 3icon to reposition the cursor
X Delete the character/entry (Y page 195). Basic functions of COMAND
Switching COMAND on/off X
Press the ufunction button on the
center console.
i If you switch off COMAND, playback of
the curren taudio or vide osource will also
be switched off. You cannot switch off
COMAND while making a call via COMAND.
You can also make phone calls using the
buttons on the multifunction steering
wheel when COMAND is switched off
(Y page 337). 126
At
ag lanceCOMAND
Page 139 of 494
X
Select Details and press
Wto confirm.
The detailed display for this device
appears.
X To close the detaile dview: turncVd or
slide XVY the COMAND controller.
De-authorizing (de-registering) a
Bluetooth ®
device Mercedes-Benz USA, LLC recommends de-
authorization in both COMAN
Dand the
Bluetooth ®
device, e.g .the mobile phone.
Subsequent authorization may otherwise fail.
X In the Bluetooth ®
device list, select the
authorized device by turning cVdthe
COMAND controller.
X Select Options by sliding
VYthe
COMAND controller and press Wto
confirm.
X Select De-authorize and press
Wto
confirm.
Ap rompt appears asking whethe ryou
really wish to de-authorize this device.
X Select Yes or
No and press
Wto confirm.
If you select Yes , the authorization for the
device will be revoked.
If you select No , the process will be aborted.
i If a Bluetooth ®
device has been de-
authorized and is out of range, when a new
search is carried out it will not appear in the
Bluetooth ®
device list. System language settings
This function allows you to determine the
language for the menu display sand the
navigation messages. The selected language
affects the characters available for entry.
Whe nyou set the system language, the
language of the Voice Control System will
change accordingly. If the selected language
is not supported by the Voice Control System,
"English" will be selected. X
Select Vehicle by turning
cVdthe
COMAND controller and press Wto
confirm.
X Select System and press
Wto confirm.
X Select Language and press
Wto confirm.
The list of languages appears. The #dot
indicates the current setting.
X Select the language by turning cVdthe
COMAND controller and press Wto
confirm.
COMAND loads the selected language and
sets it. Reset function
You can reset COMAND to the factory
settings. Amongst other things, this will
delete all personal data (e.g. station presets,
address book entries, entries in the
destination memory and in the list of previous
destinations in the navigation system).
Resetting is recommended before selling or
transferring ownership of your vehicle, for
example.
X Select Vehicle in the main function bar by
turning cVdthe COMAND controller and
press Wto confirm.
X Select System by turning
cVdthe
COMAND controller and press Wto
confirm.
X Select Reset and press
Wto confirm.
Ap rompt appears asking whethe ryou wish
to reset.
X Select Yes or
No and press
Wto confirm.
If you select No , the process will be aborted.
If you select Yes , another prompt appears
asking whether you really wish to reset.
X Select Yes or
No and press
Wto confirm.
If you select Yes , a message will be shown.
COMAND is reset and restarted.
If you select No , the process will be aborted. System settings
137COMAND Z
Page 195 of 494
R
Bluetooth ®
must be activated in COMAND
and on the Bluetooth ®
device ( Noperating
instructions of the device).
R the Bluetooth ®
device mus tbe able to send
vCards via Bluetooth ®
(N operating
instructions of the device).
R the Bluetooth ®
device in the vehicle must
be switched on.
i If you switch to another main function,
e.g. navigation, while receiving vCards, the
reception of vCards will be terminated.
X Select Data/Connections in the
telephone basic menu by sliding VÆand
turning cVdthe COMAND controller and
press Wto confirm.
X Select Download Contacts and press
W
to confirm.
X Select Via Bluetooth and press
Wto
confirm.
This interrupts the Bluetooth ®
connection
between COMAND and your active mobile
phone. In turn, COMAND is ready to receive
vCards from another Bluetooth ®
device.
X Start data transfer on the external
Bluetooth device ( Noperating instructions
of the device).
The data on the vCards is automatically
transferred to the address book. The
number of vCards received is displayed. X
To cancel reception: pressW.
or
X Press the %back button on the center
console.
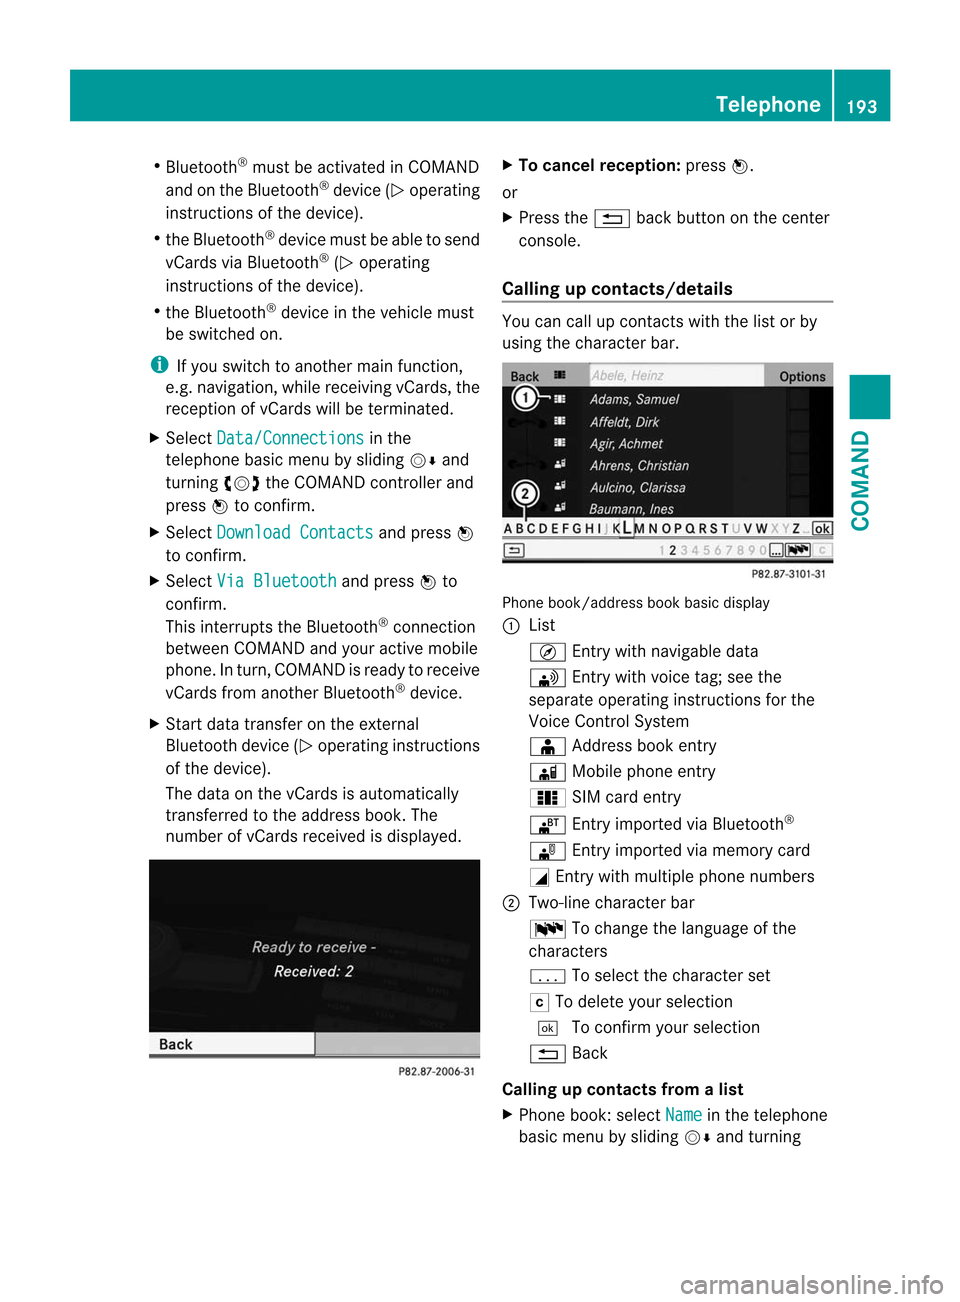
Calling up contacts/details You can call up contact
swith the list or by
using the character bar. Phone book/address book basic display
:
List
Ç Entry with navigable data
\ Entry with voice tag; see the
separate operating instructions for the
Voice Control System
Æ Address book entry
à Mobile phone entry
0 SIM card entry
® Entry imported via Bluetooth ®
¯ Entry imported via memory card
G Entry with multiple phone numbers
; Two-line character bar
B To change the language of the
characters
p To selec tthe character set
F To delete your selection
¬ To confirm your selection
% Back
Calling up contacts from alist
X Phone book :select Name in the telephone
basic menu by sliding VÆand turning Telephone
193COMAND Z
Page 197 of 494
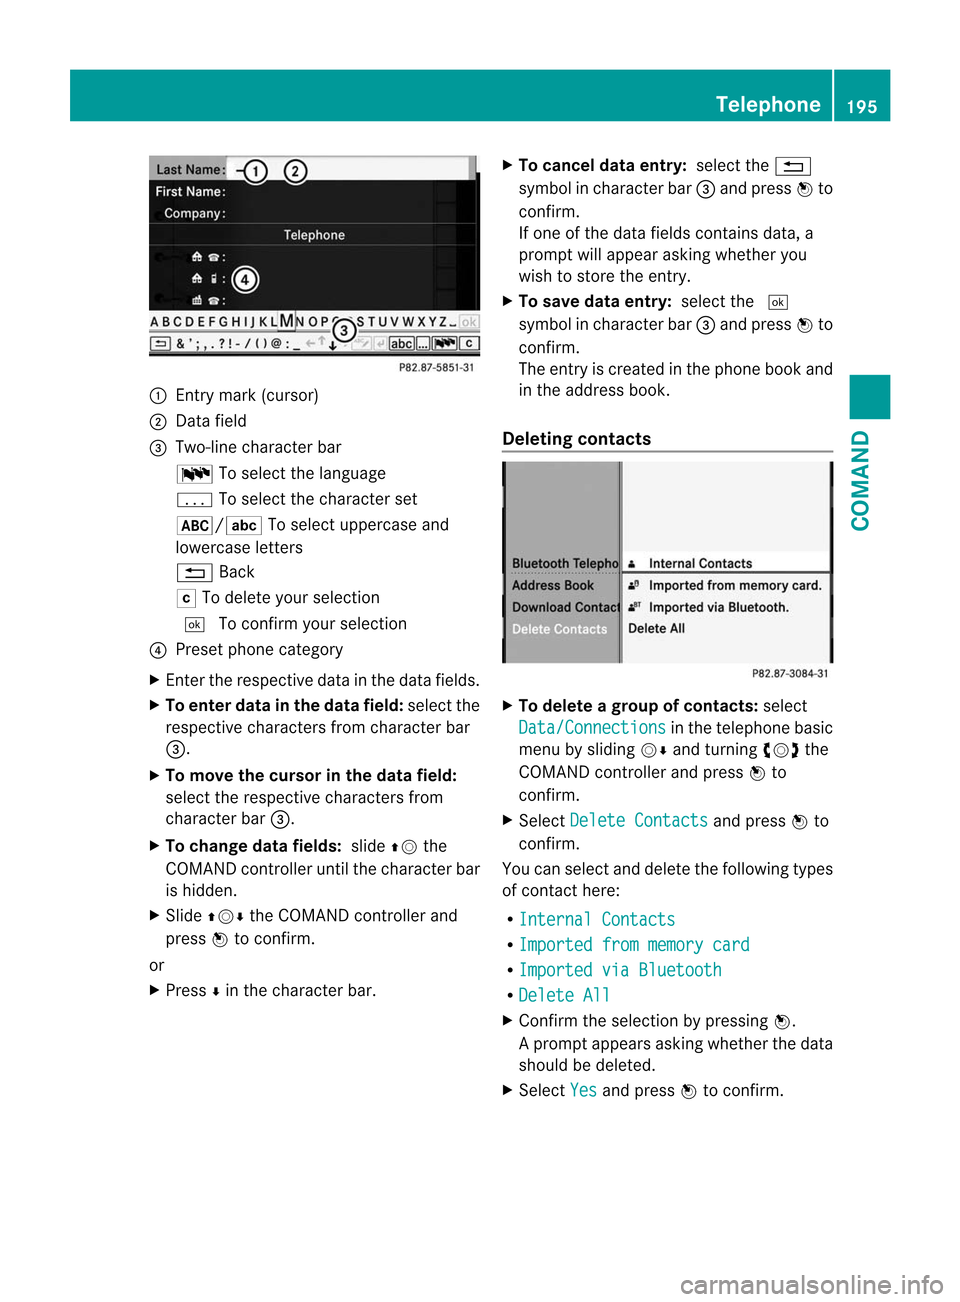
:
Entry mark (cursor)
; Data field
= Two-line character bar
B To select the language
p To select the character set
*/E To select uppercase and
lowercase letters
% Back
F To delete your selection
¬ To confirm your selection
? Prese tphone category
X Enter the respective data in the data fields.
X To enter data in the data field: select the
respective characters from character bar
=.
X To move the cursor in the data field:
select the respective characters from
character bar =.
X To change data fields: slideZVthe
COMAND controller until the character bar
is hidden.
X Slide ZVÆ the COMAND controller and
press Wto confirm.
or
X Press Æin the character bar. X
To cancel data entry: select the%
symbol in character bar =and press Wto
confirm.
If one of the data fields contains data, a
prompt will appeara sking whether you
wish to store the entry.
X To save data entry: select the¬
symbol in character bar =and press Wto
confirm.
The entry is created in the phone book and
in the address book.
Deleting contacts X
To delete a group of contacts: select
Data/Connections in the telephone basic
menu by sliding VÆand turning cVdthe
COMAND controller and press Wto
confirm.
X Select Delete Contacts and press
Wto
confirm.
You can select and delete the following types
of contact here:
R Internal Contacts R
Imported from memory card R
Imported via Bluetooth R
Delete All X
Confirm the selection by pressing W.
Ap rompt appears asking whethe rthe data
should be deleted.
X Select Yes and press
Wto confirm. Telephone
195COMAND Z
Page 228 of 494
Playing back the contents of
acategory
or folder X
Select the category or folder by turning
cVd the COMAND controller.
X Press Wthe COMAND controller for longer
than two seconds.
The content of the category or folder
selected is played in accordance with the
playback optio n(Ypage 226) selected.
Alphabetical track selection iPod
®
and MP3 players
This function is available for alphabetically
sorted categories and folders. This function
is not available for albums or playlists, for
example.
X Select a category, e.g. Artists , by turning
cVd the COMAND controller and press
W to confirm.
The available artists are displayed.
X Press the corresponding number key once
or several times to select the first letter of
the artist's name (e.g. for an artist
beginning with the letter "C", press number
key l three times).
The available letters are listed at the lower
edge of the display.
After a message, the first entry in the list
which matches the letter entered is
highlighted.
i If no corresponding entry exists, the last
entry corresponding to aprevious letter is
highlighted instead.
i For iPods ®
and MP3 players, the quality
of the search results is highly dependent on
the versio nand language variant of the
software (e.g. iTunes ®
version) used to
populate the device.
US Bm ass storage device
This function is available for alphabetically
sorted directories .This function is not
available for albums or playlists, for example. X
In a directory, press the corresponding
number key once or several times to select
the first letter of the artist's name (e.g. for
an artist beginning with the letter "C", press
number key lthree times).
The available letters are listed at the lower
edge of the display.
If the directory only contains folders,
COMAND searches for folders. After a
message, the first entryw hich matches the
letter entered is shown at the top of the list.
If no entry matches the entered letter, the
first item in the list is the last entry to
correspond to a selection.
Selecting an active partition (USB mass
storage devices only) You can select this function for USB mass
storage devices when the storage device is
partitioned. Up to four partitions (primary or
logical; FAT format) are supported.
i
The Windows formatting program
supports FAT partitioning up to 32 GB as
standard.
X Select Media Interface in the basic
display by sliding VÆand turning cVdthe
COMAND controller and press Wto
confirm.
X Select Select Active Partition and
press Wto confirm.
Playback options The following options are available:
R
Normal Track Sequence Normal track sequence: you hear the
tracks in their normal order (e.g. numerical
or alphabetical).
R Random Tracks All the tracks on the medium are played in
random order.
R Category Mix or
Random Folder (for USB
devices if Folder has been selected)226
AudioCOMAND
Page 234 of 494
It may also be possible to select the scene/
chapter from within the menu stored on the
DVD.
X
To skip forwards or back: turncVd or
slide XVY the COMAND controller.
The control menu (Y page 230) appears for
approximately eight seconds.
X On the multifunction steering wheel:
switch on video DVD mode in COMAND
(Y page 230).
X Use the =or; button to select the
Audio menu.
X Press 9or: to select a scene/
chapter.
If you press and hold 9or: for an
extended period, rapid scroll begins.
Selecting afilm/title This function is only available if the DVD is
divided into several films/tracks. If the DVD
contains several films, these can be selected
directly.
Afilm can be selected either when
the DV Dis being played back or when it is
stopped.
The film can also be selected from the menu
on the DVD itself.
X Press Wthe COMAND controller to show
the menu.
X Select DVD-V by turning
cVdthe COMAND
controller and press Wto confirm.
X Select DVD Functions and press
Wto
confirm.
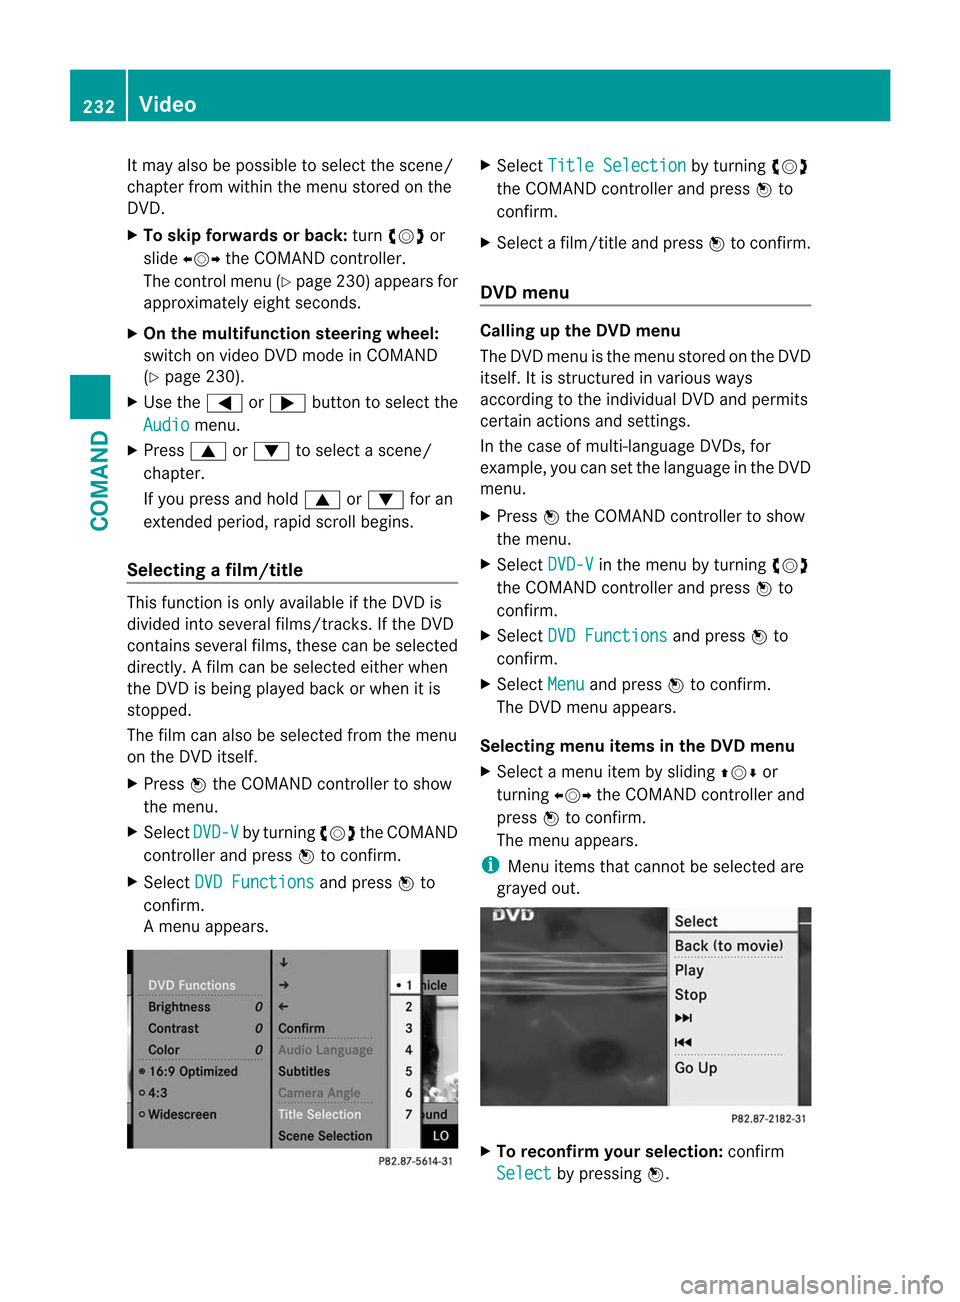
Am enu appears. X
Select Title Selection by turning
cVd
the COMAND controller and press Wto
confirm.
X Select a film/title and press Wto confirm.
DVD menu Calling up the DVD menu
The DVD menu is the menu stored on the DVD
itself. It is structured in various ways
according to the individual DVD and permits
certain actions and settings.
In the case of multi-language DVDs, for
example, you can set the language in the DVD
menu.
X Press Wthe COMAND controller to show
the menu.
X Select DVD-V in the menu by turning
cVd
the COMAND controller and press Wto
confirm.
X Select DVD Functions and press
Wto
confirm.
X Select Menu and press
Wto confirm.
The DVD menu appears.
Selecting menu items in the DVD menu
X Select a menu item by sliding ZVÆor
turning XVYthe COMAND controller and
press Wto confirm.
The menu appears.
i Menu items that cannot be selected are
grayed out. X
To reconfirm your selection: confirm
Select by pressing
W.232
VideoCOMAND