brakes MERCEDES-BENZ CL500 2002 C215 Owner's Manual
[x] Cancel search | Manufacturer: MERCEDES-BENZ, Model Year: 2002, Model line: CL500, Model: MERCEDES-BENZ CL500 2002 C215Pages: 430
Page 6 of 430

3 ContentsPower windows ............................... 183
Sliding/pop-up roof ....................... 186
Interior lighting ............................. 189
Rear window sunshade ................. 191
Sun visors ....................................... 192
Vanity mirrors ................................ 192
Interior ............................................ 193
Storage compartments and
armrests ..................................... 193
Glove box ..................................... 194
Coat hooks ...................................... 198
Cup holder ...................................... 199
Ashtrays ..........................................202
Lighter .............................................204
Parcel net in trunk ........................205
Cargo tie-down hooks ....................206
Parcel net in
front passenger footwell ..........206
Telephone, general ........................207
Garage door opener .......................208
Infrared reflecting windshield .... 212
DrivingControl and operation of
radio transmitters .....................214
The first 1 000 miles
(1 500 km) .................................. 215
Maintenance ...................................215
Tele Aid ............................................ 216
Catalytic converter ........................ 226
Emission control ............................ 227
Starter switch ................................. 228
Starter switch – KEYLESS-GO ..... 230
Starting and turning off
the engine .................................. 233
Automatic transmission ............... 235
Parking brake ................................ 244
Driving instructions ...................... 245
Drive sensibly – save fuel ........ 245
Drinking and driving ................ 245
Pedals .......................................... 245
Power assistance ........................ 246
Brakes .......................................... 246Driving off ...................................247
Parking ........................................248
Tires .............................................249
Snow chains ................................ 251
Winter driving instructions ......252
Deep water ..................................254
Passenger compartment ...........254
Traveling abroad ........................255
Cruise control .................................256
Distronic (DTR) ..............................259
Brake assist system (BAS) ............275
Antilock brake system
(ABS) ........................................... 276
Electronic stability program
(ESP) ...........................................278
Active body control (ABC) ............282
Level control system ......................283
Parking assist
(Parktronic) ................................286
What you should know
at the gas station ....................... 291
Check regularly and
before a long trip ......................294
J_OM_215.book Seite 3 Mittwoch, 30. Mai 2001 2:01 14
Page 156 of 430
153 Tire inflation pressure monitor
Te ch n i c a l
data Instruments
and controlsOperationDrivingInstrument
cluster displayPractical hints Car care Index Tire inflation pressure monitor
(optional for Canada)
The tire inflation pressure, as selected by the driver, is
monitored in all four wheels on the ground. A warning
is issued to the driver in the case of a decrease in the
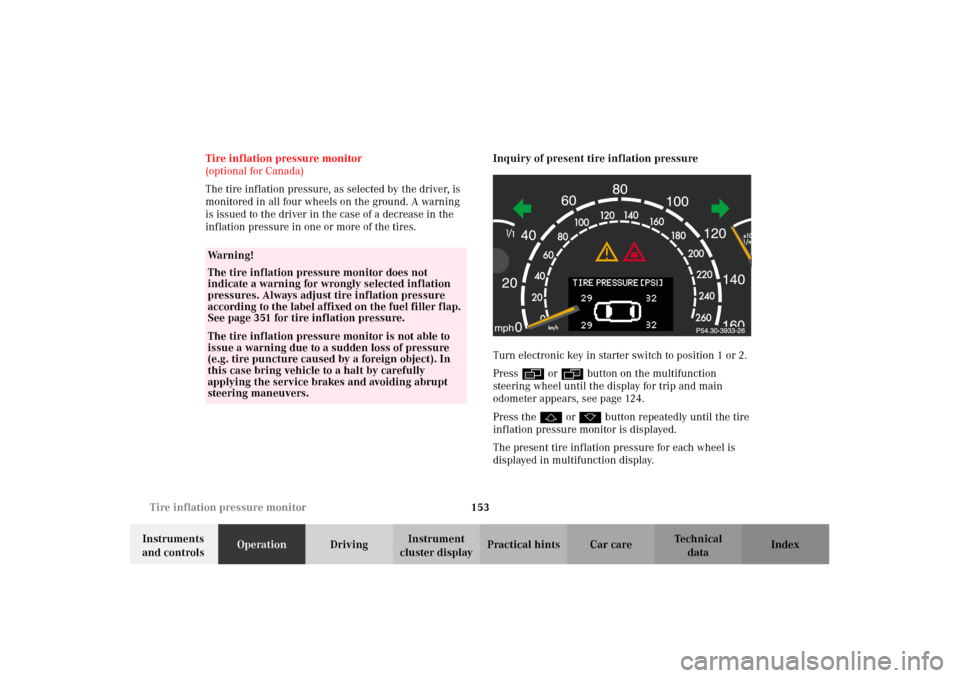
inflation pressure in one or more of the tires.Inquiry of present tire inflation pressure
Turn electronic key in starter switch to position 1 or 2.
Pressè or ÿbutton on the multifunction
steering wheel until the display for trip and main
odometer appears, see page 124.
Press thej or kbutton repeatedly until the tire
inflation pressure monitor is displayed.
The present tire inflation pressure for each wheel is
displayed in multifunction display.
Wa r n i n g !
The tire inflation pressure monitor does not
indicate a warning for wrongly selected inflation
pressures. Always adjust tire inflation pressure
according to the label affixed on the fuel filler flap.
See page 351 for tire inflation pressure.The tire inflation pressure monitor is not able to
issue a warning due to a sudden loss of pressure
(e.g. tire puncture caused by a foreign object). In
this case bring vehicle to a halt by carefully
applying the service brakes and avoiding abrupt
steering maneuvers.
J_OM_215.book Seite 153 Mittwoch, 30. Mai 2001 2:01 14
Page 216 of 430
213 Contents - Driving
Te ch n i c a l
data Instruments
and controlsOperationDrivingInstrument
cluster displayPractical hints Car care Index
DrivingControl and operation of
radio transmitters ..................... 214
The first 1 000 miles
(1 500 km) ................................. 215
Maintenance ................................... 215
Tele Aid ........................................... 216
Catalytic converter ........................226
Emission control ............................227
Starter switch .................................228
Starter switch – KEYLESS-GO ......230
Starting and turning off
the engine ..................................233
Automatic transmission ...............235
Parking brake .................................244Driving instructions ...................... 245
Drive sensibly – save fuel ........ 245
Drinking and driving ................ 245
Pedals .......................................... 245
Power assistance ........................ 246
Brakes .......................................... 246
Driving off ................................... 247
Parking ........................................ 248
Tires ............................................. 249
Snow chains ............................... 251
Winter driving instructions ..... 252
Deep water .................................. 254
Passenger compartment ........... 254
Traveling abroad ........................ 255Cruise control .................................256
Distronic (DTR) ..............................259
Brake assist system (BAS) ............275
Antilock brake system
(ABS) ........................................... 276
Electronic stability program
(ESP) ...........................................278
Active body control (ABC) ............282
Level control system ......................283
Parking assist
(Parktronic) ................................286
What you should know
at the gas station ....................... 291
Check regularly and
before a long trip ......................294
J_OM_215.book Seite 213 Mittwoch, 30. Mai 2001 2:01 14
Page 240 of 430
237 Automatic transmission
Te ch n i c a l
data Instruments
and controlsOperationDrivingInstrument
cluster displayPractical hints Car care Index Stopping
For brief stops, e.g. at traffic lights, leave the
transmission in gear and hold vehicle with the service
brake.
For longer stops with the engine idling, shift into “N”
or “P” and hold the vehicle with the service brake.
When stopping the vehicle on an uphill gradient, do not
hold it with the accelerator, use the brake. This avoids
unnecessary transmission heat build up.
Maneuvering
To maneuver in tight areas, e.g. when pulling into a
parking space, control the vehicle speed by gradually
releasing the brakes. Accelerate gently and never
abruptly step on the accelerator.
To rock a vehicle out of soft ground (mud or snow),
alternately shift from forward to reverse, while applying
slight partial throttle.Rocking a vehicle free in this manner may cause the
ABS or traction system malfunction indicator lamp to
come on. Turn off and restart the engine to clear the
malfunction indication.
Wa r n i n g !
Getting out of your vehicle with the selector lever
not fully engaged in position “P” is dangerous.
A ls o, w hen pa rked on a n in c li ne, pos i tion “P” a lon e
may not prevent your vehicle from moving,
possibly hitting people or objects.Always set the parking brake in addition to shifting
to position “P”, see page 244 for parking brake. When parked on an incline, also turn front wheel
against curb.Wa r n i n g !
When leaving the vehicle always remove the
electronic key from the starter switch, take the
KEYLESS-GO-card (if so equipped) with you and
lock the vehicle. Do not leave children unattended
in the vehicle, or with access to an unlocked
vehicle. Children could move the gear selector lever
from position “P”, which could result in an
accident or serious injury.
J_OM_215.book Seite 237 Mittwoch, 30. Mai 2001 2:01 14
Page 242 of 430
239 Automatic transmission
Te ch n i c a l
data Instruments
and controlsOperationDrivingInstrument
cluster displayPractical hints Car care Index Neutral
No power is transmitted from the engine to the
drive axle. When the brakes are released, the
vehicle can be moved freely (pushed or towed). Do
not engage “N” while driving except to coast
when the vehicle is in danger of skidding (e.g. on
icy roads, see page 252 for winter driving
instructions).
Important!
Coasting the vehicle, or driving for any other
reason with selector lever in “N” can result in
transmission damage that is not covered by the
Mercedes-Benz Limited Warranty.
The transmission automatically upshifts through
5th gear. Position “D” provides optimum driving
characteristics under all normal operating
conditions.Gear selection for special circumstances
The transmission gear ranges for special circumstances
can be selected by pressing the selector lever to the
right or the left with the selector lever in position “D”.
The gear range currently selected is indicated in the
instrument cluster display.
Briefly press selector lever in the “D –” direction:
The transmission will shift from the current gear range
to the next lower gear range.
Press and hold selector lever in the “D –” direction:
The selector lever position display will switch to the
gear range currently selected by the automatic
transmission.
Shifting into another gear range that allows for quicker
acceleration or to slow the vehicle down is possible.
Downshifts can also be performed.
Note:
To avoid overrevving the engine when the selector lever
is moved in “D –” direction, the transmission will not
shift to a lower gear if the engine’s revolutions per
minute limit would be exceeded.
J_OM_215.book Seite 239 Mittwoch, 30. Mai 2001 2:01 14
Page 243 of 430
240 Automatic transmission
Te ch n i c a l
data Instruments
and controlsOperationDrivingInstrument
cluster displayPractical hints Car care Index
Briefly press selector lever in the “D +” direction:
The transmission will shift from the current gear range
to the next higher gear range. If the transmission is
already in gear range “D”, an additional upshift of one
gear is possible.
Press and hold selector lever in the “D +” direction:
The transmission will shift from the current gear
directly to gear range “D”.
Important!
With transmission in gear range “D”, “4” or “3”,
upshifting from 1st to 2nd to 3rd gear is delayed
depending on vehicle speed and engine temperature.
This allows the catalytic converter to heat up more
quickly to operating temperatures.
During the brief warm-up period this delayed upshift
and increased engine noise might be perceived as a malfunction. However, neither the engine nor
transmission are negatively affected by this mode of
operation.
The delayed upshift is effective with vehicle speeds
below 31 mph (50 km/h) at partial throttle and engine
temperatures below 95
°F (35
°C).
To avoid overrevving the engine when the selector lever
is m ove d to a lower gear range , t he tran smi ss ion will n ot
shift to a lower gear, if the engine’s revolutions per
minute limit would be exceeded. In this case there will
be no downshift, even when the vehicle speed reaches
the engine’s rpm limit of that gear, e.g. by applying the
service brakes.
To prevent the engine from laboring at low RPM when
driving uphill gradients or with your vehicle heavily
loaded, the automatic transmission will downshift when
necessary to maintain engine RPM within the best
torque range.
Wa r n i n g !
O n s l i p p e ry ro a d s u rfa c es , n eve r d ow n s h i f t i n o rd e r
to obtain braking action. This could result in drive
wheel slip and reduced vehicle control. Your
vehicle’s ABS will not prevent this type of loss of
control.
J_OM_215.book Seite 240 Mittwoch, 30. Mai 2001 2:01 14
Page 249 of 430
246 Driving instructions
Te ch n i c a l
data Instruments
and controlsOperationDrivingInstrument
cluster displayPractical hints Car care Index
Power assistance
BrakesExcessive use of salt and other snow melting chemicals
spread on roads during the winter months may cause a
build up of moisture or residue to form on the braking
components. This build up or residue could cause light
corrosion of the braking components if the vehicle is
parked with the brakes cold. Apply steady and even
braking pressure when stopping the vehicle to warm up
and dry the brake components.
Important!
Please pay attention to the function of the brake assist
system (BAS), see page 275.
The condition of the parking brake system is checked
each time the vehicle is in the shop for the required
maintenance service at an authorized Mercedes-Benz
Center.
If the parking brake is released and the brake warning
lamp in the instrument cluster stays on, the brake fluid
level in the reservoir is too low.
Brake pad wear or a leak in the system may be the
reason for low brake fluid in the reservoir.
Have the brake system inspected at an authorized
Mercedes-Benz Center immediately.
Wa r n i n g !
When the engine is not running, the brake and
steering systems are without power assistance.
Under these circumstances, a much greater effort is
necessary to stop or steer the vehicle.Wa r n i n g !
After driving in heavy rain for some time without
applying the brakes or through water deep enough
to wet brake components or salty road conditions,
the first braking action may be somewhat reduced
and increased pedal pressure may be necessary to
obtain expected braking effect. Be sure to maintain
a safe distance from vehicles in front.Resting your foot on the brake pedal will cause
excessive and premature wear of the brake pads.It can also result in the brakes overheating thereby
significantly reducing their effectiveness. It may
not be possible to stop the vehicle in sufficient time
to avoid an accident.
J_OM_215.book Seite 246 Mittwoch, 30. Mai 2001 2:01 14
Page 250 of 430
247 Driving instructions
Te ch n i c a l
data Instruments
and controlsOperationDrivingInstrument
cluster displayPractical hints Car care Index All checks and service work on the brake system should
be carried out by an authorized Mercedes-Benz Center.
Install only brake pads and brake fluid recommended by
Mercedes-Benz.Caution!
When driving down long and steep grades, relieve the
load on the brakes by shifting into a lower gear to use
the engine’s braking power. This helps prevent
overheating of the brakes and reduces brake pad wear.
After hard braking, it is advisable to drive on for some
time, rather than immediately parking, so the air stream
will cool down the brakes faster.
Driving off
Apply the service brakes to test them briefly after
driving off. Perform this procedure only when the road
is clear of other traffic.
Warm up the engine smoothly. Do not place full load on
the engine until the operating temperature has been
reached.
When starting off on a slippery surface, do not allow one
drive wheel to spin for an extended period with the ESP
switched off. Doing so may cause serious damage to the
drive train which is not covered by the Mercedes-Benz
Limited Warranty.
Wa r n i n g !
If other than recommended brake pads are
installed, or other than recommended brake fluid
is us ed, t he b ra ki ng properti es of the vehic l e c an be
degraded to an extent that safe braking is
substantially impaired. This could result in an
accident.
J_OM_215.book Seite 247 Mittwoch, 30. Mai 2001 2:01 14
Page 253 of 430
250 Driving instructions
Te ch n i c a l
data Instruments
and controlsOperationDrivingInstrument
cluster displayPractical hints Car care Index
Aq uaplaning
Depending on the depth of the water layer on the road,
aquaplaning may occur, even at low speeds and with
new tires. Reduce vehicle speed, avoid track grooves in
the road and apply brakes cautiously in the rain.
Tire traction
The safe speed on a wet, snow covered or icy road is
always lower than on a dry road.
You should pay particular attention to the condition of
the road whenever the outside temperatures are close to
the freezing point.We recommend M+S rated radial-ply tires for the winter
season for all four wheels to insure normal balanced
handling characteristics. On packed snow, they can
reduce your stopping distance as compared with
summer tires. Stopping distance, however, is still
considerably greater than when the road is not snow or
ice covered.
Tire speed rating
CL 500 and CL 600:
Your vehicle is factory equipped with “H”-rated tires,
which have a speed rating of 130 mph (210 km/h).
Vehicles with Sport Package:
Your vehicle is factory equipped with “Y”-rated tires,
which have a speed rating of 188 mph (300 km / h).
An electronic speed limiter prevents your vehicle from
exceeding a speed of 130 mph (210 km/h).
Wa r n i n g !
If ice has formed on the road, tire traction will be
substantially reduced. Under such weather
conditions, drive, steer and brake with extreme
caution.
J_OM_215.book Seite 250 Mittwoch, 30. Mai 2001 2:01 14
Page 266 of 430
263 Driving systems
Te ch n i c a l
data Instruments
and controlsOperationDrivingInstrument
cluster displayPractical hints Car care Index •For a more precise setting the speed can be
increased in increments of 1 mph (Canada: 1 km/h)
by briefly pulling the control lever in direction (4).
Caution!
If the driver’s foot is not fully removed from the
accelerator pedal, the message “DISTRONIC OVERRIDE”
is displayed while the Distronic control system is being
overridden and it will not regulate the preset vehicle
speed and following distance. The vehicle speed and
following distance will be determined only by the
accelerator pedal position.Invalid attempts to activate
The multifunction display will show “–––MPH” during
invalid attempts to activate Distronic. Distronic will not
activate in the following situations:
•below a speed of approx. 25 mph
(Canada: 40 km/h),
•while the electronic stability program (ESP) is
switched off – ESP warning lampv in
speedometer dial is illuminated, see page 114,
•by moving the distronic control lever in “RESUME”
direction (4) when no speed is stored in memory,
•during the initialization and self-test phase after the
engine is started – this can take up to 2 minutes,
•while depressing the service brake pedal,
•while the parking brake is set – check ;warning
lamp (Canada: !) in instrument cluster, see
page 114,
•with the gear selector lever in position “P”, “R”
or “N” – check gear range indicator display in
instrument cluster, see page 114.
See page 327 for malfunction and warning messages if
the Distronic is malfunctioning.
Wa r n i n g !
Distronic brakes (up to 20% of vehicle braking
power) the vehicle to restore the preset distance or
to maintain the speed. The brake pedal is
automatically applied as this happens.Keep driver’s foot area clear at all times, including
the area under the brake pedal. Objects stored in
this area may impair pedal movement which could
interfere with the braking ability of the Distronic
system.Do not place your foot under the brake pedal – your
foot could become caught.
J_OM_215.book Seite 263 Mittwoch, 30. Mai 2001 2:01 14