ignition MERCEDES-BENZ CL550 2010 W216 Service Manual
[x] Cancel search | Manufacturer: MERCEDES-BENZ, Model Year: 2010, Model line: CL550, Model: MERCEDES-BENZ CL550 2010 W216Pages: 500, PDF Size: 9.5 MB
Page 348 of 500
sunroof until you open the driver’s or
passenger door. If no door was opened you
can operate the tilt/sliding sunroof for up
to 5 minutes.
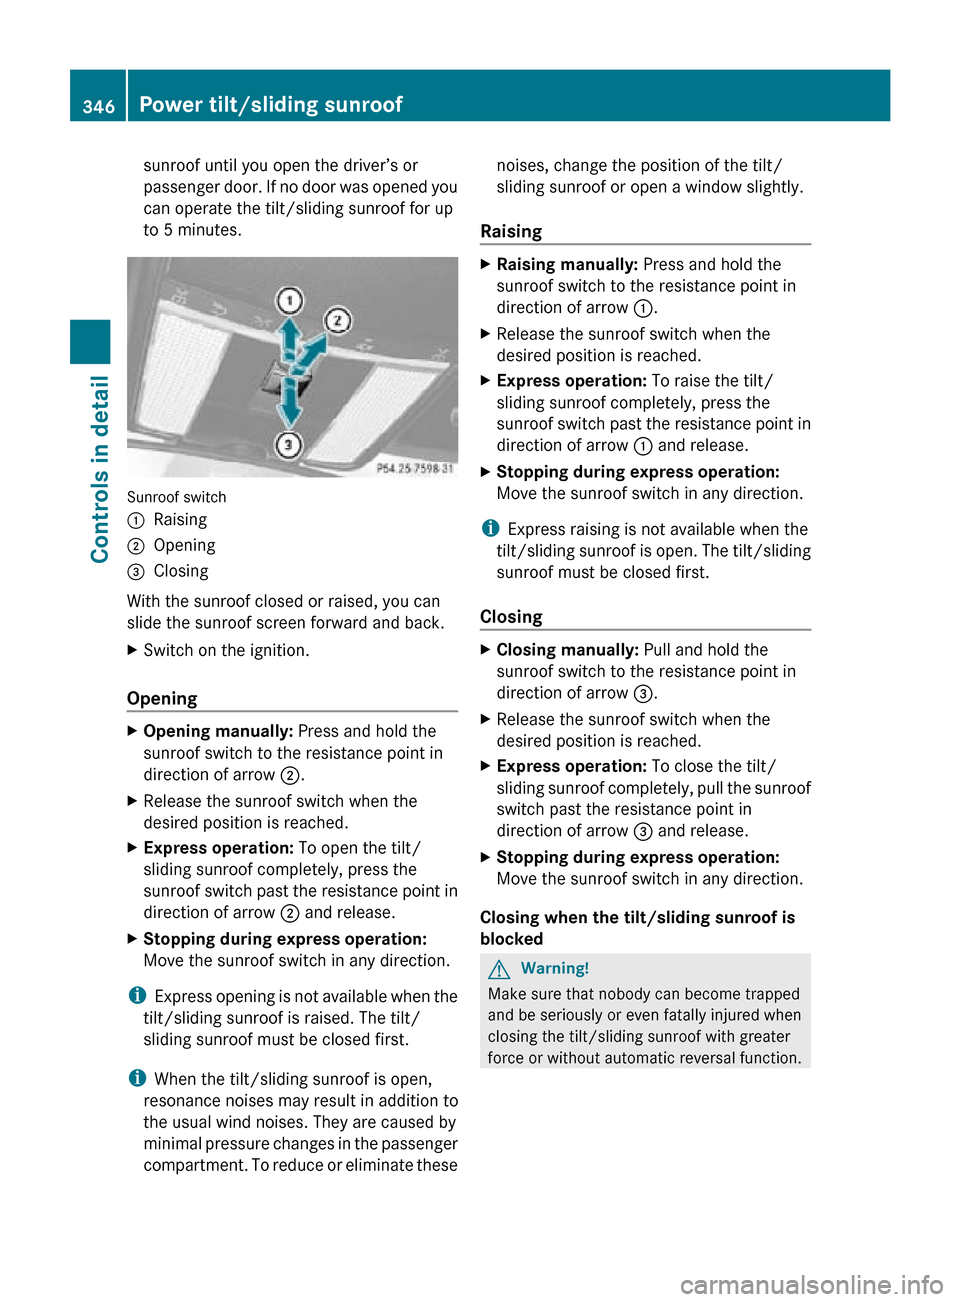
Sunroof switch
:
Raising
; Opening
= Closing
With the sunroof closed or raised, you can
slide the sunroof screen forward and back.
X Switch on the ignition.
Opening X
Opening manually: Press and hold the
sunroof switch to the resistance point in
direction of arrow ;.
X Release the sunroof switch when the
desired position is reached.
X Express operation: To open the tilt/
sliding sunroof completely, press the
sunroof switch past the resistance point in
direction of arrow ; and release.
X Stopping during express operation:
Move the sunroof switch in any direction.
i Express opening is not available when the
tilt/sliding sunroof is raised. The tilt/
sliding sunroof must be closed first.
i When the tilt/sliding sunroof is open,
resonance noises may result in addition to
the usual wind noises. They are caused by
minimal pressure changes in the passenger
compartment. To reduce or eliminate these noises, change the position of the tilt/
sliding sunroof or open a window slightly.
Raising X
Raising manually: Press and hold the
sunroof switch to the resistance point in
direction of arrow :.
X Release the sunroof switch when the
desired position is reached.
X Express operation: To raise the tilt/
sliding sunroof completely, press the
sunroof switch past the resistance point in
direction of arrow : and release.
X Stopping during express operation:
Move the sunroof switch in any direction.
i Express raising is not available when the
tilt/sliding sunroof is open. The tilt/sliding
sunroof must be closed first.
Closing X
Closing manually: Pull and hold the
sunroof switch to the resistance point in
direction of arrow =.
X Release the sunroof switch when the
desired position is reached.
X Express operation: To close the tilt/
sliding sunroof completely, pull the sunroof
switch past the resistance point in
direction of arrow = and release.
X Stopping during express operation:
Move the sunroof switch in any direction.
Closing when the tilt/sliding sunroof is
blocked G
Warning!
Make sure that nobody can become trapped
and be seriously or even fatally injured when
closing the tilt/sliding sunroof with greater
force or without automatic reversal function. 346
Power tilt/sliding sunroofControls in detail
216_AKB; 3; 90, en-US
d2ureepe,
Version: 2.11.8.1 2009-05-15T11:47:50+02:00 - Seite 346
Page 349 of 500
If the movement of the tilt/sliding sunroof is
blocked
during
the closing procedure (e.g. by
ice or pollution), the tilt/sliding sunroof will
stop and open slightly.
X Immediately after the tilt/sliding sunroof
has stopped and opened because it was
blocked, pull and hold the sunroof switch
in direction
of arrow = until the tilt/sliding
sunroof is fully closed.
The tilt/sliding sunroof closes with greater
force.
If the tilt/sliding sunroof is blocked again and
opens slightly:
X Immediately after the tilt/sliding sunroof
was blocked
and has opened, pull and hold
the sunroof switch in direction of arrow
= until the tilt/sliding sunroof is fully
closed.
The tilt/sliding sunroof closes without
automatic reversal function. G
Warning!
Pulling and holding the sunroof switch to
close the tilt/sliding sunroof immediately
after it
had been blocked two times will cause
the tilt/sliding sunroof to close without any
reversal function for as long as you hold the
sunroof switch. Synchronizing
The tilt/sliding
sunroof must be synchronized
after a malfunction or if it does not open
smoothly.
! If the tilt/sliding sunroof cannot be closed
or synchronized, contact an authorized
Mercedes-Benz Center or call Roadside
Assistance.
X Switch on the ignition.
X Press and hold the sunroof switch in
direction of
arrow : (Y page 346) until the
tilt/sliding sunroof is fully raised at the
rear. X
Keep holding the sunroof switch in
direction of arrow : for approximately
1 second.
X Check the express operation feature
(Y page 346).
If the
tilt/sliding sunroof opens and closes
completely, the roof is synchronized.
Otherwise repeat the above steps. Loading and storing
Loading instructions
G
Warning!
Always fasten items being carried as securely
as possible using fastening materials
appropriate for the weight and size of the
load.
In an
accident, during hard braking or sudden
maneuvers, loose items will be thrown around
inside the vehicle. This can cause injury to
vehicle occupants unless the items are
securely fastened in the vehicle.
To help avoid personal injury during a collision
or sudden maneuver, exercise care when
transporting cargo. Do not pile luggage or
cargo higher than the seat backrests.
The trunk is the preferred place to carry
objects. Do not place anything on the rear-
window shelf.
Never drive a vehicle with the trunk open.
Deadly carbon monoxide (CO) gases may
enter vehicle interior resulting in
unconsciousness and death.
Load distribution The total load weight including vehicle
occupants and luggage/cargo should not
exceed the total load limit indicated on the
corresponding Tire and Loading Information
placard located on the driver’s door
B-pillar
(
Y page 382).
The handling characteristics of a fully loaded
vehicle depends greatly on the load
distribution. It is therefore recommended to Loading and storing
347
Controls in detail
216_AKB; 3; 90, en-US
d2ureepe, Version: 2.11.8.1 2009-05-15T11:47:50+02:00 - Seite 347 Z
Page 354 of 500
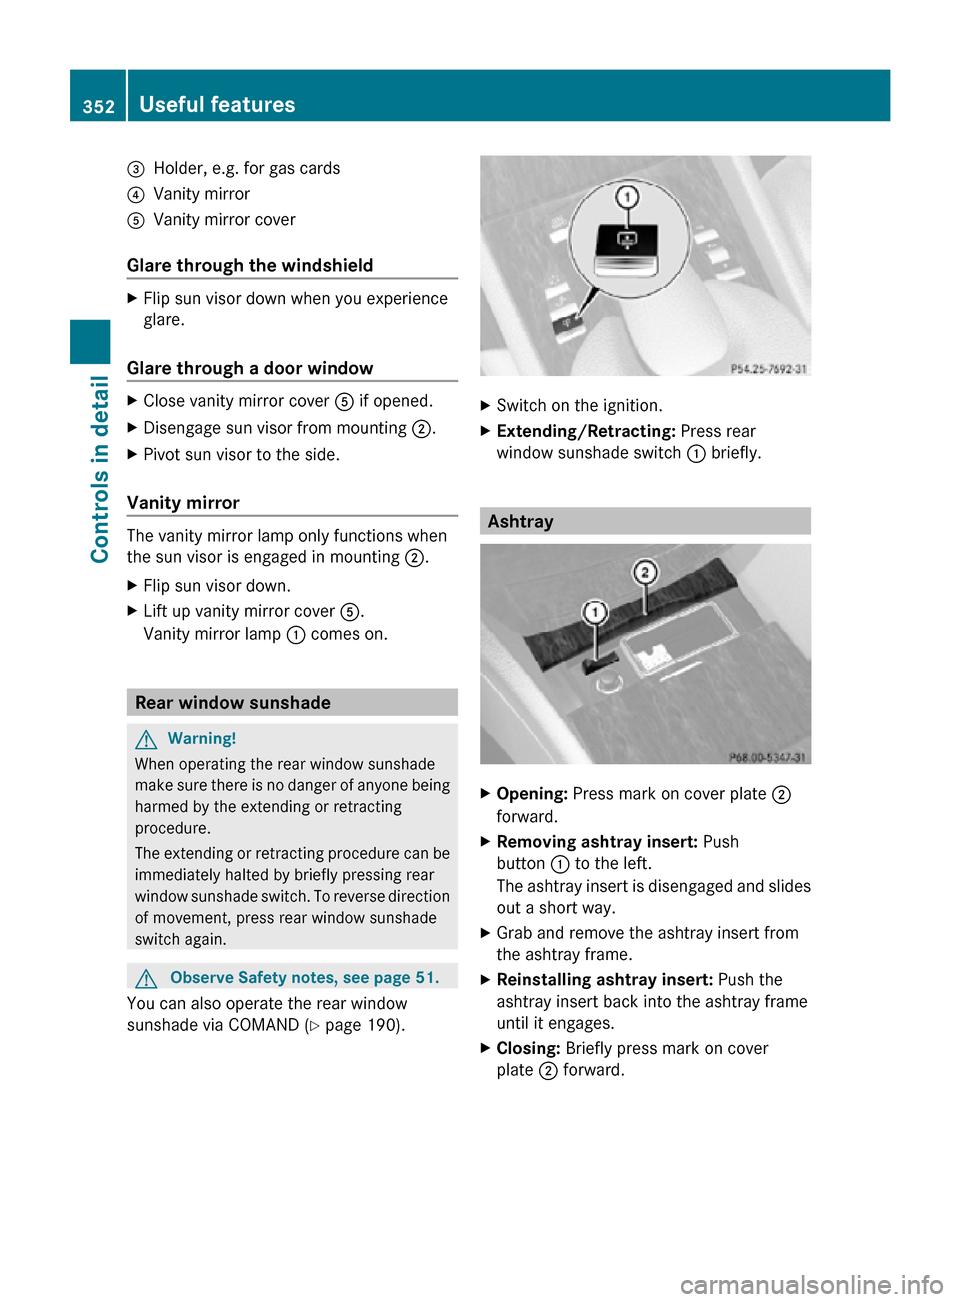
=
Holder, e.g. for gas cards
? Vanity mirror
A Vanity mirror cover
Glare through the windshield X
Flip sun visor down when you experience
glare.
Glare through a door window X
Close vanity mirror cover A if opened.
X Disengage sun visor from mounting ;.
X Pivot sun visor to the side.
Vanity mirror The vanity mirror lamp only functions when
the sun visor is engaged in mounting ;.
X
Flip sun visor down.
X Lift up vanity mirror cover A.
Vanity mirror lamp : comes on.Rear window sunshade
G
Warning!
When operating the rear window sunshade
make sure there is no danger of anyone being
harmed by the extending or retracting
procedure.
The extending or retracting procedure can be
immediately halted by briefly pressing rear
window sunshade switch. To reverse direction
of movement, press rear window sunshade
switch again. G
Observe Safety notes, see page 51.
You can also operate the rear window
sunshade via COMAND ( Y page 190). X
Switch on the ignition.
X Extending/Retracting: Press rear
window sunshade switch : briefly. Ashtray
X
Opening: Press mark on cover plate ;
forward.
X Removing ashtray insert: Push
button : to the left.
The ashtray insert is disengaged and slides
out a short way.
X Grab and remove the ashtray insert from
the ashtray frame.
X Reinstalling ashtray insert: Push the
ashtray insert back into the ashtray frame
until it engages.
X Closing: Briefly press mark on cover
plate ; forward. 352
Useful featuresControls in detail
216_AKB; 3; 90, en-US
d2ureepe,
Version: 2.11.8.1 2009-05-15T11:47:50+02:00 - Seite 352
Page 355 of 500
Cigarette lighter
G
Observe Safety notes, see page 51. G
Warning!
Never touch the heating element or sides of
the lighter; they are extremely hot. Hold the
knob only.
Make sure any children traveling with you do
not injure themselves or start a fire with the
hot cigarette lighter.
If the engine is off and the cigarette lighter is
being used extensively, the vehicle battery
may become discharged.
X Open the cover ( Y page 352). X
Switch on the ignition.
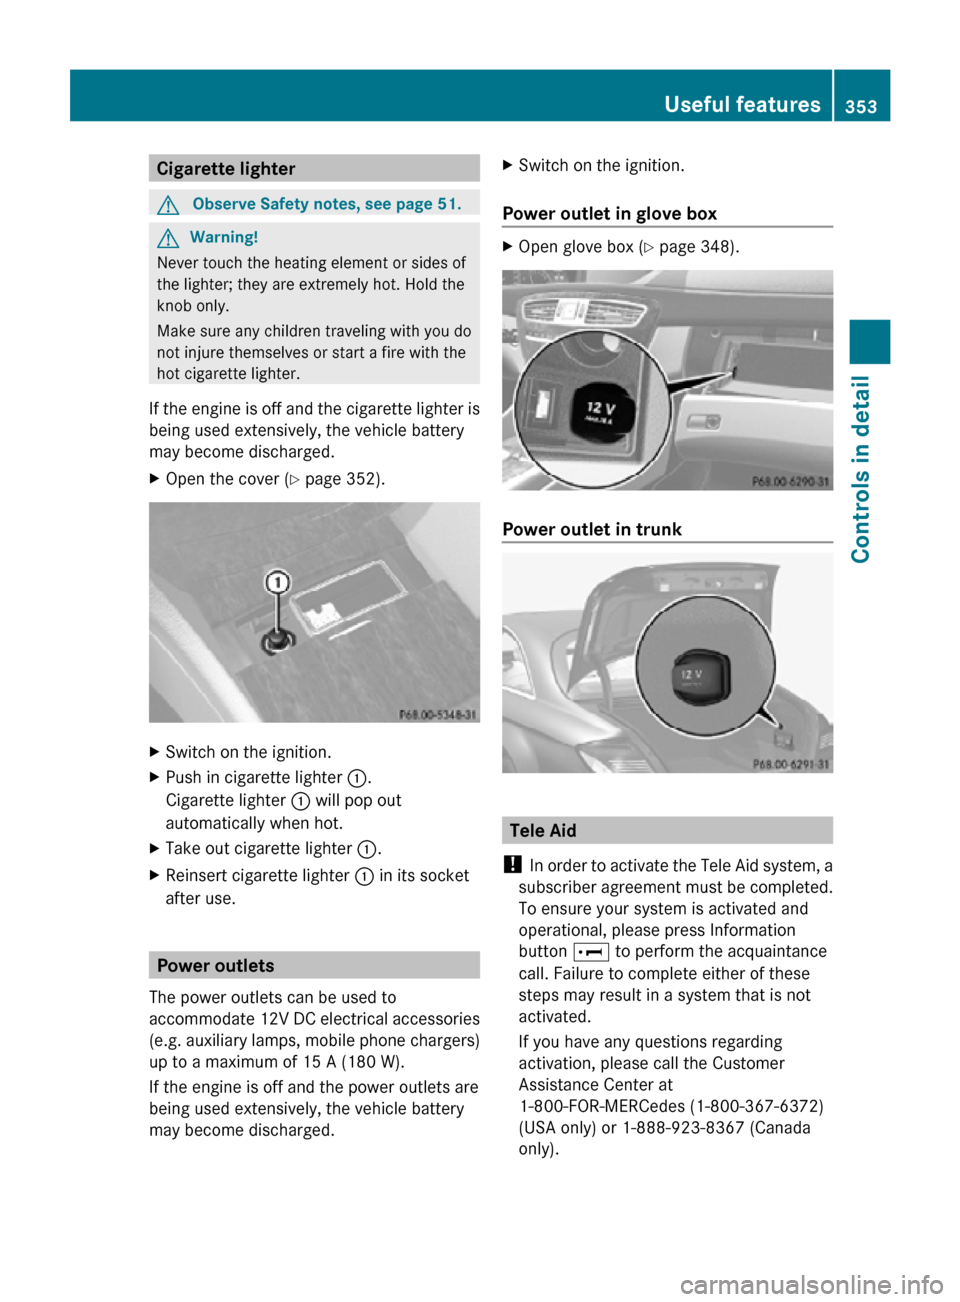
X Push in cigarette lighter :.
Cigarette lighter : will pop out
automatically when hot.
X Take out cigarette lighter :.
X Reinsert cigarette lighter : in its socket
after use. Power outlets
The power outlets can be used to
accommodate 12V DC electrical accessories
(e.g. auxiliary lamps, mobile phone chargers)
up to a maximum of 15 A (180 W).
If the engine is off and the power outlets are
being used extensively, the vehicle battery
may become discharged. X
Switch on the ignition.
Power outlet in glove box X
Open glove box ( Y page 348). Power outlet in trunk
Tele Aid
! In order to activate the Tele Aid system, a
subscriber agreement must be completed.
To ensure your system is activated and
operational, please press Information
button E to perform the acquaintance
call. Failure to complete either of these
steps may result in a system that is not
activated.
If you have any questions regarding
activation, please call the Customer
Assistance Center at
1-800-FOR-MERCedes (1-800-367-6372)
(USA only) or 1-888-923-8367 (Canada
only). Useful features
353Controls in detail
216_AKB; 3; 90, en-US
d2ureepe, Version: 2.11.8.1 2009-05-15T11:47:50+02:00 - Seite 353 Z
Page 356 of 500
Shortly after the completion of your Tele Aid
acquaintance call, you will receive a user ID
and password in the mail. You may use this
password to access the Tele Aid section in
“Owner’s
Online”
at www.mbusa.com (USA
only). The “My Tele Aid” section will give you
access to account information, remote door
unlock and more.
The Tele Aid system is available if
R it has been activated and is operational.
Activation requires a subscription for
monitoring services, connection and
cellular air time
R vehicle battery power is available
R the relevant cellular phone network and
GPS signals are available and pass the
information on to the Customer Assistance
Center
i Location of the vehicle on a map is only
possible if the vehicle is able to receive
signals from the GPS satellite network and
pass the information on to the Customer
Assistance Center.
The Tele Aid system ( Telematic Alarm Identification on Demand)
The Tele Aid system consists of three types
of response:
R Automatic and manual emergency
R Roadside Assistance
R Information
To adjust the speaker volume during a Tele
Aid call do the following:
X Press button W or X on the
multifunction steering wheel.
or
X Use the COMAND volume thumbwheel
H on the lower part of the front center
console (Y page 76).
Be sure to check “Owner’s Online” at
www.mbusa.com (USA only) for more information and a description of all available
features.
System self-test The system performs a self-test after you
have switched on the ignition.
G
Warning!
A malfunction in the system has been
detected if any or all of the following
conditions occur:
R The indicator lamp in the SOS button does
not come on during the system self-test.
R The indicator lamp in Roadside Assistance
button º does not come on during the
system self-test.
R The indicator lamp in Information button
E does not come on during the system
self-test.
R The indicator lamp in the SOS button,
Roadside Assistance button º, or
Information button E remains
illuminated constantly in red after the
system self-test.
R The message Tele Aid Inoperative or
Tele Aid Not Activated appears in the
multifunction display
after the system self-
test
If a malfunction is indicated as outlined above,
the system may not operate as expected. In
case of an emergency, help will have to be
summoned by other means.
Have the system checked at the nearest
Mercedes-Benz Center or contact the
Customer Assistance Center at
1-800-FOR-MERCedes (1-800-367-6372)
(USA only) or 1-888-923-8367 (Canada only)
as soon as possible.
Emergency calls !
In order
to activate the Tele Aid system, a
subscriber agreement must be completed.
To ensure your system is activated and
operational, please press Information 354
Useful features
Controls in detail
216_AKB; 3; 90, en-US
d2ureepe,
Version: 2.11.8.1 2009-05-15T11:47:50+02:00 - Seite 354
Page 361 of 500
i
Destination addresses will download in
the same
order they were sent. If you have
multiple Mercedes-Benz vehicles equipped
with Tele Aid and active accounts, each
destination address sent will be retrievable
by all vehicles associated with the e-mail
address you specified for your Tele Aid
account.
Remote door unlock In case you have locked your vehicle
unintentionally
(e.g.
SmartKey inside vehicle),
and the reserve SmartKey is not available:
X Contact the Customer Assistance Center
at 1-800-FOR-MERCedes
(1-800-367-6372) (USA only) or
1-888-923-8367
(Canada only).
You will be asked to provide your password.
X Then return to your vehicle at the time
arranged with the Customer Assistance
Center and pull the trunk lid handle for a
minimum of 20 seconds until the indicator
lamp in the SOS button is flashing.
The message Connecting
Call appears in
the multifunction display.
As an alternative, you may unlock the vehicle
via Internet in the “My Tele Aid” section of
“Owner’s Online”,
using your ID and password
(USA only).
i The remote door unlock feature is
available if the relevant cellular phone
network is available.
The SOS button will flash and the message
Connecting Call will appear in the
multifunction display to indicate receipt of
the door unlock command.
If the trunk lid handle was pulled for more
than 20 seconds before door unlock
authorization was received, you must wait
15 minutes before pulling the trunk lid
handle again. Remote door lock If you have forgotten to lock your vehicle and
are no longer near it, you can have it locked
remotely through the Customer Assistance
Center.
The vehicle can be remotely locked within
four
days
after the ignition has been switched
off.
X Contact the Customer Assistance Center
at 1-800-FOR-MERCedes
(1-800-367-6372) (USA only) or
1-888-923-8367
(Canada only).
You will be asked to provide your password.
When you are inside your vehicle the next
time and
switch on the ignition, the message
Tele Aid Doors Locked Remotely will
appear on the multifunction display.
i The remote door lock feature is available
if the relevant cellular phone network is
available and data connection is possible.
Automatic Maintenance Call Your vehicle is equipped with a feature that
considerably enhances vehicle care. Just
prior to reaching a vehicle maintenance
milestone, Tele Aid transmits important
vehicle maintenance information that alerts
your authorized Mercedes-Benz Center of
required service. This is automatic and does
not require driver intervention. This feature
allows your preferred Mercedes-Benz Center
to significantly improve the process of
arranging your service appointment and
ensures that your vehicle receives the best
possible care.
i
The Automatic Maintenance Call feature
is available if the relevant telephone
network is
available and data connection is
possible. Useful features
359
Controls in detail
216_AKB; 3; 90, en-US
d2ureepe, Version: 2.11.8.1 2009-05-15T11:47:50+02:00 - Seite 359 Z
Page 362 of 500
Stolen Vehicle Recovery Services
In the event your vehicle was stolen:
X
Report the incident to the police.
The police will issue a numbered incident
report.
X Pass this number on to the Customer
Assistance Center along with your
password.
The Customer Assistance Center will then
attempt to covertly contact the vehicle’s
Tele Aid system. Once the vehicle is
located, the Customer Assistance Center
will contact the local law enforcement and
you. The vehicle’s location will only be
provided to law enforcement.
i If the anti-theft alarm stays on for more
than 30 seconds, the Tele Aid system will
notify the Customer Assistance Center
automatically. Garage door opener
The integrated remote control can operate up
to three separately controlled devices
compatible with HomeLink ®
or some other
systems. G
Warning!
Before programming the integrated remote
control to a garage door opener or gate
operator, make sure people and objects are
out of the way of the device to prevent
potential harm or damage. When
programming a garage door opener, the door
moves up or down. When programming a gate
operator, the gate opens or closes.
Do not use the integrated remote control with
any garage door opener that lacks safety stop
and reverse features as required by U.S.
federal safety standards (this includes any
garage door opener model manufactured
before April 1, 1982). A garage door that
cannot detect an object - signaling the door
to stop and reverse - does not meet current
U.S. federal safety standards. When programming a garage door opener,
park vehicle outside the garage.
Do not run the engine while programming the
integrated remote control. Inhalation of
exhaust gas is hazardous to your health. All
exhaust gas contains carbon monoxide (CO),
and inhaling it can cause unconsciousness
and possible death.
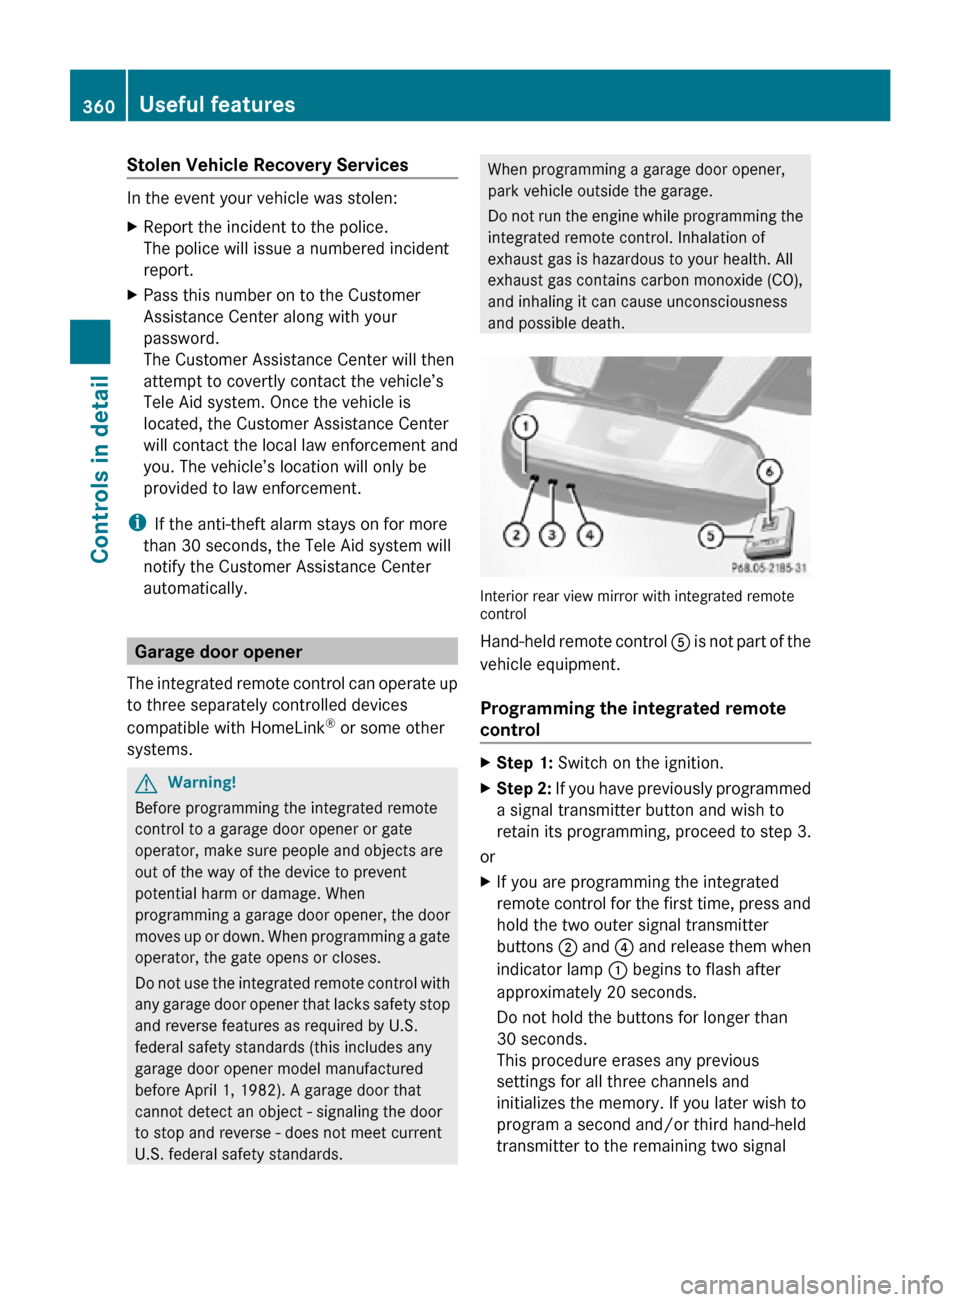
Interior rear view mirror with integrated remote
control
Hand-held remote control
A is not part of the
vehicle equipment.
Programming the integrated remote
control X
Step 1: Switch on the ignition.
X Step 2: If you have previously programmed
a signal transmitter button and wish to
retain its programming, proceed to step 3.
or
X If you are programming the integrated
remote control for the first time, press and
hold the two outer signal transmitter
buttons ; and ? and release them when
indicator lamp : begins to flash after
approximately 20 seconds.
Do not hold the buttons for longer than
30 seconds.
This procedure erases any previous
settings for all three channels and
initializes the memory. If you later wish to
program a second and/or third hand-held
transmitter to the remaining two signal 360
Useful featuresControls in detail
216_AKB; 3; 90, en-US
d2ureepe,
Version: 2.11.8.1 2009-05-15T11:47:50+02:00 - Seite 360
Page 364 of 500
Gate operator/Canadian programming
Canadian radio-frequency laws require
transmitter signals to “time-out” (or quit)
after several seconds of transmission which
may not be long enough for the integrated
signal
transmitter
to pick up the signal during
programming. Similar to this Canadian law,
some U.S. gate operators are designed to
“time-out” in the same manner.
If you live in Canada or if you are having
difficulties programming a gate operator
(regardless of where you live) by using the
programming procedures, replace step 4 with
the following:
X Step 4: Press and hold the signal
transmitter button ( ;, = or ?). Do not
release this button until it has been
successfully trained.
X While still holding down the signal
transmitter button ( ;, = or ?), “cycle”
your hand-held remote control button B
as follows: Press and hold button B for
2 seconds, then release it for 2 seconds,
and again press and hold it for 2 seconds.
Repeat this sequence on the hand-held
remote control until the frequency signal
has been learned.
Upon successful training, indicator
lamp : will flash slowly and then rapidly
after several seconds.
X Proceed with programming step 5 and
step 6 to complete.
i Upon completion of programming the
integrated remote control, make sure you
retain the hand-held remote control that
came with the garage door opener, gate
operator or other device. You may need it
for use in other vehicles, for future
programming of an integrated remote
control, or simply for continued use as a
hand-held remote control to operate the
respective device in other situations. Reprogramming a single signal
transmitter button To program a device using a signal
transmitter button previously trained, follow
these steps:
X
Switch on the ignition.
X Press and hold the desired signal
transmitter button ( ;, = or ?). Do not
release the button.
Indicator lamp : will begin to flash after
20 seconds.
X Without releasing the signal transmitter
button, proceed
with programming starting
with step 3.
Operation of integrated remote control X
Switch on the ignition.
X Select and press the appropriate
integrated signal transmitter button ( ;,
= or ?
) to activate the remote controlled
device.
The integrated remote control transmitter
continues to send the signal as long as the
button is pressed – up to 20 seconds.
Erasing the integrated remote control
memory i
If you
sell your vehicle, erase the codes of
all three channels.
X Switch on the ignition.
X Simultaneously press and hold outer signal
transmitter buttons ; and ?, for
approximately 20 seconds, until indicator
lamp : flashes rapidly. Do not hold for
longer than 30 seconds.
The codes
of all three channels are erased. 362
Useful features
Controls in detail
216_AKB; 3; 90, en-US
d2ureepe,
Version: 2.11.8.1 2009-05-15T11:47:50+02:00 - Seite 362
Page 368 of 500
Vehicle equipment
i This Operator’s Manual describes all
features, standard or optional, potentially
available for your vehicle at the time of
purchase. Please be aware that your
vehicle might not be equipped with all
features described in this manual. The first 1000 miles (1500 km)
The more cautiously you treat your vehicle
during the
break-in period, the more satisfied
you will be with its performance later on.
R Drive your vehicle during the first
1 000 miles (1 500 km) at varying but
moderate vehicle and engine speeds.
R During this period, avoid heavy loads (full
throttle driving) and excessive engine
speeds (no more than 2
/ 3 of maximum rpm
in each gear).
R Select C as the preferred shift program
(Y page 296) for the first 1 000 miles
(1 500 km).
R Avoid accelerating by kickdown.
R Do not attempt to slow the vehicle down by
shifting to a lower gear using the gear
selector lever.
R Select gear ranges 3, 2 or 1 (Y page 295)
only when driving at moderate speeds (for
hill driving).
After 1 000 miles (1 500 km) you may
gradually increase vehicle and engine speeds
to the permissible maximum.
! Additional instructions for AMG vehicles:
R During the first 1 000 miles (1 500 km),
do not exceed a speed of 85 mph
(140 km/h).
R During this period, avoid engine speeds
above 4 500 rpm in each gear.
R Shift gears in a timely manner. All of the above instructions, as may apply to
your
vehicle
type, also apply when driving the
first 1 000 miles (1 500 km) after the engine
or the rear differential has been replaced.
i Always obey applicable speed limits. At the gas station
Refueling
G
Warning!
Gasoline is highly flammable and poisonous.
It burns violently and can cause serious
personal injury.
Never allow sparks, flames or smoking
materials near gasoline!
Turn off the engine before refueling.
Whenever you are around gasoline, avoid
inhaling fumes and any skin or clothing
contact. Extinguish all smoking materials.
Direct skin contact with fuels and the
inhalation of fuel vapors are damaging your
health. G
Warning!
Overfilling of the fuel tank may create
pressure in the system which could cause a
gas discharge. This could cause the gas to
spray back
out when removing the fuel pump
nozzle, which could cause personal injury.
! Never refuel vehicles with gasoline engine
with diesel fuel. Even small amounts of
diesel fuel will damage the fuel system and
engine. Damage resulting from the use of
non-approved fuels or fuel additives or
resulting from mixing gasoline with diesel
fuel is not covered by the Mercedes-Benz
Limited Warranty.
! If you have accidentally filled the tank
with incorrect or non-approved fuel, do not
switch on the ignition. Otherwise the
incorrect or non-approved fuel will get into
the fuel lines. The fuel system must be
drained completely. Contact an authorized 366
At the gas station
Operation
216_AKB; 3; 90, en-US
d2ureepe,
Version: 2.11.8.1 2009-05-15T11:47:50+02:00 - Seite 366
Page 370 of 500
R
Washer system and headlamp cleaning
system (Y page 372)
R Brake fluid ( Y page 373) Engine compartment
Hood
G
Warning!
Do not pull the release lever while the vehicle
is in motion. Otherwise the hood could be
forced open by passing air flow.
This could cause the hood to come loose and
injure you and/or others.
Opening G
Warning!
If you see flames or smoke coming from the
engine compartment, or if the coolant
temperature gauge indicates that the engine
is overheated, do not open the hood. Move
away from vehicle and do not open the hood
until the engine has cooled. If necessary, call
the fire department. G
Warning!
You could be injured when the hood is open –
even when the engine is turned off.
Parts of the engine can become very hot. To
prevent burns, let the engine cool completely
before touching any components on the
vehicle. Comply with all relevant safety
precautions. G
Warning!
To help prevent personal injury, stay clear of
moving parts when the hood is open and the
engine is running.
The radiator fan may continue to run for
approximately 30 seconds or may even
restart after the engine has been turned off.
Stay clear of fan blades. G
Warning!
The engine is equipped with a transistorized
ignition system. Because of the high voltage
it is dangerous to touch any components
(ignition coils, spark plug sockets, diagnostic
socket) of the ignition system
R with the engine running
R while starting the engine
R when the ignition is switched on and the
engine is turned manually X
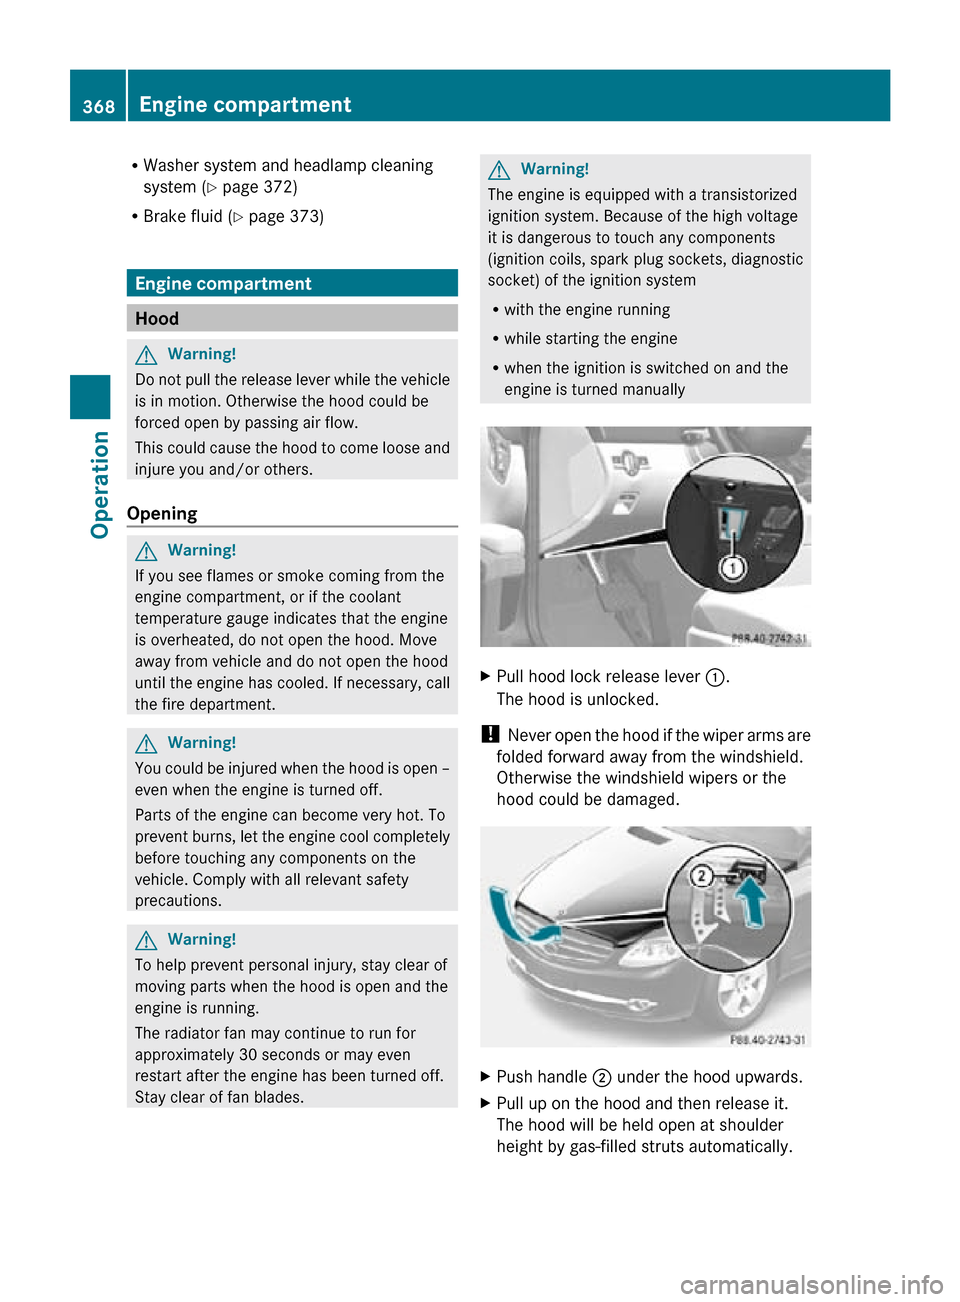
Pull hood lock release lever :.
The hood is unlocked.
! Never open the hood if the wiper arms are
folded forward away from the windshield.
Otherwise the windshield wipers or the
hood could be damaged. X
Push handle ; under the hood upwards.
X Pull up on the hood and then release it.
The hood will be held open at shoulder
height by gas-filled struts automatically. 368
Engine compartmentOperation
216_AKB; 3; 90, en-US
d2ureepe,
Version: 2.11.8.1 2009-05-15T11:47:50+02:00 - Seite 368