oil MERCEDES-BENZ CLA 2013 Owners Manual
[x] Cancel search | Manufacturer: MERCEDES-BENZ, Model Year: 2013, Model line: CLA, Model: MERCEDES-BENZ CLA 2013Pages: 352, PDF Size: 5.37 MB
Page 6 of 352
1, 2, 3 ...
12 V socket see Socket
A
ABS (Anti-lock Braking System) Display message ............................ 227
Function/notes ................................ 64
Important safety notes ....................64
Warning lamp ................................. 256
Activating/deactivating air-recir-
culation mode .................................... 134
Activating/deactivating cooling
with air dehumidification ................. 128
Active light function ......................... 110
Active Park Assist Display message ............................ 245
Active Parking Assist
Cancelling ...................................... 190
Detecting parking spaces ..............187
Exiting a parking space ..................189
Function/notes ............................. 186
Important safety notes ..................186
Parking .......................................... 188
Towing a trailer .............................. 191
ADAPTIVE BRAKE ................................. 70
Adaptive Brake Assist Display message ............................ 234
Function/notes ................................ 66
Adaptive brake lamps ......................... 68
Adaptive Highbeam Assist Display message ............................ 240
Function/notes ............................. 111
Switching on/off ........................... 112
Adaptive Main-beam Assist
Switching on/off (on-board com-
puter) ............................................. 221
Additional speedometer ................... 220
Additives (engine oil) ........................ 341
Adjusting the headlamp range ......... 108
Airbags Front airbag (driver, front
passenger) ....................................... 44
Important safety guidelines .............42
Kneebag ........................................... 44
Sidebag ............................................ 44
Triggering ......................................... 41
Windowbag ...................................... 45
Air-conditioning system
see Climate control
Air filter (white display message) .... 242
Air pressure see Tyre pressure
Air vents
Important safety notes ..................141
Rear ............................................... 142
Setting ........................................... 141
Setting the centre air vents ...........141
Setting the side air vents ...............142
Alarm system
see ATA (Anti-Theft Alarm system)
Ambient lighting
Setting the brightness (on-board
computer) ...................................... 222
Anti-glare film .................................... 280
Anti-lock braking system see ABS (Anti-lock Braking System)
Anti-Theft Alarm system
see ATA (Anti-Theft Alarm system)
Aquaplaning ....................................... 167
Ashtray ............................................... 276
Assistance display (on-board com-
puter) .................................................. 217
Assistance menu (on-board com-
puter) .................................................. 217
ASSYST PLUS Displaying a service message ........287
Hiding a service message ..............287
Notes ............................................. 286
Resetting the service interval dis-
play ................................................ 287
Service message ............................ 286
Special service requirements ......... 287
ATA (Anti-Theft Alarm system)
Activating/deactivating ...................71
Function ........................................... 71
Interior motion sensor .....................72
Switching off the alarm ....................71
Tow-away protection ........................ 71
ATTENTION ASSIST
Activating/deactivating .................218
Display message ............................ 242
Function/notes ............................. 1954Index
Page 12 of 352
Engine number ............................... 336
Jump-starting ................................. 306
Running irregularly .........................150
Starting problems ..........................150
Starting the engine with the key ....146
Stopping ........................................ 162
Tow-starting (vehicle) ..................... 311
Warning lamp (engine diagnostics) 262
Engine electronics
Notes ............................................. 334
Problem (fault) ............................... 150
Engine jump starting
see Jump starting (engine)
Engine oil
Additives ........................................ 341
Checking the oil level ..................... 284
Checking the oil level using the
dipstick .......................................... 284
Display message ............................ 242
Filling capacity ............................... 340
Notes about oil grades ................... 340
Notes on oil level/consumption ....284
Topping up ..................................... 285
Viscosity ........................................ 341
Environmental protection
Returning an end-of-life vehicle .......21
ESP ®
(Electronic Stability Pro-
gram) Deactivating/activating .................218
Deactivating/activating (notes) .......69
Display message ............................ 227
ETS .................................................. 68
Function/notes ......................... 68, 69
General notes .................................. 68
Important safety guidelines .............68
Trailer stabilisation ..........................70
Warning lamp ................................. 258
ETS (Electronic Traction System) ....... 68
Exhaust pipe (cleaning instructions) 292
Exterior lighting Settings options ............................. 106
see Lights
Exterior mirrors
Adjusting ....................................... 101
Anti-dazzle mode (automatic) ........102
Folding in/out (automatically) .......102
Folding in/out (electrically) ...........101Folding in when locking (on-board
computer) ...................................... 225
Out of position (troubleshooting) ...102
Parking position ............................. 102
Resetting ....................................... 102
Storing settings (memory function) 103
F
Fault message see Display messages
Filler cap
see Fuel filler flap
Fire extinguisher ............................... 297
First-aid kit ......................................... 296
Fitting a wheel Removing a wheel ..........................328
Fitting wheels
Fitting a wheel ............................... 328
Lowering the vehicle ......................328
Preparing the vehicle .....................325
Raising the vehicle .........................326
Securing the vehicle against roll-
ing away ........................................ 326
Flat tyre
MOExtended tyres .........................298
Preparing the vehicle .....................298
TIREFIT kit ...................................... 299
see Emergency spare wheel
Floormat ............................................. 279
Foglamps Extended range .............................. 111
Switching on/off ........................... 108
Frequencies
Mobile phone ................................. 334
Two-way radio ................................ 334
Front foglamps
Display message ............................ 238
Fuel
Additives ........................................ 338
Consumption information ..............339
Consumption statistics ..................211
Displaying the current consump-
tion ................................................ 212
Displaying the range ......................212
E10 ................................................ 337
Fuel gauge ....................................... 30
Grade (petrol) ................................ 337
10Index
Page 15 of 352
Locking (doors)Automatic ........................................ 83
Emergency locking ........................... 84
From inside (central locking but-
ton) .................................................. 82
Locking centrally
see Central locking
Locking verification signal (on-
board computer) ............................... 223
Luggage compartment enlargement 271
Luggage net ....................................... 271
Lumbar support Adjusting the 4-way lumbar sup-
port .................................................. 98
M
M+S tyres ........................................... 318
Main-beam headlamps Changing bulbs .............................. 116
Display message ............................ 238
Switching on/off ........................... 109
Maintenance
see ASSYST PLUS
Manual transmission
Engaging reverse gear ...................152
Gear lever ...................................... 151
Pulling away ................................... 146
Shifting to neutral ..........................152
Shift recommendation ...................152
Starting the engine ........................145
Matt finish (cleaning instructions) .. 290
Memory card (audio) ......................... 215
Memory function ............................... 103
Mercedes-Benz Service Centre see Qualified specialist workshop
Message memory (on-board com-
puter) .................................................. 226
Messages see Display messages
Mirror
see Vanity mirror (in sun visor)
Mirrors
see Exterior mirrors
see Rear-view mirror
Mobile phone
Frequencies ................................... 334
Installation ..................................... 334
Menu (on-board computer) ............215
Notes/placing in the bracket ......... 278
Transmission output (maximum) .... 334
Mobile telephone
Pre-installed bracket ......................279
Modifying the programming (key) ..... 77
MOExtended tyres ............................. 298
Motorway mode ................................ 111
MP3 Operating ....................................... 215
see Separate operating instructions
Multifunction display
Function/notes ............................. 210
Permanent display .........................220
Multifunction steering wheel
Operating the on-board computer . 209
Overview .......................................... 33
N
Navigation Menu (on-board computer) ............213
see separate operating instructions
Notes on running in a new vehicle .. 144
O
Occupant safety Children in the vehicle .....................50
Important safety notes ....................40
Odometer ........................................... 211
see Total distance recorder
see Trip meter
Oil
see Engine oil
On-board computer
Assistance menu ........................... 217
Audio menu ................................... 214
Convenience submenu ..................225
Displaying a service message ........287
Display messages ..........................226
DISTRONIC PLUS ........................... 179
Factory setting submenu ...............225
Heating submenu ........................... 223
Important safety notes ..................208
Instrument cluster submenu ..........220
Light submenu ............................... 220
Menu overview .............................. 211
Index13
Page 18 of 352
Fastening ......................................... 48
Important safety guidelines .............46
Rear seat belt status indicator .........49
Releasing ......................................... 49
Switching belt adjustment on/off
(on-board computer) ......................225
Warning lamp ................................. 255
Warning lamp (function) ................... 49
Seats
Adjusting (electrically) .....................96
Adjusting (manually) ........................96
Adjusting the 4-way lumbar sup-
port .................................................. 98
Adjusting the head restraint ............97
Cleaning the cover .........................293
Correct driver's seat position ........... 94
Important safety notes ....................95
Seat heating problem ....................100
Storing settings (memory function) 103
Switching seat heating on/off .........99
Sensors (cleaning instructions) ....... 291
Service see ASSYST PLUS
Service menu (on-board computer) . 219
Service products Brake fluid ..................................... 341
Coolant (engine) ............................ 341
Engine oil ....................................... 340
Fuel ................................................ 337
Important safety notes ..................336
Washer fluid ................................... 342
Settings
Factory (on-board computer) .........225
On-board computer .......................219
Setting the air distribution ............... 131
Setting the airflow ............................ 131
Shifting to neutral (manual trans-
mission) ............................................. 152
Sidebag ................................................ 44
Side lamps Switching on/off ........................... 108
Side windows
Convenience closing ........................88
Convenience opening ......................88
Important safety notes ....................86
Opening/closing .............................. 87
Problem (malfunction) .....................89
resetting .......................................... 88Sliding sunroof
see Panorama sliding sunroof
Snow chains ...................................... 319
Socket Centre console .............................. 277
Points to observe before use .........277
Rear compartment .........................277
Specialist workshop ............................ 24
Spectacles compartment ................. 269
Speed, controlling see Cruise control
Speed Limit Assist
Activating/deactivating the warn-
ing function .................................... 218
Displaying ...................................... 217
Display message ............................ 243
Display message in the multifunc-
tion display .................................... 197
Function/notes ............................. 196
Important safety notes ..................196
Speedometer
Activating/deactivating the addi-
tional speedometer ........................220
Digital ............................................ 212
In the Instrument cluster .................30
Segments ...................................... 209
Selecting the unit of measurement 220
see Instrument cluster
SPEEDTRONIC
Deactivating variable .....................172
Display message ............................ 247
Function/notes ............................. 171
Important safety notes ..................171
LIM indicator lamp .........................171
Permanent ..................................... 173
Selecting ........................................ 171
Storing the current speed ..............172
Variable ......................................... 171
SRS (Supplemental Restraint Sys-
tem) Display message ............................ 235
Introduction ..................................... 41
Warning lamp ................................. 261
Warning lamp (function) ................... 41
Start/stop function
see ECO start/stop function
Starting (engine) ................................ 145
STEER CONTROL .................................. 7016Index
Page 161 of 352
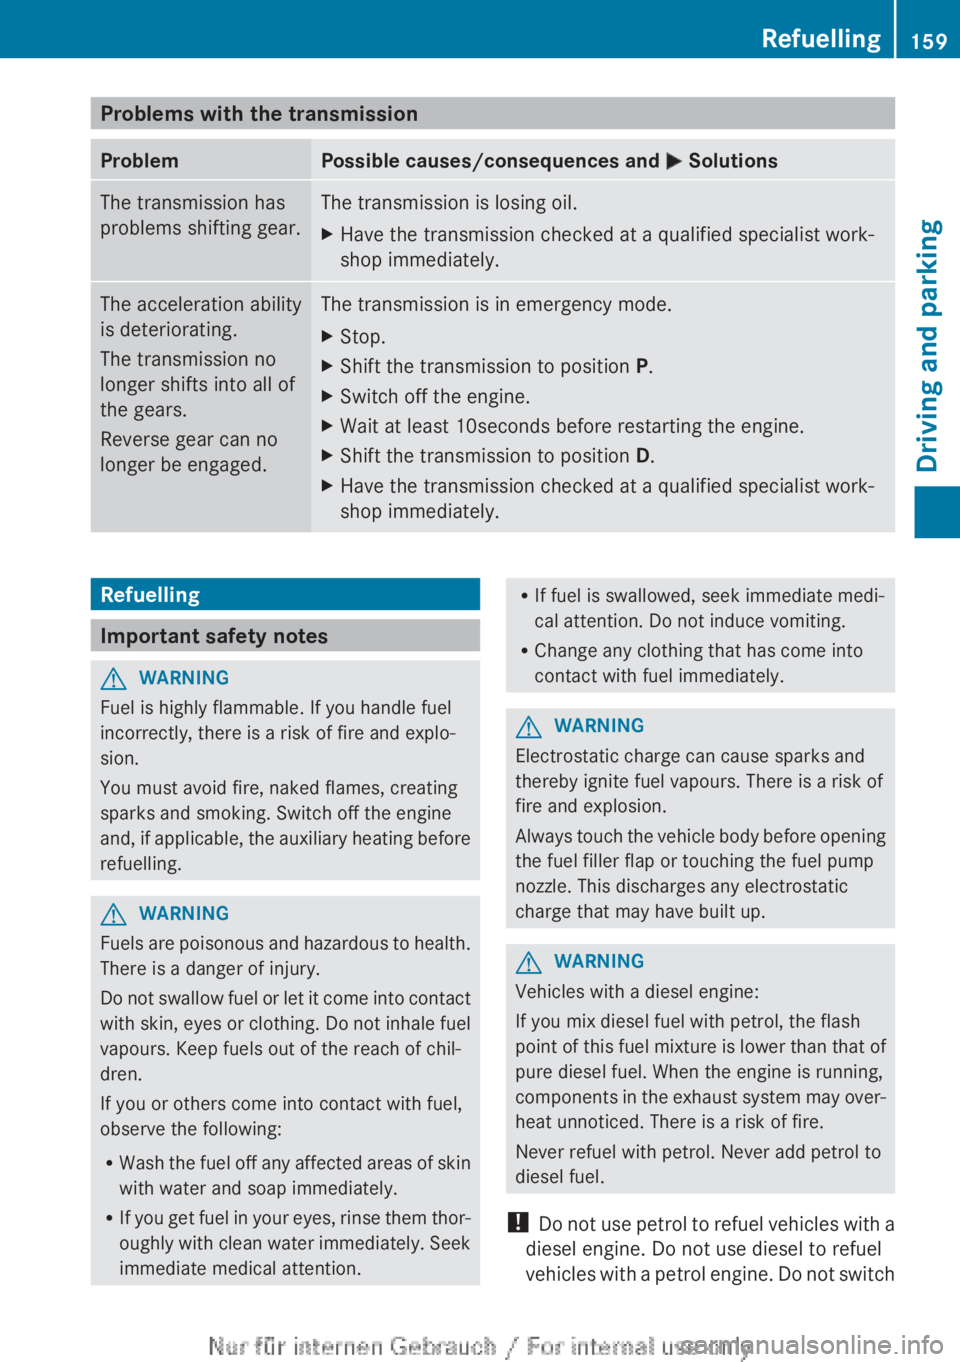
Problems with the transmissionProblemPossible causes/consequences and M SolutionsThe transmission has
problems shifting gear.The transmission is losing oil.XHave the transmission checked at a qualified specialist work-
shop immediately.The acceleration ability
is deteriorating.
The transmission no
longer shifts into all of
the gears.
Reverse gear can no
longer be engaged.The transmission is in emergency mode.XStop.XShift the transmission to position P.XSwitch off the engine.XWait at least 10seconds before restarting the engine.XShift the transmission to position D.XHave the transmission checked at a qualified specialist work-
shop immediately.Refuelling
Important safety notes
GWARNING
Fuel is highly flammable. If you handle fuel
incorrectly, there is a risk of fire and explo-
sion.
You must avoid fire, naked flames, creating
sparks and smoking. Switch off the engine
and, if applicable, the auxiliary heating before
refuelling.
GWARNING
Fuels are poisonous and hazardous to health.
There is a danger of injury.
Do not swallow fuel or let it come into contact
with skin, eyes or clothing. Do not inhale fuel
vapours. Keep fuels out of the reach of chil-
dren.
If you or others come into contact with fuel,
observe the following:
R Wash the fuel off any affected areas of skin
with water and soap immediately.
R If you get fuel in your eyes, rinse them thor-
oughly with clean water immediately. Seek
immediate medical attention.
R If fuel is swallowed, seek immediate medi-
cal attention. Do not induce vomiting.
R Change any clothing that has come into
contact with fuel immediately.GWARNING
Electrostatic charge can cause sparks and
thereby ignite fuel vapours. There is a risk of
fire and explosion.
Always touch the vehicle body before opening
the fuel filler flap or touching the fuel pump
nozzle. This discharges any electrostatic
charge that may have built up.
GWARNING
Vehicles with a diesel engine:
If you mix diesel fuel with petrol, the flash
point of this fuel mixture is lower than that of
pure diesel fuel. When the engine is running,
components in the exhaust system may over-
heat unnoticed. There is a risk of fire.
Never refuel with petrol. Never add petrol to
diesel fuel.
! Do not use petrol to refuel vehicles with a
diesel engine. Do not use diesel to refuel
vehicles with a petrol engine. Do not switch
Refuelling159Driving and parkingZ
Page 244 of 352
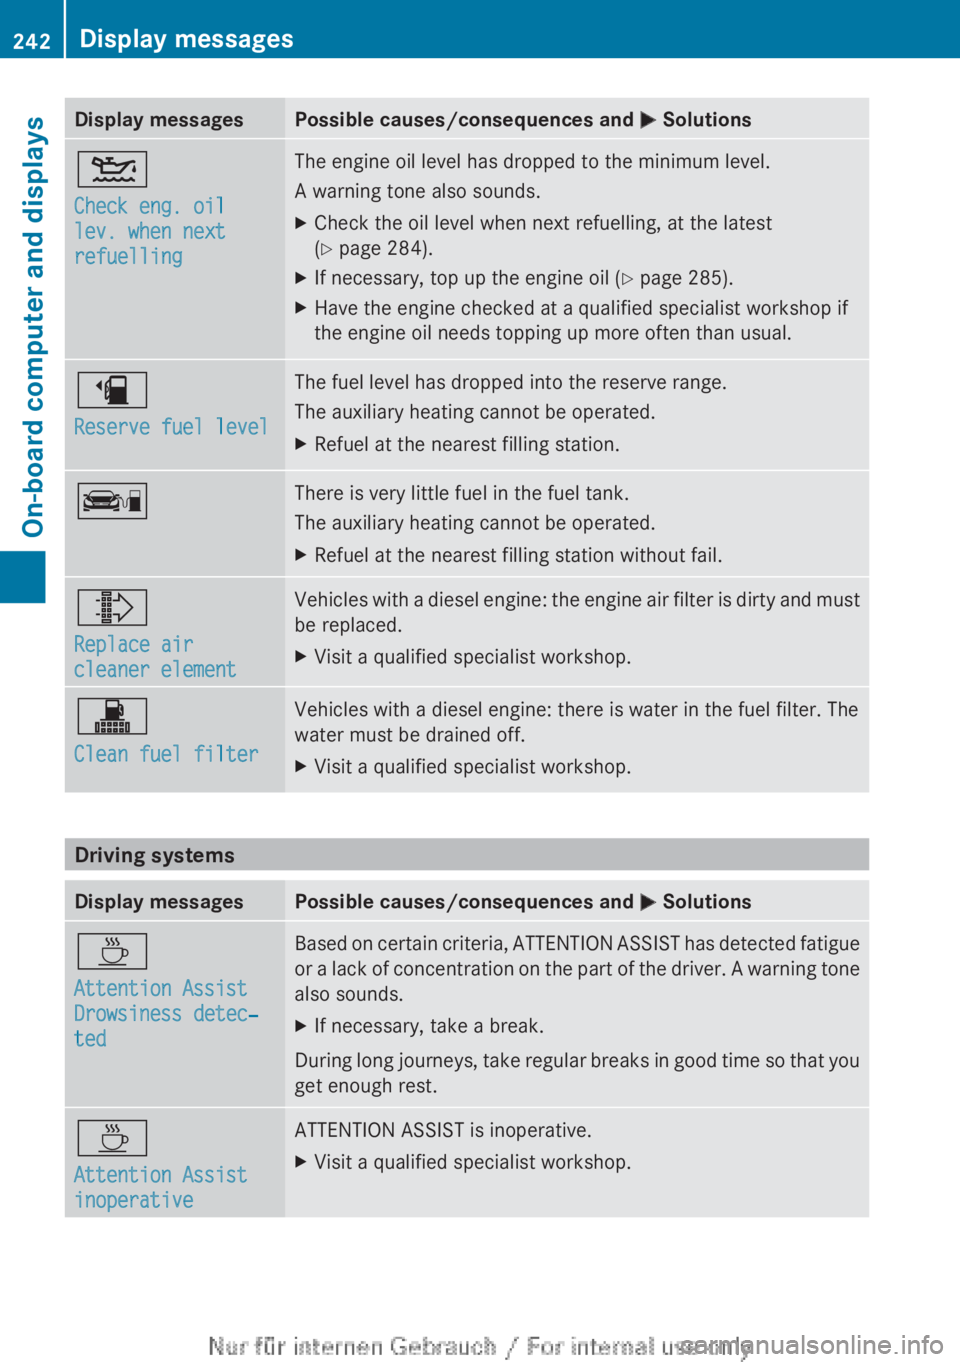
Display messagesPossible causes/consequences and M Solutions4
Check eng. oil
lev. when next
refuellingThe engine oil level has dropped to the minimum level.
A warning tone also sounds.XCheck the oil level when next refuelling, at the latest
( Y page 284).XIf necessary, top up the engine oil ( Y page 285).XHave the engine checked at a qualified specialist workshop if
the engine oil needs topping up more often than usual.æ
Reserve fuel levelThe fuel level has dropped into the reserve range.
The auxiliary heating cannot be operated.XRefuel at the nearest filling station.çThere is very little fuel in the fuel tank.
The auxiliary heating cannot be operated.XRefuel at the nearest filling station without fail.¸
Replace air
cleaner elementVehicles with a diesel engine: the engine air filter is dirty and must
be replaced.XVisit a qualified specialist workshop.!
Clean fuel filterVehicles with a diesel engine: there is water in the fuel filter. The
water must be drained off.XVisit a qualified specialist workshop.
Driving systems
Display messagesPossible causes/consequences and M SolutionsÀ
Attention Assist
Drowsiness detec‐
tedBased on certain criteria, ATTENTION ASSIST has detected fatigue
or a lack of concentration on the part of the driver. A warning tone
also sounds.XIf necessary, take a break.
During long journeys, take regular breaks in good time so that you
get enough rest.
À
Attention Assist
inoperativeATTENTION ASSIST is inoperative.XVisit a qualified specialist workshop.242Display messagesOn-board computer and displays
Page 286 of 352
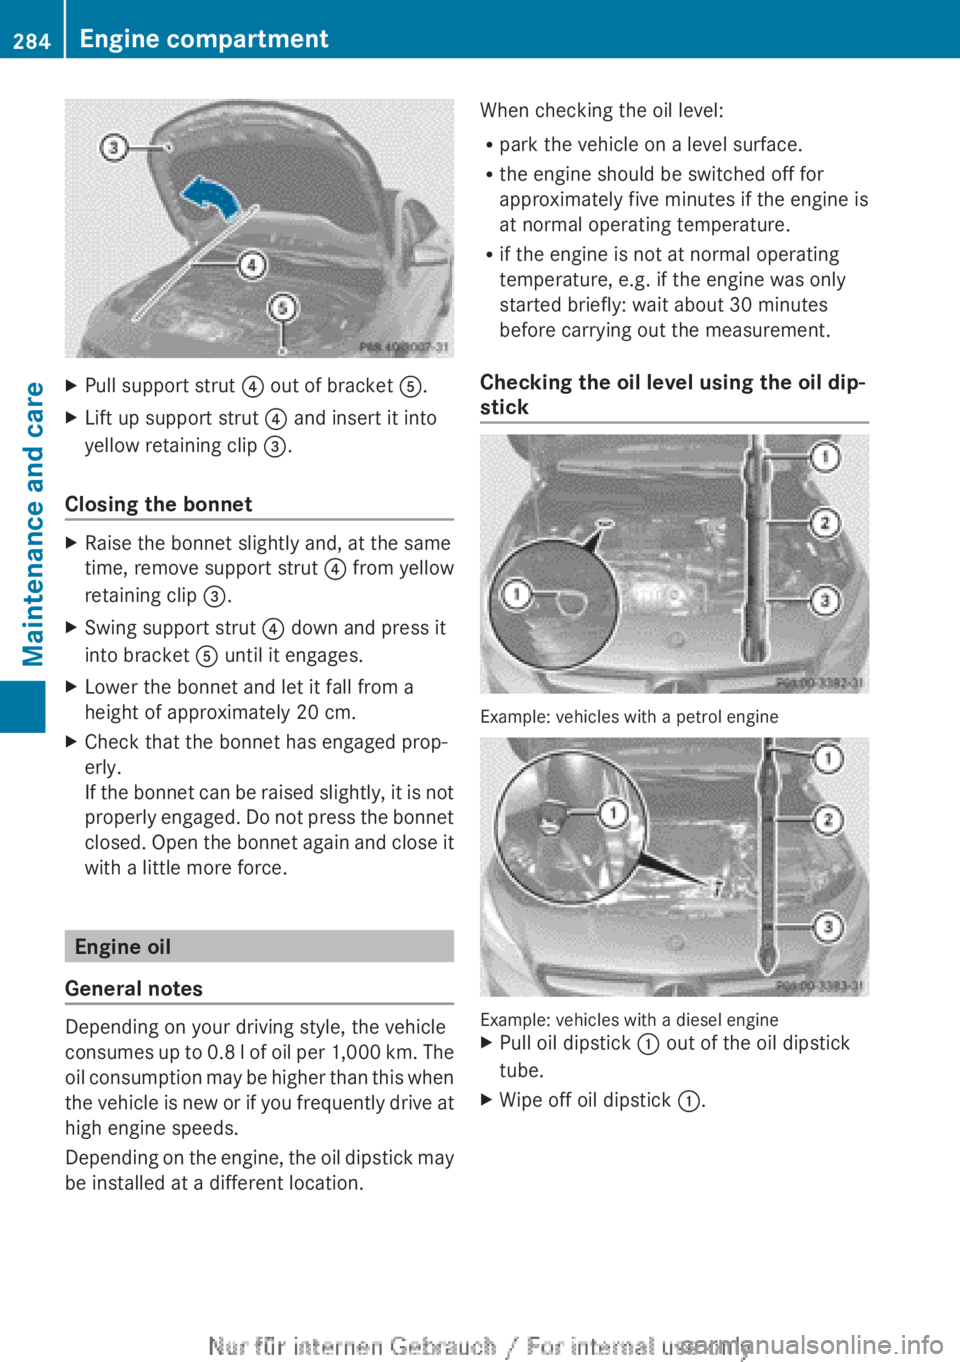
XPull support strut ? out of bracket A.XLift up support strut ? and insert it into
yellow retaining clip =.
Closing the bonnet
XRaise the bonnet slightly and, at the same
time, remove support strut ? from yellow
retaining clip =.XSwing support strut ? down and press it
into bracket A until it engages.XLower the bonnet and let it fall from a
height of approximately 20 cm.XCheck that the bonnet has engaged prop-
erly.
If the bonnet can be raised slightly, it is not
properly engaged. Do not press the bonnet
closed. Open the bonnet again and close it
with a little more force.
Engine oil
General notes
Depending on your driving style, the vehicle
consumes up to 0.8 l of oil per 1,000 km. The
oil consumption may be higher than this when
the vehicle is new or if you frequently drive at
high engine speeds.
Depending on the engine, the oil dipstick may
be installed at a different location.
When checking the oil level:
R park the vehicle on a level surface.
R the engine should be switched off for
approximately five minutes if the engine is
at normal operating temperature.
R if the engine is not at normal operating
temperature, e.g. if the engine was only
started briefly: wait about 30 minutes
before carrying out the measurement.
Checking the oil level using the oil dip-
stick
Example: vehicles with a petrol engine
Example: vehicles with a diesel engine
XPull oil dipstick : out of the oil dipstick
tube.XWipe off oil dipstick :.284Engine compartmentMaintenance and care
Page 287 of 352
XSlowly slide oil dipstick : into the guide
tube to the stop, and take it out again.
If the level is between MIN mark = and
MAX mark ;, the oil level is correct.XIf the oil level has dropped to MIN mark
= or below, top up with 1.0 litre of engine
oil.
Adding engine oil
GWARNING
If engine oil comes into contact with hot com-
ponents in the engine compartment, it may
ignite. There is a risk of fire and injury.
Make sure that engine oil does not spill out
over the filler neck. Allow the engine to cool
down and thoroughly clean the components
that have come into contact with engine oil
before you start the engine.
HEnvironmental note
When topping up the oil, take care not to spill
any. If oil enters the soil or waterways, it is
harmful to the environment.
! Only use engine oils and oil filters that
have been approved for vehicles with a
service system. You can obtain a list of the
engine oils and oil filters tested and
approved in accordance with the
Mercedes-Benz Specifications for Service
Products at any Mercedes-Benz Service
Centre.
Damage to the engine or exhaust system is
caused by the following:
R using engine oils and oil filters that have
not been specifically approved for the
service system
R changing the engine oil and oil filter after
missing the change interval required by
the service system
R using engine oil additives
! Do not add too much oil. Topping up with
too much engine oil can result in damage
to the engine or to the catalytic converter.
Have excess engine oil siphoned off.
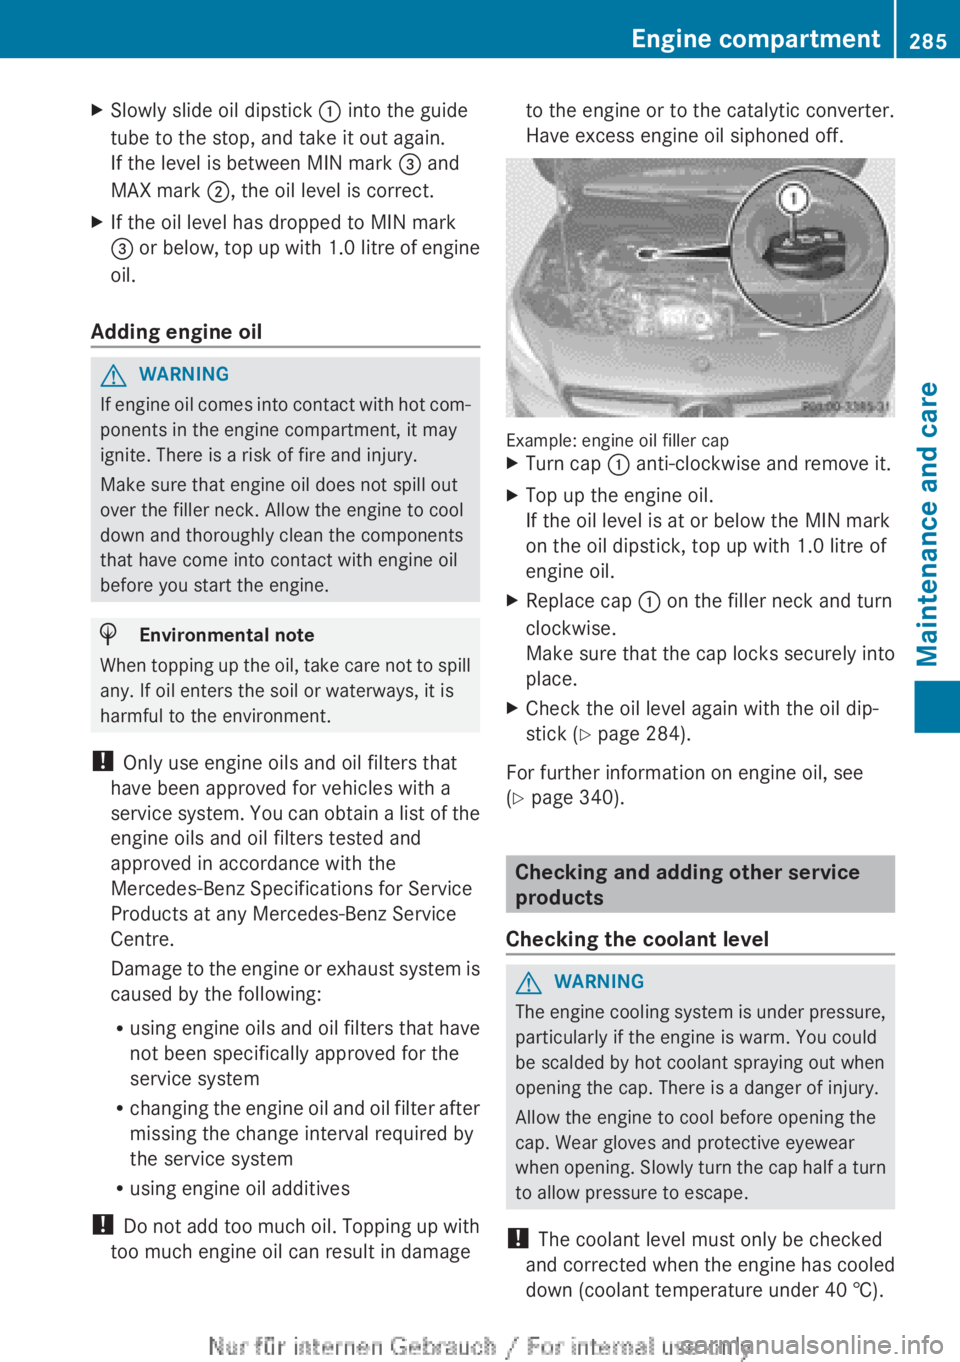
Example: engine oil filler cap
XTurn cap : anti-clockwise and remove it.XTop up the engine oil.
If the oil level is at or below the MIN mark
on the oil dipstick, top up with 1.0 litre of
engine oil.XReplace cap : on the filler neck and turn
clockwise.
Make sure that the cap locks securely into
place.XCheck the oil level again with the oil dip-
stick ( Y page 284).
For further information on engine oil, see
( Y page 340).
Checking and adding other service
products
Checking the coolant level
GWARNING
The engine cooling system is under pressure,
particularly if the engine is warm. You could
be scalded by hot coolant spraying out when
opening the cap. There is a danger of injury.
Allow the engine to cool before opening the
cap. Wear gloves and protective eyewear
when opening. Slowly turn the cap half a turn
to allow pressure to escape.
! The coolant level must only be checked
and corrected when the engine has cooled
down (coolant temperature under 40 †).
Engine compartment285Maintenance and careZ
Page 289 of 352
Information on the type of service and service
intervals (see separate Service Booklet).
You can obtain further information from any
Mercedes-Benz Service Centre.
i The ASSYST PLUS service interval display
does not show any information on the
engine oil level. Observe the notes on the
engine oil level ( Y page 284).
The multifunction display shows a service
message for a few seconds, e.g.:
R Service A in .. days
R Service A due
R Service A overdue by .. days
Depending on the operating conditions of the
vehicle, the remaining time or distance until
the next service due date is displayed.
The letter indicates which service is due. A
stands for a minor service and B for a major
service. A number or another letter may be
displayed after the letter. This figure indicates
any necessary additional maintenance work
to be performed.
If you notify a qualified specialist workshop of
this display, you will receive a statement on
the associated costs.
The ASSYST PLUS service interval display
does not take into account any periods of
time during which the battery is disconnec-
ted.
Maintaining the time-dependent service
schedule:XNote down the service due date displayed
in the multifunction display before discon-
necting the battery.
or
XAfter reconnecting the battery, subtract
the battery disconnection periods from the
service date shown on the display.
Hiding a service message
XPress % or a .Displaying service messagesXSwitch the ignition on.XUsing = or ; , select the Service
menu.XPress 9 or : to select the ASSYST
PLUS submenu and press a to confirm.
The service due date appears in the multi-
function display.
Information about Service
Resetting the ASSYST PLUS service inter-
val display
! If the ASSYST PLUS service interval dis-
play has been inadvertently reset, this set-
ting can be corrected at a qualified special-
ist workshop.
Have service work carried out as described
in the Service Booklet. This may otherwise
lead to increased wear and damage to the
major assemblies or the vehicle.
A qualified specialist workshop, e.g. a
Mercedes-Benz Service Centre, will reset the
ASSYST PLUS service interval display after
the service work has been carried out. You
can also obtain further information on main-
tenance work, for example.
Special service requirements
The prescribed service interval is based on
normal operation of the vehicle. Service work
will need to be performed more often if the
vehicle is operated under arduous conditions
or increased loads, for example:
R regular city driving with frequent intermedi-
ate stops
R if the vehicle is primarily used to travel
short distances
R for frequent operation in mountainous ter-
rain or on poor road surfaces
R if the engine is often left idling for long peri-
ods
In these or similar operating conditions, have
the air filter, engine oil and oil filter, for exam-
ple, changed more frequently. The tyres must
Service287Maintenance and careZ
Page 292 of 352
XRemove impurities immediately, where
possible, whilst avoiding rubbing too hard.XSoak insect remains with insect remover
and rinse off the treated areas afterwards.XSoak bird droppings with water and rinse
off the treated areas afterwards.XRemove coolant, brake fluid, tree resin,
oils, fuels and greases by rubbing gently
with a cloth soaked in petroleum ether or
lighter fluid.XUse tar remover to remove tar stains.XUse silicone remover to remove wax.
The following cannot always be completely
repaired:
R scratches
R corrosive deposits
R areas affected by corrosion
R damage caused by inadequate care
In such cases, visit a qualified specialist work-
shop.
Care and treatment of matt paintwork
! Never polish the vehicle or the light alloy
wheels. Polishing makes the paintwork
shiny.
! The following may cause the paint to
become shiny and thus reduce the matt
effect:
R Vigorous rubbing with unsuitable mate-
rials.
R Frequent use of car washes.
R Washing the vehicle in direct sunlight.
! Never use paint cleaner, buffing or pol-
ishing products, or gloss preserver, e.g.
wax. These products are only suitable for
high-gloss surfaces. Their use on vehicles
with matt finish leads to considerable sur-
face damage (shiny, spotted areas).
Always have paintwork repairs carried out
at a qualified specialist workshop.
! Do not use wash programs with a hot wax
treatment under any circumstances.
Observe these notes if your vehicle has a
clear matt finish. This will help you to avoid
damage to the paintwork due to incorrect
treatment.
These notes also apply to light-alloy wheels
with a clear matt finish.
i The vehicle should preferably be washed
by hand using a soft sponge, car shampoo
and plenty of water.
i Use only insect remover and car shampoo
from the range of recommended and
approved Mercedes-Benz care products.
Cleaning the windowsGWARNING
If the windscreen wipers are set in motion
when cleaning the windscreen or wiper
blades, you could become trapped. There is a
danger of injury.
Always switch off the windscreen wipers and
the ignition before cleaning the windscreen or
wiper blades.
! Only fold the windscreen wipers away
from the windscreen when vertical. Other-
wise, you will damage the bonnet.
! Do not use dry cloths, abrasive products,
solvents or cleaning agents containing sol-
vents to clean the inside of the windows.
Do not touch the insides of the windows
with hard objects, e.g. an ice scraper or
ring. There is otherwise a risk of damaging
the windows.
! Clean the water drainage channels of the
windscreen and the rear window at regular
intervals. Deposits such as leaves, petals
and pollen may under certain circumstan-
ces prevent water from draining away. This
can lead to corrosion damage and damage
to electronic components.
XClean the inside and outside of the win-
dows with a damp cloth and a cleaning
agent that is recommended and approved
by Mercedes-Benz.290CareMaintenance and care