MERCEDES-BENZ CLA 2016 Owners Manual
Manufacturer: MERCEDES-BENZ, Model Year: 2016, Model line: CLA, Model: MERCEDES-BENZ CLA 2016Pages: 374, PDF Size: 9.97 MB
Page 341 of 374
have changed the tire pressure. However, you
can also define reference values manually as
described here. The tire pressure monitor
then monitors the new tire pressure values. X
Set the tire pressure to the value recom-
mended for the corresponding driving sit-
uation on the Tire and Loading Information
placard on the driver's side
B-pillar ( Y
page 332).
You can find more tire pressure values for
various operating conditions in the tire
pressure table inside the fuel filler flap
( Y
page 168). X
Make sure that the tire pressure is correct
on all four wheels. X
Make sure that the SmartKey is in position
2 in the ignition lock ( Y
page 147).X
Press �Y or �e on the steering wheel
to select the Serv.
menu.X
Press the �c or �d button to select
Tire Pressure
.X
Press the �v button.
The multifunction display shows the cur-
rent tire pressure for each tire or the Tire
pressure will be displayed after
driving a few minutes message.X
Press the �d button.
The multifunction display shows the Use
Current Pressures as New Reference
Values message.
If you wish to confirm the restart: X
Press the �v button.
The Tire Press. Monitor Restarted
message appears in the multifunction dis-
play.
After driving for a few minutes, the system
checks whether the current tire pressures
are within the specified range. The new tire
pressures are then accepted as reference
values and monitored.
If you wish to cancel the restart: X
Press the �8 button.
The tire pressure values stored at the last
restart will continue to be monitored. Radio type approval for the tire pres-
sure monitor Country Radio type approval number
USA FCC ID: MRXMW2433A
FCC ID: MRXGG4
FCC ID: MRXMC34MA4
Canada IC: 2546A-MW2433A
IC: 2546A-GG4
IC: 2546A-MC34MA4
Loading the vehicle
Instruction labels for tires and loads
G WARNING
Overloaded tires can overheat, causing a
blowout. Overloaded tires can also impair the
steering and driving characteristics and lead
to brake failure. There is a risk of accident.
Observe the load rating of the tires. The load
rating must be at least half of the GAWR of
your vehicle. Never overload the tires by
exceeding the maximum load.
Two instruction labels on your vehicle show
the maximum possible load.
(1) The Tire and Loading Information placard
is on the B-pillar on the driver's side. The
Tire and Loading Information placard
shows the maximum permissible number
of occupants and the maximum permis-
sible vehicle load. It also contains details
of the tire sizes and corresponding pres-
sures for tires mounted at the factory.
(2) The vehicle identification plate is on the
B-pillar on the driver's side. The vehicle
identification plate informs you of the
gross vehicle weight rating. It is made up
of the vehicle weight, all vehicle occu-
pants, the fuel and the cargo. You can
also find information about the maximum
gross axle weight rating on the front and
rear axle.Loading the vehicle 339
Wheels and tires Z
Page 342 of 374
The maximum gross axle weight rating is
the maximum weight that can be carried
by one axle (front or rear axle). Never
exceed the maximum load or the maxi-
mum gross axle weight rating for the
front or rear axle.
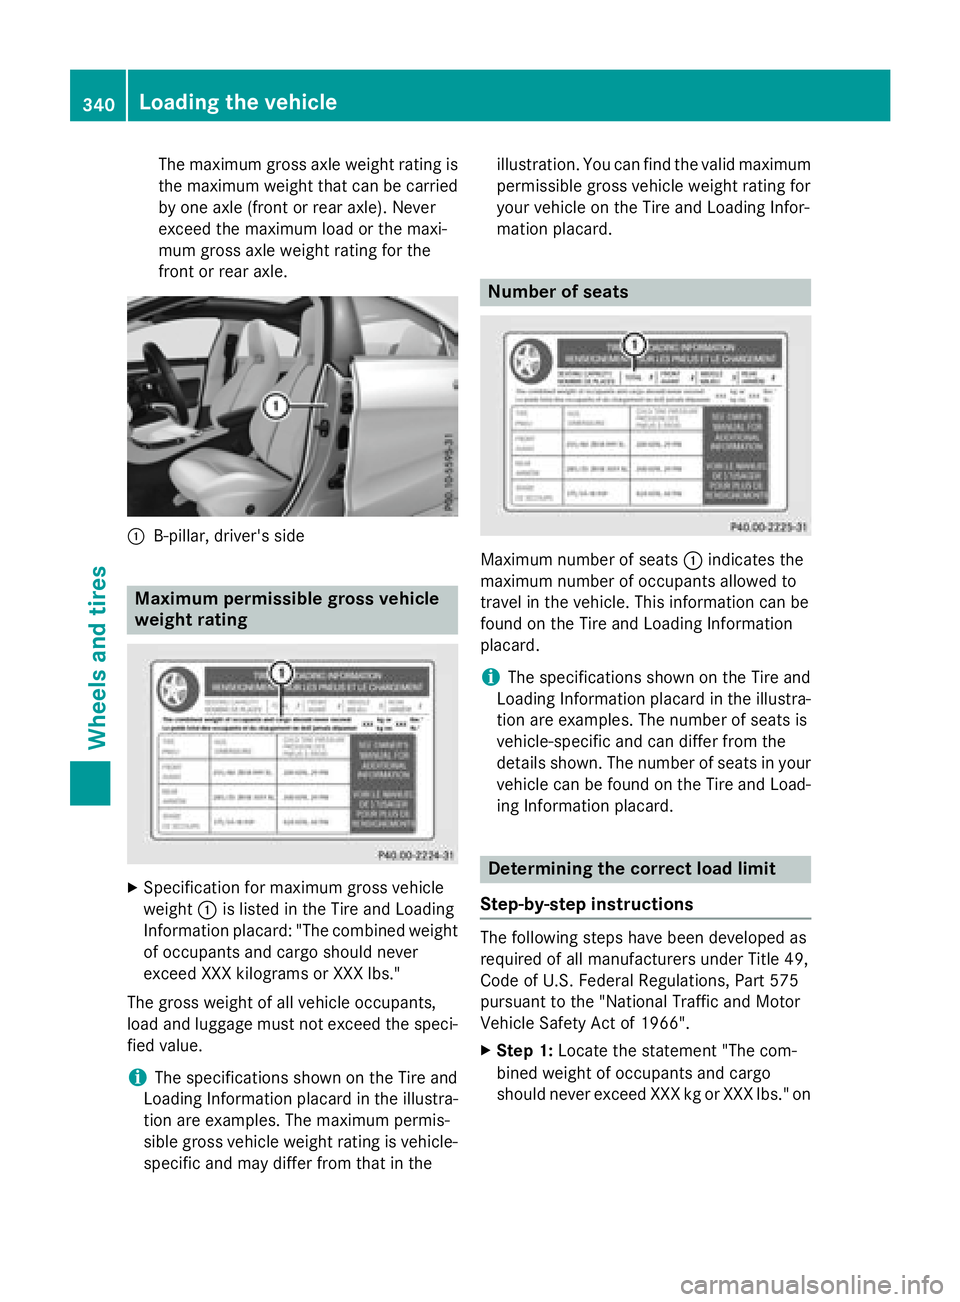
�C
B-pillar, driver's side
Maximum permissible gross vehicle
weight rating
X
Specification for maximum gross vehicle
weight �C is listed in the Tire and Loading
Information placard: "The combined weight
of occupants and cargo should never
exceed XXX kilograms or XXX lbs."
The gross weight of all vehicle occupants,
load and luggage must not exceed the speci-
fied value.
i The specifications shown on the Tire and
Loading Information placard in the illustra-
tion are examples. The maximum permis-
sible gross vehicle weight rating is vehicle-
specific and may differ from that in the illustration. You can find the valid maximum
permissible gross vehicle weight rating for
your vehicle on the Tire and Loading Infor-
mation placard.
Number of seats
Maximum number of seats �C indicates the
maximum number of occupants allowed to
travel in the vehicle. This information can be
found on the Tire and Loading Information
placard.
i The specifications shown on the Tire and
Loading Information placard in the illustra-
tion are examples. The number of seats is
vehicle-specific and can differ from the
details shown. The number of seats in your
vehicle can be found on the Tire and Load-
ing Information placard.
Determining the correct load limit
Step-by-step instructions
The following steps have been developed as
required of all manufacturers under Title 49,
Code of U.S. Federal Regulations, Part 575
pursuant to the "National Traffic and Motor
Vehicle Safety Act of 1966". X
Step 1: Locate the statement "The com-
bined weight of occupants and cargo
should never exceed XXX kg or XXX lbs." on340
Loading the vehicle
Wheels and tires
Page 343 of 374
your vehicle’s Tir e and Loadin g Information
placard. X
Step 2: Determin e th e combine d weight of
th e driver and passenger s that will be ridin g
in your vehicle. X
Step 3: Subtract th e combine d weight of
th e driver and passenger s from XXX kilo-
grams or XXX lbs. X
Step 4: The resultin g figure equals th e
available amount of cargo and luggage load
capacity. Fo r example, if th e "XXX " amount
equals 1400 lbs and there will be fiv e
150-lb passenger s in your vehicle, th e
amount of available cargo and luggage load
capacity is 65 0 lbs (1400 - 75 0 (5 x 150) =
65 0 lbs) .X
Step 5: Determin e th e combine d weight of
luggage and cargo bein g loade d on th e
vehicle. That weight may no t safely exceed
th e available cargo and luggage load capa-
cit y calculated in step 4. Loading the vehicle 341
Wheels and tires Z
Page 344 of 374
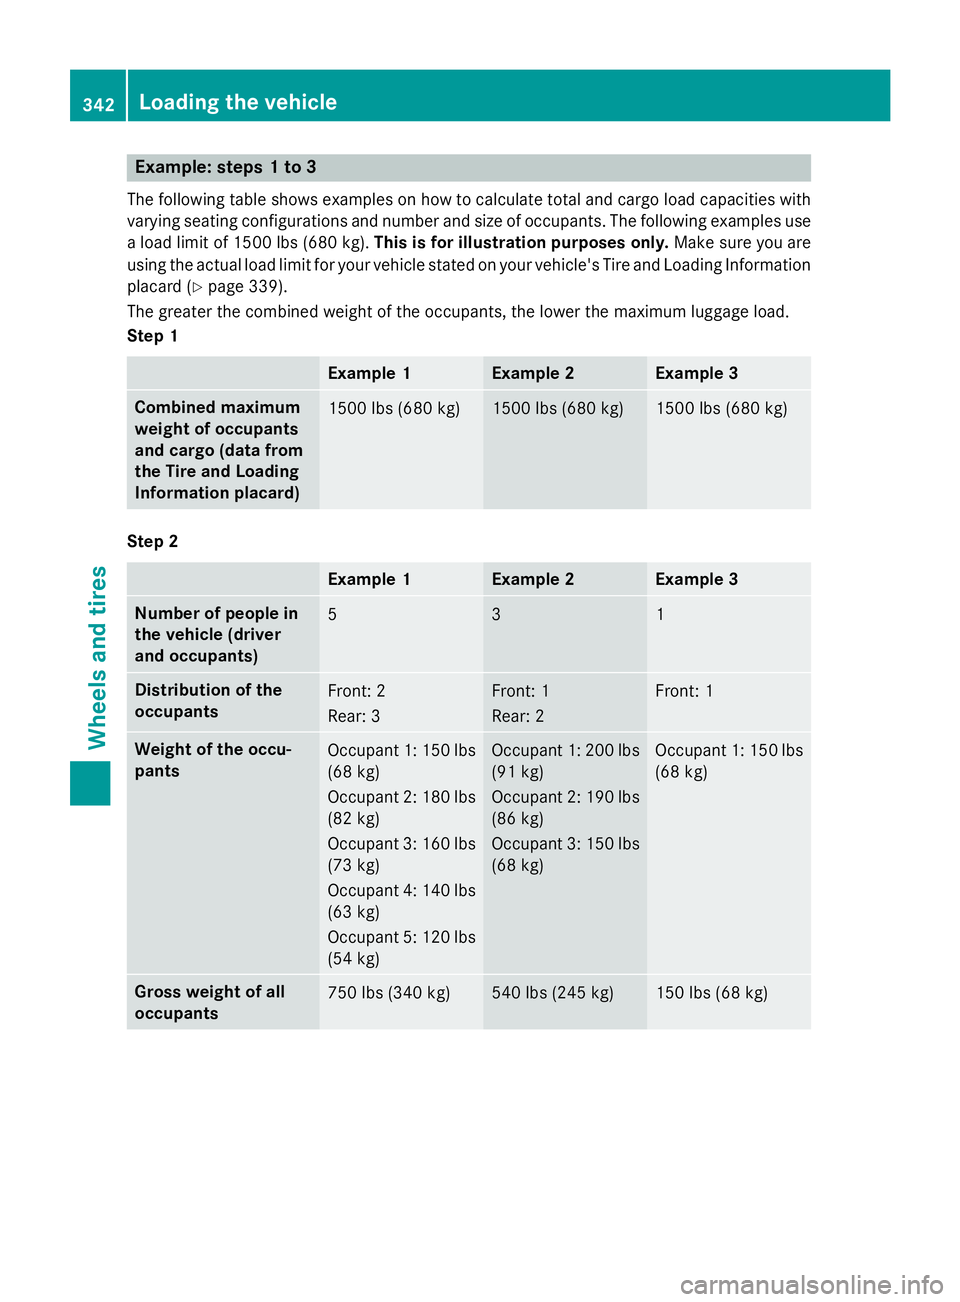
Example: steps 1 to 3The following table shows examples on how to calculate total and cargo load capacities with
varying seating configurations and number and size of occupants. The following examples use
a load limit of 1500 lbs (680 kg). This is for illustration purposes only. Make sure you are
using the actual load limit for your vehicle stated on your vehicle's Tire and Loading Information
placard ( Y
page 339).
The greater the combined weight of the occupants, the lower the maximum luggage load.
Step 1
Example 1 Example 2 Example 3
Combined maximum
weight of occupants
and cargo (data from
the Tire and Loading
Information placard) 1500 lbs (680 kg) 1500 lbs (680 kg) 1500 lbs (680 kg)
Step 2
Example 1 Example 2 Example 3
Number of people in
the vehicle (driver
and occupants) 5 3 1
Distribution of the
occupants Front: 2
Rear: 3 Front: 1
Rear: 2 Front: 1
Weight of the occu-
pants Occupant 1: 150 lbs
(68 kg)
Occupant 2: 180 lbs
(82 kg)
Occupant 3: 160 lbs
(73 kg)
Occupant 4: 140 lbs
(63 kg)
Occupant 5: 120 lbs
(54 kg) Occupant 1: 200 lbs
(91 kg)
Occupant 2: 190 lbs
(86 kg)
Occupant 3: 150 lbs
(68 kg) Occupant 1: 150 lbs
(68 kg)
Gross weight of all
occupants 750 lbs (340 kg) 540 lbs (245 kg) 150 lbs (68 kg)342
Loading the vehicle
Wheels and tires
Page 345 of 374
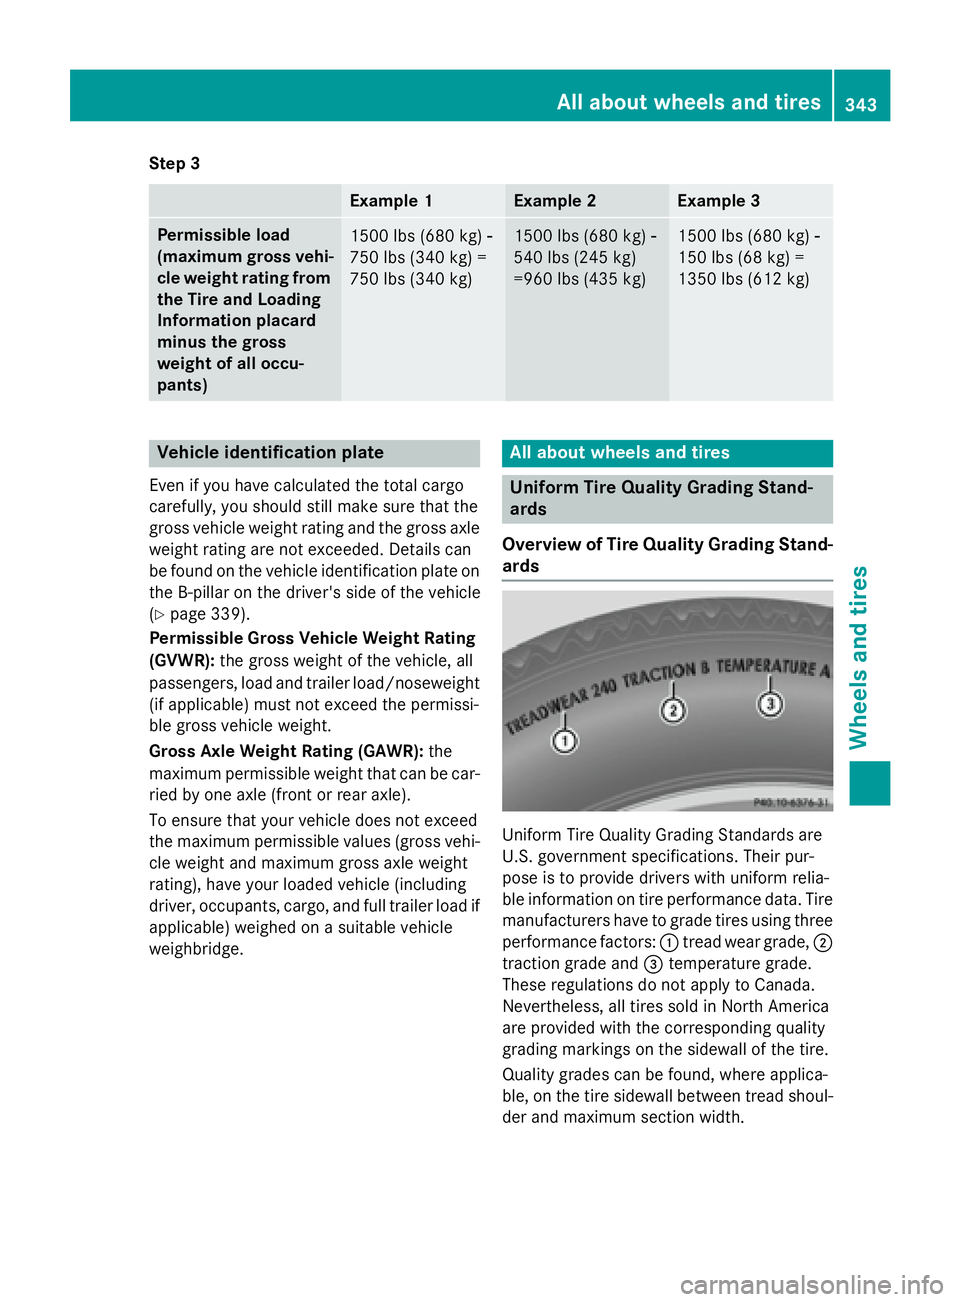
Step 3
Example 1 Example 2 Example 3
Permissible load
(maximum gross vehi-
cle weight rating from
the Tire and Loading
Information placard
minus the gross
weight of all occu-
pants) 1500 lbs (680 kg) �
Page 346 of 374
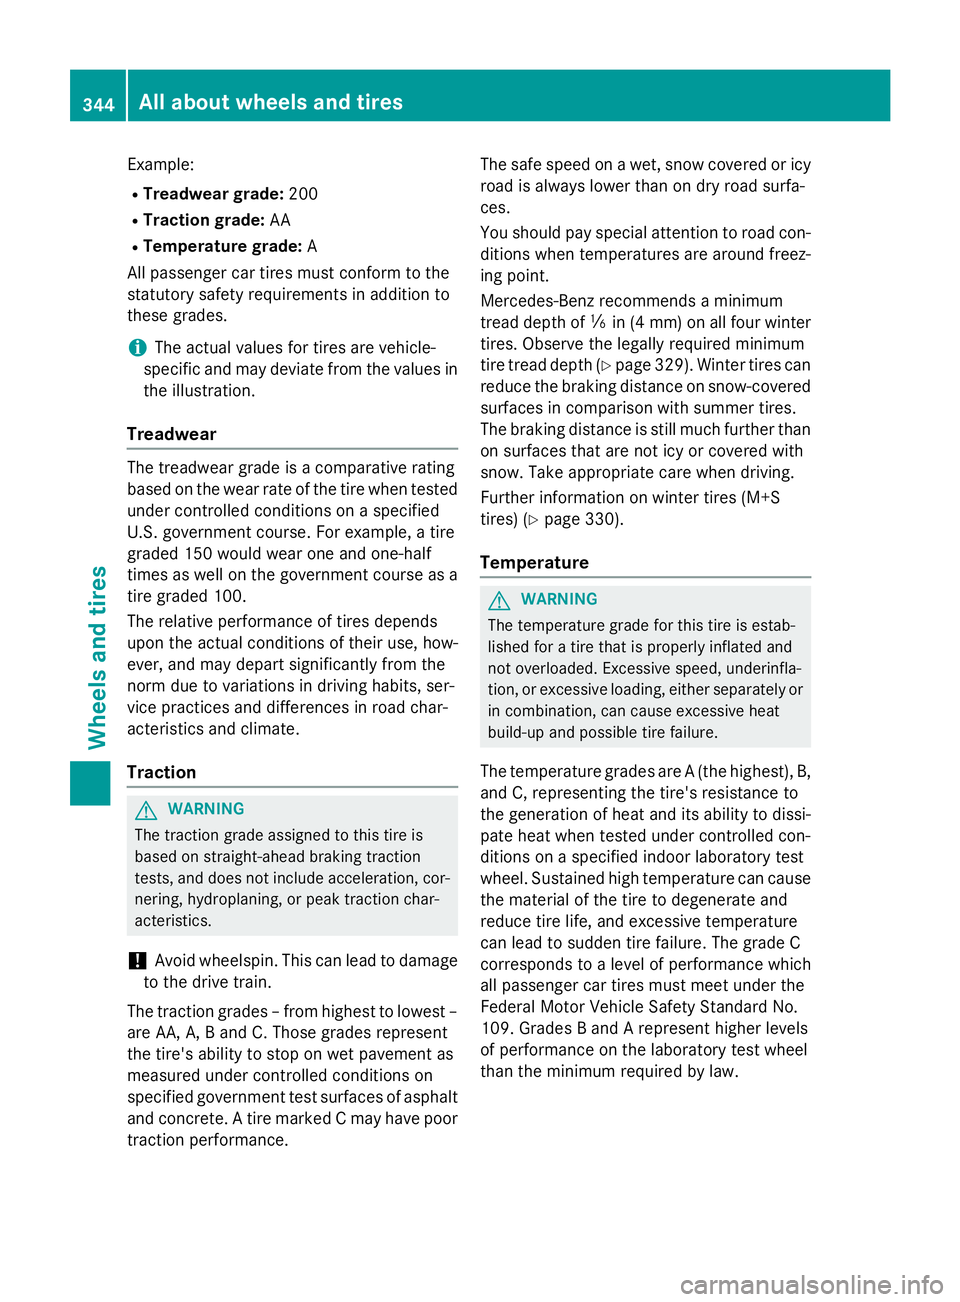
Example: R
Treadwear grade: 200R
Traction grade: AAR
Temperature grade: A
All passenger car tires must conform to the
statutory safety requirements in addition to
these grades.
i The actual values for tires are vehicle-
specific and may deviate from the values in
the illustration.
Treadwear The treadwear grade is a comparative rating
based on the wear rate of the tire when tested
under controlled conditions on a specified
U.S. government course. For example, a tire
graded 150 would wear one and one-half
times as well on the government course as a
tire graded 100.
The relative performance of tires depends
upon the actual conditions of their use, how-
ever, and may depart significantly from the
norm due to variations in driving habits, ser-
vice practices and differences in road char-
acteristics and climate.
Traction
G WARNING
The traction grade assigned to this tire is
based on straight-ahead braking traction
tests, and does not include acceleration, cor-
nering, hydroplaning, or peak traction char-
acteristics.
! Avoid wheelspin. This can lead to damage
to the drive train.
The traction grades – from highest to lowest –
are AA, A, B and C. Those grades represent
the tire's ability to stop on wet pavement as
measured under controlled conditions on
specified government test surfaces of asphalt
and concrete. A tire marked C may have poor
traction performance. The safe speed on a wet, snow covered or icy
road is always lower than on dry road surfa-
ces.
You should pay special attention to road con-
ditions when temperatures are around freez-
ing point.
Mercedes-Benz recommends a minimum
tread depth of �
Page 347 of 374
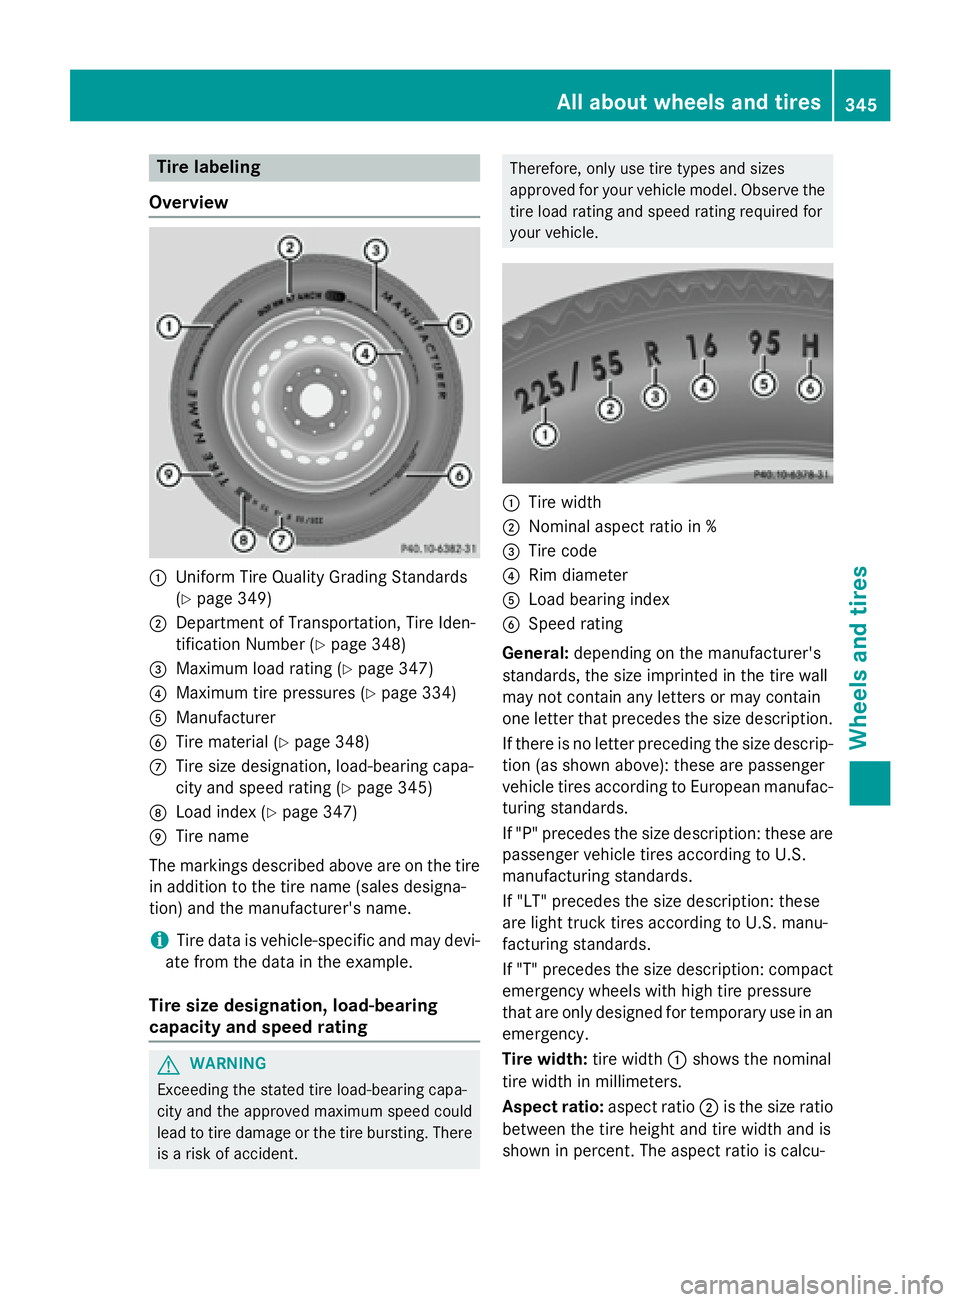
Tire labeling
Overview
�C
Uniform Tire Quality Grading Standards
( Y
page 349)�D
Department of Transportation, Tire Iden-
tification Number ( Y
page 348)�
Page 348 of 374
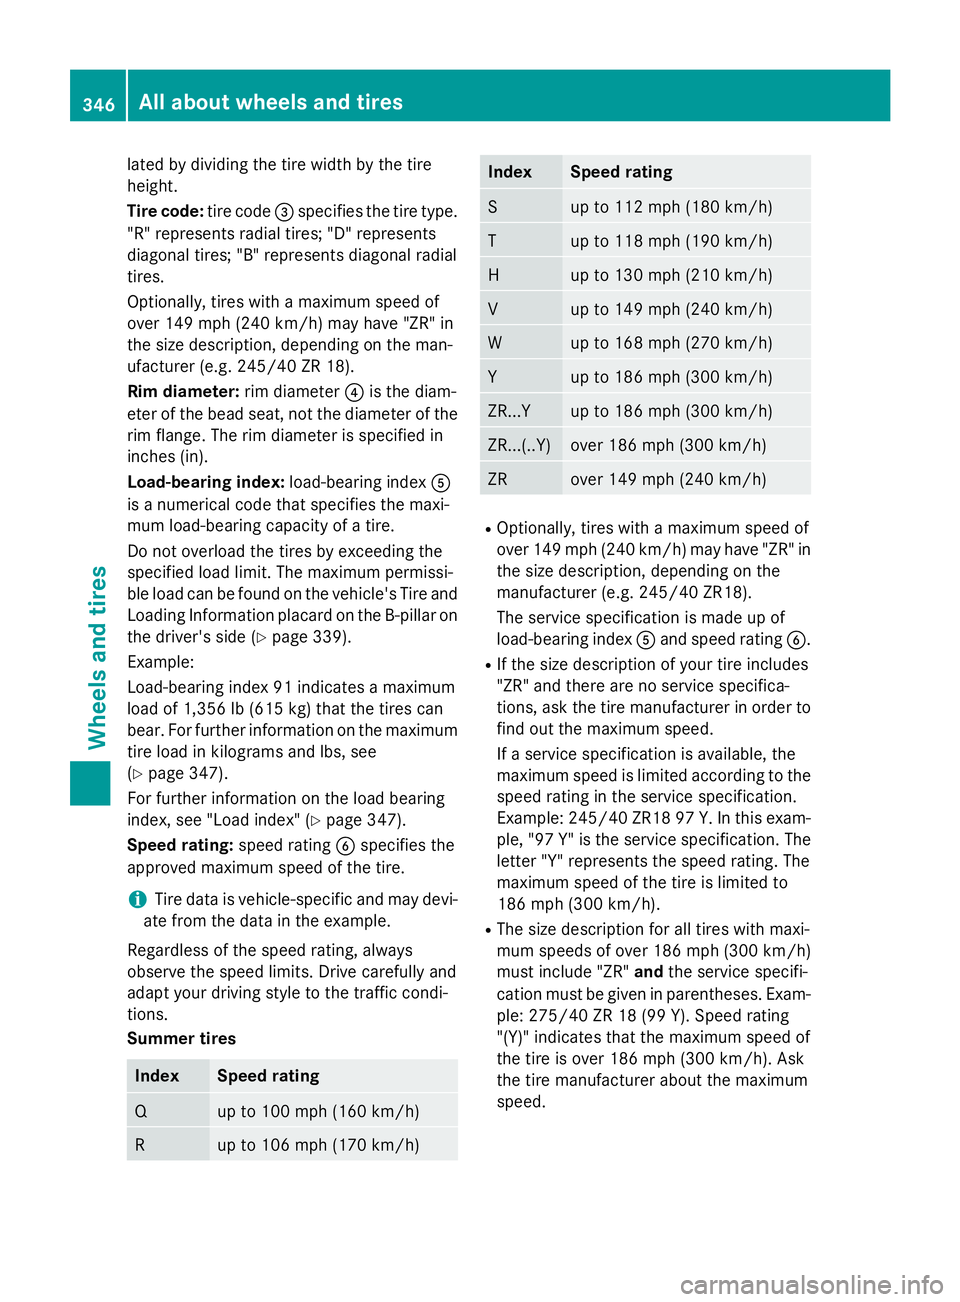
lated by dividing the tire width by the tire
height.
Tire code: tire code �
Page 349 of 374
All-weather tires and winter tires
Index Speed ra ting
Q M+S 1
up to 100 mph (160 km/h)
T M+S 1
up to 118 mph (190 km/h)
H M+S 1
up to 130 mph (210 km/h)
V M+S 1
up to 149 mph (240 km/h)
i Not all tires with the M+S marking provide
the driv ing characteristics of winter tires. In
addit ion to the M+S marking, winter tires
also have the �M snowflake symbol on
the tire wall. Tires wit h this marking fulfill
the requirements of the Rubber Manufac-
turers Association (RMA) and the Rubber
Association of Canada (RAC) regarding the
tire traction on snow. They have been espe-
cial ly developed for driving on snow.
An electron ic speed limiter prevents your
veh icle from exceeding a speed of 130 mph
(21 0 km/ h) .
The speed rating of tires mounted at the fac-
tory may be higher than the maximum speed
that the electronic speed limiter permits.
Make sure that your tires have the required
speed rating, e.g. when buying new tires. The
required speed rating for your vehicle can be
found in the "Tires" section ( Y
page 355).
Further information about reading tire data
can be obtained from any qualified specialist
workshop. Load index
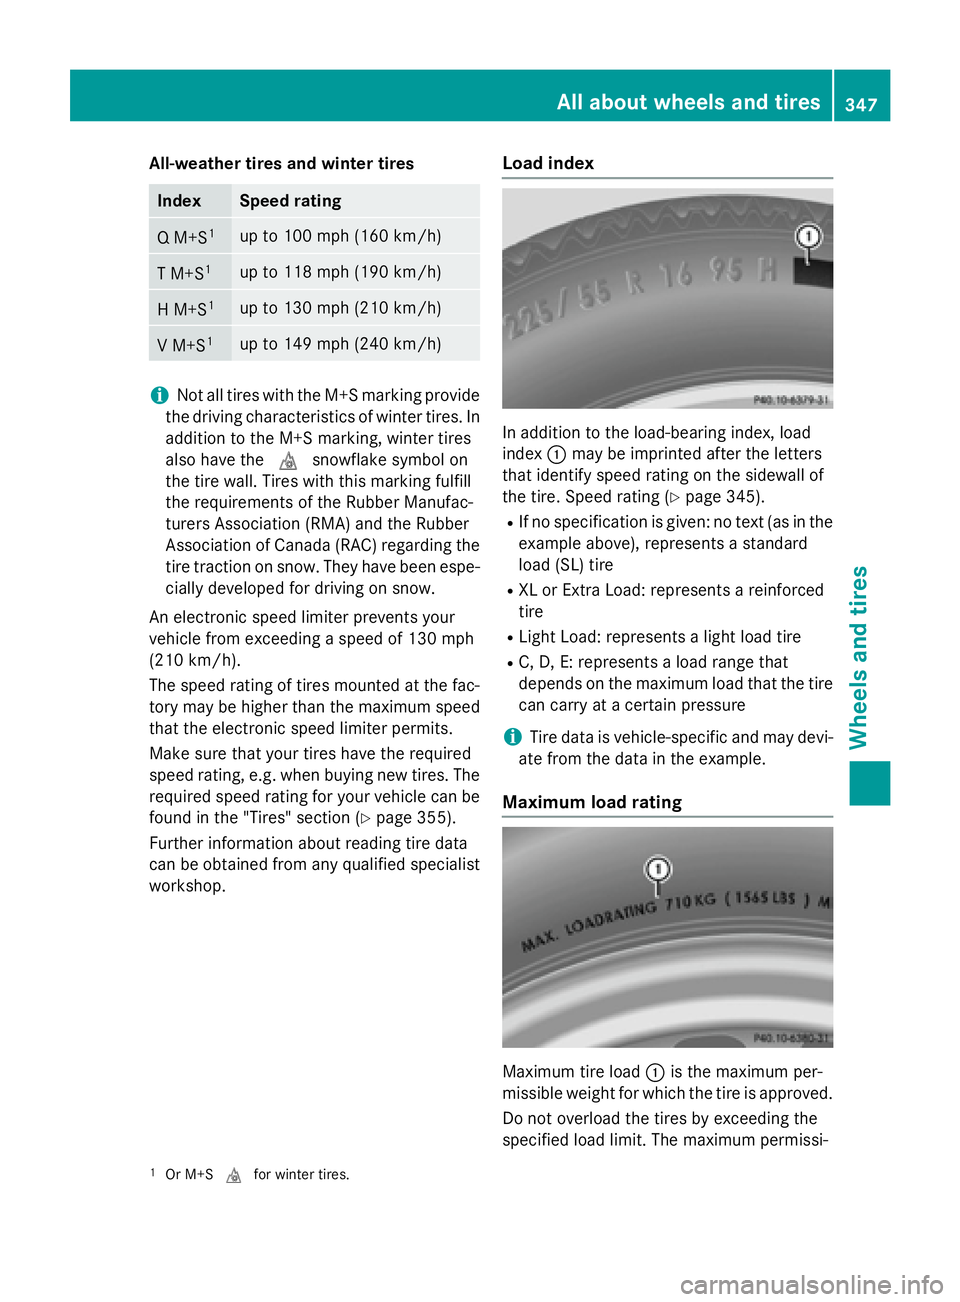
In addition to the load-bearing index, load
index �C may be imprinted after the letters
that identify speed rating on the sidewall of
the tire. Speed rating ( Y
page 345).R
If no specification is given: no text (as in the
example above), represents a standard
load (SL) tire R
XL or Extra Load: represents a reinforced
tire R
Light Load: represents a light load tire R
C, D, E: represents a load range that
depends on the maximum load that the tire
can carry at a certain pressure
i Tire data is vehicle-specific and may devi-
ate from the data in the example.
Maximum load rating
Maximum tire load �C is the maximum per-
missible weight for which the tire is approved.
Do not overload the tires by exceeding the
specified load limit. The maximum permissi-1
Or M+S �M for winter tires. All about wheels and tires 347
Wheels and tires Z
Page 350 of 374
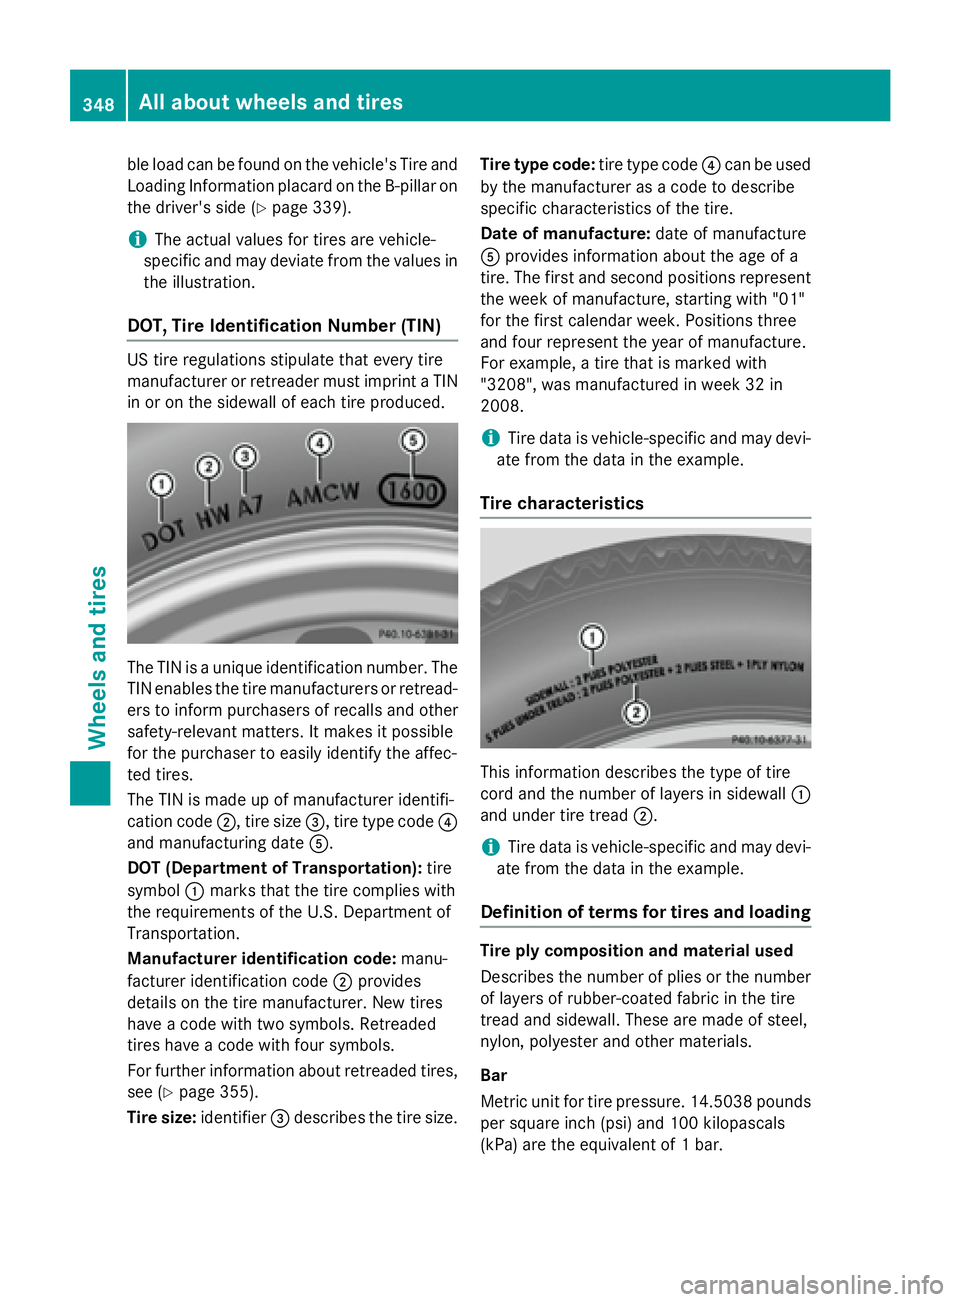
ble load can be found on the vehicle's Tire and
Loading Information placard on the B-pillar on
the driver's side ( Y
page 339).
i The actual values for tires are vehicle-
specific and may deviate from the values in
the illustration.
DOT, Tire Identification Number (TIN) US tire regulations stipulate that every tire
manufacturer or retreader must imprint a TIN
in or on the sidewall of each tire produced.
The TIN is a unique identification number. The
TIN enables the tire manufacturers or retread-
ers to inform purchasers of recalls and other
safety-relevant matters. It makes it possible
for the purchaser to easily identify the affec-
ted tires.
The TIN is made up of manufacturer identifi-
cation code �D , tire size �