MERCEDES-BENZ CLA 2019 Owners Manual
Manufacturer: MERCEDES-BENZ, Model Year: 2019, Model line: CLA, Model: MERCEDES-BENZ CLA 2019Pages: 330, PDF Size: 23.57 MB
Page 101 of 330
If you come into contact with the electrolyte,
observe the following:
RRinse off the electrolyte from your skin
immediately with water.
RImmediately rinse the electrolyte out of
your eyes thoroughly with clean water.
RIf the electrolyte is swallowed, immediately
rinse your mouth out thoroughly. Do not
induce vomiting.
RIf electrolyte comes into contact with your
skin or hair or is swallowed, seek medical
attention immediately.
RImmediately change out of clothing which
has come into contact with electrolyte.
RIf an allergic reaction occurs, seek medical
attention immediately.
The "Automatic anti-glare mirrors" function isonly available if the vehicle is equipped with the"Mirrors package".
The rear-view mirror and the exterior mirror onthe driver's side automatically go into anti-glaremode if:
Rthe ignition is switched on and
Rincident light from headlamps strikes the sen-sor in the rear-view mirror
The mirrors do not go into anti-glare mode ifreverse gear is engaged or if the interior lightingis switched on.
Parking position for the exterior mir-
ror on the front-passenger side
Setting and storing the parking position
You can set the front-passenger side exteriormirror such that you can see the rear wheel onthat side as soon as you engage reverse gear.You can store this position.
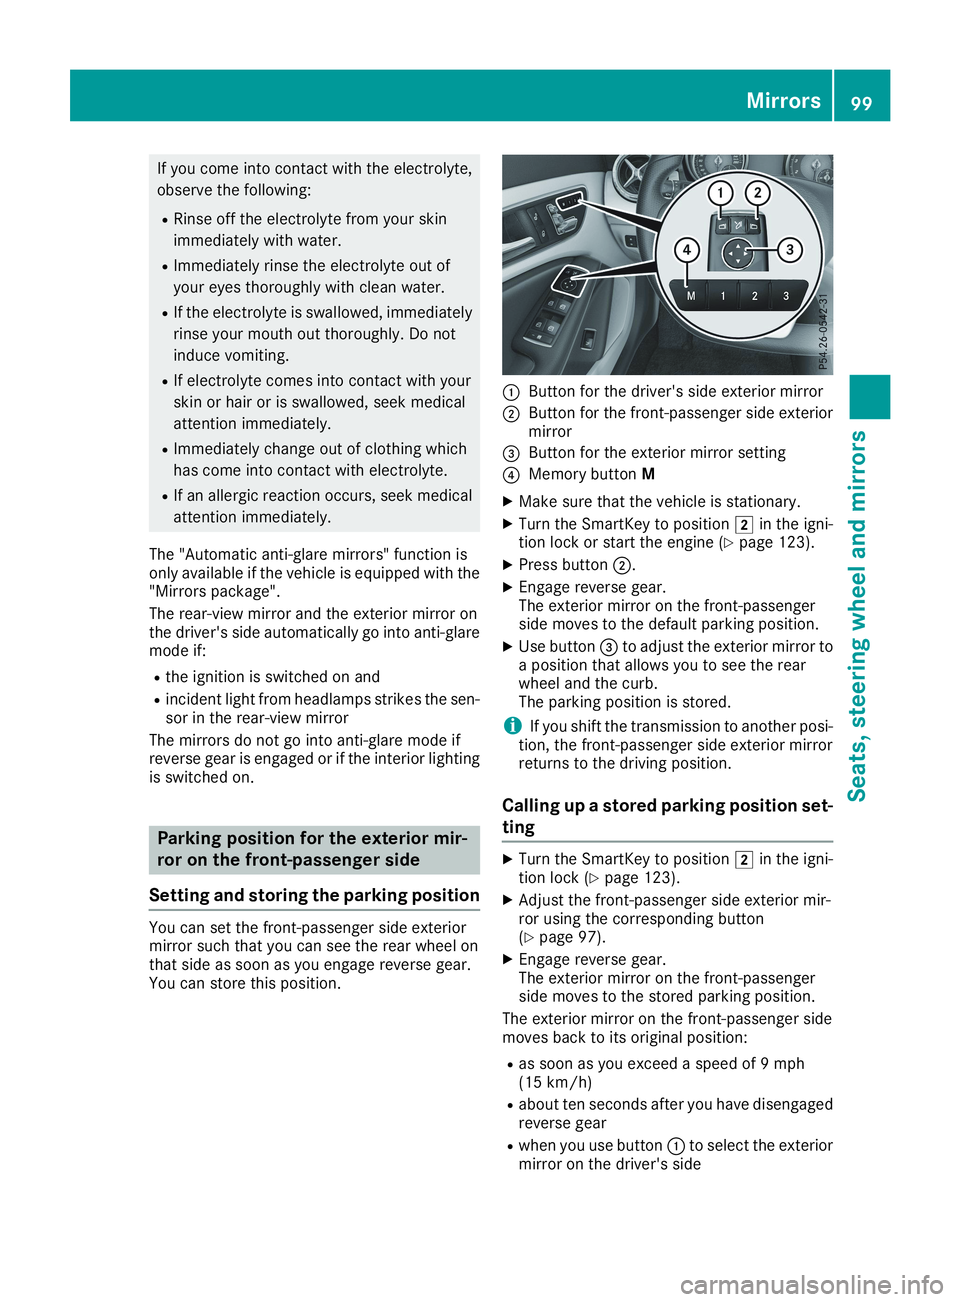
�CButton for the driver's side exterior mirror
�DButton for the front-passenger side exteriormirror
�
Page 102 of 330

Memory function
Important safety notes
GWARNING
If you use the memory function on the driver's
side while driving, you could lose control of
the vehicle as a result of the adjustments
being made. There is a risk of an accident.
Only use the memory function on the driver's
side when the vehicle is stationary.
GWARNING
When the memory function adjusts the seat,
you and other vehicle occupants – particularly
children – could become trapped. There is a
risk of injury.
While the memory function is making adjust-
ments, make sure that no one has any body
parts in the sweep of the seat. If somebody
becomes trapped, immediately release the
memory function position button. The adjust-
ment process is stopped.
GWARNING
Children could become trapped if they acti-
vate the memory function, particularly when
unattended. There is a risk of injury.
Never leave children unsupervised in the vehi-
cle.
When leaving the vehicle, always take the
SmartKey with you and lock the vehicle. This
also applies for the Digital Vehicle Key if the
"Digital Vehicle Key" function is activated via
Mercedes me connect.
The memory function can be used at any time,e.g. even when the SmartKey is not in the igni-tion lock.
Storing settings
With the memory function, you can store up tothree different settings, e.g. for three differentpeople.
The following settings are stored as a singlememory preset:
RSeat and backrest position
RDriver's side: position of the exterior mirrorson the driver's and front-passenger sides
XAdjust the seat (Ypage 93).
XAdjust the exterior mirror on the driver's side(Ypage 97).
XBriefly press theMmemory button and thenpress preset position button1,2or3withinthree seconds.The settings are stored in the selected presetposition. A tone sounds when the settingshave been completed.
Calling up a stored setting
XPress and hold the relevant preset positionbutton1,2or3until the seat and exteriormirrors are in the stored position.
iThe setting procedure is interrupted as soonas you release the storage position button.
100Memory function
Seats, steering wheel and mirrors
Page 103 of 330
Exterior lighting
General notes
For reasons of safety, Mercedes-Benz recom-mends that you drive with the lights switched oneven during the daytime. In some countries,operation of the headlamps varies due to legalrequirements and self-imposed obligations.
Setting the exterior lighting
Setting options
Exterior lighting can be set using the:
Rlight switch
Rcombination switch (Ypage 102)
Ron-board computer (Ypage 189)
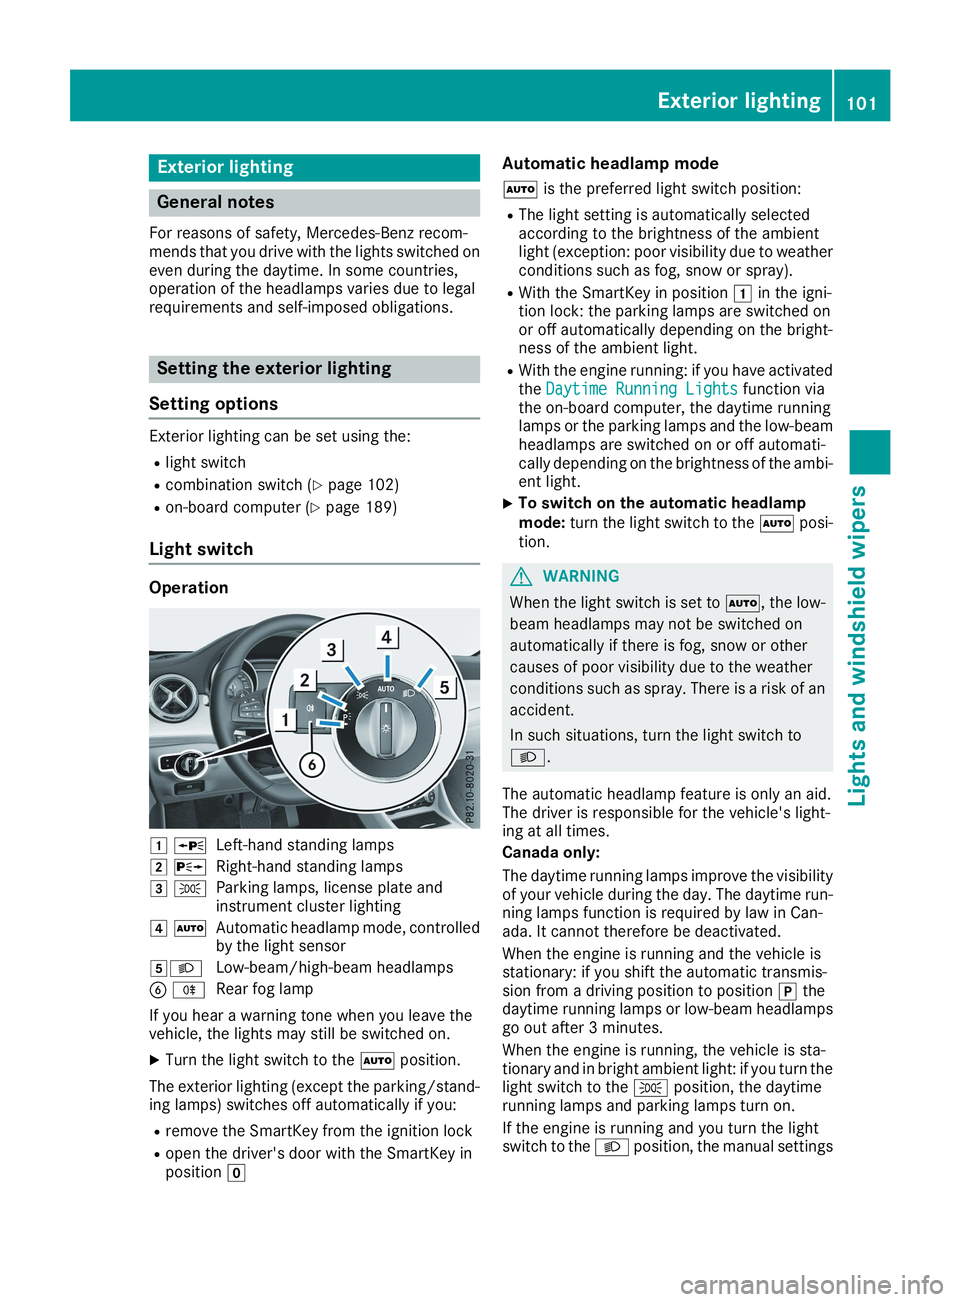
Light switch
Operation
�G�cLeft-hand standing lamps
�H�dRight-hand standing lamps
�I�`Parking lamps, license plate andinstrument cluster lighting
�J�XAutomatic headlamp mode, controlledby the light sensor
�K�XLow-beam/high-beam headlamps
�
Page 104 of 330
take precedence over the daytime runninglamps.
USA only:
The daytime running lamps improve the visibilityof your vehicle during the day. To do this, thedaytime running lamps function must beswitched on using the on-board computer(Ypage 189).
If the engine is running and you turn the lightswitch to the�`or�Xposition, the manualsettings take precedence over the daytime run-ning lamps.
Low-beam headlamps
Even if the light sensor does not detect that it isdark, the parking lamps and low-beam head-lamps switch on when the ignition is switched onand the light switch is set to the�Xposition.This is a particularly useful function in the eventof rain and fog.
XTo switch on the low-beam headlamps:turn the SmartKey to position�Hin the igni-tion lock or start the engine.
XTurn the light switch to�X.The green�Xindicator lamp in the instru-ment cluster lights up.
Rear fog lamp
The rear fog lamp improves visibility of yourvehicle for the traffic behind in the event of thickfog. Please take note of the country-specificregulations for the use of rear fog lamps.
XTo switch on the rear fog lamp:turn theSmartKey in the ignition lock to position�Horstart the engine.
XTurn the light switch to�Xor�X.
XPress the�^button.The yellow�^indicator lamp in the instru-ment cluster lights up.
XTo switch off the rear fog lamp:press the�^button.The yellow�^indicator lamp in the instru-ment cluster goes out.
iWhen the rear fog lamp is switched on, thecenter brake lamp in the tail lamp switches offdue to a legal requirement.
Parking lamps
!If the battery charge is very low, the parkinglamps or standing lamps are automaticallyswitched off to enable the next engine start.Always park your vehicle safely and in a well lit
area, in accordance with the relevant legalstipulations. Avoid using the�`parkinglamps over a period of several hours. If pos-sible, switch on the right-hand�dor left-hand�cstanding lamps.
XTo switch on:turn the light switch to�`.The green�`indicator lamp in the instru-ment cluster lights up.
Standing lamps
Switching on the standing lamps ensures thecorresponding side of the vehicle is illuminated.
XTo switch on the standing lamps:theSmartKey is not in the ignition lock or it is inposition�Zin the ignition lock.
XTurn the light switch to�c(left-hand side ofthe vehicle) or�d(right-hand side of thevehicle).
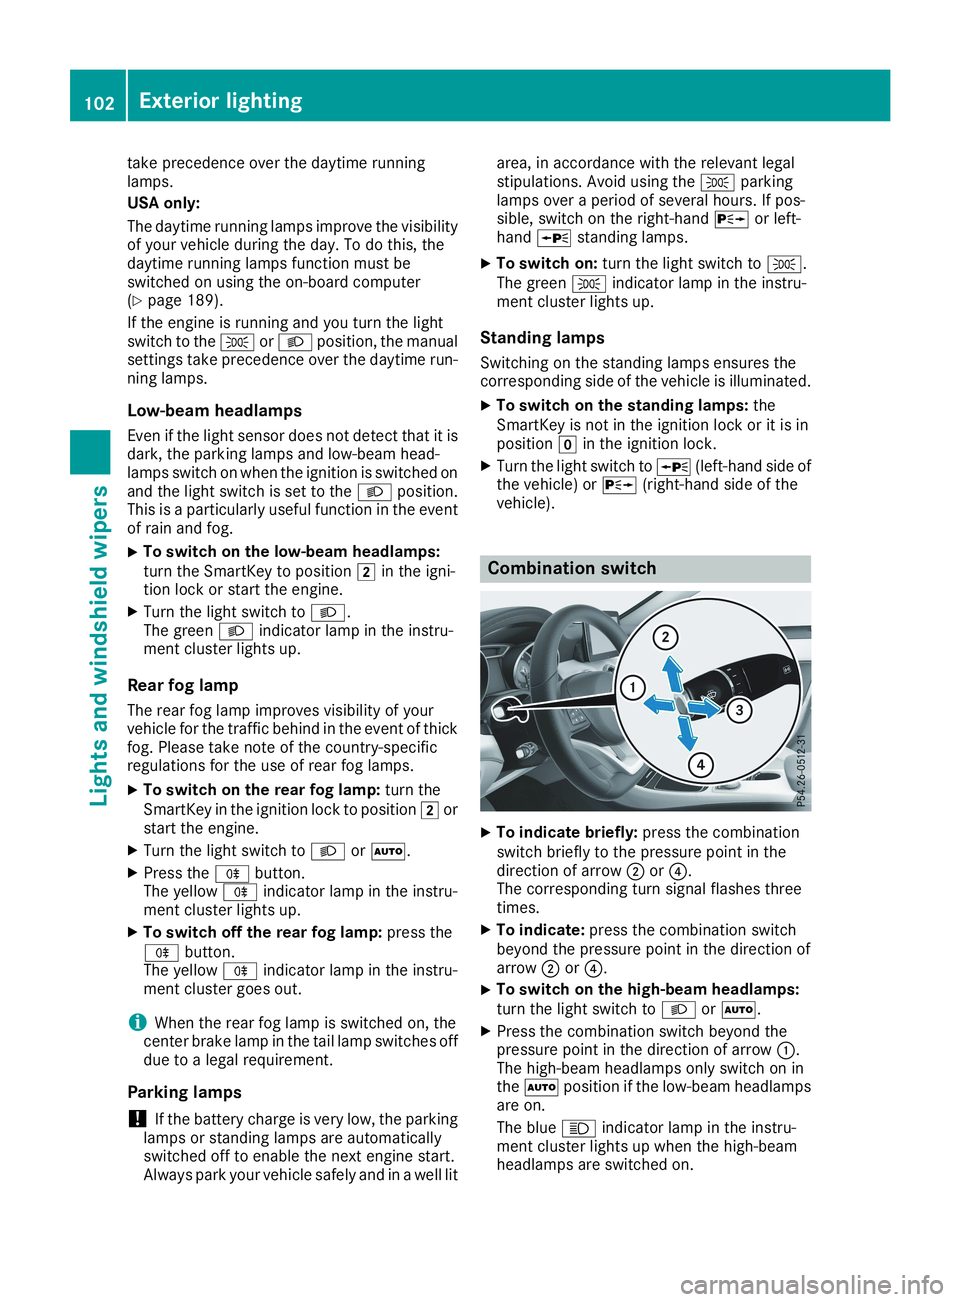
Combination switch
XTo indicate briefly:press the combinationswitch briefly to the pressure point in thedirection of arrow�Dor�
Page 105 of 330
XTo switch off the high-beam headlamps:move the combination switch back to its nor-mal position.The blue�Windicator lamp in the instru-ment cluster goes out.
Vehicles with Adaptive Highbeam Assist:when Adaptive Highbeam Assist is active, itcontrols activation and deactivation of thehigh-beam headlamps (Ypage 103).
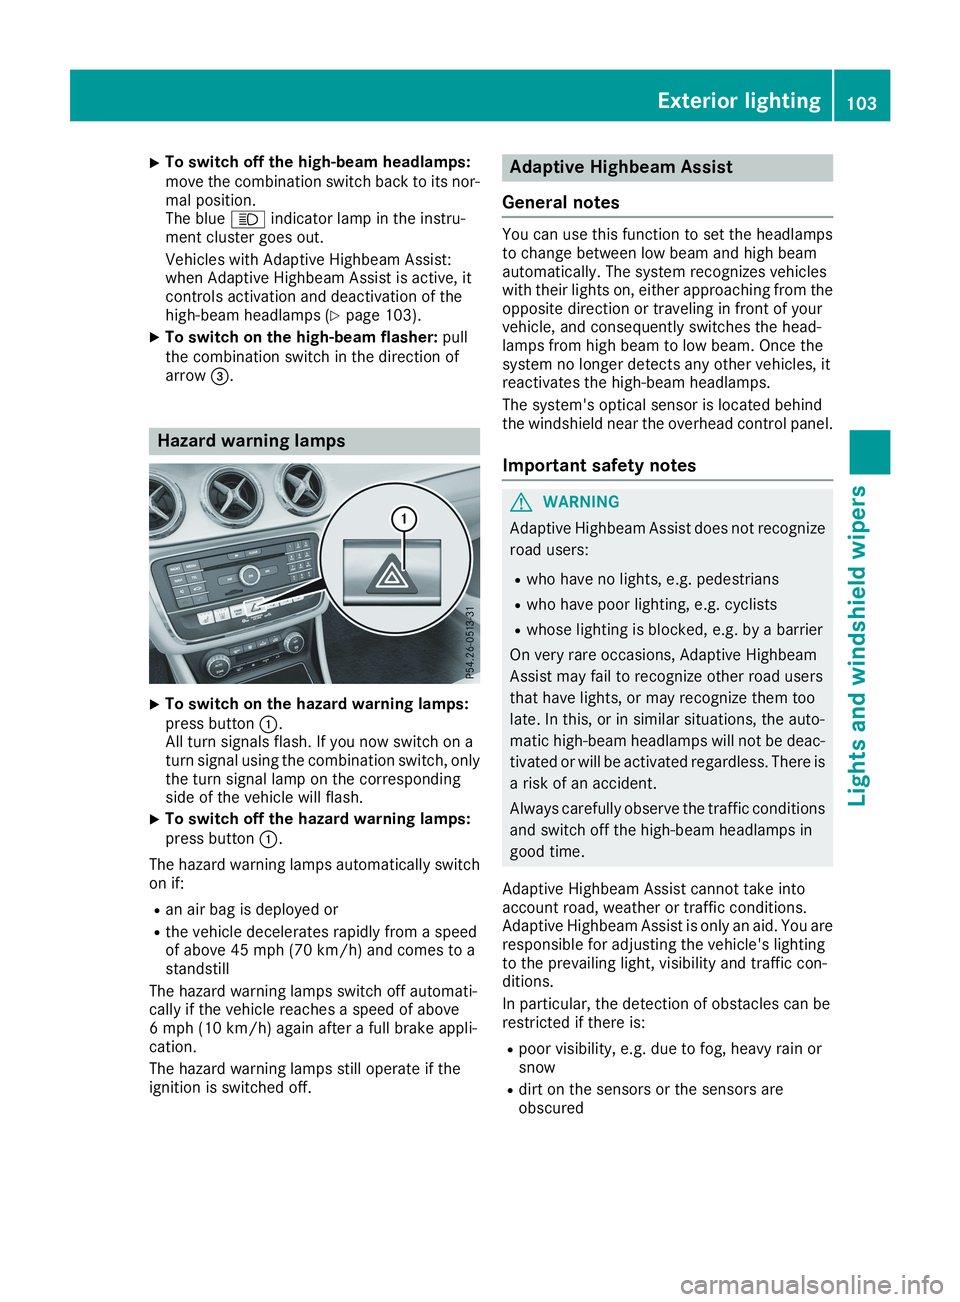
XTo switch on the high-beam flasher:pullthe combination switch in the direction ofarrow�
Page 106 of 330
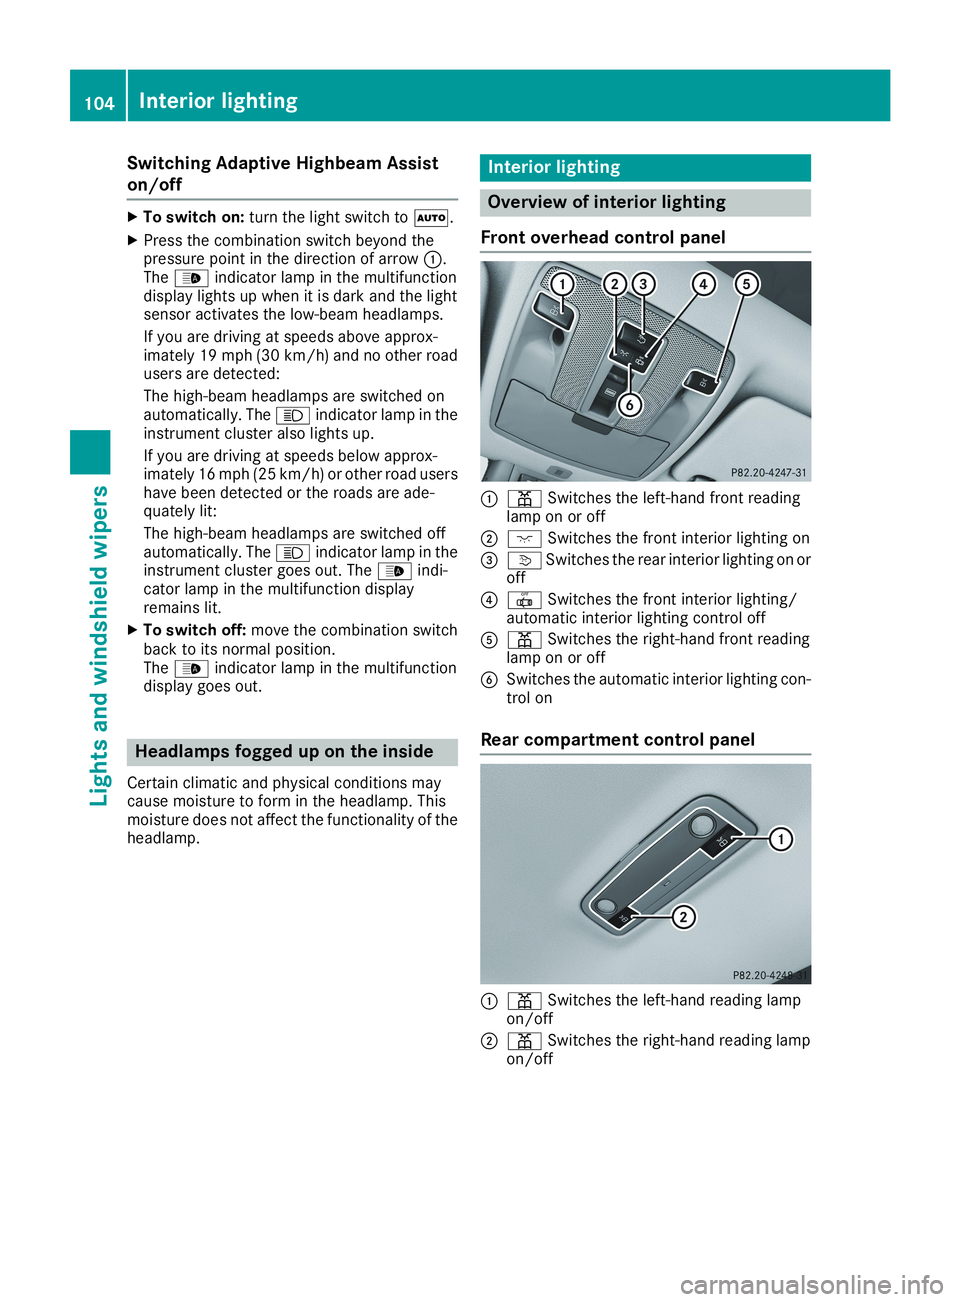
Switching Adaptive Highbeam Assist
on/off
XTo switch on:turn the light switch to�X.
XPress the combination switch beyond thepressure point in the direction of arrow�C.The�
Page 107 of 330
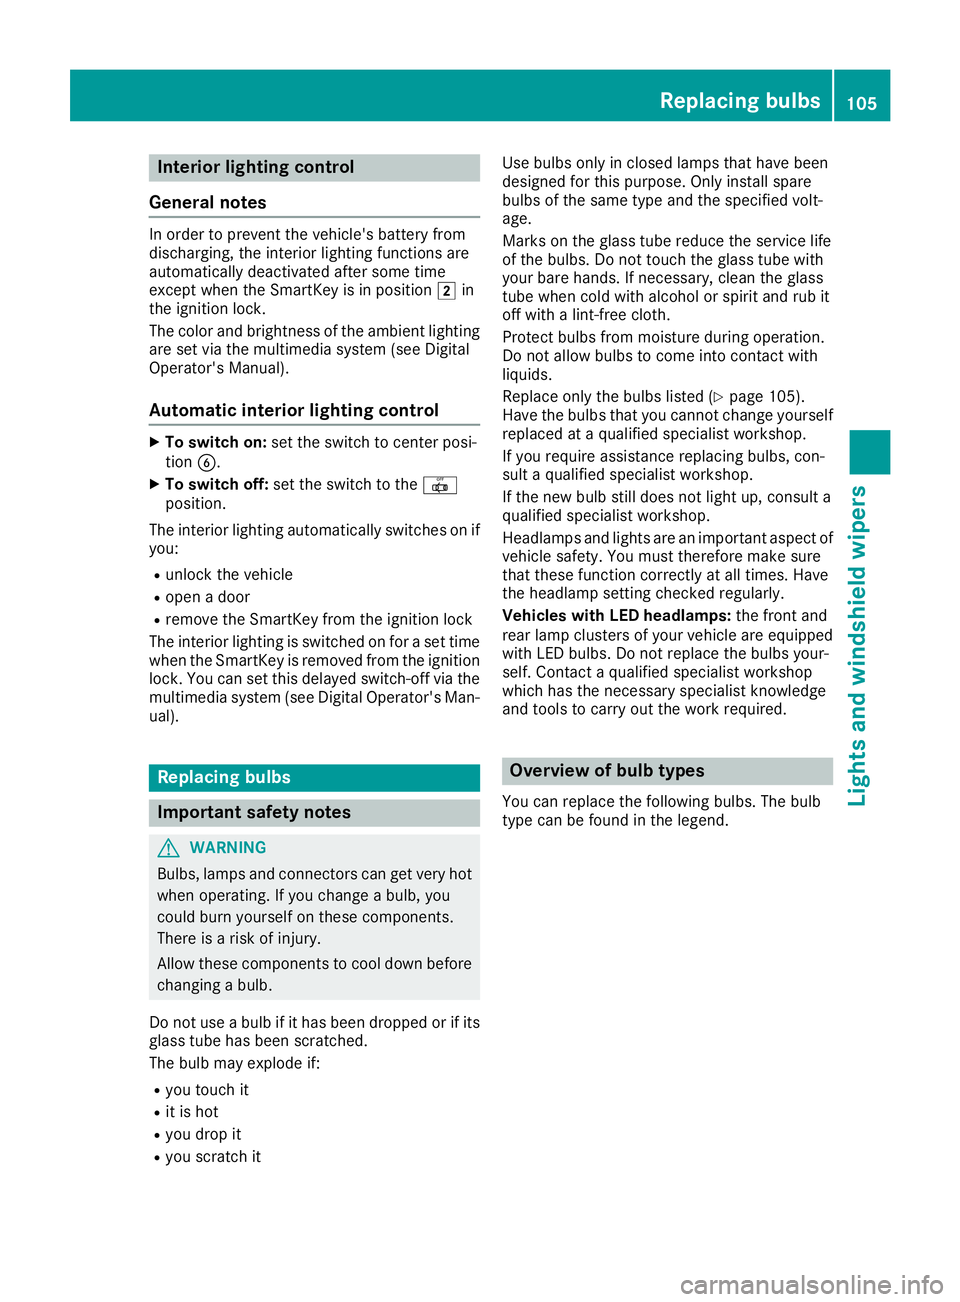
Interior lighting control
General notes
In order to prevent the vehicle's battery fromdischarging, the interior lighting functions areautomatically deactivated after some timeexcept when the SmartKey is in position�Hinthe ignition lock.
The color and brightness of the ambient lightingare set via the multimedia system (see DigitalOperator's Manual).
Automatic interior lighting control
XTo switch on:set the switch to center posi-tion�
Page 108 of 330
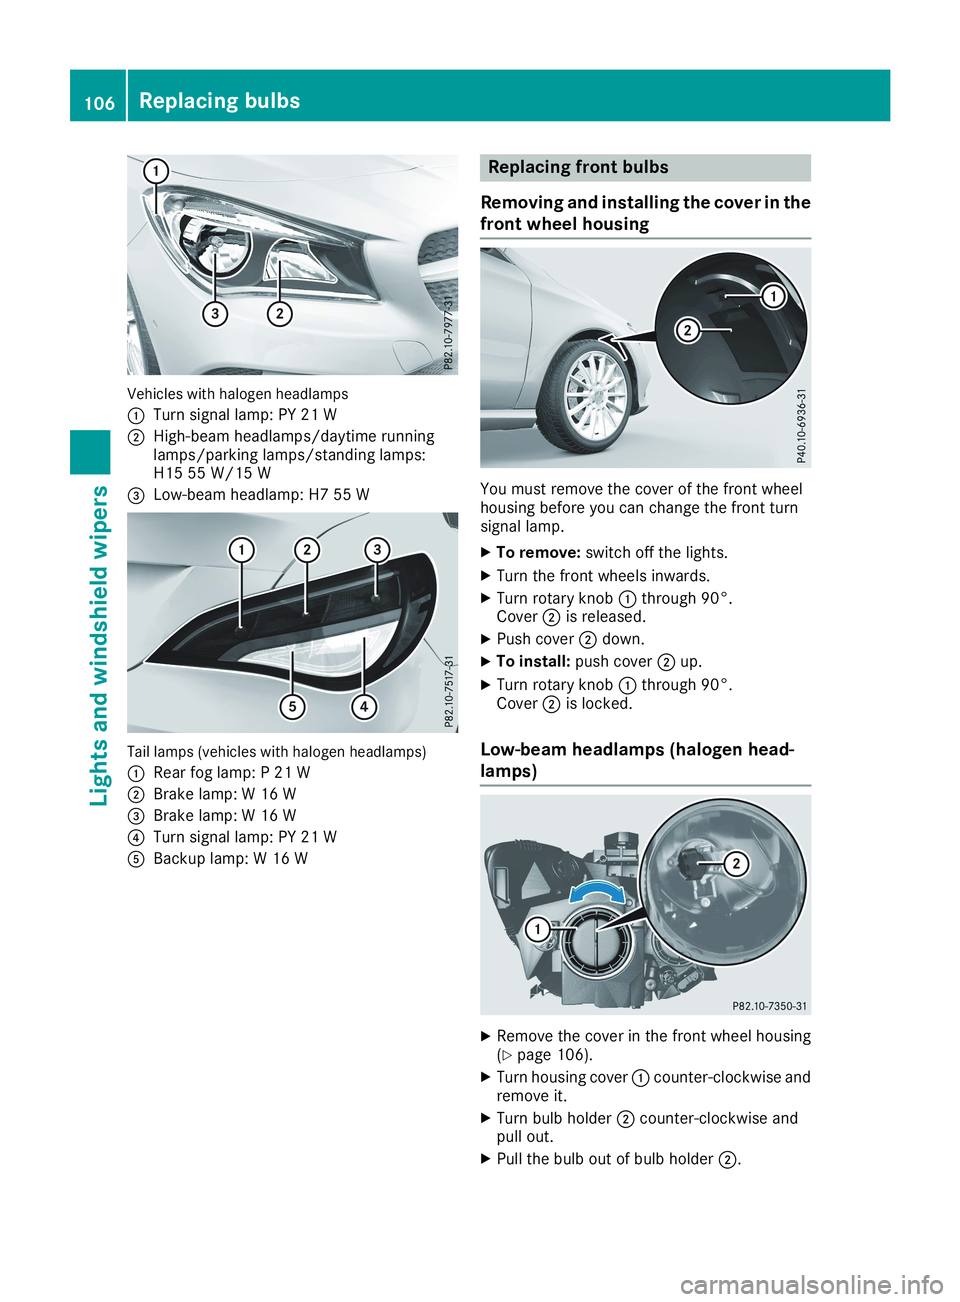
Vehicles with halogen headlamps
�CTurn signal lamp: PY 21 W
�DHigh-beam headlamps/daytime runninglamps/parking lamps/standing lamps:H15 55 W/15 W
�
Page 109 of 330
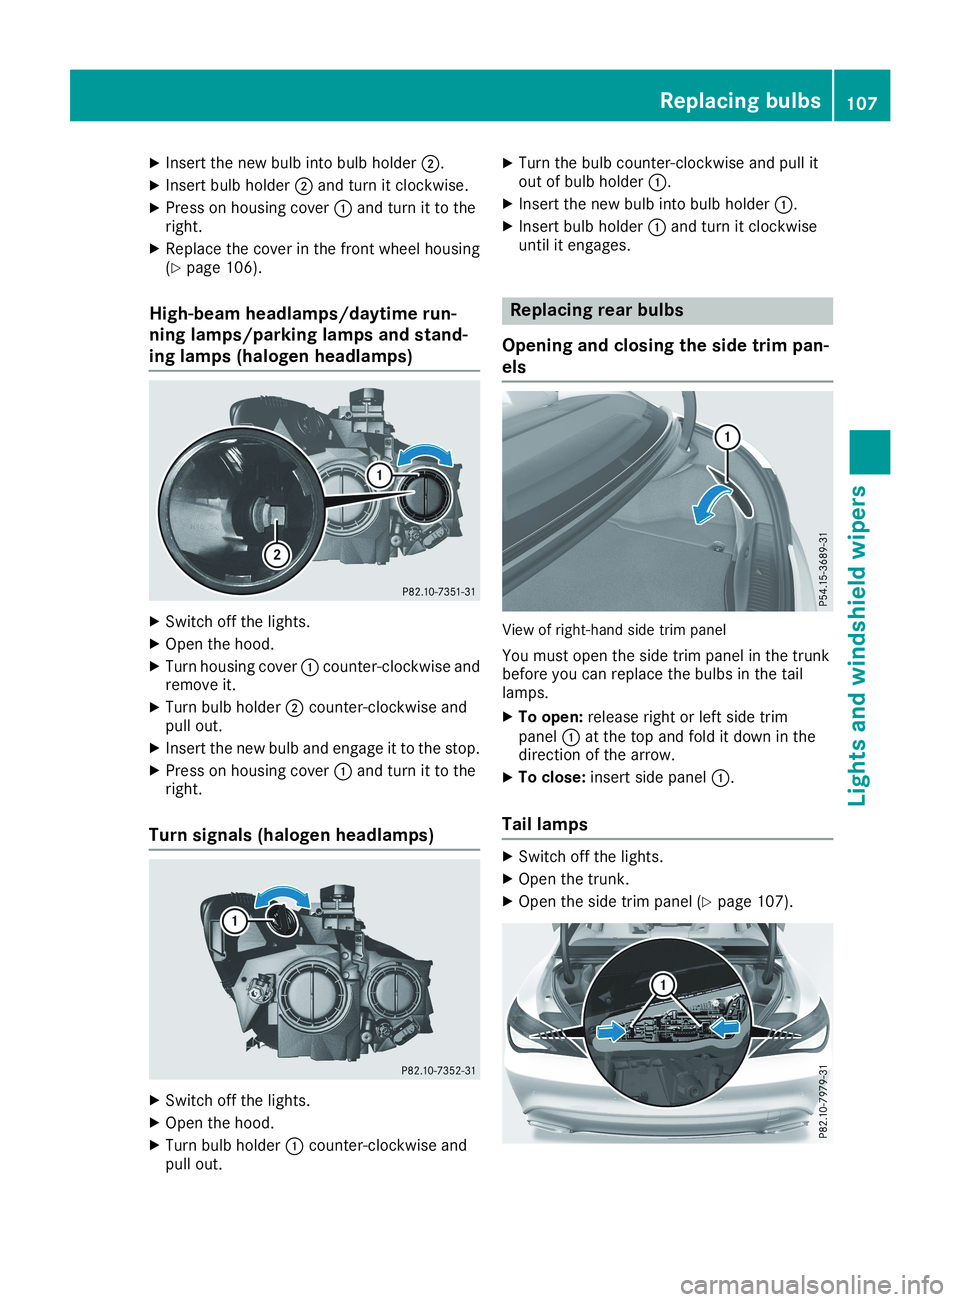
XInsert the new bulb into bulb holder�D.
XInsert bulb holder�Dand turn it clockwise.
XPress on housing cover�Cand turn it to theright.
XReplace the cover in the front wheel housing(Ypage 106).
High-beam headlamps/daytime run-
ning lamps/parking lamps and stand-
ing lamps (halogen headlamps)
XSwitch off the lights.
XOpen the hood.
XTurn housing cover�Ccounter-clockwise andremove it.
XTurn bulb holder�Dcounter-clockwise andpull out.
XInsert the new bulb and engage it to the stop.
XPress on housing cover�Cand turn it to theright.
Turn signals (halogen headlamps)
XSwitch off the lights.
XOpen the hood.
XTurn bulb holder�Ccounter-clockwise andpull out.
XTurn the bulb counter-clockwise and pull itout of bulb holder�C.
XInsert the new bulb into bulb holder�C.
XInsert bulb holder�Cand turn it clockwiseuntil it engages.
Replacing rear bulbs
Opening and closing the side trim pan-
els
View of right-hand side trim panel
You must open the side trim panel in the trunkbefore you can replace the bulbs in the taillamps.
XTo open:release right or left side trimpanel�Cat the top and fold it down in thedirection of the arrow.
XTo close:insert side panel�C.
Tail lamps
XSwitch off the lights.
XOpen the trunk.
XOpen the side trim panel (Ypage 107).
Replacing bulbs107
Lights and windshield wipers
Z
Page 110 of 330
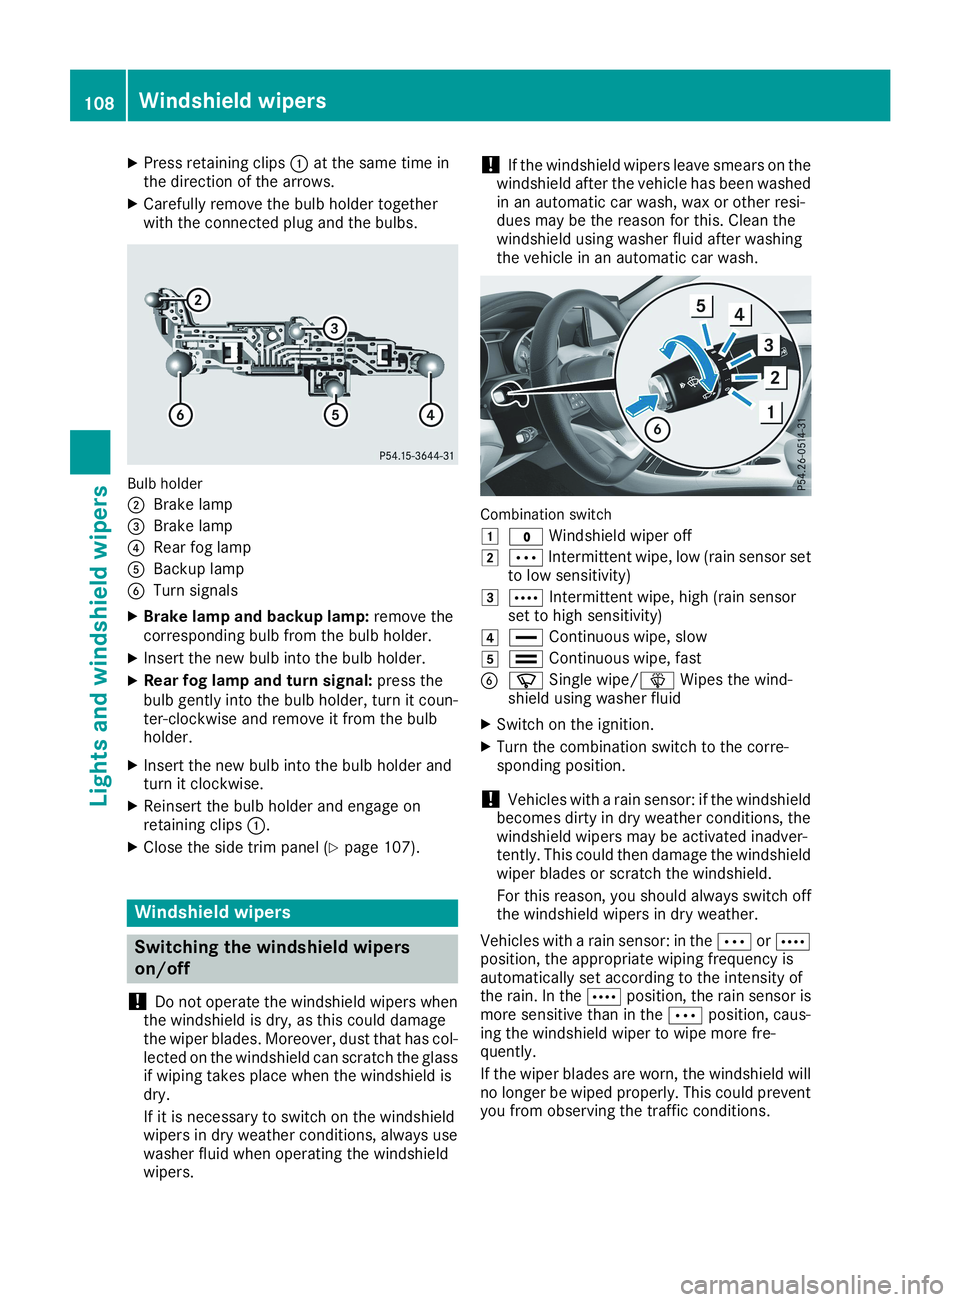
XPress retaining clips�Cat the same time inthe direction of the arrows.
XCarefully remove the bulb holder togetherwith the connected plug and the bulbs.
Bulb holder
�DBrake lamp
�