change time MERCEDES-BENZ CLA-Class 2014 C117 Comand Manual
[x] Cancel search | Manufacturer: MERCEDES-BENZ, Model Year: 2014, Model line: CLA-Class, Model: MERCEDES-BENZ CLA-Class 2014 C117Pages: 270, PDF Size: 5.76 MB
Page 177 of 270
Deleting favorites in the Favorites menu
X Select Delete
Delete by turning 00790052007Aor sliding
009700520064 the COMAND controller and press
0098 to confirm.
or
X Press the 0084button to the right of the
COMAND controller.
The favorite is deleted. Settings
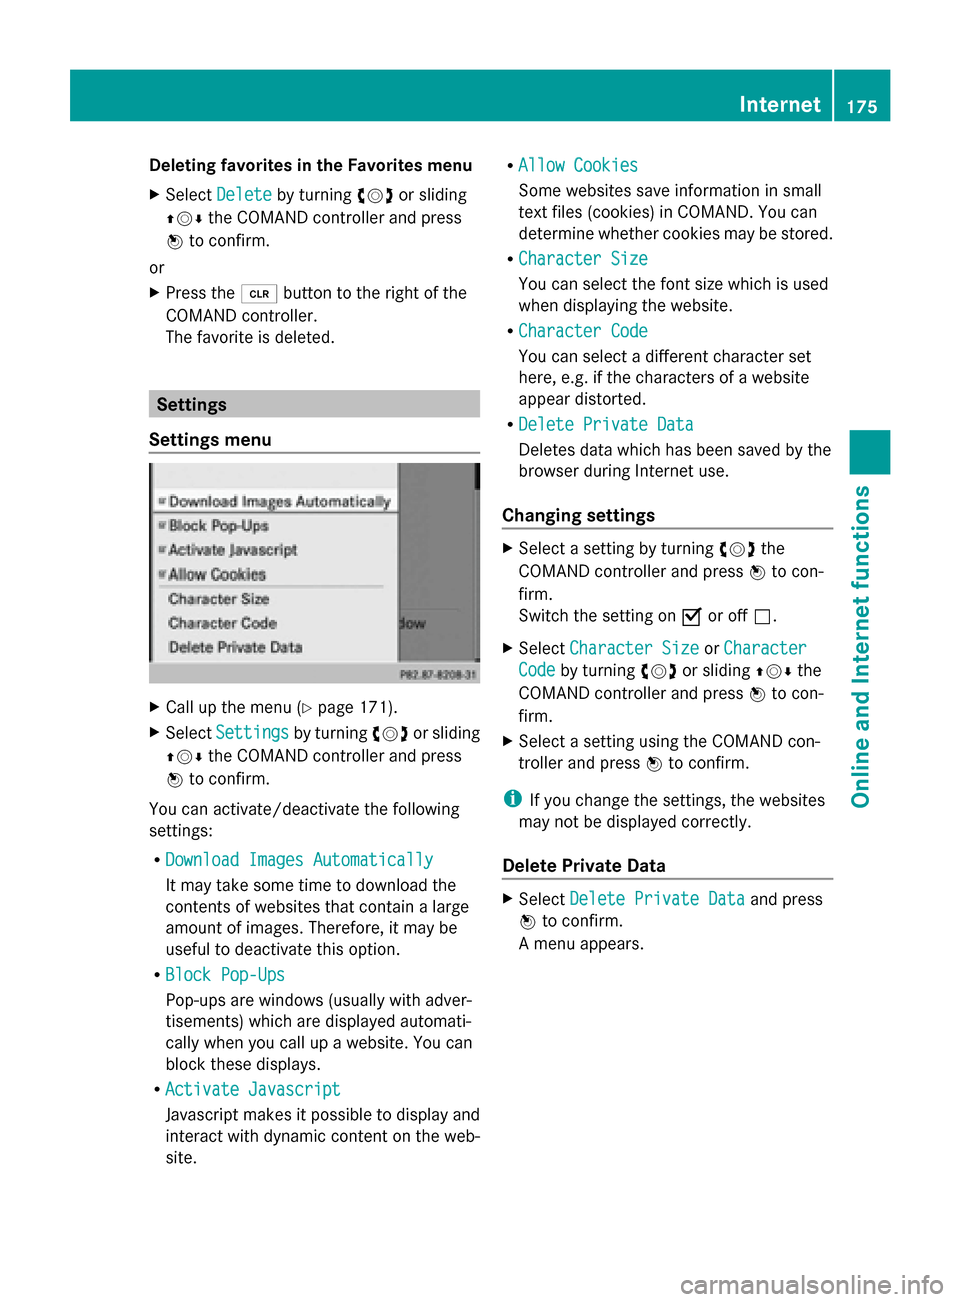
Settings menu X
Call up the menu ( Ypage 171).
X Select Settings Settings by turning00790052007Aor sliding
009700520064 the COMAND controller and press
0098 to confirm.
You can activate/deactivate the following
settings:
R Download Images Automatically
Download Images Automatically
It may take some time to download the
contents of websites that contain a large
amount of images. Therefore, it may be
useful to deactivate this option.
R Block Pop-Ups
Block Pop-Ups
Pop-ups are windows (usually with adver-
tisements) which are displayed automati-
cally when you call up a website. You can
block these displays.
R Activate Javascript Activate Javascript
Javascript makes it possible to display and
interact with dynamic content on the web-
site. R
Allow Cookies
Allow Cookies
Some websites save information in small
text files (cookies) in COMAND. You can
determine whether cookies may be stored.
R Character Size
Character Size
You can select the font size which is used
when displaying the website.
R Character Code Character Code
You can select a different character set
here, e.g. if the characters of a website
appear distorted.
R Delete Private Data Delete Private Data
Deletes data which has been saved by the
browser during Internet use.
Changing settings X
Select a setting by turning 00790052007Athe
COMAND controller and press 0098to con-
firm.
Switch the setting on 0073or off 0053.
X Select Character Size Character Size orCharacter
Character
Code
Code by turning 00790052007Aor sliding 009700520064the
COMAND controller and press 0098to con-
firm.
X Select a setting using the COMAND con-
troller and press 0098to confirm.
i If you change the settings, the websites
may not be displayed correctly.
Delete Private Data X
Select Delete Private Data Delete Private Data and press
0098 to confirm.
A menu appears. Internet
175Online and Internet functions
Page 190 of 270
Handle discs only when the vehicle is station-
ary.
Bear in mind that at a speed of just 30 mph
(approximately 50 km/h), your vehicle is cov-
ering a distance of 44 feet (approximately
14 m) every second. G
WARNING
SD cards are small objects measuring 24 x 32
x 2.1 mm. Small parts can be swallowed and
are a choking hazard. There is a risk of fatal
injury.
Keep SD cards out of the reach of children. If
an SD card is swallowed, seek immediate
medical attention. Inserting/ejecting CDs/DVDs
Notes If the CD/DVD has a printed side, this must
face upwards when the CD/DVD is inserted.
If neither side is printed, the side to be played
should face downwards. The system may not
be able to play CDs/DVDs with copy protec-
tion.
i If a medium contains other files in addi-
tion to music files, the loading time before
the first track starts to play may be longer.
Inserting a disc into the single DVD
drive X
Press the 0062eject button.
If there is a disc already inserted, it will be
ejected.
X Take the disc out of the slot.
X Insert a disc into the slot.
If the disc is correctly inserted and is a suit-
able disc, it is drawn in by the drive and
played. Ejecting a disc from the single DVD
drive X
Press the 0062eject button.
X Take the disc out of the slot.
If you do not take the disc out of the slot, it
is drawn in again automatically after a short
while and reloaded.
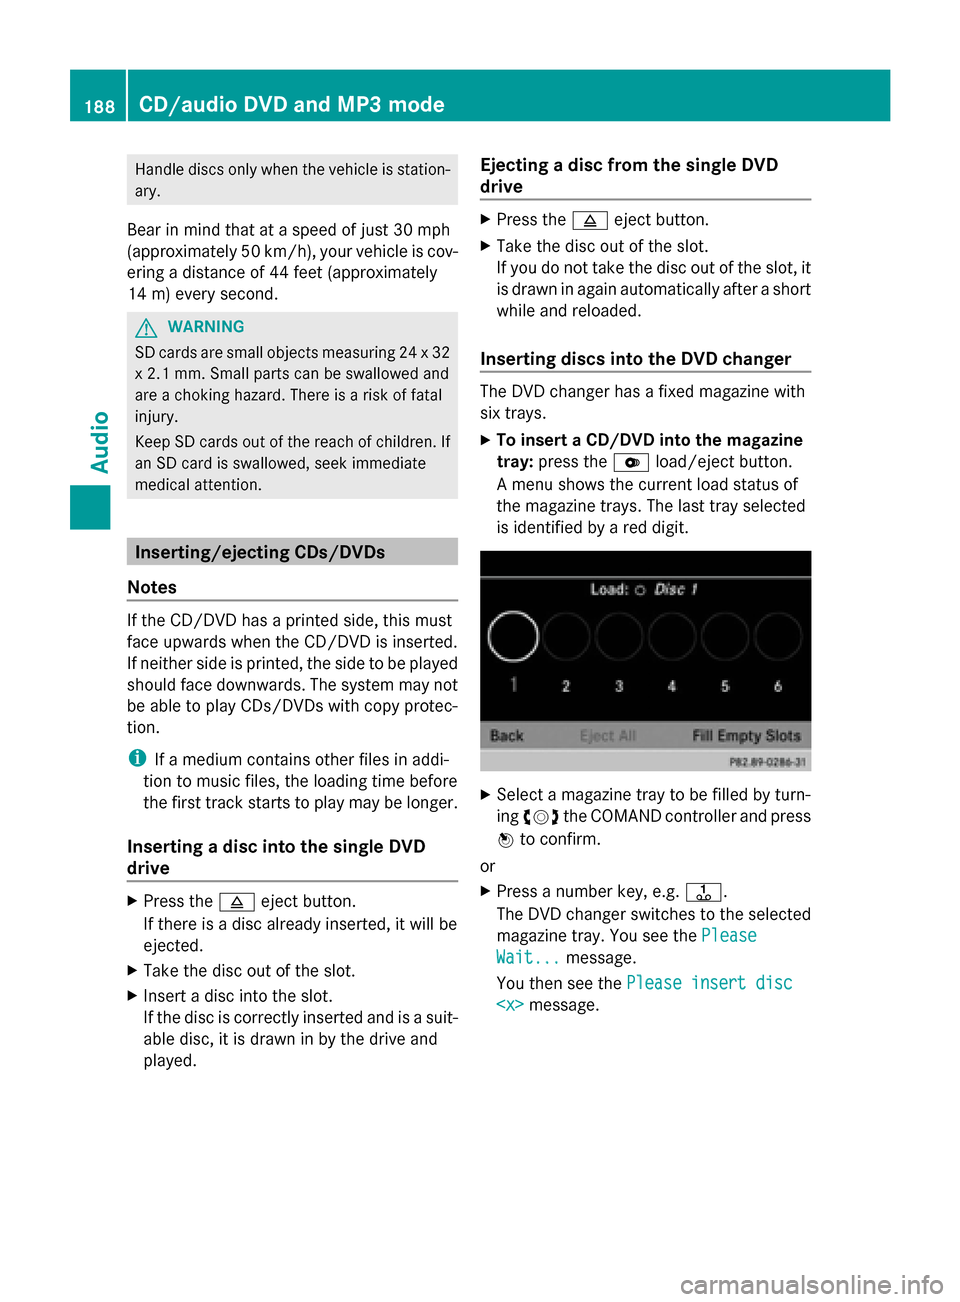
Inserting discs into the DVD changer The DVD changer has a fixed magazine with
six trays.
X
To insert a CD/DVD into the magazine
tray: press the 0065load/eject button.
A menu shows the current load status of
the magazine trays. The last tray selected
is identified by a red digit. X
Select a magazine tray to be filled by turn-
ing 00790052007A the COMAND controller and press
0098 to confirm.
or
X Press a number key, e.g. 0080.
The DVD changer switches to the selected
magazine tray. You see the Please Please
Wait...
Wait... message.
You then see the Please insert disc
Please insert disc
CD/audio DVD and MP3 modeAudio
Page 191 of 270
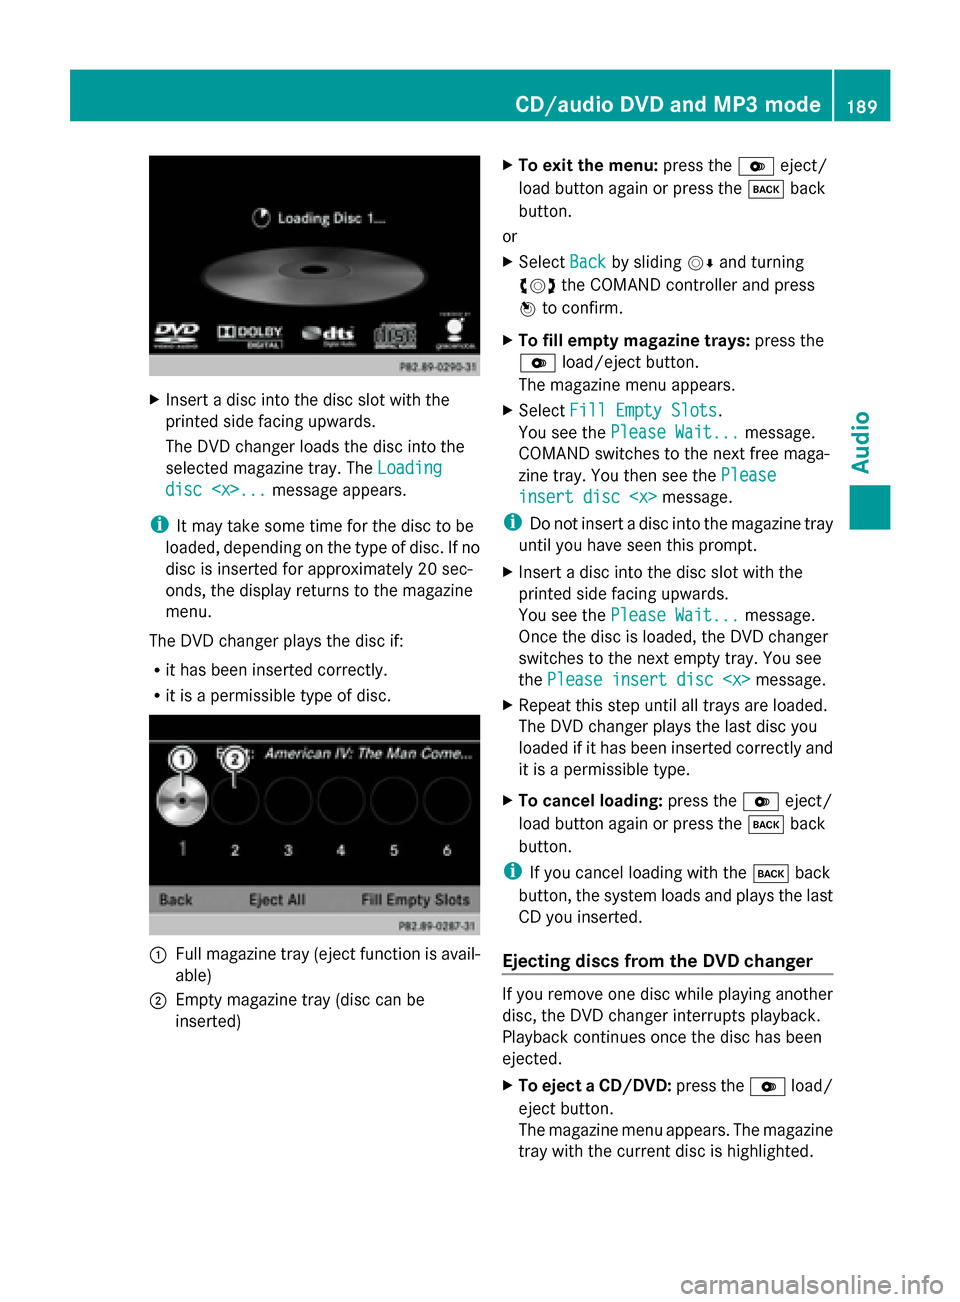
X
Insert a disc into the disc slot with the
printed side facing upwards.
The DVD changer loads the disc into the
selected magazine tray. The Loading
Loading
disc
i It may take some time for the disc to be
loaded, depending on the type of disc. If no
disc is inserted for approximately 20 sec-
onds, the display returns to the magazine
menu.
The DVD changer plays the disc if:
R it has been inserted correctly.
R it is a permissible type of disc. 0043
Full magazine tray (eject function is avail-
able)
0044 Empty magazine tray (disc can be
inserted) X
To exit the menu: press the0065eject/
load button again or press the 003Dback
button.
or
X Select Back
Back by sliding 00520064and turning
00790052007A the COMAND controller and press
0098 to confirm.
X To fill empty magazine trays: press the
0065 load/eject button.
The magazine menu appears.
X Select Fill Empty Slots
Fill Empty Slots.
You see the Please Wait... Please Wait... message.
COMAND switches to the next free maga-
zine tray. You then see the Please
Please
insert disc
insert disc
i Do not insert a disc into the magazine tray
until you have seen this prompt.
X Insert a disc into the disc slot with the
printed side facing upwards.
You see the Please Wait... Please Wait... message.
Once the disc is loaded, the DVD changer
switches to the next empty tray. You see
the Please insert disc
X Repeat this step until all trays are loaded.
The DVD changer plays the last disc you
loaded if it has been inserted correctly and
it is a permissible type.
X To cancel loading: press the0065eject/
load button again or press the 003Dback
button.
i If you cancel loading with the 003Dback
button, the system loads and plays the last
CD you inserted.
Ejecting discs from the DVD changer If you remove one disc while playing another
disc, the DVD changer interrupts playback.
Playback continues once the disc has been
ejected.
X
To eject a CD/DVD: press the0065load/
eject button.
The magazine menu appears. The magazine
tray with the current disc is highlighted. CD/audio DVD and MP3 mode
189Audio Z
Page 193 of 270
i
Not all memory cards available on the
market are designed for the temperatures
which may be reached in the vehicle.
If the SD memory card is no longer in use,
you should remove it from COMAND. High
temperatures can damage the card.
Due to the wide range of SD memory cards
available on the market, playback cannot
be guaranteed for all brands of SD memory
card.
The readable storage capacity depends on
the memory card used. You can obtain fur-
ther information at any authorized
Mercedes-Benz Center.
Inserting an SD memory card X
Insert the memory card into the slot on the
control panel until it engages in place. The
side with the contacts must face down-
wards and point towards the slot.
If no MP3 tracks can be found, you will see
a message to this effect.
The first 100 MP3 tracks are loaded. The
first MP3 track is then played. Further
tracks are loaded in the background; this is
indicated by an hourglass symbol.
Ejecting an SD memory card X
Press the memory card.
The memory card is ejected.
X Remove the memory card from slot. Connecting a USB device
The USB port is located in the stowage com-
partment in the center console.
Electrical consumption at this connection
must not exceed a continuous current of
500 mA. If the electrical consumption is
higher, use a separate source to provide
power for the USB device (e.g.
12 V power supply). X
Connect the USB device (e.g. USB stick) to
the USB port.
If no MP3 tracks can be found, you will see
a message to this effect.
The first 100 MP3 tracks are loaded. The
first MP3 track is then played. Further
tracks are loaded in the background; this is
indicated by an hourglass symbol.
i Due to the wide range of USB devices
available on the market, playback cannot
be guaranteed for all brands of USB device.
Information about suitable USB devices
can be obtained from an authorized
Mercedes-Benz Center.
MP3 players must support Media Transfer
Protocol (MTP). The MTP mode must be
active. Switching to audio CD/DVD or MP3
mode
Inserting or connecting a medium X
Insert CDs/DVDs (Y page 188)
or
X Insert an SD memory card (Y page 191)
or
X Connect a USB device (Y page 191).
COMAND loads the medium inserted and
starts to play it.
Switching modes using the function
button X
Press the 003Afunction button one or more
times.
By pressing the function button repeatedly,
you can change the operating mode in the
following order:
R CD/audio DVD/video DVD/MP3 CD/MP3
DVD in the DVD changer or single DVD
drive (disc mode)
R Memory card mode
R MUSIC REGISTER CD/audio DVD and MP3 mode
191Audio Z
Page 200 of 270
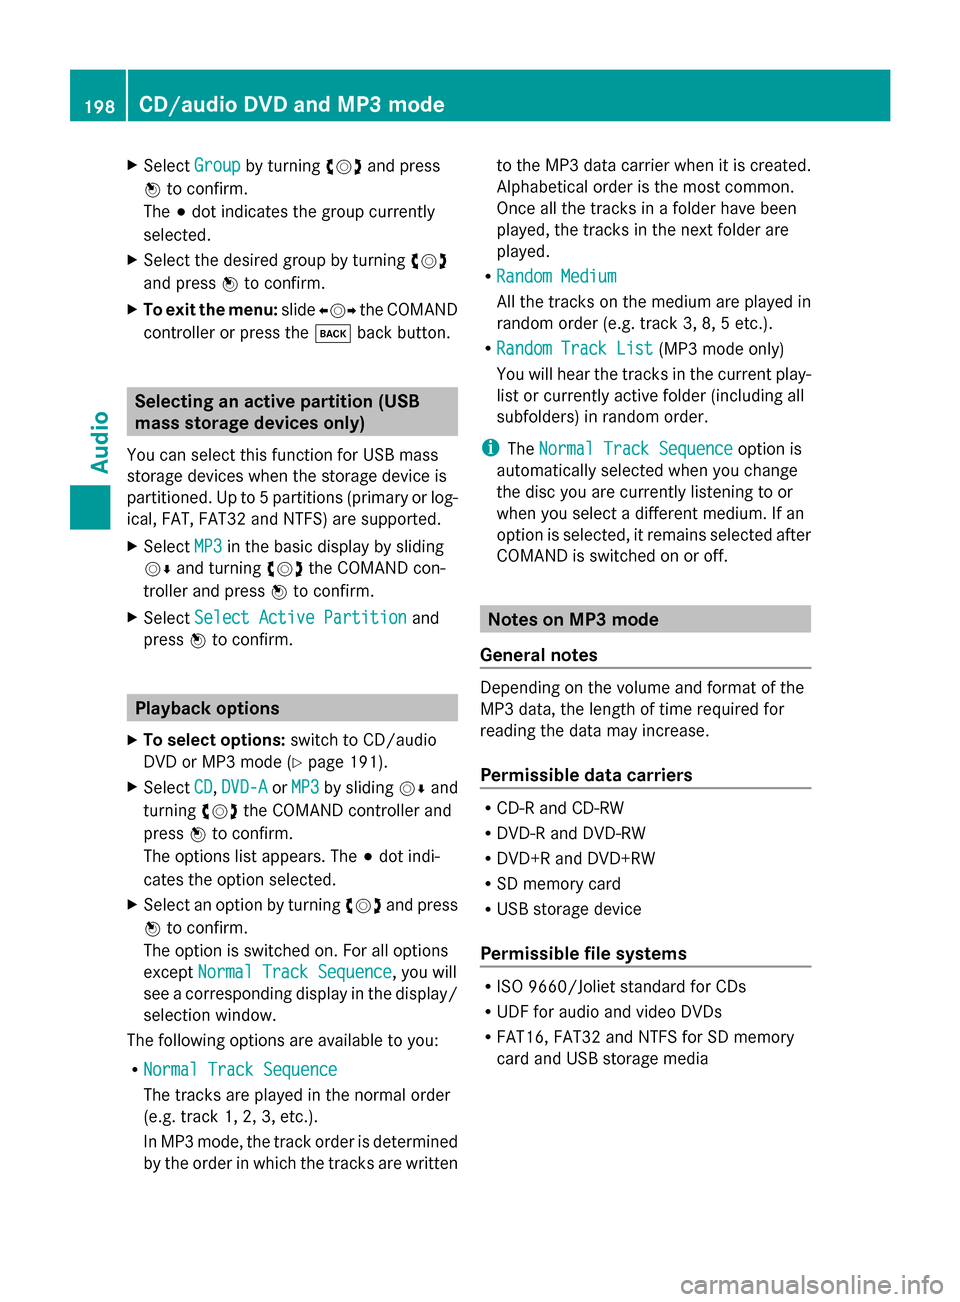
X
Select Group
Groupby turning 00790052007Aand press
0098 to confirm.
The 003Bdot indicates the group currently
selected.
X Select the desired group by turning 00790052007A
and press 0098to confirm.
X To exit the menu: slide009500520096 the COMAND
controller or press the 003Dback button. Selecting an active partition (USB
mass storage devices only)
You can select this function for USB mass
storage devices when the storage device is
partitioned. Up to 5 partitions (primary or log-
ical, FAT, FAT32 and NTFS) are supported.
X Select MP3
MP3 in the basic display by sliding
00520064 and turning 00790052007Athe COMAND con-
troller and press 0098to confirm.
X Select Select Active Partition
Select Active Partition and
press 0098to confirm. Playback options
X To select options: switch to CD/audio
DVD or MP3 mode ( Ypage 191).
X Select CD
CD, DVD-A
DVD-A orMP3
MP3 by sliding 00520064and
turning 00790052007Athe COMAND controller and
press 0098to confirm.
The options list appears. The 003Bdot indi-
cates the option selected.
X Select an option by turning 00790052007Aand press
0098 to confirm.
The option is switched on. For all options
except Normal Track Sequence
Normal Track Sequence, you will
see a corresponding display in the display/
selection window.
The following options are available to you:
R Normal Track Sequence
Normal Track Sequence
The tracks are played in the normal order
(e.g. track 1, 2, 3, etc.).
In MP3 mode, the track order is determined
by the order in which the tracks are written to the MP3 data carrier when it is created.
Alphabetical order is the most common.
Once all the tracks in a folder have been
played, the tracks in the next folder are
played.
R Random Medium
Random Medium
All the tracks on the medium are played in
random order (e.g. track 3, 8, 5 etc.).
R Random Track List
Random Track List (MP3 mode only)
You will hear the tracks in the current play-
list or currently active folder (including all
subfolders) in random order.
i The Normal Track Sequence Normal Track Sequence option is
automatically selected when you change
the disc you are currently listening to or
when you select a different medium. If an
option is selected, it remains selected after
COMAND is switched on or off. Notes on MP3 mode
General notes Depending on the volume and format of the
MP3 data, the length of time required for
reading the data may increase.
Permissible data carriers
R
CD-R and CD-RW
R DVD-R and DVD-RW
R DVD+R and DVD+RW
R SD memory card
R USB storage device
Permissible file systems R
ISO 9660/Joliet standard for CDs
R UDF for audio and video DVDs
R FAT16, FAT32 and NTFS for SD memory
card and USB storage media 198
CD/audio DVD and MP3 modeAudio
Page 206 of 270
Switching to the MUSIC REGISTER
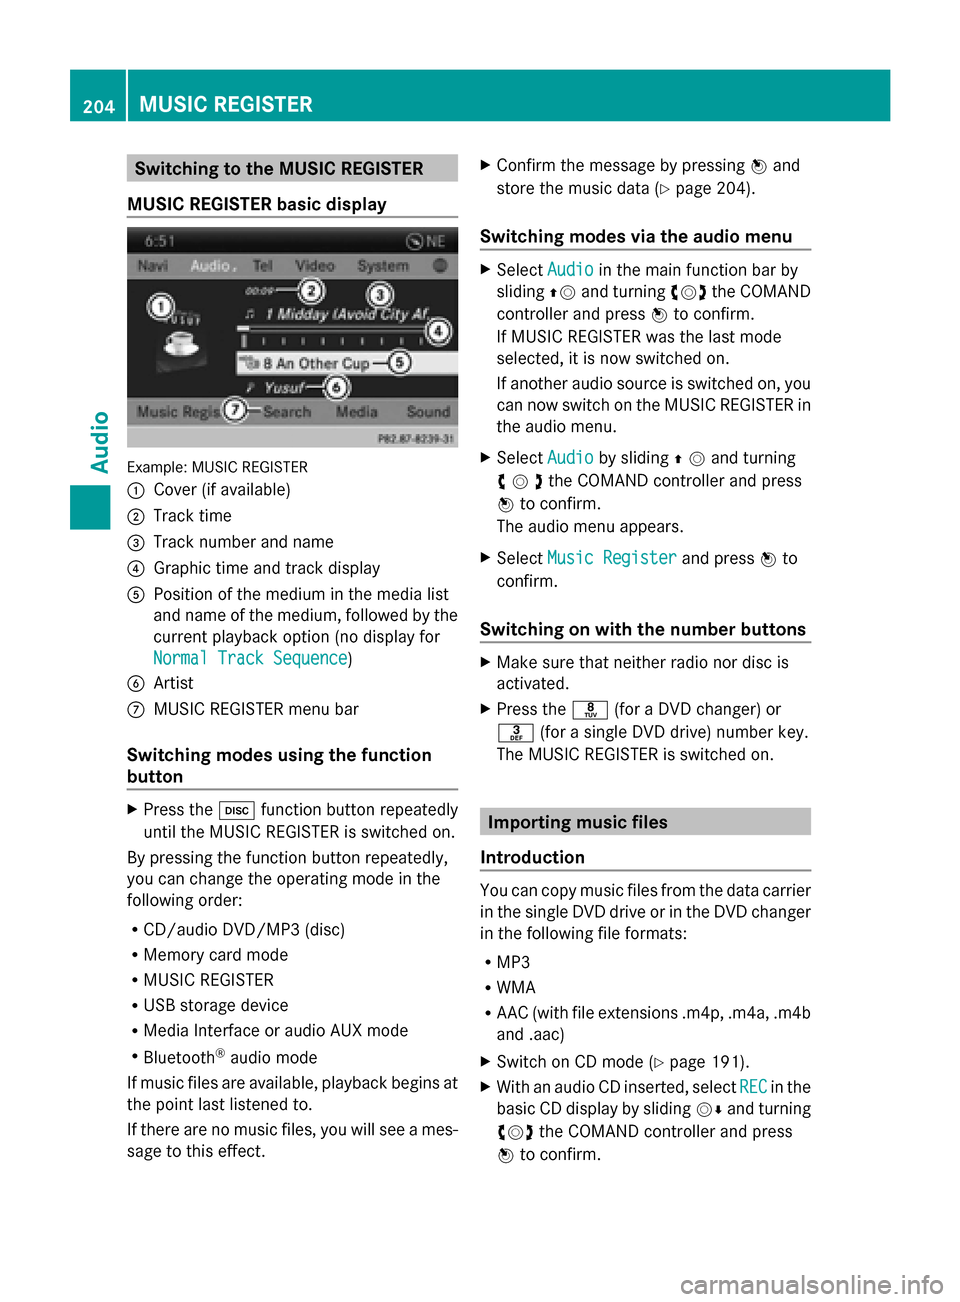
MUSIC REGISTER basic display Example: MUSIC REGISTER
0043
Cover (if available)
0044 Track time
0087 Track number and name
0085 Graphic time and track display
0083 Position of the medium in the media list
and name of the medium, followed by the
current playback option (no display for
Normal Track Sequence
Normal Track Sequence)
0084 Artist
006B MUSIC REGISTER menu bar
Switching modes using the function
button X
Press the 003Afunction button repeatedly
until the MUSIC REGISTER is switched on.
By pressing the function button repeatedly,
you can change the operating mode in the
following order:
R CD/audio DVD/MP3 (disc)
R Memory card mode
R MUSIC REGISTER
R USB storage device
R Media Interface or audio AUX mode
R Bluetooth ®
audio mode
If music files are available, playback begins at
the point last listened to.
If there are no music files, you will see a mes-
sage to this effect. X
Confirm the message by pressing 0098and
store the music data (Y page 204).
Switching modes via the audio menu X
Select Audio Audioin the main function bar by
sliding 00970052and turning 00790052007Athe COMAND
controller and press 0098to confirm.
If MUSIC REGISTER was the last mode
selected, it is now switched on.
If another audio source is switched on, you
can now switch on the MUSIC REGISTER in
the audio menu.
X Select Audio Audioby sliding 00970052and turning
00790052007Athe COMAND controller and press
0098 to confirm.
The audio menu appears.
X Select Music Register Music Register and press0098to
confirm.
Switching on with the number buttons X
Make sure that neither radio nor disc is
activated.
X Press the 0088(for a DVD changer) or
0083 (for a single DVD drive) number key.
The MUSIC REGISTER is switched on. Importing music files
Introduction You can copy music files from the data carrier
in the single DVD drive or in the DVD changer
in the following file formats:
R
MP3
R WMA
R AAC (with file extensions .m4p, .m4a, .m4b
and .aac)
X Switch on CD mode (Y page 191).
X With an audio CD inserted, select REC RECin the
basic CD display by sliding 00520064and turning
00790052007A the COMAND controller and press
0098 to confirm. 204
MUSIC REGISTERAudio
Page 210 of 270
This device name is predetermined but can
usually be changed. To make a clear selec-
tion of the Bluetooth ®
device possible,
Mercedes-Benz recommends that you cus-
tomize the device name.
i A2DP (Advanced AudioDistribution
Profile): Bluetooth ®
audio profile for audio
data transmission
AVRCP (Audio VideoRemote Control
Profile): Bluetooth ®
audio profile for audio
data playback.
i Not all Bluetooth ®
audio devices available
on the market are equally suitable. To
obtain more information about suitable
Bluetooth ®
audio devices and about con-
necting Bluetooth ®
audio devices to
COMAND, visit
http://www.mbusa-mobile.com (USA).
Or call the Mercedes-Benz Customer Assis-
tance center at 1-800-FOR-MERCedes
(1-800-367-6372)( USA) or Customer Rela-
tions at 1-800-387-0100 (Canada).
X Activate Bluetooth ®
and Bluetooth ®
visibil-
ity on the Bluetooth ®
audio device. Preconditions in COMAND
X Activate the Bluetooth ®
function in
COMAND (Y page 45). Connecting Bluetooth
®
audio devices
General information Before using your Bluetooth
®
audio device
with COMAND for the first time, you will need
to authorize it.
When you authorize a new Bluetooth ®
audio
device, it is connected automatically. Con-
nection involves first searching for a Blue-
tooth ®
audio device and then authorizing it.
You can authorize up to fifteen Bluetooth ®
devices. i
If you authorize a mobile phone that sup-
ports Bluetooth ®
audio, the A2DP and
AVRCP Bluetooth ®
audio profiles are con-
nected automatically.
The mobile phone is then entered:
R in the Bluetooth ®
telephone list
(Y page 128)
R in the Bluetooth ®
device list
(Y page 208).
Mercedes-Benz recommends authorizing a
mobile phone in Bluetooth ®
telephony
(Y page 128).
Searching for and authorizing a Blue-
tooth ®
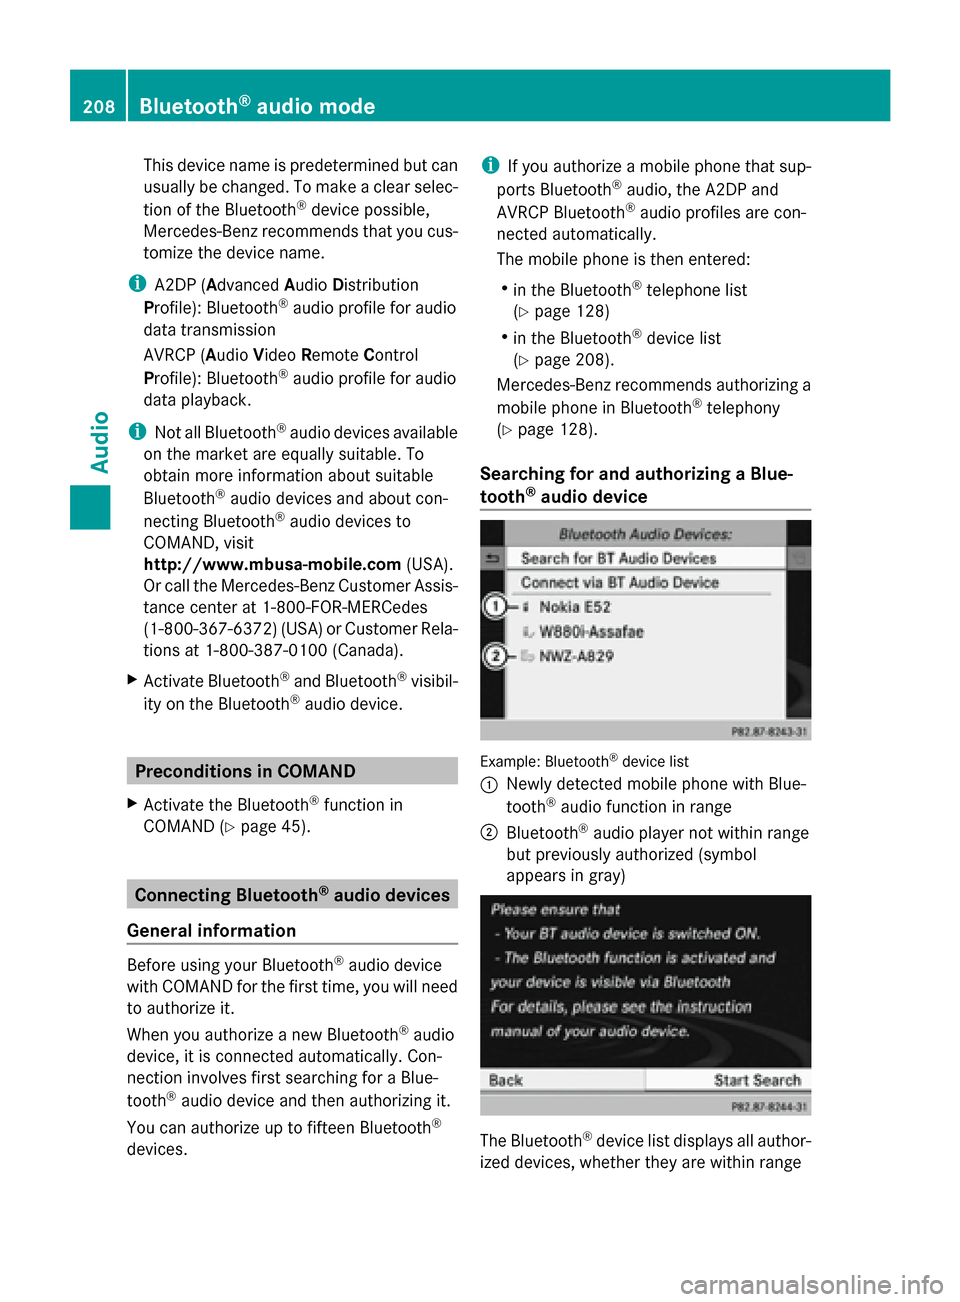
audio device Example: Bluetooth
®
device list
0043 Newly detected mobile phone with Blue-
tooth ®
audio function in range
0044 Bluetooth ®
audio player not within range
but previously authorized (symbol
appears in gray) The Bluetooth
®
device list displays all author-
ized devices, whether they are within range 208
Bluetooth ®
audio modeAudio
Page 214 of 270
Using the function button
X
Press the 003Afunction button one or more
times.
By pressing the function button repeatedly,
you can change the operating mode in the
following order:
R CD/audio DVD/MP3 (disc)
R Memory card mode
R MUSIC REGISTER
R USB storage device
R Media Interface or audio AUX mode
R Bluetooth ®
audio mode
Using the media list X
Select Bluetooth Audio Bluetooth Audio in the media list
by turning 00790052007Athe COMAND controller
and press 0098to confirm (Y page 193).
COMAND activates the connected device.
You will see a message to this effect. The
basic display then appears. Starting/stopping playback
X To start playback: select00D0by sliding
00520064 and turning 00790052007Athe COMAND con-
troller and press 0098to confirm.
Playback starts. 00DBis selected.
X To stop playback: select00DBby turning
00790052007A the COMAND controller and press
0098 to confirm.
A message appears. 00D0is selected.
X To continue playback: select00D0by
turning 00790052007Athe COMAND controller and
press 0098to confirm.
A message appears. 00DBis selected. Restarting playback after stopping
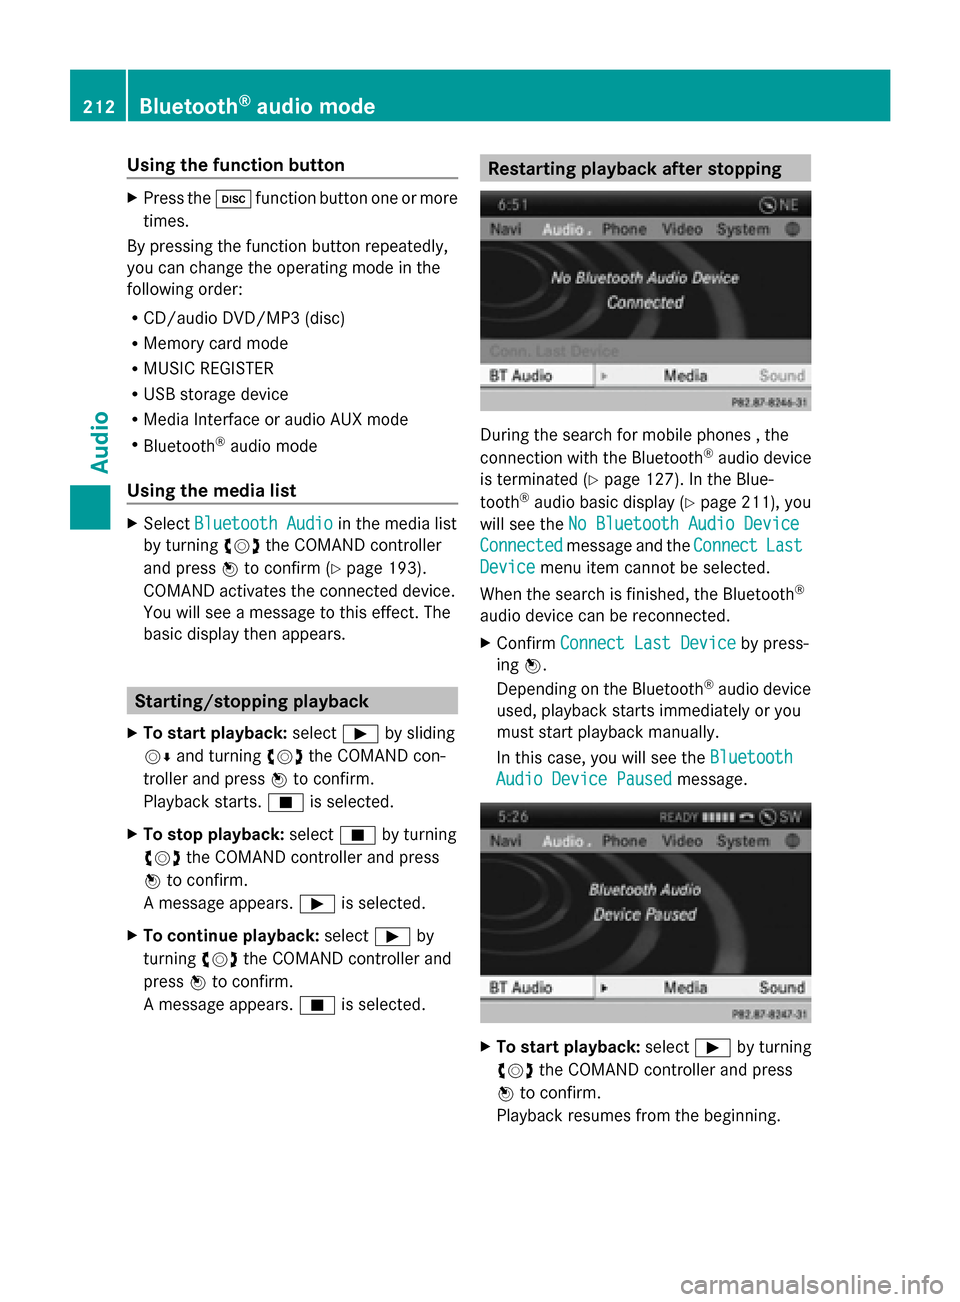
During the search for mobile phones , the
connection with the Bluetooth
®
audio device
is terminated (Y page 127). In the Blue-
tooth ®
audio basic display (Y page 211), you
will see the No Bluetooth Audio Device
No Bluetooth Audio Device
Connected Connected message and the Connect
ConnectLast
Last
Device
Device menu item cannot be selected.
When the search is finished, the Bluetooth ®
audio device can be reconnected.
X Confirm Connect Last Device
Connect Last Device by press-
ing 0098.
Depending on the Bluetooth ®
audio device
used, playback starts immediately or you
must start playback manually.
In this case, you will see the Bluetooth Bluetooth
Audio Device Paused
Audio Device Paused message. X
To start playback: select00D0by turning
00790052007A the COMAND controller and press
0098 to confirm.
Playback resumes from the beginning. 212
Bluetooth ®
audio modeAudio
Page 217 of 270
R
the Media Interface connection is faulty.
R a mass storage device (e.g. a USB memory
stick or USB hard drive) is connected to the
Media Interface.
In this case the Please connect the
Please connect the
device to the other USB port
device to the other USB port mes-
sage appears.
i The separate USB connection ensures
quick access and expanded media content
options.
i Consult an authorized Mercedes-Benz
Center if you have further questions.
Disconnecting an iPod ®
X Press the release buttons on iPod ®
plug 0044and pull the iPod ®
cable from the
iPod ®
, see the separate cable kit instruc-
tions. Switching to Media Interface mode
General notes In extreme cases, starting up individual func-
tions can take up to several minutes – this
depends on the external device and its con-
tent (e.g. video podcasts).
Only use the original software to save files on
iPods ®
or MP3 players. Otherwise, some or
all functions may not be available.
Switching on automatically X
Connect an external device (Y page 214).
COMAND activates the device (if con-
nected via the iPod ®
connector or USB
socket). The basic display then appears.
Switching modes using the function
button The external device is connected to the Media
Interface.
X Press the 003Afunction button one or more
times. By pressing the function button repeatedly,
you can change the operating mode in the
following order:
R
CD/audio DVD/MP3 (disc)
R Memory card mode
R MUSIC REGISTER
R USB storage device
R Media Interface or audio AUX mode
R Bluetooth ®
audio mode
Switching on using a number key X
Press the 007Fnumber key (for a DVD
changer) or the 0085number key (for a
single DVD drive).
This selects the connected external audio
device directly.
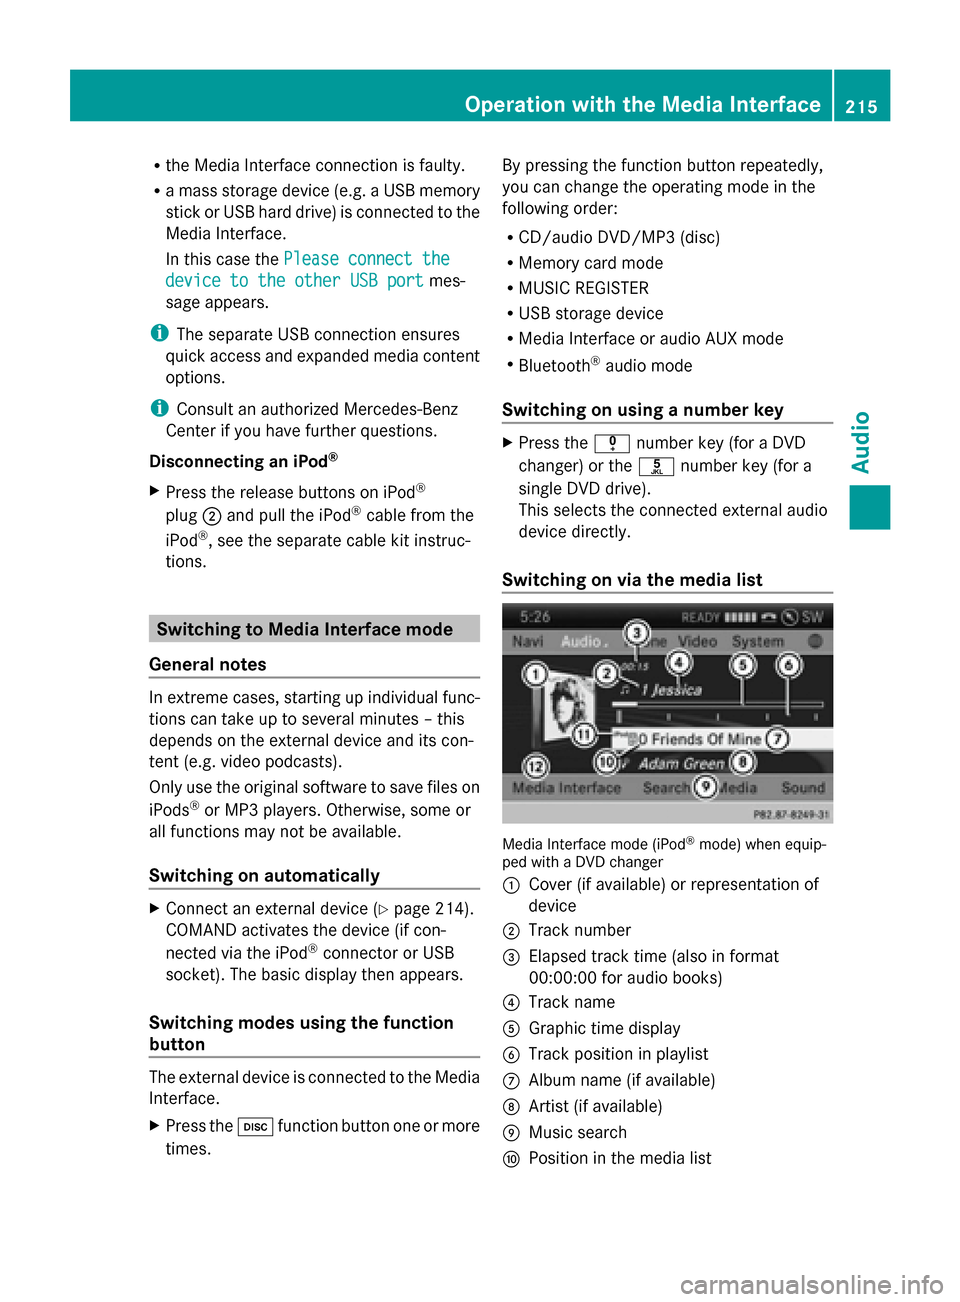
Switching on via the media list Media Interface mode (iPod
®
mode) when equip-
ped with a DVD changer
0043 Cover (if available) or representation of
device
0044 Track number
0087 Elapsed track time (also in format
00:00:00 for audio books)
0085 Track name
0083 Graphic time display
0084 Track position in playlist
006B Album name (if available)
006C Artist (if available)
006D Music search
006E Position in the media list Operation
withthe Media Interface
215Audio Z
Page 222 of 270
Audio AUX mode
Notes on audio AUX mode
External audio sources may have different
volumes, which can mean that system mes-
sages such as traffic announcements and
navigation system announcements are much
louder. If necessary, deactivate the system
messages or adjust their volume manually.
You can connect an external audio source
(AUX) to COMAND.
Depending on the vehicle model series the
connection is made via a jack in the storage
compartment in the center console or via the
USB port (Y page 191).
If COMAND is equipped with the Media Inter-
face, external audio sources are connected
using the cable set provided. An AUX socket
is not provided. The connections for the
Media Interface are located in the stowage
compartment in the center console.
i You will find further information online at
http://www.mbusa-mobile.com. Or call
the Mercedes-Benz Customer Assistance
Center at 1-800-FOR-MERCedes
(1-800-367-6372 )(for the USA) or Cus-
tomer Relations at 1-800-387-010 0(for
Canada). Switching to audio AUX mode
Switching modes using the function
button The external device is connected to the audio
AUX in.
X Press the 003Afunction button one or more
times.
By pressing the function button repeatedly,
you can change the operating mode in the
following order:
R CD/audio DVD/MP3 (disc)
R Memory card mode
R MUSIC REGISTER
R USB storage device R
Media Interface or audio AUX mode
R Bluetooth ®
audio mode
Switching modes via the audio menu When you connect an external audio source,
audio AUX is not selected automatically.
X
Select Audio
Audio in the main function bar by
sliding 00970052and turning 00790052007Athe COMAND
controller and press 0098to confirm.
If AUX mode was the last mode selected, it
will now be active.
If another audio source is switched on, you
can now switch to audio AUX mode in the
audio menu.
X Select Audio Audiousing00970052and press 0098to
confirm.
The audio menu appears.
X Select Aux Auxby turning 00790052007Aand press 0098to
confirm.
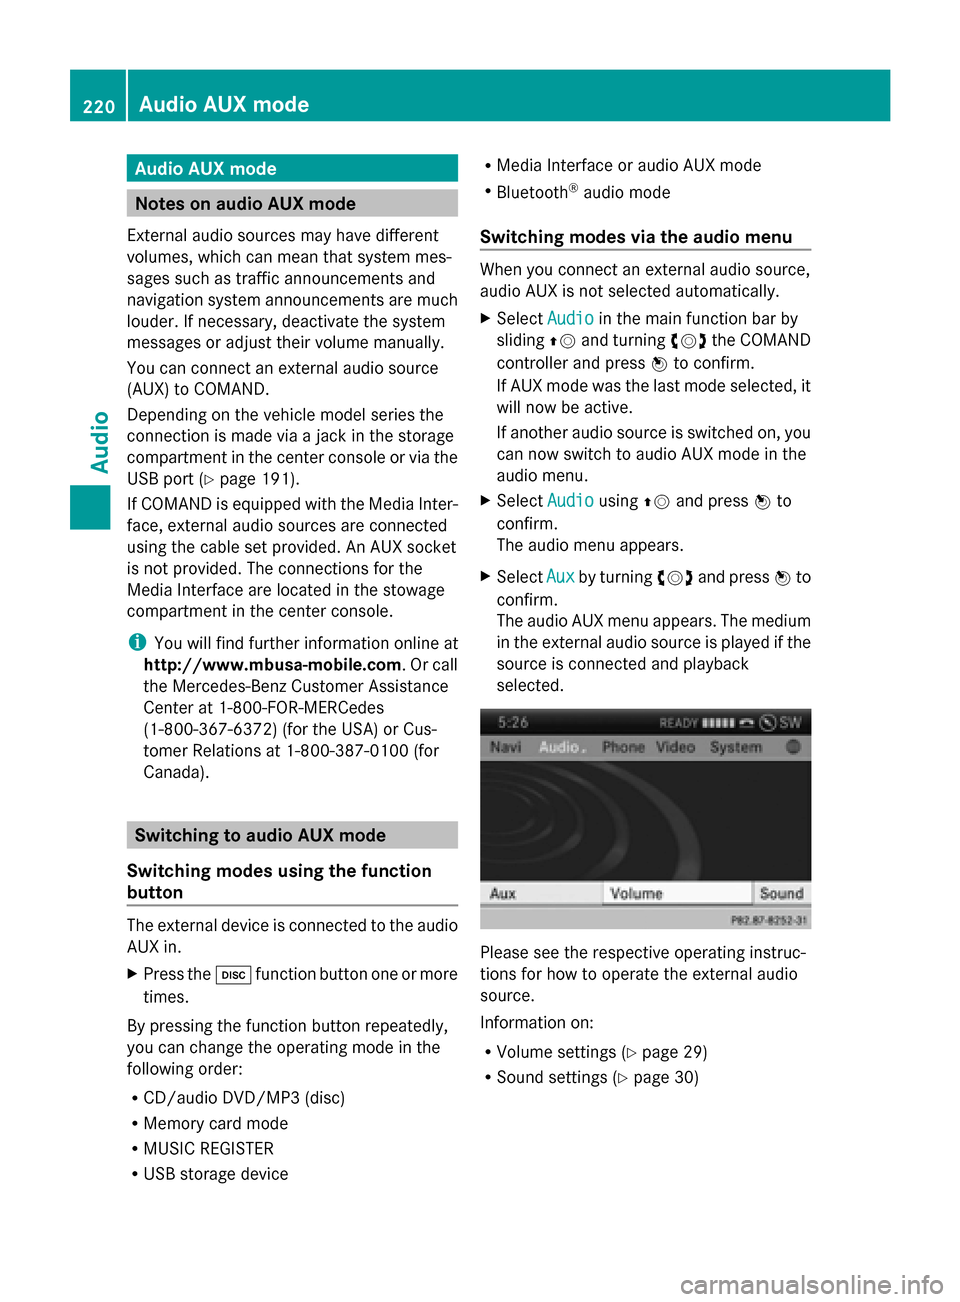
The audio AUX menu appears. The medium
in the external audio source is played if the
source is connected and playback
selected. Please see the respective operating instruc-
tions for how to operate the external audio
source.
Information on:
R
Volume settings (Y page 29)
R Sound settings (Y page 30)220
Audio AUX modeAudio