change time MERCEDES-BENZ CLA-Class 2014 C117 Comand Manual
[x] Cancel search | Manufacturer: MERCEDES-BENZ, Model Year: 2014, Model line: CLA-Class, Model: MERCEDES-BENZ CLA-Class 2014 C117Pages: 270, PDF Size: 5.76 MB
Page 227 of 270

Bear in mind that at a speed of just 30 mph
(approximately 50 km/h), your vehicle is cov-
ering a distance of 44 feet (approximately
14 m) every second. Notes on discs
! Do not affix stickers or labels to the discs.
They could peel off and damage COMAND.
Stickers can cause the disc to bend, which
can result in read errors and disc recogni-
tion problems.
! COMAND is designed to play discs that
comply with the EN 60908 standard. There-
fore, you can only use discs with a maxi-
mum thickness of 1.3 mm.
If you insert thicker discs, e.g. those that
contain data on both sides (DVD on one
side and audio data on the other), they can-
not be ejected and can damage the device.
Only use round discs with a diameter of
12 cm. Do not use discs with a diameter of
8 cm, even with an adapter.
Playback problems may occur when playing
copied discs. There are a large variety of
discs, DVD authoring software, writing soft-
ware and writers available. This variety means
that there is no guarantee that the system will
be able to play discs that you have copied
yourself. DVD playback conditions
If video DVDs do not conform to the NTSC or
PAL TV standards, they may create picture,
sound or other problems during playback.
COMAND is capable of playing back video
DVDs produced according to the following
standards:
R Region code 1 or region code 0 (no region
code)
R PAL or NTSC standard
You will generally find the relevant details
either on the DVD itself or on the DVD case. i
If you insert a video DVD with a different
region code, you will see a message to this
effect.
i COMAND is set to region code 1 at the
factory. This setting can be changed at an
authorized Mercedes-Benz Center. This will
allow you to play video DVDs with a differ-
ent region code, provided that they are pro-
duced in accordance with the PAL or NTSC
standard. The region code can be changed
up to five times. Function restrictions
Depending on the DVD, it is possible that cer-
tain functions or actions will be temporarily
blocked or may not function at all. As soon as
you try to activate these functions or actions,
you will see the 0047symbol in the display. Inserting and removing DVDs
X Proceed as described in the "Inserting and
ejecting CDs and DVDs" section
(Y page 188). Switching to video DVD mode
Switching on automatically X
Single DVD drive: insert a video DVD.
COMAND loads the medium inserted and
starts to play it.
X DVD changer: insert a video DVD.
X Press 003A.
or
X Press the 003Dback button.
COMAND loads the medium inserted and
starts to play it. Video DVD mode
225Video Z
Page 228 of 270

Switching modes using the function
button
X
Press the 003Afunction button.
COMAND switches to the previous disc
operating mode.
By pressing the function button repeatedly,
you can change the operating mode in the
following order:
R Video DVD/CD/audio DVD/MP3 in the
DVD changer or DVD single drive (disc
mode)
R Memory card mode
R MUSIC REGISTER
R USB storage device
R Media Interface or audio AUX mode
R Bluetooth ®
audio mode
X DVD changer: selectMedia
Media by sliding
00520064 and turning 00790052007Athe COMAND con-
troller and press 0098to confirm.
Single DVD drive: selectMedia Media by sliding
00520064 and turning 00790052007Athe COMAND con-
troller and press 0098to confirm.
X Select a ývideo DVD from the media list
(Y page 228).
Switching on with the video menu X
Select Video
Videoin the main function bar by
sliding 00970052and turning 00790052007Athe COMAND
controller and press 0098to confirm.
Video DVD mode is switched on. Showing/hiding the control menu
X To show: in DVD video mode, slide 009700520064
the COMAND controller.
X To hide: slide009700520064 the COMAND control-
ler.
or
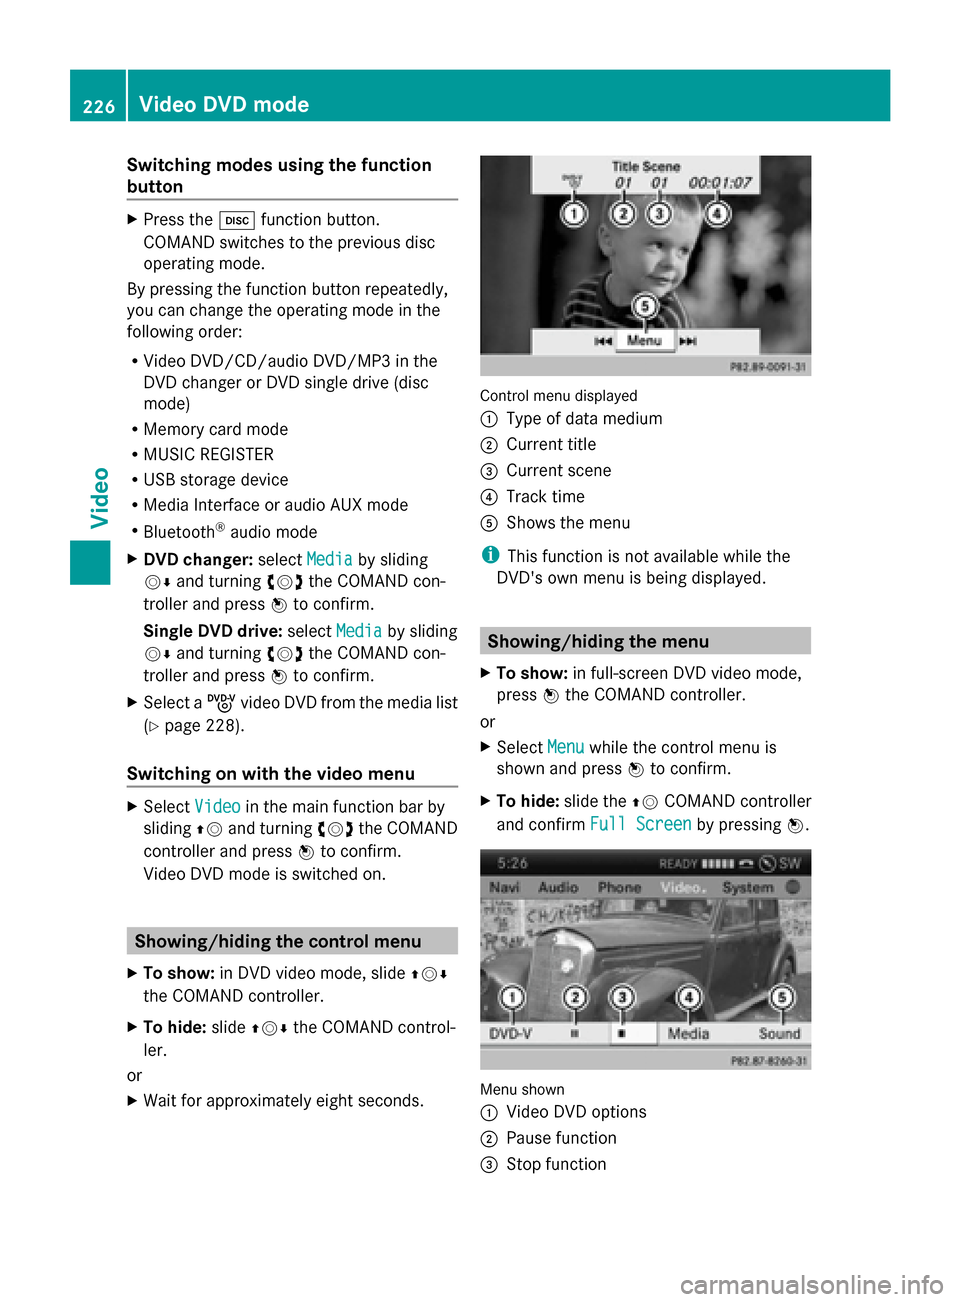
X Wait for approximately eight seconds. Control menu displayed
0043
Type of data medium
0044 Current title
0087 Current scene
0085 Track time
0083 Shows the menu
i This function is not available while the
DVD's own menu is being displayed. Showing/hiding the menu
X To show: in full-screen DVD video mode,
press 0098the COMAND controller.
or
X Select Menu Menuwhile the control menu is
shown and press 0098to confirm.
X To hide: slide the 00970052COMAND controller
and confirm Full Screen
Full Screen by pressing0098. Menu shown
0043
Video DVD options
0044 Pause function
0087 Stop function 226
Video DVD modeVideo
Page 236 of 270

Your COMAND equipment
These operating instructions describe all the
standard and optional equipment for your
COMAND system, as available at the time of
going to print. Country-specific differences
are possible. Please note that your
COMAND system may not be equipped with
all the features described. Overview
Important safety notes
G
WARNING
The CD/DVD drive is a class 1 laser product.
If you open the CD/DVD drive housing, you
could be exposed to invisible laser radiation.
This laser radiation could damage your retina.
There is a risk of injury.
Never open the housing. Always have main-
tenance and repair work carried out at a quali-
fied specialist workshop. G
WARNING
If objects such as headphones/headsets or
external audio/video sources are not secured
in the passenger compartment, they can be
flung around and hit vehicle occupants. There
is a risk of injury, for example in the event of
sudden braking or a sudden change in direc-
tion.
Always stow these items or similar objects
carefully so that they cannot be flung around,
for example in a lockable vehicle stowage
compartment. Components
The Rear Seat Entertainment System
includes:
R two screens for the rear behind the front-
seat head restraints
R two remote controls
R a CD/DVD drive R
AUX jacks on both screens (AUX display)
and on the CD/DVD drive (AUX drive)
R two sets of cordless headphones 234
OverviewRea
r Seat Entertainment System
Page 266 of 270

Weather
front Explanation
Cold front If a cold front moves in, the
weather remains changeable
and there are often rain show-
ers and thunderstorms. The
air temperature decreases. Warm front This can mean longer periods
of rain and can lead to an
increase in cloud cover and a
slow increase in temperature.
Stationary
front The weather front moves min-
imally. The weather remains
changeable in this area.
Occlusion This occurs when a faster cold
front reaches an advancing
warm front and combines
with it. The weather remains
changeable and rainy within
an occlusion.
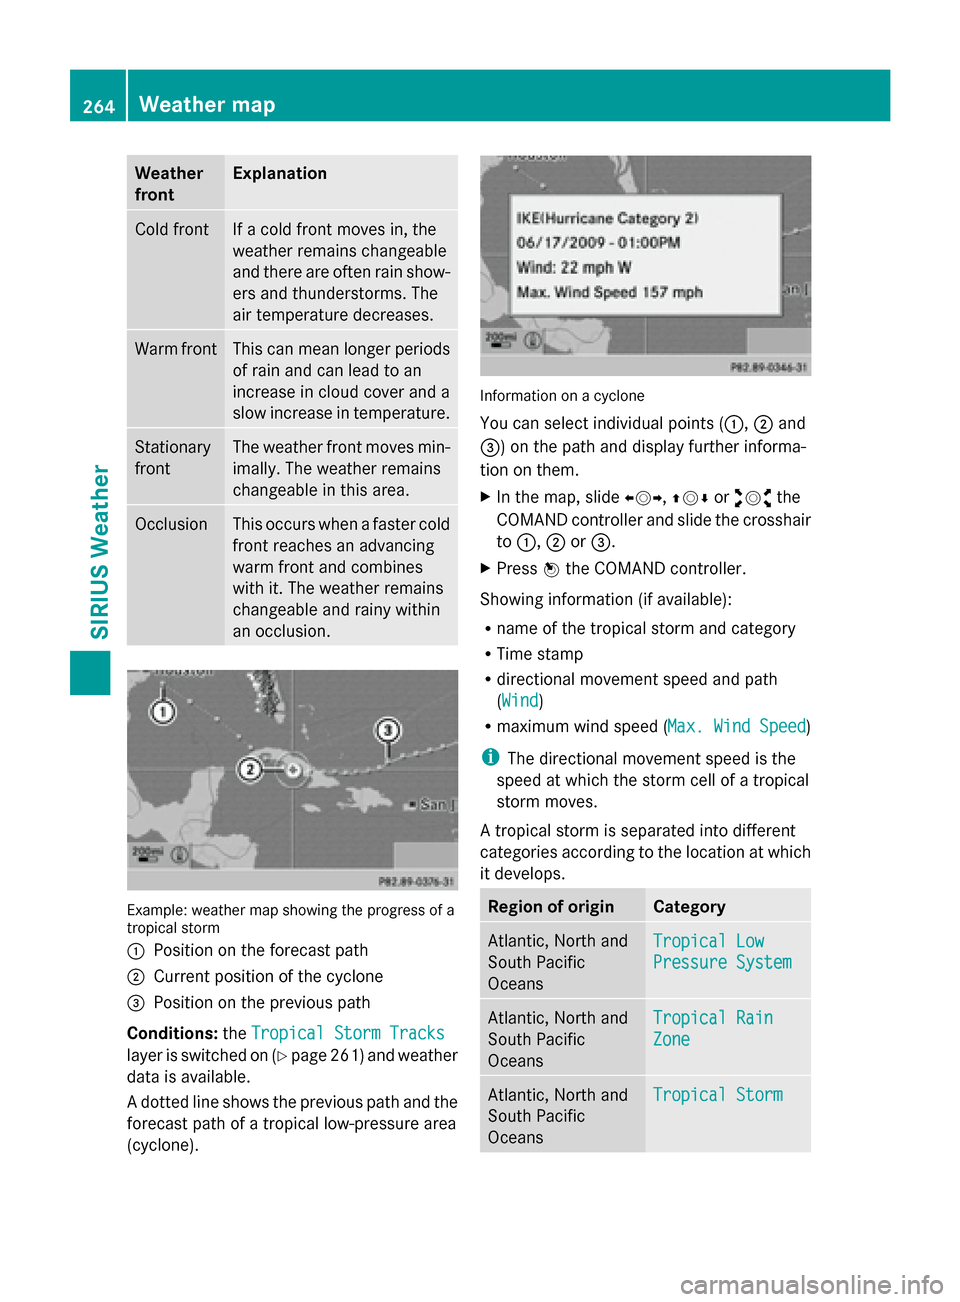
Example: weather map showing the progress of a
tropical storm
0043
Position on the forecast path
0044 Current position of the cyclone
0087 Position on the previous path
Conditions: theTropical Storm Tracks
Tropical Storm Tracks
layer is switched on (Y page 261) and weather
data is available.
A dotted line shows the previous path and the
forecast path of a tropical low-pressure area
(cyclone). Information on a cyclone
You can select individual points (
0043,0044and
0087) on the path and display further informa-
tion on them.
X In the map, slide 009500520096,009700520064or009100520078 the
COMAND controller and slide the crosshair
to 0043, 0044or0087.
X Press 0098the COMAND controller.
Showing information (if available):
R name of the tropical storm and category
R Time stamp
R directional movement speed and path
(WindWind)
R maximum wind speed ( Max. Wind Speed Max. Wind Speed)
i The directional movement speed is the
speed at which the storm cell of a tropical
storm moves.
A tropical storm is separated into different
categories according to the location at which
it develops. Region of origin Category
Atlantic, North and
South Pacific
Oceans
Tropical Low Tropical Low
Pressure System Pressure System
Atlantic, North and
South Pacific
Oceans
Tropical Rain Tropical Rain
Zone Zone
Atlantic, North and
South Pacific
Oceans
Tropical Storm Tropical Storm264
Weather mapSIRIUS Weather
Page 268 of 270

The time stamp shows when the weather data
was created by the weather station.
A time stamp corresponds to the time at the
vehicle's current position. The changeover
from summer time to standard time is per-
formed automatically.
X Display the menu on the weather map
(Y page 260).
X Select Map Options
Map Options by turning00790052007Athe
COMAND controller and pressing 0098to
confirm.
X Select Time Stamp
Time Stamp and press0098to con-
firm. Changing to the information chart
X Display the menu on the weather map
(Y page 260).
X Select Display Weather Display Weather and press0098to
confirm. 266
Weather mapSIRIUS Weather