light MERCEDES-BENZ CLA-Class 2014 C117 Comand Manual
[x] Cancel search | Manufacturer: MERCEDES-BENZ, Model Year: 2014, Model line: CLA-Class, Model: MERCEDES-BENZ CLA-Class 2014 C117Pages: 270, PDF Size: 5.76 MB
Page 103 of 270
X
Select Traffic
Traffic in the navigation system
menu bar by turning 00790052007Athe COMAND
controller and press 0098to confirm.
X Select Traffic Symbol Information
Traffic Symbol Information by
turning 00790052007Athe COMAND controller and
press 0098to confirm.
X Select Next
Next orPrevious
Previous by turning 00790052007A
the COMAND controller and press 0098to
confirm in order to continue highlighting
traffic symbols.
X To change the map scale: selectMap
Map by
sliding 00970052the COMAND controller and
press 0098to confirm.
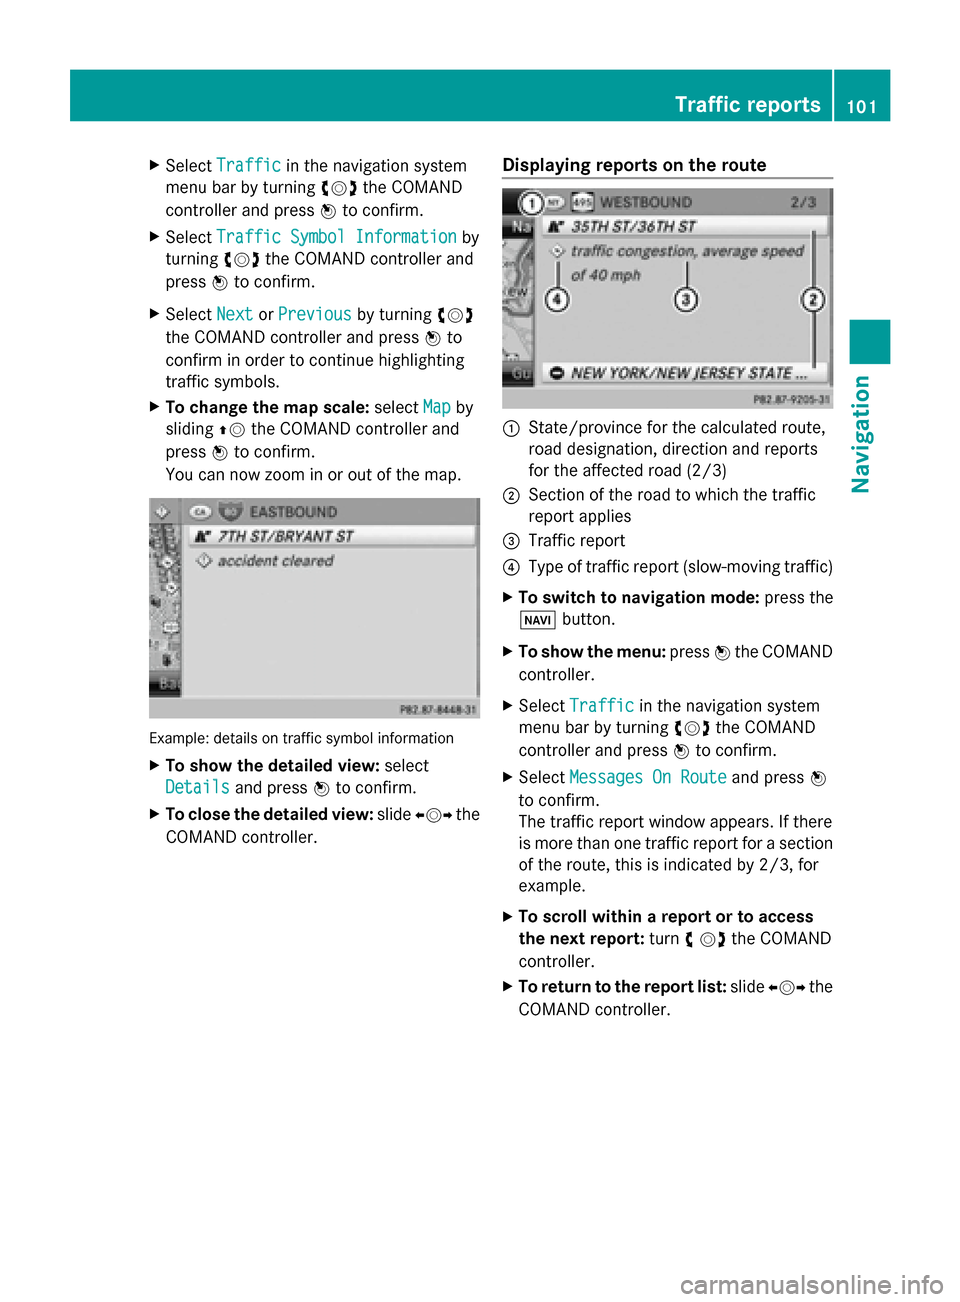
You can now zoom in or out of the map. Example: details on traffic symbol information
X To show the detailed view: select
Details
Details and press 0098to confirm.
X To close the detailed view: slide009500520096 the
COMAND controller. Displaying reports on the route 0043
State/province for the calculated route,
road designation, direction and reports
for the affected road (2/3)
0044 Section of the road to which the traffic
report applies
0087 Traffic report
0085 Type of traffic report (slow-moving traffic)
X To switch to navigation mode: press the
00BE button.
X To show the menu: press0098the COMAND
controller.
X Select Traffic Traffic in the navigation system
menu bar by turning 00790052007Athe COMAND
controller and press 0098to confirm.
X Select Messages On Route Messages On Route and press0098
to confirm.
The traffic report window appears. If there
is more than one traffic report for a section
of the route, this is indicated by 2/3, for
example.
X To scroll within a report or to access
the next report: turn00790052the COMAND
controller.
X To return to the report list: slide009500520096 the
COMAND controller. Traffic reports
101Navigation Z
Page 106 of 270
X
Slide 00520097the COMAND controller repeat-
edly until the destination memory list
appears as a selection list.
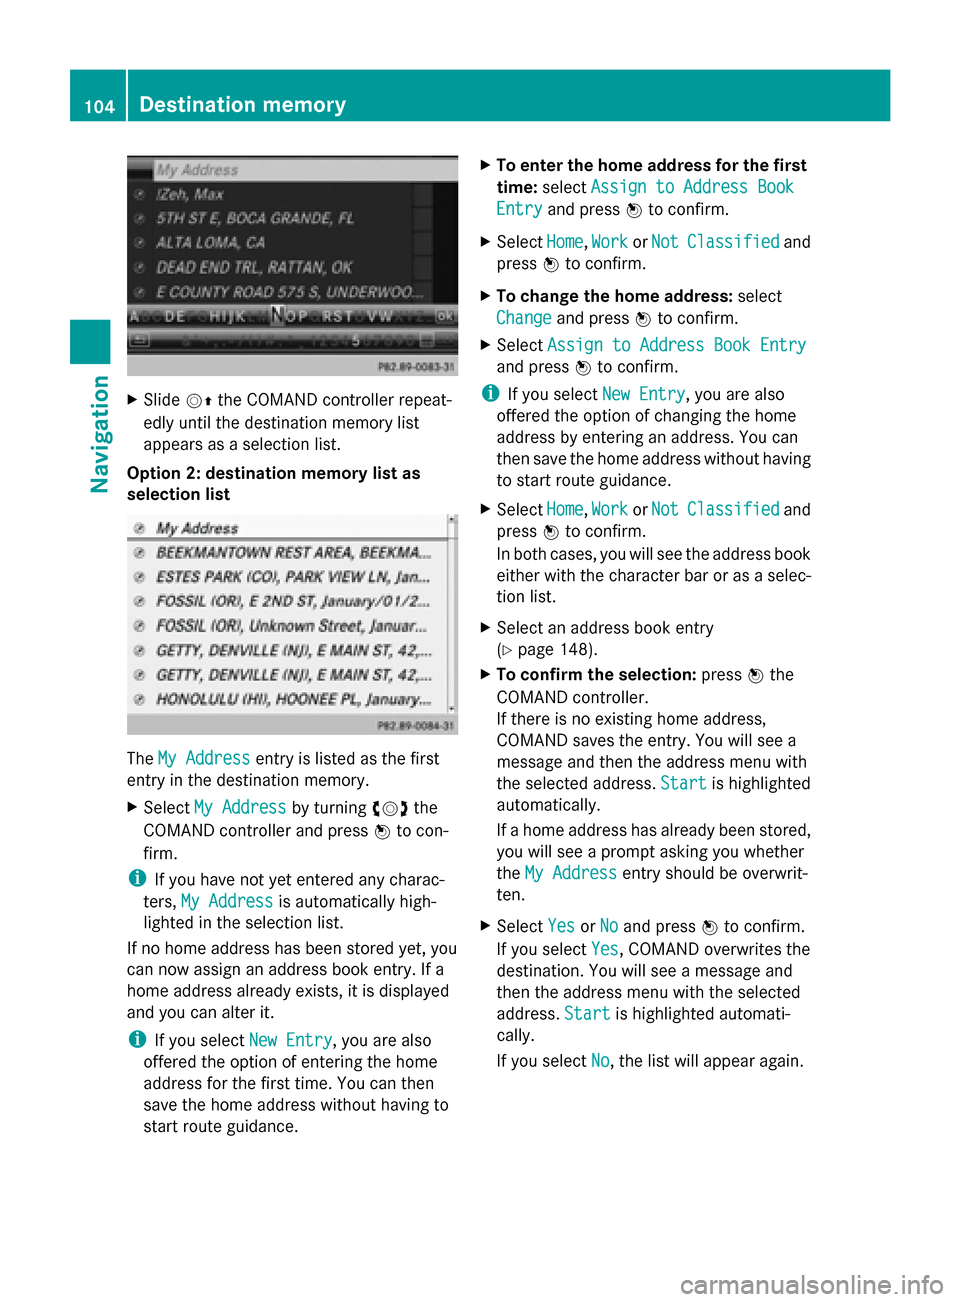
Option 2: destination memory list as
selection list The
My Address
My Address entry is listed as the first
entry in the destination memory.
X Select My Address My Address by turning00790052007Athe
COMAND controller and press 0098to con-
firm.
i If you have not yet entered any charac-
ters, My Address
My Address is automatically high-
lighted in the selection list.
If no home address has been stored yet, you
can now assign an address book entry. If a
home address already exists, it is displayed
and you can alter it.
i If you select New Entry New Entry, you are also
offered the option of entering the home
address for the first time. You can then
save the home address without having to
start route guidance. X
To enter the home address for the first
time: select Assign to Address Book
Assign to Address Book
Entry Entry and press 0098to confirm.
X Select Home
Home,Work
WorkorNot
Not Classified
Classified and
press 0098to confirm.
X To change the home address: select
Change
Change and press 0098to confirm.
X Select Assign to Address Book Entry
Assign to Address Book Entry
and press 0098to confirm.
i If you select New Entry
New Entry, you are also
offered the option of changing the home
address by entering an address. You can
then save the home address without having
to start route guidance.
X Select Home
Home, Work WorkorNot
Not Classified
Classified and
press 0098to confirm.
In both cases, you will see the address book
either with the character bar or as a selec-
tion list.
X Select an address book entry
(Y page 148).
X To confirm the selection: press0098the
COMAND controller.
If there is no existing home address,
COMAND saves the entry. You will see a
message and then the address menu with
the selected address. Start
Start is highlighted
automatically.
If a home address has already been stored,
you will see a prompt asking you whether
the My Address
My Address entry should be overwrit-
ten.
X Select Yes YesorNo No and press 0098to confirm.
If you select Yes
Yes, COMAND overwrites the
destination. You will see a message and
then the address menu with the selected
address. Start Startis highlighted automati-
cally.
If you select No No, the list will appear again.104
Destination memoryNavigation
Page 130 of 270
list. In this case, start a new search to
update the Bluetooth
®
telephone list.
Authorizing (registering) a mobile
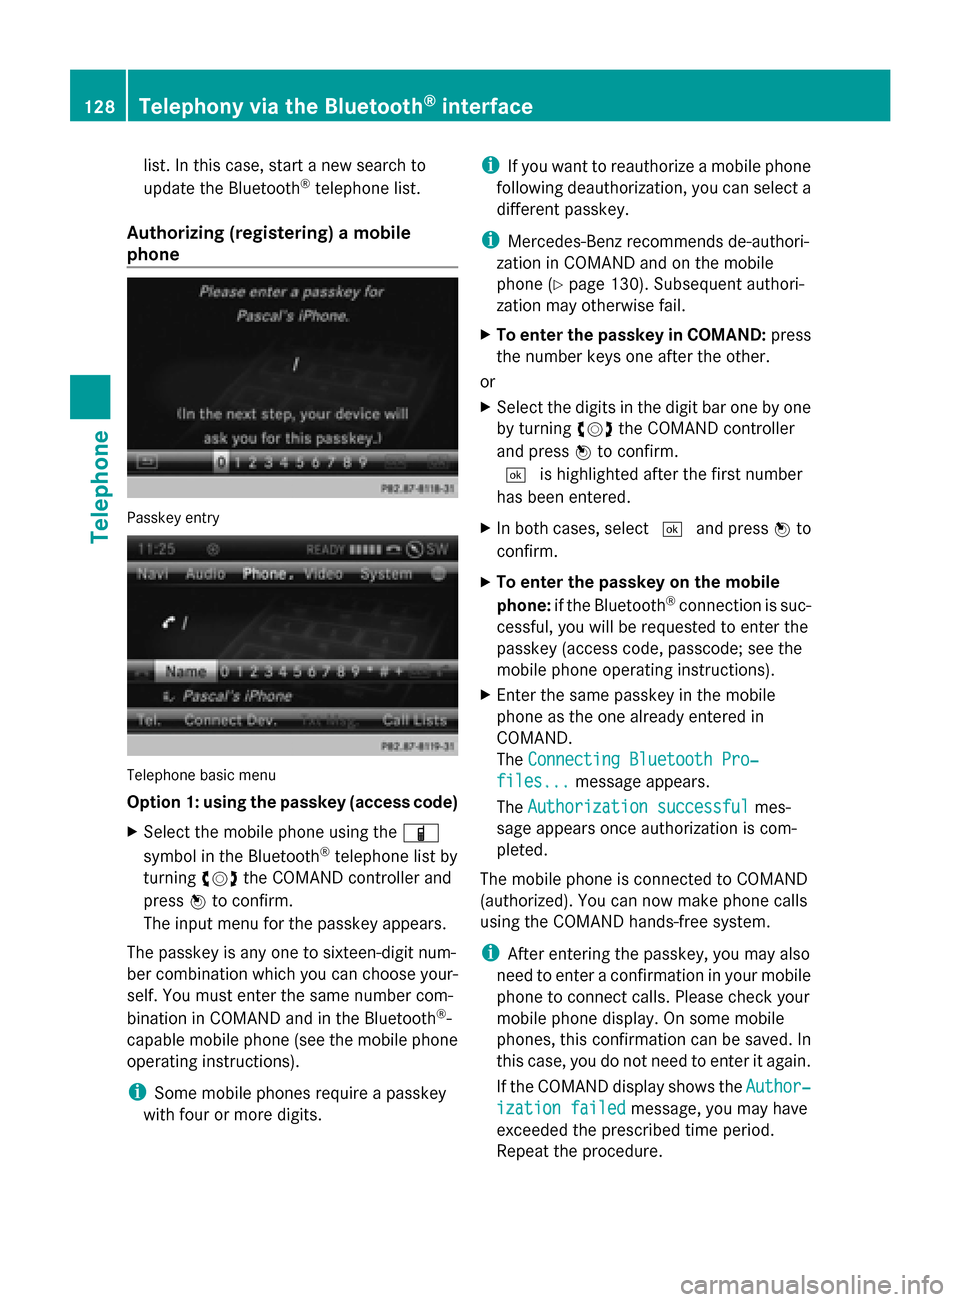
phone Passkey entry
Telephone basic menu
Option 1: using the passkey (access code)
X Select the mobile phone using the 00D3
symbol in the Bluetooth ®
telephone list by
turning 00790052007Athe COMAND controller and
press 0098to confirm.
The input menu for the passkey appears.
The passkey is any one to sixteen-digit num-
ber combination which you can choose your-
self. You must enter the same number com-
bination in COMAND and in the Bluetooth ®
-
capable mobile phone (see the mobile phone
operating instructions).
i Some mobile phones require a passkey
with four or more digits. i
If you want to reauthorize a mobile phone
following deauthorization, you can select a
different passkey.
i Mercedes-Benz recommends de-authori-
zation in COMAND and on the mobile
phone (Y page 130). Subsequent authori-
zation may otherwise fail.
X To enter the passkey in COMAND: press
the number keys one after the other.
or
X Select the digits in the digit bar one by one
by turning 00790052007Athe COMAND controller
and press 0098to confirm.
0054 is highlighted after the first number
has been entered.
X In both cases, select 0054and press 0098to
confirm.
X To enter the passkey on the mobile
phone: if the Bluetooth ®
connection is suc-
cessful, you will be requested to enter the
passkey (access code, passcode; see the
mobile phone operating instructions).
X Enter the same passkey in the mobile
phone as the one already entered in
COMAND.
The Connecting Bluetooth Pro‐
Connecting Bluetooth Pro‐
files... files... message appears.
The Authorization successful
Authorization successful mes-
sage appears once authorization is com-
pleted.
The mobile phone is connected to COMAND
(authorized). You can now make phone calls
using the COMAND hands-free system.
i After entering the passkey, you may also
need to enter a confirmation in your mobile
phone to connect calls. Please check your
mobile phone display. On some mobile
phones, this confirmation can be saved. In
this case, you do not need to enter it again.
If the COMAND display shows the Author‐ Author‐
ization failed
ization failed message, you may have
exceeded the prescribed time period.
Repeat the procedure. 128
Telephony via the Bluetooth ®
interfaceTelephone
Page 140 of 270
Sym-
bol Explanation
00BB
Entry that has been imported from
the memory card or USB device 00BA
Entry imported via the Bluetooth
®
interface Searching for a phone book entry
Using the character bar You determine the first letter of the entry you
are looking for with the first character you
enter.
X Select a character by turning 00790052007Athe
COMAND controller and press 0098to con-
firm.
The first entry in the list that starts with the
letter selected is highlighted. If there are
similar entries, the next different character
is shown. For example, with entries such as
Christel Christel andChristine
Christine, the beginnings
of the names are similar. In this case, you
will be offered a choice between E
E and I I.
X Select the characters of the entry you are
searching for one by one and press 0098to
confirm.
When the selection is clear, COMAND
switches automatically to the selection list.
X To complete the search: slide00520097the
COMAND controller repeatedly or press
and hold 0098until the character bar disap-
pears.
The selection list appears.
Information about character entry
(Y page 34) Using the number keypad You determine the first letter of the entry you
are looking for with the first character you
enter.
X
Press the appropriate number keys as
many times as necessary and one after the
other.
Further information on character entry using
the number keypad (direct entry)
(Y page 36).
Directly from the list You can switch to the list at any time during
character entry.
X
Slide 00520097the COMAND controller repeat-
edly or press and hold 0098until the charac-
ter bar disappears.
or
X Select 0054and press 0098to confirm.
X To select an entry: turn00790052007A the
COMAND controller until the desired entry
is highlighted and press 0098to confirm.
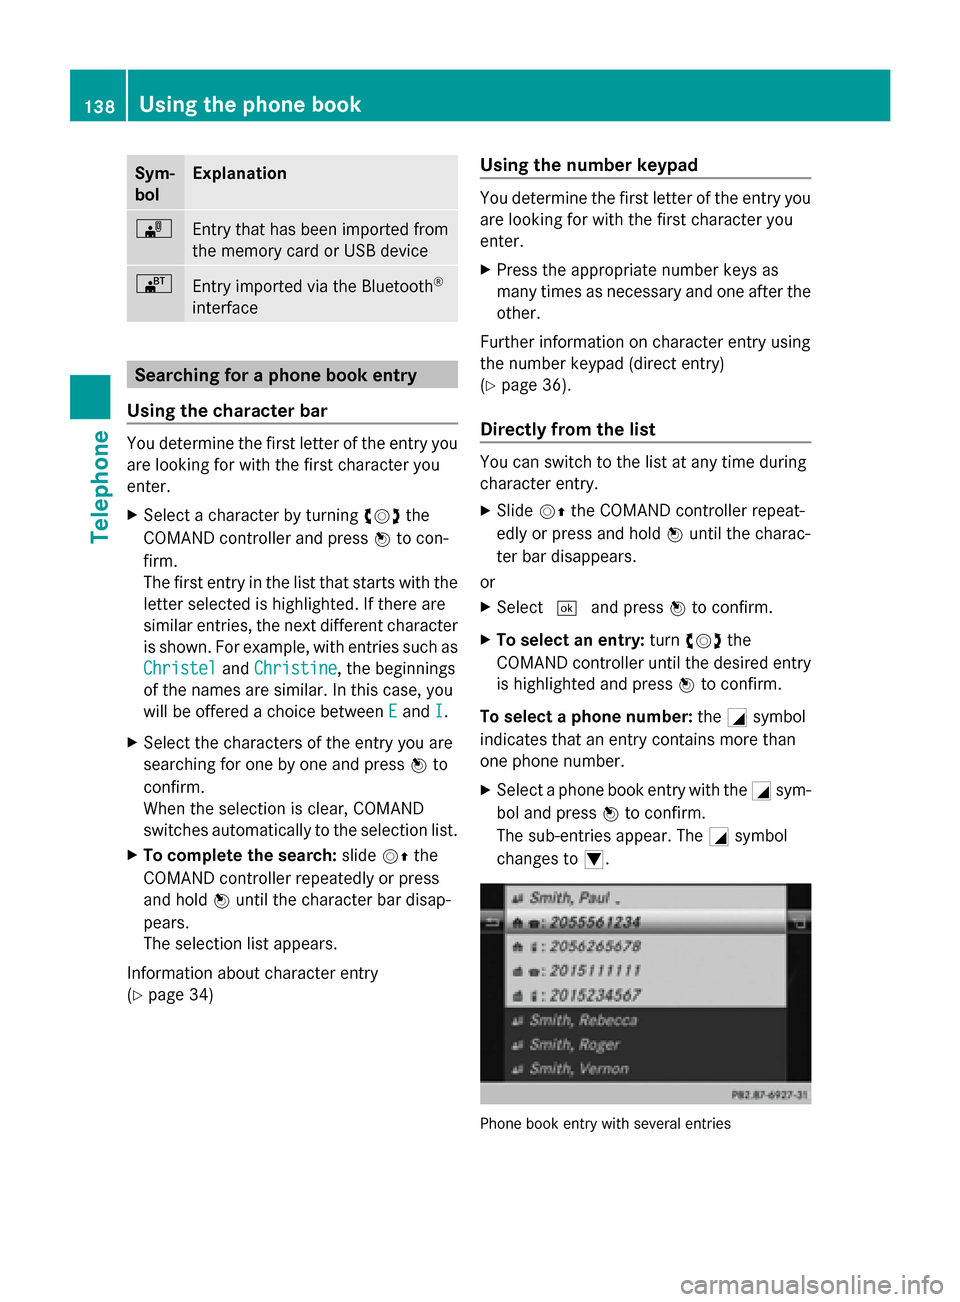
To select a phone number: the0043symbol
indicates that an entry contains more than
one phone number.
X Select a phone book entry with the 0043sym-
bol and press 0098to confirm.
The sub-entries appear. The 0043symbol
changes to 0045. Phone book entry with several entries138
Using the phone bookTelephone
Page 141 of 270
X
Select a sub-entry by turning 00790052007Aand
press 0098to confirm.
X To return to the phone book using the
character bar: select0039in the list and
press 0098to confirm.
or
X Press the 003Dbutton. Displaying details for an entry
X Select an entry in the selection list by turn-
ing 00790052007A the COMAND controller.
X Select the list symbol to the right of the
entry by sliding 00520096the COMAND control-
ler and press 0098to confirm.
X Select Details
Details and press 0098to confirm.
The detailed view appears.
X To close the detailed display: slide
009500520096 repeatedly until the entry is high-
lighted again.
or
X Press the 003Dback button. Deleting an entry from the phone
book
If the entry contains only phone numbers, it
is deleted from the phone book and address
book.
If it contains additional data, such as a navi-
gable destination, the entry is deleted in the
phone book. However, the entry is retained in
the address book.
X Select an entry in the selection list by turn-
ing 00790052007A the COMAND controller.
X Select the list symbol to the right of the
entry by sliding 00520096the COMAND control-
ler and press 0098to confirm.
X Select Delete
Delete and press 0098to confirm.
A prompt appears asking whether the entry
should be deleted. X
Select Yes
Yes orNo No and press 0098to confirm.
If you select Yes
Yes, the entry is deleted in
accordance with the rules described above.
If you select No No, the process will be can-
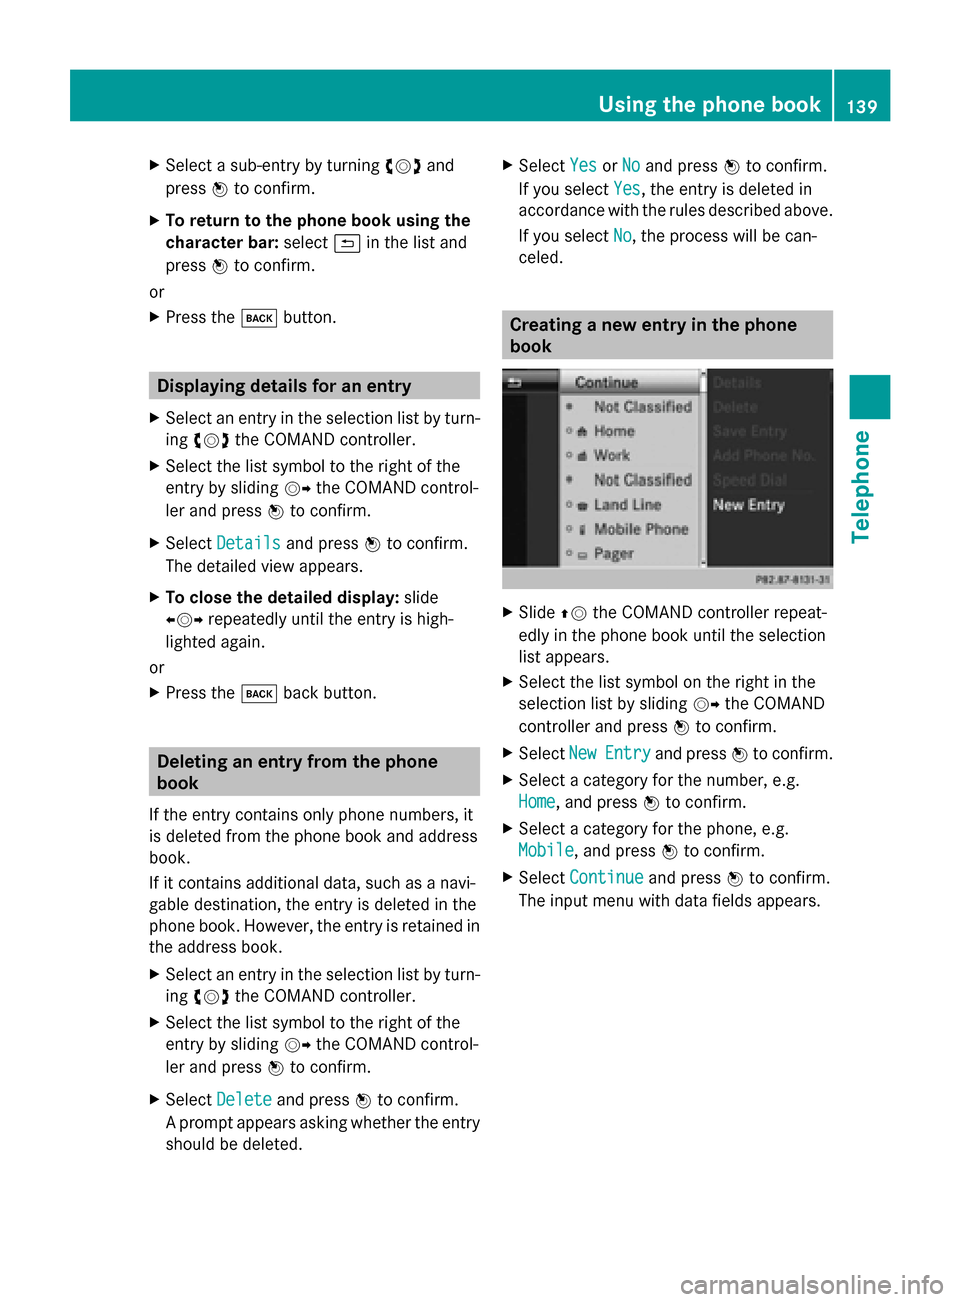
celed. Creating a new entry in the phone
book
X
Slide 00970052the COMAND controller repeat-
edly in the phone book until the selection
list appears.
X Select the list symbol on the right in the
selection list by sliding 00520096the COMAND
controller and press 0098to confirm.
X Select New NewEntry
Entry and press 0098to confirm.
X Select a category for the number, e.g.
Home Home, and press 0098to confirm.
X Select a category for the phone, e.g.
Mobile Mobile , and press 0098to confirm.
X Select Continue
Continue and press0098to confirm.
The input menu with data fields appears. Using the phone book
139Telephone Z
Page 142 of 270
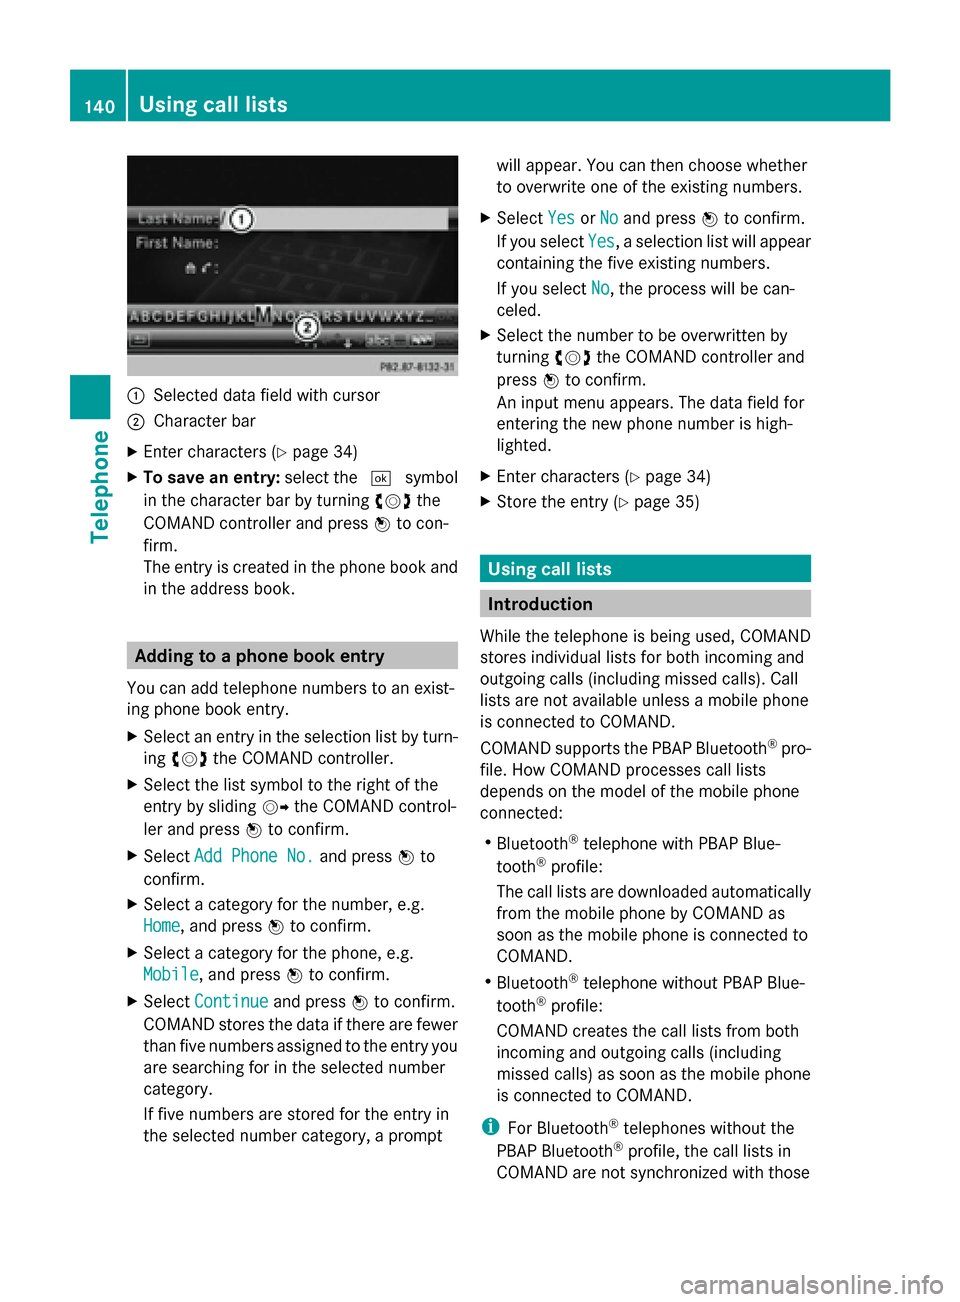
0043
Selected data field with cursor
0044 Character bar
X Enter characters ( Ypage 34)
X To save an entry: select the0054symbol
in the character bar by turning 00790052007Athe
COMAND controller and press 0098to con-
firm.
The entry is created in the phone book and
in the address book. Adding to a phone book entry
You can add telephone numbers to an exist-
ing phone book entry.
X Select an entry in the selection list by turn-
ing 00790052007A the COMAND controller.
X Select the list symbol to the right of the
entry by sliding 00520096the COMAND control-
ler and press 0098to confirm.
X Select Add Phone No.
Add Phone No. and press0098to
confirm.
X Select a category for the number, e.g.
Home Home, and press 0098to confirm.
X Select a category for the phone, e.g.
Mobile Mobile , and press 0098to confirm.
X Select Continue
Continue and press0098to confirm.
COMAND stores the data if there are fewer
than five numbers assigned to the entry you
are searching for in the selected number
category.
If five numbers are stored for the entry in
the selected number category, a prompt will appear. You can then choose whether
to overwrite one of the existing numbers.
X Select Yes
Yes orNo No and press 0098to confirm.
If you select Yes
Yes, a selection list will appear
containing the five existing numbers.
If you select No No, the process will be can-
celed.
X Select the number to be overwritten by
turning 00790052007Athe COMAND controller and
press 0098to confirm.
An input menu appears. The data field for
entering the new phone number is high-
lighted.
X Enter characters ( Ypage 34)
X Store the entry (Y page 35) Using call lists
Introduction
While the telephone is being used, COMAND
stores individual lists for both incoming and
outgoing calls (including missed calls). Call
lists are not available unless a mobile phone
is connected to COMAND.
COMAND supports the PBAP Bluetooth ®
pro-
file. How COMAND processes call lists
depends on the model of the mobile phone
connected:
R Bluetooth ®
telephone with PBAP Blue-
tooth ®
profile:
The call lists are downloaded automatically
from the mobile phone by COMAND as
soon as the mobile phone is connected to
COMAND.
R Bluetooth ®
telephone without PBAP Blue-
tooth ®
profile:
COMAND creates the call lists from both
incoming and outgoing calls (including
missed calls) as soon as the mobile phone
is connected to COMAND.
i For Bluetooth ®
telephones without the
PBAP Bluetooth ®
profile, the call lists in
COMAND are not synchronized with those 140
Using call listsTelephone
Page 143 of 270
on your mobile phone. These calls may or
may not be listed on your mobile phone,
depending on the model.
i If no mobile phone is connected, then the
Call Lists
Call Lists menu item is grayed out and
cannot be selected. If you connect a mobile
phone other than the previous one to
COMAND, the previously available call lists
and their entries will be deleted automati-
cally. They are still available on the mobile
phone itself.
i You will only be able to select the respec-
tive menu items once calls have been
received or dialed from COMAND.
Displaying missed calls in the COMAND
display is not supported by all mobile
phones. Opening the call list and selecting an
entry
X Press the 002Bfunction button.
X Select Call Lists
Call Lists in the telephone basic
menu by sliding 00520064and turning 00790052007Athe
COMAND controller and press 0098to con-
firm.
A menu appears.
X Select Calls Received Calls Received orCalls
Calls
Dialed
Dialed by turning 00790052007Aand press 0098to
confirm.
The corresponding list appears.
i You can also call up the list of dialed calls
by pressing the 0061button when the tele-
phone basic menu is shown. In this case,
the list will only show phone numbers.
X Select an entry by turning 00790052007Athe
COMAND controller.
X To dial a phone number: press0098.
X To close the list: select the0039symbol
and press 0098to confirm.
or
X Press the 003Dback button. Displaying details from a list entry
COMAND can also show a shortened list entry
in full.
X Select a list entry by turning 00790052007Athe
COMAND controller.
X Select the list symbol to the right of the
entry by sliding 00520096the controller and
press 0098to confirm.
X Select Details Details and press 0098to confirm.
The detailed view appears.
X To go back to the list: slide009500520096 repeat-
edly until the list is highlighted. Storing a phone number
New address book entry For incoming calls from a person who is not
in the address book, COMAND displays the
phone number in the call list. You can save
this entry.
X
Open a call list and select an entry
(Y page 141).
X Select the list symbol to the right of the
entry by sliding 00520096the COMAND control-
ler and press 0098to confirm.
X Select Save
Save and press 0098to confirm.
X Select New NewEntry
Entry and press 0098to confirm.
X Select a category for the number, e.g.
Home Home, and press 0098to confirm.
X Select a category for the phone, e.g.
Mobile Mobile, and press 0098to confirm. Number category Display (phone
book and address
book)
Not Classified Not Classified No symbol
Home
Home 00D5
Work
Work 00D4Using call lists
141Telephone Z
Page 145 of 270
profile, you cannot delete them from
COMAND.
X
Select Call Lists
Call Lists in the telephone basic
menu by turning 00790052007Athe COMAND con-
troller and press 0098to confirm.
X Select Delete Call Lists
Delete Call Lists and press0098
to confirm.
A prompt appears asking whether you wish
to delete all call lists.
X Select Yes
Yes orNo No and press 0098to confirm.
If you select Yes
Yes, the call lists are deleted.
If you select No
No, the process will be can-
celed.
i If you delete these call lists from the
mobile phone (see the separate mobile
phone operating instructions), COMAND
updates the call list display the next time it
connects. Using the speed dial list
Storing an entry
You can assign ten speed dial presets (0 – 9)
to the speed dial list. There are two options
available for this purpose.
Option 1:
X Search for a phone book entry in the phone
book (Y page 138).
X If an entry has several phone numbers,
select the desired number by turning
00790052007A the COMAND controller.
X Select the list symbol to the right of the
entry by sliding 00520096the COMAND control-
ler and press 0098to confirm.
A menu appears.
X Select Speed Dial
Speed Dial by turning00790052007Athe
COMAND controller and press 0098to con-
firm.
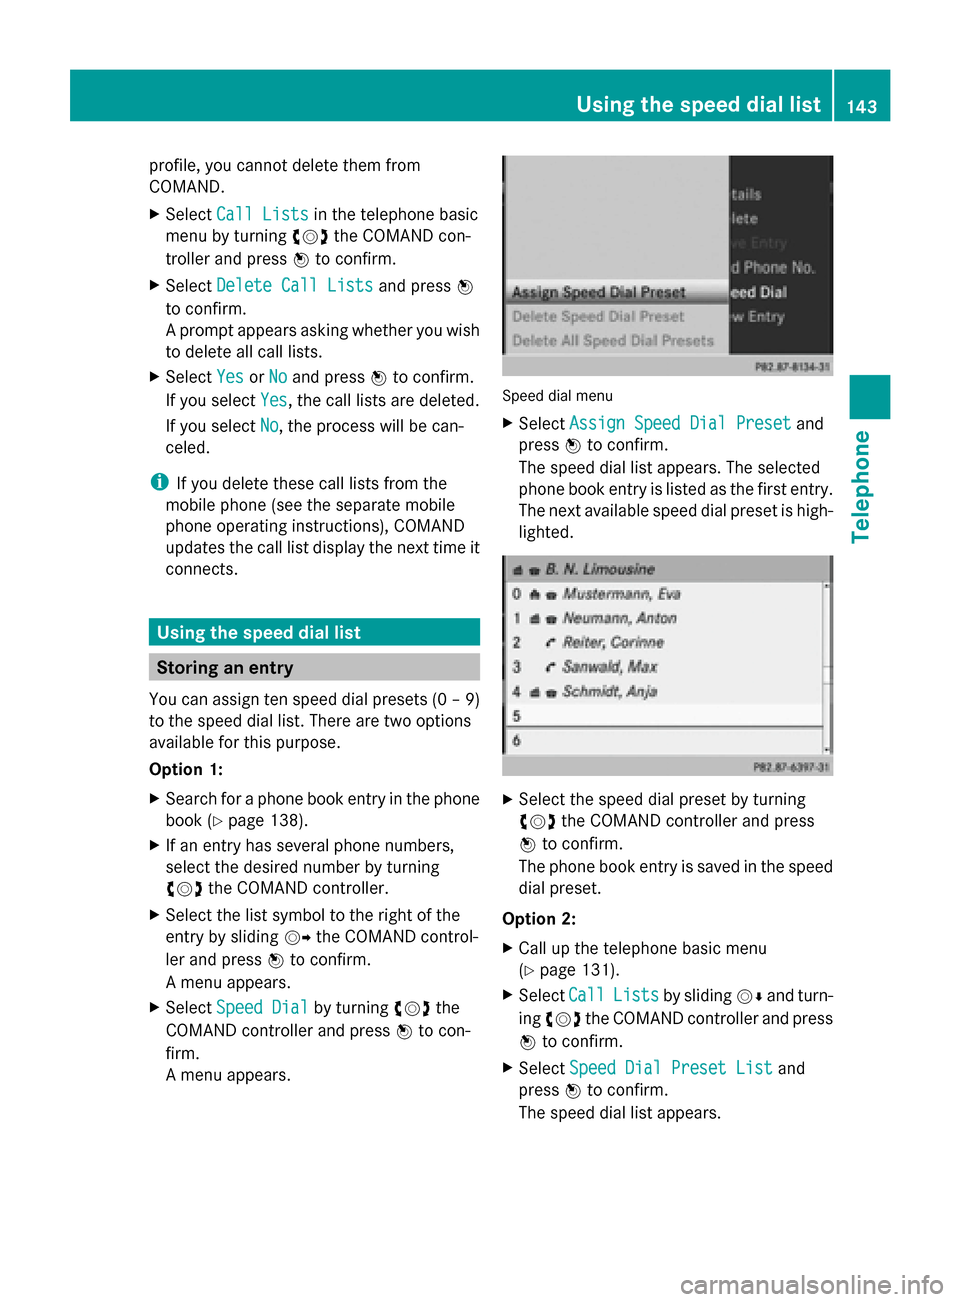
A menu appears. Speed dial menu
X
Select Assign Speed Dial Preset Assign Speed Dial Preset and
press 0098to confirm.
The speed dial list appears. The selected
phone book entry is listed as the first entry.
The next available speed dial preset is high-
lighted. X
Select the speed dial preset by turning
00790052007A the COMAND controller and press
0098 to confirm.
The phone book entry is saved in the speed
dial preset.
Option 2:
X Call up the telephone basic menu
(Y page 131).
X Select Call CallLists
Lists by sliding 00520064and turn-
ing 00790052007A the COMAND controller and press
0098 to confirm.
X Select Speed Dial Preset List
Speed Dial Preset List and
press 0098to confirm.
The speed dial list appears. Using the speed dial list
143Telephone Z
Page 146 of 270
X
Select the list symbol to the right of the
entry by sliding 00520096the COMAND control-
ler and press 0098to confirm.
X Select Assign Speed Dial Preset
Assign Speed Dial Preset and
press 0098to confirm.
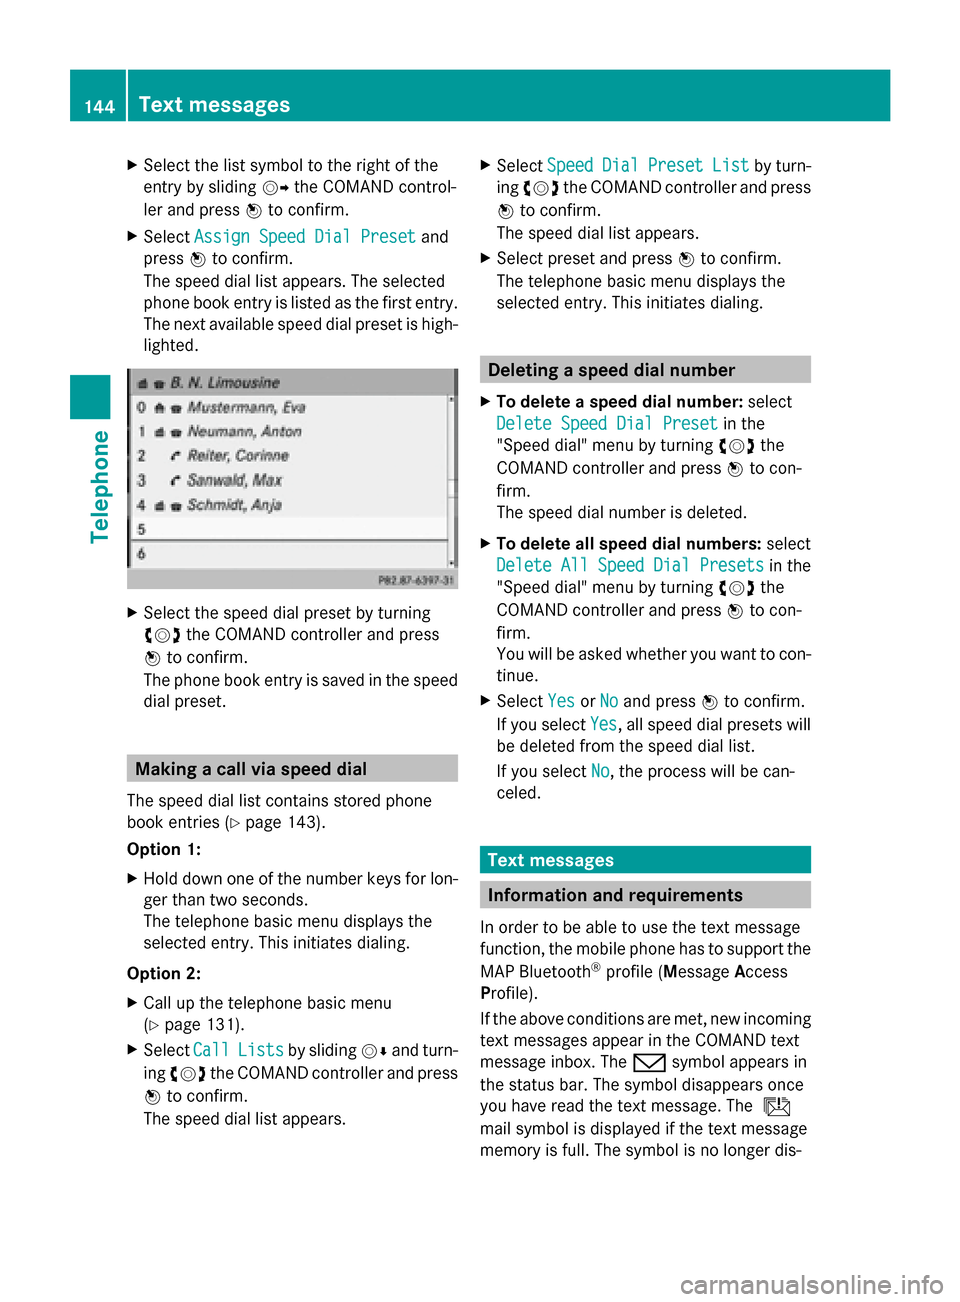
The speed dial list appears. The selected
phone book entry is listed as the first entry.
The next available speed dial preset is high-
lighted. X
Select the speed dial preset by turning
00790052007A the COMAND controller and press
0098 to confirm.
The phone book entry is saved in the speed
dial preset. Making a call via speed dial
The speed dial list contains stored phone
book entries (Y page 143).
Option 1:
X Hold down one of the number keys for lon-
ger than two seconds.
The telephone basic menu displays the
selected entry. This initiates dialing.
Option 2:
X Call up the telephone basic menu
(Y page 131).
X Select Call
Call Lists Lists by sliding 00520064and turn-
ing 00790052007A the COMAND controller and press
0098 to confirm.
The speed dial list appears. X
Select Speed
Speed Dial
DialPreset
Preset List
Listby turn-
ing 00790052007A the COMAND controller and press
0098 to confirm.
The speed dial list appears.
X Select preset and press 0098to confirm.
The telephone basic menu displays the
selected entry. This initiates dialing. Deleting a speed dial number
X To delete a speed dial number: select
Delete Speed Dial Preset Delete Speed Dial Preset in the
"Speed dial" menu by turning 00790052007Athe
COMAND controller and press 0098to con-
firm.
The speed dial number is deleted.
X To delete all speed dial numbers: select
Delete All Speed Dial Presets Delete All Speed Dial Presets in the
"Speed dial" menu by turning 00790052007Athe
COMAND controller and press 0098to con-
firm.
You will be asked whether you want to con-
tinue.
X Select Yes
Yes orNo No and press 0098to confirm.
If you select Yes
Yes, all speed dial presets will
be deleted from the speed dial list.
If you select No No, the process will be can-
celed. Text messages
Information and requirements
In order to be able to use the text message
function, the mobile phone has to support the
MAP Bluetooth ®
profile (Message Access
Profile).
If the above conditions are met, new incoming
text messages appear in the COMAND text
message inbox. The 008Fsymbol appears in
the status bar. The symbol disappears once
you have read the text message. The ú
mail symbol is displayed if the text message
memory is full. The symbol is no longer dis- 144
Text messagesTelephone
Page 147 of 270
played once you delete at least one text mes-
sage.
i COMAND may not load all of the most
recent text messages:
This may occur in exceptional cases, for
example when using certain mobile
phones/brackets and if the mobile phone
inbox holds a large number of text mes-
sages. Displaying the text message inbox
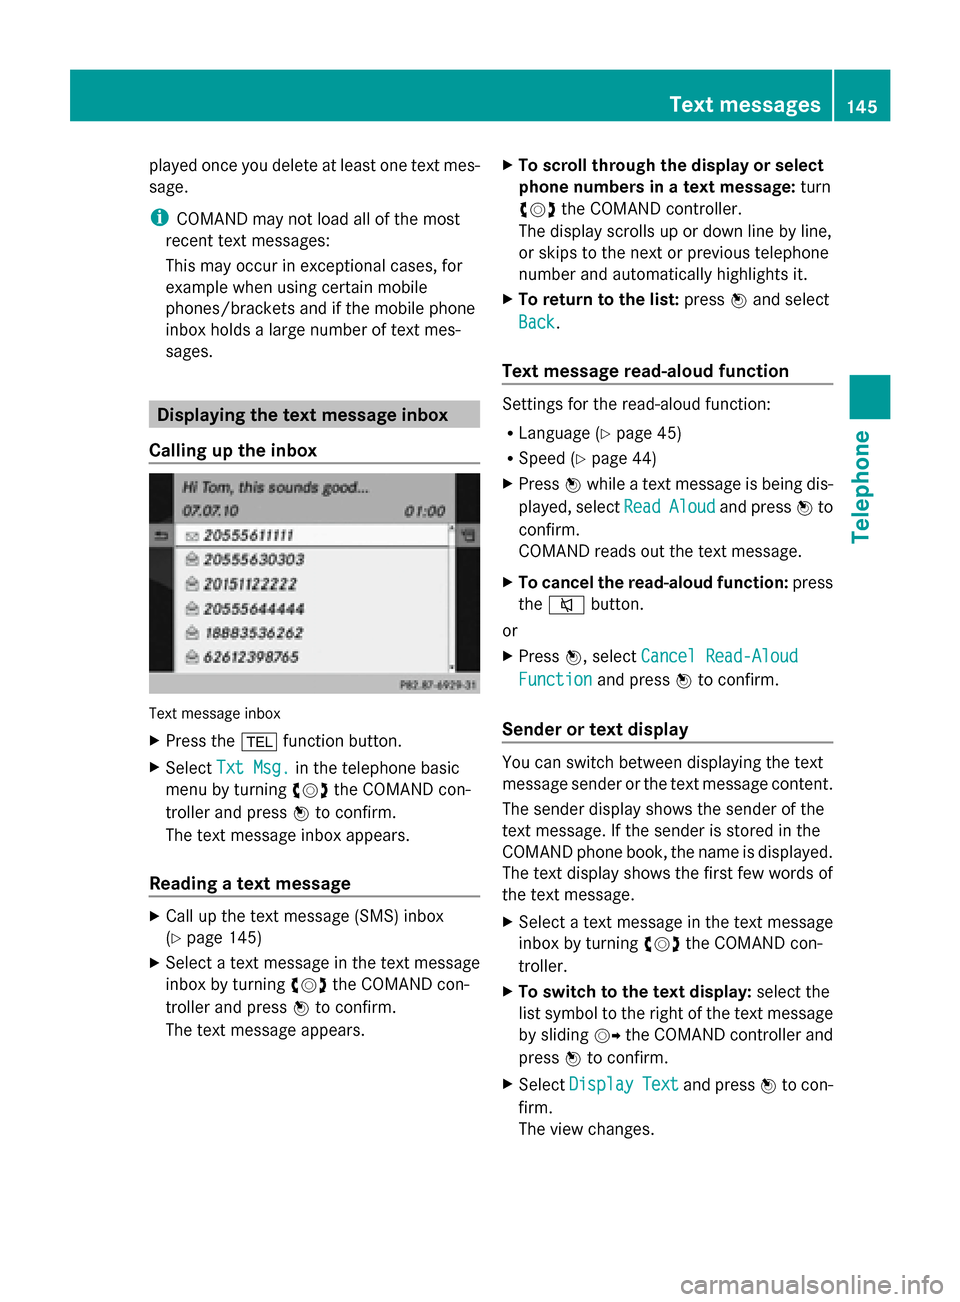
Calling up the inbox Text message inbox
X
Press the 002Bfunction button.
X Select Txt Msg.
Txt Msg. in the telephone basic
menu by turning 00790052007Athe COMAND con-
troller and press 0098to confirm.
The text message inbox appears.
Reading a text message X
Call up the text message (SMS) inbox
(Y page 145)
X Select a text message in the text message
inbox by turning 00790052007Athe COMAND con-
troller and press 0098to confirm.
The text message appears. X
To scroll through the display or select
phone numbers in a text message: turn
00790052007A the COMAND controller.
The display scrolls up or down line by line,
or skips to the next or previous telephone
number and automatically highlights it.
X To return to the list: press0098and select
Back
Back.
Text message read-aloud function Settings for the read-aloud function:
R
Language (Y page 45)
R Speed (Y page 44)
X Press 0098while a text message is being dis-
played, select Read ReadAloud
Aloud and press 0098to
confirm.
COMAND reads out the text message.
X To cancel the read-aloud function: press
the 0063 button.
or
X Press 0098, select Cancel Read-Aloud
Cancel Read-Aloud
Function Function and press0098to confirm.
Sender or text display You can switch between displaying the text
message sender or the text message content.
The sender display shows the sender of the
text message. If the sender is stored in the
COMAND phone book, the name is displayed.
The text display shows the first few words of
the text message.
X
Select a text message in the text message
inbox by turning 00790052007Athe COMAND con-
troller.
X To switch to the text display: select the
list symbol to the right of the text message
by sliding 00520096the COMAND controller and
press 0098to confirm.
X Select Display Display Text
Text and press 0098to con-
firm.
The view changes. Text messages
145Telephone Z