child lock MERCEDES-BENZ CLA-Class 2014 C117 User Guide
[x] Cancel search | Manufacturer: MERCEDES-BENZ, Model Year: 2014, Model line: CLA-Class, Model: MERCEDES-BENZ CLA-Class 2014 C117Pages: 358, PDF Size: 6.6 MB
Page 65 of 358
vehicle is unlocked, the door can be opened
from the outside.
X To activate: press the child-proof lock
lever up in the direction of arrow 0043.
X Make sure that the child-proof locks are
working properly.
X To deactivate: press the child-proof lock
lever down in the direction of arrow 0044.
Override feature for the rear side win-
dows G
WARNING
When children ride on the vehicle's rear seats, activate the override switch. Otherwise, the
children could be injured, e.g. by trapping
themselves in the rear side window. X
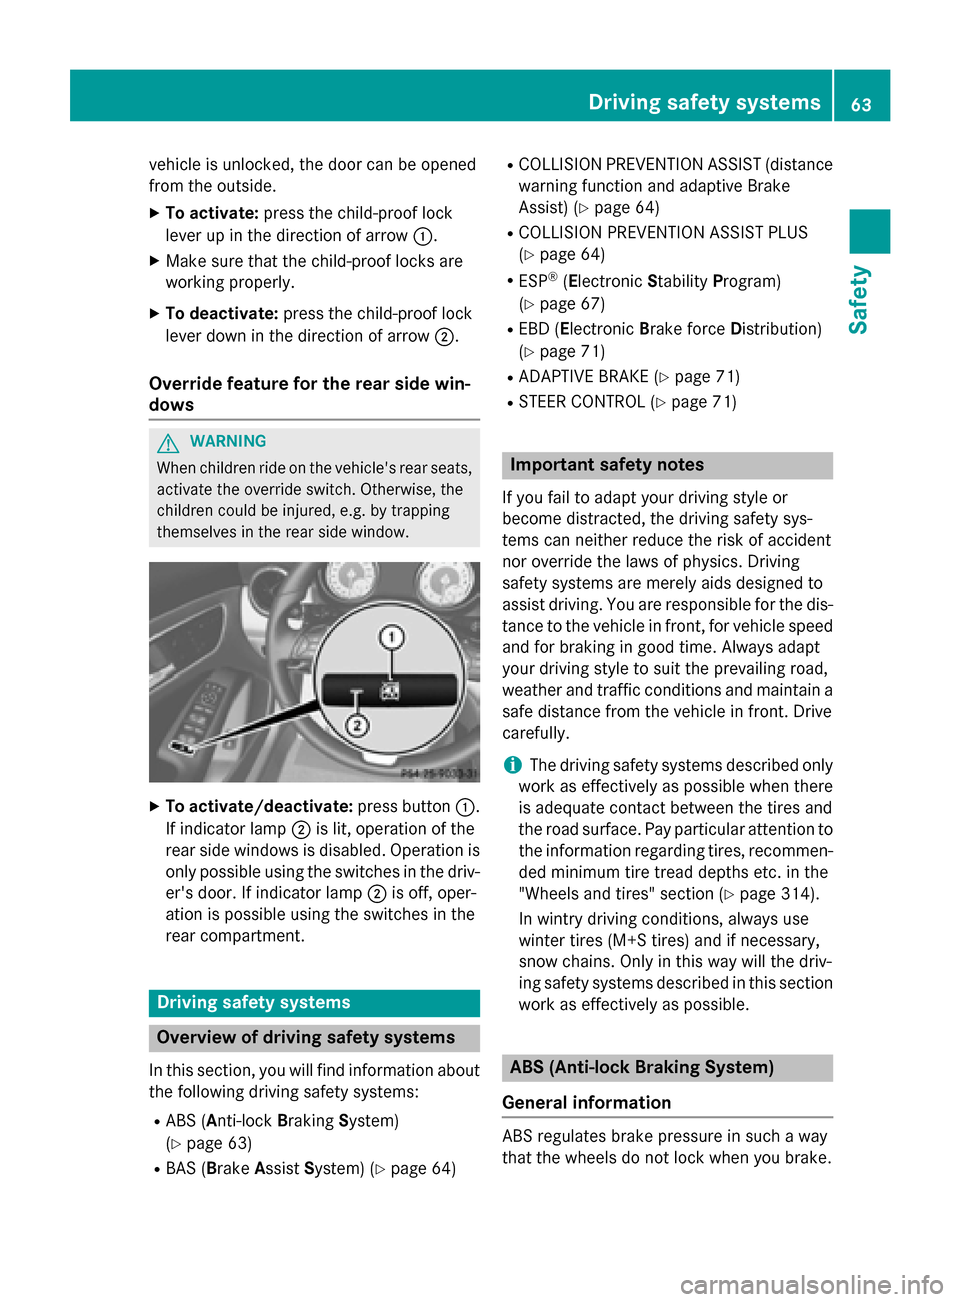
To activate/deactivate: press button0043.
If indicator lamp 0044is lit, operation of the
rear side windows is disabled. Operation is
only possible using the switches in the driv- er's door. If indicator lamp 0044is off, oper-
ation is possible using the switches in the
rear compartment. Driving safety systems
Overview of driving safety systems
In this section, you will find information about the following driving safety systems:
R ABS ( Anti-lock BrakingSystem)
(Y page 63)
R BAS ( Brake Assist System) (Y page 64) R
COLLISION PREVENTION ASSIST (distance
warning function and adaptive Brake
Assist) (Y page 64)
R COLLISION PREVENTION ASSIST PLUS
(Y page 64)
R ESP ®
(Electronic StabilityProgram)
(Y page 67)
R EBD ( Electronic Brake force Distribution)
(Y page 71)
R ADAPTIVE BRAKE (Y page 71)
R STEER CONTROL (Y page 71) Important safety notes
If you fail to adapt your driving style or
become distracted, the driving safety sys-
tems can neither reduce the risk of accident
nor override the laws of physics. Driving
safety systems are merely aids designed to
assist driving. You are responsible for the dis- tance to the vehicle in front, for vehicle speedand for braking in good time. Always adapt
your driving style to suit the prevailing road,
weather and traffic conditions and maintain a
safe distance from the vehicle in front. Drive
carefully.
i The driving safety systems described only
work as effectively as possible when there
is adequate contact between the tires and
the road surface. Pay particular attention to the information regarding tires, recommen-
ded minimum tire tread depths etc. in the
"Wheels and tires" section (Y page 314).
In wintry driving conditions, always use
winter tires (M+S tires) and if necessary,
snow chains. Only in this way will the driv-
ing safety systems described in this section
work as effectively as possible. ABS (Anti-lock Braking System)
General information ABS regulates brake pressure in such a way
that the wheels do not lock when you brake. Driving safety systems
63Safety Z
Page 78 of 358
Useful information
i This Operator's manual describes all
models and all standard and optional equip- ment of your vehicle available at the time of
publication of the Operator's manual.
Country-specific differences are possible.
Please note that your vehicle may not be
equipped with all features described. This
also applies to safety-related systems and
functions.
i Read the information on qualified special-
ist workshops (Y page 26). SmartKey
Important safety notes
G
WARNING
If children are left unsupervised in the vehicle, they could:
R open the doors, thus endangering other
people or road users.
R get out and disrupt traffic.
R operate the vehicle's equipment.
Additionally, children could set the vehicle in
motion if, for example, they:
R release the parking brake.
R shifting the automatic transmission out of
park position P
R Start the engine.
There is a risk of an accident and injury.
When leaving the vehicle, always take the
SmartKey with you and lock the vehicle. Never
leave children or animals unattended in the
vehicle. Always keep the SmartKey out of
reach of children. G
WARNING
If persons, particularly children are subjected to prolonged exposure to extreme heat or
cold, there is a risk of injury, possibly even
fatal. Never leave children unattended in the
vehicle. G
WARNING
If you attach heavy or large objects to the
SmartKey, the SmartKey could be uninten-
tionally turned in the ignition lock. This could
cause the engine to be switched off. There is a risk of an accident.
Do not attach any heavy or large objects to the
SmartKey. Remove any bulky key rings before
inserting the SmartKey into the ignition lock.
! Keep the SmartKey away from strong
magnetic fields. Otherwise, the remote
control function could be affected.
Strong magnetic fields can occur in the
vicinity of powerful electrical installations.
Do not keep the SmartKey: R with electronic devices, e.g. a mobile
phone or another SmartKey
R with metallic objects, e.g. coins or metal
foil
R inside metallic objects, e.g. a metal case SmartKey functions
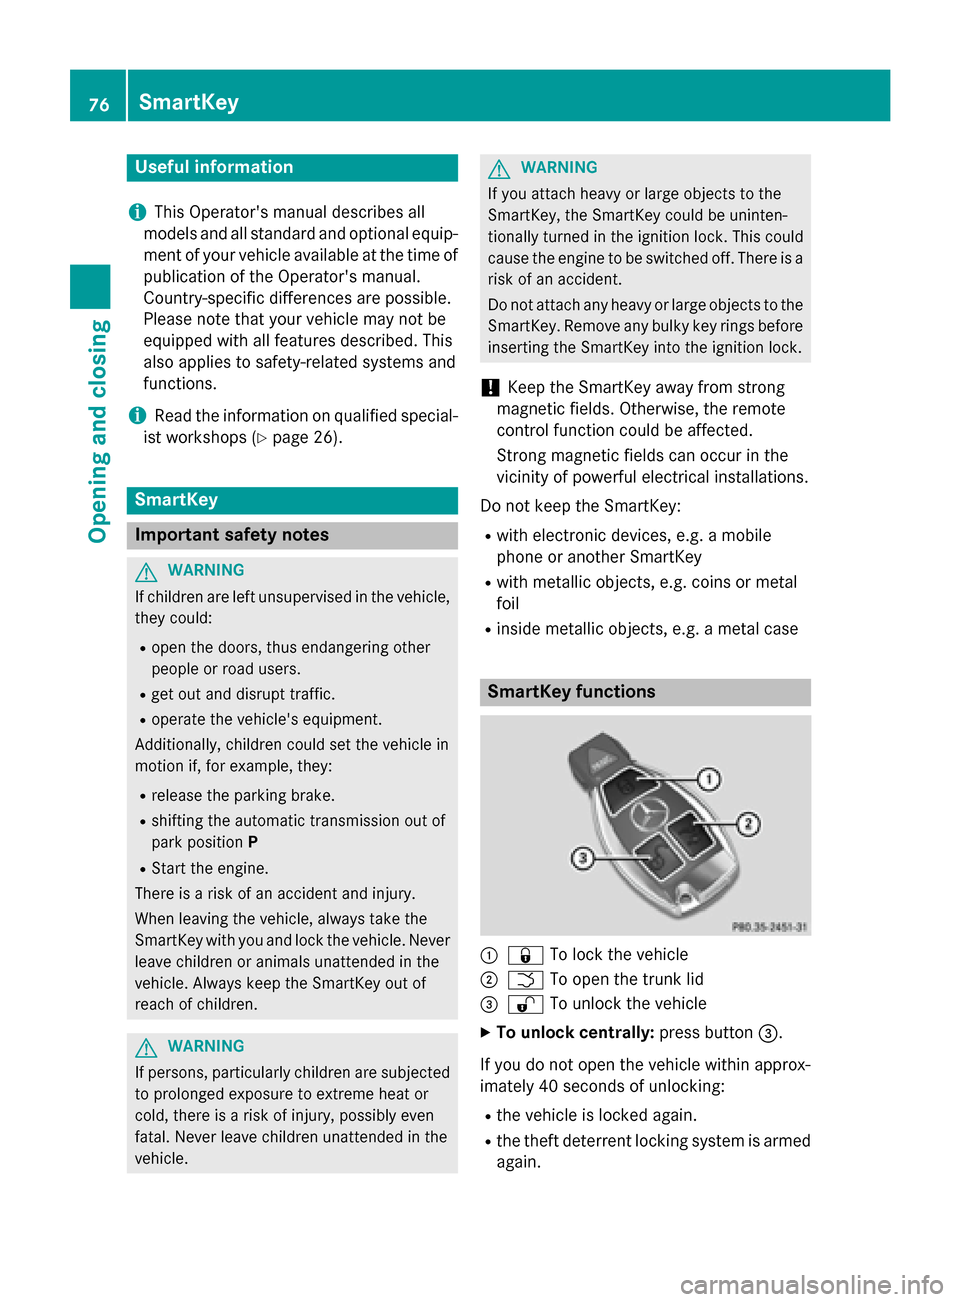
0043
0037 To lock the vehicle
0044 0054 To open the trunk lid
0087 0036 To unlock the vehicle
X To unlock centrally: press button0087.
If you do not open the vehicle within approx-
imately 40 seconds of unlocking: R the vehicle is locked again.
R the theft deterrent locking system is armed
again. 76
SmartKeyOpening and closing
Page 80 of 358
For further information about:
R unlocking the driver's door (Y page 83)
R unlocking the trunk (Y page 86)
R locking the vehicle (Y page 83)
Inserting the mechanical key X
Push mechanical key 0044completely into
the SmartKey until it engages, and release
catch 0043is back in its basic position. SmartKey battery
Important safety notes G
WARNING
Batteries contain toxic and corrosive substan- ces. If batteries are swallowed, it can result in
severe health problems. There is a risk of fatal injury.
Keep batteries out of the reach of children. If
a battery is swallowed, seek medical attention immediately.
The SmartKey batteries contain perchlorate
material, which may require special handling
and regard for the environment. National
guidelines must be observed during disposal.
In California, see www.dtsc.ca.gov/
HazardousWaste/Perchlorate/
index.cfm.
Mercedes-Benz recommends that you have
the batteries replaced at a qualified specialist workshop. Checking the battery X
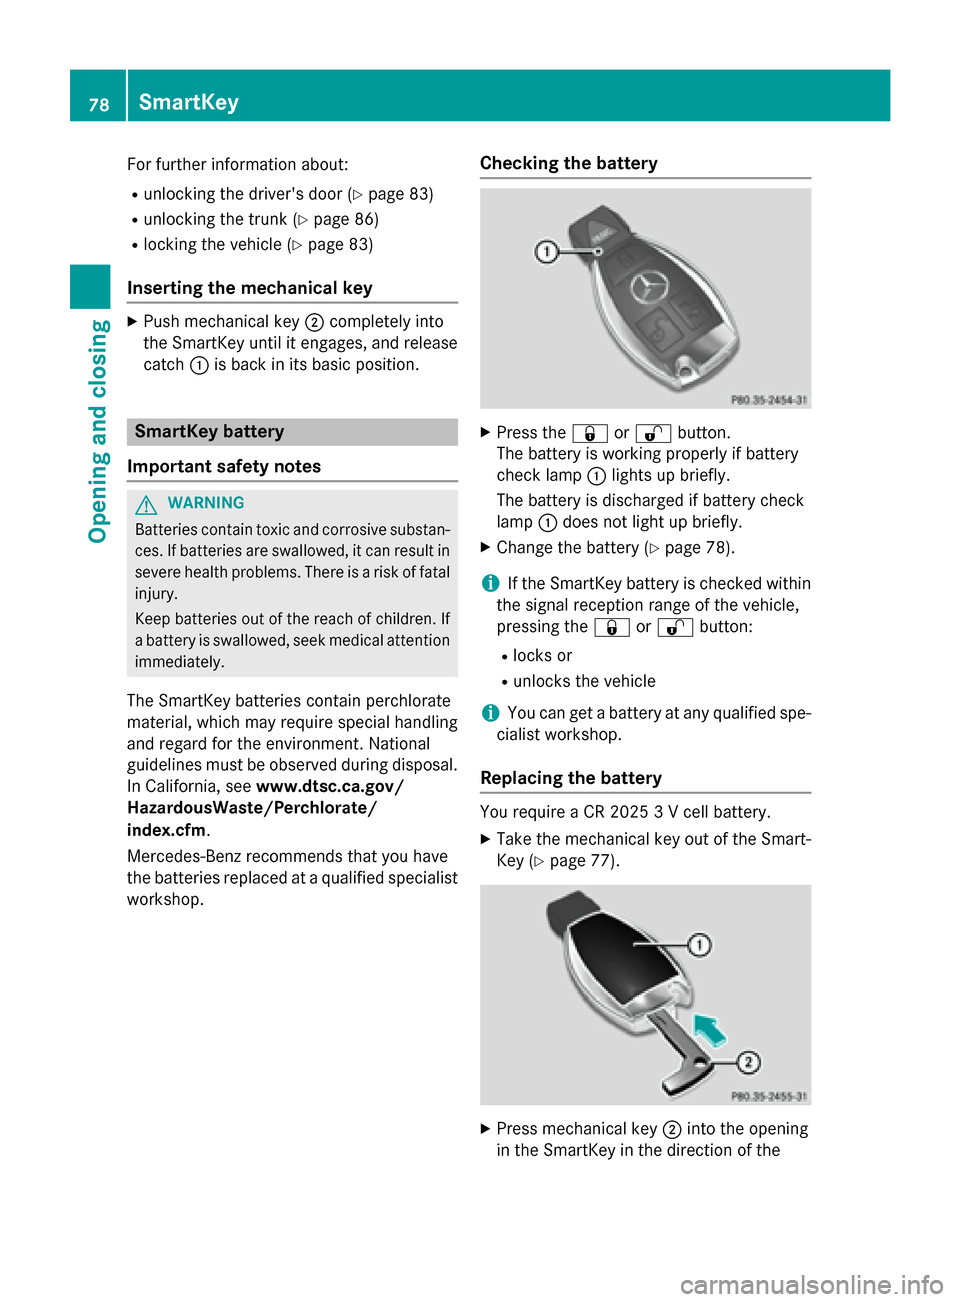
Press the 0037or0036 button.
The battery is working properly if battery
check lamp 0043lights up briefly.
The battery is discharged if battery check
lamp 0043does not light up briefly.
X Change the battery (Y page 78).
i If the SmartKey battery is checked within
the signal reception range of the vehicle,
pressing the 0037or0036 button:
R locks or
R unlocks the vehicle
i You can get a battery at any qualified spe-
cialist workshop.
Replacing the battery You require a CR 2025 3 V cell battery.
X Take the mechanical key out of the Smart-
Key (Y page 77). X
Press mechanical key 0044into the opening
in the SmartKey in the direction of the 78
SmartKeyOpening and closing
Page 83 of 358
Problem
Possible causes/consequences and
0050
0050Solutions The engine cannot be
started using the
SmartKey. The on-board voltage is too low.
X Switch off non-essential consumers, e.g. seat heating or interior
lighting, and try to start the engine again.
If this does not work:
X Check the starter battery and charge it if necessary
(Y page 301).
or
X Jump-start the vehicle (Y page 305).
or
X Consult a qualified specialist workshop. The engine cannot be
started using the
SmartKey. The steering lock is mechanically blocked.
X Remove the SmartKey and reinsert it into the ignition lock. While
doing this, turn the steering wheel in both directions. Doors
Important safety notes
G
WARNING
If children are left unsupervised in the vehicle, they could:
R open the doors, thus endangering other
people or road users.
R get out and disrupt traffic.
R operate the vehicle's equipment.
Additionally, children could set the vehicle in
motion if, for example, they:
R release the parking brake.
R shifting the automatic transmission out of
park position P
R Start the engine.
There is a risk of an accident and injury.
When leaving the vehicle, always take the
SmartKey with you and lock the vehicle. Never
leave children or animals unattended in the
vehicle. Always keep the SmartKey out of
reach of children. G
WARNING
If persons, particularly children are subjected to prolonged exposure to extreme heat or
cold, there is a risk of injury, possibly even
fatal. Never leave children unattended in the
vehicle.
You should preferably place luggage or loads
in the cargo compartment. Observe the load- ing guidelines (Y page 256). Unlocking and opening doors from
the inside
i When a door is opened, the side window
on that side opens slightly. When the door
is closed, the side window closes again.
! The side windows will not open/close if
the battery is discharged or if the side win- dows have iced up. It will then not be pos-
sible to close the door. Do not attempt to
force the door closed. You could otherwise
damage the door or the side window. Doors
81Opening and closing Z
Page 84 of 358
X
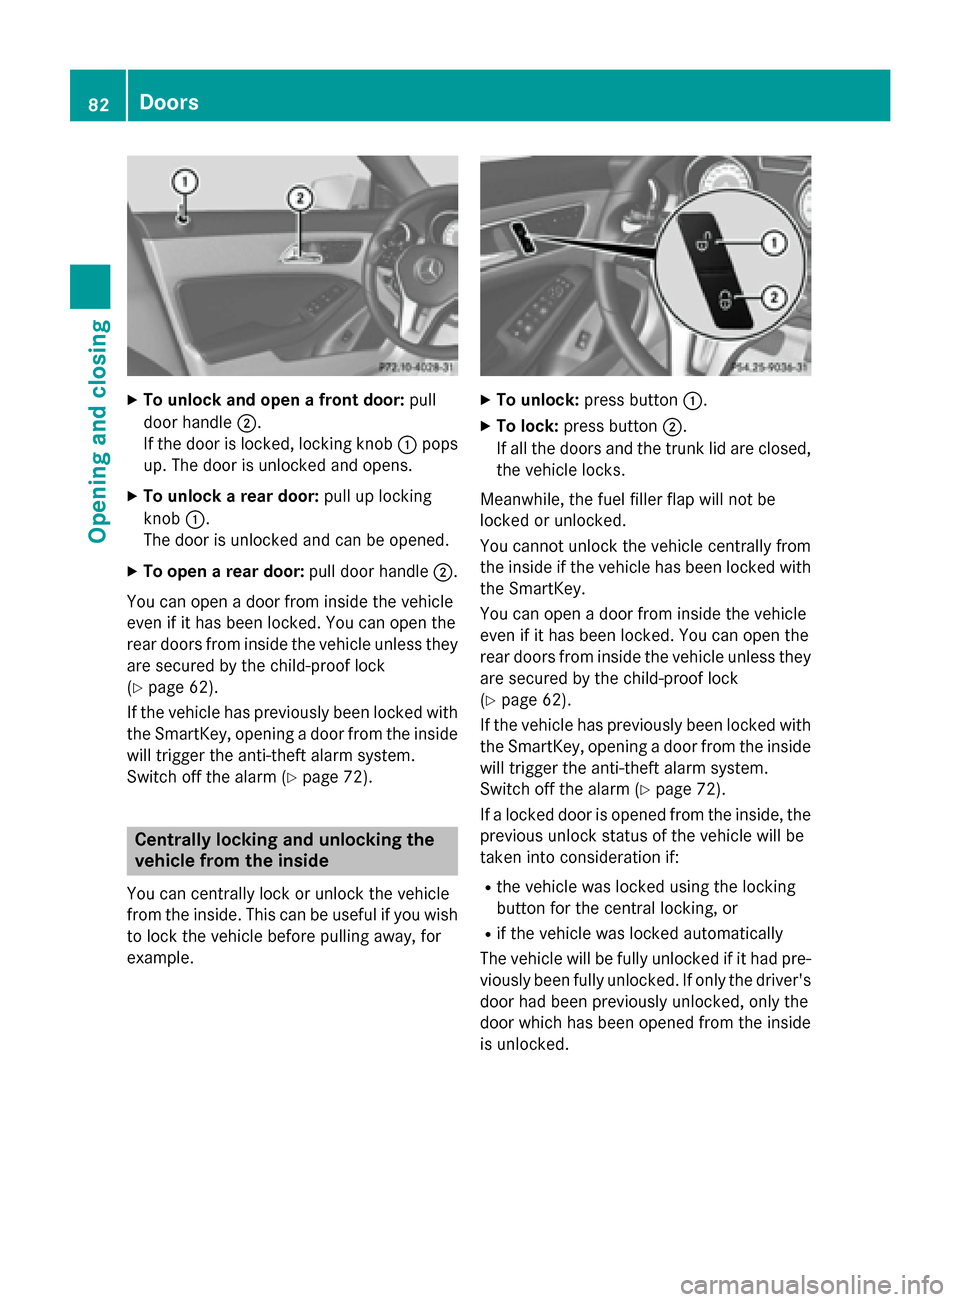
To unlock and open a front door: pull
door handle 0044.
If the door is locked, locking knob 0043pops
up. The door is unlocked and opens.
X To unlock a rear door: pull up locking
knob 0043.
The door is unlocked and can be opened.
X To open a rear door: pull door handle0044.
You can open a door from inside the vehicle
even if it has been locked. You can open the
rear doors from inside the vehicle unless they are secured by the child-proof lock
(Y page 62).
If the vehicle has previously been locked with the SmartKey, opening a door from the inside
will trigger the anti-theft alarm system.
Switch off the alarm (Y page 72).Centrally locking and unlocking the
vehicle from the inside
You can centrally lock or unlock the vehicle
from the inside. This can be useful if you wish to lock the vehicle before pulling away, for
example. X
To unlock: press button 0043.
X To lock: press button 0044.
If all the doors and the trunk lid are closed, the vehicle locks.
Meanwhile, the fuel filler flap will not be
locked or unlocked.
You cannot unlock the vehicle centrally from
the inside if the vehicle has been locked with the SmartKey.
You can open a door from inside the vehicle
even if it has been locked. You can open the
rear doors from inside the vehicle unless they
are secured by the child-proof lock
(Y page 62).
If the vehicle has previously been locked with
the SmartKey, opening a door from the inside will trigger the anti-theft alarm system.
Switch off the alarm (Y page 72).
If a locked door is opened from the inside, the
previous unlock status of the vehicle will be
taken into consideration if:
R the vehicle was locked using the locking
button for the central locking, or
R if the vehicle was locked automatically
The vehicle will be fully unlocked if it had pre- viously been fully unlocked. If only the driver's
door had been previously unlocked, only the
door which has been opened from the inside
is unlocked. 82
DoorsOpening and closing
Page 86 of 358
X
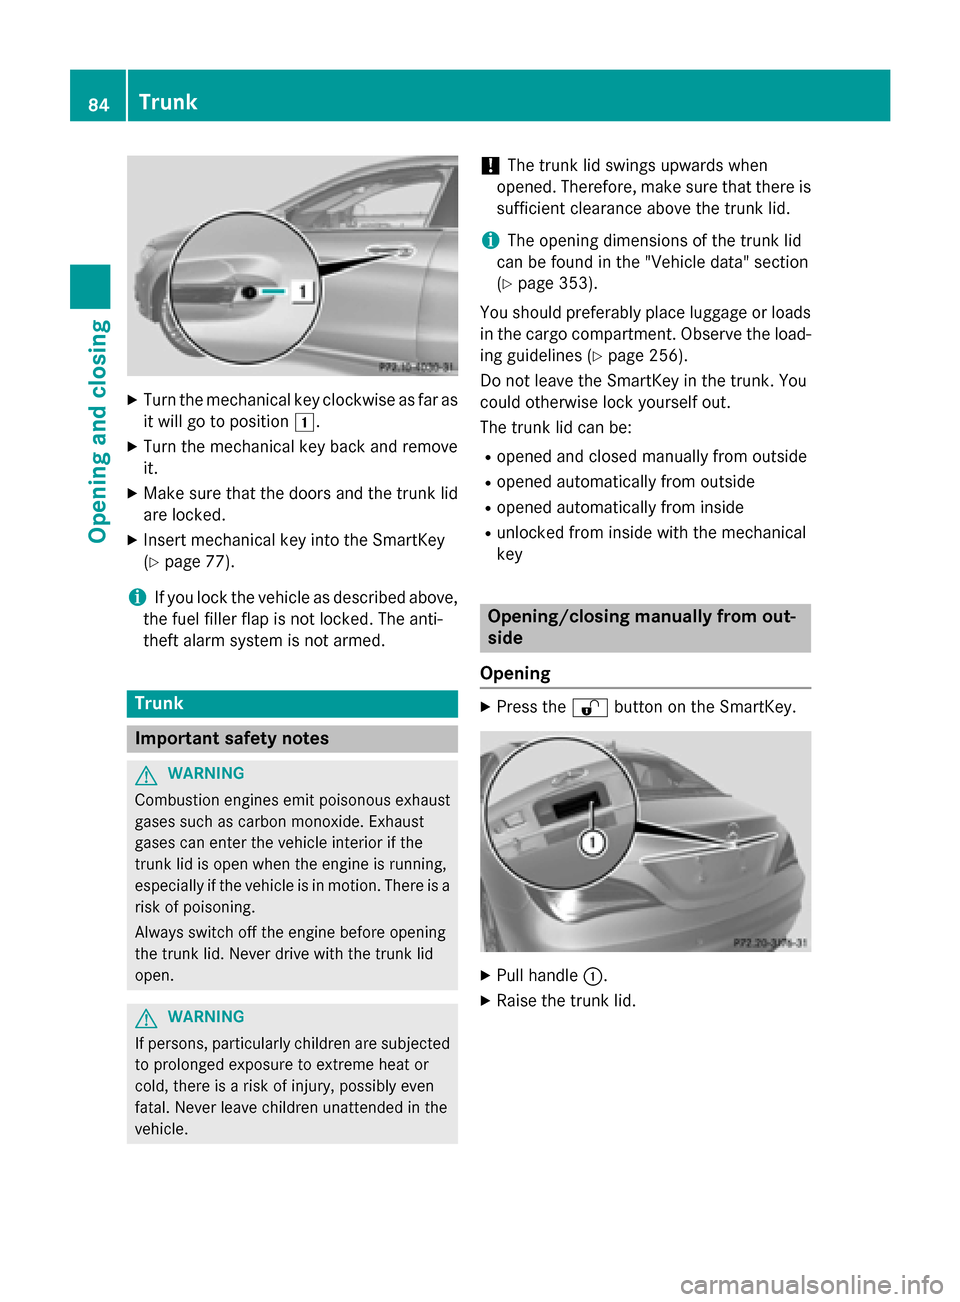
Turn the mechanical key clockwise as far as
it will go to position 0047.
X Turn the mechanical key back and remove
it.
X Make sure that the doors and the trunk lid
are locked.
X Insert mechanical key into the SmartKey
(Y page 77).
i If you lock the vehicle as described above,
the fuel filler flap is not locked. The anti-
theft alarm system is not armed. Trunk
Important safety notes
G
WARNING
Combustion engines emit poisonous exhaust
gases such as carbon monoxide. Exhaust
gases can enter the vehicle interior if the
trunk lid is open when the engine is running,
especially if the vehicle is in motion. There is a risk of poisoning.
Always switch off the engine before opening
the trunk lid. Never drive with the trunk lid
open. G
WARNING
If persons, particularly children are subjected to prolonged exposure to extreme heat or
cold, there is a risk of injury, possibly even
fatal. Never leave children unattended in the
vehicle. !
The trunk lid swings upwards when
opened. Therefore, make sure that there is
sufficient clearance above the trunk lid.
i The opening dimensions of the trunk lid
can be found in the "Vehicle data" section
(Y page 353).
You should preferably place luggage or loads in the cargo compartment. Observe the load-
ing guidelines (Y page 256).
Do not leave the SmartKey in the trunk. You
could otherwise lock yourself out.
The trunk lid can be:
R opened and closed manually from outside
R opened automatically from outside
R opened automatically from inside
R unlocked from inside with the mechanical
key Opening/closing manually from out-
side
Opening X
Press the 0036button on the SmartKey. X
Pull handle 0043.
X Raise the trunk lid. 84
TrunkOpening and closing
Page 88 of 358
Emergency release
If the trunk lid can no longer be opened from
outside the vehicle, use the emergency
release on the inside of the trunk lid.
! The trunk lid swings upwards when
opened. Therefore, make sure that there is
sufficient clearance above the trunk lid.
i The opening dimensions of the trunk lid
can be found in the "Vehicle data" section
(Y page 353).
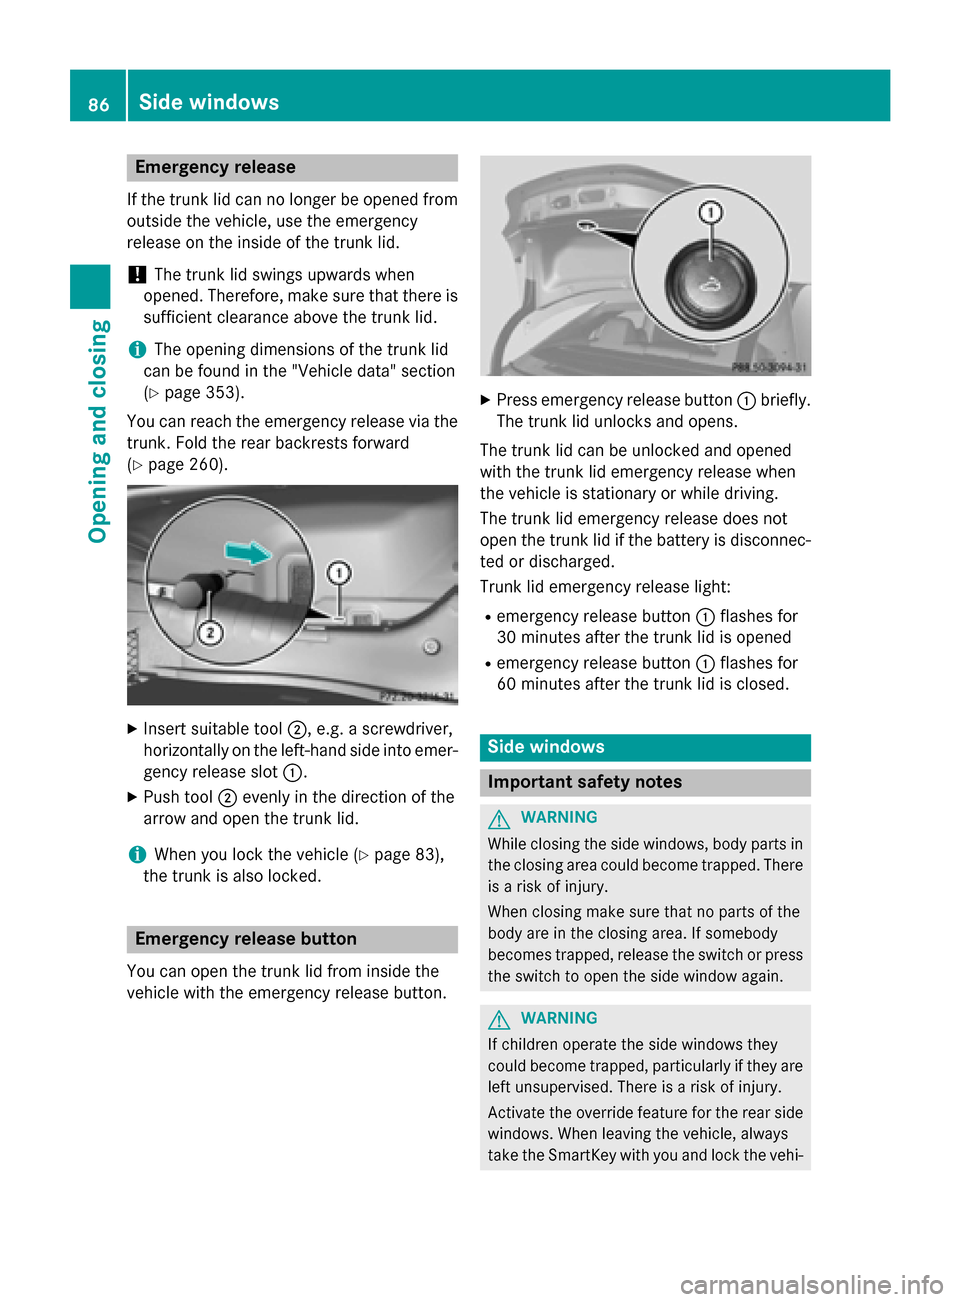
You can reach the emergency release via the
trunk. Fold the rear backrests forward
(Y page 260). X
Insert suitable tool 0044, e.g. a screwdriver,
horizontally on the left-hand side into emer- gency release slot 0043.
X Push tool 0044evenly in the direction of the
arrow and open the trunk lid.
i When you lock the vehicle (Y
page 83),
the trunk is also locked. Emergency release button
You can open the trunk lid from inside the
vehicle with the emergency release button. X
Press emergency release button 0043briefly.
The trunk lid unlocks and opens.
The trunk lid can be unlocked and opened
with the trunk lid emergency release when
the vehicle is stationary or while driving.
The trunk lid emergency release does not
open the trunk lid if the battery is disconnec- ted or discharged.
Trunk lid emergency release light:
R emergency release button 0043flashes for
30 minutes after the trunk lid is opened
R emergency release button 0043flashes for
60 minutes after the trunk lid is closed. Side windows
Important safety notes
G
WARNING
While closing the side windows, body parts in the closing area could become trapped. There is a risk of injury.
When closing make sure that no parts of the
body are in the closing area. If somebody
becomes trapped, release the switch or press
the switch to open the side window again. G
WARNING
If children operate the side windows they
could become trapped, particularly if they are left unsupervised. There is a risk of injury.
Activate the override feature for the rear side
windows. When leaving the vehicle, always
take the SmartKey with you and lock the vehi- 86
Side windowsOpening and closing
Page 89 of 358
cle. Never leave children unsupervised in the
vehicle. Side window reversing feature
The side windows are equipped with an auto- matic reversing feature. If a solid object
blocks or restricts a side window from trav-
eling upwards during the automatic closing
process, the side window opens again auto-
matically. During the manual closing process,
the side window only opens again automati-
cally after the corresponding switch is
released. The automatic reversing feature is
only an aid and is no substitute for your atten- tion when closing a side window. G
WARNING
The reversing feature does not react:
R to soft, light and thin objects, e.g. small fin-
gers
R while resetting
This means that the reversing feature cannot
prevent someone being trapped in these sit-
uations. There is a risk of injury.
Make sure that no body parts are in close
proximity during the closing procedure. If
someone becomes trapped, press the switch
to open the side window again. Opening and closing the side win-
dows
The switches for all side windows are located on the driver's door. There is also a switch on
each door for the corresponding side window.
The switches on the driver's door take prec-
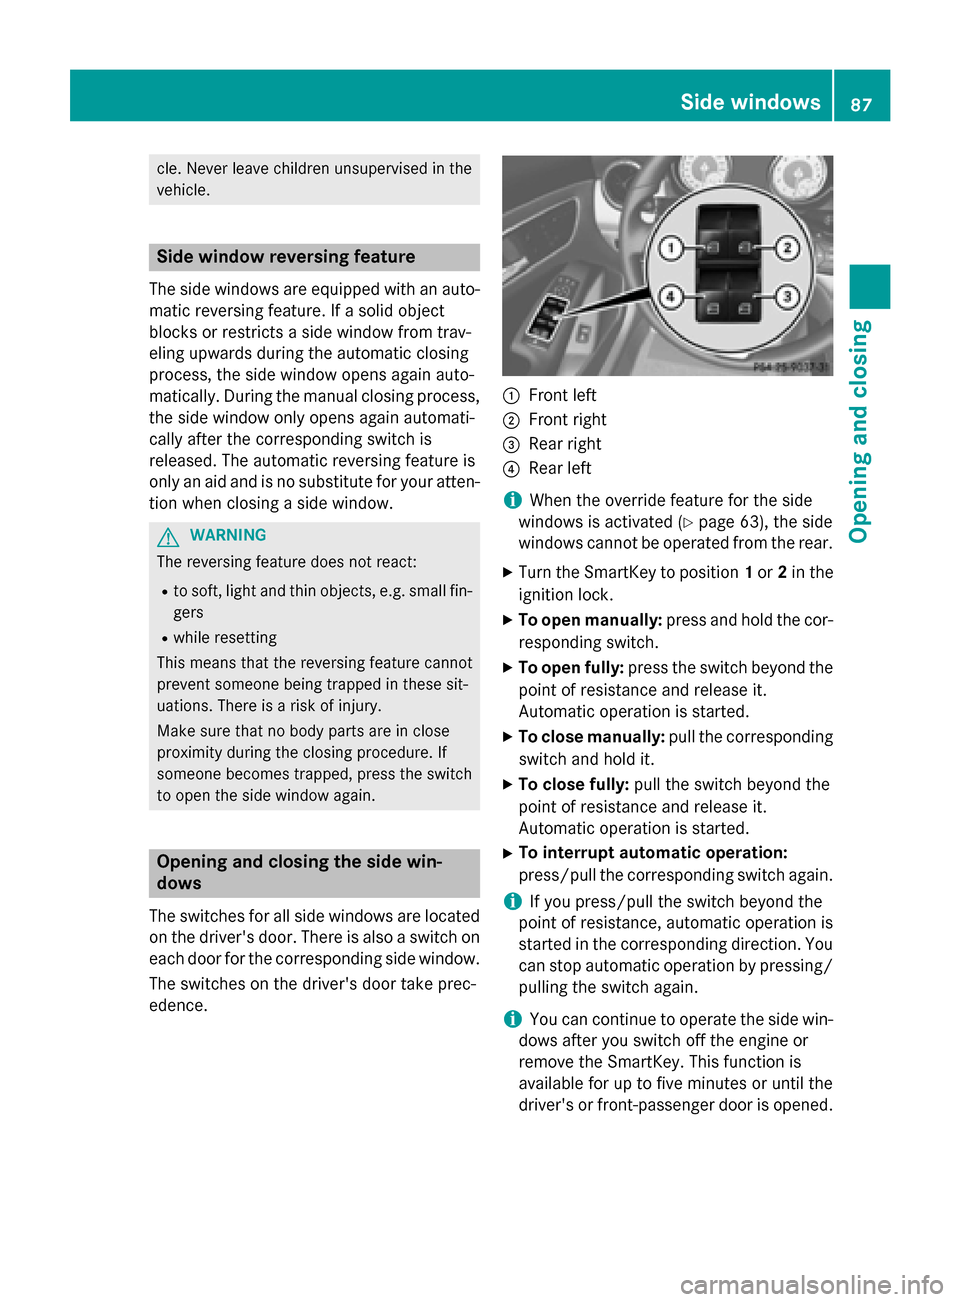
edence. 0043
Front left
0044 Front right
0087 Rear right
0085 Rear left
i When the override feature for the side
windows is activated (Y page 63), the side
windows cannot be operated from the rear.
X Turn the SmartKey to position 1or 2in the
ignition lock.
X To open manually: press and hold the cor-
responding switch.
X To open fully: press the switch beyond the
point of resistance and release it.
Automatic operation is started.
X To close manually: pull the corresponding
switch and hold it.
X To close fully: pull the switch beyond the
point of resistance and release it.
Automatic operation is started.
X To interrupt automatic operation:
press/pull the corresponding switch again.
i If you press/pull the switch beyond the
point of resistance, automatic operation is
started in the corresponding direction. You
can stop automatic operation by pressing/ pulling the switch again.
i You can continue to operate the side win-
dows after you switch off the engine or
remove the SmartKey. This function is
available for up to five minutes or until the
driver's or front-passenger door is opened. Side windows
87Opening and closing Z
Page 92 of 358
Problems with the side windows
G
WARNING
If you close a side window again immediately after it has been blocked or reset, the side window
closes with increased or maximum force. The reversing feature is then not active. Parts of the
body could be trapped in the closing area in the process. This poses an increased risk of injury or even fatal injury.
Make sure that no parts of the body are in the closing area. To stop the closing process, releasethe switch or push the switch again to reopen the side window. Problem
Possible causes/consequences and
0050 0050Solutions A side window cannot
be closed because it is
blocked by objects, e.g.
leaves in the window
guide. X
Remove the objects.
X Close the side window. A side window cannot
be closed and you can-
not see the cause. If a side window is obstructed during closing and reopens again
slightly:
X Immediately after the window blocks, pull the corresponding
switch again until the side window has closed.
The side window is closed with increased force.
If a side window is obstructed again during closing and reopens
again slightly: X Immediately after the window blocks, pull the corresponding
switch again until the side window has closed.
The side window is closed without the anti-entrapment feature. Panorama roof with power tilt/sliding
panel Important safety notes
In the following section, the term "sliding sun- roof" refers to the panorama roof with powertilt/sliding panel. G
WARNING
While opening and closing the sliding sunroof, body parts in close proximity could become
trapped. There is a risk of injury.
Make sure that no body parts are in close
proximity during the opening and closing pro- cedures. If somebody becomes trapped:
R release the switch immediately, or
R during automatic operation, push the
switch briefly in any direction
The opening or closing procedure will be stop-
ped. G
WARNING
If children operate the sliding sunroof they
could become trapped, particularly if they are left unsupervised. There is a risk of injury.
When leaving the vehicle, always take the
SmartKey with you and lock the vehicle. Never
leave children unsupervised in the vehicle. 90
Panorama roof with power tilt/sliding panelOpening and closing
Page 99 of 358
The seat belt should:
R fit snugly across your body
R be routed across the middle of your
shoulder
R be routed in your pelvic area across the
hip joints
X Before starting off, adjust the rear-view mir-
ror and the exterior mirrors (Y page 103) in
such a way that you have a good view of
road and traffic conditions.
X Vehicles with a memory function: save
the seat and exterior mirror settings
(Y page 105). Seats
Important safety notes
G
WARNING
Children could become trapped if they adjust the seats, particularly when unattended.
There is a risk of injury.
When leaving the vehicle, always take the
SmartKey with you and lock the vehicle. Never leave children unsupervised in the vehicle. G
WARNING
You could lose control of your vehicle if you do the following while driving:
R adjust the driver's seat, head restraint,
steering wheel or mirrors
R fasten the seat belt
There is a risk of an accident.
Adjust the driver's seat, head restraint, steer-
ing wheel and mirror and fasten your seat belt before starting the engine. G
WARNING
If you adjust the seat height carelessly, you or other vehicle occupants could be trapped andthereby injured. Children in particular could
accidentally press the electrical seat adjust-
ment buttons and become trapped. There is a
risk of injury. While moving the seats, make sure that your
hands or other body parts do not get under the
lever assembly of the seat adjustment sys-
tem. G
WARNING
When you adjust a seat, you or other vehicle
occupants could become trapped, e.g. on the seat guide rail. There is a risk of injury.
Make sure when adjusting a seat that no one
has any body parts in the sweep of the seat. G
WARNING
The seat belt does not offer the intended level of protection if you have not moved the back-
rest to an almost vertical position. When brak-
ing or in the event of an accident, you could
slide underneath the seat belt and sustain
abdomen or neck injuries, for example. This
poses an increased risk of injury or even fatal injury.
Adjust the seat properly before beginning
your journey. Always ensure that the backrest
is in an almost vertical position and that the
shoulder section of your seat belt is routed
across the center of your shoulder. G
WARNING
If head restraints are not installed and adjus-
ted correctly, they cannot provide protection
as intended. There is an increased risk of
injury in the head and neck area, e.g. in the
event of an accident or when braking.
Always drive with the head restraints instal-
led. Before driving off, make sure for every
vehicle occupant that the center of the head
restraint supports the back of the head at
about eye level. G
WARNING
According to accident statistics, children are
safer when properly restrained on the rear
seats than on the front-passenger seat. Thus, we strongly recommend that children be
placed in the rear seat whenever possible.
Regardless of seating position, children 12 Seats
97Seats, steering wheel and mirrors
Z