lights MERCEDES-BENZ CLA-Class 2014 C117 Workshop Manual
[x] Cancel search | Manufacturer: MERCEDES-BENZ, Model Year: 2014, Model line: CLA-Class, Model: MERCEDES-BENZ CLA-Class 2014 C117Pages: 358, PDF Size: 6.6 MB
Page 194 of 358
This device has been approved by the FCC
as a "Vehicular Radar System". The radar
sensor is intended for use in an automotive radar system only. Removing, tampering
with, or altering the device will void any
warranties, and is not permitted by the
FCC. Do not tamper with, alter, or use in
any non-approved way.
Any unauthorized modification to this
device could void the user’s authority to
operate the equipment.
Monitoring range of the sensors
In particular, the detection of obstacles can
be impaired if:
R dirt on the sensors or anything else cover-
ing the sensors
R there is poor visibility, e.g. due to fog, heavy
rain or snow
R a narrow vehicle traveling in front, e.g. a
motorbike or bicycle
R the road has very wide lanes
R the road has narrow lanes
R you are not driving in the middle of the lane
R there are barriers or similar lane borders
Vehicles in the monitoring range are then not
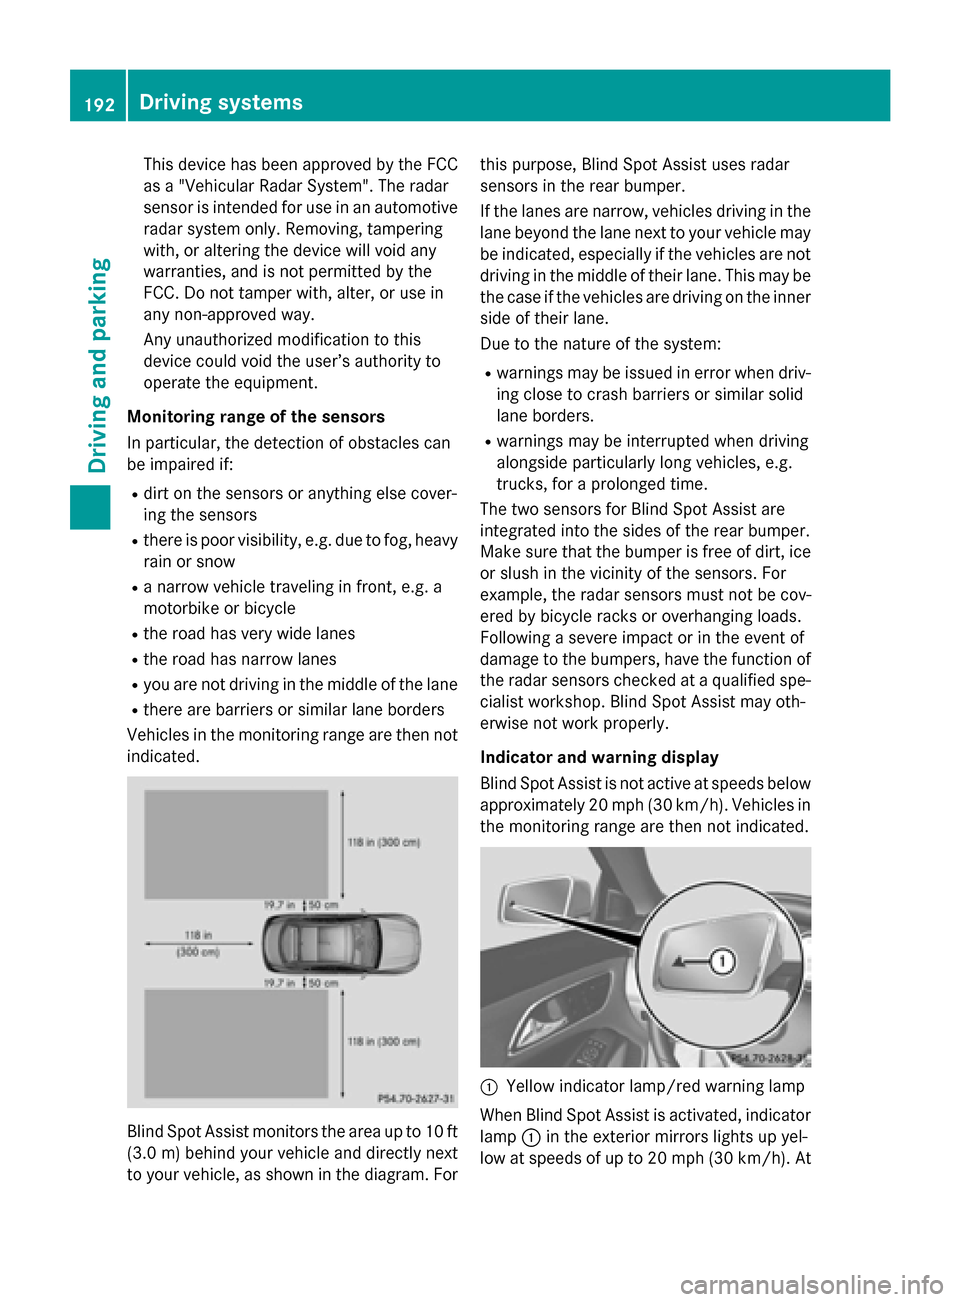
indicated. Blind Spot Assist monitors the area up to 10 ft
(3.0 m)behind your vehicle and directly next
to your vehicle, as shown in the diagram. For this purpose, Blind Spot Assist uses radar
sensors in the rear bumper.
If the lanes are narrow, vehicles driving in the
lane beyond the lane next to your vehicle may
be indicated, especially if the vehicles are not
driving in the middle of their lane. This may be the case if the vehicles are driving on the inner
side of their lane.
Due to the nature of the system:
R warnings may be issued in error when driv-
ing close to crash barriers or similar solid
lane borders.
R warnings may be interrupted when driving
alongside particularly long vehicles, e.g.
trucks, for a prolonged time.
The two sensors for Blind Spot Assist are
integrated into the sides of the rear bumper.
Make sure that the bumper is free of dirt, ice
or slush in the vicinity of the sensors. For
example, the radar sensors must not be cov-
ered by bicycle racks or overhanging loads.
Following a severe impact or in the event of
damage to the bumpers, have the function of
the radar sensors checked at a qualified spe-
cialist workshop. Blind Spot Assist may oth-
erwise not work properly.
Indicator and warning display
Blind Spot Assist is not active at speeds below approximately 20 mph (30 km/h). Vehicles in the monitoring range are then not indicated. 0043
Yellow indicator lamp/red warning lamp
When Blind Spot Assist is activated, indicator
lamp 0043in the exterior mirrors lights up yel-
low at speeds of up to 20 mph (30 km/ h). At 192
Driving systemsDriving and parking
Page 195 of 358
speeds above 20 mph (30 km/h), the indica-
tor lamp goes out and Blind Spot Assist is
operational.
If a vehicle is detected within the monitoring
range of Blind Spot Assist at speeds above
20 mph (30 km/h), then warning lamp 0043on
the corresponding side lights up red. This
warning is always emitted when a vehicle
enters the blind spot monitoring range from
behind or from the side. When you overtake a vehicle, the warning only occurs if the differ-
ence in speed is less than 7 mph (12 km/h).
The yellow indicator lamp goes out if reverse gear is engaged. In this event, Blind Spot
Assist is no longer active.
The brightness of the indicator/warning
lamps is adjusted automatically according to
the ambient light.
Collision warning
If a vehicle is detected in the monitoring range of Blind Spot Assist and you switch on the
corresponding turn signal, a double warning
tone sounds. Red warning lamp 0043flashes. If
the turn signal remains on, vehicles detected
are indicated by the flashing of red warning
lamp 0043. There are no further warning tones.
Switching on Blind Spot Assist X Make sure that Blind Spot Assist is activa-
ted in the on-board computer
(Y page 206).
X Turn the SmartKey to position 2in the igni-
tion lock.
Warning lamps 0043in the exterior mirrors
light up red for approximately 1.5 seconds
and then turn yellow. Lane Keeping Assist General notes
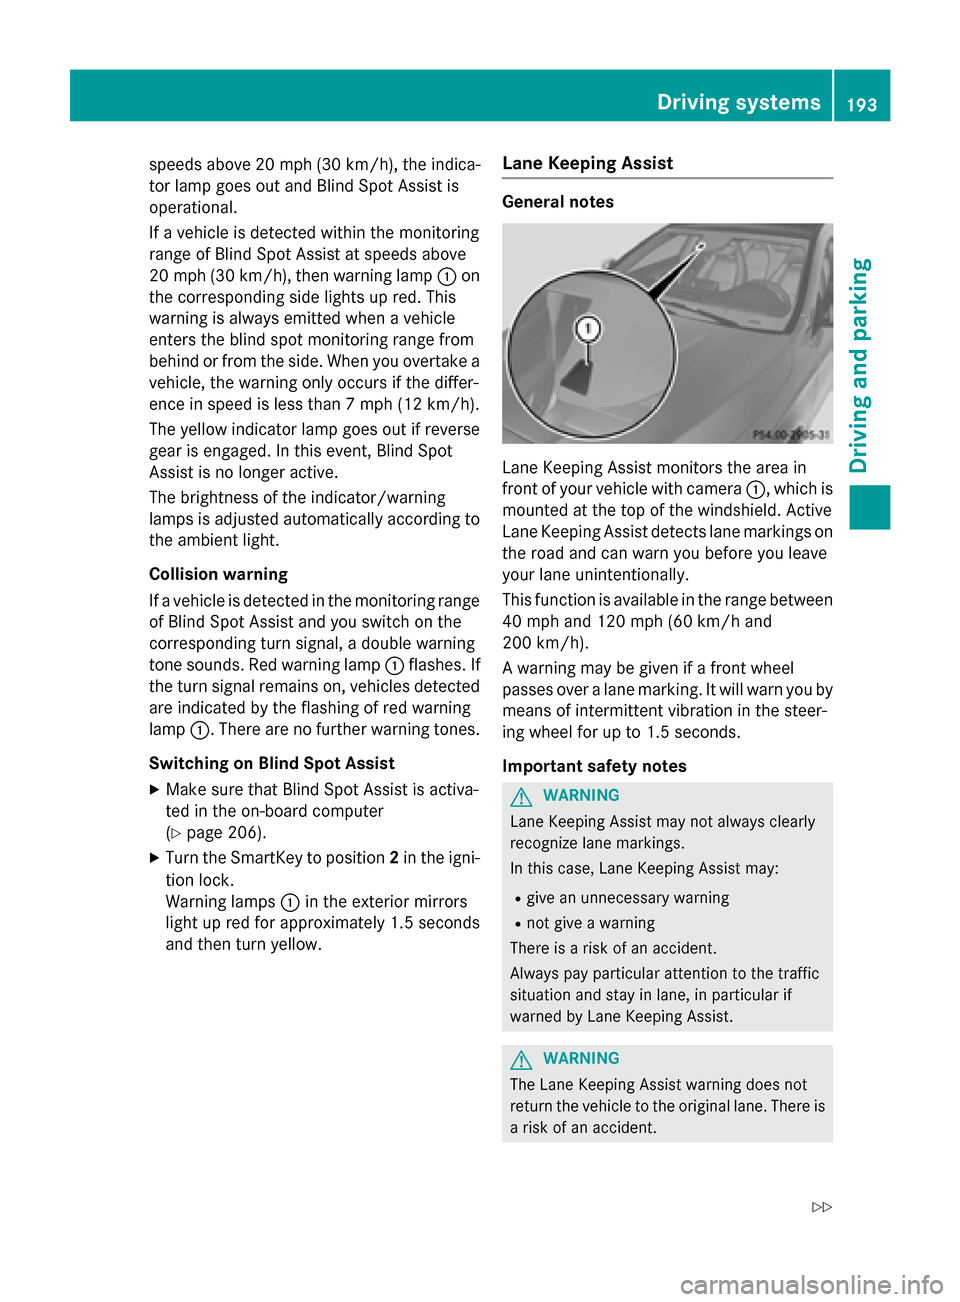
Lane Keeping Assist monitors the area in
front of your vehicle with camera
0043, which is
mounted at the top of the windshield. Active
Lane Keeping Assist detects lane markings on
the road and can warn you before you leave
your lane unintentionally.
This function is available in the range between
40 mph and 120 mph (60 km/h and
200 km/h).
A warning may be given if a front wheel
passes over a lane marking. It will warn you by means of intermittent vibration in the steer-
ing wheel for up to 1.5 seconds.
Important safety notes G
WARNING
Lane Keeping Assist may not always clearly
recognize lane markings.
In this case, Lane Keeping Assist may:
R give an unnecessary warning
R not give a warning
There is a risk of an accident.
Always pay particular attention to the traffic
situation and stay in lane, in particular if
warned by Lane Keeping Assist. G
WARNING
The Lane Keeping Assist warning does not
return the vehicle to the original lane. There is a risk of an accident. Driving systems
193Driving and parking
Z
Page 207 of 358
X
Press the 0059or0065 button on the steer-
ing wheel to select the DriveAssist DriveAssistmenu.
X Press 0063or0064 to select Assistance Assistance
Graphic
Graphic.
X Press the 0076button.
The multifunction display shows the DIS-
TRONIC PLUS distance display in the assis- tance graphic.
The assistance graphic displays the status of and information from the following driving
systems or driving safety systems:
R DISTRONIC PLUS (Y page 174)
R ATTENTION ASSIST (Y page 189)
R Lane Keeping Assist (Y page 193)
R Speed Limit Assist (Y page 190)
R Distance warning function of COLLISION
PREVENTION ASSIST (Y page 64)
R COLLISION PREVENTION ASSIST PLUS
(Y page 67)
Speed Limit Assist Activating/deactivating the Speed Limit
Assist message function
X Press the 0059or0065 button on the steer-
ing wheel to select the DriveAssist
DriveAssist menu.
X Press the 0063or0064 button to select
Speed Limit Assist Speed Limit Assist.
X Press the 0076button.
The current selection is displayed.
X To activate or deactivate: press0076.
When the Speed Limit Assist message
function is activated, the assistance
graphic shows the 00B8symbol.
If the Speed Limit Assist message function
is activated, a detected speed limit is auto- matically displayed for five seconds. Other
items in the multifunction display are sup-
pressed during this time.
Deactivating/activating ESP ®Observe the "Important safety notes" section
in the description of ESP (Y page 68). G
WARNING
If you deactivate ESP ®
, ESP ®
no longer sta-
bilizes the vehicle. There is an increased risk
of skidding and an accident.
Only deactivate ESP ®
in the situations descri-
bed in the following.
It may be best to deactivate ESP ®
in the fol-
lowing situations:
R when using snow chains
R in deep snow
R on sand or gravel
Activating/deactivating ESP ®
on AMG vehi-
cles (Y page 69).
For further information about ESP ®
, see
(Y page 67).
X Start the engine.
X Press the 0059or0065 button on the steer-
ing wheel to select the DriveAssist DriveAssistmenu.
X Press the 0063or0064 button to select
ESP
ESP.
X Press the 0076button.
The current selection is displayed.
X To activate/deactivate: press the0076
button again.
ESP ®
is deactivated if the 00BBwarning
lamp in the instrument cluster lights up
continuously when the engine is running.
If the 00E5 warning lamp and the 00BBwarn-
ing lamp are lit continuously, ESP ®
is not
available due to a malfunction.
Observe the information on warning lamps
(Y page 247).
Observe the information on display messages (Y page 214).
Activating/deactivating the distance
warning function X
Press the 0059or0065 button on the steer-
ing wheel to select the DriveAssist DriveAssistmenu.
X Press 0063or0064 to select Distance
Distance
Warning
Warning. Menus and submenus
205On-board computer and displays Z
Page 210 of 358
![MERCEDES-BENZ CLA-Class 2014 C117 Workshop Manual X
Press the 0064or0063 button to select the
Speedometer [km/h]
Speedometer [km/h] orSpeedometer
Speedometer
[mph]
[mph] function.
You will see the selected setting: on
onoroff
off.
X Press the 0076but](/img/4/3597/w960_3597-209.png "MERCEDES-BENZ CLA-Class 2014 C117 Workshop Manual X
Press the 0064or0063 button to select the
Speedometer [km/h]
Speedometer [km/h] orSpeedometer
Speedometer
[mph]
[mph] function.
You will see the selected setting: on
onoroff
off.
X Press the 0076but")
X
Press the 0064or0063 button to select the
Speedometer [km/h]
Speedometer [km/h] orSpeedometer
Speedometer
[mph]
[mph] function.
You will see the selected setting: on
onoroff
off.
X Press the 0076button to save the setting.
Selecting the permanent display function
You can determine whether the multifunction display permanently shows your speed or the
outside temperature.
X Press the 0059or0065 button on the steer-
ing wheel to select the Sett
Sett menu.
X Press the 0064or0063 button to select the
Instrument Cluster
Instrument Cluster submenu.
X Press 0076to confirm.
X Press the 0064or0063 button to select the
Permanent Display
Permanent Display function.
You will see the selected setting Outside
Outside
Temperature
Temperature orSpeedometer [km/h]
Speedometer [km/h]/
Speedometer [mph]
Speedometer [mph].
X Press the 0076button to save the setting.
Lights Switching the daytime running lamps on/
off
Canada only: daytime running lamps are
required by law. You cannot set the Daytime
Daytime
Running Lights
Running Lights function via the on-board
computer.
X Press the 0059or0065 button on the steer-
ing wheel to select the Sett
Sett menu.
X Press the 0064or0063 button to select the
Light Light submenu.
X Press 0076to confirm.
X Press the 0064or0063 button to select the
Daytime Running Lights
Daytime Running Lights function.
If the Daytime Running Lights
Daytime Running Lights function
has been switched on, the cone of light and the 0086 symbol in the multifunction dis-
play are shown in orange.
X Press the 0076button to save the setting.
Further information on daytime running
lamps (Y page 109). Setting the brightness of the ambient
lighting
X Press the 0059or0065 button on the steer-
ing wheel to select the Sett
Sett menu.
X Press the 0064or0063 button to select the
Light
Light submenu.
X Press 0076to confirm.
X Press the 0064or0063 button to select the
Amb. Light +/- Amb. Light +/- function.
You will see the selected setting.
X Change the setting with 0076.
X Press the 0064or0063 button to adjust the
brightness to a level from Off
OfftoLevel 5
Level 5
(bright).
X Press the 0076or0038 button to save the
setting.
Activating/deactivating surround light-
ing and exterior lighting delayed switch-
off
If you have activated the Surround Light‐
Surround Light‐
ing ing function and the light switch is set to
0058, the following functions are activated
when it is dark:
R surround lighting: the exterior lighting
remains lit for 40 seconds after unlocking
with the key. If you start the engine, the
surround lighting is switched off and auto-
matic headlamp mode is activated
(Y page 109).
R exterior lighting delayed switch-off: the
exterior lighting remains lit for 60 seconds
after the engine is switched off. If you close all the doors and the trunk lid, the exterior
lighting goes off after 15 seconds.
X Press the 0059or0065 button on the steer-
ing wheel to select the Sett Settmenu.
X Press the 0064or0063 button to select the
Light
Light submenu.
X Press 0076to confirm.
X Press the 0064or0063 button to select the
Surround Lighting
Surround Lighting function.
When the Surround Lighting
Surround Lighting function is
activated, the light cone and the area 208
Menus and submenusOn-board computer and displays
Page 211 of 358
around the vehicle are displayed in orange
in the multifunction display.
X Press the 0076button to save the setting.
Deactivating delayed switch-off of the exte-
rior lighting temporarily:
X Before leaving the vehicle, turn the Smart-
Key to position 0in the ignition lock.
X Turn the SmartKey to position 2in the igni-
tion lock.
The exterior lighting delayed switch-off is
deactivated.
Delayed switch-off of the exterior lighting is
reactivated the next time you start the
engine.
i Depending on your vehicle's equipment,
when the surround lighting and delayed
switch-off exterior lighting are on, the fol-
lowing light up:
R Parking lamps
R Front fog lamps
R Low-beam headlamps
R Daytime running lamps
R Side marker lamps
R Surround lighting in the exterior mirrors
Activating/deactivating the interior light-
ing delayed switch-off
If you activate the Interior Lighting
Interior Lighting
Delay
Delay function, the interior lighting remains
on for 20 seconds after you remove the key
from the ignition lock.
X Press the 0059or0065 button on the steer-
ing wheel to select the Sett Settmenu.
X Press the 0064or0063 button to select the
Light
Light submenu.
X Press 0076to confirm.
X Press the 0064or0063 button to select the
Interior Lighting Delay
Interior Lighting Delay function.
If the Interior
Interior Lighting
LightingDelay
Delayfunction
has been switched on, the vehicle interior is
displayed in orange in the multifunction
display.
X Press the 0076button to save the setting. Vehicle Activating/deactivating the automatic
door locking mechanism
X Press the 0059or0065 button on the steer-
ing wheel to select the Sett Settmenu.
X Press the 0064or0063 button to select the
Vehicle
Vehicle submenu.
X Press 0076to confirm.
X Press the 0064or0063 button to select the
Automatic Door Lock
Automatic Door Lock function.
When the Automatic
Automatic Door
DoorLock
Lockfunction
is activated, the vehicle doors are displayed in orange in the multifunction display.
X Press the 0076button to save the setting.
If you activate the Automatic Door Lock
Automatic Door Lock
function, the vehicle is centrally locked above
a speed of approximately 9 mph (15 km/h).
For further information on the automatic lock- ing feature, see (Y page 83).
Activating/deactivating the acoustic
locking verification signal
If you switch on the Acoustic AcousticLock
Lockfunction,
an acoustic signal sounds when you lock the
vehicle.
X Press the 0059or0065 button on the steer-
ing wheel to select the Sett
Sett menu.
X Press the 0064or0063 button to select the
Vehicle Vehicle submenu.
X Press 0076to confirm.
X Press the 0064or0063 button to select the
Acoustic Lock
Acoustic Lock function.
If the Acoustic
Acoustic Lock
Lockfunction is activated,
the 0037 symbol in the multifunction dis-
play lights up orange.
X Press the 0076button to save the setting.
Activating/deactivating the radar sensor
system X Press the 0059or0065 button on the steer-
ing wheel to select the Sett Settmenu.
X Press the 0064or0063 button to select the
Vehicle
Vehicle submenu.
X Press 0076to confirm. Menus and submenus
209On-board computer and displays Z
Page 212 of 358
X
Press the 0063or0064 button to select
Radar Sensor (See Oper. Manual):
Radar Sensor (See Oper. Manual):.
You will see the selected setting: Enabled
Enabled
or Disabled
Disabled.
X Press the 0076button to save the setting.
If the radar sensor system is switched off,
Blind Spot Assist is deactivated (Y page 191).
Convenience Switching the fold-in mirrors when lock-
ing feature on/off
This function is only available on vehicles with
the memory function (Y page 105).
When you activate the Auto. Auto.Mirror
Mirror Fold‐
Fold‐
ing ing function, the exterior mirrors are folded
in when the vehicle is locked.
If you unlock the vehicle and then open a
door, the exterior mirrors fold out again.
If you have switched on the Auto. Mirror Auto. Mirror
Folding
Folding function and you fold in the exterior
mirrors using the button on the door
(Y page 103), they will not fold out automat-
ically. The exterior mirrors can then only be
folded out using the button on the door.
X Press the 0059or0065 button on the steer-
ing wheel to select the Sett
Sett menu.
X Press the 0064or0063 button to select the
Convenience Convenience submenu.
X Press 0076to confirm.
X Press the 0064or0063 button to select the
Auto. Mirror Folding
Auto. Mirror Folding function.
If the Auto. Mirror Folding
Auto. Mirror Folding function is
activated, the vehicle's exterior mirror is
displayed in orange in the multifunction
display.
X Press the 0076button to save the setting.
Restoring the factory settings X
Press the 0059or0065 button on the steer-
ing wheel to select the Sett Settmenu.
X Press the 0064or0063 button to select the
Factory Setting
Factory Setting submenu. X
Press 0076to confirm.
The Reset All Settings? Reset All Settings? message
appears.
X Press the 0064or0063 button to select No No
or Yes
Yes.
X Press 0076to confirm the selection.
If you have selected Yes
Yes, the multifunction
display shows a confirmation message.
For safety reasons, the Daytime Running
Daytime Running
Lamps
Lamps function in the Light
Lightsubmenu is only
reset if the vehicle is stationary. AMG menu in AMG vehicles
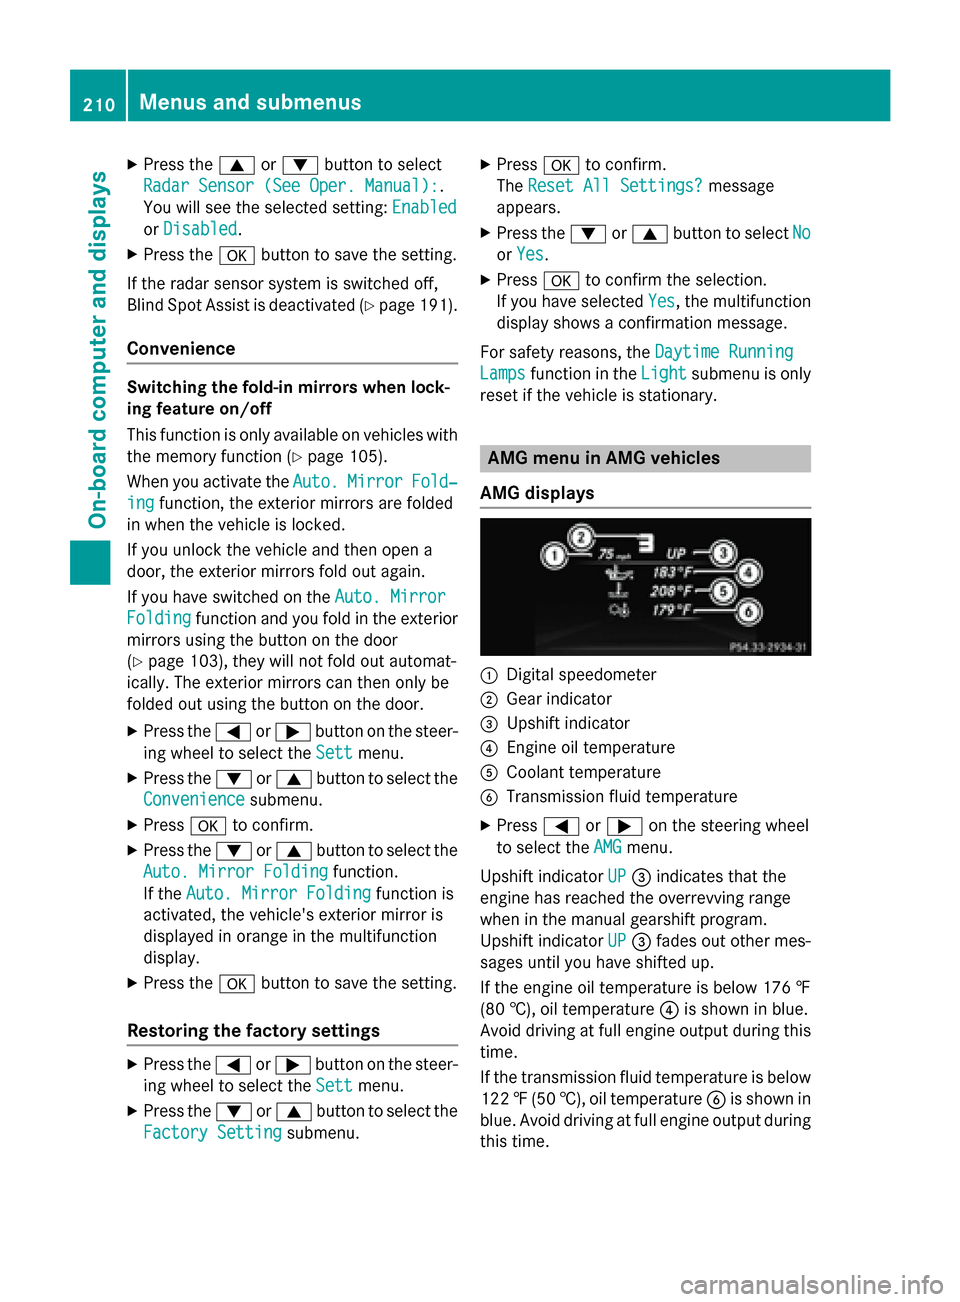
AMG displays 0043
Digital speedometer
0044 Gear indicator
0087 Upshift indicator
0085 Engine oil temperature
0083 Coolant temperature
0084 Transmission fluid temperature
X Press 0059or0065 on the steering wheel
to select the AMG
AMG menu.
Upshift indicator UP
UP0087 indicates that the
engine has reached the overrevving range
when in the manual gearshift program.
Upshift indicator UP UP0087 fades out other mes-
sages until you have shifted up.
If the engine oil temperature is below 176 ‡
(80 †), oil temperature 0085is shown in blue.
Avoid driving at full engine output during this time.
If the transmission fluid temperature is below
122 ‡(50 †), oil temperature 0084is shown in
blue. Avoid driving at full engine output during
this time. 210
Menus and submenusOn-board computer and displays
Page 219 of 358
Display messages
Possible causes/consequences and
0050
0050Solutions 0049(USA
only)0024
(Canada
only)
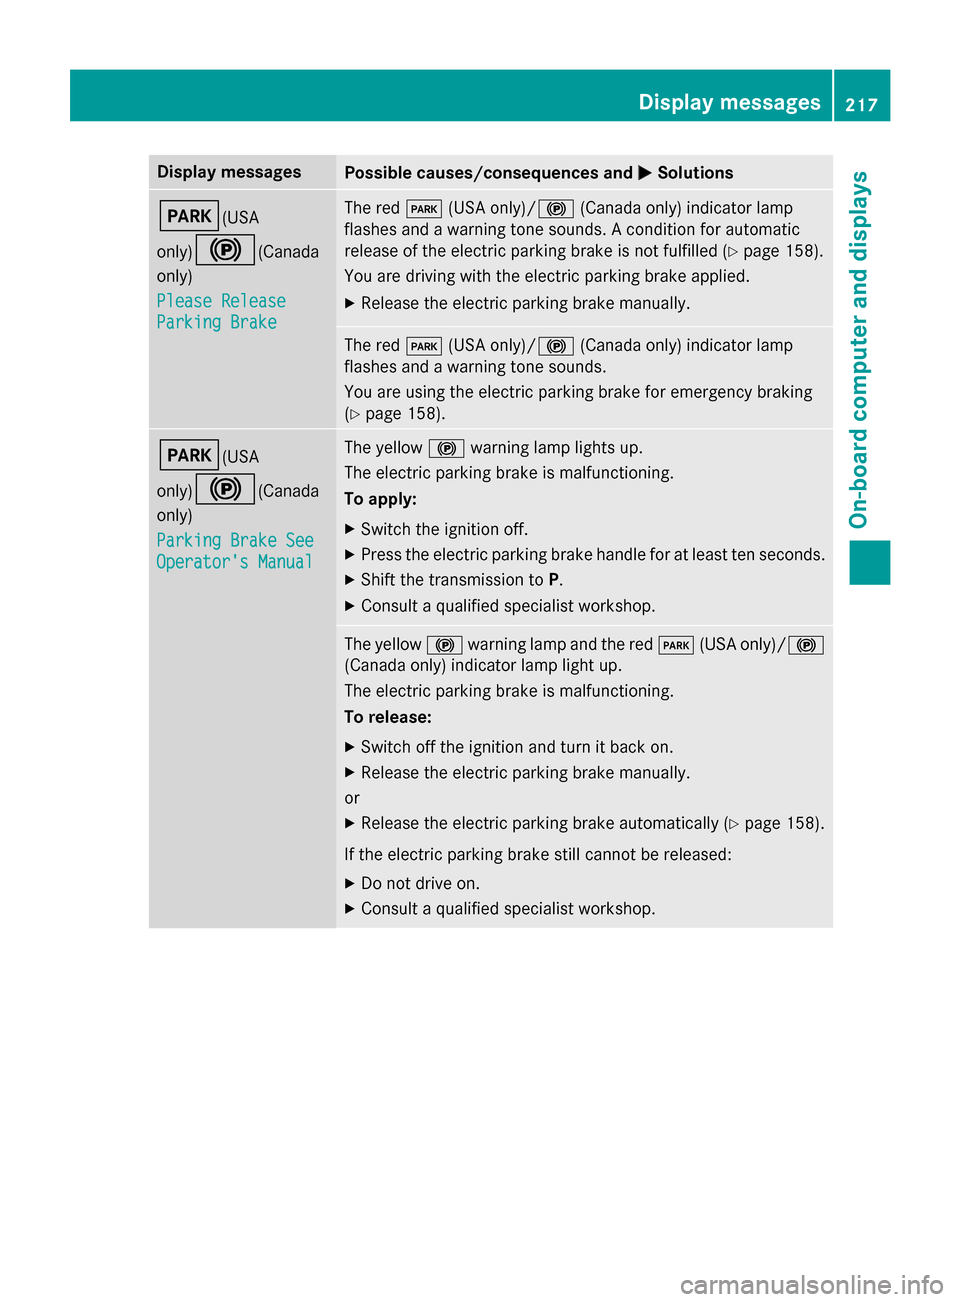
Please Release Please Release
Parking Brake Parking Brake The red
0049(USA only)/0024 (Canada only) indicator lamp
flashes and a warning tone sounds. A condition for automatic
release of the electric parking brake is not fulfilled (Y page 158).
You are driving with the electric parking brake applied.
X Release the electric parking brake manually. The red
0049(USA only)/0024 (Canada only) indicator lamp
flashes and a warning tone sounds.
You are using the electric parking brake for emergency braking
(Y page 158). 0049(USA
only)0024
(Canada
only)
Parking Brake See Parking Brake See
Operator's Manual Operator's Manual The yellow
0024warning lamp lights up.
The electric parking brake is malfunctioning.
To apply:
X Switch the ignition off.
X Press the electric parking brake handle for at least ten seconds.
X Shift the transmission to P.
X Consult a qualified specialist workshop. The yellow
0024warning lamp and the red 0049(USA only)/ 0024
(Canada only) indicator lamp light up.
The electric parking brake is malfunctioning.
To release:
X Switch off the ignition and turn it back on.
X Release the electric parking brake manually.
or X Release the electric parking brake automatically (Y page 158).
If the electric parking brake still cannot be released: X Do not drive on.
X Consult a qualified specialist workshop. Display
messages
217On-board computer and displays Z
Page 220 of 358
Display messages
Possible causes/consequences and
0050
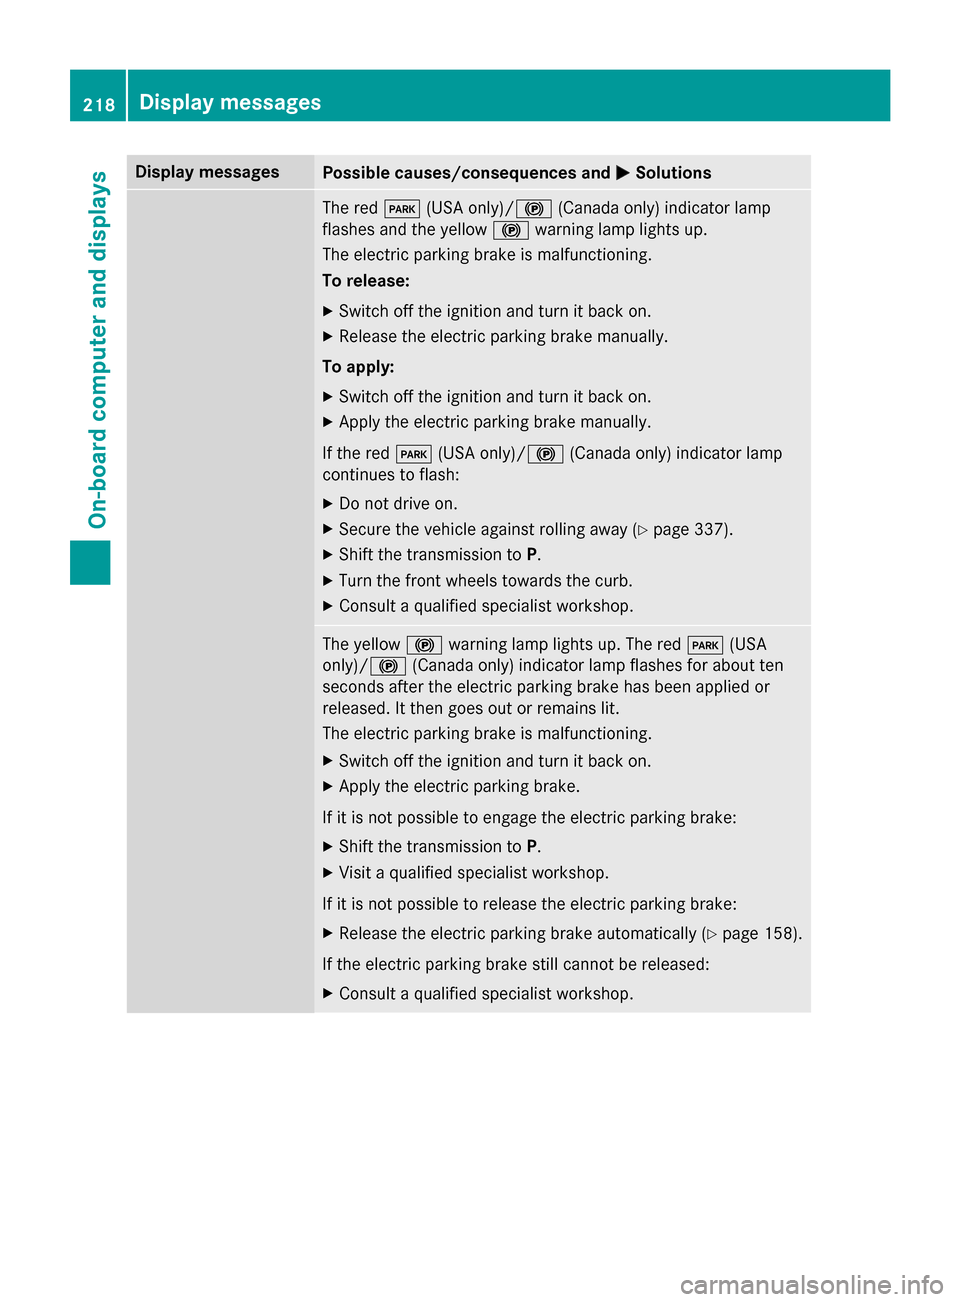
0050Solutions The red
0049(USA only)/0024 (Canada only) indicator lamp
flashes and the yellow 0024warning lamp lights up.
The electric parking brake is malfunctioning.
To release:
X Switch off the ignition and turn it back on.
X Release the electric parking brake manually.
To apply: X Switch off the ignition and turn it back on.
X Apply the electric parking brake manually.
If the red 0049(USA only)/ 0024(Canada only) indicator lamp
continues to flash:
X Do not drive on.
X Secure the vehicle against rolling away (Y page 337).
X Shift the transmission to P.
X Turn the front wheels towards the curb.
X Consult a qualified specialist workshop. The yellow
0024warning lamp lights up. The red 0049(USA
only)/ 0024(Canada only) indicator lamp flashes for about ten
seconds after the electric parking brake has been applied or
released. It then goes out or remains lit.
The electric parking brake is malfunctioning.
X Switch off the ignition and turn it back on.
X Apply the electric parking brake.
If it is not possible to engage the electric parking brake:
X Shift the transmission to P.
X Visit a qualified specialist workshop.
If it is not possible to release the electric parking brake:
X Release the electric parking brake automatically (Y page 158).
If the electric parking brake still cannot be released: X Consult a qualified specialist workshop. 218
Display
messagesOn-board computer and displays
Page 221 of 358
Display messages
Possible causes/consequences and
0050
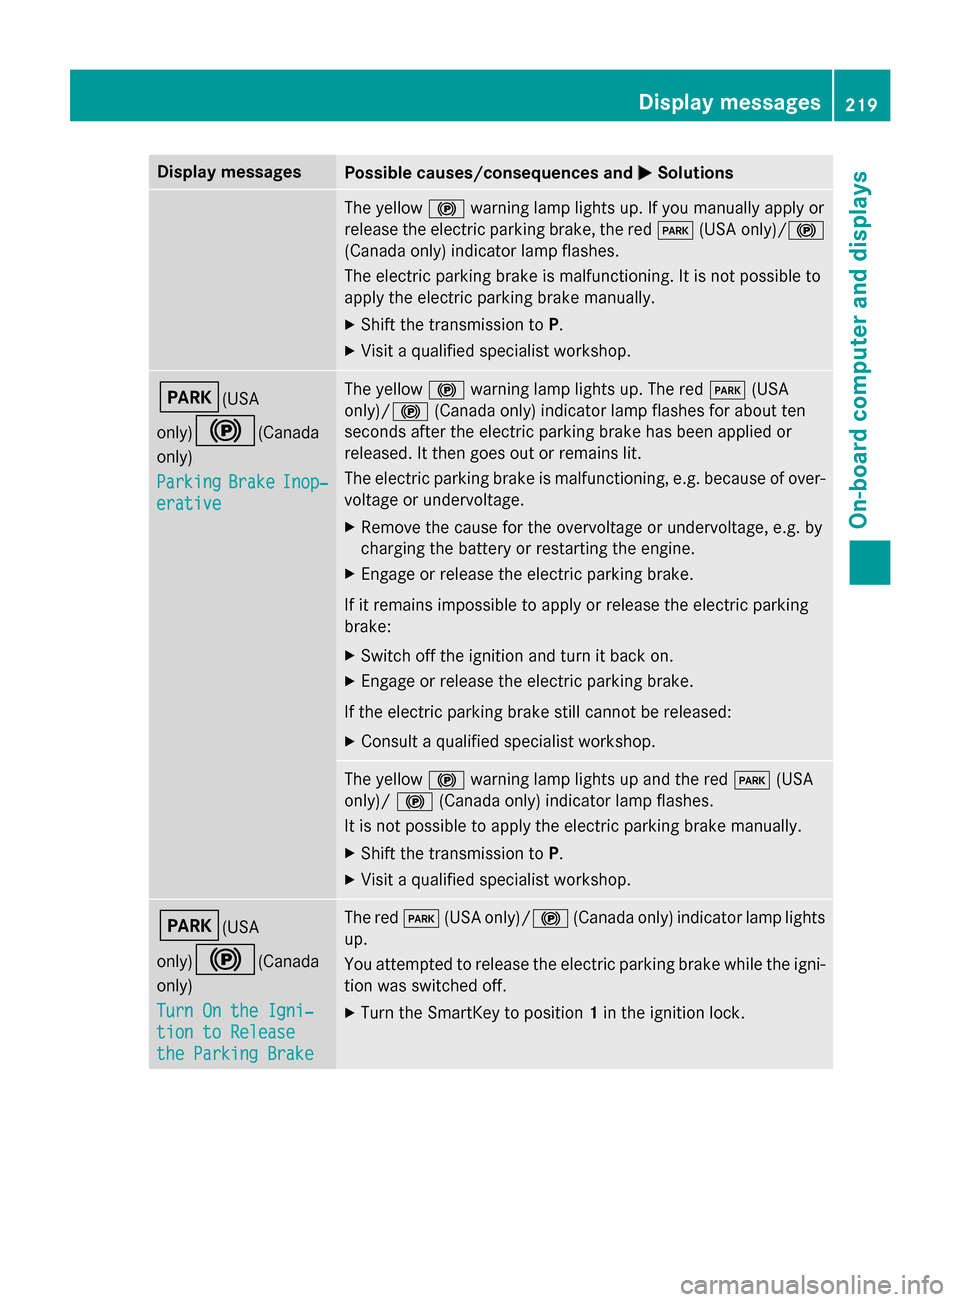
0050Solutions The yellow
0024warning lamp lights up. If you manually apply or
release the electric parking brake, the red 0049(USA only)/ 0024
(Canada only) indicator lamp flashes.
The electric parking brake is malfunctioning. It is not possible to
apply the electric parking brake manually.
X Shift the transmission to P.
X Visit a qualified specialist workshop. 0049(USA
only)0024
(Canada
only)
Parking Parking Brake
BrakeInop‐
Inop‐
erative
erative The yellow
0024warning lamp lights up. The red 0049(USA
only)/ 0024(Canada only) indicator lamp flashes for about ten
seconds after the electric parking brake has been applied or
released. It then goes out or remains lit.
The electric parking brake is malfunctioning, e.g. because of over-
voltage or undervoltage.
X Remove the cause for the overvoltage or undervoltage, e.g. by
charging the battery or restarting the engine.
X Engage or release the electric parking brake.
If it remains impossible to apply or release the electric parking
brake:
X Switch off the ignition and turn it back on.
X Engage or release the electric parking brake.
If the electric parking brake still cannot be released: X Consult a qualified specialist workshop. The yellow
0024warning lamp lights up and the red 0049(USA
only)/ 0024(Canada only) indicator lamp flashes.
It is not possible to apply the electric parking brake manually.
X Shift the transmission to P.
X Visit a qualified specialist workshop. 0049(USA
only)0024
(Canada
only)
Turn On the Igni‐ Turn On the Igni‐
tion to Release tion to Release
the Parking Brake the Parking Brake The red
0049(USA only)/0024 (Canada only) indicator lamp lights
up.
You attempted to release the electric parking brake while the igni-
tion was switched off.
X Turn the SmartKey to position 1in the ignition lock. Display
messages
219On-board computer and displays Z
Page 222 of 358
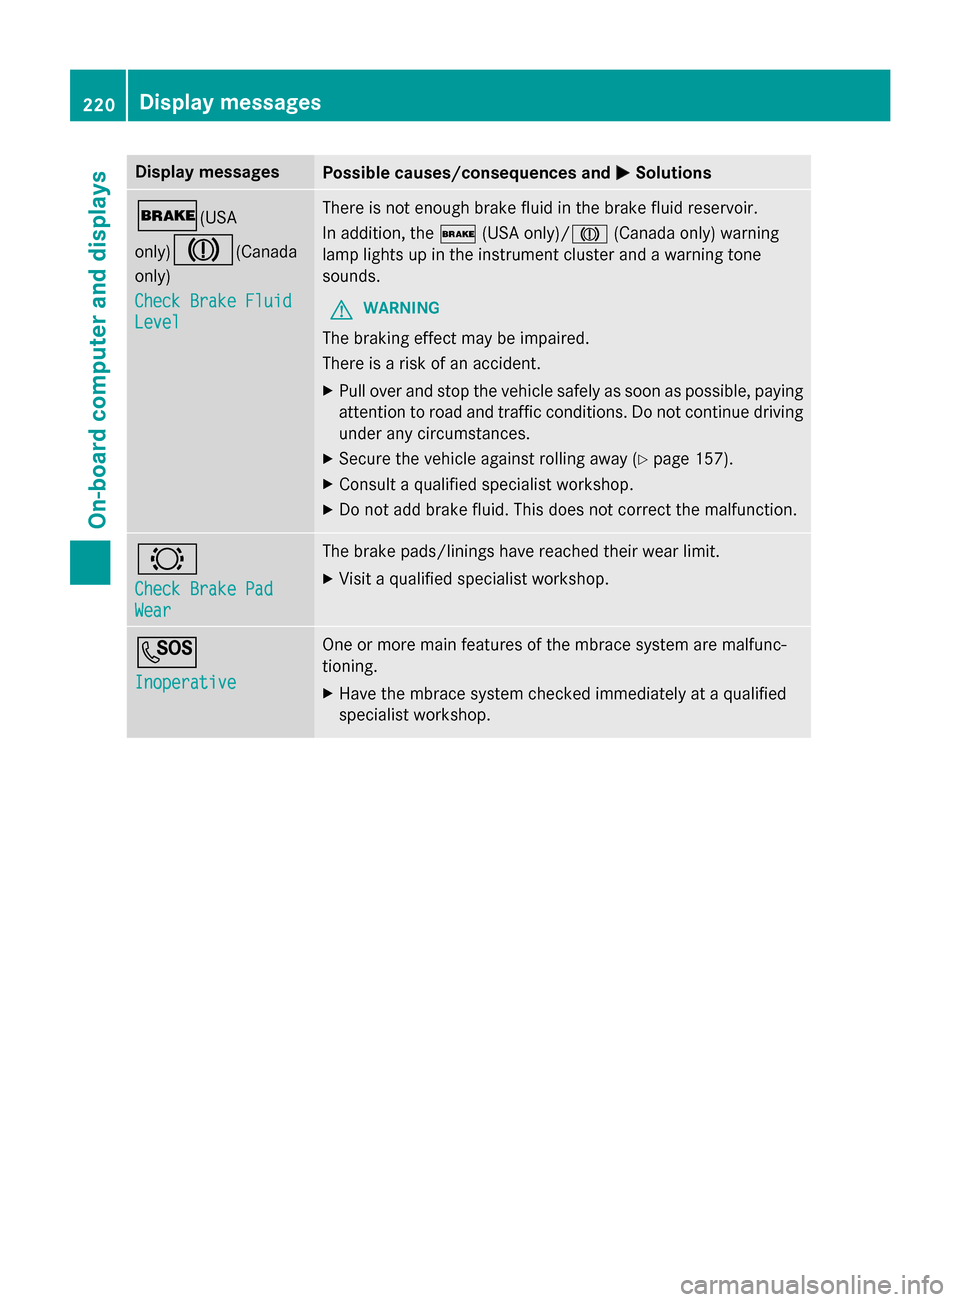
Display messages
Possible causes/consequences and
0050
0050Solutions 0027(USA
only)004D
(Canada
only)
Check Brake Fluid Check Brake Fluid
Level Level There is not enough brake fluid in the brake fluid reservoir.
In addition, the
0027(USA only)/ 004D(Canada only) warning
lamp lights up in the instrument cluster and a warning tone
sounds.
G WARNING
The braking effect may be impaired.
There is a risk of an accident. X Pull over and stop the vehicle safely as soon as possible, paying
attention to road and traffic conditions. Do not continue driving
under any circumstances.
X Secure the vehicle against rolling away (Y page 157).
X Consult a qualified specialist workshop.
X Do not add brake fluid. This does not correct the malfunction. 0026
Check Brake Pad Check Brake Pad
Wear Wear The brake pads/linings have reached their wear limit.
X Visit a qualified specialist workshop. 0053
Inoperative Inoperative One or more main features of the mbrace system are malfunc-
tioning.
X Have the mbrace system checked immediately at a qualified
specialist workshop. 220
Display
messagesOn-board computer and displays