display MERCEDES-BENZ CLA-Class 2014 C117 Repair Manual
[x] Cancel search | Manufacturer: MERCEDES-BENZ, Model Year: 2014, Model line: CLA-Class, Model: MERCEDES-BENZ CLA-Class 2014 C117Pages: 358, PDF Size: 6.6 MB
Page 187 of 358
Otherwise Active Parking Assist will be can-
celed.
X Stop when PARKTRONIC sounds the con-
tinuous warning tone, if not before.
X Shift the transmission to position Dor Ras
required while the vehicle is stationary.
Active Parking Assist immediately steers in
the other direction. The Park Assist Park Assist
Active Accelerate and Brake
Active Accelerate and Brake
Observe
Observe Surroundings
Surroundings message appears
in the multifunction display.
i You will achieve the best results by wait-
ing for the steering procedure to complete before pulling away.
If you back up after activation, the steering wheel is moved to the straight-ahead posi-
tion.
X Drive forwards and back up as prompted by
the PARKTRONIC warning displays, several
times if necessary.
X Stop as soon as PARKTRONIC sounds the
continuous warning tone, if not before.
Once you have exited the parking space com- pletely, the steering wheel is moved to the
straight-ahead position. You hear a tone and
the Park Assist Finished Park Assist Finished message
appears in the multifunction display. You will
then have to steer and merge into traffic on
your own. PARKTRONIC is still available. You
can take over the steering, before the vehicle
has exited the parking space completely. This is useful, for example when you recognize
that it is already possible to pull out of the
parking space. Canceling Active Parking Assist You can cancel Active Parking Assist at any
time.
X Stop the movement of the multifunction
steering wheel or steer yourself.
Active Parking Assist will be canceled at
once. The Park Assist Canceled Park Assist Canceled mes-
sage appears in the multifunction display.
or
X Press the PARKTRONIC button on the cen-
ter console (Y page 180).
PARKTRONIC is switched off and Active
Parking Assist is immediately canceled.
The Park Assist Canceled Park Assist Canceled message
appears in the multifunction display.
Active Parking Assist is canceled automati-
cally if:
R the electric parking brake is engaged
R transmission position Pis selected
R parking using Active Parking Assist is no
longer possible
R you are driving faster than 6 mph (10 km/h)
R a wheel spins, ESP ®
intervenes or fails. The
00E5 warning lamp lights up in the instru-
ment cluster.
A warning tone sounds. The parking symbol
disappears and the multifunction display
shows the Park Assist Canceled Park Assist Canceled mes-
sage.
If Active Parking Assist is canceled, you must
steer again yourself. Driving systems
185Driving and parking Z
Page 188 of 358
Rear view camera
General notes Rear view camera
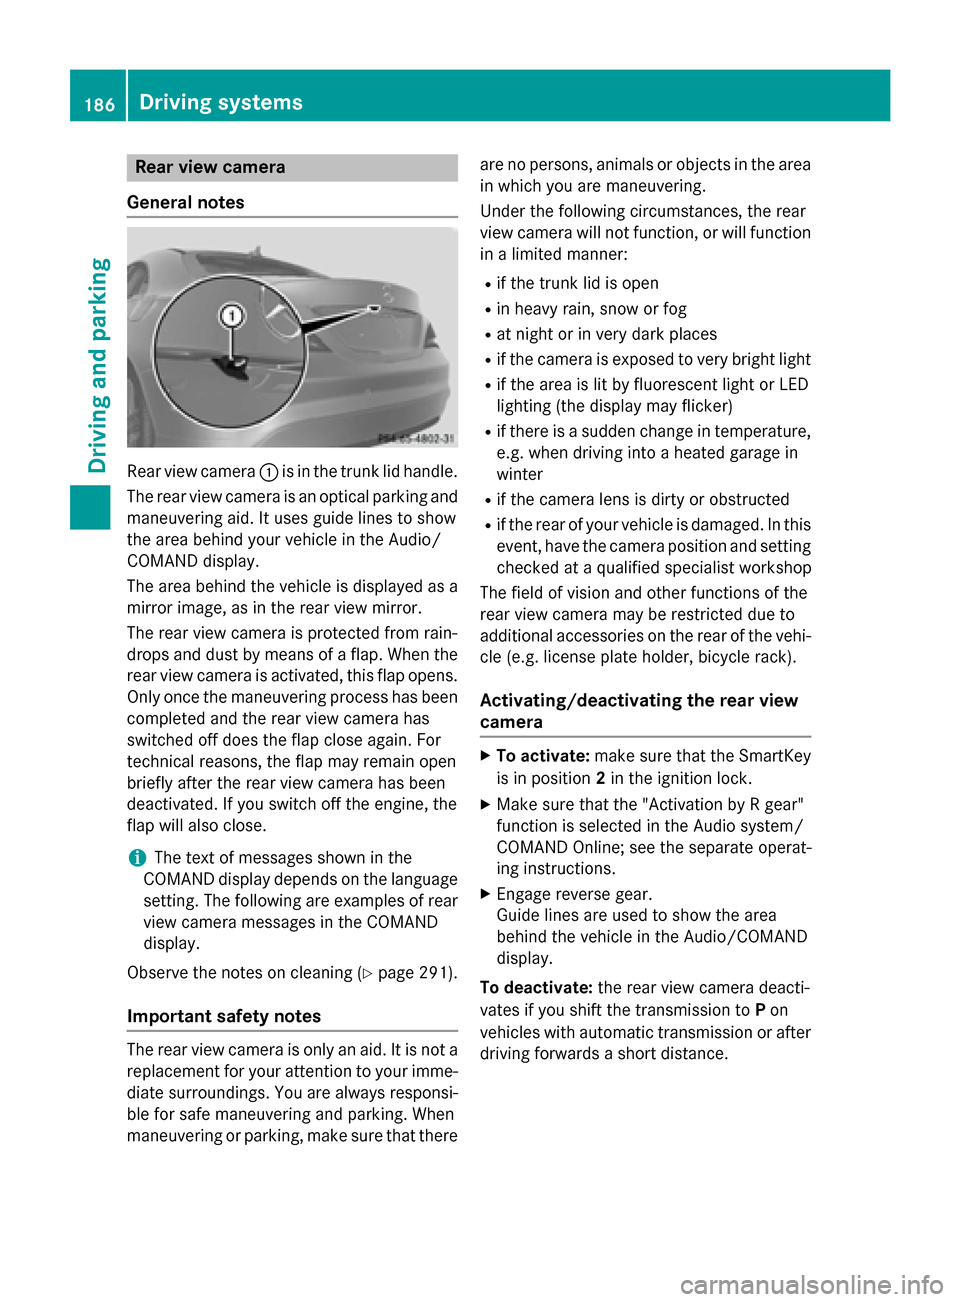
0043is in the trunk lid handle.
The rear view camera is an optical parking and maneuvering aid. It uses guide lines to show
the area behind your vehicle in the Audio/
COMAND display.
The area behind the vehicle is displayed as a
mirror image, as in the rear view mirror.
The rear view camera is protected from rain-
drops and dust by means of a flap. When the
rear view camera is activated, this flap opens. Only once the maneuvering process has been
completed and the rear view camera has
switched off does the flap close again. For
technical reasons, the flap may remain open
briefly after the rear view camera has been
deactivated. If you switch off the engine, the
flap will also close.
i The text of messages shown in the
COMAND display depends on the language
setting. The following are examples of rear view camera messages in the COMAND
display.
Observe the notes on cleaning (Y page 291).
Important safety notes The rear view camera is only an aid. It is not a
replacement for your attention to your imme-
diate surroundings. You are always responsi- ble for safe maneuvering and parking. When
maneuvering or parking, make sure that there are no persons, animals or objects in the area
in which you are maneuvering.
Under the following circumstances, the rear
view camera will not function, or will function
in a limited manner:
R if the trunk lid is open
R in heavy rain, snow or fog
R at night or in very dark places
R if the camera is exposed to very bright light
R if the area is lit by fluorescent light or LED
lighting (the display may flicker)
R if there is a sudden change in temperature,
e.g. when driving into a heated garage in
winter
R if the camera lens is dirty or obstructed
R if the rear of your vehicle is damaged. In this
event, have the camera position and setting checked at a qualified specialist workshop
The field of vision and other functions of the
rear view camera may be restricted due to
additional accessories on the rear of the vehi-
cle (e.g. license plate holder, bicycle rack).
Activating/deactivating the rear view camera X
To activate: make sure that the SmartKey
is in position 2in the ignition lock.
X Make sure that the "Activation by R gear"
function is selected in the Audio system/
COMAND Online; see the separate operat-
ing instructions.
X Engage reverse gear.
Guide lines are used to show the area
behind the vehicle in the Audio/COMAND
display.
To deactivate: the rear view camera deacti-
vates if you shift the transmission to Pon
vehicles with automatic transmission or after driving forwards a short distance. 186
Driving systemsDriving and parking
Page 189 of 358
Displays in the Audio/COMAND display
The rear view camera may show a distorted
view of obstacles, show them incorrectly or
not at all. The rear view camera does not show objects in the following positions:
R very close to the rear bumper
R under the rear bumper
R in close range above the handle on the
trunk lid
! Objects not at ground level may appear to
be further away than they actually are, e.g.:
R the bumper of a parked vehicle
R the drawbar of a trailer
R the ball coupling of a trailer tow hitch
R the rear section of an HGV
R a slanted post
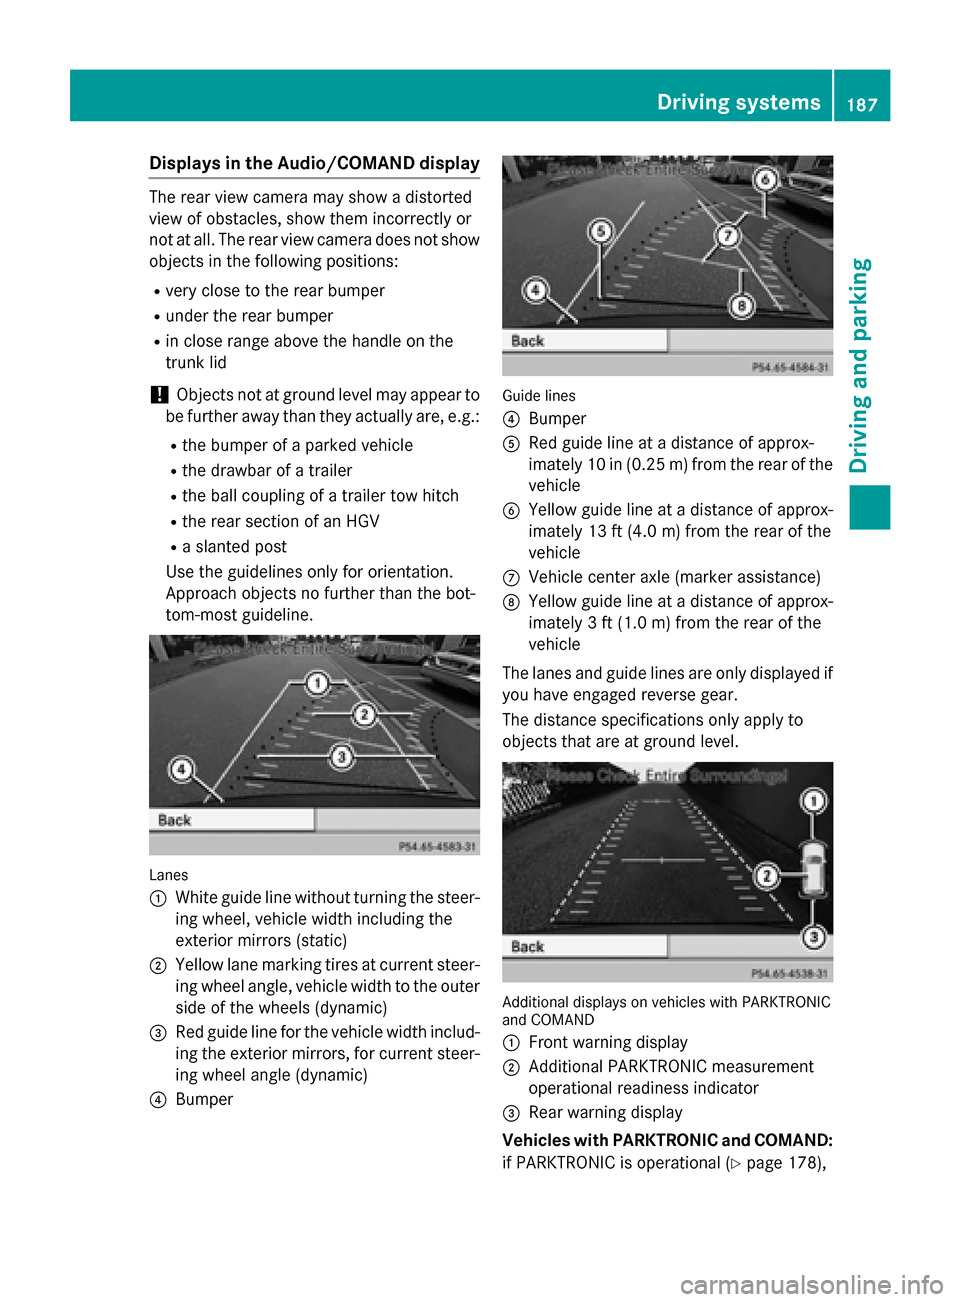
Use the guidelines only for orientation.
Approach objects no further than the bot-
tom-most guideline. Lanes
0043
White guide line without turning the steer-
ing wheel, vehicle width including the
exterior mirrors (static)
0044 Yellow lane marking tires at current steer-
ing wheel angle, vehicle width to the outer
side of the wheels (dynamic)
0087 Red guide line for the vehicle width includ-
ing the exterior mirrors, for current steer- ing wheel angle (dynamic)
0085 Bumper Guide lines
0085
Bumper
0083 Red guide line at a distance of approx-
imately 10 in (0.25 m) from the rear of the
vehicle
0084 Yellow guide line at a distance of approx-
imately 13 ft (4.0 m) from the rear of the
vehicle
006B Vehicle center axle (marker assistance)
006C Yellow guide line at a distance of approx-
imately 3 ft (1.0 m) from the rear of the
vehicle
The lanes and guide lines are only displayed if
you have engaged reverse gear.
The distance specifications only apply to
objects that are at ground level. Additional displays on vehicles with PARKTRONIC
and COMAND
0043
Front warning display
0044 Additional PARKTRONIC measurement
operational readiness indicator
0087 Rear warning display
Vehicles with PARKTRONIC and COMAND:
if PARKTRONIC is operational (Y page 178), Driving syste
ms
187Driving an d parking Z
Page 190 of 358
an additional operational readiness indicator
will appear in COMAND display 0044.If the
PARKTRONIC warning displays are active or
light up, warning displays 0043and 0087are also
active or light up correspondingly in the
COMAND display.
"Reverse parking" function X
Make sure that the rear view camera is
activated and the "Reverse parking" func-
tion is selected; see the separate operating instructions for the audio system/
COMAND.
The lane and the guide lines are shown.
Backing up straight into a parking space
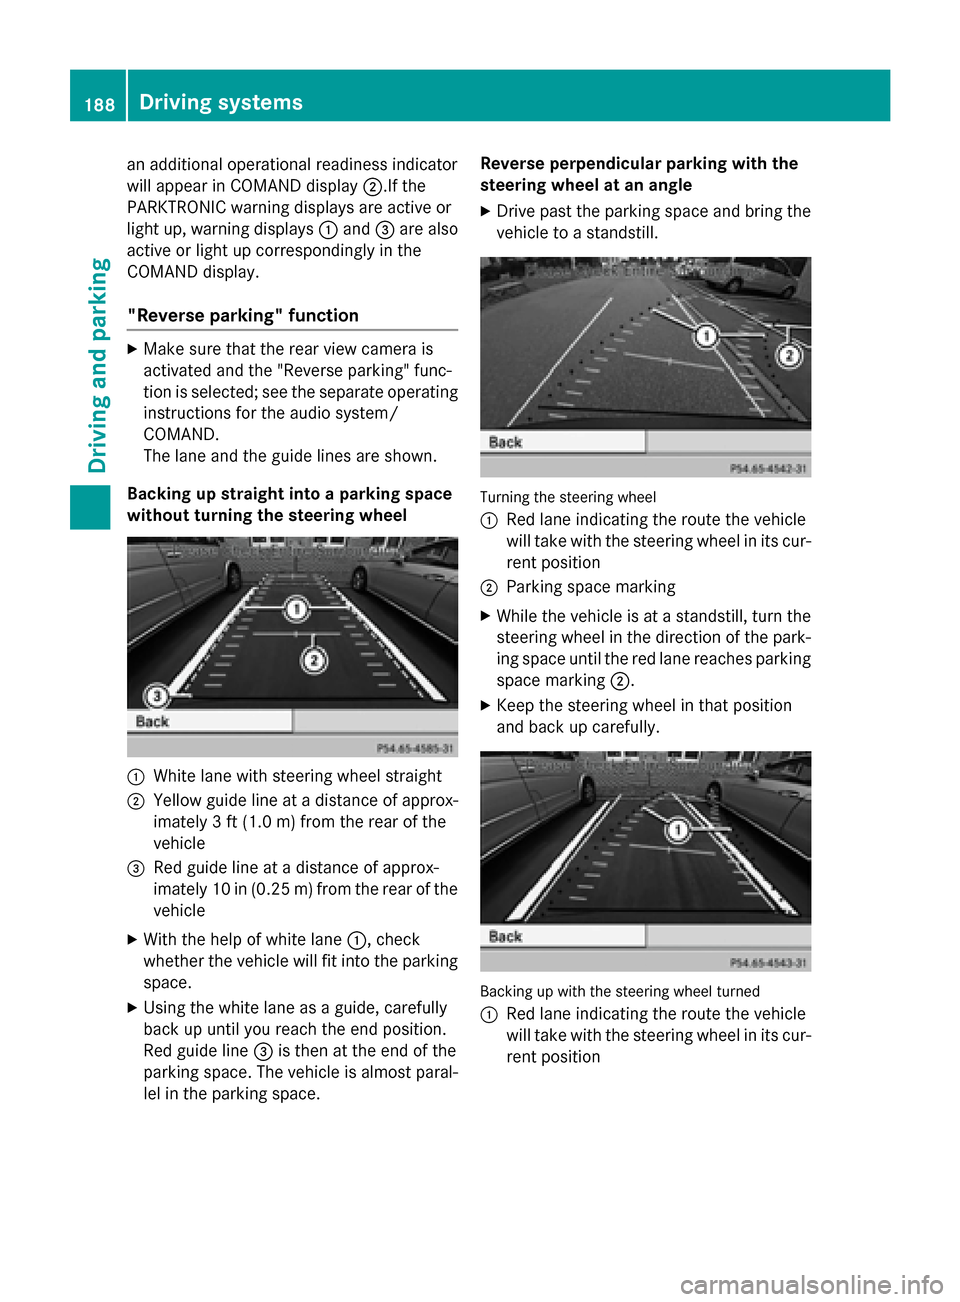
without turning the steering wheel 0043
White lane with steering wheel straight
0044 Yellow guide line at a distance of approx-
imately 3 ft (1.0 m) from the rear of the
vehicle
0087 Red guide line at a distance of approx-
imately 10 in (0.25m) from the rear of the
vehicle
X With the help of white lane 0043, check
whether the vehicle will fit into the parking
space.
X Using the white lane as a guide, carefully
back up until you reach the end position.
Red guide line 0087is then at the end of the
parking space. The vehicle is almost paral-
lel in the parking space. Reverse perpendicular parking with the
steering wheel at an angle
X Drive past the parking space and bring the
vehicle to a standstill. Turning the steering wheel
0043
Red lane indicating the route the vehicle
will take with the steering wheel in its cur-
rent position
0044 Parking space marking
X While the vehicle is at a standstill, turn the
steering wheel in the direction of the park-ing space until the red lane reaches parkingspace marking 0044.
X Keep the steering wheel in that position
and back up carefully. Backing up with the steering wheel turned
0043 Red lane indicating the route the vehicle
will take with the steering wheel in its cur-
rent position 188
Driving systemsDriving an
d parking
Page 192 of 358
Warning and display messages in the
multifunction display X
Activate ATTENTION ASSIST using the on-
board computer (Y page 206).
If ATTENTION ASSIST is active, you will be
warned no sooner than 20 minutes after
your journey has begun. You then hear an
intermittent warning tone twice and the
Attention Assist: Take a Break!
Attention Assist: Take a Break!
message appears in the multifunction dis-
play.
X If necessary, take a break.
X Press the 0076or0038 button to confirm
the message.
On long journeys, take regular breaks in good time to allow yourself to rest properly. If you
do not take a break, you will be warned again
after 15 minutes at the earliest. The precon-
dition for this is that ATTENTION ASSIST still
detects typical indicators of fatigue or
increasing lapses in concentration.
ATTENTION ASSIST is reset when you con-
tinue your journey and starts assessing your
tiredness again if:
R you switch off the engine.
R you take off your seat belt and open the
driver's door, e.g. for a change of drivers or
to take a break.
When ATTENTION ASSIST is deactivated, the 00D7 symbol appears in the multifunction
display in the assistance graphic display. Speed Limit Assist
General notes Speed Limit Assist shows you detected speed
limits in the multifunction display. Data from
the navigation system is also used for this
purpose. If a traffic sign indicating a speed
limit or the end of a speed limit is detected, it
is shown in the multifunction display. If Speed
Limit Assist does not detect any traffic signs, the speed limit from the digital road map is
used and shown in the display. Speed Limit Assist detects the traffic signs
with a camera attached behind the top of the
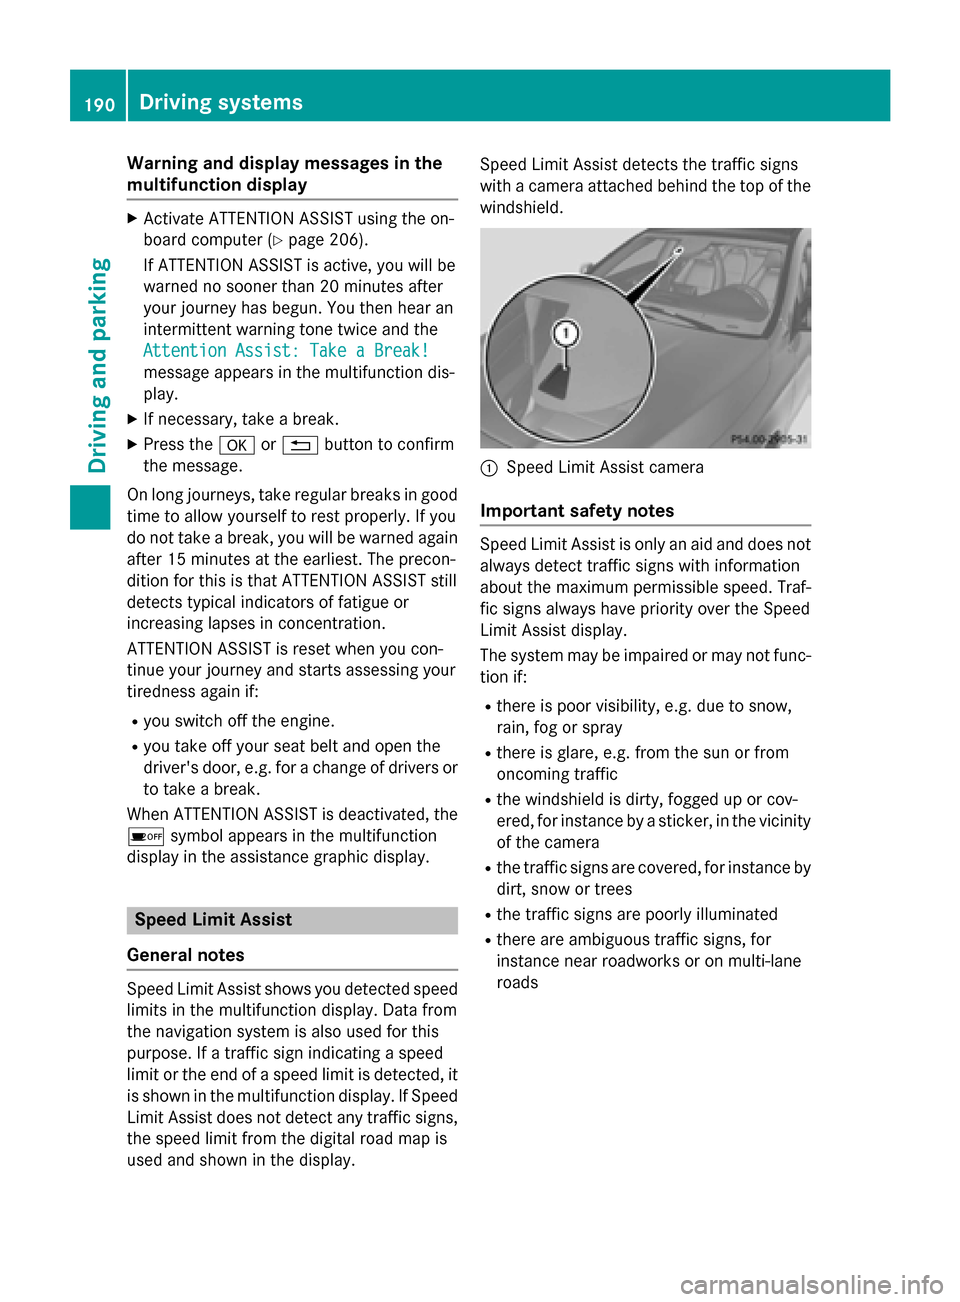
windshield. 0043
Speed Limit Assist camera
Important safety notes Speed Limit Assist is only an aid and does not
always detect traffic signs with information
about the maximum permissible speed. Traf-
fic signs always have priority over the Speed
Limit Assist display.
The system may be impaired or may not func-
tion if:
R there is poor visibility, e.g. due to snow,
rain, fog or spray
R there is glare, e.g. from the sun or from
oncoming traffic
R the windshield is dirty, fogged up or cov-
ered, for instance by a sticker, in the vicinity
of the camera
R the traffic signs are covered, for instance by
dirt, snow or trees
R the traffic signs are poorly illuminated
R there are ambiguous traffic signs, for
instance near roadworks or on multi-lane
roads 190
Driving systemsDriving and parking
Page 193 of 358
Information in the multifunction display
Briefly showing detected traffic signs in
the multifunction display
X Activate the Speed Limit Assist warning
function using the on-board computer
(Y page 205).
A traffic sign indicating a speed limit or the
end of a speed limit appears in the multi-
function display for around five seconds as soon as it is detected. Any other informa-
tion in the multifunction display is hidden
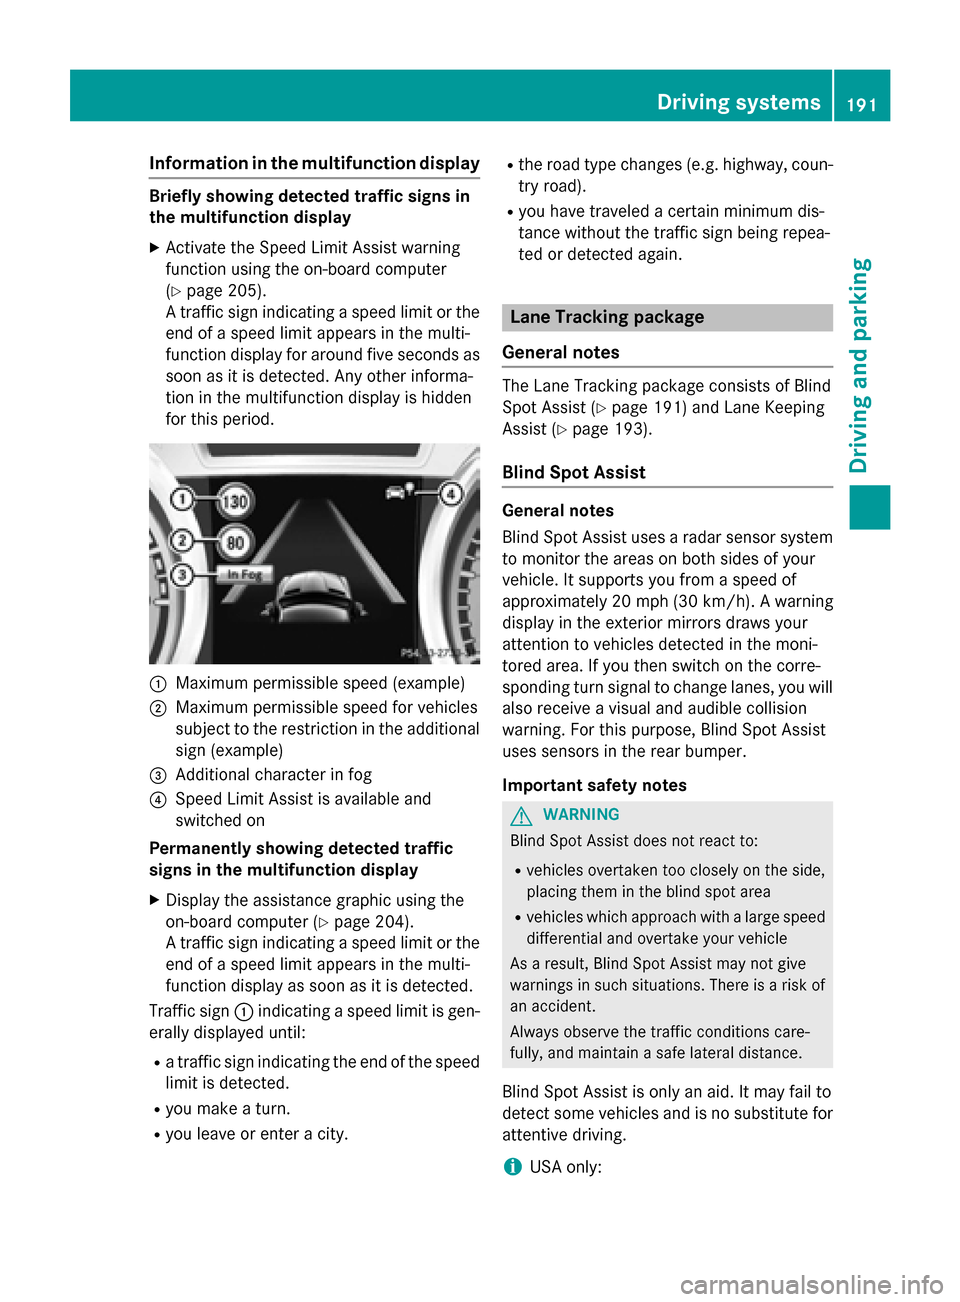
for this period. 0043
Maximum permissible speed (example)
0044 Maximum permissible speed for vehicles
subject to the restriction in the additional
sign (example)
0087 Additional character in fog
0085 Speed Limit Assist is available and
switched on
Permanently showing detected traffic
signs in the multifunction display
X Display the assistance graphic using the
on-board computer (Y page 204).
A traffic sign indicating a speed limit or the
end of a speed limit appears in the multi-
function display as soon as it is detected.
Traffic sign 0043indicating a speed limit is gen-
erally displayed until:
R a traffic sign indicating the end of the speed
limit is detected.
R you make a turn.
R you leave or enter a city. R
the road type changes (e.g. highway, coun-
try road).
R you have traveled a certain minimum dis-
tance without the traffic sign being repea-
ted or detected again. Lane Tracking package
General notes The Lane Tracking package consists of Blind
Spot Assist (Y page 191) and Lane Keeping
Assist (Y page 193).
Blind Spot Assist General notes
Blind Spot Assist uses a radar sensor system
to monitor the areas on both sides of your
vehicle. It supports you from a speed of
approximately 20 mph (30 km/h). A warning
display in the exterior mirrors draws your
attention to vehicles detected in the moni-
tored area. If you then switch on the corre-
sponding turn signal to change lanes, you will also receive a visual and audible collision
warning. For this purpose, Blind Spot Assist
uses sensors in the rear bumper.
Important safety notes G
WARNING
Blind Spot Assist does not react to:
R vehicles overtaken too closely on the side,
placing them in the blind spot area
R vehicles which approach with a large speed
differential and overtake your vehicle
As a result, Blind Spot Assist may not give
warnings in such situations. There is a risk of an accident.
Always observe the traffic conditions care-
fully, and maintain a safe lateral distance.
Blind Spot Assist is only an aid. It may fail to
detect some vehicles and is no substitute for
attentive driving.
i USA only: Driving systems
191Driving and parking Z
Page 194 of 358
This device has been approved by the FCC
as a "Vehicular Radar System". The radar
sensor is intended for use in an automotive radar system only. Removing, tampering
with, or altering the device will void any
warranties, and is not permitted by the
FCC. Do not tamper with, alter, or use in
any non-approved way.
Any unauthorized modification to this
device could void the user’s authority to
operate the equipment.
Monitoring range of the sensors
In particular, the detection of obstacles can
be impaired if:
R dirt on the sensors or anything else cover-
ing the sensors
R there is poor visibility, e.g. due to fog, heavy
rain or snow
R a narrow vehicle traveling in front, e.g. a
motorbike or bicycle
R the road has very wide lanes
R the road has narrow lanes
R you are not driving in the middle of the lane
R there are barriers or similar lane borders
Vehicles in the monitoring range are then not
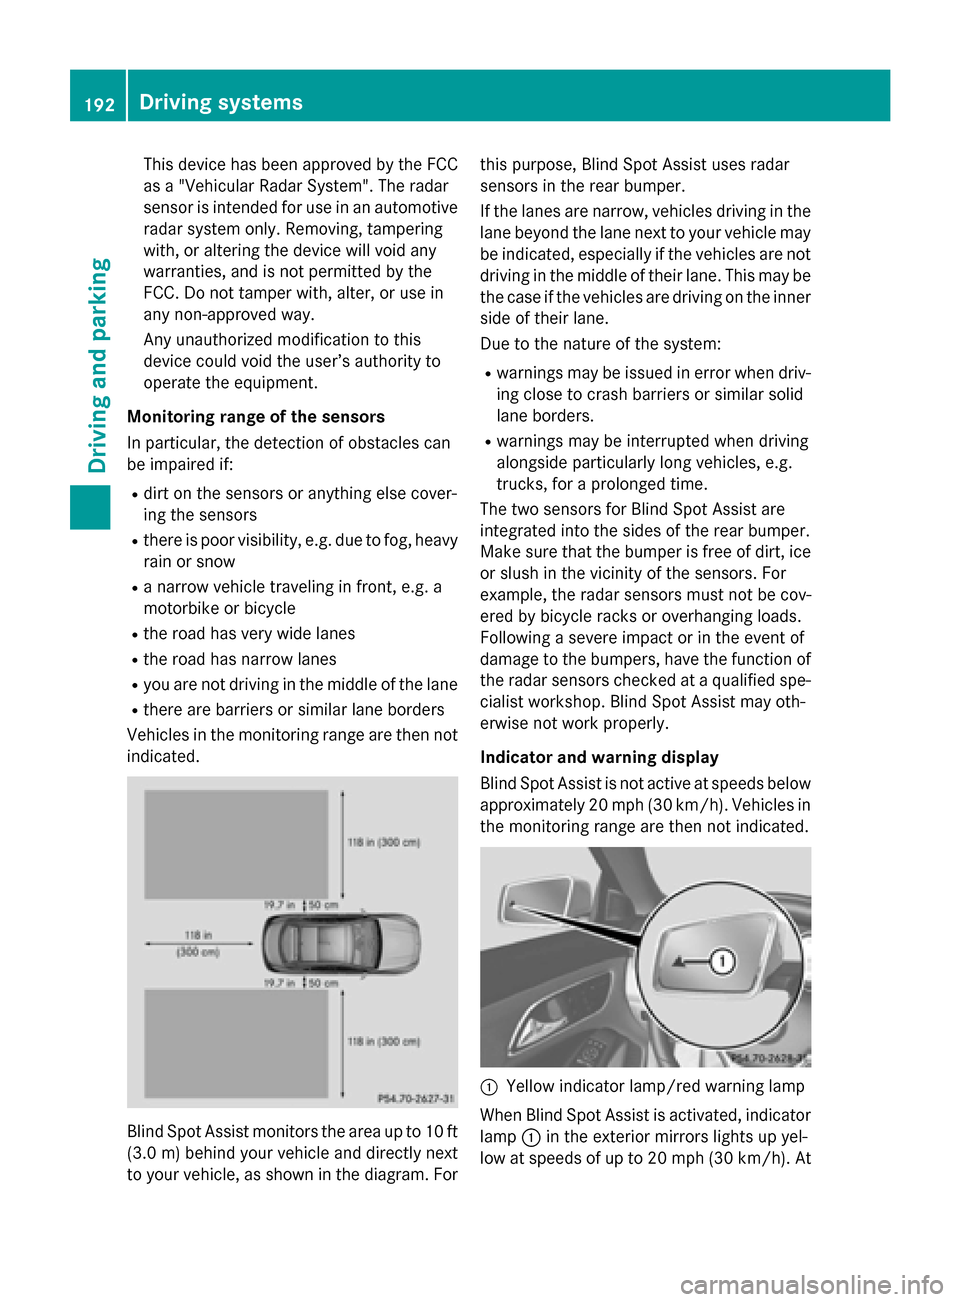
indicated. Blind Spot Assist monitors the area up to 10 ft
(3.0 m)behind your vehicle and directly next
to your vehicle, as shown in the diagram. For this purpose, Blind Spot Assist uses radar
sensors in the rear bumper.
If the lanes are narrow, vehicles driving in the
lane beyond the lane next to your vehicle may
be indicated, especially if the vehicles are not
driving in the middle of their lane. This may be the case if the vehicles are driving on the inner
side of their lane.
Due to the nature of the system:
R warnings may be issued in error when driv-
ing close to crash barriers or similar solid
lane borders.
R warnings may be interrupted when driving
alongside particularly long vehicles, e.g.
trucks, for a prolonged time.
The two sensors for Blind Spot Assist are
integrated into the sides of the rear bumper.
Make sure that the bumper is free of dirt, ice
or slush in the vicinity of the sensors. For
example, the radar sensors must not be cov-
ered by bicycle racks or overhanging loads.
Following a severe impact or in the event of
damage to the bumpers, have the function of
the radar sensors checked at a qualified spe-
cialist workshop. Blind Spot Assist may oth-
erwise not work properly.
Indicator and warning display
Blind Spot Assist is not active at speeds below approximately 20 mph (30 km/h). Vehicles in the monitoring range are then not indicated. 0043
Yellow indicator lamp/red warning lamp
When Blind Spot Assist is activated, indicator
lamp 0043in the exterior mirrors lights up yel-
low at speeds of up to 20 mph (30 km/ h). At 192
Driving systemsDriving and parking
Page 196 of 358
You should always steer, brake or accelerate
yourself, in particular if warned by Lane Keep- ing Assist.
If you fail to adapt your driving style, Lane
Keeping Assist can neither reduce the risk of
an accident nor override the laws of physics. Lane Keeping Assist cannot take into account
the road, traffic and weather conditions. Lane Keeping Assist is merely an aid. You are
responsible for the distance to the vehicle in
front, for vehicle speed, for braking in good
time and for staying in your lane.
The Lane Keeping Assist does not keep the
vehicle in the lane.
The system may be impaired or may not func-
tion if:
R there is poor visibility, e.g. due to insuffi-
cient illumination of the road, or due to
snow, rain, fog or spray
R there is glare, e.g. from oncoming traffic,
the sun or reflections (e.g. when the road
surface is wet)
R the windshield is dirty, fogged up, damaged
or covered, for instance by a sticker, in the
vicinity of the camera
R there are no, several or unclear lane mark-
ings for a lane, e.g. in areas with road con-
struction work
R the lane markings are worn away, dark or
covered up, e.g. by dirt or snow
R the distance to the vehicle in front is too
small and the lane markings thus cannot be
detected
R the lane markings change quickly, e.g.
lanes branch off, cross one another or
merge
R the road is narrow and winding
R there are strong shadows cast on the lane
Switching on Lane Keeping Assist
X Switch on Active Lane Keeping Assist using
the on-board computer; to do so, select
Standard Standard orAdaptive
Adaptive (Ypage 206).
If you drive at speeds above 40 mph
(60 km/h) and lane markings are detected, the lane markings in the assistance graph-
ics display (Y
page 204) are shown in
green.
When Standard is selected, no warning vibra-
tion occurs if:
R you switch on the turn signals. In this event,
the warnings are suppressed for a certain
period of time.
R a driving safety system intervenes, such as
ABS, BAS or ESP ®
.
When Adaptive is selected, no warning vibra-
tion occurs if:
R you switch on the turn signals. In this event,
the warnings are suppressed for a certain
period of time.
R a driving safety system intervenes, e.g.
ABS, BAS or ESP ®
.
R you accelerate hard, e.g. kickdown.
R you brake hard.
R you steer actively, e.g. swerve to avoid an
obstacle or change lanes quickly.
R you cut the corner on a sharp bend.
In order that you are warned only when nec-
essary and in good time if you cross the lane marking, the system recognizes certain con-
ditions and warns you accordingly.
The warning vibration occurs earlier if:
R you approach the outer lane marking on a
bend.
R the road has very wide lanes, e.g. a free-
way.
R the system recognizes solid lane markings.
The warning vibration occurs later if:
R the road has narrow lanes.
R you cut the corner on a bend. 194
Driving systemsDriving and parking
Page 197 of 358
Useful information
............................196
Important safety notes ....................196
Displays and operation ....................196
Menus and submenus ......................199
Display messages ............................. 213
Warning and indicator lamps in the instrument cluster ............................243 195On-board computer and displays
Page 198 of 358
Useful information
i This Operator's manual describes all
models and all standard and optional equip- ment of your vehicle available at the time of
publication of the Operator's manual.
Country-specific differences are possible.
Please note that your vehicle may not be
equipped with all features described. This
also applies to safety-related systems and
functions.
i Read the information on qualified special-
ist workshops (Y page 26). Important safety notes
G
WARNING
If you operate information systems and com-
munication equipment integrated in the vehi- cle while driving, you will be distracted from
traffic conditions. You could also lose control of the vehicle. There is a risk of an accident.
Only operate the equipment when the traffic
situation permits. If you are not sure that this
is possible, park the vehicle paying attention
to traffic conditions and operate the equip-
ment when the vehicle is stationary. G
WARNING
If the instrument cluster has failed or mal-
functioned, you may not recognize function
restrictions in systems relevant to safety. The operating safety of your vehicle may be
impaired. There is a risk of an accident.
Drive on carefully. Have the vehicle checked
at a qualified specialist workshop immedi-
ately.
You must observe the legal requirements for
the country in which you are currently driving when operating the on-board computer.
The on-board computer only shows messages
or warnings from certain systems in the mul- tifunction display. You should therefore make
sure your vehicle is operating safely at all times. Otherwise, a vehicle that is not oper-
ating safely may cause an accident.
For an overview, see the instrument panel
illustration (Y
page 31). Displays and operation
Instrument cluster lighting
The lighting in the instrument cluster, in the
displays and the controls in the vehicle inte-
rior can be adjusted using the brightness con-
trol knob.
The brightness control knob is located on the bottom left of the instrument cluster
(Y page 31).
X Turn the brightness control knob clockwise
or counter-clockwise.
If the light switch is set to 0058,0060or
0058, the brightness is dependent upon
the brightness of the ambient light.
i The light sensor in the instrument cluster
automatically controls the brightness of
the multifunction display.
In daylight, the displays in the instrument
cluster are not illuminated. Coolant temperature display
G
WARNING
Opening the hood when the engine is over-
heated or when there is a fire in the engine
compartment could expose you to hot gases
or other service products. There is a risk of
injury.
Let an overheated engine cool down before
opening the hood. If there is a fire in the
engine compartment, keep the hood closed
and contact the fire department.
! A display message is shown if the coolant
temperature is too high.
If the coolant temperature is over 248 ‡
(120 †), do not continue driving. The
engine will otherwise be damaged. 196
Displays and operationOn-board computer and displays